display CADILLAC ESCALADE 2020 Owner's Manual
[x] Cancel search | Manufacturer: CADILLAC, Model Year: 2020, Model line: ESCALADE, Model: CADILLAC ESCALADE 2020Pages: 392, PDF Size: 6.39 MB
Page 7 of 392

Cadillac Escalade Owner Manual (GMNA-Localizing-U.S./Canada/Mexico-
13566588) - 2020 - CRC - 4/24/19
6 INTRODUCTION
1.Air Vents 0163.
2. Head-Up Display (HUD) 0132 (If
Equipped).
3. Turn Signal Lever. See Turn and
Lane-Change Signals 0152.
Windshield Wiper/Washer 0105.
Rear Window Wiper/Washer
0 107.
4. Hazard Warning Flashers 0152.
5. Instrument Cluster 0115.
6. Shift Lever. See Automatic
Transmission 0191.
Tow/Haul Mode Selector Button.
See Tow/Haul Mode 0195.
Range Selection Mode Buttons (If
Equipped). See Manual Mode
0 194.
7. Magnetic Ride Control Button. See Magnetic Ride Control 0206.
Pedal Adjust Switch (If
Equipped). See Adjustable Throttle
and Brake Pedal 0183.
Traction Control/Electronic
Stability Control 0203. 8. Light Sensor. See
Automatic
Headlamp System 0151.
9. Infotainment 0156.
10. Glove Box Button. See Glove Box
0 100.
Lane Keep Assist (LKA) 0232 (If
Equipped).
Park Assist Button. See
Assistance Systems for Parking or
Backing 0219.
11. Dual Automatic Climate Control
System 0157.
Instrument Panel Storage 0100.
12. CD Player. See the infotainment manual.
13. ENGINE START/STOP Button. SeeIgnition Positions 0184.
14. Steering Wheel Controls 0105.
Driver Information Center (DIC)
Controls. See Driver Information
Center (DIC) 0130.
15. Horn 0105.
16. Steering Wheel Adjustment 0105.
17. Hood Release. See Hood0258. 18.
Cruise Control 0207 (If
Equipped).
Adaptive Cruise Control 0210 (If
Equipped).
Forward Collision Alert (FCA)
System 0226 (If Equipped).
Heated Steering Wheel 0105 (If
Equipped).
Phone Button. See the
infotainment manual.
19. Automatic Transfer Case Knob (If Equipped). See Four-Wheel Drive
0 196.
20. Data Link Connector (DLC) (Out of View). See Malfunction
Indicator Lamp (Check Engine
Light) 0121.
21. Electric Parking Brake 0201 (If
Equipped).
22. Exterior Lamp Controls 0148.
23. Instrument Panel Illumination
Control 0153.
Page 12 of 392
Cadillac Escalade Owner Manual (GMNA-Localizing-U.S./Canada/Mexico-
13566588) - 2020 - CRC - 4/24/19
KEYS, DOORS, AND WINDOWS 11
exterior handle to unlock the doors or
open the liftgate will cause the turn
signal lamps to flash four times
quickly, indicating access is disabled.
If disabled, disarm the alarm system
before starting the vehicle.
Enabling Keyless Unlocking:
With the vehicle off, press and hold
Q
andKon the RKE transmitter at the
same time for approximately
three seconds. The turn signal lamps
will flash twice quickly to indicate
access is enabled.
Enabling and disabling can also be
may also be configured from the
personalization menu. See “Passive
Door Unlock” underVehicle
Personalization 0136.
Passive Locking
Keyless Access will lock the vehicle
several seconds after all doors are
closed, if the vehicle is off and at least
one RKE transmitter has been
removed from the interior, or none
remain in the interior. If other electronic devices interfere
with the RKE transmitter signal, the
vehicle may not detect the RKE
transmitter inside the vehicle.
If passive locking is enabled, the doors
may lock with the RKE transmitter
inside the vehicle. Do not leave the
RKE transmitter in an unattended
vehicle.
To customize the doors to
automatically lock when exiting the
vehicle, see
“Remote Lock, Unlock,
Start ”under Vehicle Personalization
0 136.
Temporary Disable of Passive
Locking
Temporarily disable passive locking by
pressing and holding
Kon the
interior door switch with a door open
for at least four seconds, or until three
chimes are heard. Passive locking will
then remain disabled until
Qon the
interior door is pressed, or until the
vehicle is turned on. Remote Left In Vehicle Alert
When the vehicle is turned off and an
RKE transmitter is left in the vehicle,
the horn will chirp three times after
all doors are closed. To turn on or off
see
Vehicle Personalization 0136.
Remote No Longer in Vehicle Alert
If the vehicle is on with a door open,
and then all doors are closed, the
vehicle will check for RKE
transmitters inside. If an RKE
transmitter is not detected, the Driver
Information Center (DIC) will display
NO REMOTE DETECTED and the horn
will chirp three times. This occurs
only once each time the vehicle is
driven. To turn on or off see Vehicle
Personalization 0136.
Keyless Liftgate Opening
Press the touch pad on the rear of the
liftgate above the license plate to open
the liftgate when all doors are
unlocked or when the transmitter is
within 1 m (3 ft).
Page 13 of 392
Cadillac Escalade Owner Manual (GMNA-Localizing-U.S./Canada/Mexico-
13566588) - 2020 - CRC - 4/24/19
12 KEYS, DOORS, AND WINDOWS
Keyless Liftglass Opening
Press the exterior liftglass button to
open the liftglass when all doors are
unlocked or when the transmitter is
within 1 m (3 ft).
Key Access
To access a vehicle with a weak
transmitter battery, seeDoor Locks
0 16.
Programming Transmitters to
the Vehicle
Only RKE transmitters programmed to
the vehicle will work. If a transmitter
is lost or stolen, a replacement can be
purchased and programmed through
your dealer. The vehicle can be
reprogrammed so that lost or stolen
transmitters no longer work. Each
vehicle can have up to eight
transmitters matched to it.
Programming with Recognized
Transmitters
A new transmitter can be programmed
to the vehicle when there are two
recognized transmitters. To program, the vehicle must be off
and all transmitters, both currently
recognized and new, must be
with you.
1. Remove the key from the recognized transmitter.
2. Place the two recognized transmitters in the cupholder or
on the passenger seat.
3. Remove the key lock cylinder cap on the driver door handle. See
Door Locks 016. Insert the
vehicle key into the key lock
cylinder on the driver door
handle; then turn the key
counterclockwise, to the unlock
position, five times within
10 seconds.
The DIC displays READY FOR
REMOTE #2, 3, 4, ETC.
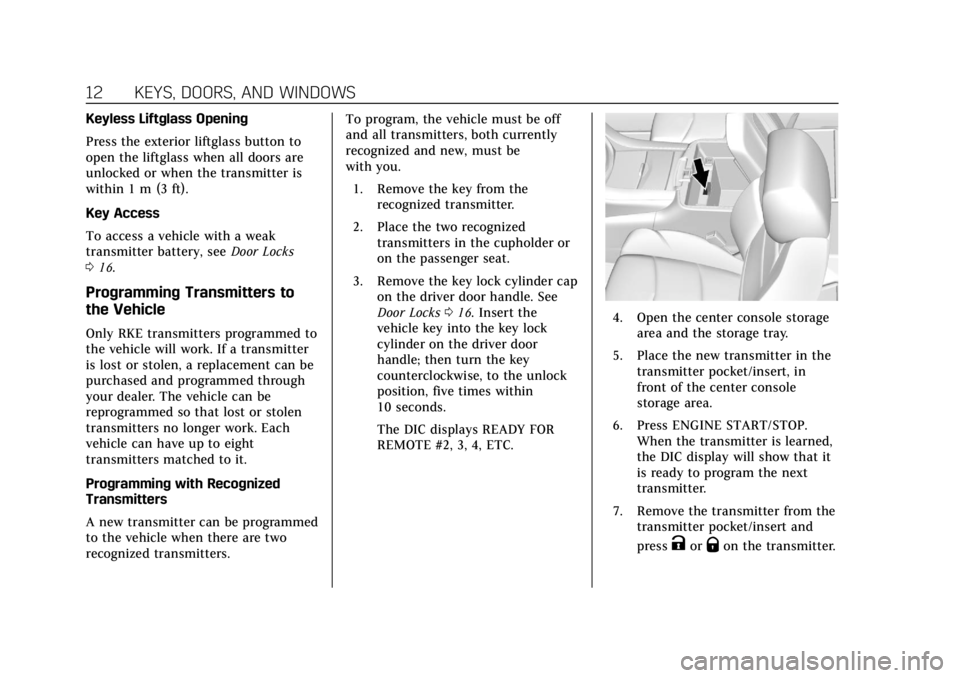
4. Open the center console storage
area and the storage tray.
5. Place the new transmitter in the transmitter pocket/insert, in
front of the center console
storage area.
6. Press ENGINE START/STOP. When the transmitter is learned,
the DIC display will show that it
is ready to program the next
transmitter.
7. Remove the transmitter from the transmitter pocket/insert and
press
KorQon the transmitter.
Page 14 of 392
Cadillac Escalade Owner Manual (GMNA-Localizing-U.S./Canada/Mexico-
13566588) - 2020 - CRC - 4/24/19
KEYS, DOORS, AND WINDOWS 13
To program additional
transmitters, repeat Steps 4–7.
When all additional transmitters
are programmed, press and hold
ENGINE START/STOP for
approximately 12 seconds to exit
programming mode.
8. Put the key back into the transmitter.
9. Replace the key lock cylinder cap. See Door Locks 016.
Programming without Recognized
Transmitters
If two currently recognized
transmitters are not available, follow
this procedure to program up to eight
transmitters. This feature is not
available in Canada. This procedure
will take approximately 30 minutes to
complete. The vehicle must be off and
all transmitters to be programmed
must be with you. 1. Remove the vehicle key from the transmitter.
2. Remove the key lock cylinder cap on the driver door handle. See
Door Locks 016. Insert the vehicle key into the key lock
cylinder on the driver door
handle; then turn the key
counterclockwise, to the unlock
position, five times within
10 seconds.
The DIC displays REMOTE
LEARN PENDING,
PLEASE WAIT.
3. Wait for 10 minutes until the DIC displays PRESS ENGINE
START BUTTON TO LEARN,
then press ENGINE
START/STOP.
The DIC will again display
REMOTE LEARN PENDING,
PLEASE WAIT.
4. Repeat Step 3 two additional times. After the third time all
previously known transmitters
will no longer work with the
vehicle. Remaining transmitters
can be relearned during the next
steps.
The DIC should now display
READY FOR REMOTE # 1.
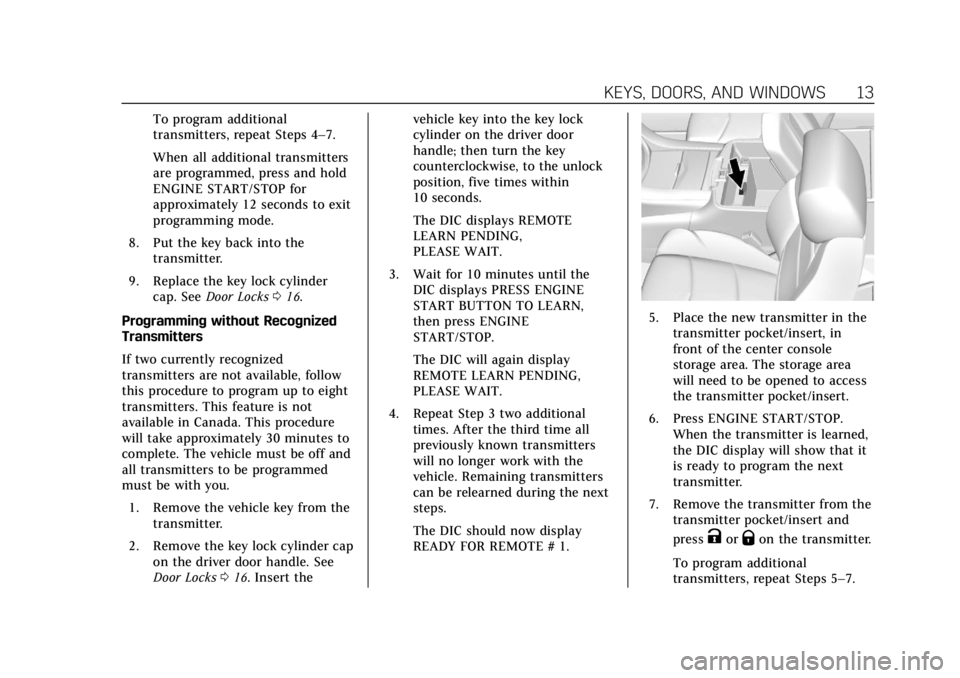
5. Place the new transmitter in thetransmitter pocket/insert, in
front of the center console
storage area. The storage area
will need to be opened to access
the transmitter pocket/insert.
6. Press ENGINE START/STOP. When the transmitter is learned,
the DIC display will show that it
is ready to program the next
transmitter.
7. Remove the transmitter from the transmitter pocket/insert and
press
KorQon the transmitter.
To program additional
transmitters, repeat Steps 5–7.
Page 15 of 392
Cadillac Escalade Owner Manual (GMNA-Localizing-U.S./Canada/Mexico-
13566588) - 2020 - CRC - 4/24/19
14 KEYS, DOORS, AND WINDOWS
When all additional transmitters
are programmed, press and hold
ENGINE START/STOP for
approximately 12 seconds to exit
programming mode.
8. Return the key back into the transmitter.
9. Replace the key lock cylinder cap. See Door Locks 016.
Starting the Vehicle with a Low
Transmitter Battery
If the transmitter battery is weak or if
there is interference with the signal,
the DIC may display NO REMOTE
DETECTED or NO REMOTE KEY WAS
DETECTED PLACE KEY IN
TRANSMITTER POCKET THEN
START YOUR VEHICLE when starting
the vehicle.
To start the vehicle:
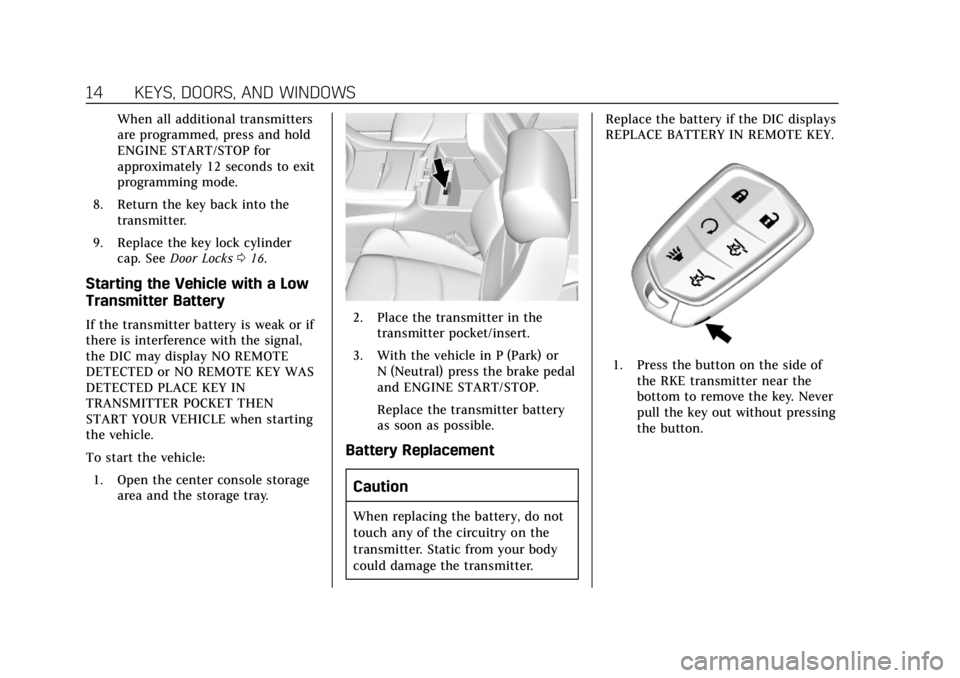
1. Open the center console storage area and the storage tray.2. Place the transmitter in thetransmitter pocket/insert.
3. With the vehicle in P (Park) or N (Neutral) press the brake pedal
and ENGINE START/STOP.
Replace the transmitter battery
as soon as possible.
Battery Replacement
Caution
When replacing the battery, do not
touch any of the circuitry on the
transmitter. Static from your body
could damage the transmitter. Replace the battery if the DIC displays
REPLACE BATTERY IN REMOTE KEY.
1. Press the button on the side of
the RKE transmitter near the
bottom to remove the key. Never
pull the key out without pressing
the button.
Page 31 of 392
Cadillac Escalade Owner Manual (GMNA-Localizing-U.S./Canada/Mexico-
13566588) - 2020 - CRC - 4/24/19
30 KEYS, DOORS, AND WINDOWS
The power sounder provides an
audible alarm which is distinct from
the vehicle’s horn. It has its own
power source, and can sound an alarm
if the vehicle’s battery is
compromised.
The inclination sensor can set off the
alarm if it senses movement of the
vehicle, such as a change in vehicle
orientation.
The intrusion sensor monitors the
vehicle interior, and can activate the
alarm if it senses unauthorized entry
into the vehicle’s interior. Do not
allow passengers or pets to remain in
the vehicle when the intrusion sensor
is activated.
Before arming the theft-deterrent
system and activating the intrusion
sensor:
.Make sure all doors and windows
are completely closed.
. Secure any loose items such as
sunshades.
. Make sure there are no
obstructions blocking the sensors
in the front overhead console. .
Close DVD screens before leaving
the vehicle.
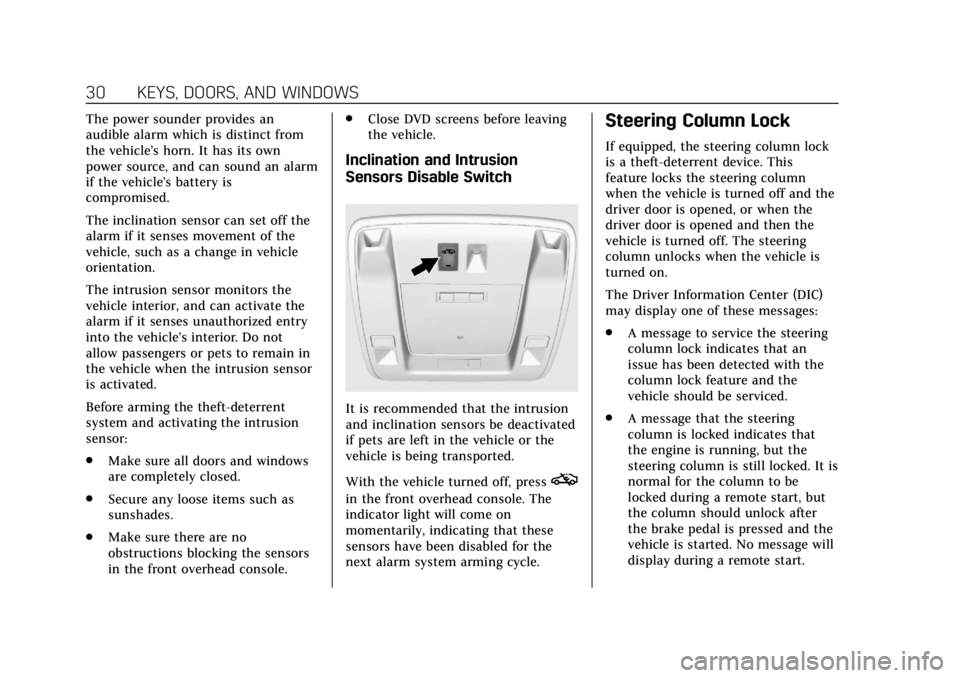
Inclination and Intrusion
Sensors Disable Switch
It is recommended that the intrusion
and inclination sensors be deactivated
if pets are left in the vehicle or the
vehicle is being transported.
With the vehicle turned off, press
o
in the front overhead console. The
indicator light will come on
momentarily, indicating that these
sensors have been disabled for the
next alarm system arming cycle.
Steering Column Lock
If equipped, the steering column lock
is a theft-deterrent device. This
feature locks the steering column
when the vehicle is turned off and the
driver door is opened, or when the
driver door is opened and then the
vehicle is turned off. The steering
column unlocks when the vehicle is
turned on.
The Driver Information Center (DIC)
may display one of these messages:
.A message to service the steering
column lock indicates that an
issue has been detected with the
column lock feature and the
vehicle should be serviced.
. A message that the steering
column is locked indicates that
the engine is running, but the
steering column is still locked. It is
normal for the column to be
locked during a remote start, but
the column should unlock after
the brake pedal is pressed and the
vehicle is started. No message will
display during a remote start.
Page 35 of 392
Cadillac Escalade Owner Manual (GMNA-Localizing-U.S./Canada/Mexico-
13566588) - 2020 - CRC - 4/24/19
34 KEYS, DOORS, AND WINDOWS
Interior Mirrors
Interior Rearview Mirrors
Adjust the rearview mirror for a clear
view of the area behind your vehicle.
If equipped with OnStar, there may be
three buttons at the bottom of the
mirror. SeeOnStar Overview 0370.
To avoid accidental OnStar calls, clean
the mirror with the ignition off. Do
not spray glass cleaner directly on the
mirror. Use a soft towel dampened
with water.
Automatic Dimming
Rearview Mirror
The rearview mirror automatically
dims to reduce the glare of the
headlamps from behind. This feature
comes on when the vehicle is started.
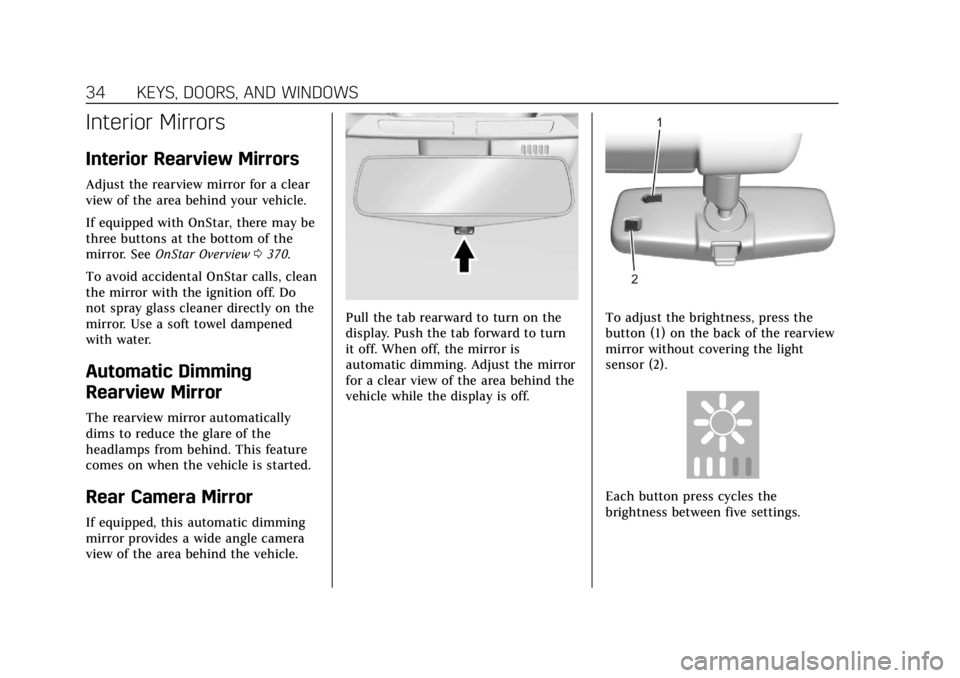
Rear Camera Mirror
If equipped, this automatic dimming
mirror provides a wide angle camera
view of the area behind the vehicle.
Pull the tab rearward to turn on the
display. Push the tab forward to turn
it off. When off, the mirror is
automatic dimming. Adjust the mirror
for a clear view of the area behind the
vehicle while the display is off.To adjust the brightness, press the
button (1) on the back of the rearview
mirror without covering the light
sensor (2).
Each button press cycles the
brightness between five settings.
Page 36 of 392
Cadillac Escalade Owner Manual (GMNA-Localizing-U.S./Canada/Mexico-
13566588) - 2020 - CRC - 4/24/19
KEYS, DOORS, AND WINDOWS 35
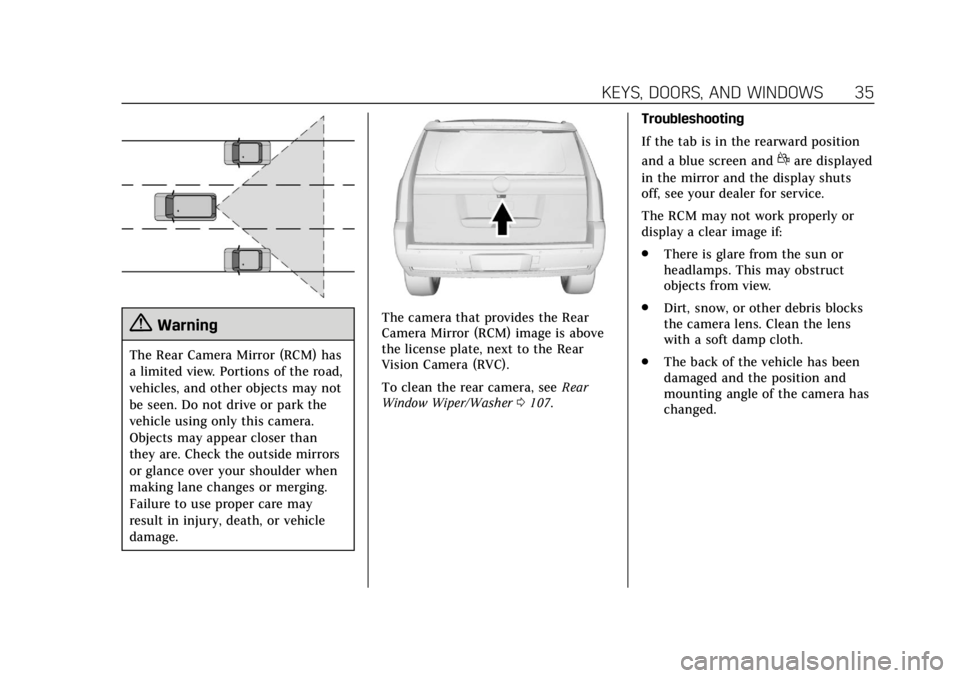
{Warning
The Rear Camera Mirror (RCM) has
a limited view. Portions of the road,
vehicles, and other objects may not
be seen. Do not drive or park the
vehicle using only this camera.
Objects may appear closer than
they are. Check the outside mirrors
or glance over your shoulder when
making lane changes or merging.
Failure to use proper care may
result in injury, death, or vehicle
damage.
The camera that provides the Rear
Camera Mirror (RCM) image is above
the license plate, next to the Rear
Vision Camera (RVC).
To clean the rear camera, seeRear
Window Wiper/Washer 0107. Troubleshooting
If the tab is in the rearward position
and a blue screen and
dare displayed
in the mirror and the display shuts
off, see your dealer for service.
The RCM may not work properly or
display a clear image if:
. There is glare from the sun or
headlamps. This may obstruct
objects from view.
. Dirt, snow, or other debris blocks
the camera lens. Clean the lens
with a soft damp cloth.
. The back of the vehicle has been
damaged and the position and
mounting angle of the camera has
changed.
Page 44 of 392
Cadillac Escalade Owner Manual (GMNA-Localizing-U.S./Canada/Mexico-
13566588) - 2020 - CRC - 4/24/19
SEATS AND RESTRAINTS 43
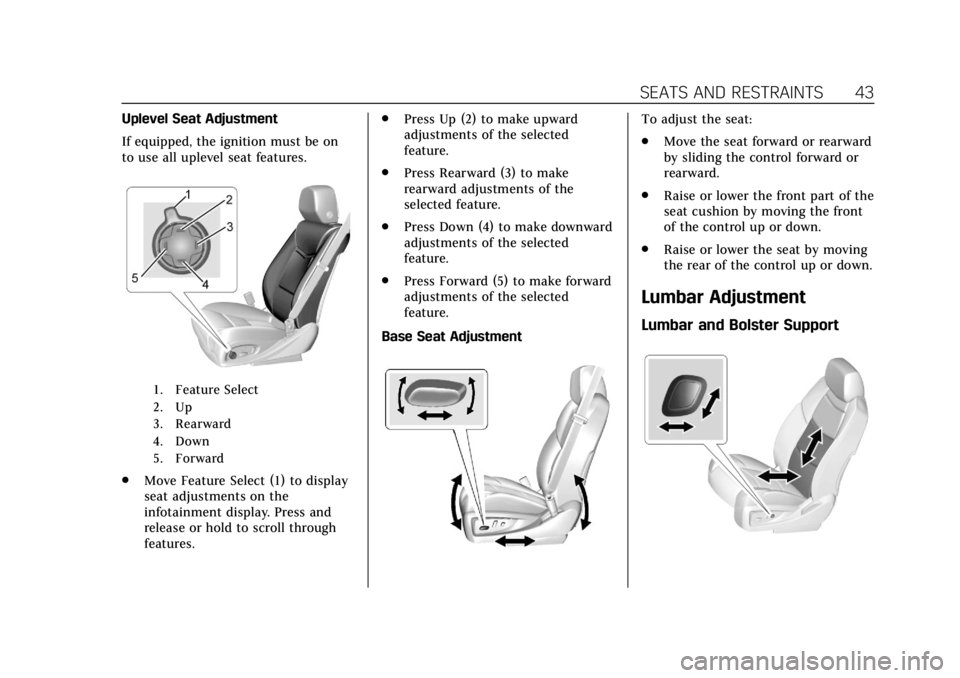
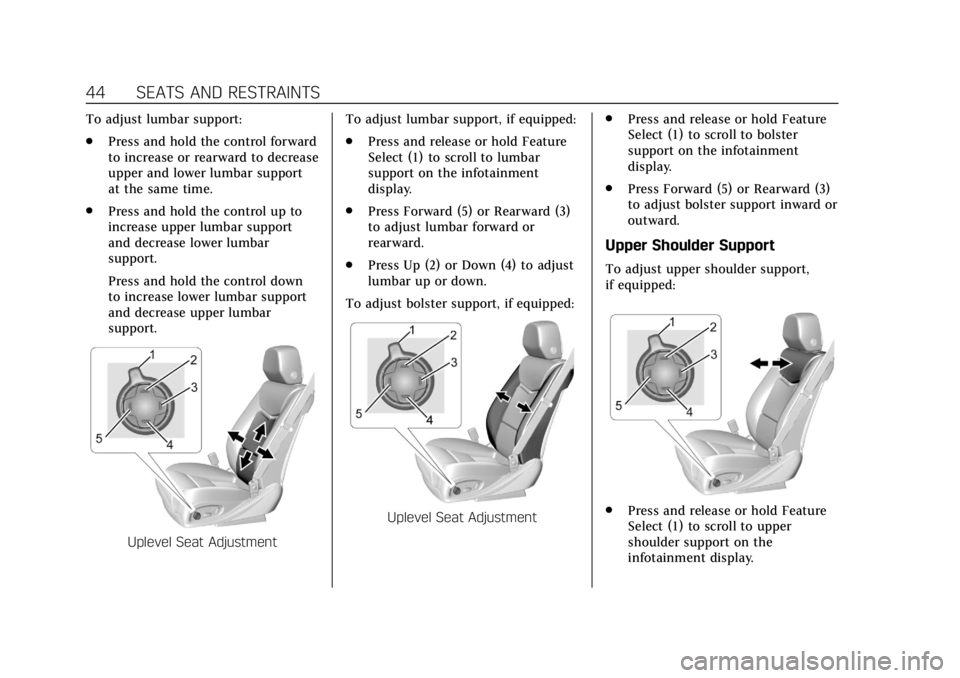
Uplevel Seat Adjustment
If equipped, the ignition must be on
to use all uplevel seat features.
1. Feature Select
2. Up
3. Rearward
4. Down
5. Forward
.Move Feature Select (1) to display
seat adjustments on the
infotainment display. Press and
release or hold to scroll through
features. .
Press Up (2) to make upward
adjustments of the selected
feature.
. Press Rearward (3) to make
rearward adjustments of the
selected feature.
. Press Down (4) to make downward
adjustments of the selected
feature.
. Press Forward (5) to make forward
adjustments of the selected
feature.
Base Seat Adjustment
To adjust the seat:
. Move the seat forward or rearward
by sliding the control forward or
rearward.
. Raise or lower the front part of the
seat cushion by moving the front
of the control up or down.
. Raise or lower the seat by moving
the rear of the control up or down.
Lumbar Adjustment
Lumbar and Bolster Support
Page 45 of 392
Cadillac Escalade Owner Manual (GMNA-Localizing-U.S./Canada/Mexico-
13566588) - 2020 - CRC - 4/24/19
44 SEATS AND RESTRAINTS
To adjust lumbar support:
.Press and hold the control forward
to increase or rearward to decrease
upper and lower lumbar support
at the same time.
. Press and hold the control up to
increase upper lumbar support
and decrease lower lumbar
support.
Press and hold the control down
to increase lower lumbar support
and decrease upper lumbar
support.
Uplevel Seat Adjustment To adjust lumbar support, if equipped:
.
Press and release or hold Feature
Select (1) to scroll to lumbar
support on the infotainment
display.
. Press Forward (5) or Rearward (3)
to adjust lumbar forward or
rearward.
. Press Up (2) or Down (4) to adjust
lumbar up or down.
To adjust bolster support, if equipped:
Uplevel Seat Adjustment .
Press and release or hold Feature
Select (1) to scroll to bolster
support on the infotainment
display.
. Press Forward (5) or Rearward (3)
to adjust bolster support inward or
outward.
Upper Shoulder Support
To adjust upper shoulder support,
if equipped:
.Press and release or hold Feature
Select (1) to scroll to upper
shoulder support on the
infotainment display.