ECU CADILLAC ESCALADE ESV 2004 2.G Owners Manual
[x] Cancel search | Manufacturer: CADILLAC, Model Year: 2004, Model line: ESCALADE ESV, Model: CADILLAC ESCALADE ESV 2004 2.GPages: 504, PDF Size: 3.27 MB
Page 7 of 504
Front Seats......................................................1-3
Power Seats..................................................1-3
Power Lumbar...............................................1-4
Heated Seats.................................................1-5
Heated and Cooled Seats................................1-6
Reclining Seatbacks........................................1-7
Head Restraints.............................................1-8
Rear Seats.......................................................1-9
Rear Seat Operation.......................................1-9
Heated Seats...............................................1-11
Heated and Cooled Seats..............................1-11
60/40 Split Bench Seat..................................1-12
50/50 Split Bench Seat..................................1-14
Bench Seat..................................................1-21
Bucket Seats...............................................1-27
Safety Belts...................................................1-30
Safety Belts: They Are for Everyone................1-30
Questions and Answers About Safety Belts......1-34
How to Wear Safety Belts Properly.................1-35
Driver Position..............................................1-36
Safety Belt Use During Pregnancy..................1-43
Right Front Passenger Position.......................1-44Center Passenger Position.............................1-44
Rear Seat Passengers..................................1-46
Rear Safety Belt Comfort Guides for Children
and Small Adults.......................................1-49
Safety Belt Extender.....................................1-52
Child Restraints.............................................1-53
Older Children..............................................1-53
Infants and Young Children............................1-55
Child Restraint Systems.................................1-60
Where to Put the Restraint.............................1-62
Top Strap....................................................1-63
Top Strap Anchor Location.............................1-65
Lower Anchorages and Top Tethers for
Children (LATCH System)...........................1-68
Securing a Child Restraint Designed for the
LATCH System.........................................1-70
Securing a Child Restraint in a Rear Outside
Seat Position............................................1-70
Securing a Child Restraint in a Center Rear
Seat Position............................................1-73
Securing a Child Restraint in the Right Front
Seat Position............................................1-75
Section 1 Seats and Restraint Systems
1-1
Page 20 of 504
Returning the Seats to an Upright
Position
{CAUTION:
If the seatback is not locked, it could move
forward in a sudden stop or crash. That could
cause injury to the person sitting there. Always
press rearward on the seatback to be sure it is
locked.
{CAUTION:
A safety belt that is improperly routed, not
properly attached, or twisted will not provide
the protection needed in a crash. The person
wearing the belt could be seriously injured.
After raising the rear seatback, always check
to be sure that the safety belts are properly
routed and attached, and are not twisted.To return the seat to the upright position, do the
following:
1. On Escalade ESV models, lift the load �oor panels
and latch them into the seatback.
2. Lift the seatback up and push it rearward all
the way.
3. Lower the seat cushion until it latches into position.
4. Pull forward on the seatback and up on the seat
cushion to make sure the seat is securely in place.
5. On Escalade models, return the head restraints to
the upright position.
6. Check to see that the safety belt buckles on the
driver’s side seat are accessible to the outboard
and center occupants and are not under the
seat cushions.50/50 Split Bench Seat
If your vehicle has a 50/50 split bench, the seatback(s)
can be folded and the entire seat(s) tilted or removed
from the vehicle.
1-14
Page 26 of 504
{CAUTION:
A safety belt that is improperly routed, not
properly attached, or twisted will not provide
the protection needed in a crash. The person
wearing the belt could be seriously injured.
After raising the rear seatback, always check
to be sure that the safety belts are properly
routed and attached, and are not twisted.
To replace the 50/50 split bench, do the following:
1. While holding the rear of the seat up, slide the front
wheels into the slots on the �oor. The front latches
should lock into place. If the latches do not lock,
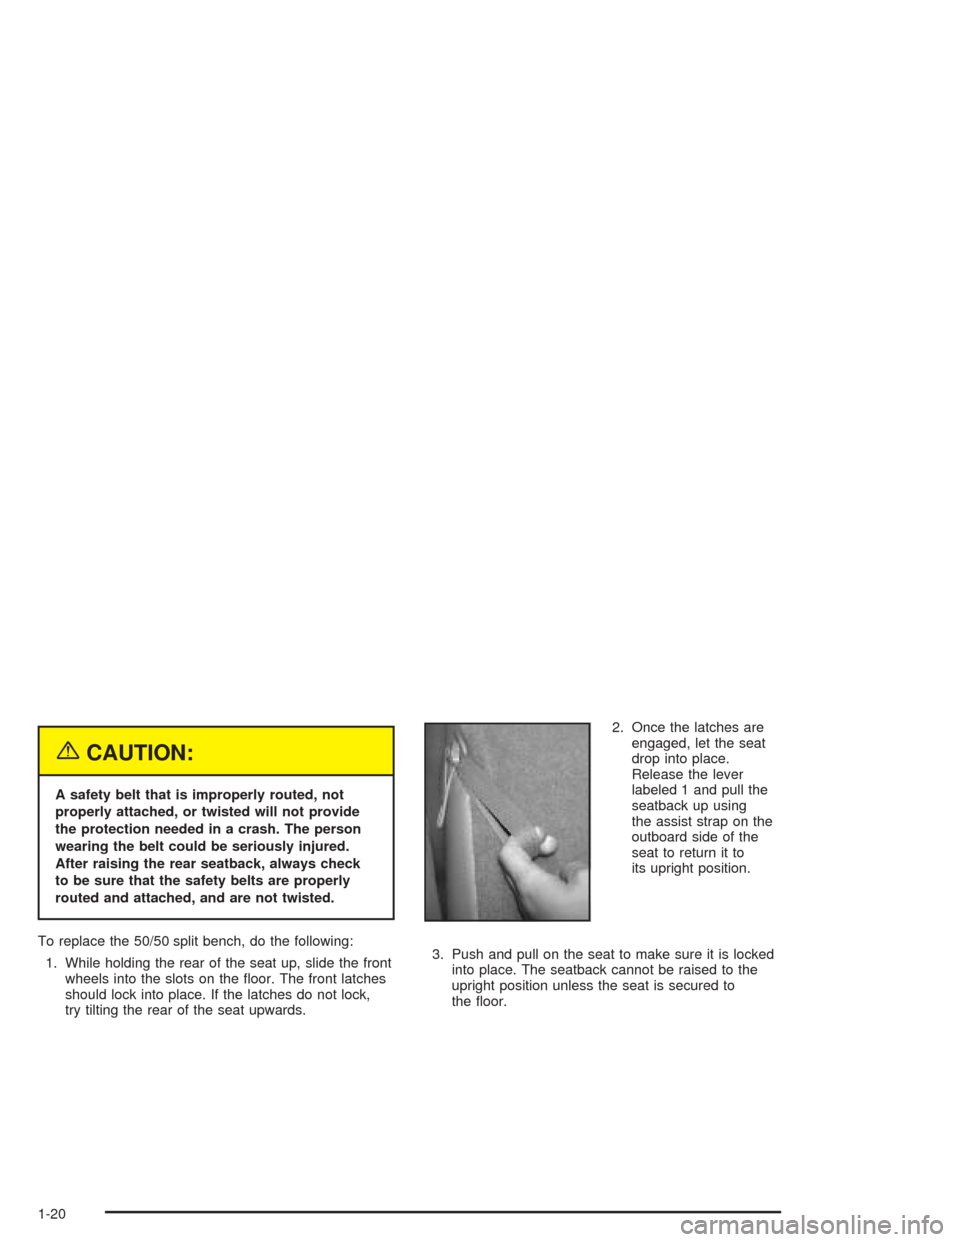
try tilting the rear of the seat upwards.2. Once the latches are
engaged, let the seat
drop into place.
Release the lever
labeled 1 and pull the
seatback up using
the assist strap on the
outboard side of the
seat to return it to
its upright position.
3. Push and pull on the seat to make sure it is locked
into place. The seatback cannot be raised to the
upright position unless the seat is secured to
the �oor.
1-20
Page 32 of 504
Replacing the Bench Seat
{CAUTION:
If the seatback is not locked, it could move
forward in a sudden stop or crash. That could
cause injury to the person sitting there. Always
press rearward on the seatback to be sure it is
locked.
{CAUTION:
A seat that isn’t locked into place properly can
move around in a collision or sudden stop.
People in the vehicle could be injured. Be sure
to lock the seat into place properly when
installing it.
{CAUTION:
A safety belt that is improperly routed, not
properly attached, or twisted will not provide
the protection needed in a crash. The person
wearing the belt could be seriously injured.
After raising the rear seatback, always check
to be sure that the safety belts are properly
routed and attached, and are not twisted.
To replace the bench seat, do the following:
1. While holding the rear of the seat up, slide the front
wheels into the slots on the �oor. The front latches
should lock into place. If the latches do not lock,
try tilting the rear of the seat upwards.
2. Once the latches are engaged, let the seat drop
into place. Release the lever labeled 1 to return
the seatback to its upright position.
3. Push and pull on the seat to make sure it is locked
into place. The seatback cannot be raised to the
upright position unless the seat is secured to
the �oor.
1-26
Page 35 of 504

Once the seatbacks are folded down, on Escalade ESV
models only, the rear seat footwell area will be
exposed and will have to be covered by the load �oor
panel. To create a load �oor, do the following:
1. Release the panels from the seatbacks by pushing
forward on the latches.
2. Then fold the panels back to cover the rear seat
footwell area.Returning the Seatbacks to an Upright
Position
{CAUTION:
If the seatback is not locked, it could move
forward in a sudden stop or crash. That could
cause injury to the person sitting there. Always
press rearward on the seatback to be sure it is
locked.
To return the seatbacks to the upright position, do the
following:
1. On Escalade ESV models, lift the load �oor panels
and latch them into the seatback.
2. Lift the seatback up and push it rearward all the
way. On Escalade ESV models, move the headrest
to the seatback.
3. Lower the seat cushion until it latches into position.
4. Pull forward on the seatback and up on the seat
cushion to make sure the seat is securely in place.
5. On Escalade models, return the headrests to the
upright position.
1-29
Page 42 of 504
Driver Position
This part describes the driver’s restraint system.
Lap-Shoulder Belt
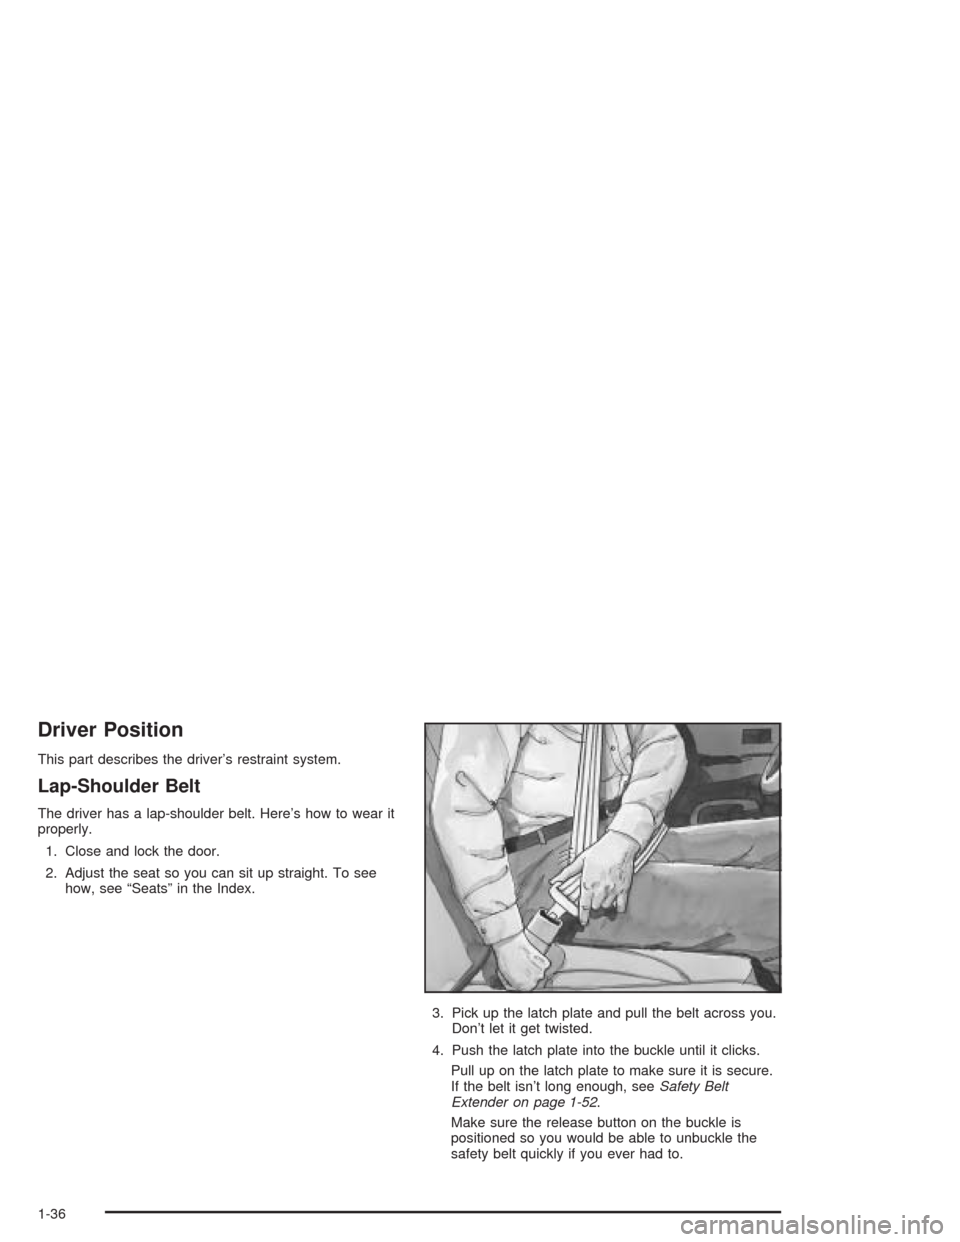
The driver has a lap-shoulder belt. Here’s how to wear it
properly.
1. Close and lock the door.
2. Adjust the seat so you can sit up straight. To see
how, see “Seats” in the Index.
3. Pick up the latch plate and pull the belt across you.
Don’t let it get twisted.
4. Push the latch plate into the buckle until it clicks.
Pull up on the latch plate to make sure it is secure.
If the belt isn’t long enough, seeSafety Belt
Extender on page 1-52.
Make sure the release button on the buckle is
positioned so you would be able to unbuckle the
safety belt quickly if you ever had to.
1-36
Page 53 of 504
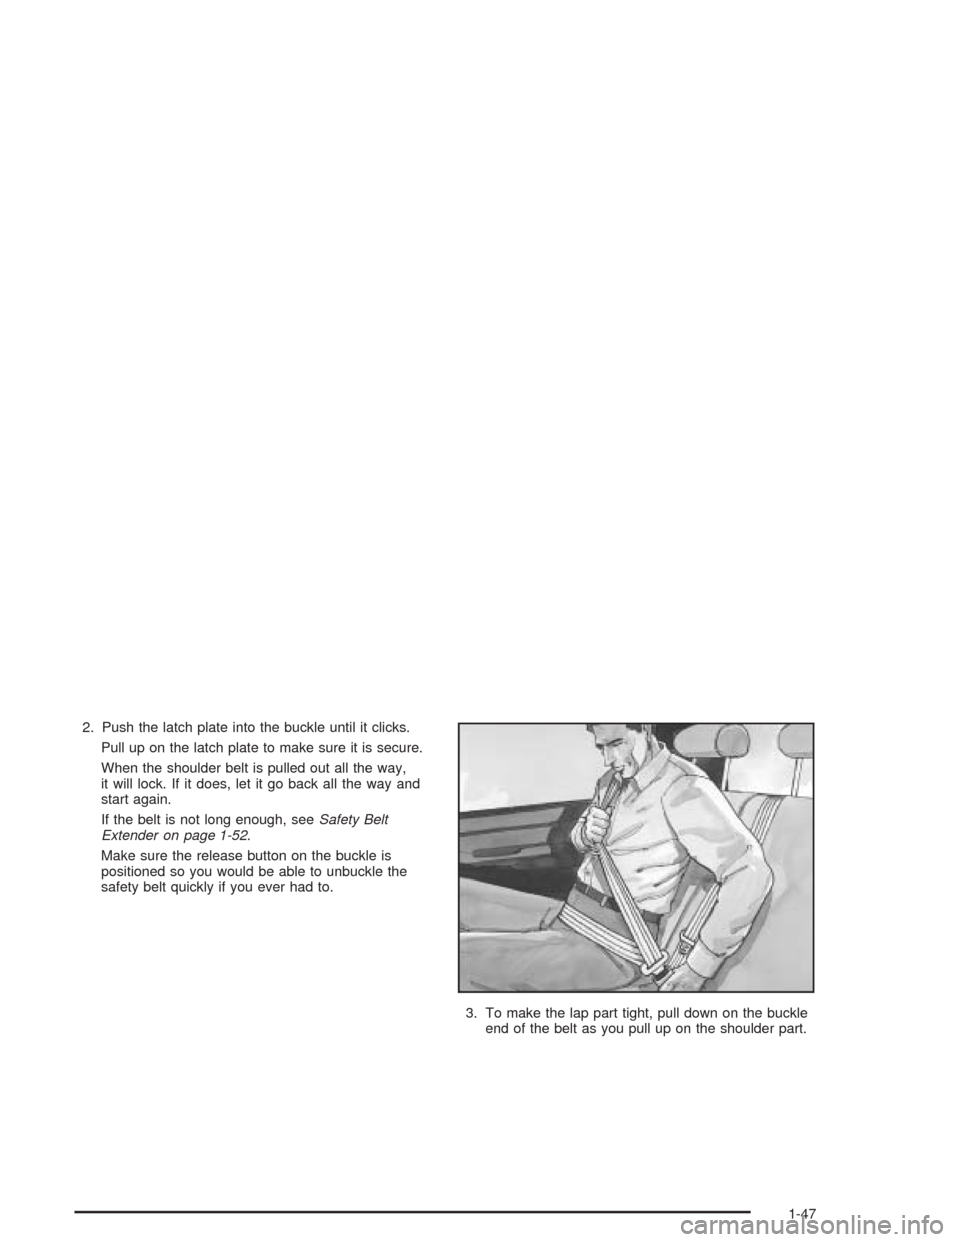
2. Push the latch plate into the buckle until it clicks.
Pull up on the latch plate to make sure it is secure.
When the shoulder belt is pulled out all the way,
it will lock. If it does, let it go back all the way and
start again.
If the belt is not long enough, seeSafety Belt
Extender on page 1-52.
Make sure the release button on the buckle is
positioned so you would be able to unbuckle the
safety belt quickly if you ever had to.
3. To make the lap part tight, pull down on the buckle
end of the belt as you pull up on the shoulder part.
1-47
Page 62 of 504
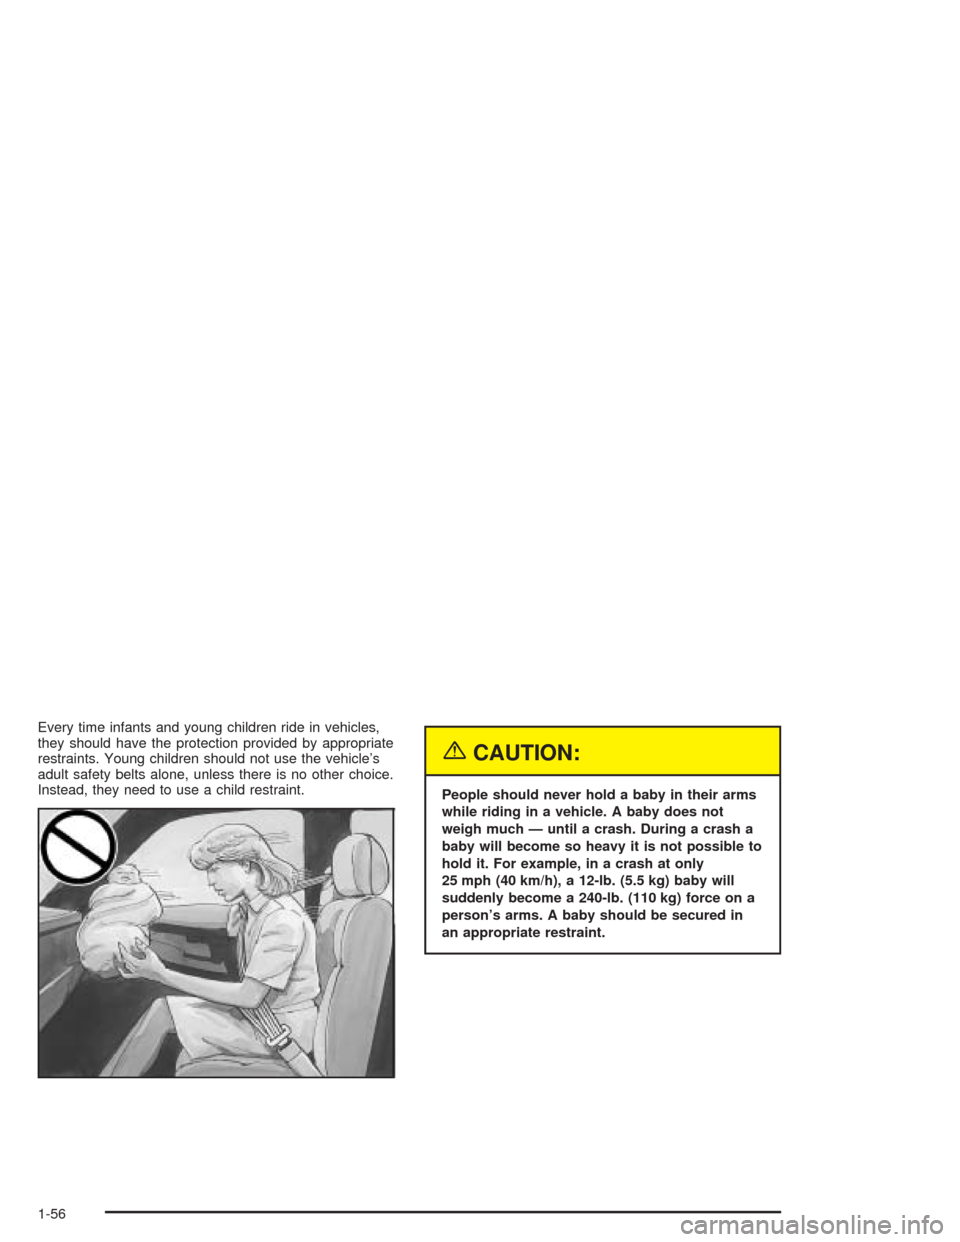
Every time infants and young children ride in vehicles,
they should have the protection provided by appropriate
restraints. Young children should not use the vehicle’s
adult safety belts alone, unless there is no other choice.
Instead, they need to use a child restraint.
{CAUTION:
People should never hold a baby in their arms
while riding in a vehicle. A baby does not
weigh much — until a crash. During a crash a
baby will become so heavy it is not possible to
hold it. For example, in a crash at only
25 mph (40 km/h), a 12-lb. (5.5 kg) baby will
suddenly become a 240-lb. (110 kg) force on a
person’s arms. A baby should be secured in
an appropriate restraint.
1-56
Page 65 of 504
{CAUTION:
Newborn infants need complete support,
including support for the head and neck. This is
necessary because a newborn infant’s neck is
weak and its head weighs so much compared
with the rest of its body. In a crash, an infant in a
rear-facing seat settles into the restraint, so the
crash forces can be distributed across the
strongest part of an infant’s body, the back and
shoulders. Infants always should be secured in
appropriate infant restraints.
{CAUTION:
The body structure of a young child is quite
unlike that of an adult or older child, for whom
the safety belts are designed. A young child’s
hip bones are still so small that the vehicle’s
regular safety belt may not remain low on the
hip bones, as it should. Instead, it may settle
up around the child’s abdomen. In a crash, the
belt would apply force on a body area that is
unprotected by any bony structure. This alone
could cause serious or fatal injuries. Young
children always should be secured in
appropriate child restraints.
1-59
Page 68 of 504
Q:How do child restraints work?
A:A child restraint system is any device designed for
use in a motor vehicle to restrain, seat, or position
children. A built-in child restraint system is a
permanent part of the motor vehicle. An add-on
child restraint system is a portable one, which
is purchased by the vehicle’s owner.
For many years, add-on child restraints have used
the adult belt system in the vehicle. To help
reduce the chance of injury, the child also has to be
secured within the restraint. The vehicle’s belt
system secures the add-on child restraint in the
vehicle, and the add-on child restraint’s harness
system holds the child in place within the restraint.
One system, the three-point harness, has straps that
come down over each of the infant’s shoulders and
buckle together at the crotch. The �ve-point harness
system has two shoulder straps, two hip straps and a
crotch strap. A shield may take the place of hip
straps. A T-shaped shield has shoulder straps that
are attached to a �at pad which rests low against the
child’s body. A shelf- or armrest-type shield has
straps that are attached to a wide, shelf-like shield
that swings up or to the side.When choosing a child restraint, be sure the child
restraint is designed to be used in a vehicle. If it is,
it will have a label saying that it meets federal motor
vehicle safety standards.
Then follow the instructions for the restraint. You may
�nd these instructions on the restraint itself or in a
booklet, or both. These restraints use the belt system or
the LATCH system in your vehicle, but the child also
has to be secured within the restraint to help reduce the
chance of personal injury. When securing an add-on
child restraint, refer to the instructions that come with the
restraint which may be on the restraint itself or in a
booklet, or both, and to this manual. The child restraint
instructions are important, so if they are not available,
obtain a replacement copy from the manufacturer.
Where to Put the Restraint
Accident statistics show that children are safer if they
are restrained in the rear rather than the front seat.
General Motors recommends that child restraints
be secured in a rear seat, including an infant riding in a
rear-facing infant seat, a child riding in a forward-facing
child seat and an older child riding in a booster seat.
Your vehicle has a rear seat that will accommodate
a rear-facing child restraint. A label on your sun visor
says,″Never put a rear-facing child seat in the
front.″This is because the risk to the rear-facing child is
so great, if the air bag deploys.
1-62