clock CADILLAC ESCALADE EXT 2010 3.G Owners Manual
[x] Cancel search | Manufacturer: CADILLAC, Model Year: 2010, Model line: ESCALADE EXT, Model: CADILLAC ESCALADE EXT 2010 3.GPages: 580, PDF Size: 6.23 MB
Page 9 of 580

A.Outlet Adjustment on page 4‑24.
B. Turn Signal/Multifunction Lever on page 4‑4.
C. Hazard Warning Flashers on page 4‑3.
D. Instrument Panel Cluster on page 4‑26.
E. Shift Lever/Tow/Haul Selector Button. See Automatic Transmission Operation
on page 3‑35and Tow/Haul Mode on page 3‑39.
F. Analog Clock on page 4‑20.
G. Audio System(s)
on page 4‑66.Navigation Audio
Systemon page 5‑59(If Equipped).
H. Exterior Lamps on page 4‑10.
I. Dome Lamp Override on page 4‑17.
J. Cruise Control on page 4‑7.
K. Tilt Wheel on page 4‑3.
L. Horn on page 4‑3. M.
Audio Steering Wheel Controls on page 4‑88.
N. Driver Information Center (DIC) Buttons. See Driver Information Center (DIC) on page 4‑39.
O. Pedal Adjust Button. See Adjustable Throttle and
Brake Pedal
on page 3‑34. Heated Windshield
Washer Fluid Button (If Equipped). See Windshield
Washer
on page 4‑6. Power Running Boards
Disable Button (If Equipped). See Power Assist
Steps on page 3‑21.
P. Dual Automatic Climate Control System
on
page 4‑20. Heated and Cooled Seatson
page 2‑5(If Equipped).
Q. StabiliTrak®Systemon page 6‑6.Ultrasonic
Rear Parking Assist (URPA) on page 3‑48.
R. Glove Box on page 3‑60.
1-3
Page 19 of 580
Interior Lighting
Dome Lamps
The dome lamps come on when any door is opened.
They turn off after all the doors are closed.
The dome lamps can also be turned on by turning the
instrument panel brightness knob, located on the
instrument panel to the left of the steering column,
clockwise to the farthest position. In this position, the
dome lamps remain on whether a door is opened or
closed.
k:The dome lamp override button is located next to
the exterior lamps control.
Press the button in and the dome lamps remain off
when a door is opened. Press the button again to return
it to the extended position so that the dome lamps come
on when a door is opened.
Reading Lamps
For vehicles with reading lamps in the overhead
console, press the button located next to the lamp to
turn it on or off.
The vehicle may also have reading lamps in other
locations. The lamps cannot be adjusted.
For more information about interior lamps, see:
.Dome Lamps on page 4‑17.
.Reading Lamps on page 4‑17.
.Instrument Panel Brightness on page 4‑16.
1-13
Page 121 of 580

To lower the Midgate®, do the following:
1. Fold the rear seats. The front seats might have to be moved forward slightly to allow the rear seats to
fold. See Rear Seat Operation
on page 2‑9for
more information.
Rear Glass in Normal Position
2. Standing outside of the vehicle, hold the Midgate®
securely so it does not fall forward. Turn the
Midgate®handle clockwise and pull the Midgate®
toward you.
3. Lower the Midgate®until it is flat.
3-19
Page 181 of 580

Section 4 Instrument Panel
Instrument Panel Overview. . . . . . . . . . . . . . . . . . . . . . . .4-3
Hazard Warning Flashers . . . . . . . . . . . . . . . . . . . . . . . 4-3
Horn . . . . . . . . . . . . . . . . . . . . . . . . . . . . . . . . . . . . . . . . . . . . 4-3
Tilt Wheel . . . . . . . . . . . . . . . . . . . . . . . . . . . . . . . . . . . . . . . 4-3
Heated Steering Wheel . . . . . . . . . . . . . . . . . . . . . . . . . 4-3
Turn Signal/Multifunction Lever . . . . . . . . . . . . . . . . . . 4-4
Turn and Lane-Change Signals . . . . . . . . . . . . . . . . . 4-4
Headlamp High/Low-Beam Changer . . . . . . . . . . . . 4-5
Flash-to-Pass . . . . . . . . . . . . . . . . . . . . . . . . . . . . . . . . . . . 4-5
Windshield Wipers . . . . . . . . . . . . . . . . . . . . . . . . . . . . . . 4-6
Windshield Washer . . . . . . . . . . . . . . . . . . . . . . . . . . . . . 4-6
Cruise Control . . . . . . . . . . . . . . . . . . . . . . . . . . . . . . . . . . 4-7
Exterior Lamps . . . . . . . . . . . . . . . . . . . . . . . . . . . . . . . . 4-10
Headlamps on Reminder . . . . . . . . . . . . . . . . . . . . . . 4-14
Daytime Running Lamps (DRL) . . . . . . . . . . . . . . . . 4-14
Automatic Headlamp System . . . . . . . . . . . . . . . . . . 4-15
Fog Lamps . . . . . . . . . . . . . . . . . . . . . . . . . . . . . . . . . . . . 4-16
Exterior Cargo Lamps . . . . . . . . . . . . . . . . . . . . . . . . . 4-16
Instrument Panel Brightness . . . . . . . . . . . . . . . . . . . 4-16
Dome Lamps . . . . . . . . . . . . . . . . . . . . . . . . . . . . . . . . . . 4-17
Dome Lamp Override . . . . . . . . . . . . . . . . . . . . . . . . . . 4-17 Entry/Exit Lighting . . . . . . . . . . . . . . . . . . . . . . . . . . . . . 4-17
Reading Lamps . . . . . . . . . . . . . . . . . . . . . . . . . . . . . . . . 4-17
Electric Power Management . . . . . . . . . . . . . . . . . . . 4-17
Battery Run-Down Protection . . . . . . . . . . . . . . . . . . 4-18
Accessory Power Outlet(s) . . . . . . . . . . . . . . . . . . . . . 4-18
Ashtray(s) and Cigarette Lighter . . . . . . . . . . . . . . . 4-19
Analog Clock . . . . . . . . . . . . . . . . . . . . . . . . . . . . . . . . . . 4-20
Climate Controls . . . . . . . . . . . . . . . . . . . . . . . . . . . . . . . . . . 4-20
Dual Automatic Climate Control System . . . . . . . 4-20
Outlet Adjustment . . . . . . . . . . . . . . . . . . . . . . . . . . . . . . 4-24
Warning Lights, Gages, and Indicators . . . . . . . . . .4-25
Instrument Panel Cluster . . . . . . . . . . . . . . . . . . . . . . . 4-26
Speedometer and Odometer . . . . . . . . . . . . . . . . . . . 4-27
Trip Odometer . . . . . . . . . . . . . . . . . . . . . . . . . . . . . . . . . 4-27
Tachometer . . . . . . . . . . . . . . . . . . . . . . . . . . . . . . . . . . . . 4-27
Safety Belt Reminders . . . . . . . . . . . . . . . . . . . . . . . . . 4-27
Airbag Readiness Light . . . . . . . . . . . . . . . . . . . . . . . . 4-28
Passenger Airbag Status Indicator . . . . . . . . . . . . . 4-29
Charging System Light . . . . . . . . . . . . . . . . . . . . . . . . 4-30
Brake System Warning Light . . . . . . . . . . . . . . . . . . . 4-31
4-1
Page 196 of 580

Fog Lamps
For vehicles with fog lamps, they can be used for better
vision in foggy or misty conditions. The parking lamps
and/or low-beam headlamps must be on for the fog
lamps to work.
The fog lamp button is located on the left side of the
instrument panel.
#(Fog Lamps):Press to turn the fog lamps on or off.
An indicator light comes on in the instrument panel
cluster to show that the fog lamps are on.
Remember, fog lamps alone will not give off as much
light as the headlamps. Never use the fog lamps in the
dark without turning on the headlamps.
The fog lamps will go off whenever the high-beam
headlamps come on. When the high beams go off, the
fog lamps will come on again.
The fog lamps will be cancelled after the ignition is
turned off. To use the fog lamps after restarting the
vehicle, press the fog lamp button again.
Some localities have laws that require the headlamps to
be on along with the fog lamps.
Exterior Cargo Lamps
The cargo lamp can be used if more light is needed in
the cargo area of the vehicle or in the top-box storage
units. Some vehicles will only have a cargo lamp in the
driver side top box.
The cargo lamps come on by turning on the interior
dome lamps.
Instrument Panel Brightness
The knob for this feature is located next to the exterior
lamps control.
D (Instrument Panel Lights) : Push the knob to extend
and then turn clockwise or counterclockwise to brighten
or dim the instrument panel lights and the radio display.
This only works if the headlamps or parking lamps
are on.
To turn on the dome lamps, with the vehicle doors
closed, turn the knob all the way clockwise.
4-16
Page 197 of 580
Dome Lamps
The dome lamps come on when any door is opened.
They turn off after all the doors are closed.
The dome lamps can also be turned on by turning the
instrument panel brightness knob, located on the
instrument panel to the left of the steering column,
clockwise to the farthest position. In this position, the
dome lamps remain on whether a door is opened or
closed.
Dome Lamp Override
The dome lamp override button is located next to the
exterior lamps control.
k(Dome Off):Press the button in and the dome
lamps remain off when a door is opened. Press the
button again to return it to the extended position so
that the dome lamps come on when a door is opened.
Entry/Exit Lighting
The vehicle has an illuminated entry/exit feature.
The dome lamps come on if the dome override button is
in the out position, when a door is opened or the key is
removed from the ignition.
Reading Lamps
If the vehicle has front reading lamps, press the button
located next to the lamp to turn it on or off.
The vehicle may also have reading lamps in other
locations. The lamps cannot be adjusted.
Electric Power Management
The vehicle has Electric Power Management (EPM) that
estimates the battery's temperature and state of charge.
It then adjusts the voltage for best performance and
extended life of the battery.
When the battery's state of charge is low, the voltage is
raised slightly to quickly bring the charge back up.
When the state of charge is high, the voltage is lowered
slightly to prevent overcharging. If the vehicle has a
voltmeter gage or a voltage display on the Driver
Information Center (DIC), you may see the voltage
move up or down. This is normal. If there is a problem,
an alert will be displayed.
The battery can be discharged at idle if the electrical
loads are very high. This is true for all vehicles. This is
because the generator (alternator) may not be spinning
fast enough at idle to produce all the power that is
needed for very high electrical loads.
4-17
Page 200 of 580
Analog Clock
The analog clock is located on the instrument panel
above the radio. The clock is not connected with any
other vehicle system and runs by itself. To adjust the
clock:1. The adjustment button is located in the lower left corner of the clock.
2. Push and hold the adjustment button to advance the clock hands. Holding the button down will
cause the clock to advance faster. Release the
button before reaching the desired time.
3. Push and release the button to increase the time by one minute increments until the desired time is
reached.
Climate Controls
Dual Automatic Climate Control
System
The heating, cooling, and ventilation in the vehicle can
be controlled with this system. The vehicle also has a
flow-through ventilation system described later in this
section.
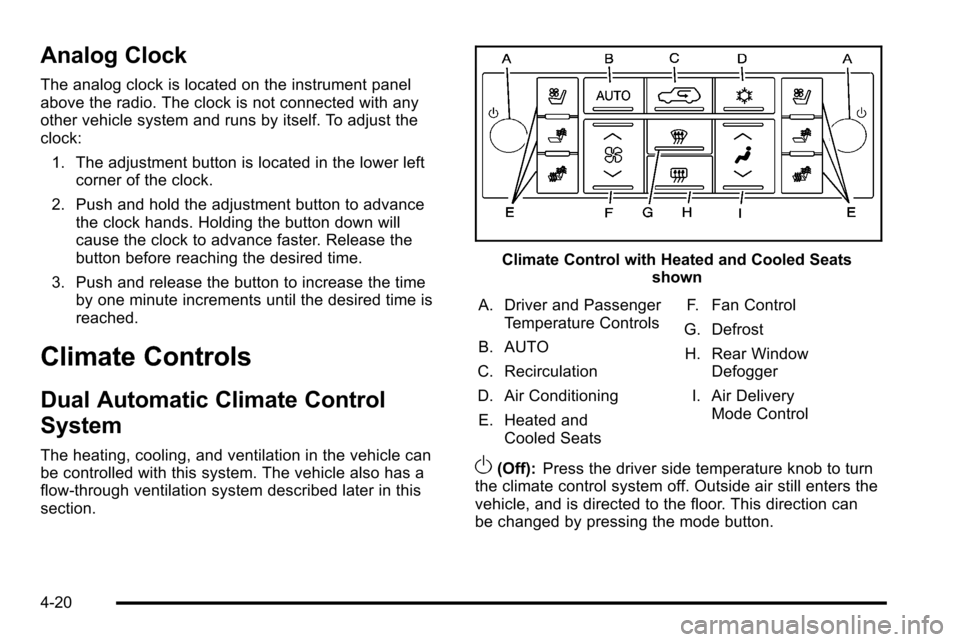
Climate Control with Heated and Cooled Seats shown
A. Driver and Passenger Temperature Controls
B. AUTO
C. Recirculation
D. Air Conditioning E. Heated and Cooled Seats F. Fan Control
G. Defrost
H. Rear Window Defogger
I. Air Delivery Mode Control
O(Off): Press the driver side temperature knob to turn
the climate control system off. Outside air still enters the
vehicle, and is directed to the floor. This direction can
be changed by pressing the mode button.
4-20
Page 201 of 580
The temperature can also be adjusted using either
temperature knob. Press the up or down arrows on the
fan switch, the defrost button, the AUTO button, driver
side temperature knob, or the air conditioning button to
turn the system on when it is off.
Driver and Passenger Side
Temperature Knob
The driver and passenger side temperature knobs are
used to adjust the temperature of the air coming
through the system on the driver or passenger's side of
the vehicle. The temperature can be adjusted even if
the system is turned off. This is possible since outside
air always flows through the system as the vehicle is
moving forward unless it is set to recirculation mode.
See“Recirculation” later in this section.
Turn the knob clockwise or counterclockwise to
increase or decrease the cabin temperature. The
display will show the temperature setting increasing or
decreasing.
Set the passenger's temperature setting to match the
driver temperature setting by pressing the passenger
power knob.
When in defrost mode the passenger temperature
setting cannot be changed.
Automatic Operation
AUTO (Automatic) : When automatic operation is
active the system will control the inside temperature, the
air delivery, and the fan speed.
Use the steps below to place the entire system in
automatic mode:
1. Press the AUTO button. When AUTO is selected, the display will change to
show the current temperature(s) and AUTO will
appear. The current delivery mode and fan speed
will also be displayed for approximately
five seconds.
When AUTO is selected, the air conditioning
operation and air inlet will be automatically
controlled. The air conditioning compressor will
run when the outside temperature is over about
4°C (40°F). The air inlet will normally be set to
outside air. If it is hot outside, the air inlet may
automatically switch to recirculate inside air to help
quickly cool down the vehicle. The light on the
button comes on in recirculation.
4-21
Page 273 of 580

A. FULL MAP Touch Screen Button. See“NAV”under
“Hard Keys” underUsing the Navigation System
on page 5‑12for more information.
B. No GPS Symbol. See Symbols
on page 5‑17for
more information.
C. North Up/Heading Up Symbol. See Symbols
on
page 5‑17for more information.
D. Map Scale. See “Map Scales”underMaps
on
page 5‑14for more information.
E.
0(Zoom In) Touch Screen Button. See “Map
Scales” underMaps
on page 5‑14for more
information.
F. Mark Touch Screen Button. See “Adding
Destinations to the Address Book” under
Destination
on page 5‑24for more information.
G.
Z(DVD Map Disc Eject) Key. See Mapson
page 5‑14
for more information.
H. Map DVD Slot. See “Installing the Map DVD” under
Maps
on page 5‑14for information on how to
install and eject a map DVD.
I.
M(Load) Key. See CD Playeron page 5‑68or
DVD Player
on page 5‑75for more information.
J.
Z(CD/DVD Video/Audio Eject) Key. See CD
Player
on page 5‑68or DVD Playeron page 5‑75for more information. K. CD/DVD Video/Audio Slot. See
CD Player
on
page 5‑68or DVD Playeron page 5‑75for more
information.
L.
O/n(Power/Volume) Knob. See Navigation
Audio System
on page 5‑59for more information.
M.
M(Disc Up/Down) Key. See “Hard Keys”under
Using the Navigation System
on page 5‑12for
more information.
N. AUDIO Key. See Navigation Audio System
on
page 5‑59for more information.
O. FAV (Favorite) Key. See “Storing Radio Station
Presets” underNavigation Audio System
on
page 5‑59for more information.
P.
5(Phone) Key. See the OnStar®owner guide and
Bluetooth®on page 4‑66for more information.
Q.
e(Sound) Key. See “Sound Menu”under
Navigation Audio System
on page 5‑59for more
information.
R. Source (AM, FM, XM, CD, etc.) Touch Screen Button. See Navigation Audio System
on
page 5‑59for more information.
S. Clock Touch Screen Button. See “Setting the
Clock” underConfigure Menu
on page 5‑42for
more information.
5-3
Page 278 of 580
Setting the Clock
The navigation system time and the analog clock
operate independently. Changing the time through the
navigation system does not change the time on the
analog clock. SeeAnalog Clock
on page 4‑20to
change the analog clock time.
To set the time for the navigation system:
1. Press the CONFIG key to enter the configure menu options, then press the CONFIG key
repeatedly until the time is selected or touch the
time screen button.
2. Press the Hours and Minutes −(minus) and
+ (plus) signs to decrease or to increase the time.
See “Setting the Clock” underConfigure Menu
on
page 5‑42for more information.
Entering an Address and Point of
Interest, and Storing Preset
Destinations
Entering an Address
Enter a destination by inputting the city name first:
1. If the radio is already on with a map disc inserted, skip to Step 5.
2. Press
Oto turn the system on. 3. Insert the DVD map disc. See
“Installing the Map
DVD” under Maps
on page 5‑14for more
information.
4. A caution may appear. Touch the OK screen button to proceed.
5. Press the DEST hard key.
6. Press the
2Address Entry screen button.
7. Select the state/province screen button, if needed, to change the current state or province. A list of all
of the available states and provinces appear.
Select the state or province.
8. Once a state or province has been selected the City name category is automatically selected for
entry.
If five or less names are available, a list displays.
If more than five are available, the List screen
button displays a number. This number represents
the number of available cities. Select this button to
view the list and select a city.
5-8