power CADILLAC SRX 2011 2.G Manual PDF
[x] Cancel search | Manufacturer: CADILLAC, Model Year: 2011, Model line: SRX, Model: CADILLAC SRX 2011 2.GPages: 498, PDF Size: 7.62 MB
Page 306 of 498
Black plate (30,1)Cadillac SRX Owner Manual - 2011
9-30 Driving and Operating
Drive Systems
All-Wheel Drive
Vehicles with this feature always
send engine power to all four
wheels. It is fully automatic, and
adjusts itself as needed for road
conditions.
When using a compact spare tire
on an AWD vehicle, the system
automatically detects the compact
spare and disables AWD. To restore
AWD operation and prevent
excessive wear on the system,
replace the compact spare with a
full-size tire as soon as possible.
SeeCompact Spare Tire on
page 10‑93 for more information.
Brakes
Antilock Brake
System (ABS)
This vehicle has the Antilock
Brake System (ABS), an advanced
electronic braking system that helps
prevent a braking skid.
When the engine is started and the
vehicle begins to drive away, ABS
checks itself. A momentary motor or
clicking noise might be heard while
this test is going on, and it might
even be noticed that the brake
pedal moves a little. This is normal.
If there is a problem with ABS, this
warning light stays on. See Antilock
Brake System (ABS) Warning Light
on page 5‑23. If driving safely on a wet road
and it becomes necessary to
slam on the brakes and continue
braking to avoid a sudden obstacle,
a computer senses that the wheels
are slowing down. If one of the
wheels is about to stop rolling,
the computer will separately work
the brakes at each wheel.
ABS can change the brake pressure
to each wheel, as required, faster
than any driver could. This can help
the driver steer around the obstacle
while braking hard.
As the brakes are applied, the
computer keeps receiving updates
on wheel speed and controls
braking pressure accordingly.
Page 307 of 498
Black plate (31,1)Cadillac SRX Owner Manual - 2011
Driving and Operating 9-31
Remember: ABS does not change
the time needed to get a foot up to
the brake pedal or always decrease
stopping distance. If you get too
close to the vehicle in front of you,
there will not be enough time to
apply the brakes if that vehicle
suddenly slows or stops. Always
leave enough room up ahead to
stop, even with ABS.
Using ABS
Do not pump the brakes. Just hold
the brake pedal down firmly and let
ABS work. You might hear the ABS
pump or motor operating and feel
the brake pedal pulsate, but this is
normal.
Braking in Emergencies
ABS allows the driver to steer and
brake at the same time. In many
emergencies, steering can help
more than even the very best
braking.
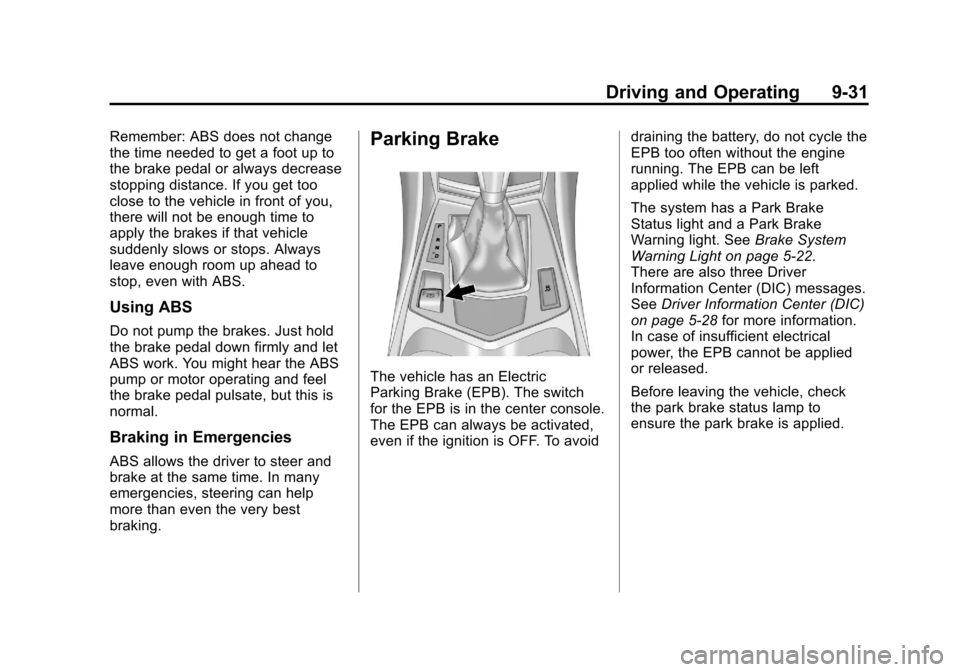
Parking Brake
The vehicle has an Electric
Parking Brake (EPB). The switch
for the EPB is in the center console.
The EPB can always be activated,
even if the ignition is OFF. To avoiddraining the battery, do not cycle the
EPB too often without the engine
running. The EPB can be left
applied while the vehicle is parked.
The system has a Park Brake
Status light and a Park Brake
Warning light. See
Brake System
Warning Light on page 5‑22.
There are also three Driver
Information Center (DIC) messages.
See Driver Information Center (DIC)
on page 5‑28 for more information.
In case of insufficient electrical
power, the EPB cannot be applied
or released.
Before leaving the vehicle, check
the park brake status lamp to
ensure the park brake is applied.
Page 309 of 498
Black plate (33,1)Cadillac SRX Owner Manual - 2011
Driving and Operating 9-33
Notice:Driving with the parking
brake on can overheat the brake
system and cause premature
wear or damage to brake system
parts. Make sure that the parking
brake is fully released and the
brake warning light is off before
driving.
Automatic EPB Release
The EPB will automatically release
if the vehicle is running, placed into
gear and an attempt is made to
drive away. Avoid rapid acceleration
when the EPB is applied, to
preserve park brake lining life.
If you are towing a trailer and
parking on a hill, see Driving
Characteristics and Towing Tips on
page 9‑54 for more information.
Brake Assist
This vehicle has a brake assist
feature designed to assist the
driver in stopping or decreasing
vehicle speed in emergency
driving conditions. This feature
uses the stability system hydraulic
brake control module to supplement
the power brake system under
conditions where the driver has
quickly and forcefully applied the
brake pedal in an attempt to quickly
stop or slow down the vehicle.
The stability system hydraulic brake
control module increases brake
pressure at each corner of the
vehicle until the ABS activates.
Minor brake pedal pulsation or
pedal movement during this time
is normal and the driver should
continue to apply the brake pedal
as the driving situation dictates.
The brake assist feature will
automatically disengage when
the brake pedal is released or
brake pedal pressure is quickly
decreased.
Hill Start Assist (HSA)
This vehicle has a Hill Start Assist
(HSA) feature, which may be useful
when the vehicle is stopped on a
grade. This feature is designed to
prevent the vehicle from rolling,
either forward or rearward, during
vehicle drive off. After driver
completely stops and holds the
vehicle in a complete standstill on
a grade, HSA will be automatically
activated. During the transition
period between when the driver
releases the brake pedal and starts
to accelerate to drive off on a grade,
HSA holds the braking pressure
to ensure that there is no rolling
back. The brakes will automatically
release when the accelerator pedal
is applied within the two second
window. It will not activate if the
vehicle is in a drive gear and facing
downhill or if the vehicle is facing
uphill and in R (Reverse).
Page 310 of 498
Black plate (34,1)Cadillac SRX Owner Manual - 2011
9-34 Driving and Operating
Ride Control Systems
Traction Control
System (TCS)
The vehicle has a Traction Control
System (TCS) that limits wheel spin.
On a front-wheel-drive vehicle,
the system operates if it senses
that one or both of the front wheels
are spinning or beginning to lose
traction. On an All-Wheel-Drive
(AWD) vehicle, the system will
operate if it senses that any of the
wheels are spinning or beginning to
lose traction. When this happens,
the system brakes the spinning
wheel(s) and/or reduces engine
power to limit wheel spin.
The system may be heard or felt
while it is working, but this is
normal.
TCS is on whenever the vehicle
is started. To limit wheel spin,
especially in slippery roadconditions, the system should
always be left on. But, TCS can
be turned off if needed.
dflashes to indicate that the
traction control system is active.
If there is a problem detected
with TCS, SERVICE TRACTION
CONTROL and SERVICE
STABILITRAK may be displayed on
the Driver Information Center (DIC)
and
dwill be on. See Ride Control
System Messages on page 5‑37.
When this message is displayed
and
dcomes on and stays on,
the vehicle is safe to drive but the
system is not operational. Driving
should be adjusted accordingly. Notice:
Do not repeatedly brake
or accelerate heavily when TCS is
off. The vehicle's driveline could
be damaged.
If
dcomes on and stays on, reset
the system by:
1. Stopping the vehicle.
2. Turning the engine off and waiting 15 seconds.
3. Starting the engine.
If
dstill comes on and stays on at a
speed above 20 km/h (13 mph), see
your dealer for service.
A chime may also sound when the
light comes on steady.
The
gis located on the console.
Page 339 of 498
Black plate (1,1)Cadillac SRX Owner Manual - 2011
Vehicle Care 10-1
Vehicle Care
General Information
General Information . . . . . . . . . . 10-2
California Proposition65 Warning . . . . . . . . . . . . . . . . . 10-2
California Perchlorate Materials Requirements . . . . 10-3
Accessories and Modifications . . . . . . . . . . . . . . . 10-3
Vehicle Checks
Doing Your OwnService Work . . . . . . . . . . . . . . . 10-4
Hood . . . . . . . . . . . . . . . . . . . . . . . . 10-5
Engine Compartment Overview . . . . . . . . . . . . . . . . . . . 10-6
Engine Cover . . . . . . . . . . . . . . . . 10-9
Engine Oil . . . . . . . . . . . . . . . . . . 10-10
Engine Oil Life System . . . . . 10-14
Automatic Transmission Fluid . . . . . . . . . . . . . . . . . . . . . . 10-15
Engine Air Cleaner/Filter . . . . 10-16
Cooling System . . . . . . . . . . . . 10-18
Engine Coolant . . . . . . . . . . . . . 10-19
Engine Overheating . . . . . . . . 10-22
Power Steering Fluid . . . . . . . 10-24
Washer Fluid . . . . . . . . . . . . . . . 10-24 Brakes . . . . . . . . . . . . . . . . . . . . . 10-25
Brake Fluid . . . . . . . . . . . . . . . . . 10-26
Battery . . . . . . . . . . . . . . . . . . . . . 10-28
All-Wheel Drive . . . . . . . . . . . . . 10-28
Starter Switch Check . . . . . . . 10-29
Automatic Transmission Shift
Lock Control Function
Check . . . . . . . . . . . . . . . . . . . . . 10-29
Ignition Transmission Lock Check . . . . . . . . . . . . . . . . . . . . . 10-30
Park Brake and P (Park) Mechanism Check . . . . . . . . 10-30
Wiper Blade Replacement . . . . . . . . . . . . . . 10-31
Headlamp Aiming
Headlamp Aiming . . . . . . . . . . 10-32
Bulb Replacement
Bulb Replacement . . . . . . . . . . 10-36
Halogen Bulbs . . . . . . . . . . . . . . 10-36
High Intensity Discharge(HID) Lighting . . . . . . . . . . . . . 10-36
Headlamps . . . . . . . . . . . . . . . . . 10-36
Fog Lamps . . . . . . . . . . . . . . . . . 10-41
Turn Signal Lamps . . . . . . . . . 10-41
Back-Up Lamps . . . . . . . . . . . . 10-43
License Plate Lamp . . . . . . . . 10-44
Replacement Bulbs . . . . . . . . . 10-45
Electrical System
Electrical System Overload . . . . . . . . . . . . . . . . . . 10-45
Fuses and Circuit Breakers . . . . . . . . . . . . . . . . . . 10-46
Engine Compartment Fuse
Block . . . . . . . . . . . . . . . . . . . . . 10-46
Instrument Panel Fuse Block . . . . . . . . . . . . . . . . . . . . . 10-49
Rear Compartment Fuse Block . . . . . . . . . . . . . . . . . . . . . 10-51
Wheels and Tires
Tires . . . . . . . . . . . . . . . . . . . . . . . . 10-54
Tire Sidewall Labeling . . . . . . 10-55
Tire Designations . . . . . . . . . . . 10-57
Tire Terminology andDefinitions . . . . . . . . . . . . . . . . 10-58
Tire Pressure . . . . . . . . . . . . . . . 10-61
Tire Pressure for High-Speed Operation . . . . . . . . . . . . . . . . . 10-62
Tire Pressure Monitor System . . . . . . . . . . . . . . . . . . . 10-63
Tire Pressure Monitor Operation . . . . . . . . . . . . . . . . . 10-64
Tire Inspection . . . . . . . . . . . . . . 10-68
Tire Rotation . . . . . . . . . . . . . . . 10-68
When It Is Time for New Tires . . . . . . . . . . . . . . . . . . . . . . 10-69
Page 345 of 498

Black plate (7,1)Cadillac SRX Owner Manual - 2011
Vehicle Care 10-7
A.Engine Air Cleaner/Filter on
page 10‑16.
B. Power Steering Reservoir and Cap. See Power Steering Fluid
on page 10‑24.
C. Engine Oil Fill Cap. See Engine
Oil on page 10‑10.
D. Engine Oil Dipstick (Out of View). See Engine Oil on
page 10‑10.
E. Brake Master Cylinder Reservoir. See Brakes on
page 10‑25.
F. Battery (Out of View). See Battery on page 10‑28. G. Engine Coolant Surge Tank and
Pressure Cap. See Engine
Coolant on page 10‑19.
H. Remote Positive (+) Terminal. See Jump Starting on
page 10‑94.
I. Remote Negative (−) Terminal (Out of View). See Jump
Starting on page 10‑94.
J. Engine Compartment Fuse
Block on page 10‑46.
K. Windshield Washer Fluid Reservoir. See Washer Fluid on
page 10‑24.
Page 347 of 498
Black plate (9,1)Cadillac SRX Owner Manual - 2011
Vehicle Care 10-9
A.Engine Air Cleaner/Filter on
page 10‑16.
B. Power Steering Reservoir and Cap (Under engine cover).
See Power Steering Fluid on
page 10‑24.
C. Engine Oil Fill Cap. See Engine
Oil on page 10‑10.
D. Engine Oil Dipstick (Out of View). See Engine Oil on
page 10‑10.
E. Engine Cover on page 10‑9.
F. Transmission Fluid Cap and Dipstick. See Automatic
Transmission Fluid on
page 10‑15.
G. Brake Master Cylinder Reservoir. See Brakes on
page 10‑25. H. Engine Coolant Surge Tank and
Pressure Cap. See Engine
Coolant on page 10‑19.
I. Battery (Out of View). See Battery on page 10‑28.
J. Remote Positive (+) Terminal. See Jump Starting on
page 10‑94.
K. Remote Negative (−) Terminal (Out of View). See Jump
Starting on page 10‑94.
L. Engine Compartment Fuse
Block on page 10‑46.
M. Windshield Washer Fluid Reservoir. See Washer Fluid on
page 10‑24.Engine Cover
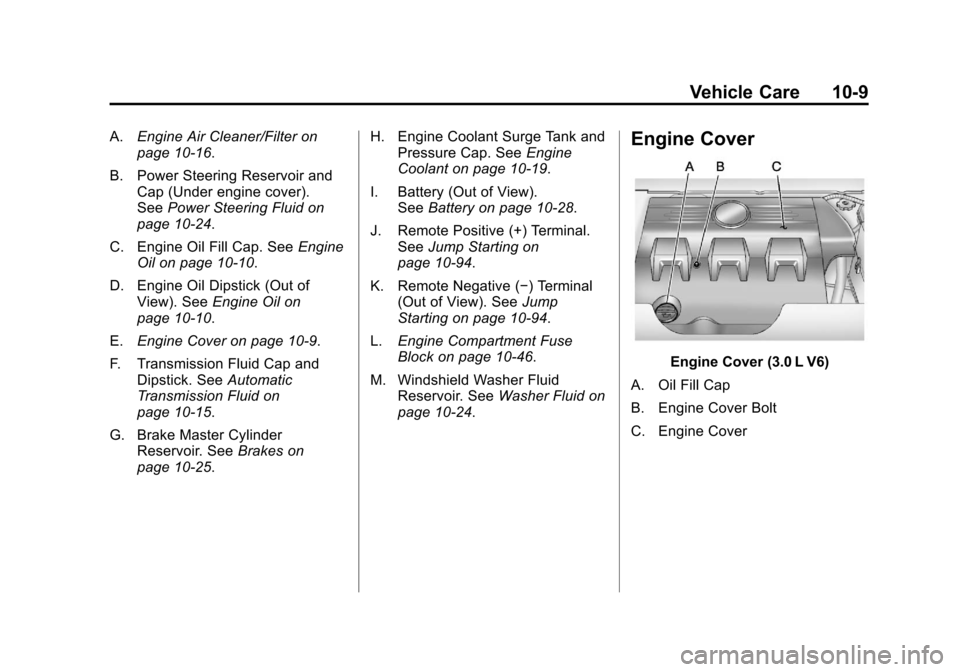
Engine Cover (3.0 L V6)
A. Oil Fill Cap
B. Engine Cover Bolt
C. Engine Cover
Page 362 of 498
Black plate (24,1)Cadillac SRX Owner Manual - 2011
10-24 Vehicle Care
Power Steering Fluid
SeeEngine Compartment Overview
on page 10‑6 for reservoir location.
When to Check Power Steering
Fluid
It is not necessary to regularly
check power steering fluid unless
a leak is suspected in the system
or unusual noise is heard. A fluid
loss in this system could indicate a
problem. Have the system inspected
and repaired.
How to Check Power Steering
Fluid
To check the power steering fluid:
1. Turn the key off and let the
engine compartment cool down.
2. Remove the engine cover, if required. See Engine Cover on
page 10‑9.
3. Wipe the cap and the top of the reservoir clean.
4. Unscrew the cap and wipe the dipstick with a clean rag.
5. Replace the cap and completely tighten it.
6. Remove the cap again and look at the fluid level on the dipstick.
The level should be within the
HOT mark. If necessary, add only
enough fluid to bring the level within
the mark.
What to Use
To determine what kind of fluid to
use, see Recommended Fluids and
Lubricants on page 11‑7. Always
use the proper fluid.
Washer Fluid
What to Use
When windshield washer fluid
is needed, be sure to read the
manufacturer's instructions before
use. If operating the vehicle in an
area where the temperature may
fall below freezing, use a fluid that
has sufficient protection against
freezing.
Page 379 of 498
Black plate (41,1)Cadillac SRX Owner Manual - 2011
Vehicle Care 10-41
Front Turn Signal Lamp
(Base and Up-Level)
To replace the Front Turn
Signal Lamp:
1. Remove the turn signal lampbulb socket from the headlamp
assembly.
2. Remove the turn signal lamp bulb from the socket.
3. Replace the bulb in the bulb socket.
4. Install the bulb socket in the headlamp assembly.
5. For driver side, reinstall the underhood electrical center
cover by latching three clips.
6. For passenger side, reinstall the air filter/cleaner assembly base
by pushing to seat. Verify the
base is seated securely, then
install the engine air filter/
cleaner assembly.
Fog Lamps
To replace the fog lamp bulb:
1. Locate the bulb assembly underthe front fascia.
2. Disconnect the electrical connector from the bulb
assembly.
3. Remove the bulb by turning it counterclockwise and pulling it
straight out of the assembly.
4. Install the new bulb by turning it clockwise into the assembly.
5. Reconnect the electrical connector to the bulb assembly.
Turn Signal Lamps
To replace one of these bulbs:
1. Open the liftgate. See Liftgate
(Manual) on page 2‑14 or
Liftgate (Power) on page 2‑15.
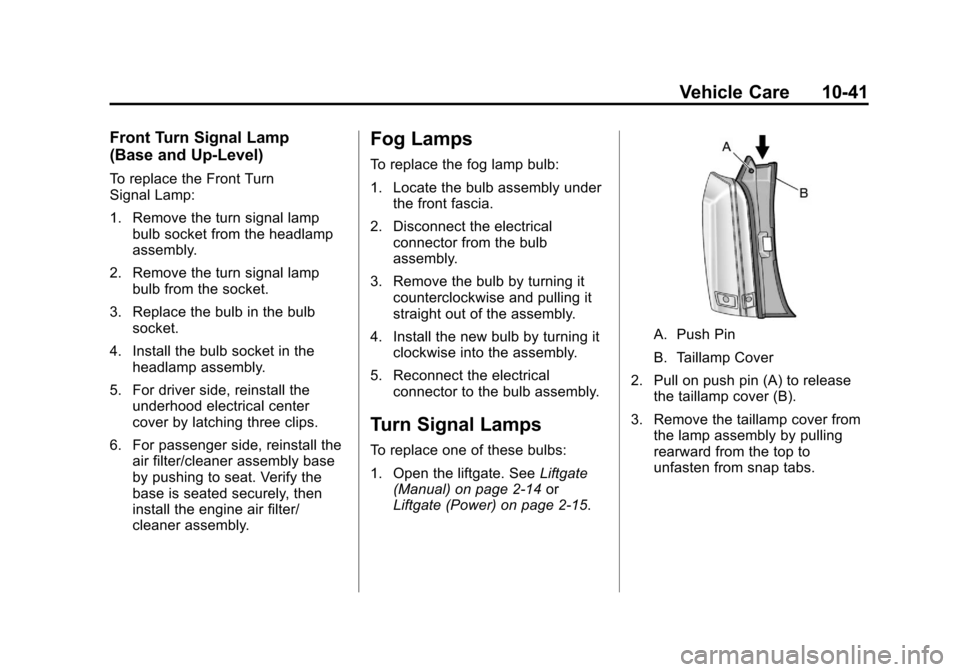
A. Push Pin
B. Taillamp Cover
2. Pull on push pin (A) to release the taillamp cover (B).
3. Remove the taillamp cover from the lamp assembly by pulling
rearward from the top to
unfasten from snap tabs.
Page 381 of 498
Black plate (43,1)Cadillac SRX Owner Manual - 2011
Vehicle Care 10-43
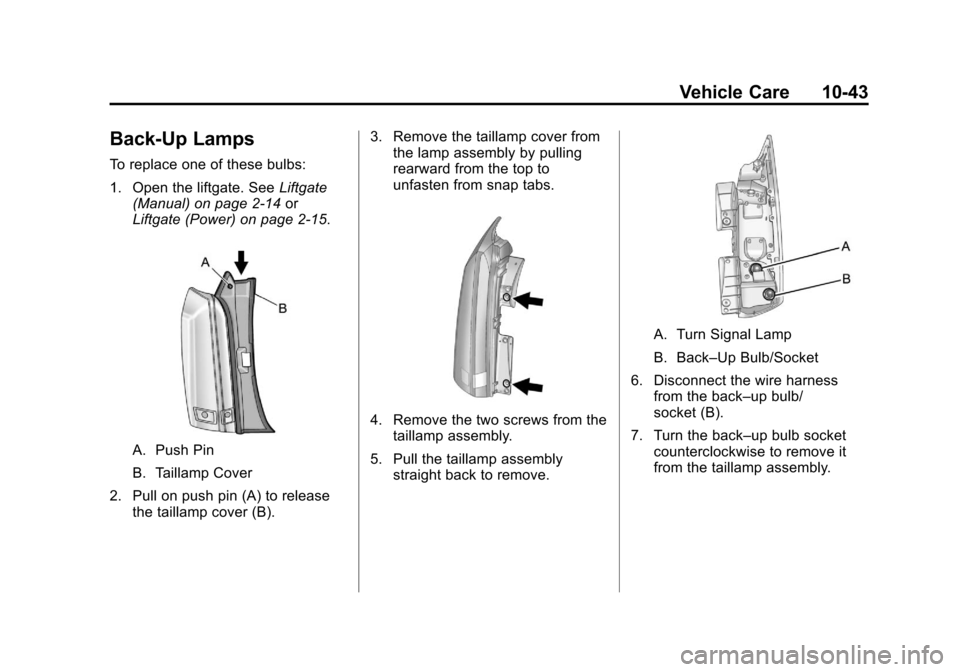
Back-Up Lamps
To replace one of these bulbs:
1. Open the liftgate. SeeLiftgate
(Manual) on page 2‑14 or
Liftgate (Power) on page 2‑15.
A. Push Pin
B. Taillamp Cover
2. Pull on push pin (A) to release the taillamp cover (B). 3. Remove the taillamp cover from
the lamp assembly by pulling
rearward from the top to
unfasten from snap tabs.
4. Remove the two screws from the
taillamp assembly.
5. Pull the taillamp assembly straight back to remove.
A. Turn Signal Lamp
B. Back–Up Bulb/Socket
6. Disconnect the wire harness from the back–up bulb/
socket (B).
7. Turn the back–up bulb socket counterclockwise to remove it
from the taillamp assembly.