manual transmission CADILLAC XLR 2004 1.G Owners Manual
[x] Cancel search | Manufacturer: CADILLAC, Model Year: 2004, Model line: XLR, Model: CADILLAC XLR 2004 1.GPages: 356, PDF Size: 2.36 MB
Page 81 of 356

Driver Shift Control
The driver shift control feature gives you more manual
control over the operation of the transmission.
To use this feature, move
the shift lever from the
AUTOMATIC OVERDRIVE
(D) position to the left
and into the driver
shift control gate.
A plus symbol will also appear on the shift console
above the AUTOMATIC OVERDRIVE (D) indicator and
minus symbol will appear below the indicator.
To request an upshift, brie¯y move the shift lever up
toward the plus symbol. To request a downshift, brie¯y
move the shift lever down toward the minus symbol.
The Head-Up Display (HUD) will display the change in
gear range, though the actual upshift or downshift
may be delayed until the engine speed is correct for the
requested gear range.The currently selected gear will be remembered as the
selected gear range and will be displayed in the
HUD. SeeHead-Up Display (HUD) on page 3-27.
The gear range indicated in the HUD is only a requested
range of available gears. It does not indicate that the
vehicle will operate only in that speci®c gear. The actual
gear the vehicle will choose depends on a combination
of the driver-requested gear range, vehicle speed
and throttle position.
If you do not upshift as the engine approaches the
redline engine rpm for the selected gear range,
an engine speed limiter will prevent over-revving by
limiting the engine rpm available. No automatic upshift
will occur until you request it. Operating the engine
for extended periods of time against the speed limiter is
not recommended.
Not all manual downshift requests will be accepted by
the transmission. To prevent over-revving the engine,
each gear range has a maximum vehicle speed
associated with it. Any downshift request above this
speed will be ignored by the transmission.
2-25
Page 82 of 356

Some automatic downshifts may occur to maintain
minimum engine speed. This will only occur if you leave
the vehicle in too high of a gear range for the speed
the vehicle is traveling. For example, if you have been
driving in ®fth gear range and come to a stop without
manually downshifting, ®fth gear range will continue to
display in the HUD. The transmission will automatically
downshift to second gear. As you begin to drive
and accelerate, the transmission will automatically
upshift as quickly as possible to the selected ®fth
gear range.
In higher gear ranges, an automatic downshift will occur
if you press the accelerator pedal to the ¯oor. This
feature provides you with adequate acceleration
capabilities if you forget to downshift manually.
Automatic upshifts and downshifts will not display in
the HUD.
Driver shift control is available while the cruise control is
engaged. The shift behavior of the transmission will
react differently than when cruise control is not engaged.
This is not a malfunction and is necessary to allow
proper operation of the cruise control.
To return to fully automatic operation, move the shift
lever to the right and back into the AUTOMATIC
OVERDRIVE (D) position.Parking Brake
The parking brake pedal is
located to the left of the
regular brake pedal,
near the driver's door.
To set the parking brake, hold the regular brake pedal
down with your right foot and push the parking brake
pedal down with your left foot.
If the ignition is running, the parking brake indicator light
on the instrument panel cluster should come on. If it
does not, you need to have your vehicle serviced.
2-26
Page 241 of 356

Follow these steps to reinstall the cover to the engine
air cleaner/®lter housing:
1. Align the four tabs located on the back of the cover
with the three slots on the back of the housing.
2. Push the cover slightly down and towards the
engine to engage the tabs in the slots and align the
two wing screws.
3. Engage and tighten the two clasps on the top of the
engine air cleaner/®lter cover.
{CAUTION:
Operating the engine with the air cleaner/®lter
off can cause you or others to be burned. The
air cleaner not only cleans the air, it helps to
stop ¯ame if the engine back®res. If it is not
there and the engine back®res, you could
be burned. Do not drive with it off, and be
careful working on the engine with the air
cleaner/®lter off.
Notice:If the air cleaner/®lter is off, a back®re can
cause a damaging engine ®re. And, dirt can
easily get into your engine, which will damage it.
Always have the air cleaner/®lter in place when you
are driving.
Automatic Transmission Fluid
How to Check
It is not necessary to check the transmission ¯uid level.
A transmission ¯uid leak is the only reason for ¯uid
loss. If a leak occurs, take the vehicle to your dealer
service department and have it repaired as soon
as possible.
There is a special procedure for checking and changing
the transmission ¯uid. Because this procedure is
difficult, you should have this done at your dealer service
department. Contact your dealer for additional
information or the procedure can be found in the service
manual. To purchase a service manual, see
Service
Publications Ordering Information on page 7-11.
5-19
Page 261 of 356

Jump Starting
If your battery has run down, you may want to use
another vehicle and some jumper cables to start your
vehicle. Be sure to follow the steps below to do it safely.
{CAUTION:
Batteries can hurt you. They can be dangerous
because:
·They contain acid that can burn you.
·They contain gas that can explode or
ignite.
·They contain enough electricity to
burn you.
If you do not follow these steps exactly, some
or all of these things can hurt you.
Notice:If you try to start your vehicle by pushing
or pulling it, you could damage your vehicle. Do not
push or pull your vehicle to start it; instead, use
the jump starting procedure in this manual to start
your vehicle when the battery has run down.
1. Check the other vehicle. It must have a 12-volt
battery with a negative ground system.
Notice:If the other vehicle's system is not a 12-volt
system with a negative ground, both vehicles can
be damaged. Only use vehicles with 12-volt systems
with negative grounds to jump start your vehicle.
2. Get the vehicles close enough so the jumper cables
can reach, but be sure the vehicles are not touching
each other. If they are, it could cause a ground
connection you do not want. You would not be able
to start your vehicle, and the bad grounding
could damage the electrical systems.
To avoid the possibility of the vehicles rolling, set
the parking brake ®rmly on both vehicles involved in
the jump start procedure. Put an automatic
transmission in PARK (P) or a manual transmission
in NEUTRAL before setting the parking brakes.
5-39
Page 313 of 356

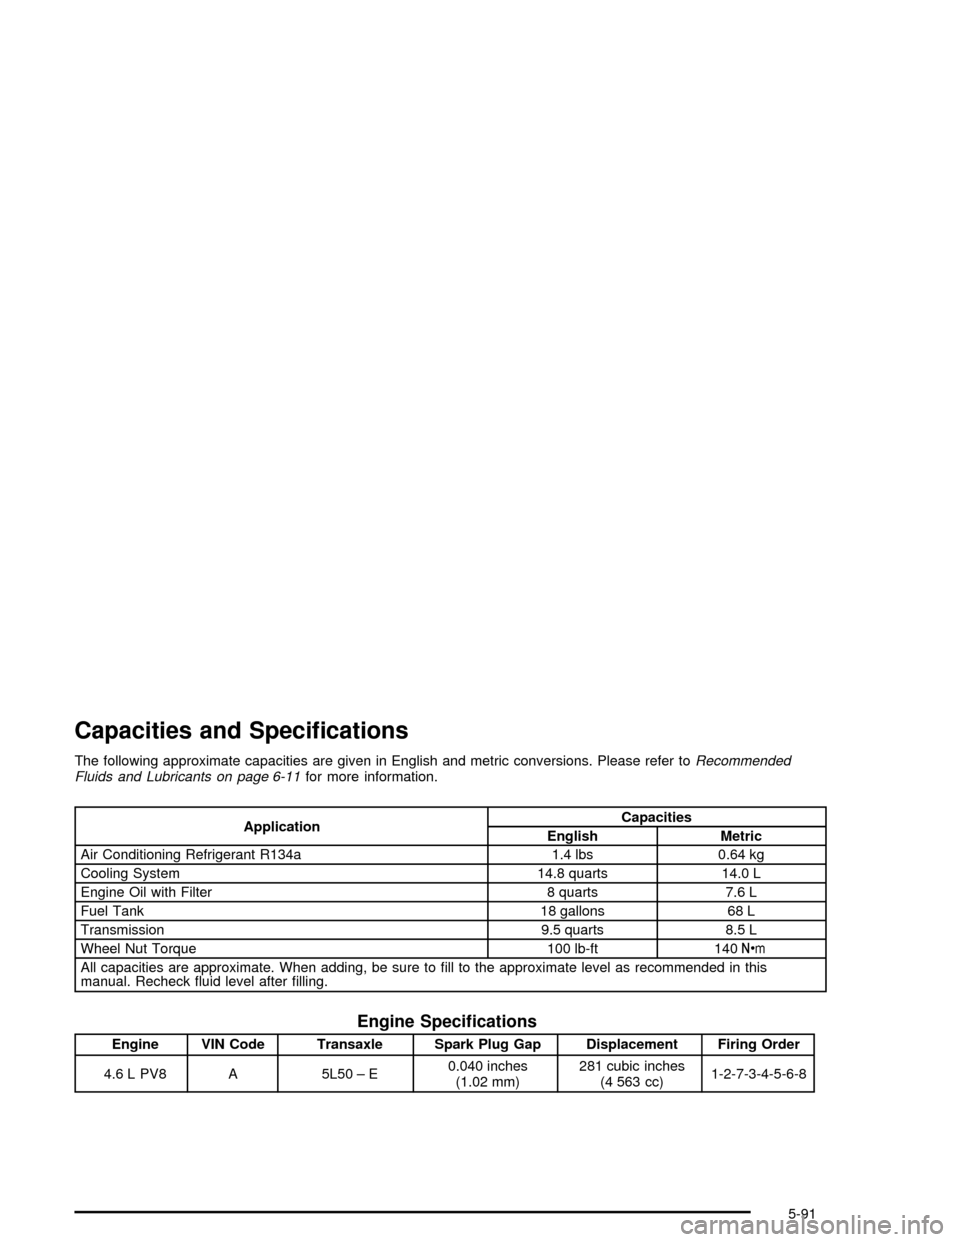
Capacities and Speci®cations
The following approximate capacities are given in English and metric conversions. Please refer toRecommended
Fluids and Lubricants on page 6-11for more information.
ApplicationCapacities
English Metric
Air Conditioning Refrigerant R134a 1.4 lbs 0.64 kg
Cooling System 14.8 quarts 14.0 L
Engine Oil with Filter 8 quarts 7.6 L
Fuel Tank 18 gallons 68 L
Transmission 9.5 quarts 8.5 L
Wheel Nut Torque 100 lb-ft 140Y
All capacities are approximate. When adding, be sure to ®ll to the approximate level as recommended in this
manual. Recheck ¯uid level after ®lling.
Engine Speci®cations
Engine VIN Code Transaxle Spark Plug Gap Displacement Firing Order
4.6 L PV8 A 5L50 ± E0.040 inches
(1.02 mm)281 cubic inches
(4 563 cc)1-2-7-3-4-5-6-8
5-91
Page 341 of 356

Reporting Safety Defects to
General Motors
In addition to notifying NHTSA (or Transport Canada) in
a situation like this, we certainly hope you'll notify us.
Please call us at 1-800-458-8006, or write:
Cadillac Customer Assistance Center
Cadillac Motor Car Division
P.O. Box 33169
Detroit, MI 48232-5169
In Canada, please call us at 1-800-263-3777 (English)
or 1-800-263-7854 (French). Or, write:
Customer Communication Centre, 163-005
General Motors of Canada Limited
1908 Colonel Sam Drive
Oshawa, Ontario L1H 8P7
Service Publications Ordering
Information
Service Manuals
Service Manuals have the diagnosis and repair
information on engines, transmission, axle, suspension,
brakes, electrical, steering, body, etc.
RETAIL SELL PRICE: $120.00
Transmission, Transaxle, Transfer
Case Unit Repair Manual
This manual provides information on unit repair service
procedures, adjustments and speci®cations for GM
transmissions, transaxles and transfer cases.
RETAIL SELL PRICE: $50.00
7-11
Page 354 of 356

T
Tachometer....................................................3-41
TCS Warning Light..........................................3-46
Telescopic Steering Column, Power Tilt Wheel...... 3-5
Testing the Alarm............................................2-18
Theft-Deterrent, Radio.....................................3-71
Theft-Deterrent System....................................2-17
Theft-Deterrent Systems...................................2-17
Tire
Pressure Light.............................................3-48
Tire Sidewall Labeling......................................5-50
Tire Size Codes..............................................5-52
Tire Terminology and De®nitions........................5-53
Tires.............................................................5-50
Buying New Tires........................................5-63
Chains.......................................................5-68
If a Tire Goes Flat.......................................5-73
In¯ation - Tire Pressure................................5-57
Inspection and Rotation................................5-60
Lifting Your Vehicle......................................5-69
Pressure Monitor System..............................5-58
Run-Flat.....................................................5-56
Uniform Tire Quality Grading.........................5-64
Wheel Alignment and Tire Balance.................5-65
Wheel Replacement.....................................5-66
When It Is Time for New Tires......................5-62To Use the Engine Coolant Heater....................2-22
Top Strap......................................................1-27
Torque Lock...................................................2-29
Towing
Recreational Vehicle.....................................4-32
Towing a Trailer..........................................4-37
Your Vehicle...............................................4-32
Traction
Control System (TCS).................................... 4-9
Control System Warning Light.......................3-46
Limited-Slip Rear Axle..................................4-10
Magnetic Ride Control..................................4-10
Stabilitrak
žSystem......................................4-11
Transmission
Fluid, Automatic...........................................5-19
Transmission Operation, Automatic....................2-23
Transmission, Transaxle, Transfer Case Unit
Repair Manual............................................7-11
Transportation Options...................................... 7-7
Trip Computer
Oil Life Indicator..........................................3-70
Trip Odometer................................................3-41
Trunk............................................................2-11
Trunk Lock Release........................................2-12
Turn and Lane-Change Signals.......................... 3-6
Turn Signal/Multifunction Lever........................... 3-5
Twilight Sentinel
ž............................................3-24
12