lock CADILLAC XLR 2008 1.G Workshop Manual
[x] Cancel search | Manufacturer: CADILLAC, Model Year: 2008, Model line: XLR, Model: CADILLAC XLR 2008 1.GPages: 470, PDF Size: 8.39 MB
Page 213 of 470
Entering a destination or alphanumeric text requires
many steps, so you can only perform these operations
when the vehicle is in PARK (P). You will notice
that touch-sensitive screen buttons leading to the
alphanumeric keyboard are dimmed out while driving.
Other functions may also be locked out while driving and
they too will appear grayed out on the screen — but
all functions are available when parked. Some functions
can be performed while driving, as long as you can
do so without diverting too much of your attention from
your driving.
{CAUTION:
This system provides you with a far greater
access to audio stations and song listings.
Giving extended attention to entertainment
tasks while driving can cause a crash and you
or others can be injured or killed. Always keep
your eyes on the road and your mind on the
drive — avoid engaging in extended searching
while driving.
{CAUTION:
Looking at the moving map on the navigation
screen frequently or for too long while driving
can cause a crash and you or others can be
injured or killed. Keep your eyes and mind on
the road and avoid looking too long or too
often at the moving map on the navigation
screen. Use the voice guidance directions
whenever possible.
The navigation system allows you to do the following:
Plan a route with provided turn-by-turn route
and map guidance with voice prompts. See
Plan Route on page 4-19for more information.
Select a destination using various methods and
choices.
Receive broadcast announcements on traffic and
emergency alert communications.
4-5
Page 214 of 470
You should always be alert and obey traffic and roadway
laws and instructions, regardless of the guidance from
the navigation system. The navigation system uses
street map information that does not include all traffic
restrictions or the latest road changes, it may suggest
using a road that is now closed for construction or a
turn that is prohibited by signs at the intersection.
The system uses limited information, you must always
evaluate whether following the system’s directions
is safe and legal for the current conditions.
When getting started you may set the navigation system
to your preference or delete information you may
have entered using various options. To do so, reference
the following topics:
To adjust screen appearance, language, clock,
English/metric measurements, or other options,
see “Main Audio Menu” underNavigation Audio
System on page 4-54.
To adjust voice guidance volume or other navigation
settings, seeSetup Menu on page 4-13.
Deleting Personal Information
This navigation system can record and store
destinations. At times, such as when you are disposing
of your vehicle, you may want to delete these
destinations. Refer to the following sections to delete
the destination information that has been stored.
See “Deleting Single Memory Points”, “Deleting All
Memory Points”, “Preset Dests.” (Destinations), “Home”
and “Previous Dest.” (Destination) underEdit Memory
Point on page 4-20for deleting stored destinations.
Storing Radio Station Presets
To set preset radio stations, do the following:
1. Press the PWR/VOL knob to turn the system on.
2. Press the audio source screen button (AM, FM1,
FM2, etc.) and select the desired band (AM, FM1,
FM2, XM1, or XM2 (if equipped), or WX (weather)
(if equipped)).
3. Use the TUNE/SEEK arrows to tune to the
desired station.
4. Press and hold one of the six preset screen buttons,
at the bottom of the screen, until you hear a beep or
see the station displayed on the selected preset
button.
5. Repeat the steps for each preset.
See “Preset Station Menu” underNavigation Audio
System on page 4-54for more information.
4-6
Page 215 of 470
Setting the Time
To set the time, do the following:
1. Press the PWR/VOL knob to turn the system on.
2. Press the
e/z(Audio/Adjust) hard key.
3. Press the
8clock symbol screen button.
4. Select the 12H or 24H screen button to display the
time in standard or military time.
5. Press and hold the HOUR and MIN. (minute) arrow
buttons to increase or to decrease the time.
6. Select the appropriate time zone screen button.
7. Select the Daylight Saving Time screen button,
if necessary.
The radio will use the GPS satellite to set the time.
The vehicle needs to be in an open area to receive the
signal. See “Clock Adjust Menu” underNavigation
Audio System on page 4-54for more information.
Setting the Search Area, Entering an
Address and Point of Interest, Storing a
Home Destination, and Using Your
Home or Previous Destinations
Before entering an Address, Point of Interest, Home, or
Preset Destination, select the appropriate region that
contains the nal destination. Your vehicle must
be stopped to perform this operation.
Setting the Search Area
To set the search area, do the following:
1. If the radio is already on with a map disc inserted,
skip to Step 5.
2. Press the PWR/VOL knob to turn the system on.
3. Insert the DVD map disc. See “Regional Maps”
underMaps on page 4-39for more information.
4. A notice may appear. Touch the I AGREE screen
button to proceed.
5. Press the ROUTE hard key.
6. Press the Enter Destination screen button.
7. Press the Change screen button.
8. Select the appropriate region numbered screen
button that contains your nal destination.
The system will return to the Destination menu. See
Enter Destination on page 4-28for more information.
4-7
Page 263 of 470
Display Presets on the Map:With this feature on,
your audio system presets for the current audio source
will be displayed on the left of the map screen.
Touch ON to turn this feature on. You may also choose
to turn this feature off.
With this feature on, you can recall your preset radio
stations from the map screen. You cannot store preset
stations from the map screen. You must do this from
the audio screen. See “Preset Station Menu” later in this
section for more information on storing presets.
Automatic Volume Control (AVC):The system has
Bose AudioPilot
®noise compensation technology.
AudioPilot®continuously adjusts the audio system
equalization, to compensate for background noise, so
that your music always sounds the same at the set
volume level.
To use AudioPilot
®, press the ON screen button.
To turn it off, press the OFF screen button.
This feature is most effective at lower volume settings
where background noise can affect how well you hear the
music being played through your vehicle’s audio system.
At higher volume settings, where the music is much
louder than the background noise, there may be little or
no adjustments by AudioPilot
®. For more information on
AudioPilot®, visit www.bose.com/audiopilot.
8(Clock):Touch this screen button to get to the
CLOCK ADJUST menu. See “Clock Adjust Menu” later
in this section for more information.
SCREEN ADJUST:To adjust the brightness or contrast
of the screen, touch SCREEN ADJUST to display the
screen adjust menu. See “Screen Adjust Menu” later in
this section for more information.
SOUND:Touch this screen button to access the
Sound menu. See “Sound Menu” later in this section for
more information.
DSP (Digital Signal Processing):Touch this screen
button to access the DSP menu. See “Adjusting
the Speakers” later in this section for more information.
4-55
Page 264 of 470
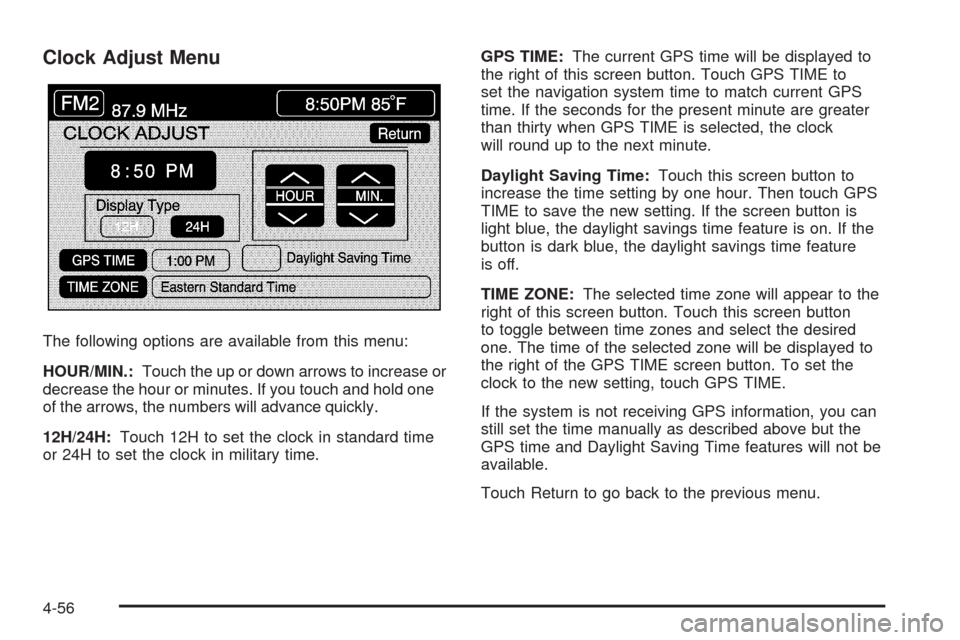
Clock Adjust Menu
The following options are available from this menu:
HOUR/MIN.:Touch the up or down arrows to increase or
decrease the hour or minutes. If you touch and hold one
of the arrows, the numbers will advance quickly.
12H/24H:Touch 12H to set the clock in standard time
or 24H to set the clock in military time.GPS TIME:The current GPS time will be displayed to
the right of this screen button. Touch GPS TIME to
set the navigation system time to match current GPS
time. If the seconds for the present minute are greater
than thirty when GPS TIME is selected, the clock
will round up to the next minute.
Daylight Saving Time:Touch this screen button to
increase the time setting by one hour. Then touch GPS
TIME to save the new setting. If the screen button is
light blue, the daylight savings time feature is on. If the
button is dark blue, the daylight savings time feature
is off.
TIME ZONE:The selected time zone will appear to the
right of this screen button. Touch this screen button
to toggle between time zones and select the desired
one. The time of the selected zone will be displayed to
the right of the GPS TIME screen button. To set the
clock to the new setting, touch GPS TIME.
If the system is not receiving GPS information, you can
still set the time manually as described above but the
GPS time and Daylight Saving Time features will not be
available.
Touch Return to go back to the previous menu.
4-56
Page 265 of 470
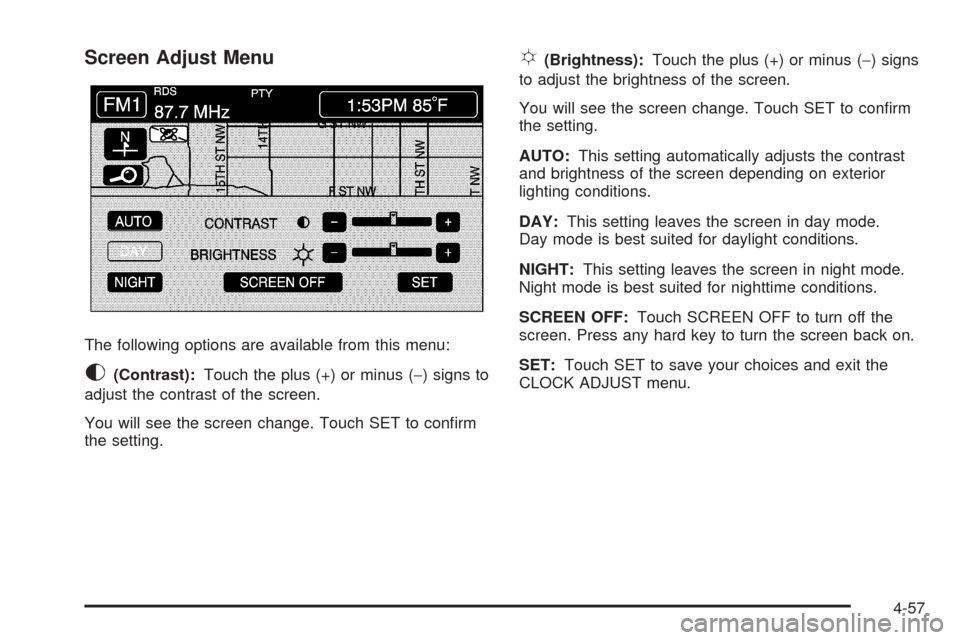
Screen Adjust Menu
The following options are available from this menu:
K(Contrast):Touch the plus (+) or minus (−) signs to
adjust the contrast of the screen.
You will see the screen change. Touch SET to conrm
the setting.
!(Brightness):Touch the plus (+) or minus (−) signs
to adjust the brightness of the screen.
You will see the screen change. Touch SET to conrm
the setting.
AUTO:This setting automatically adjusts the contrast
and brightness of the screen depending on exterior
lighting conditions.
DAY:This setting leaves the screen in day mode.
Day mode is best suited for daylight conditions.
NIGHT:This setting leaves the screen in night mode.
Night mode is best suited for nighttime conditions.
SCREEN OFF:Touch SCREEN OFF to turn off the
screen. Press any hard key to turn the screen back on.
SET:Touch SET to save your choices and exit the
CLOCK ADJUST menu.
4-57
Page 274 of 470

Setting Program Type (PTY) Preset
Stations
S
CATT(Category):Press the arrows to select a
category.
Once the desired category is displayed, press
TUNE/SEEK to select the category and take you to the
category’s rst station. If you want to go to another
station within that category, press TUNE/SEEK once.
Touch and hold one of the desired P1-P6 presets
to store the selected station as a preset. If PTY times
out and is no longer on the display, start again.
SCAN:Use this button to scan through the channels
within a category or scan through the preset stations.
To scan through the channels in a category, do the
following:
1. Select a category by using the category arrows.
2. Once the desired category is displayed, touch
SCAN. The radio will begin scanning within the
chosen category.
3. Touch SCAN again to stop scanning.
To scan through your preset stations, touch and hold
SCAN. Touch SCAN again to stop scanning.
XM™ Radio Messages
XL (Explicit Language Channels):XL on the radio
display, after the channel name, indicates content with
explicit language. These channels, or any others,
can be blocked at a customer’s request by calling
1-800-852-XMXM (9696).
XM Updating:The encryption code in the receiver is
being updated and no action is required.
No XM signal:The vehicle is in a location that is
blocking the XM™ signal. When the vehicle is moved
into an open area, the signal should return.
Loading XM:The audio system is processing audio
and text data received. No action is needed.
Channel Off Air:This channel is not currently in
service.
Channel Unavail:This previously assigned channel is
no longer assigned.
No Artist Info:No artist information is available.
The system is working properly.
No Title Info:No song title information is available.
The system is working properly.
4-66
Page 275 of 470
No CAT Info:No category information is available.
The system is working properly.
CAT Not Found:There are no channels available for
the selected category. The system is working properly.
No Information:No text or informational messages
are available. The system is working properly.
XM Theftlocked:The XM™ receiver may have
previously been in another vehicle. For security
purposes, XM™ receivers cannot be swapped between
vehicles. If this message is received after having
your vehicle serviced, check with your dealer/retailer.
XM Radio ID:If tuned to channel 0, this message
will alternate with the XM™ Radio eight digit radio
ID label. This label is needed to activate the service.
Unknown:If this message is received when tuned
to channel 0, there may be a receiver fault. Consult with
your dealer/retailer.
Check XM Receiver:If this message does not clear
within a short period of time, the receiver may have
a fault. Consult with your dealer/retailer.Six-Disc CD Changer
With the compact disc changer, you can play up to
six normal size discs continuously.
When the radio is turned on, the changer will begin
checking for discs. This will continue for up to one and
a half minutes, depending on the number of discs
loaded. You may hear noise, but this is normal.
The CD changer is initializing.
Press the CD hard key to access the six-disc CD
changer screen. You can also use the system’s DVD
player for single CD play once the map DVD is removed.
SeeCD/DVD Player on page 4-70for more information.
If no CD is loaded in the CD/DVD Player and you
press the CD hard key, the message “No CD Loaded”
will appear on the display.
4-67
Page 282 of 470
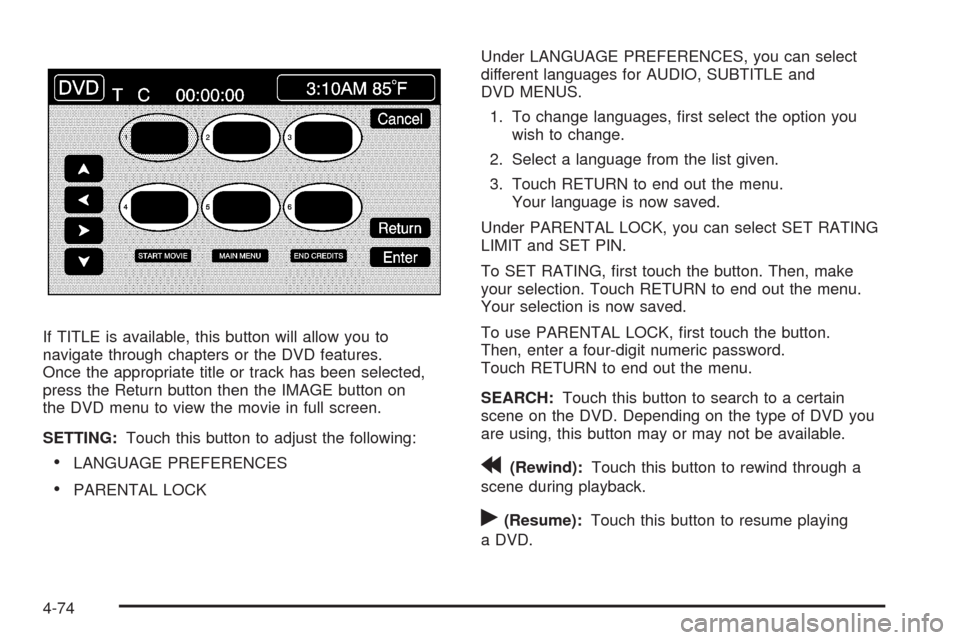
If TITLE is available, this button will allow you to
navigate through chapters or the DVD features.
Once the appropriate title or track has been selected,
press the Return button then the IMAGE button on
the DVD menu to view the movie in full screen.
SETTING:Touch this button to adjust the following:
LANGUAGE PREFERENCES
PARENTAL LOCKUnder LANGUAGE PREFERENCES, you can select
different languages for AUDIO, SUBTITLE and
DVD MENUS.
1. To change languages, rst select the option you
wish to change.
2. Select a language from the list given.
3. Touch RETURN to end out the menu.
Your language is now saved.
Under PARENTAL LOCK, you can select SET RATING
LIMIT and SET PIN.
To SET RATING, rst touch the button. Then, make
your selection. Touch RETURN to end out the menu.
Your selection is now saved.
To use PARENTAL LOCK, rst touch the button.
Then, enter a four-digit numeric password.
Touch RETURN to end out the menu.
SEARCH:Touch this button to search to a certain
scene on the DVD. Depending on the type of DVD you
are using, this button may or may not be available.
r(Rewind):Touch this button to rewind through a
scene during playback.
r(Resume):Touch this button to resume playing
a DVD.
4-74
Page 293 of 470
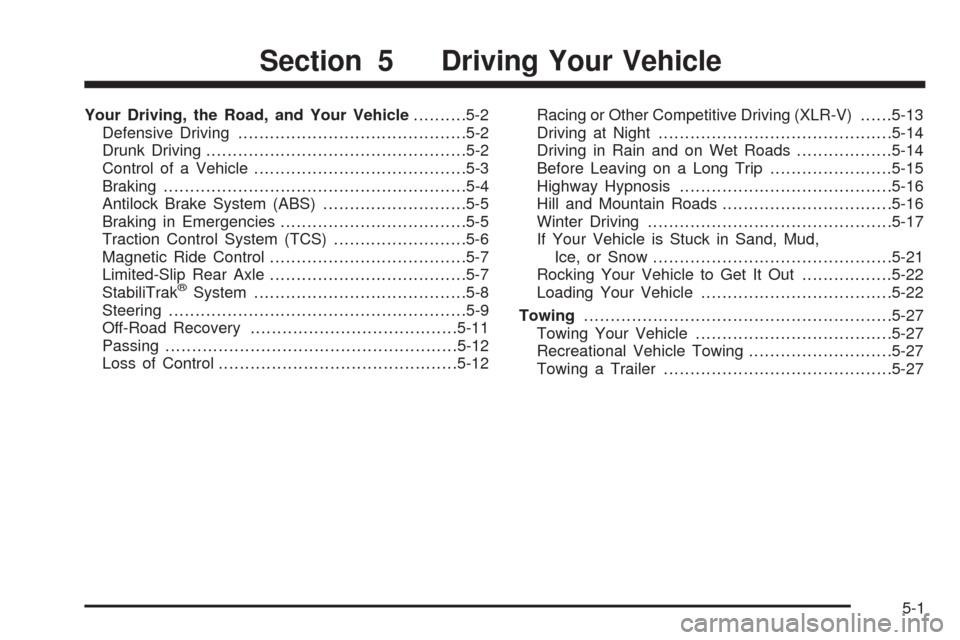
Your Driving, the Road, and Your Vehicle..........5-2
Defensive Driving...........................................5-2
Drunk Driving.................................................5-2
Control of a Vehicle........................................5-3
Braking.........................................................5-4
Antilock Brake System (ABS)...........................5-5
Braking in Emergencies...................................5-5
Traction Control System (TCS).........................5-6
Magnetic Ride Control.....................................5-7
Limited-Slip Rear Axle.....................................5-7
StabiliTrak
®System........................................5-8
Steering........................................................5-9
Off-Road Recovery.......................................5-11
Passing.......................................................5-12
Loss of Control.............................................5-12Racing or Other Competitive Driving (XLR-V)......5-13
Driving at Night............................................5-14
Driving in Rain and on Wet Roads..................5-14
Before Leaving on a Long Trip.......................5-15
Highway Hypnosis........................................5-16
Hill and Mountain Roads................................5-16
Winter Driving..............................................5-17
If Your Vehicle is Stuck in Sand, Mud,
Ice, or Snow.............................................5-21
Rocking Your Vehicle to Get It Out.................5-22
Loading Your Vehicle....................................5-22
Towing..........................................................5-27
Towing Your Vehicle.....................................5-27
Recreational Vehicle Towing...........................5-27
Towing a Trailer...........................................5-27
Section 5 Driving Your Vehicle
5-1