battery replacement CHEVROLET CAMARO 1967 1.G Chassis User Guide
[x] Cancel search | Manufacturer: CHEVROLET, Model Year: 1967, Model line: CAMARO, Model: CHEVROLET CAMARO 1967 1.GPages: 659, PDF Size: 114.24 MB
Page 281 of 659
ENGINE 6-16
5.
Adjust ignition timing and carburetor idle speed and
mixture.
VALVE STEM OIL SEAL AND/OR VALVE SPRING
Replacement
1.
Remove rocker arm cover as outlined.
2.
Remove spark plug, rocker arm and push rod on the
cylinder(s) to be serviced.
3.
Apply compressed air to the spark plug hole to hold
the valves in place.
NOTE: A tool to apply air to the cylinder is
available through local jobbers or may be manu-
factured. In manufacturing this Tool a AC-46N
Spark Plug or its equivalent is recommended.
This will make the Tool universal for all
Chevrolet engines. Chisel the spark plug as
shown, then drive the porcelain out of the plug
by tapping the center electrode against a hard
block. Using a 3/8" pipe tap, cut threads in the
remaining portion of the spark ^>lug and assem-
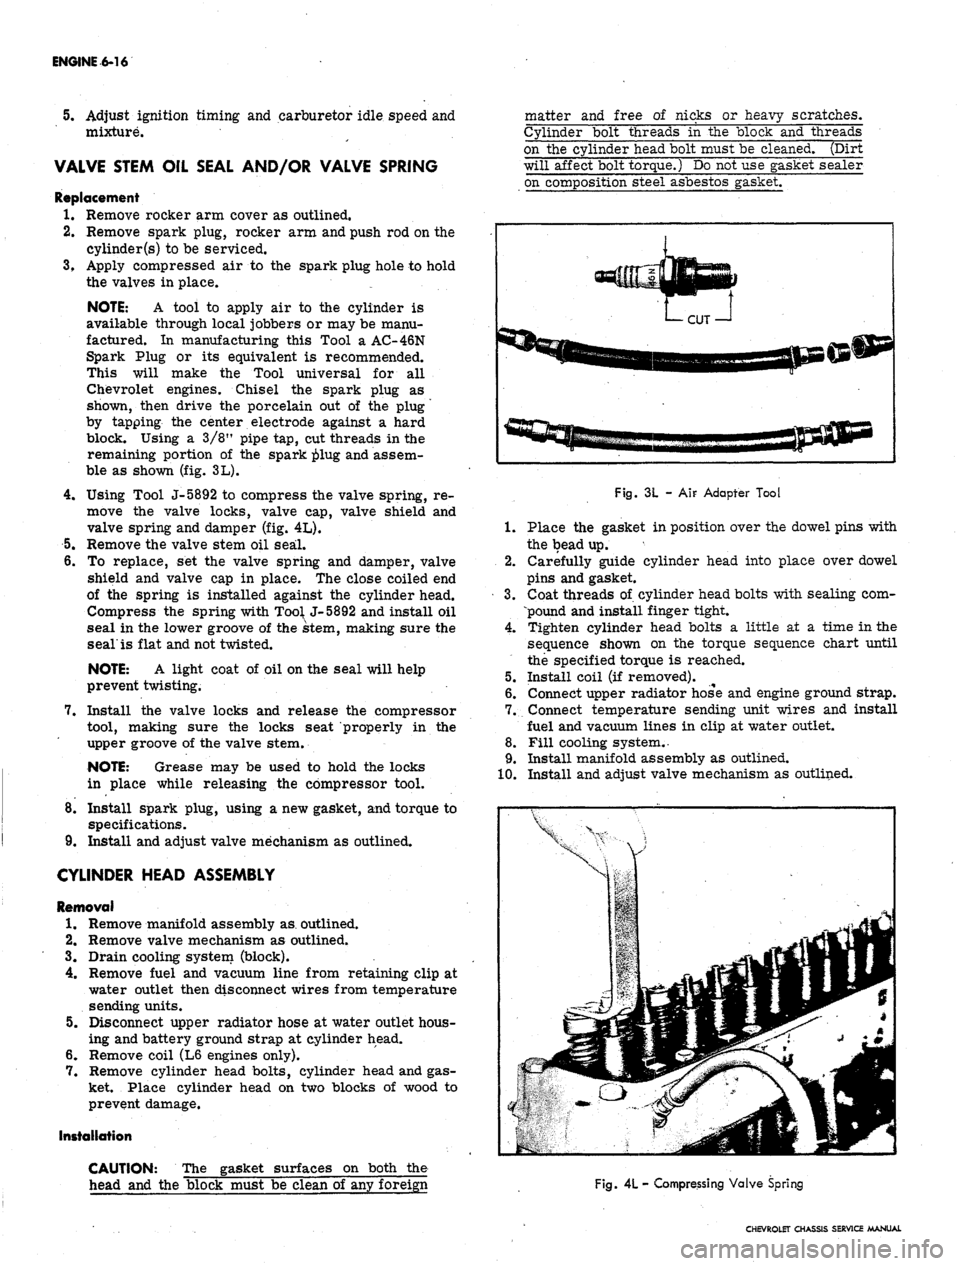
ble as shown (fig. 3L).
4.
Using Tool J-5892 to compress the valve spring, re-
move the valve locks, valve cap, valve shield and
valve spring and damper (fig. 4L).
5.
Remove the valve stem oil seal.
6. To replace, set the valve spring and damper, valve
shield and valve cap in place. The close coiled end
of the spring is installed against the cylinder head.
Compress the spring with
Too^
J-5892 and install oil
seal in the lower groove of the stem, making sure the
seal'is flat and not twisted.
NOTE: A light coat of oil on the seal will help
prevent twisting.
7.
Install the valve locks and release the compressor
tool, making sure the locks seat properly in the
upper groove of the valve stem.
NOTE: Grease may be used to hold the locks
in place while releasing the compressor tool.
8. Install spark plug, using a new gasket, and torque to
specifications.
9. Install and adjust valve mechanism as outlined.
CYLINDER HEAD ASSEMBLY
Removal
1.
Remove manifold assembly as. outlined.
2.
Remove valve mechanism as outlined.
3.
Drain cooling system (block).
4.
Remove fuel and vacuum line from retaining clip at
water outlet then disconnect wires from temperature
sending units.
5.
Disconnect upper radiator hose at water outlet hous-
ing and battery ground strap at cylinder head.
6. Remove coil (L6 engines only).
7.
Remove cylinder head bolts, cylinder head and gas-
ket. Place cylinder head on two blocks of wood to
prevent damage.
Installation
CAUTION: The gasket surfaces on both the
head and the block must be clean of any foreign
matter and free of nicks or heavy scratches.
Cylinder bolt threads in the block and threads
on the cylinder head bolt must be cleaned. (Dirt
will affect bolt torque.) Do not use gasket sealer
on composition steel asbestos gasket.
Fig. 3L -
AIF
Adapter Tool
1.
Place the gasket in position over the dowel pins with
the bead up.
2.
Carefully guide cylinder head into place over dowel
pins and gasket.
3.
Coat threads of cylinder head bolts with sealing com-
pound and install finger tight.
4.
Tighten cylinder head bolts a little at a time in the
sequence shown on the torque sequence chart until
the specified torque is reached.
5.
Install coil (if removed).
6. Connect upper radiator hose and engine ground strap.
7.
Connect temperature sending unit wires and install
fuel and vacuum lines in clip at water outlet.
8. Fill cooling system.
•
9. Install manifold assembly as outlined.
10.
Install and adjust valve mechanism as outlined.
Fig.
4L
- Compressing Valve Spring
CHEVROLET CHASSIS SERVICE MANUAL
Page 290 of 659
ENGINE 6-25
refer to Section 6 of the Chassis Overhaul Manual.
Because of the interchangeability and similarity of
many engines, engine sub-assemblies and engine parts,
regardless of which passenger vehicle they are used in,
typical illustrations and procedures are used except
where specific illustrations or procedures are necessary
to clarify the operation. Although illustrations showing
bench operations are used, most single operations, when
not part of a general overhaul, should be performed (if
practical) with the engine in the vehicle.
COMPONENT REPLACEMENT AND ADJUSTMENT
ENGINE ASSEMBLY
Removal
• .1. Drain cooling system and engine oil.
2.
Remove air cleaner and disconnect battery cables at
battery.
3.
Remove hood as outlined in Section 11.
4.
Remove radiator and shroud as outlined in Sec-
tion 13.
5. Remove fan blade and pulley as outlined in Sec-
tion 6K.
6. Disconnect wires at:
• Starter solenoid
• Delcotron
• Temperature switch
• Oil pressure switch
• Coil
7. Disconnect:
• Accelerator linkage at pedal lever.
• Exhaust pipes at manifold flanges.
• Vacuum line to power brake unit at manifold (if
so equipped),
• Power steering pump lines at pump end (if so
equipped).
• Fuel line (from tank) at fuel pump.
• Engine cooler lines (if so equipped).
• Oil pressure gauge line (if so equipped).
8. Raise vehicle and place on jack stands.
9. Remove propeller shaft.
NOTE:
If plug for propeller shaft opening
in transmission is not available, drain
transmission.
10.
Disconnect:
• Shift linkage at transmission.
• Speedometer cable at transmission.
• Transmission cooler lines (if so equipped).
11.
On synchromesh equipped vehicles, disconnect clutch
linkage at cross-shaft then remove cross-shaft en-
gine bracket.
12.
Remove rocker arm covers as outlined, then attach
engine lifting adapter at the proper cylinder head bolt
locations.
13.
Remove front mount bolts.
14.
Attach lifting device and raise engine to take weight
off front mounts, then remove rear mount bolts.
15.
Raise engine to take weight off rear mount, then re-
move crossmember.
NOTE:
On Chevrolets it will be necessary to
remove mount from transmission before cross-
member can be removed.
16.
Remove engine-transmission assembly from vehicle
as a unit.
17.
Remove transmission (and clutch):
Synchromesh Transmission
a. Remove clutch housing cover plate screws.
b.
Remove bolts attaching the clutch housing to en-
gine block then remove transmission and clutch
housing as a unit.
NOTE:
Support the transmission as the last
mounting bolt is removed, and as it is being
pulled away from the engine (to prevent damage
to clutch disc).
c. Remove starter and clutch housing rear cover
plate.
d. Loosen clutch mounting bolts a turn at a time (to
prevent distortion of clutch cover) until the spring
pressure is released. Remove all bolts, clutch
disc and pressure plate assembly.
Automatic
Transmission
a. Lower engine, secured by the hoist, and support
engine on blocks.
b.
Remove starter and converter housing underpan.
c. Remove flywheel-to-converter attaching bolts.
d. Support transmission on blocks.
e. Remove transmission-to-engine mounting bolts.
f. With the hoist attached, remove blocks from the
engine only and slowly guide the engine from the
transmission.
18.
Mount engine in stand.
Installation
1.
Attach lifting device to engine and remove engine
from engine stand.
2.
Install transmission (and clutch):
Synchromesh Transmission
a. Install the clutch on flywheel as outlined in Sec-
tion 7.
b.
Install clutch housing rear cover and starter.
c. Install transmission and clutch housing as out-
lined in Section 7.
d. Install clutch housing cover screws and tighten
securely.
Automatic
Transmissions
a. Position engine adjacent to the transmission and
align the converter with the flywheel.
b.
Bolt transmission to engine, then raise engine and
transmission assembly and install flywheel to
converter attaching bolts.
c. Install converter housing underpan and starter.
3.
Tilt and lower engine and transmission assembly into
the chassis as a unit, guiding engine to align front
mounts with frame supports.
4.
Install front mount bolts and torque to specifications.
5. Raise engine enough to install rear crossmember,
then install crossmember, install rear mount, lower
engine and torque rear mount to specifications.
CHEVROLET CHASSIS SERVICE MANUAL
Page 313 of 659
ENGINE FUEL 6M-5
3.
Disconnect choke rod or choke cable.
4.
Disconnect accelerator linkage.
5.
If equipped with Automatic transmission, discon-
nect TV linkage.
6. Remove carburetor attaching nuts and/or bolts and
remove carburetor.
Test Before Installation -
It is good shop practice to fill the carburetor bowl
before installing the carburetor. This reduces the strain
on the starting motor and battery and reduces the pos-
sibility of backfiring while attempting to start the engine.
A fuel pump clamped to the bench, a small supply of fuel
and the necessary fittings enable the carburetor to be
filled1 and the operation of the float and'intake needle and
seat to be checked. Operate the throttle several times
and check the discharge from the pump jets before in-
stalling the carburetor.
Installation
1.
Be certain throttle body and intake manifold sealing
surfaces are clean.
2.
Install new carburetor to manifold flange gasket (if
required).
3.
Install carburetor over manifold studs.
4.
Start vacuum and fuel lines at carburetor.
5.
Install attaching nuts and/or bolts and tighten
securely.
6. Tighten fuel and vacuum lines.
7.
Connect and adjust accelerator and TV linkage.
8. Connect choke tube or choke rod.
9. Adjust idle speed and mixture, then install air
cleaner. #
Fuel Filter Maintenance
1.
Disconnect fuel line connection at inlet fuel filter
nut.
2.
Remove inlet fuel filter nut from carburetor with a
1"
box wrench or socket.
3.
Remove filter element and spring (fig. 4c).
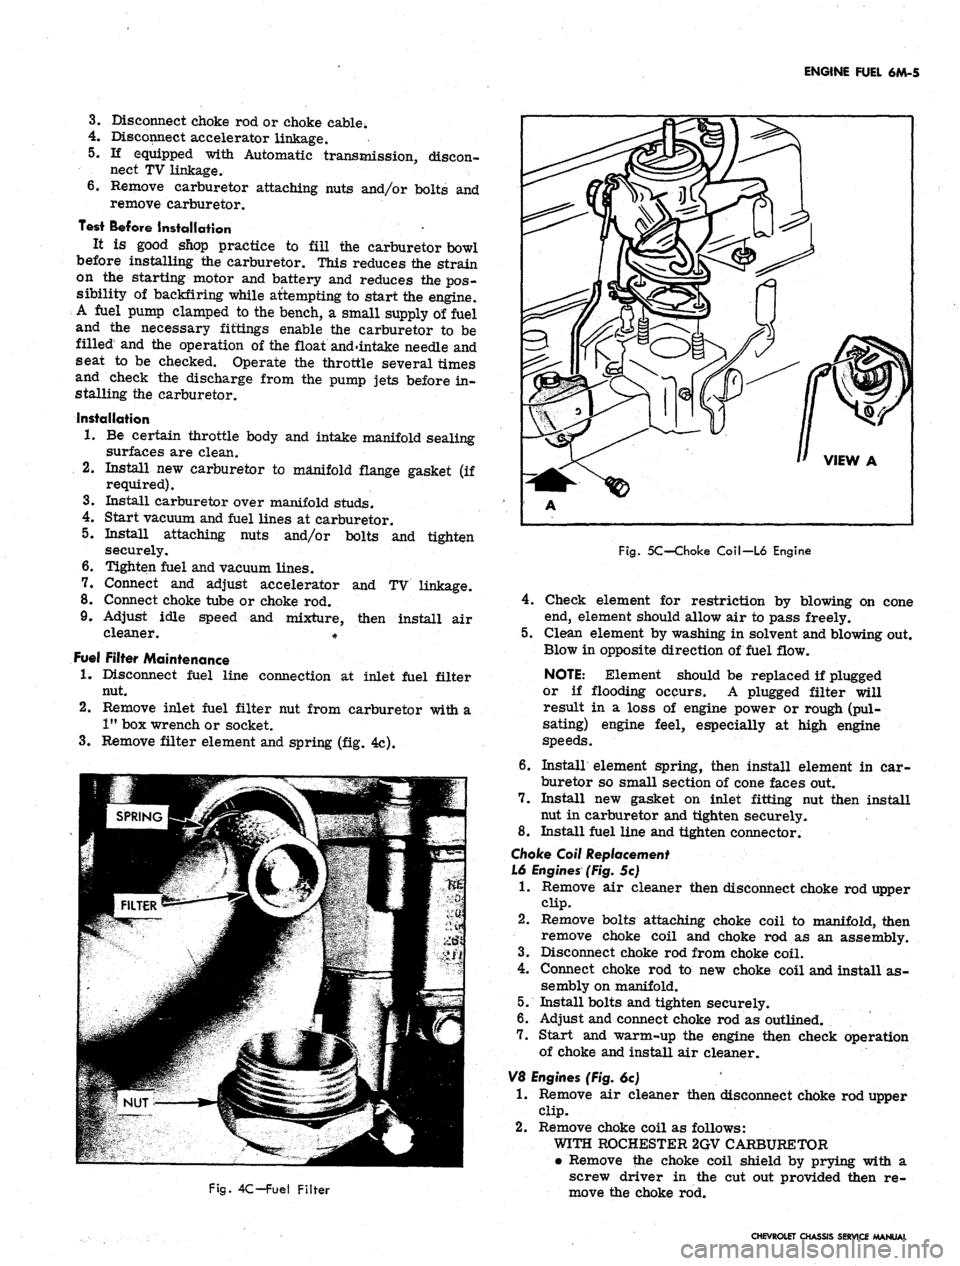
Fig. 5C-Choke Coil-L6 Engine
4.
Fig. 4C-Fuel Filter
Check element for restriction by blowing on cone
end, element should allow air to pass freely.
5.
Clean element by washing in solvent and blowing out.
Blow in opposite direction of fuel flow.
NOTE: Element should be replaced if plugged
or if flooding ocpurs. A plugged filter will
result in a loss of engine power or rough (pul-
sating) engine feel, especially at high engine
speeds.
6. Install element spring, then install element in car-
buretor so small section of cone faces out.
7.
Install new gasket on inlet fitting nut then install
nut in carburetor and tighten securely.
8. Install fuel line and tighten connector.
Choke Coil Replacement
L6 Engines (Fig. 5c)
1.
Remove air cleaner then disconnect choke rod upper
clip.
2.
Remove bolts attaching choke coil to manifold, then
remove choke coil and choke rod as an assembly.
3.
Disconnect choke rod from choke coil.
4.
Connect choke rod to new choke coil and install as-
sembly on manifold.
5.
Install bolts and tighten securely.
6. Adjust and connect choke rod as outlined.
7.
Start and warm-up the engine then check operation
of choke and install air cleaner.
V8 Engines (Fig. 6c)
1.
Remove air cleaner then disconnect choke rod upper
clip.
2.
Remove choke coil as follows:
WITH ROCHESTER 2GV CARBURETOR
• Remove the choke coil shield by prying with a
screw driver in the cut out provided then re-
move the choke rod.
CHEVROLET CHASSIS SERVICE MANUAL
Page 332 of 659
ENGINE-ELECTRICAL 6Y-7
CHARGING SYSTEM
INDEX
Page
General Description . 6Y-7
Maintenance and Adjustments 6Y-9
Static Checks . 6Y-10
System Condition Check and Voltage
•Regular Adjustment. 6Y-10
General Output 6Y-11
Generator Diode and Field Test 6Y-12
Indicator Lamp-Initial Field Excitation
Circuit Tests . 6Y-12
Page
Field Circuit Resistance Wire Tests 6Y-13
Field Relay Test and Adjustment 6Y-14
Other Harness Checks 6Y-14
Service Operations 6Y-14
Generator 6Y-14
Removal and Installation 6Y-14
Pulley Replacement. 6Y-14
Brush Replacement (6" Delcotron). 6Y-15
Double Contact Regulator . . . . . . 6Y-16
GENERAL DESCRIPTION
The charging system includes the battery, generator,
regulator, telltale light, and necessary wiring to connect
these components. The Delcotron is offered as standard
equipment, although there are various capacities avail-
able on all models.
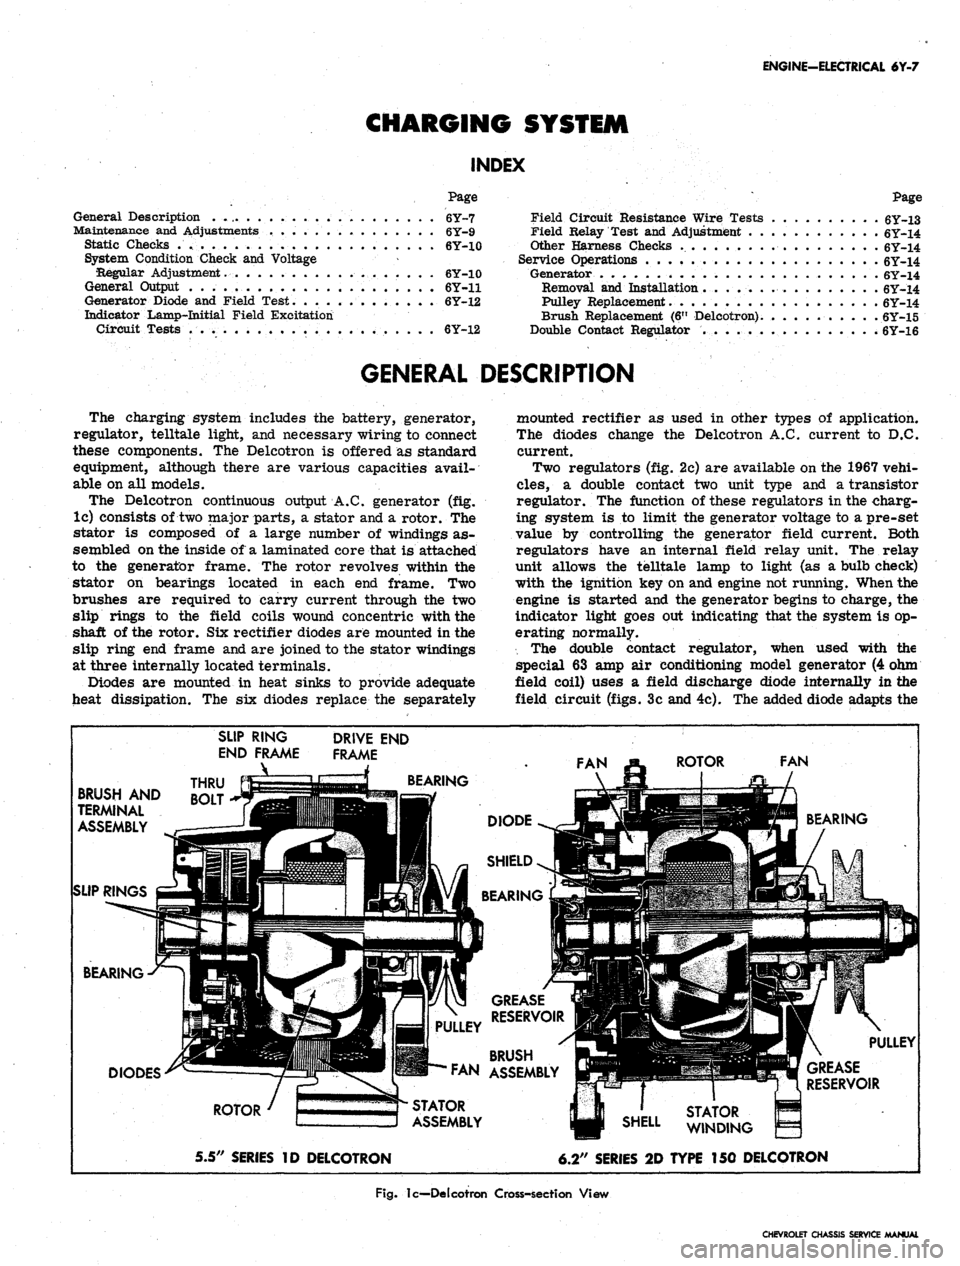
The Delcotron continuous output A.C. generator (fig.
lc) consists of two major parts, a stator and a rotor. The
stator is composed of a large number of windings as-
sembled on the inside of a laminated core that is attached
to the generator frame. The rotor revolves within the
stator on bearings located in each end frame. Two
brushes are required to carry current through the two
slip rings to the field coils wound concentric with the
shaft of the rotor. Six rectifier diodes are mounted in the
slip ring end frame and are joined to the stator windings
at three internally located terminals.
Diodes are mounted in heat sinks to provide adequate
heat dissipation. The six diodes replace the separately
mounted rectifier as used in other types of application.
The diodes change the Delcotron A.C. current to D.C.
current.
Two regulators (fig. 2c) are available on the 1967 vehi-
cles,
a double contact two unit type and a transistor
regulator. The function of these regulators in the charg-
ing system is to limit the generator voltage to a pre-set
value by controlling the generator field current. Both
regulators have an internal field relay unit. The relay
unit allows the telltale lamp to light (as a bulb check)
with the ignition key on and engine not running. When the
engine is started and the generator begins to charge, the
indicator light goes out indicating that the system is op-
erating normally.
The double contact regulator, when used with the
special 63 amp air conditioning model generator (4 ohm
field coil) uses a field discharge diode internally in the
field circuit (figs. 3c and 4c). The added diode adapts the
BRUSH AND
TERMINAL
ASSEMBLY
SLIP RINGS
SLIP RING
END FRAME
_\
THRU
BOLT
DRIVE END
FRAME
BEARING
BEARING
DIODES
ROTOR
5.5" SERIES ID DELCOTRON
STATOR
ASSEMBLY
GREASE
RESERVOIR
BRUSH
FAN ASSEMBLY
6.2" SERIES 2D TYPE 150 DELCOTRON
Fig.
lc—Delcotron Cross-section View
CHEVROLET CHASSIS SERVICE MANUAL
Page 339 of 659
ENGINE-ELECTRICAL 6Y-14
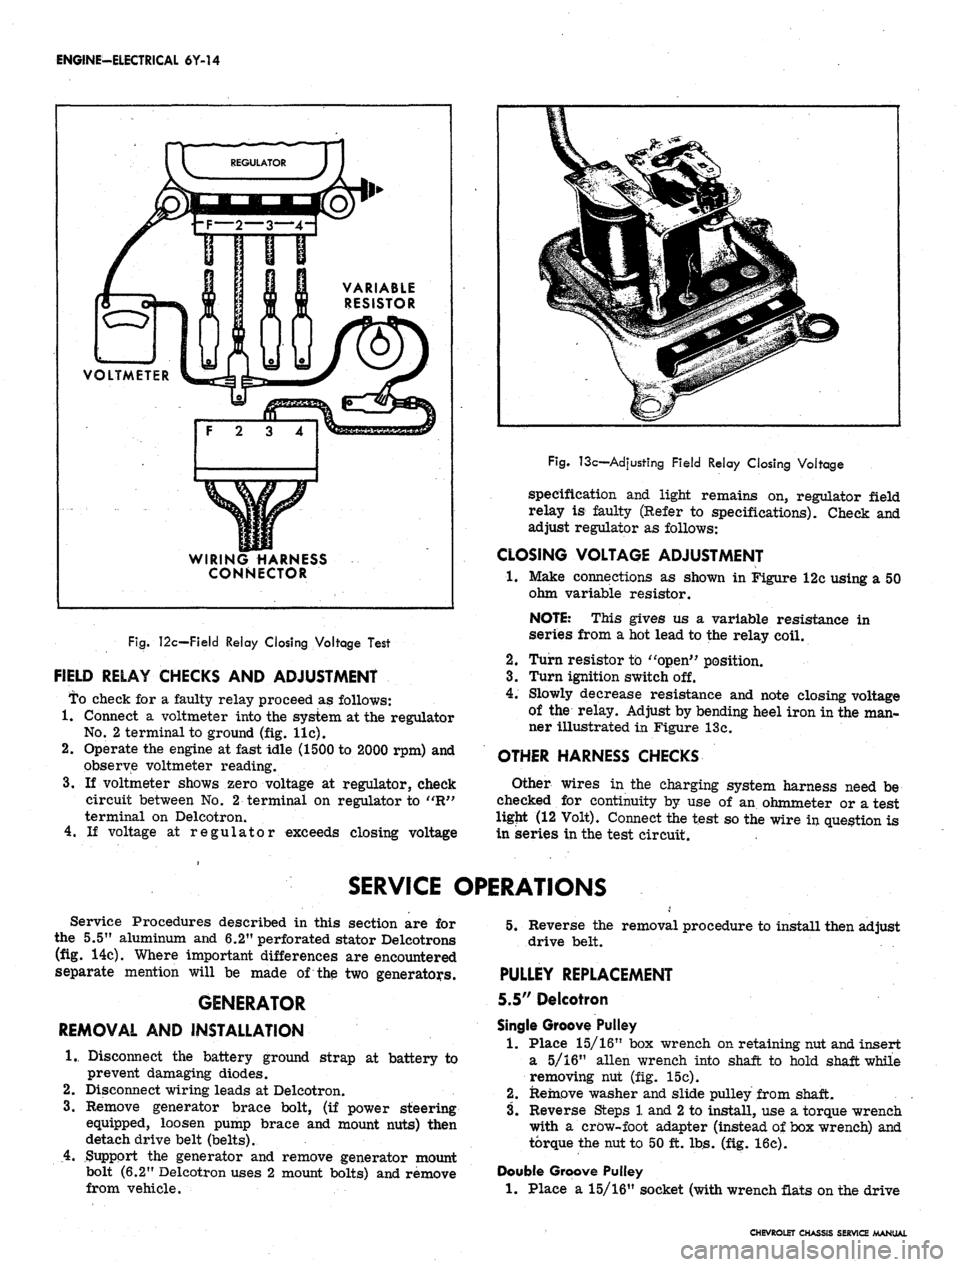
VOLTMETER
WIRING HARNESS
CONNECTOR
Fig.
12c—Field Relay Closing Voltage Test
FIELD RELAY CHECKS AND ADJUSTMENT
To check for a faulty relay proceed as follows:
1.
Connect a voltmeter into the system at the regulator
No.
2 terminal to ground (fig. lie).
2.
Operate the engine at fast idle (1500 to 2000 rpm) and
observe voltmeter reading.
3.
If voltmeter shows zero voltage at regulator, check
circuit between No. 2 terminal on regulator to "R"
terminal on Delcotron.
4.
If voltage at regulator exceeds closing voltage
Fig.
13c—Adjusting Field Relay Closing Voltage
specification and light remains on, regulator field
relay is faulty (Refer to specifications). Check and
adjust regulator as follows:
CLOSING VOLTAGE ADJUSTMENT
•1.
Make connections as shown in Figure 12c using a 50
ohm variable resistor.
NOTE: This gives us a variable resistance in
series from a hot lead to the relay coil.
2.
Turn resistor to "open" position.
3.
Turn ignition switch off.
4.
Slowly decrease resistance and note closing voltage
of the relay. Adjust by bending heel iron in the man-
ner illustrated in Figure 13c.
OTHER HARNESS CHECKS
Other wires in the charging system harness need be
checked for continuity by use of an ohmmeter or a test
ligjit (12 Volt). Connect the test so the wire in question is
in series in the test circuit.
SERVICE OPERATIONS
Service Procedures described in this section are for
the 5.5" aluminum and 6.2" perforated stator Delcotrons
(fig. 14c). Where important differences are encountered
separate mention will be made of the two generators.
GENERATOR
REMOVAL AND INSTALLATION
1.
Disconnect the battery ground strap at battery to
prevent damaging diodes.
2.
Disconnect wiring leads at Delcotron.
3.
Remove generator brace bolt, (if power steering
equipped, loosen pump brace and mount nuts) then
detach drive belt (belts).
4.
Support the generator and remove generator mount
bolt (6.2" Delcotron uses 2 mount bolts) and remove
from vehicle.
5.
Reverse the removal procedure to install then adjust
drive belt.
PULLEY REPLACEMENT
5.5" Delcotron
Single Groove Pulley
1.
Place 15/16" box wrench on retaining nut and insert
a 5/16" alien wrench into shaft to hold shaft while
removing nut (fig. 15c).
2.
Remove washer and slide pulley from shaft.
3.
Reverse Steps 1 and
2
to install, use a torque wrench
with a crow-foot adapter (instead of box wrench) and
torque the nut to 50 ft. lbs. (fig. 16c).
Double Groove Pulley
1.
Place a 15/16" socket (with wrench flats on the drive
CHEVROLET CHASSIS SERVICE MANUAL
Page 343 of 659
ENGINE-ELECTRICAL 6Y-18
IGNITION SYSTEMS
INDEX
Page
General Description . 6Y-18
Maintenance and Adjustments 6Y-19
Breaker Point System 6Y-19
Breakerless System . . 6Y-X9
Ignition Coil Check 6Y-19
Spark Plugs 6Y-19
Service Operations , 6Y-19
Distributor Contact Points . 6Y-19
Cleaning 6Y-19
Replacement 6Y-20
Setting Dwell Angle 6Y-21
Distributor Condenser 6Y-22
Performance Diagnosis. 6Y-22
Replacement . . 6Y-23
Distributor
Breaker Point Type 6Y-23
Removal. . 6Y-23
Disassembly • 6Y-23
Page
Cleaning and Inspection .....'.., 6Y-25
Assembly . 6Y-25
Installation 6Y-26
Breakerless i 6Y-27
Removal . 6Y-27
Disassembly and Assembly 6Y-27
Installation 6Y-27
Off-Engine Test. . 6Y-27
Coil Replacement 6Y-27
Pulse Amplifier. 6Y-28
Disassembly .6Y-4S8
Component Checks
!
6Y-28
Assembly 6Y-29
Ignition Switch Replacement 6Y-29
Spark Plugs 6Y-30
Cleaning and Regapping I ....... 6Y-30
Installation . 6Y-31
GENERAL DESCRIPTION
There are two ignition systems available on 1967
vehicles. The breaker point type which is continued as
the regular production system and the optional (Corvette
only) transistor controlled breakerless ignition system
(magnetic pulse type). The transistor ignition system
features a specially designed distributor, control unit
(ignition pulse amplifier), and a special coil. Two resist-
ance wires are also used in the circuit; one as a ballast
between the coil negative terminal and ground, while the
other resistance wire provides a voltage drop for the
engine run circuit and is by-passed at cranking. The
other units in the system (the ignition switch, spark
plugs,
and battery) are of standard design. The dis-
tributor and control unit (ignition pulse amplifier) are
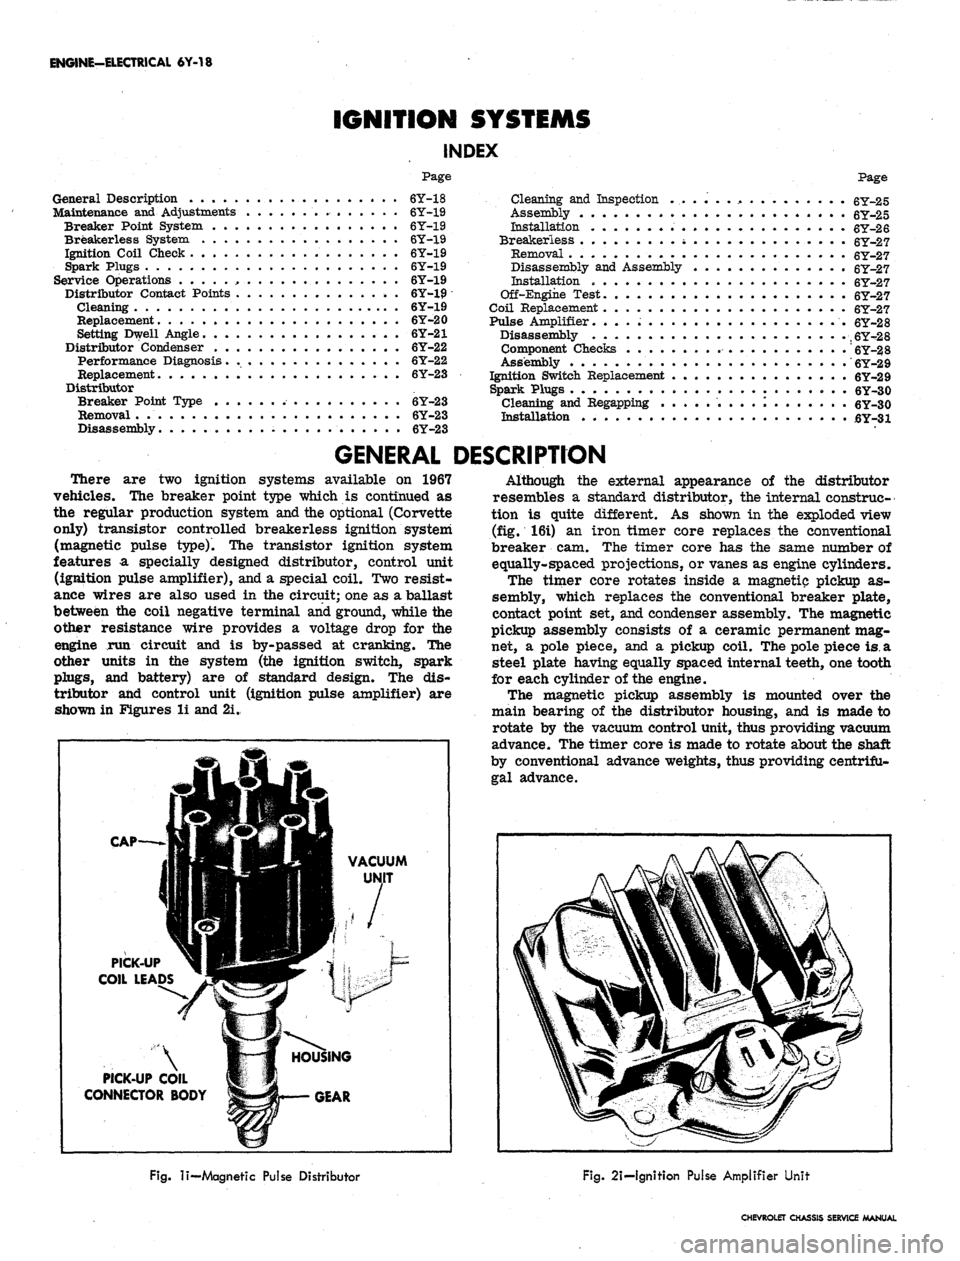
shown in Figures li and 2i.
CAP-
VACUUM
PICK-UP
COIL LEADS
PICK-UP COIL
CONNECTOR BODY
Although the external appearance of the distributor
resembles a standard distributor, the internal construc-
tion is quite different. As shown in the exploded view
(fig. 16i) an iron timer core replaces the conventional
breaker cam. The timer core has the same number of
equally-spaced projections, or vanes as engine cylinders.
The timer core rotates inside a magnetic pickup as-
sembly, which replaces the conventional breaker plate,
contact point set, and condenser assembly. The magnetic
pickup assembly consists of a ceramic permanent mag-
net, a pole piece, and a pickup coil. The pole piece
is.
a
steel plate having equally spaced internal teeth, one tooth
for each cylinder of the engine.
The magnetic pickup assembly is mounted over the
main bearing of the distributor housing, and is made to
rotate by the vacuum control unit, thus providing vacuum
advance. The timer core is made to rotate about the shaft
by conventional advance weights, thus providing centrifu-
gal advance.
Fig.
li—
Magnetic Pulse Distributor
Fig.
2i-lgnition Pulse Amplifier Unit
CHEVROLET CHASSIS SERVICE MANUAL
Page 354 of 659
ENGINE-ELECTRICAL 6Y-29
each capacitor (not illustrated). The capacitor is
shorted if both readings are zero.
6. Resistor Rl: The resistor is open if both readings
are infinite.
7. Resistor R2: Use an ohmmeter scale on which the
1800 ohm value is within, or nearly within, the
middle third of the scale. If both readings are infi-
nite, the resistor is open.
8. Resistor R3: Use an ohmmeter scale on which the
680 Ohm value is within, or nearly within, the middle
third of the scale. If both readings are infinite, the
resistor is open.
9. Resistor R4: Select an ohmmeter scale on which the
15000 ohm value is within, or nearly .within, the
middle third of the scale. If either reading is infi-
nite, the resistor is open. ~
10.
Resistor R5: Use the lowest range ohmmeter scale.
The resistor is open if either reading is infinite.
NOTE:
This resistor on some applications may
be located in the vehicle wiring harness, and not
on the panel board.
11.
Resistor R6: An ohmmeter scale on which the 150
ohm value is within or nearly within, the middle
third of the scale should be used. If both readings
are infinite, the resistor is open.
REASSEMBLY
During assembly, coat with silicone grease both sides
of the flat insulators used between the transistors and
heat sink, and also the heat sink on the side on which the
transistors are mounted. The silicone grease, which is
available commercially, conducts heat and thereby pro-
vides better cooling.'
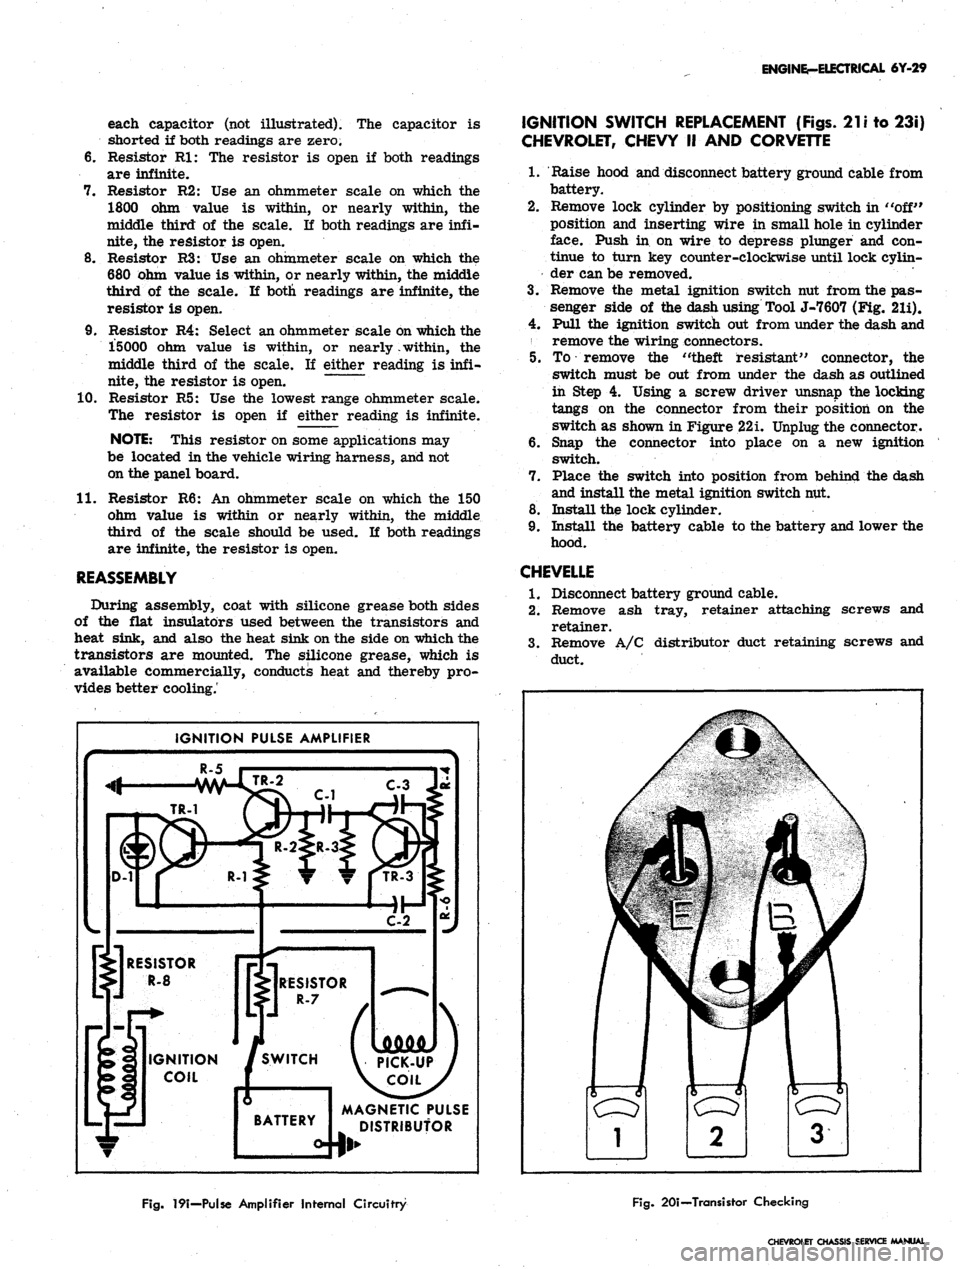
IGNITION PULSE AMPLIFIER
R-5
C-3 Ju
MAGNETIC PULSE
DISTRIBUTOR
IGNITION SWITCH REPLACEMENT (Figs.
21
i to 23i)
CHEVROLET, CHEVY II AND CORVETTE
1.
Raise hood and disconnect battery ground cable from
battery.
2.
Remove lock cylinder by positioning switch in "off"
position and inserting wire in small hole in cylinder
face. Push in on wire to depress plunger and con-
tinue to turn key counter-clockwise until lock cylin-
der can be removed.
3.
Remove the metal ignition switch nut from the pas-
senger side of the dash using Tool J-7607 (Fig. 21i).
4.
Pull the ignition switch out from under the dash and
remove the wiring connectors.
5. To remove the "theft resistant" connector, the
switch must be out from under the dash as outlined
in Step 4. Using a screw driver unsnap the locking
tangs on the connector from their position on the
switch as shown in Figure 22i. Unplug the connector.
6. Snap the connector into place on a new ignition
switch.
7. Place the switch into position from behind the dash
and install the metal ignition switch nut.
8. Install the lock cylinder.
9. Install the battery cable to the battery and lower the
hood.
CHEVELLE
1.
Disconnect battery ground cable.
2.
Remove ash tray, retainer attaching screws and
retainer.
3.
Remove A/C distributor duct retaining screws and
duct.
Fig.
19i—Pulse Amplifier Internal Circuitry
Fig.
20i—Transistor Checking
CHEVROLET Oi
Page 368 of 659
CLUTCH AND TRANSMISSIONS 7-9
6. Connect speedometer cable.
7. Install propeller shaft assembly.
8. Fill transmission with lubricant specified in Section
O.
CORVETTE TRANSMISSION REPLACEMENT
, 1. Disconnect battery ground cable.
2.
Pisassemble transmission shift control lever by un-
screwing ball from lever, lifting out
"T"
handle re-
turn spring and "T" handle, then remove the anti-
rattle bushings.
3.
Raise front and rear of vehicle.
4.
Insert a block of wood between the top of the dif-
ferential carrier housing and the underbody (to pre-
vent upward travel of the carrier when the carrier
front support is disconnected).
5. Disconnect the differential carrier front supportfrom
its frame bracket, by removing the nut on the under-
side of the biscuit mount.
6. Pry the carrier downward to relieve load while re-
moving the two center mounting bolts from the car-
rier front support. (To pry carrier downward insert
crowfoot end of a pry bar through the opening in the
carrier front support, hooking end of bar over top of
the center mounting bolt pad cast in the underside of
the carrier.)
7. Pivot carrier support downward for access to prop
shaft "U" joint.
8.
.
Disconnect prop shaft front and then rear "U" bolts.
9. Disconnect parking brake cable from ball socket at
idler lever located near center of underbody.
10.
Remove prop shaft by moving shaft forward.
11.
Remove heat deflectors from the right and left ex-
haust pipe.
12.
Remove left bank exhaust pipe.
13.
Remove right bank exhaust pipe and heat riser.
14.
Disassemble the transmission mount, as follows:
a. Remove the two bolts that attach rear mount
cushion to the rear mount bracket.
b.
Support engine under oil pan and raise engine to
remove load from rear mount cushion.
CAUTION: To avoid damage to oil pan, a suit-
able wide base, heavy wood platform should be
placed between the jack pad and the oil pan.
c. Remove the three transmission mount bracket-
to-
crossm ember bolts and remove mount bracket.
d. Remove the two bolts from mount pad to trans-
mission case and remove rubber mount cushion
and exhaust pipe "yoke".
15.
Disconnect transmission linkage by removing the
shift levers at the transmission side cover.
16.
Disconnect speedo cable at transmission extension.
17.
Remove transmission output shaft slip yoke.
NOTE:
The yoke is removed to avoid tearing
the heat reflecting pad on the underbody, when
the transmission is being removed.
18.
Remove two bolts to disconnect the transmission
gearshift control lever and bracket assembly from
its adapter plate on side of transmission. Lower
transmission assembly from the vehicle, letting the
gearshift lever slide down and through the dust boot
in the console.
19.
Remove transmission-to-clutch housing attaching
bolts.
20.
Slide transmission assembly rearward from clutch
and rotate transmission for access to the three flat
head machine screws in the control lever bracket
adapter plate. Remove adapter plate. Rotate trans-
mission back to the upright position.
21.
To allow room for transmission removal slowly
lower the rear of engine until the tachometer drive
cable at the distributor just clears the horizontal
ledge across the front of dash.
CAUTION: The tachometer cable can be easily
damaged by heavy contact with the dash. Slide
transmission rearward out of the clutch, then
tip front end of transmission downward and
lower the assembly from vehicle.
22.
Reinstall transmission assembly by performing above
steps in reverse order.
TRANSMISSION OVERDRIVE
INDEX
Page
General
Description 7-10
Maintenance
and Adjustments 7—10
Governor
Switch and Pinion .............. 7-10
Sun
Gear Solenoid Oil Seal and Control
Cable
Bracket 7-10
Case
Rear Oil Seal 7-10
Removal
7-10
Installation
. . . . . 7-10
Control
Shaft Lever and Oil Seal 7-10
Speedometer
Driven Gear 7-10
Electrical
Unit Checks 7-11
Overdrive
Relay . 7-11
Page
Air
Gap 7-11
Point
Opening 7-11
Closing
Voltage 7-11
Solenoid
. 7-11
Closing
Coil 7-11
Engaging
Spring . - 7-11
Ignition
Grounding Contact . 7-11
Governor
Switch 7-11
Kickdown
Switch 7-11
Diagnosis
- Overdrive 7-12
Mechanical
. 7-12
Electrical
7-13
CHEVROLET CHASSIS SERVICE MANUAL
Page 390 of 659
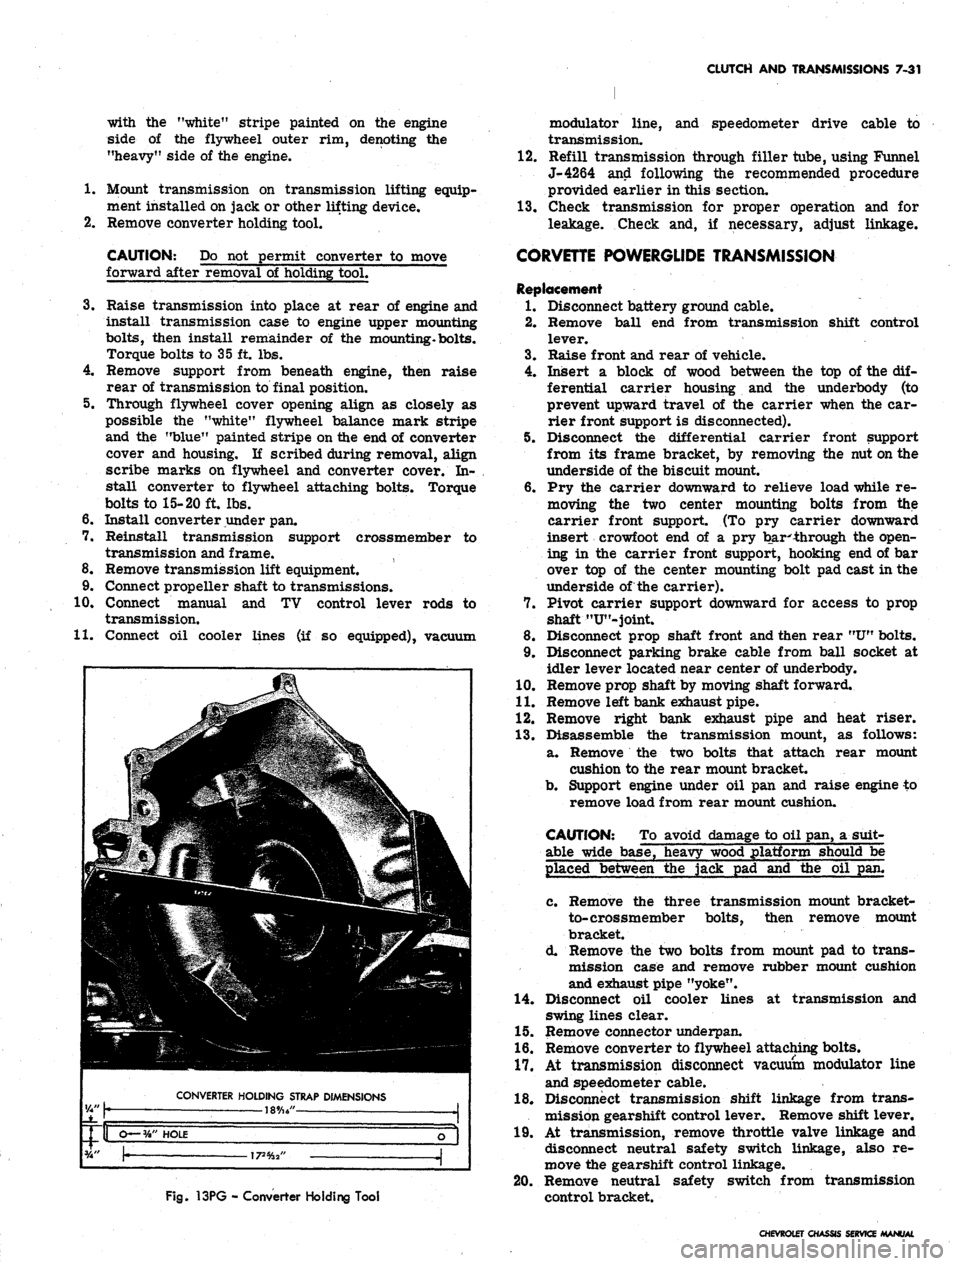
CLUTCH AND TRANSMISSIONS 7-31
with the "white" stripe painted on the engine
side of the flywheel outer rim, denoting the
"heavy" side of the engine.
1.
Mount transmission on transmission lifting equip-
ment installed on jack or other lifting device.
2.
Remove converter holding tool.
CAUTION: Do not permit converter to move
forward after removal of holding tool.
3.
Raise transmission into place at rear of engine and
install transmission case to engine upper mounting
bolts,
then install remainder of the mounting*bolts.
Torque bolts to 35 ft. lbs.
4.
Remove support from beneath engine, then raise
rear of transmission to final position.
5. Through flywheel cover opening align as closely as
possible the "white" flywheel balance mark stripe
and the "blue" painted stripe on the end of converter
cover and housing. If scribed during removal, align
scribe marks on flywheel and converter cover. In-
stall converter to flywheel attaching bolts. Torque
bolts to 15-20 ft. lbs.
6. Install converter under pan.
7. Reinstall transmission support crossmember to
transmission and frame.
8. Remove transmission lift equipment.
9. Connect propeller shaft to transmissions.
10.
Connect manual and TV control lever rods to
transmission.
11.
Connect oil cooler lines (if so equipped), vacuum
Fig.
13PG - Converter Holding Tool
modulato:* line, and speedometer drive cable to
transmission.
12.
Refill transmission through filler tube, using Funnel
J-4264 and following the recommended procedure
provided earlier in this section.
13.
Check transmission for proper operation and for
leakage. Check and, if necessary, adjust linkage.
CORVETTE POWERGLIDE TRANSMISSION
Replacement
1.
Disconnect battery ground cable.
2.
Remove ball end from transmission shift control
lever.
3.
Raise front and rear of vehicle.
4.
Insert a block of wood between the top of the dif-
ferential carrier housing and the underbody (to
prevent upward travel of the carrier when the car-
rier front support is disconnected).
5. Disconnect the differential carrier front support
from its frame bracket, by removing the nut on the
underside of the biscuit mount.
6. Pry the carrier downward to relieve load while re-
moving the two center mounting bolts from the
carrier front support. (To pry carrier downward
insert crowfoot end of a pry bar**hrough the open-
ing in the carrier front support, hooking end of bar
over top of the center mounting bolt pad cast in the
underside of the carrier).
7. Pivot carrier support downward for access to prop
shaft "U"-joint.
8. Disconnect prop shaft front and then rear
"U"
bolts.
9. Disconnect parking brake cable from ball socket at
idler lever located near center of underbody.
10.
Remove prop shaft by moving shaft forward.
11.
Remove left bank exhaust pipe.
12.
Remove right bank exhaust pipe and heat riser.
13.
Disassemble the transmission mount, as follows:
a. Remove the two bolts that attach rear mount
cushion to the rear mount bracket.
b.
Support engine under oil pan and raise engine to
remove load from rear mount cushion.
CAUTION: To avoid damage to oil pan, a suit-
able wide base, heavy wood platform should be
placed between the jack pad and the oil pan.
c. Remove the three transmission mount bracket-
to-crossmember bolts, then remove mount
bracket.
d. Remove the two bolts from mount pad to trans-
mission case and remove rubber mount cushion
and exhaust pipe "yoke".
14.
Disconnect oil cooler lines at transmission and
swing lines clear.
15.
Remove connector underpan.
16.
Remove converter to flywheel attaching bolts.
17.
At transmission disconnect vacuum modulator line
and speedometer cable.
18.
Disconnect transmission shift linkage from trans-
mission gearshift control lever. Remove shift lever.
19.
At transmission, remove throttle valve linkage and
disconnect neutral safety switch linkage, also re-
move the gearshift control linkage.
20.
Remove neutral safety switch from transmission
control bracket.
CHEVROLET CHASSIS SERVICE
Page 399 of 659
CLUTCH AND TRANSMISSIONS 7-40
pipes.
If
care
is
taken
in
removing control valve
body
the six (6)
check balls will stay
in
place above
the spacer plate.
CAUTION:
Do not
drop manual valve.
5. Remove
the
governor pipes
and
manual valve from
control valve body.
Installation
Installation
of the
control valve body
is the
reverse
of
the removal.
GOVERNOR
Removal
.
1.
Remove governor cover attaching screws, cover,
and
gasket.
2.
Discard gasket.
3.
Withdraw governor assembly from case.
Installation
Installation
of the
governor assembly
is the
reverse
of
the removal.
Use a new
gasket under
the
governor
cover.
MODULATOR AND MODULATOR VALVE
Removal
1.
Remove modulator assembly attaching screw
and
retainer.
2.
Remove modulator assembly from case. Discard
"O"
ring seal.
3.
Remove modulator valve from case.
Installation
Installation
of the
modulator assembly
and
modulator
valve
is the
reverse
of the
removal.
Use a new
"O" ring
seal
on the
modulator assembly.
PARKING LINKAGE
Removal
1.
Remove bottom
pan and oil
strainer.
2.
Unthread
jam nut
holding detent lever
to
manual
shaft.
3.
Remove manual shaft retaining
pin
from case.
4.
Remove manual shaft
and jam nut
from case.
NOTE:
DO NOT
remove manual shaft seal
un-
less replacement
is
required.
5. Remove parking actuator
rod and
detent lever
as-
sembly.
6. Remove parking pawl bracket attaching screws
and
bracket.
7. Remove parking pawl return spring.
NOTE:
The
following steps should
not be com-
pleted unless part replacement
is
required.
8. Remove parking pawl shaft retainer.
9.
Remove parking pawl shaft,
cup
plug, parking pawl
shaft, and parking pawl.
Installation
Installation
of the
parking linkage
is the
reverse
of the
removal.
Use new
seal
and cup
plug,
if
removed,
and
new bottom
pan
gasket.
REAR SEAL
Removal
1.
Remove propeller shaft.
2.
Pry
seal
out
with screw driver.
Installation
1.
Using Tool J-5154
or
J-21359 install
new
seal.
2.
Re-install propeller shaft.
OTHER SERVICE WITH TRANSMISSION IN VEHICLE
The following operations when done
as
single opera-
tions
and not as
part
of a
general overhaul should,
as a
practical matter,
be
performed with
the
transmission
in
the.
vehicle. Refer
to the
"Transmission Disassembly
and Reassembly" section
of the
Overhaul Manual
for
service procedures.
a. Oil
filler pipe
and
"O"
ring seal.
b.
Oil pan
and
gasket.
c. Down shift solenoid
or
connector.
d. Valve body spacer plate, gasket
and
check balls.
e. Front accumulator piston.
f.
Rear servo
and
rear accumulator assembly.
g.
Rear band apply checking with Tool J-21370.
Ji.
Front servo assembly.
i. Speedo driven gear.
j.
Case extension
or
gasket.
k.
Strainer
and
"O"
ring.
TRANSMISSION REPLACEMENT
Before raising
the car,
disconnect
the
battery
and re-
lease
the
parking brake.
1.
Remove propeller shaft.
8.
2.
Disconnect speedometer cable, electrical lead to case
9.
connector, vacuum line
at
modulator,
and oil
cooler
10.
pipes.
3.
Disconnect shift control linkage.
4.
Support transmission with suitable transmission jack.
11.
5. Disconnect rear mount from frame crossmember.
6. Remove
two
bolts
at
each
end of
frame crossmember
12.
and remove crossmember.
7. Remove
oil
cooler lines, vacuum modulator line,
speedo cable,
and
detent solenoid connector wire
at
transmission.
Remove converter under
pan.
Remove converter
to
flywheel bolts.
Loosen exhaust pipe
to
manifold bolts approximately
1/4
inch,
and
lower transmission until jack
is
barely
supporting
it.
Remove transmission
to
engine mounting bolts
and
remove
oil
filler tube
at
transmission.
Raise transmission
to its
normal position, support
engine with jack
and
slide transmission rearward
from engine
and
lower
it
away from vehicle.
CHEVROLET CHASSIS SERVICE MANUAL