fuse CHEVROLET CAMARO 1967 1.G Chassis Owner's Manual
[x] Cancel search | Manufacturer: CHEVROLET, Model Year: 1967, Model line: CAMARO, Model: CHEVROLET CAMARO 1967 1.GPages: 659, PDF Size: 114.24 MB
Page 528 of 659
ELECTRICAL-BODY AND CHASSIS 12-16
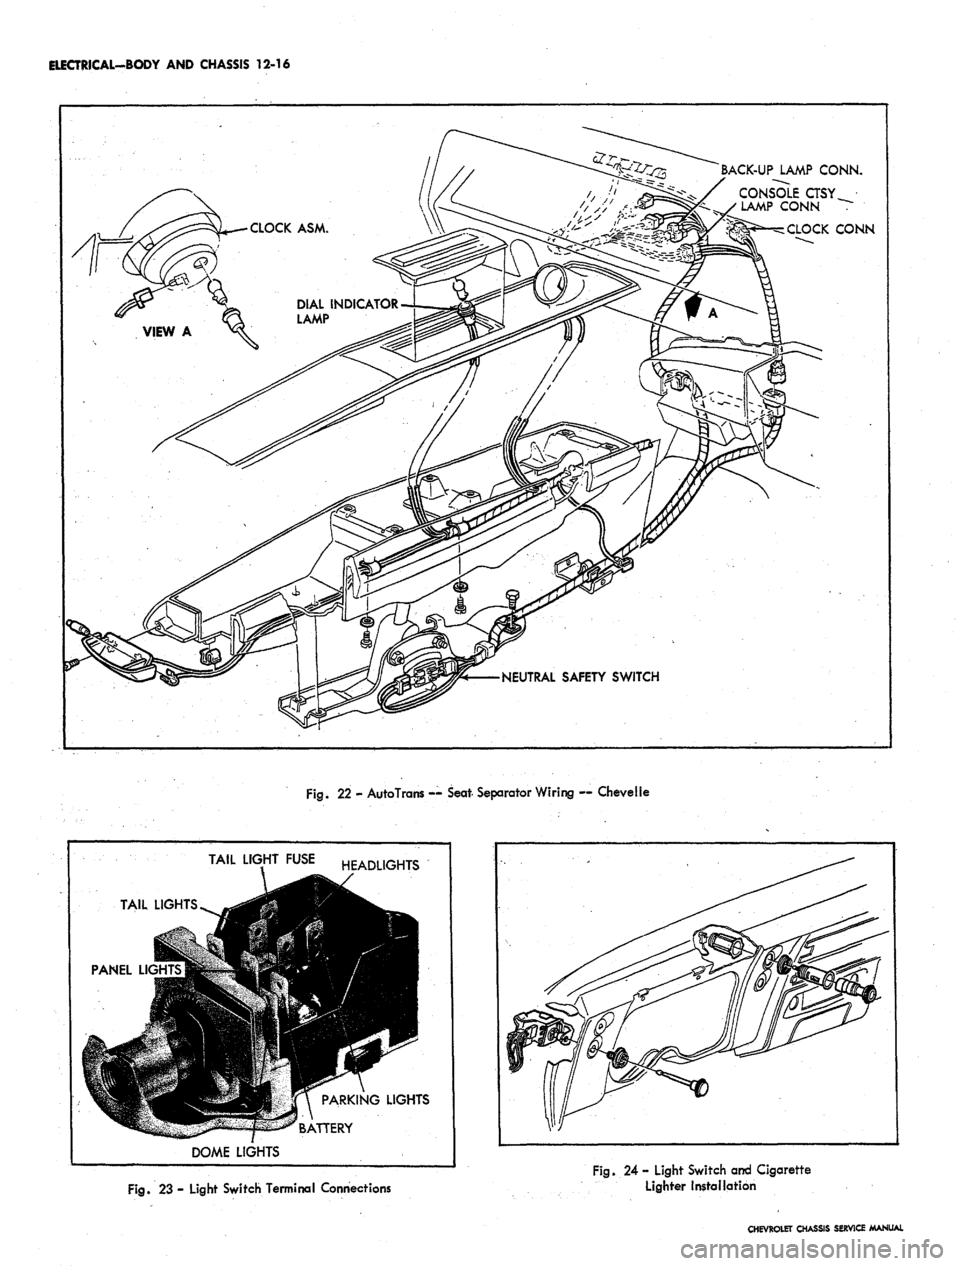
BACK-UP LAMP CONN.
CONSOLE CTSY
LAMP CONN
CLOCK CONN
NEUTRAL SAFETY SWITCH
Fig.
22 - AutoTrans — Seat- Separator Wiring — Chevelle
TAIL
PANEL Ll<
J
TAIL
LIGHTS ^^g
9
""TUtflll -^ ""
DOME
LIGHT
r
•I
m
/
LIGHTS
FUSE HEADLIGHTS
9R
jl PARKING LIGHTS
*^ R ATTPRY
Fig.
23 - Light Switch Terminal Connections
Fig.
24 - Light Switch and Cigarette
Lighter Installation
CHEVROLET CHASSIS SERVICE MANUAL
Page 545 of 659
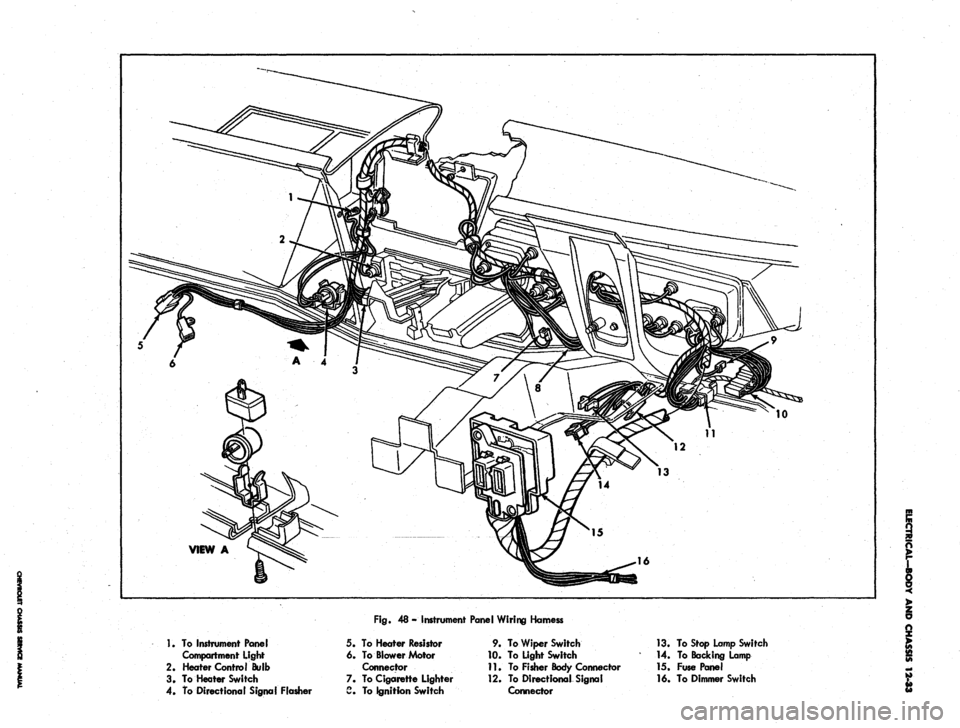
Fig.
48 - Instrument Panel Wiring Hamess
1.
To Instrument Panel
Compartment light
2.
Heater Control Bulb
3. To Heater Switch
4.
To Directional Signal Flasher
5.
6.
7.
a
To Heater Resistor
To Blower Motor
Connector
To Cigarette Lighter
To Ignition Switch
9.
10.
11.
12.
To Wiper Switch
To Light Switch
To Fisher Body Connector
To Directional Signal
Connector
13.
To Stop Lamp Switch
14.
To Backing Lamp
15.
Fuse Panel
16.
To Dimmer Switch
Page 547 of 659
ELECTRICAL-BODY AND CHASSIS 12-35
SERVICE OPERATIONS
INSTRUMENT CLUSTER
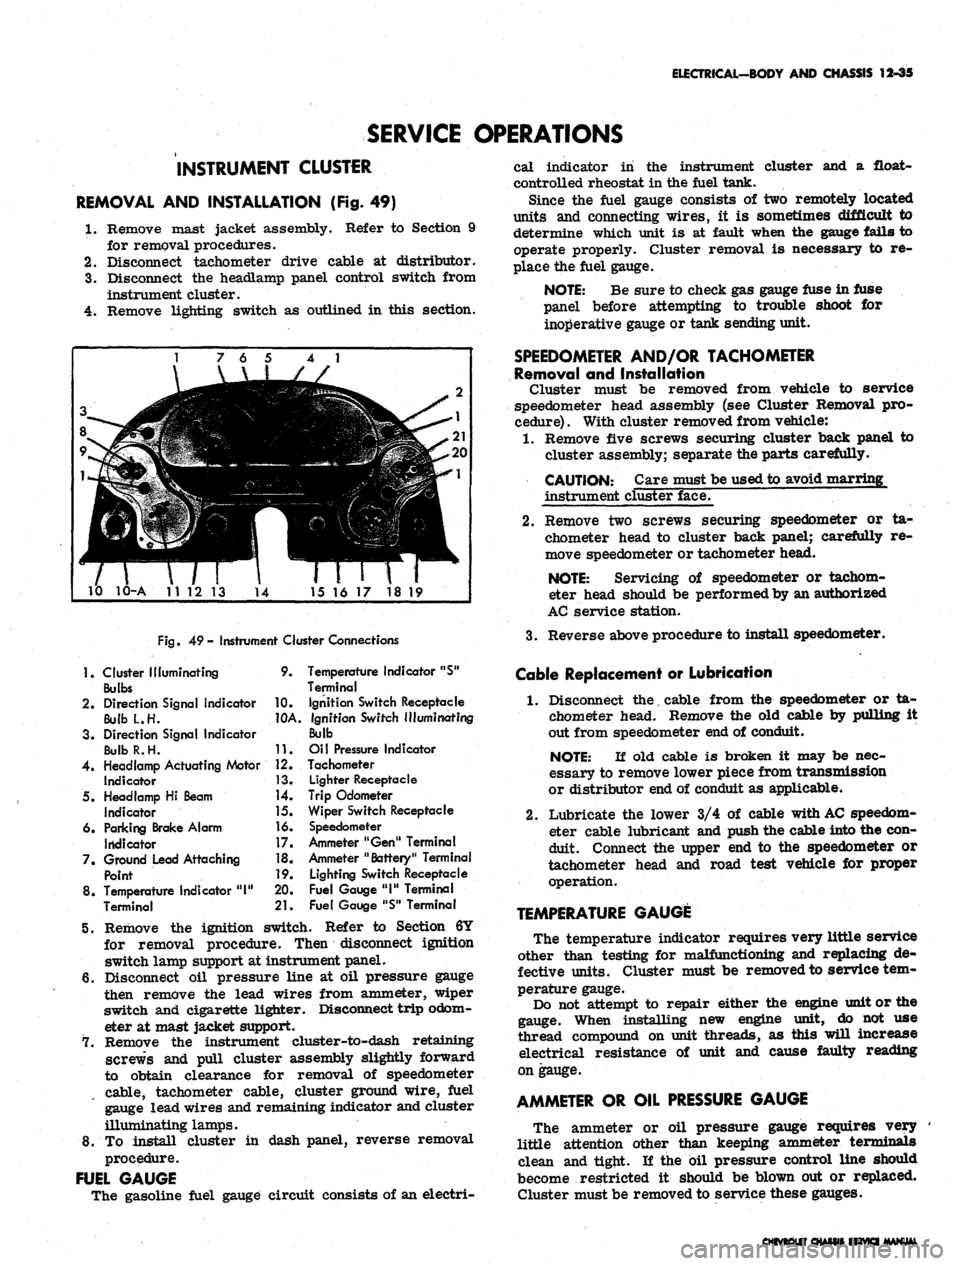
REMOVAL AND INSTALLATION (Fig. 49)
1.
Remove mast jacket assembly. Refer to Section 9
for removal procedures.
2.
Disconnect tachometer drive cable at distributor.
3.
Disconnect the headlamp panel control switch from
instrument cluster.
4.
Remove lighting switch as outlined in this section.
10 10-A 1112 13
14
15 16 17 18 19
Fig.
49- Instrument Cluster Connections
1.
Cluster Illuminating
Bulbs
2.
Direction Signal Indicator
Bulb L.H.
3. Direction Signal Indicator
BulbR.H.
4.
Headlamp Actuating Motor
Indicator
5. Headlamp Hi Beam
Indicator
6. Parking Brake Alarm
Indicator
7. Ground Lead Attaching
Point
8. Temperature Indicator
"1"
Terminal
9.
10.
10A.
11.
12.
13.
14.
]5.
16.
17.
18.
19.
20.
21.
Temperature Indicator "S"
Terminal
Ignition Switch Receptacle
ignition Switch Illuminating
Bulb
Oil Pressure Indicator
Tachometer
Lighter Receptacle
Trip Odometer
Wiper Switch Receptacle
Speedometer
Ammeter "Gen" Terminal
Ammeter "Battery" Terminal
Lighting Switch Receptacle
Fuel Gauge
"1"
Terminal
Fuel Gauge "S" Terminal
5. Remove the ignition switch. Refer to Section 6Y
for removal procedure. Then disconnect ignition
switch lamp support at instrument panel.
6. Disconnect oil pressure line at oil pressure gauge
then remove the lead wires from ammeter, wiper
switch and cigarette lighter. Disconnect trip odom-
eter at mast jacket support.
7. Remove the instrument cluster-to-dash retaining
screws and pull cluster assembly slightly forward
to obtain clearance for removal of speedometer
cable, tachometer cable, cluster ground wire, fuel
gauge lead wires and remaining indicator and cluster
illuminating lamps.
8. To install cluster in dash panel, reverse removal
procedure.
FUEL GAUGE
The gasoline fuel gauge circuit consists of an electri-
cal indicator in the instrument cluster and a float-
controlled rheostat in the fuel tank.
Since the fuel gauge consists of two remotely located
units and connecting wires, it is sometimes difficult to
determine which unit is at fault when the gauge fails to
operate properly. Cluster removal is necessary to re-
place the fuel gauge.
NOTE:
Be sure to check gas gauge fuse in fuse
panel before attempting to trouble shoot for
inoperative gauge or tank sending unit.
SPEEDOMETER AND/OR TACHOMETER
Removal and Installation
Cluster must be removed from vehicle to service
speedometer head assembly (see Cluster Removal pro-
cedure)
.
With cluster removed from vehicle:
1.
Remove five screws securing cluster back panel to
cluster assembly; separate the parts carefully.
CAUTION: Care must be used to avoid marring
instrument cluster face.
2.
Remove two screws securing speedometer or ta-
chometer head to cluster back panel; carefully re-
move speedometer or tachometer head.
NOTE:
Servicing of speedometer or tachom-
eter head should be performed by an authorized
AC service station.
3.
Reverse above procedure to install speedometer.
Cable Replacement or Lubrication
1.
Disconnect the. cable from the speedometer or ta-
chometer head. Remove the old cable by pulling it
out from speedometer end of conduit.
NOTE:
If old cable is broken it may be nec-
essary to remove lower piece from transmission
or distributor end of conduit as applicable.
2.
Lubricate the lower 3/4 of cable with
AC
speedom-
eter cable lubricant and push the cable into the con-
duit. Connect the upper end to the speedometer or
tachometer head and road test vehicle for proper
operation.
TEMPERATURE GAUGE
The temperature indicator requires very little service
other than testing for malfunctioning and replacing de-
fective units. Cluster must be removed to service tem-
perature gauge.
Do not attempt to repair either the engine unit or the
gauge. When installing new engine unit, do not use
thread compound on unit threads, as this will increase
electrical resistance of unit and cause faulty reading
on gauge.
AMMETER OR OIL PRESSURE GAUGE
The ammeter or oil pressure gauge requires very
little attention other than keeping ammeter terminals
clean and tight. If the oil pressure control line should
become restricted it should be blown out or replaced.
Cluster must be removed to service these gauges.
HftVKI MANUAL
Page 551 of 659

17-
VIEW A
Fig.
53 - Instrument Panel Wiring Harness
1.
To Glove Box Light
2.
To Heater Control
3. Heater Control Lamp
4. To Cigarette Lighter
5. To Ignition Switch
6. To Instrument Cluster
7. To Wiper Switch
8. To Light Switch
9.
To Directional Signal Switch
10.
To Stop Lamp Switch
11.
To Backing Lamp Switch
12.
Fuse Panel
13.
To Dimmer Switch
14.
To Fisher Body Connector
15.
To Directional Signal Flasher
16.
To Heater Resistor
17.
Directional Signal Flasher
Page 552 of 659
ELECTRICAL-BODY AND CHASSIS 12-40
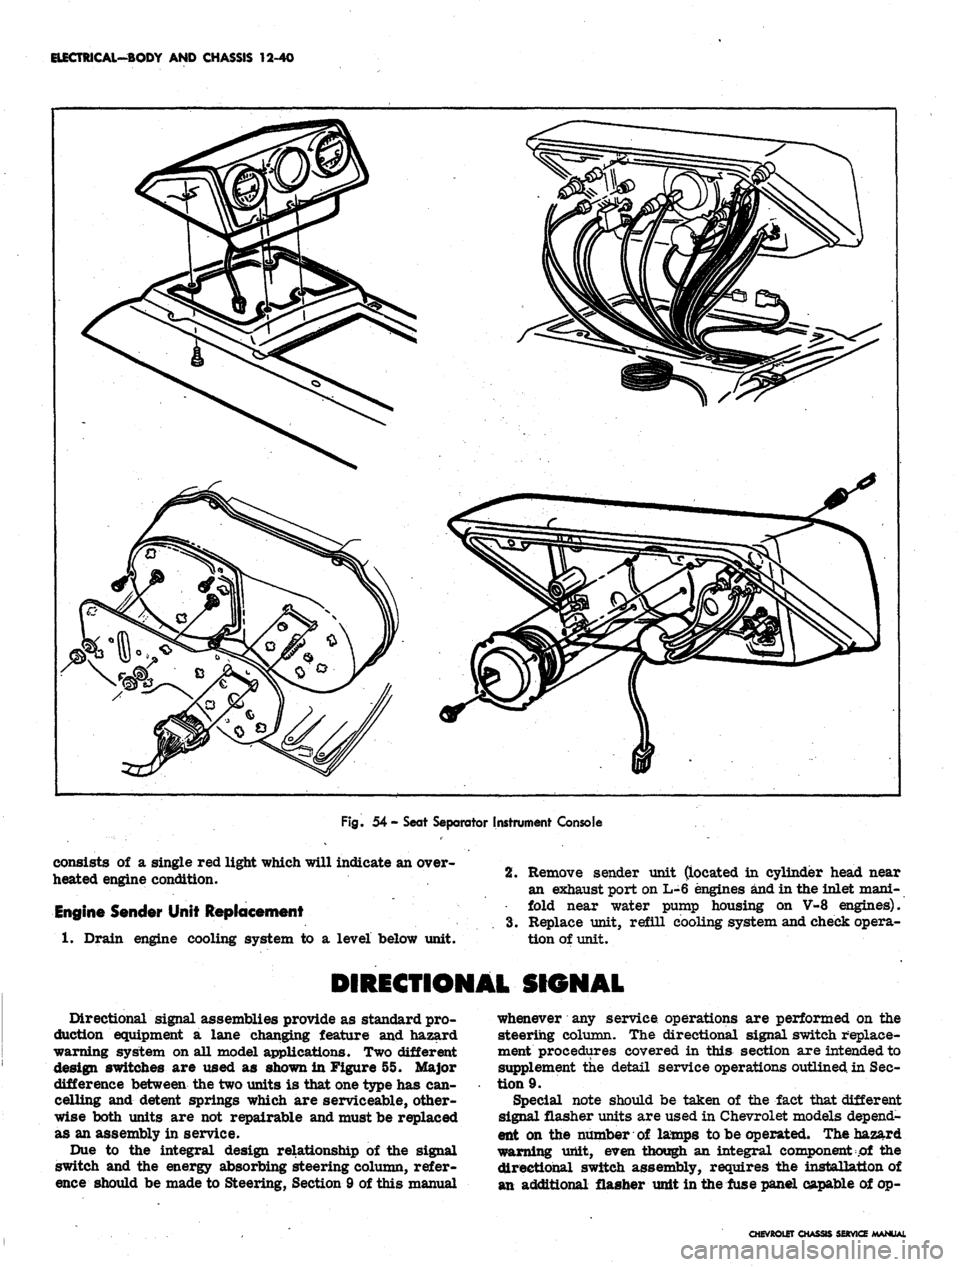
Fig.
54 - Seat Separator Instrument Console
consists of a single red light which will indicate an over-
heated engine condition.
Engine Sender Unit Replacement
1.
Drain engine cooling system to a level below unit.
2.
Remove sender unit (located in cylinder head near
an exhaust port on L-6 engines and in the inlet mani-
fold near water pump housing on V-8 engines).
3.
Replace unit, refill cooling system and check opera-
tion of unit.
DIRECTIONAL SIGNAL
Directional signal assemblies provide as standard pro-
duction equipment a lane changing feature and hazard
warning system on all model applications. Two different
design switches are used as shown in Figure 55. Major
difference between the two units is that one type has can-
celling and detent springs which are serviceable, other-
wise both units are not repairable and must be replaced
as an assembly in service.
Due to the integral design relationship of the signal
switch and the energy absorbing steering column, refer-
ence should be made to Steering, Section 9 of this manual
whenever any service operations are performed on the
steering column. The directional signal switch replace-
ment procedures covered in this section are intended to
supplement the detail service operations outlined in Sec-
tion 9.
Special note should be taken of the fact that different
signal flasher units are used in Chevrolet models depend-
ent on the number of lamps to be operated. The hazard
warning unit, even though an integral component of the
directional switch assembly, requires the installation of
an additional flasher unit in the fuse panel capable of op-
CHEVROtET CHASSIS SERVICE MANUAL
Page 574 of 659
ELECTRICAL-BODY
AND
CHASSIS
12-62
BULKHEAD-
CONNECTOR
HEATER
RESISTOR
PANEL ASM.
12 BRN
20
Y
12 BRN
»-67 MOD ONLY
*45 MOD ONLY
14 PPL
DIRSIG.
FLASHER
20 BRN
'20 LBL
20
P
16 BRN
>20
LG
• 20 PPL
•
14 LBL
• 20
T
.20 OR
-20 DG
20
Y
20
LG
—
20DBL/W.
20
DG
—16 BRN
20 DG
10
OR
TAPE BACK
'10 OR
10 OR/B
18
P
20 BRN
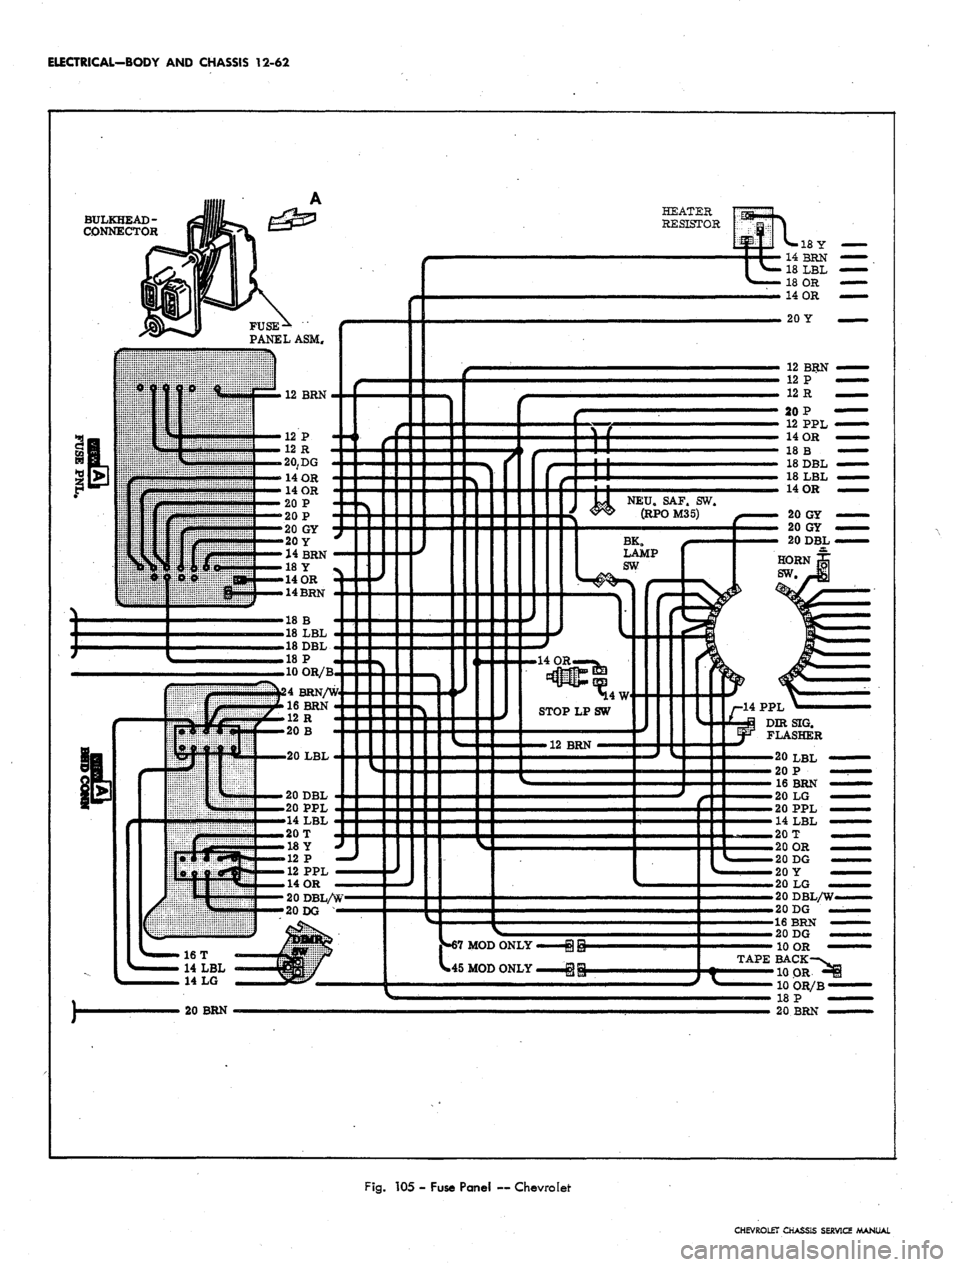
Fig.
105 -
Fuse Panel
—
Chevrolet
CHEVROLET CHASSIS SERVICE MANUAL
Page 579 of 659
ELECTRICAL-BODY AND CHASSIS 12-67
NEU. SAF. SW.
COLUMN SHIFT
RPOM-35
BHD.
CONN.
__ 20 P
1 20 LG<
BACK UP LP. SW.
COLUMN SHIFT
.12 BRN
8
12.P —
is fi-
le LBL.
.18 DBL
. 12 PPL —
.
20
DG —
>16T —
-24 BRN/W-
• 16 BRN —
•20 DBL —
. 20
DBL —
.12R
•20 LBL
, 20 LBL
.20 B
20 LG
•20 PPL
-16 LG
• -12 PPL/W
•
-12 PPL
NEU. SAF. SW.
FLOOR SHIFT
RPOM35
.20 LG—-f
—
20 DG—^
.
18 DG —
'18 LG~
BACKUP LP. SW>
FLOOR SHIFT /—18 OR—
/-20Y —
. 12 PPL/W
12 R—
12 P_
20 DG—
14 BRN—
,12 BRN—
.24 BRN/W
,14OR—.
20 GY —
14 W
.12 R
.14OR —
14OR —
20T-_
20 DBL—
20 P _
20 LG-—.
,18 BRN—.
L.20P
14 LBL
20 DBL—
•14 PPL—
12 BRN—
>
18 LBL—
18 B ——
.18 DBL—
20 LBL—
20 LG.
»20Y-
•
20DG<
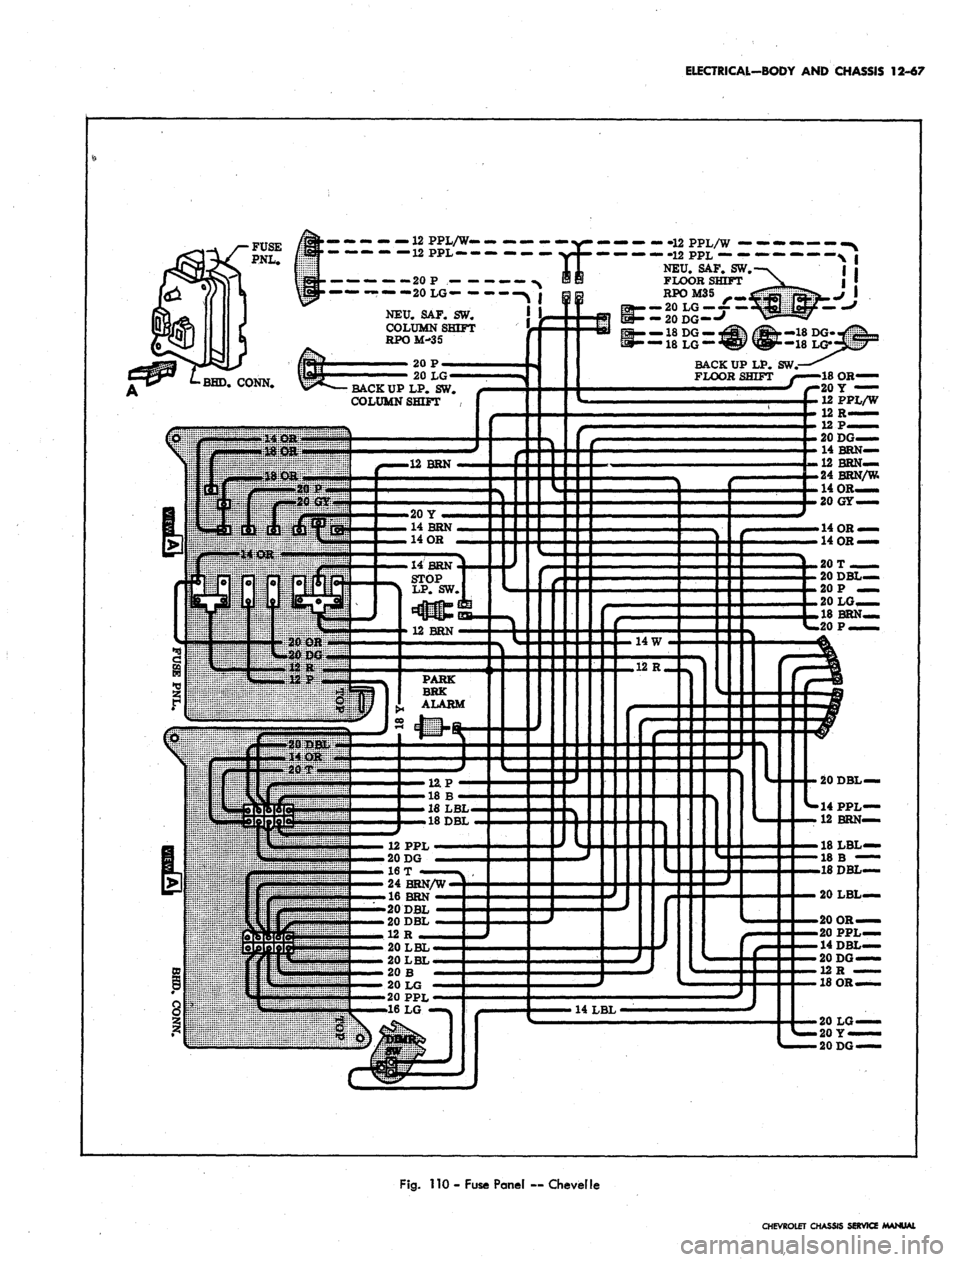
Fig.
110 - Fuse Panel — Chevelle
CHEVROLET CHASSIS SERVICE MANUAL
Page 583 of 659
ELECTRICAL-BODY
AND
CHASSIS
12-71
HTRBIiO
20LG
20OR
14OR
14W-
FUSE
PNL
ASM
20LG
—
20P
—
12PPL —
12PPL
—
NEUSAF
(RPO M-35)
11700-800
18DBL
12PPL
—
16BRN
—
12BRN—•
24BRN/W—
NEUSAFSW
(RPO
M-35)
ALLEXC.
11700-800
§§
7T
RPO
M-35
20LBL
20DBL
20PPL
14LBL
20PPL
14LBL
20LG
12R
20DG—
C,
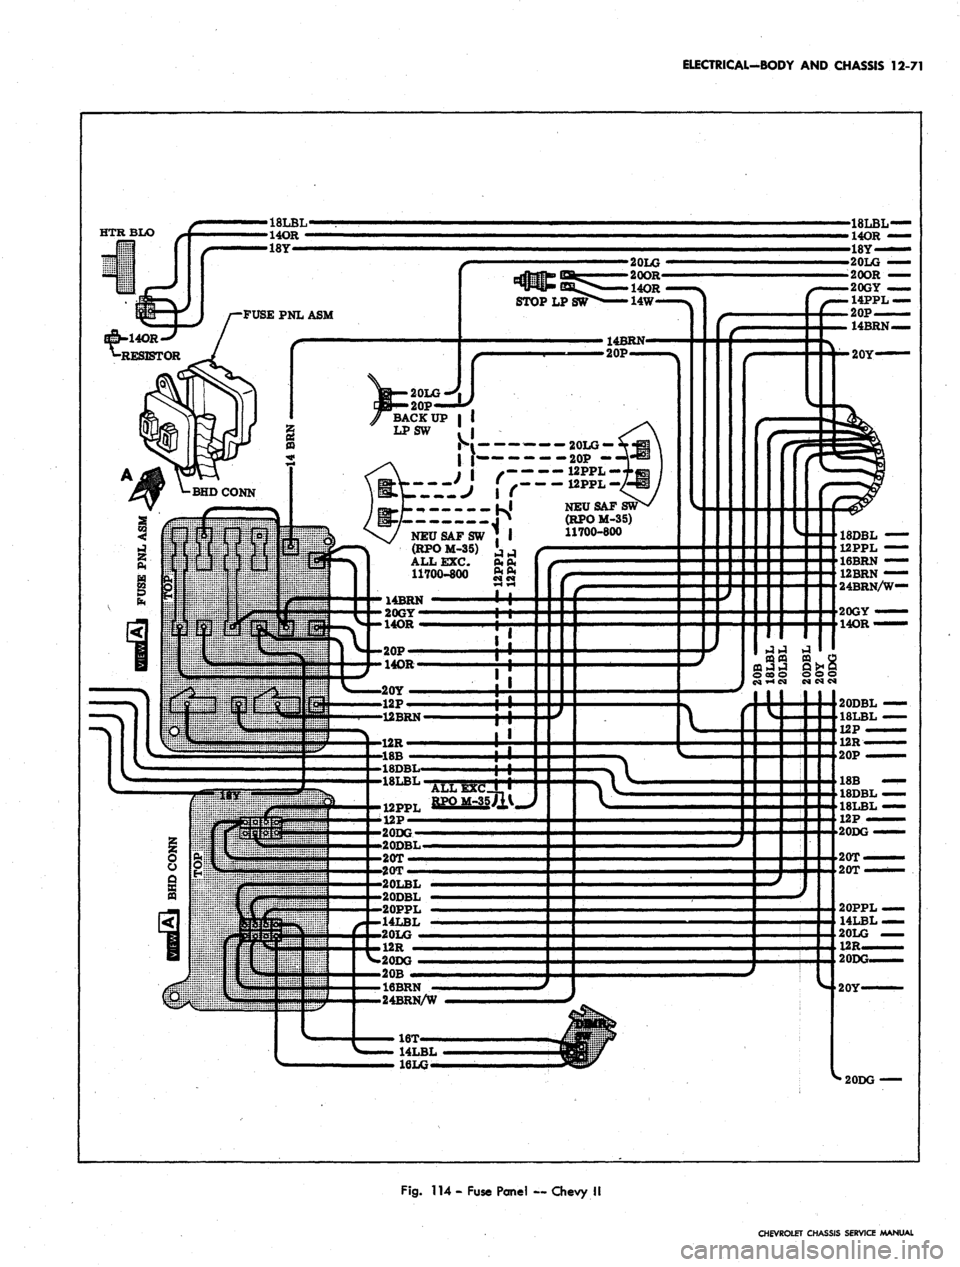
Fig.
114 -
Fuse Panel
—
Chevy
II
CHEVROLET CHASSIS SERVICE MANUAL
Page 587 of 659
ELECTRICAL-BODY AND CHASSIS 12-75
12 BRN
12 BRN
HEATER RESISTOR
14 LBL—
14 OR
14 Y
—12PPL—*\
/
^.LG
R. H. COURT LP.
-12 BRN —
cmcurr
BREAKER!
.R.H. DOOR
JAMB SW.
20OR-
18 LBL'
20 Y
14PPL%
•-20
W
X
/-20DG'
20 P
—
18 CfY/DBL/B
— 20 B
•^-14
OR
——
-—14 LBL —
L,
H.
DOOR JAMB SW.-
20 P
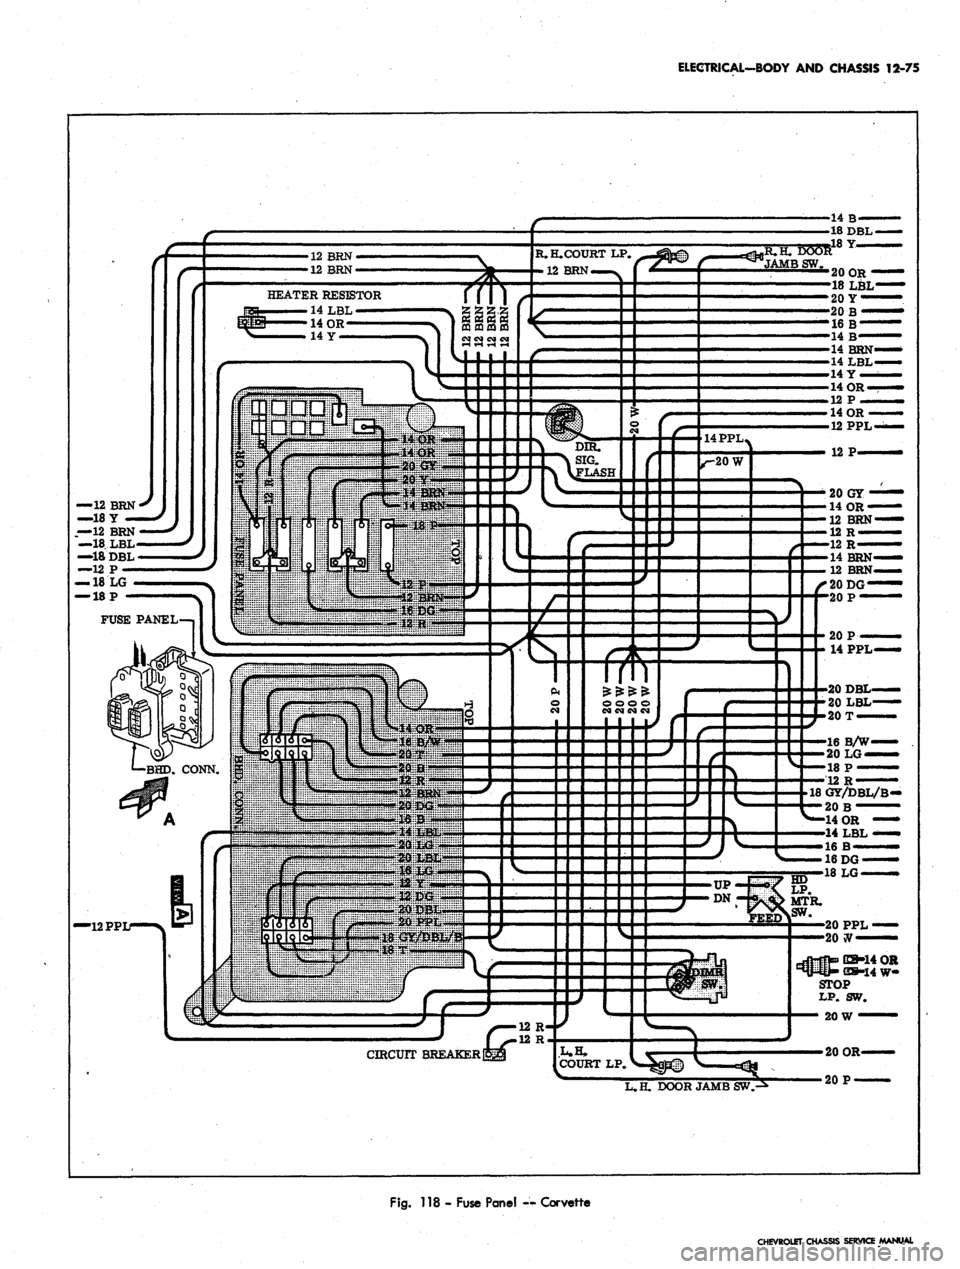
Fig.
118 - Fuse Panel — Corvette
CHEVROLET CHASSIS SERVICE MANUAl
Page 591 of 659
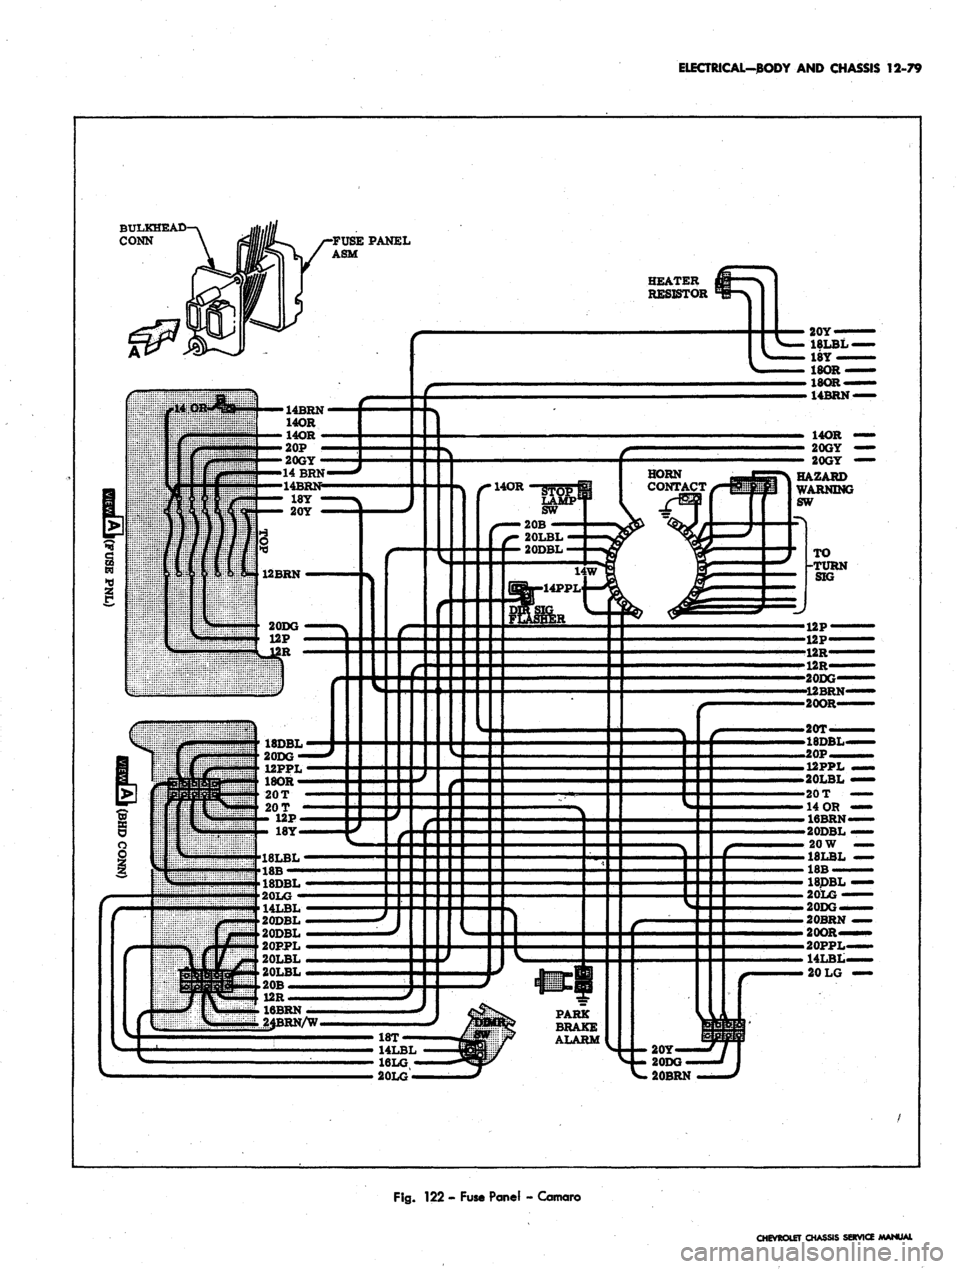
ELECTRICAL-BODY AND CHASSIS 12-79
14LBL
20DBL
20DBL
20PPL
20LBL
20LBL
20B —
12R
—
Fig.
122 - Fuse Panel - Camaro
CHEVROLET at
SERVICE MANUAL