ECU CHEVROLET CAMARO 1967 1.G Chassis Owner's Guide
[x] Cancel search | Manufacturer: CHEVROLET, Model Year: 1967, Model line: CAMARO, Model: CHEVROLET CAMARO 1967 1.GPages: 659, PDF Size: 114.24 MB
Page 239 of 659
BRAKES 5-6
Fig.
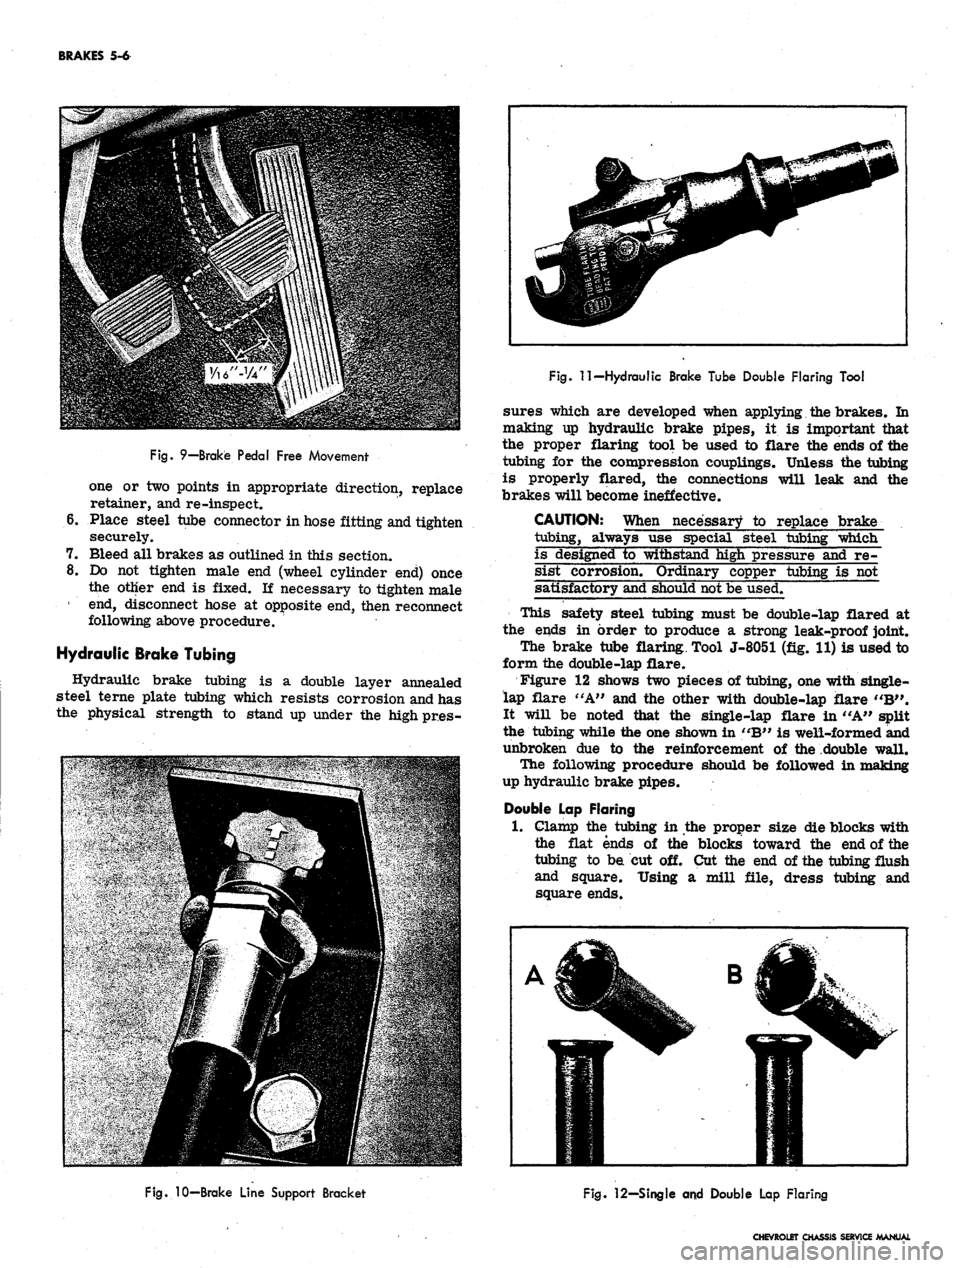
9—Brake Pedal Free Movement
one or two points in appropriate direction, replace
retainer, and re-inspect.
6. Place steel tube connector in hose fitting and tighten
securely.
7. Bleed all brakes as outlined in this section.
8. Do not tighten male end (wheel cylinder end) once
the other end is fixed. If necessary to tighten male
1 end, disconnect hose at opposite end, then reconnect
following above procedure.
Hydraulic Brake Tubing
Hydraulic brake tubing is a double layer annealed
steel terne plate tubing which resists corrosion and has
the physical strength to stand up under the high pr.es-
Fig.
11—Hydraulic Brake Tube Double Flaring Tool
sures which are developed when applying the brakes. In
making up hydraulic brake pipes, it is important that
the proper flaring tool be used to flare the ends of the
tubing for the compression couplings. Unless the tubing
is properly flared, the connections will leak and the
brakes will become ineffective.
CAUTION: When necessary to replace brake
tubing, always use special steel tubing which
is designed to withstand high pressure and re-
sist corrosion. Ordinary copper tubing is not
satisfactory and should not be used.
This safety steel tubing must be double-lap flared at
the ends in order to produce a strong leak-proof joint.
The brake tube flaring. Tool J-8051 (fig. 11) is used to
form the double-lap flare.
Figure 12 shows two pieces of tubing, one with single-
lap flare "A" and the other with double-lap flare "B".
It will be noted that the single-lap flare in "A" split
the tubing while the one shown in "B" is well-formed and
unbroken due to the reinforcement of the double wall.
The following procedure should be followed in making
up hydraulic brake pipes.
Double Lap Flaring
1.
Clamp the tubing in the proper size die blocks with
the flat ends of the blocks toward the end of the
tubing to be cut off. Cut the end of the tubing flush
and square. Using a mill file, dress tubing and
square ends.
Fig.
10-Brake Line Support Bracket
Fig.
12—Single and Double Lap Flaring
CHEVROLET CHASSIS SERVICE MANUAL
Page 240 of 659
BRAKES 5-7
LATCH PLATE
DIE BLOCK
TUBE
UPSET FLARE PUNCH
RAM GUIDE
STOP PLATE
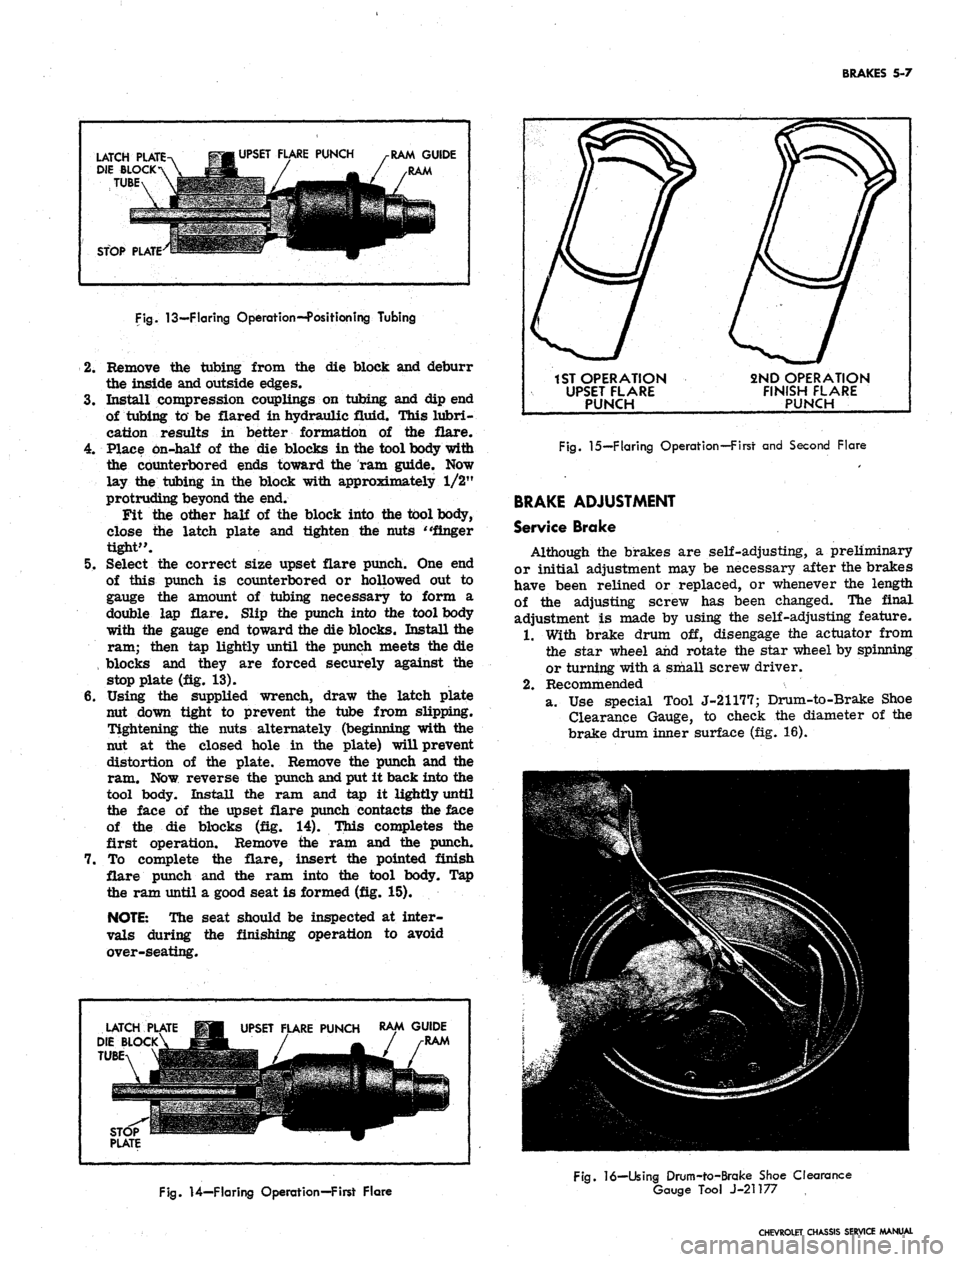
Fig.
13—Flaring Operation--Position ing Tubing
2.
Remove the tubing from the die block and deburr
the inside and outside edges.
3.
Install compression couplings on tubing and dip end
of tubing to be flared in hydraulic fluid. This lubri-
cation results in better formation of the flare.
4.
Place on-half of the die blocks in the tool body with
the counterbored ends toward the ram guide. Now
lay the tubing in the block with approximately 1/2"
protruding beyond the end.
Fit the other half of the block into the tool body,
close the latch plate and tighten the nuts "finger
tight".
5. Select the correct size upset flare punch. One end
of this punch is counterbored or hollowed out to
gauge the amount of tubing necessary to form a
double lap flare. Slip the punch into the tool body
with the gauge end toward the die blocks. Install the
ram; then tap lightly until the punch meets the die
, blocks and they are forced securely against the
stop plate (fig. 13).
6. Using the supplied wrench, draw the latch plate
nut down tight to prevent the tube from slipping.
Tightening the nuts alternately (beginning with the
nut at the closed hole in the plate) will prevent
distortion of the plate. Remove the punch and the
ram. Now reverse the punch and put it back into the
tool body. Install the ram and tap it lightly until
the face of the upset flare punch contacts the face
of the die blocks (fig. 14). This completes the
first operation. Remove the ram and the punch.
7. To complete the flare, insert the pointed finish
flare punch and the ram into the tool body. Tap
the ram until a good seat is formed (fig. 15).
NOTE:
The seat should be inspected at inter-
vals during the finishing operation to avoid
over-seating.
LATCH
DIE BLOCK
TUBE
UPSET FLARE PUNCH
RAM GUIDE
RAM
1ST OPERATION
UPSET FLARE
PUNCH
2ND OPERATION
FINISH FLARE
PUNCH
Fig.
15—Flaring Operation—First and Second Flare
BRAKE ADJUSTMENT
Service Brake
Although the brakes are self-adjusting, a preliminary
or initial adjustment may be necessary after the brakes
have been relined or replaced, or whenever the length
of the adjusting screw has been changed. The final
adjustment is made by using the self-adjusting feature.
1.
With brake drum off, disengage the actuator from
the star wheel and rotate the star wheel by spinning
or turning with a small screw driver.
2.
Recommended
a. Use special Tool J-21177; Drum-to-Brake Shoe
Clearance Gauge, to check the diameter of the
brake drum inner surface (fig. 16).
Fig.
14—Flaring Operation—First Flare
Fig.
16—Using Drum-to-Brake Shoe Clearance
Gauge Tool J-21177
CHEVROLET CHASSIS SERVICE MANUAL
Page 241 of 659
BRAKES 5-8
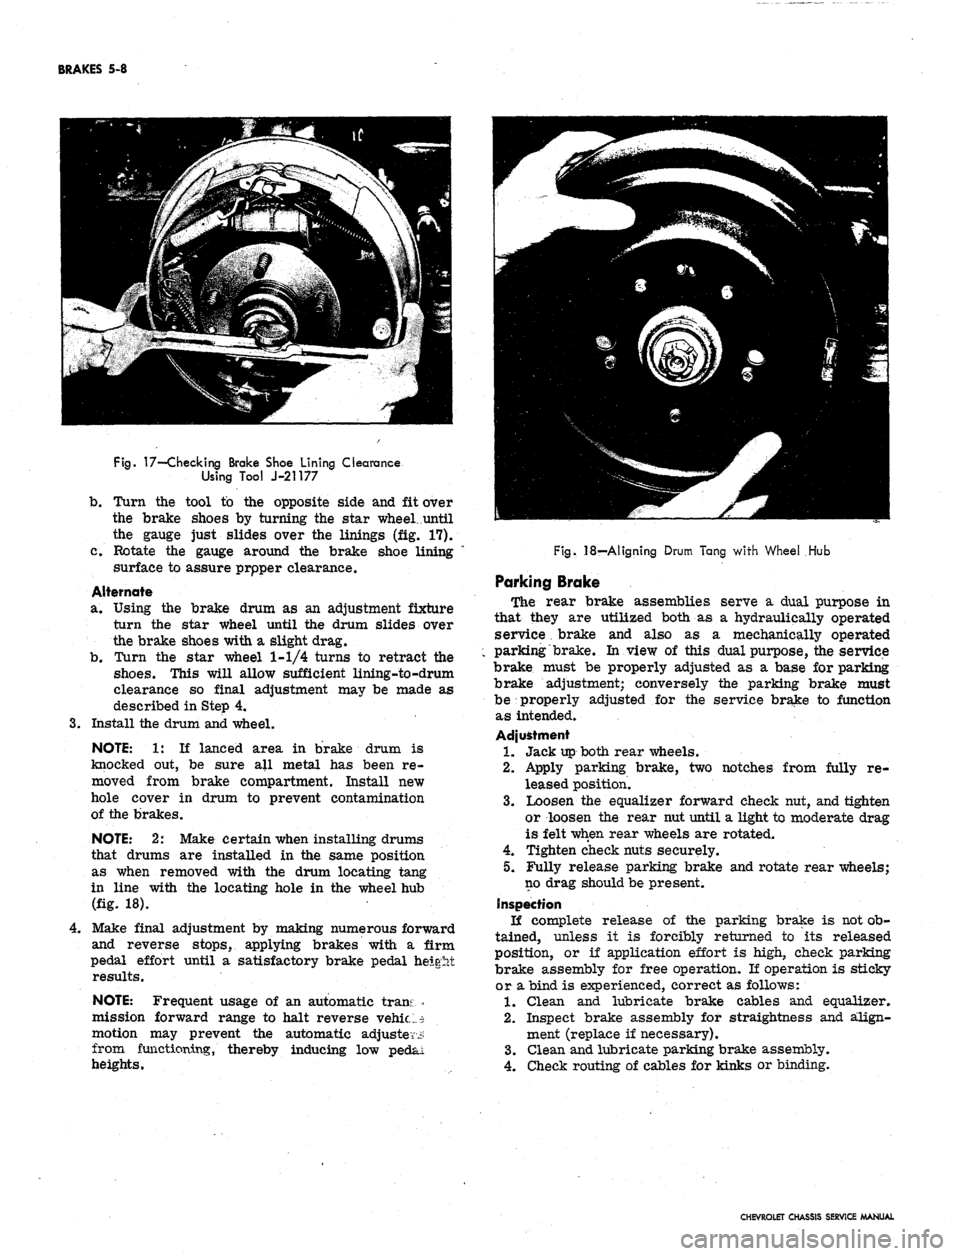
Fig.
17—-Checking Brake Shoe Lining Clearance
Using Tool J-21177
b.
Turn the tool to the opposite side and fit over
the brake shoes by turning the star wheel, until
the gauge just slides over the linings (fig. 17).
c. Rotate the gauge around the brake shoe lining
surface to assure prpper clearance.
Alternate
a. Using the brake drum as an adjustment fixture
turn the star wheel until the drum slides over
the brake shoes with a slight drag.
b.
Turn the star wheel 1-1/4 turns to retract the
shoes.
This will allow sufficient lining-to-drum
clearance so final adjustment may be made as
described in Step 4.
3.
Install the drum and wheel.
NOTE: 1: If lanced area in brake drum is
knocked out, be sure all metal has been re-
moved from brake compartment. Install new
hole cover in drum to prevent contamination
of the brakes.
NOTE: 2: Make certain when installing drums
that drums are installed in the same position
as when removed with the drum locating tang
in line with the locating hole in the wheel hub
(fig. 18).
4.
Make final adjustment by making numerous forward
and reverse stops, applying brakes with a firm
pedal effort until a satisfactory brake pedal height
results.
NOTE: Frequent usage of an automatic trans-
mission forward range to halt reverse vehic;..$
motion may prevent the automatic adjuster.:?
from functioning, thereby inducing low pedal
heights.
Fig.
.18—Aligning Drum Tang with Wheel Hub
Parking Broke
The rear brake assemblies serve a dual purpose in
that they are utilized both as a hydraulically operated
service brake and also as a mechanically operated
parking brake. In view of this dual purpose, the service
brake must be properly adjusted as a base for parking
brake adjustment; conversely the parking brake must
be properly adjusted for the service brake to function
as intended.
Adjustment
1.
Jack up both rear wheels.
2.
Apply parking brake, two notches from fully re-
leased position.
3.
Loosen the equalizer forward check nut, and tighten
or loosen the rear nut until a light to moderate drag
is felt when rear wheels are rotated.
4.
Tighten check nuts securely.
5.
Fully release parking brake and rotate rear wheels;
no drag should be present.
Inspection
If complete release of the parking brake is not ob-
tained, unless it is forcibly returned to its released
position, or if application effort is high, check parking
brake assembly for free operation. If operation is sticky
or a bind is experienced, correct as follows:
1.
Clean and lubricate brake cables and equalizer.
2.
Inspect brake assembly for straightness and align-
ment (replace if necessary).
3.
Clean and lubricate parking brake assembly.
4.
Check routing of cables for kinks or binding.
CHEVROLET CHASSIS SERVICE MANUAL
Page 242 of 659
BRAKES 5-9
COMPONENT REPLACEMENT AND REPAIRS
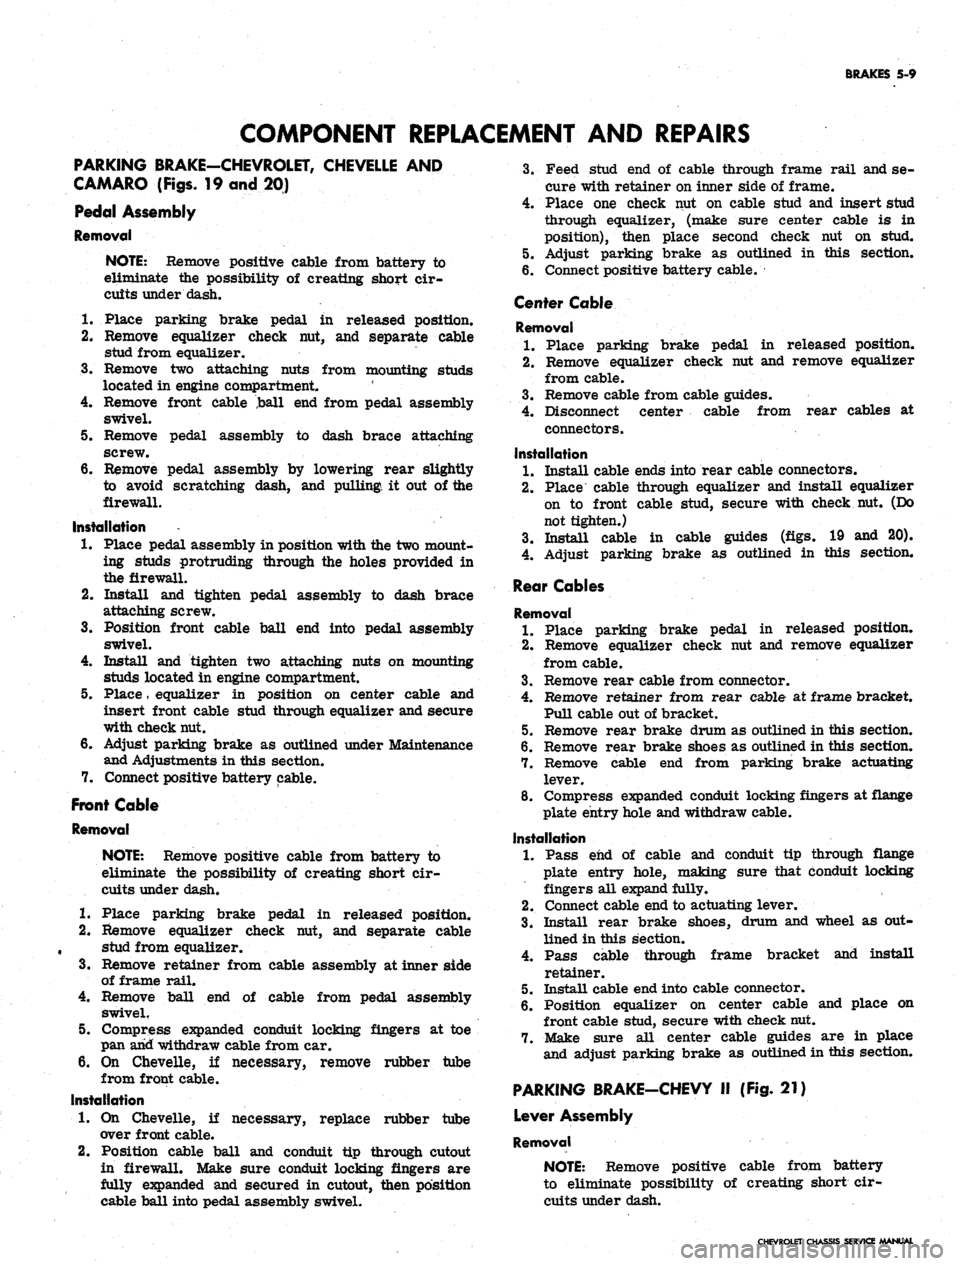
PARKING BRAKE-CHEVROLET, CHEVELLE AND
CAMARO (Figs. 19 and 20)
Pedal Assembly
Removal
NOTE:
Remove positive cable from battery to
eliminate the possibility of creating short cir-
cuits under dash.
1.
Place parking brake pedal in released position.
2.
Remove equalizer check nut, and separate cable
stud from equalizer.
3.
Remove two attaching nuts from mounting studs
located in engine compartment.
4.
Remove front cable .ball end from pedal assembly
swivel.
5. Remove pedal assembly to dash brace attaching
screw.
6. Remove pedal assembly by lowering rear slightly
to avoid scratching dash, and pulling, it out of the
firewall.
Installation
1.
Place pedal assembly in position with the two mount-
ing studs protruding through the holes provided in
the firewall.
2.
Install and tighten pedal assembly to dash brace
attaching screw.
3.
Position front cable ball end into pedal assembly
swivel.
4.
Install and tighten two attaching nuts on mounting
studs located in engine compartment.
5. Place
,
equalizer in position on center cable and
insert front cable stud through equalizer and secure
with check nut.
6. Adjust parking brake as outlined under Maintenance
and Adjustments in this section.
7. Connect positive battery cable.
Front Cable
Removal
NOTE:
Remove positive cable from battery to
eliminate the possibility of creating short cir-
cuits under dash.
1.
Place parking brake pedal in released position.
2.
Remove equalizer check nut, and separate cable
, stud from equalizer.
3.
Remove retainer from cable assembly at inner side
of frame rail.
4.
Remove ball end of cable from pedal assembly
swivel.
5. Compress expanded conduit locking fingers at toe
pan arid withdraw cable from car.
6. On Chevelle, if necessary, remove rubber tube
from front cable.
Installation
1.
On Chevelle, if necessary, replace rubber tube
over front cable.
2.
Position cable ball and conduit tip through cutout
in firewall. Make sure conduit locking fingers are
fully expanded and secured in cutout, then position
cable ball into pedal assembly swivel.
3.
Feed stud end of cable through frame rail and se-
cure with retainer on inner side of frame.
4.
Place one check nut on cable stud and insert stud
through equalizer, (make sure center cable is in
position), then place second check nut on stud.
5. Adjust parking brake as outlined in this section.
6. Connect positive battery cable.
Center Cable
Removal
1.
Place parking brake pedal in released position.
2.
Remove equalizer check nut and remove equalizer
from cable.
3.
Remove cable from cable guides.
4.
Disconnect center cable from rear cables at
connectors.
Installation
1.
Install cable ends into rear cable connectors.
2.
Place cable through equalizer and install equalizer
on to front cable stud, secure with check nut. (Do
not tighten.)
3.
Install cable in cable guides (figs. 19 and 20),
4.
Adjust parking brake as outlined in this section.
Rear Cables
Removal
1.
Place parking brake pedal in released position.
2.
Remove equalizer check nut and remove equalizer
from cable.
3.
Remove rear cable from connector.
4.
Remove retainer from rear cable at frame bracket.
Pull cable out of bracket.
5. Remove rear brake drum as outlined in this section.
6. Remove rear brake shoes as outlined in this section.
7. Remove cable end from parking brake actuating
lever.
8. Compress expanded conduit locking fingers at flange
plate entry hole and withdraw cable.
Installation
1.
Pass end of cable and conduit tip through flange
plate entry hole, making sure that conduit locking
fingers all expand fully.
2.
Connect cable end to actuating lever.
3.
Install rear brake shoes, drum and wheel as out-
lined in this section.
4.
Pass cable through frame bracket and install
retainer.
5. Install cable end into cable connector.
6. Position equalizer on center cable and place on
front cable stud, secure with check nut.
7. Make sure all center cable guides are in place
and adjust parking brake as outlined in this section.
PARKING BRAKE-CHEVY II (Fig. 21)
Lever Assembly
Removal
NOTE:
Remove positive cable from battery
to eliminate possibility of creating short cir-
cuits under dash.
CHEVROLET CHASSIS SERVICE MANUAL
Page 244 of 659
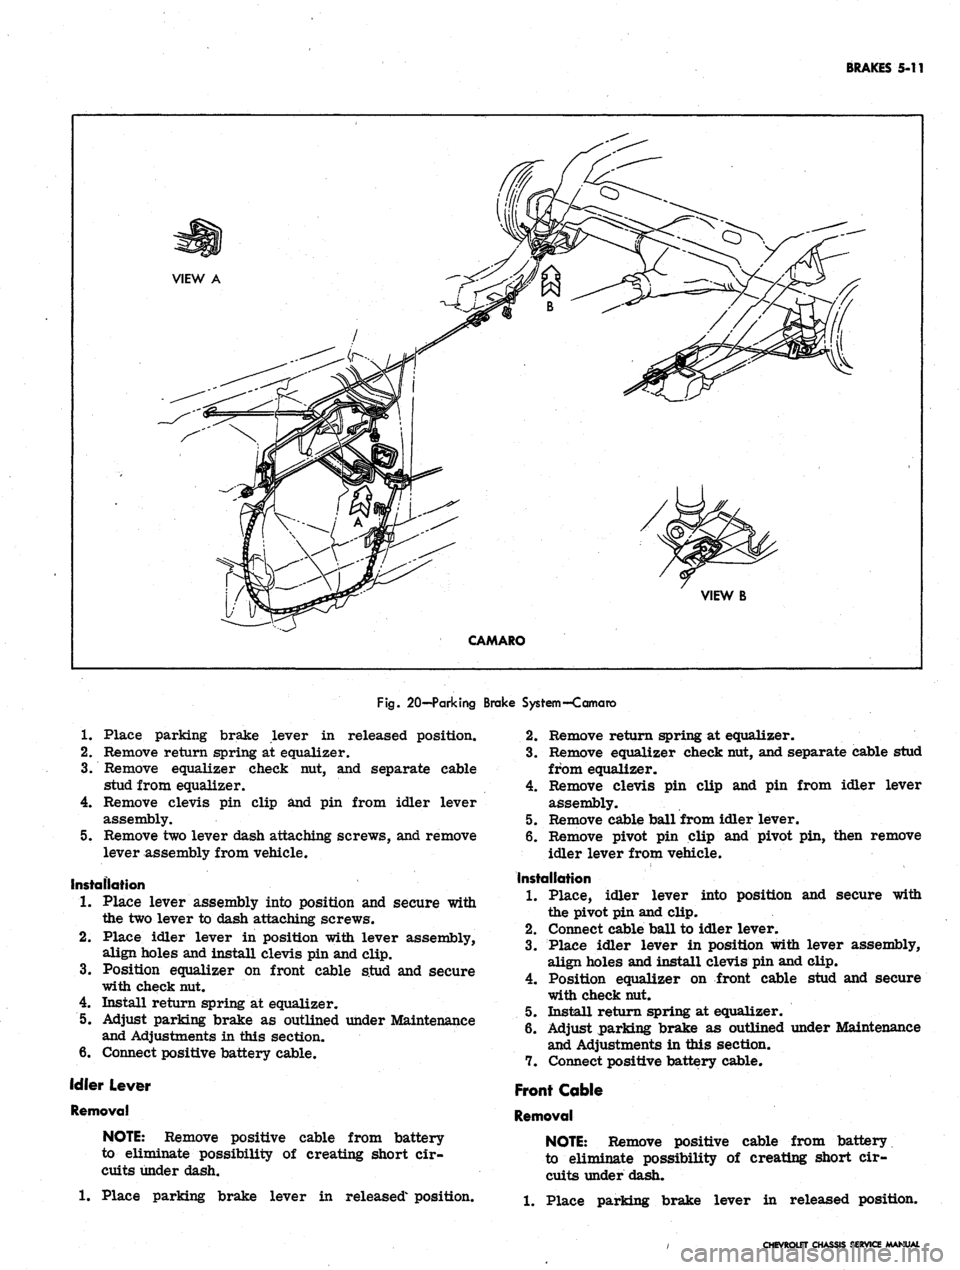
BRAKES 5-11
VIEW A
VIEWB
CAMARO
Fig.
20—Parking Brake System—Camano
1.
Place parking brake lever in released position.
2.
Remove return spring at equalizer.
3.
Remove equalizer check nut, and separate cable
stud from equalizer.
4.
Remove clevis pin clip and pin from idler lever
assembly.
5. Remove two lever dash attaching screws, and remove
lever assembly from vehicle.
Installation
1.
Place lever assembly into position and secure with
the two lever to dash attaching screws.
2.
Place idler lever in position with lever assembly,
align holes and install clevis pin and clip.
3.
Position equalizer on front cable stud and secure
with check nut.
4.
Install return spring at equalizer.
5. Adjust parking brake as outlined under Maintenance
and Adjustments in this section.
6. Connect positive battery cable.
Idler Lever
Removal
NOTE:
Remove positive cable from battery
to eliminate possibility of creating short cir-
cuits under dash.
1.
Place parking brake lever in released' position.
2.
Eemove return spring at equalizer.
3.
Remove equalizer check nut, and separate cable stud
from equalizer.
4.
Remove clevis pin clip and pin from idler lever
assembly.
5. Remove cable ball from idler lever.
6. Remove pivot pin clip and pivot pin, then remove
idler lever from vehicle.
Installation
1.
Place, idler lever into position and secure with
the pivot pin and clip.
2.
Connect cable ball to idler lever.
3.
Place idler lever in position with lever assembly,
align holes and install clevis pin and clip.
4.
Position equalizer on front cable stud and secure
with check nut.
5. Install return spring at equalizer.
6. Adjust parking brake as outlined under Maintenance
and Adjustments in this section.
7. Connect positive battery cable.
Front Cable
Removal
NOTE:
Remove positive cable from battery
to eliminate possibility of creating short cir-
cuits under dash.
1.
Place parking brake lever in released position.
CHEVROLET CHASSIS SERVICE MANUAL
Page 245 of 659
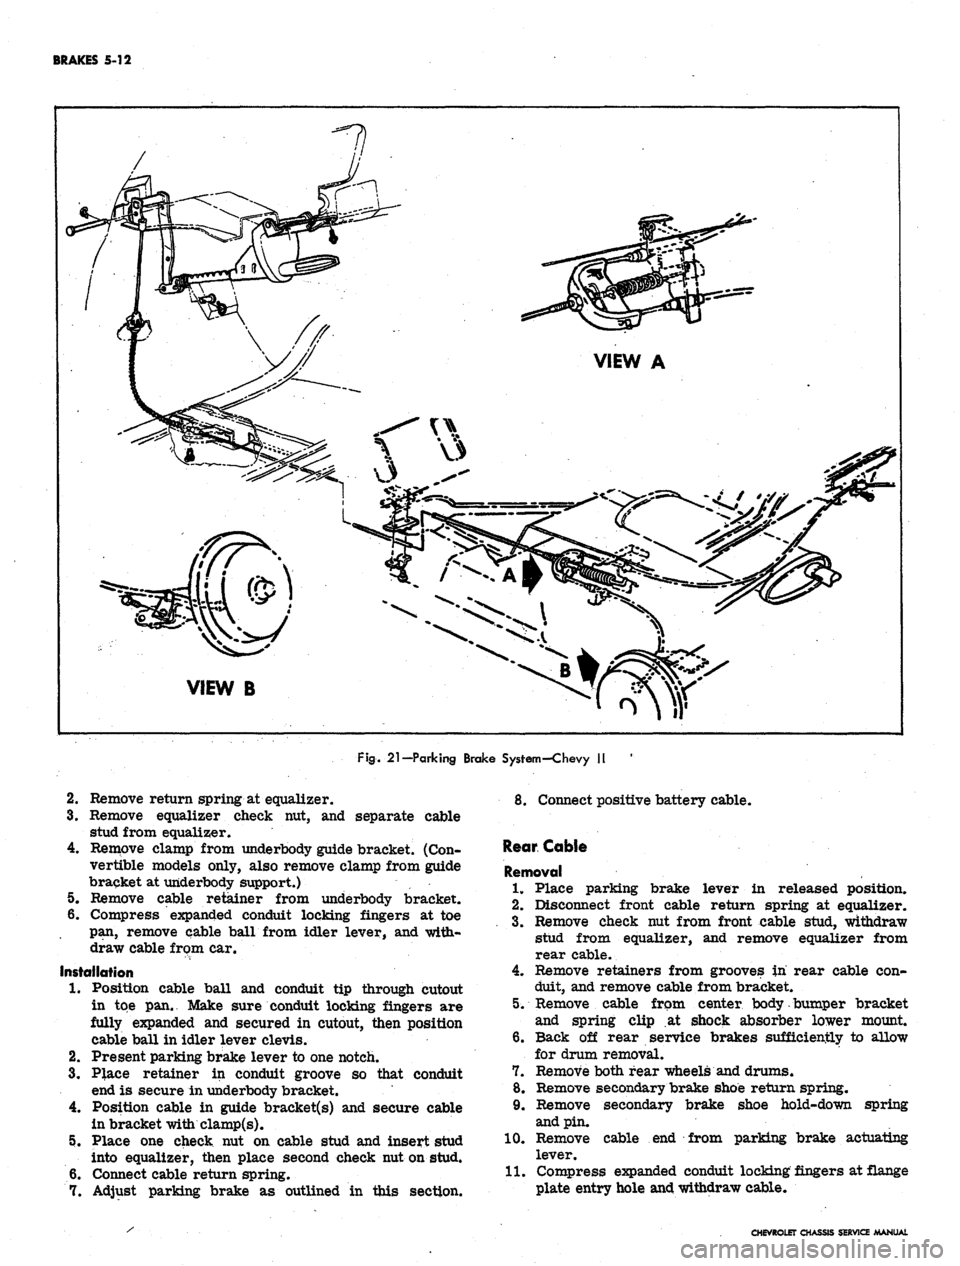
BRAKES 5-12
VIEW B
Fig.
21—Parking Brake System-Chevy II
2.
Remove return spring at equalizer.
3.
Remove equalizer check nut, and separate cable
stud from equalizer.
4.
Remove clamp from underbody guide bracket. (Con-
vertible models only, also remove clamp from guide
bracket at underbody support.)
5. Remove cable retainer from underbody bracket.
6. Compress expanded conduit locking fingers at toe
pan,
remove cable ball from idler lever, and with-
draw cable from car.
Installation
1.
Position cable ball and conduit tip through cutout
in toe pan.. Make sure conduit locking fingers are
fully expanded and secured in cutout, then position
cable ball in idler lever clevis.
2.
Present parking brake lever to one notch.
3.
P}ace retainer in conduit groove so that conduit
end is secure in underbody bracket.
4.
Position cable in guide bracket(s) and secure cable
in bracket with clamp(s).
5. Place one check nut on cable stud and insert stud
into equalizer, then place second check nut on stud.
6. Connect cable return spring.
7. Adjust parking brake as outlined in this section.
8. Connect positive battery cable.
Rear Cable
Removal
1.
Place parking brake lever in released position.
2.
Disconnect front cable return spring at equalizer.
3.
Remove check nut from front cable stud, withdraw
stud from equalizer, and remove equalizer from
rear cable.
4.
Remove retainers from grooves in rear cable con-
duit, and remove cable from bracket.
5. Remove cable from center body bumper bracket
and spring clip at shock absorber lower mount.
6. Back off rear service brakes sufficiently to allow
for drum removal.
7. Remove both rear wheels and drums.
8. Remove secondary brake shoe return spring.
9. Remove secondary brake shoe hold-down spring
and pin.
10.
Remove cable end from parking brake actuating
lever.
11.
Compress expanded conduit locking fingers at flange
plate entry hole and withdraw cable.
CHEVROLET CHASSIS SERVICE MANUAL
Page 246 of 659
Installation
1.
Pass end of cable and conduit tip through flange
plate entry hole, making sure that conduit locking
fingers all expand fully.
2.
Compress retaining spring and place cable end in
actuating lever.
3.
Install secondary shoe hold-down pin and spring.
4.
Install secondary shoe return spring.
5. Install drum and wheel.
6. Snap cable conduit into spring clip at shock ab-
sorber lower mount.
7. Install cable conduit in bracket at center body bump-
er bracket.
8. Position cable conduit ends in cable bracket and
install retainers in grooves.
9. Place equalizer on cable and insert forward cable
stud. Install check nut and return spring.
NOTE:
To perform its intended function, equal-
izer must be free to slide on rear cable. Lubri-
cate cable at equalizer with chassis grease.
10.
Adjust rear service brakes and parking brake as
outlined in this section.
BRAKES 5-13
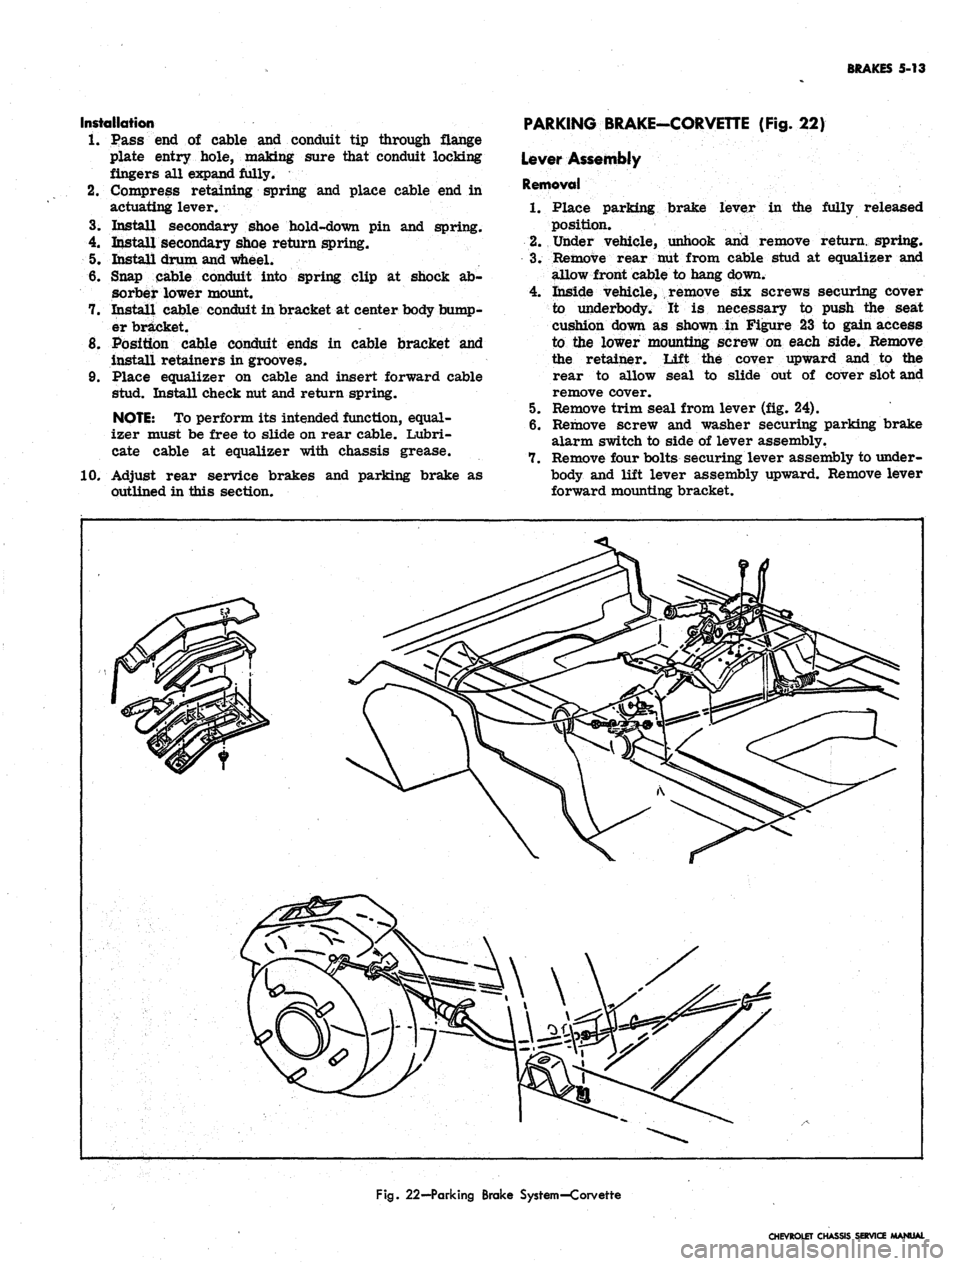
PARKING BRAKE-CORVETTE (Fig. 22)
Lever Assembly
Removal
1.
Place parking brake lever in the fully released
position.
2.
Under vehicle, unhook and remove return, spring.
3.
Remove rear nut from cable stud at equalizer and
allow front cable to hang down.
4.
Inside vehicle, remove six screws securing cover
to underbody. It is necessary to push the seat
cushion down as shown in Figure 23 to gain access
to the lower mounting screw on each side. Remove
the retainer. Lift the cover upward and to the
rear to allow seal to slide out of cover slot and
remove cover.
5. Remove trim seal from lever (fig. 24).
6. Remove screw and washer securing parking brake
alarm switch to side of lever assembly.
7. Remove four bolts securing lever assembly to under-
body and lift lever assembly upward. Remove lever
forward mounting bracket.
Fig.
22—Parking Brake System—Corvette
CHEVROLET CHASSIS SERVICE MANUAL
Page 247 of 659
BRAKES 5-14
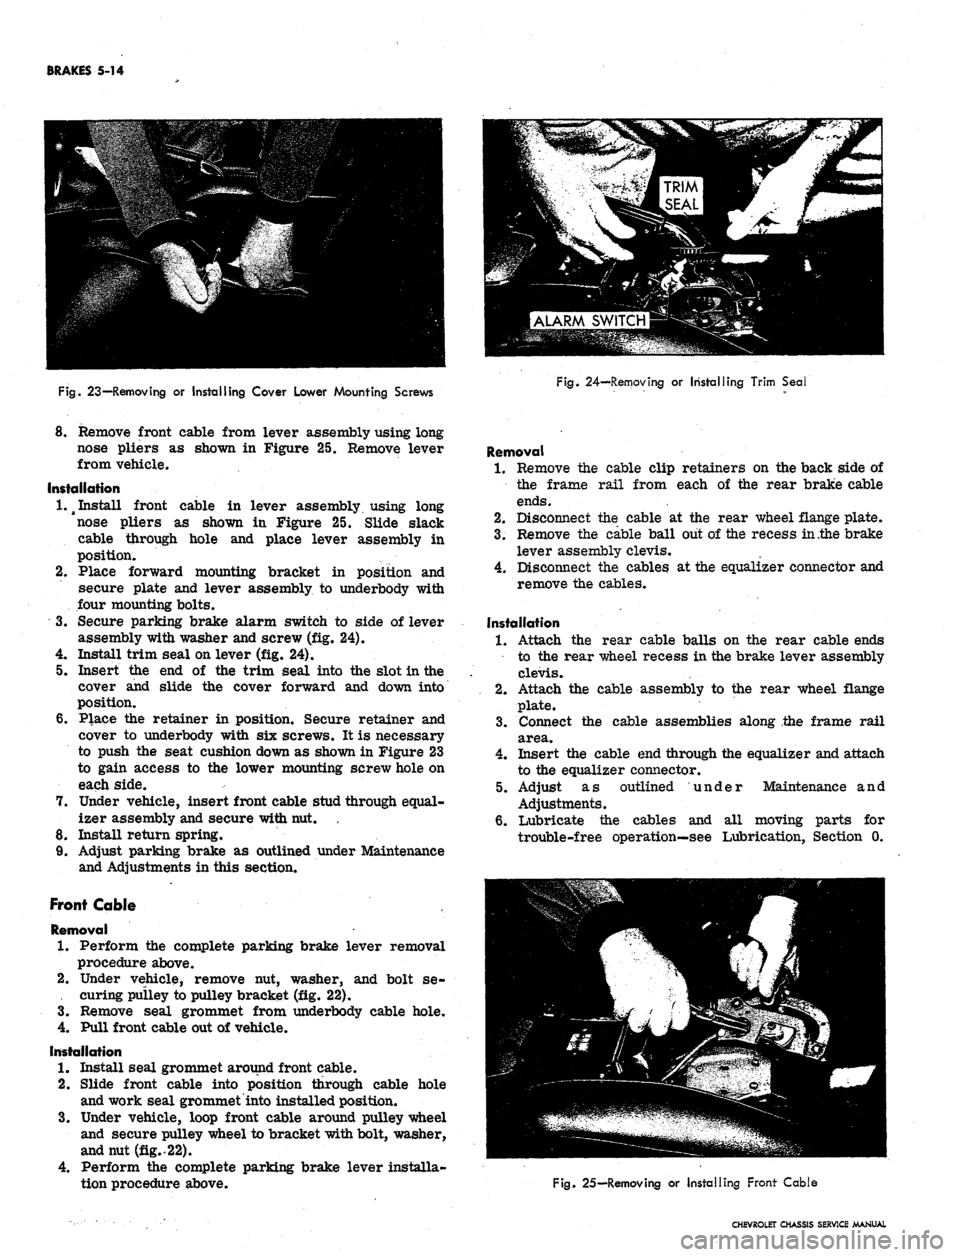
Fig.
23—Removing or Installing Cover Lower Mounting Screws
Fig.
24—Removing or Installing Trim Seal
8. Remove front cable from lever assembly using long
nose pliers as shown in Figure 25. Remove lever
from vehicle.
Installation
1.^
Install front cable in lever assembly using long
nose pliers as shown in Figure 25. Slide slack
cable through hole and place lever assembly in
position.
2.
Place forward mounting bracket in position and
secure plate and lever assembly to underbody with
four mounting bolts.
3.
Secure parking brake alarm switch to side of lever
assembly with washer and screw (fig. 24).
4.
Install trim seal on lever (fig. 24).
5. Insert the end of the trim seal into the slot in the
cover and slide the cover forward and down into
position.
6. Place the retainer in position. Secure retainer and
cover to underbody with six screws. It is necessary
to push the seat cushion down as shown in Figure 23
to gain access to the lower mounting screw hole on
each side.
7. Under vehicle, insert front cable stud through equal-
izer assembly and secure with nut.
8. Install return spring.
9. Adjust parking brake as outlined under Maintenance
and Adjustments in this section.
Front Cable
Removal
1.
Perform the complete parking brake lever removal
procedure above.
2.
Under vehicle, remove nut, washer, and bolt se-
. curing pulley to pulley bracket (fig. 22).
3.
Remove seal grommet from underbody cable hole.
4.
Pull front cable out of vehicle.
Installation
1.
Install seal grommet around front cable.
2.
Slide front cable into position through cable hole
and work seal grommet into installed position.
3.
Under vehicle, loop front cable around pulley wheel
and secure pulley wheel to bracket with bolt, washer,
and nut (fig..22).
4.
Perform the complete parking brake lever installa-
tion procedure above.
Removal
1.
Remove the cable clip retainers on the back side of
the frame rail from each of the rear brake cable
ends.
2.
Disconnect the cable at the rear wheel flange plate.
3.
Remove the cable ball out of the recess in .the brake
lever assembly clevis.
4.
Disconnect the cables at the equalizer connector and
remove the cables.
Installation
1.
Attach the rear cable balls on the rear cable ends
to the rear wheel recess in the brake lever assembly
clevis.
2.
Attach the cable assembly to the rear wheel flange
plate.
3.
Connect the cable assemblies along the frame rail
area.
4.
Insert the cable end through the equalizer and attach
to the equalizer connector.
5. Adjust as outlined under Maintenance and
Adjustments.
6. Lubricate the cables and all moving parts for
trouble-free operation—see Lubrication, Section 0.
Fig.
25—Removing or Installing Front Cable
CHEVROLET CHASSIS SERVICE MANUAL
Page 248 of 659
BRAKES 5-15
Brake Shoes
Refer to parking brake shoe service procedures under
Disc Brakes in this section.
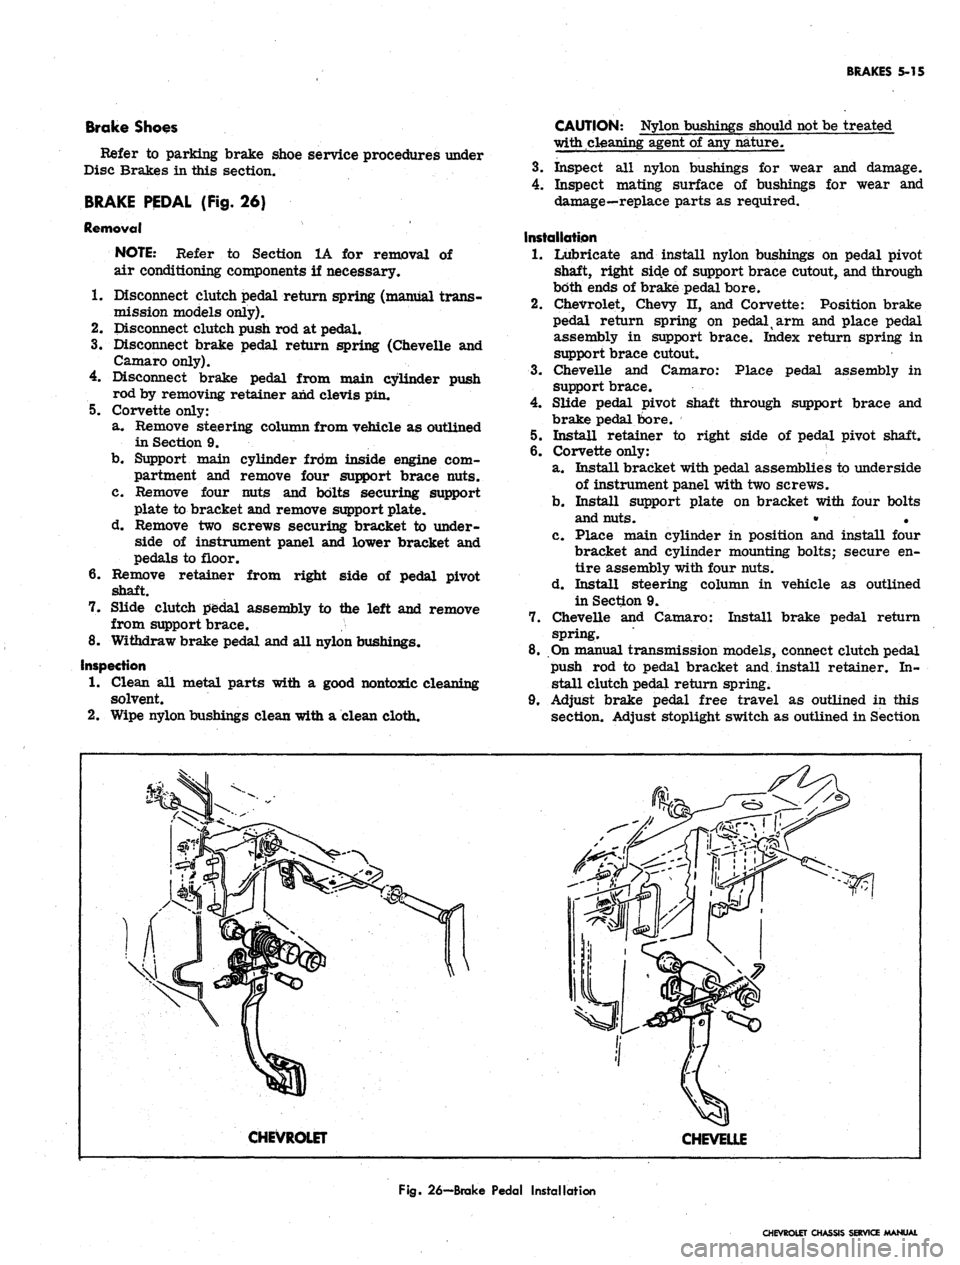
BRAKE PEDAL (Fig. 26)
Removal
NOTE: Refer to Section 1A for removal
air conditioning components if necessary.
of
1.
5.
b.
c.
Disconnect clutch pedal return spring (manual trans-
mission models only).
Disconnect clutch push rod at pedal.
Disconnect brake pedal return spring (Chevelle and
Camaro only).
Disconnect brake pedal from main cylinder push
rod by removing retainer and clevis pin.
Corvette only:
a. Remove steering column from vehicle as outlined
in Section 9.
Support main cylinder frdm inside engine com-
partment and remove four support brace nuts.
Remove four nuts and bolts securing support
plate to bracket and remove support plate.
d. Remove two screws securing bracket to under-
side of instrument panel and lower bracket and
pedals to floor.
Remove retainer from right side of pedal pivot
shaft.
7.
Slide clutch pedal assembly to the left and remove
from support brace.
8. Withdraw brake pedal and all nylon bushings.
Inspection
1.
Clean all metal parts with a good nontoxic cleaning
solvent.
2.
Wipe nylon bushings clean with a clean cloth.
6
CAUTION: Nylon bushings should not be treated
with cleaning agent of any nature.
3.
Inspect all nylon bushings for wear and damage.
4.
Inspect mating surface of bushings for wear and
damage—replace parts as required.
Installation
1.
Lubricate and install nylon bushings on pedal pivot
shaft, right side of support brace cutout, and through
both ends of brake pedal bore.
2.
Chevrolet, Chevy n, and Corvette: Position brake
pedal return spring on pedal arm and place pedal
assembly in support brace. Index return spring in
support brace cutout.
3.
Chevelle and Camaro: Place pedal assembly in
support brace.
4.
Slide pedal pivot shaft through support brace and
brake pedal bore.
5.
Install retainer to right side of pedal pivot shaft.
6. Corvette only:
a. Install bracket with pedal assemblies to underside
of instrument panel with two screws.
b.
Install support plate on bracket with four bolts
and nuts. • • ' •
c. Place main cylinder in position and install four
bracket and cylinder mounting bolts; secure en-
tire assembly with four nuts.
d. Install steering column in vehicle as outlined
in Section 9.
7.
Chevelle and Camaro: Install brake pedal return
spring.
8. On manual transmission models, connect clutch pedal
push rod to pedal bracket and install retainer. In-
stall clutch pedal return spring.
9. Adjust brake pedal free travel as outlined in this
section. Adjust stoplight switch as outlined in Section
CHEVROLET
CHEVELLE
Fig.
26—Brake Pedal Installation
CHEVROLET CHASSIS SERVICE MANUAL
Page 250 of 659
BRAKES 5-17
mended shoe and lining assemblies. Otherwise,
serious fade or failure may occur.
1.
Inspect new linings and make certain there are no
nicks or burrs on bonding material on shoe edge
where contact is made with brake flange plate or
on any of the contact surfaces.
NOTE: Keep hands clean while handling brake
shoes.
Do not permit oil or grease to come in
contact with linings.
2.
If working on rear brakes, lubricate parking brake
cable.
3.
On rear brakes only, lubricate fulcrum end of park-
ing brake lever and the bolt with brake lube, then
attach lever to secondary shoe with bolt, spring
washer, lock washer and nut. Make sure that lever
moves freely.
4.
Before installation make certain the adjusting screw
is clean and lubricated properly.
NOTE: Loose adjustment may occur from an
adjusting screw that is not properly operating.
If the lubrication in the adjusting screw as-
sembly is contaminated or destroyed, the ad-
justing screw should be thoroughly cleaned and
lubricated.
5.
Connect brake shoes together with adjusting screw
spring, then place adjusting screw, socket and nut
in position.
CAUTION: Make sure the proper adjusting
screw is used ("L" for left side of vehicle,
"R"
for right side of vehicle). The star wheel
should only be installed with the star wheel
nearest to the secondary shoe and the adjusting
screw spring inserted to prevent interference
with the star wheel.
6. On rear wheels connect parking brake cable to lever.
7.
Secure the primary brake shoe (short lining—faces
forward) first with the hold-down pin and spring
using a pair of pliers. Engages shoes with the wheel
cylinder connecting links.
8. Install and secure the actuator assembly and second-
ary brake shoe with the hold-down pin and spring
using a pair of needle nose pliers. On rear wheels
position parking brake strut and strut spring.
9. Install guide plate over anchor pin.
10.
Install the wire link.
NOTE: Do not hook the wire link over the
anchor pin stud with the regular spring hook
tool. This may damage the cylinder boot seals.
Fasten the wire link to the actuator assembly ;
first, then place over the anchor pin stud by
hand while holding the adjuster assembly in the
full down position.
11.
Install actuator return spring.
NOTE: Do not pry actuator lever to install re-
turn spring. Ease it in place using the end of a
screw driver or other suitable flat tool.
12.
If old brake pull back (return) springs are nicked,
distorted or if strength is doubtful, install new
springs.
13.
Hook springs in shoes using Tool J-8049 by in-
stalling the primary spring from the shoe over the
anchor pin and then spring from secondary shoe
over the wire link end.
14.
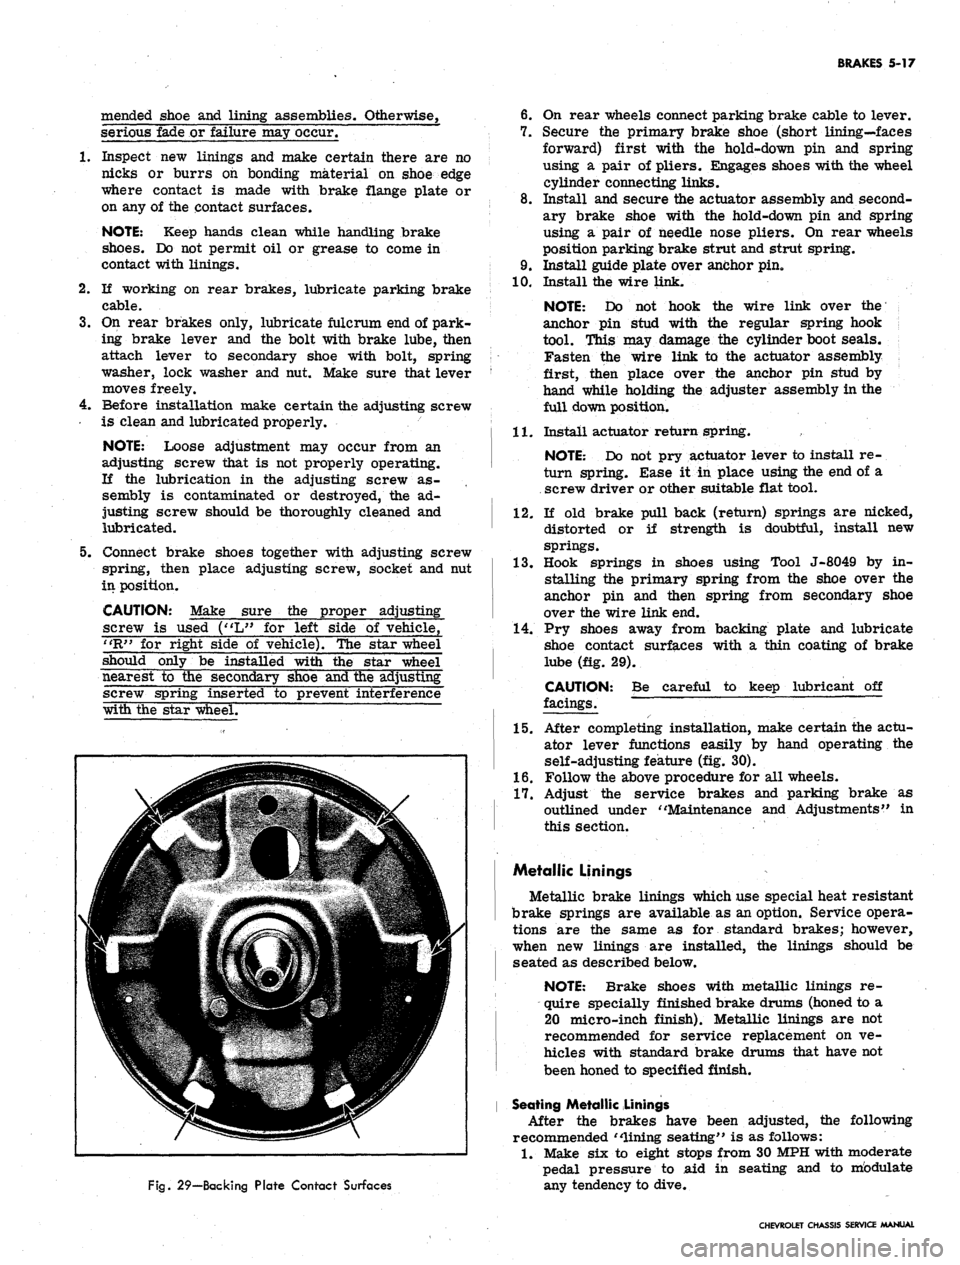
Pry shoes away from backing plate and lubricate
shoe contact surfaces with a thin coating of brake
lube (fig. 29).
CAUTION:
facings.
Be careful to keep lubricant off
Fig.
29—Backing Plate Contact Surfaces
15.
After completing installation, make certain the actu-
ator lever functions easily by hand operating the
self-adjusting feature (fig. 30).
1.6. Follow the above procedure for all wheels.
17.
Adjust the service brakes and parking brake as
outlined under "Maintenance and Adjustments" in
this section.
Metallic Linings
Metallic brake linings which use special heat resistant
brake springs are available as an option. Service opera-
tions are the same as for standard brakes; however,
when new linings are installed, the linings should be
seated as described below.
NOTE: Brake shoes with metallic linings re-
quire specially finished brake drums (honed to a
20 micro-inch finish). Metallic linings are not
recommended for service replacement on ve-
hicles with standard brake drums that have not
been honed to specified finish.
Seating Metallic Linings
After the brakes have been adjusted, the following
recommended "lining seating" is as follows:
1.
Make six to eight stops from 30 MPH with moderate
pedal pressure to aid in seating and to mbdulate
any tendency to dive.
CHEVROLET CHASSIS SERVICE MANUAL