ECU CHEVROLET CAMARO 1967 1.G Chassis Repair Manual
[x] Cancel search | Manufacturer: CHEVROLET, Model Year: 1967, Model line: CAMARO, Model: CHEVROLET CAMARO 1967 1.GPages: 659, PDF Size: 114.24 MB
Page 352 of 659
ENGINE-ELECTRICAL 6Y-27
timing mark on pulley lines up with timing tab.
2.
Position distributor to opening in block in normal
installed attitude (fig. 15i), noting position of vacuum
control unit.
3.
Position rotor to point toward front of engine (with
distributor housing held in installed attitude), then
turn rotor counter-clockwise approximately 1/8 turn
more toward left cylinder bank and push distributor
down to engine camshaft. It may be necessary to ro-
tate rotor slightly until camshaft engagement is felt.
4.
While pressing firmly down on distributor housing,
kick starter over a few times to make sure oil pump
shaft is engaged. Install hold-down clamp and bolt
and snug up bolt.
5. Turn distributor body slightly until points just open
and tighten distributor clamp bolt.
6. Place distributor cap in position and check to see
that rotor lines up with terminal for No. 1 spark
plug.
7. Install cap, check all high tension wire connections
and connect spark plug wires if they have been re-
moved. It is important that the wires be installed in
their location in the supports.
NOTE:
The brackets are numbered to show the
correct installation. Wires must be installed as
indicated to prevent cross firing.
8. Connect vacuum line to distributor and distributor
primary wire to coil terminal.
9. Start engine and set timing as described under Turn-
Up in Section 6.
BREAKERLESS (MAGNETIC PULSE)
DISTRIBUTOR
REMOVAL (CORVETTE)
1.
If vehicle is equipped with radio, remove three bolts
securing ignition shield over distributor and coil.
One bolt is accessible from the top of shield, the
other two are at rear of shield, facing firewall.
2.
Disconnect tachometer drive cables from distributor
housing.
3.
Disconnect pickup coil leads at connector.
4.
Remove distributor cap.
5. Crank engine so rotor is in position to fire No. 1
cylinder and timing mark on harmonic balancer is
indexed with pointer.
6. Remove vacuum line from distributor.
7. Remove distributor clamping screw and hold-down
clamp.
8. Remove distributor and distributor-to-block gasket.
It will be noted that the rotor will rotate as the
distributor is pulled out of the block. Mark the re-
lationship of the rotor and the distributor housing
after removal so that the rotor can be set in the
same position when the distributor is being installed.
DISASSEMBLY (Fig. 16i)
NOTE:
If a distributor is being disassembled
for replacement of the stationary magnetic
pickup assembly only, it will be necessary to
perform only Steps 3, 4, 5, 7, 8, 9, and 12 of the
service procedure listed below.
1.
Remove screws securing rotor and remove rotor.
2.
Remove centrifugal weight springs and weights.
3.
Remove the tachometer drive gear from the distribu-
tor (Corvette only).
4.
Remove roll pin, then remove distributor drive gear
and washer.
CAUTION: To prevent
magnet, support drive gear
;e to the permanent
?n
driving out roll
pin.
5. Remove drive shaft assembly.
6. Remove centrifugal weight support and timer core
from drive shaft.
7. Remove connector from pickup coil leads.
8. Remove retaining ring which secures magnetic
core support plate to distributor shaft bushing in
housing.
9. As a unit, remove the entire magnetic pickup assem-
bly from the distributor housing.
10.
Remove brass washer and felt pad.
11.
Remove vacuum advance unit.
12.
To reassemble distributor, perform the above steps
in reverse order.
INSTALLATION (CORVETTE)
1.
Check to see that the engine is at firing position for
No.
1 cylinder (timing mark on harmonic balancer
indexed with pointer).
2.
Position a new distributor-to-block gasket on the
block.
3.
Before installing distributor, index rotor with hous-
ing as noted when distributor was removed. Install
distributor in block so that vacuum diaphragm faces
approximately 45° forward on the right side of the
engine and the rotor points toward contact in cap for
No.
1 cylinder.
4.
Replace distributor clamp leaving screw loose
enough to allow distributor to be turned for timing
adjustment.
5. Install spark plug wires in distributor cap. Place
wire for No. 1 cylinder in tower (marked on old cap
during disassembly) then install remaining wires
clockwise around the cap according to the firing
order (1-8-4-3-6-5-7-2).
6. Attach distributor to coil primary wires.
7. Replace distributor cap.
8. Adjust timing and then fully tighten distributor clamp
screw.
9. Attach vacuum line to distributor.
10.
Connect tachometer drive cables to distributor body.
11.
Replace ignition shields.
DISTRIBUTOR OFF-ENGINE TEST
The distributor's centrifugal and vacuum advance can
be checked in a distributor testing machine or synchro-
scope specially adapted or designed to accommodate this
type distributor. However, since this involves removing
the distributor from the engine, this test may be post-
poned until other system checks have been made. A dwell
reading cannot be obtained on this distributor and it is not
likely that the centrifugal or vacuum advance will be a
cause of trouble.
COIL REPLACEMENT
1.
Disconnect ignition switch and distributor leads from
CHEVROLET CHASSIS SERVICE MANUAL
Page 353 of 659

ENGINE-ELECTRICAL 6Y-28
terminals on eoil. On Corvettes equipped with radio,
remove bolts securing ignition shield over distribu-
tor and coil.
2.
Pull high tension wire from center terminal of coil.
3.
Remove the two coil support mounting bolts or loosen
friction clamp screw and remove coil.
4.
Place new coil in position and install attaching bolts
or tighten clamp screw.
5.
Place high tension lead securely in center terminal
of coil and connect ignition switch and distributor
primary leads to terminals on coil. Replace ignition
shield on Corvettes.
6. Start engine and test coil operation.
IGNITION PULSE AMPLIFIER
DISASSEMBLY
To check the amplifier for defective components, pro-
ceed as follows:
1.
Remove the bottom plate from the amplifier.
2.
To aid in reassembly, note the locations of the lead
connections to the panel board.
3.
Remove the three panel board attaching screws, and
lift the assembly from the housing.
4.
To aid in reassembly, note any identifying markings
on the two transistors and their respective locations
on the panel board and heat sink assembly.
5.
Note the insulators between the transistors.and the
heat sink, and the insulators separating the heat sink
from the panel board.
6. Remove the transistor attaching screws, and sepa-
rate the two transistors and heat sink from the panel
board.
7.
Carefully examine the panel board for evidence of
damage.
MOUNTING
SCREW
RESISTOR R5 jgSfe. / DIODE Dl
TRANSISTOR TR2
(UNDERNEATH)
1H L >©V
[So
To
I
/'%**jt\
\
TRANSISTC>R"""
1 X ^^w^ X \ (UNDERNEATH)
9^ESISTORR^^^H|^^^^^H
^B
RESISTOR
R4
^HPH^^H
WM'
RESISTOR
R3
I^B^^^^I^U
N .6 ®
mm
N%|/MOUNTING
• tr^i^w ^\ vjR SCREW
CAPACITOR
Cl\
pNkj^^A^
\
RESISTOR
Rl
MOUNTING ^55S^^ \ CAPACITOR C3
SCREW I RESISTOR R6 CAPACITOR C2
TRANSISTOR TR3
COMPONENT CHECKS (Figs. \7\ and 18i)
With the two transistors separated from the assembly,
an ohmmeter may be used to check the transistors and
components on the panel board for defects. An ohmmeter
having a 1-1/2 volt cell, which is the type usually found
in service stations, is recommended. The low range
scale on the ohmmeter should be used except where
specified otherwise.
A 25 watt soldering gun is recommended, and a 60% tin
40%
lead solder should be used when re-soldering. Avoid
excessive heat which may damage the panel board. Chip
away any epoxy involved, and apply new epoxy which is
commercially available.
In order to check the panel board assembly, it is
necessary to unsolder at the locations indicated in Fig-
ure 18i the two capacitors C2 and C3. In all of the fol-
lowing checks, connect the ohmmeter as shown and then
reverse the ohmmeter leads to obtain two readings. The
amplifier circuitry is shown in Figure 19i.
1.
Transistors TR1 and TR2: Check each transistor by
referring to Figure 20i. If both readings in Step 1
are zero, the transistor is shorted. If both readings
in Step 2 are zero, the transistor is shorted; and if
both readings are infinite, the transistor is open.
Interpret Step 3 the same as Step 2.
2.
Trigger Transistor TR3:
11
both readings in Step 1
are zero, the transistor is shorted. If both readings
in Step 2 are zero, the transistor is shorted; and if
both readings are infinite, the transistor is open.
Interpret Step 3 the same as Step 2.
3.
Diode Dl: 11 both readings are zero, the diode is
shorted; and if both readings are infinite, the diode
is open.
4.
Capacitor Cl: If both readings are zero, the capaci-
tor is shorted.
5.
Capacitors C2 and C3: Connect the ohmmeter across
CHECKING
RESISTOR Rl
UNSOLDER
I
CHECKING TRIGGER
TRANSISTOR TR3
CHECKING
CAPACITOR C
Fig.
171—Pulse Amplifier Panel Board
Fig.
18i—Pulse
Amplifier
Component
Checks
CHEVROLET CHASSIS SERVICE MANUAL
Page 366 of 659
CLUTCH AND TRANSMISSIONS 7-7
MAINTENANCE AND ADJUSTMENTS
CHEVROLET, CHEVELLE, CHEVY II, CAMARO,
SHIFT LINKAGE ADJUSTMENT
In cases where the gearshift linkage has been discon-
nected, it should be adjusted as follows:
1.
Move both transmission shift levers until transmis-
sion is in neutral. Neutral detents in transmission
cover must both be engaged to make this adjustment
correctly. (To check, start engine with clutch dis-
engaged, and release clutch slowly.)
2.
Move selector lever to neutral position. Align first
and reverse tube lever with the second and third
shifter tube lever on the mast jacket. This may be
done by having an assistant hold the mast .jacket shift
levers aligned in neutral position or use a simple
gauge or pin to align these levers in neutral.
3.
Make necessary adjustment to align shift control
rods and transmission levers in neutral position.
Move selector lever through all positions to check ad-
justment and to insure over-travel in all positions.
FLOOR SHIFT LINKAGE ADJUSTMENT
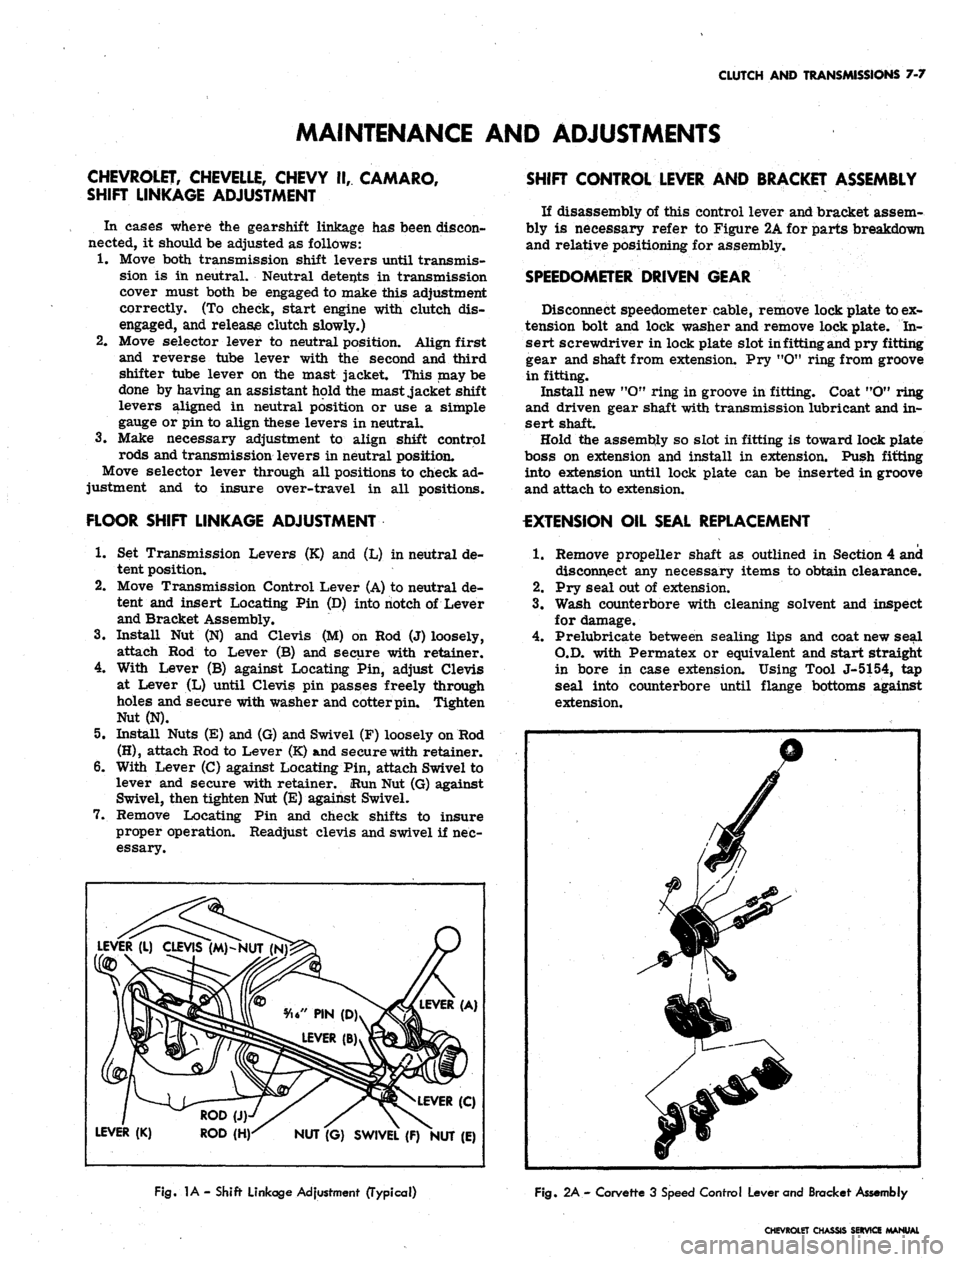
1.
Set Transmission Levers (K) and (L) in neutral de-
tent position.
2.
Move Transmission Control Lever (A) to neutral de-
tent and insert Locating Pin (D) into notch of Lever
and Bracket Assembly.
3.
Install Nut (N) and Clevis (M) on Rod (J) loosely,
attach Rod to Lever (B) and secure with retainer.
4.
With Lever (B) against Locating Pin, adjust Clevis
at Lever (L) until Clevis pin passes freely through
holes and secure with washer and cotter pin. Tighten
Nut (N).
5.
Install Nuts (E) and (G) and Swivel (F) loosely on Rod
(H),
attach Rod to Lever (K) and secure with retainer.
6. With Lever (C) against Locating Pin, attach Swivel to
lever and secure with retainer. iRun Nut (G) against
Swivel, then tighten Nut (E) against Swivel.
7.
Remove Locating Pin and check shifts to insure
proper operation. Readjust clevis and swivel if nec-
essary.
LEVER (A)
LEVER (L) CLEVIS (M)-NUT (N
LEVER (C)
ROD(J).
" - -
LEVER (K) ROD (H)^ NUT '(G) SWIVEL (F) ^NUT (E)
SHIFT CONTROL LEVER AND BRACKET ASSEMBLY
If disassembly of this control lever and bracket assem-
bly is necessary refer to Figure 2A for parts breakdown
and relative positioning for assembly.
SPEEDOMETER DRIVEN GEAR
Disconnect speedometer cable, remove lock plate to ex-
tension bolt and lock washer and remove lock plate. In-
sert screwdriver in lock plate slot in fitting and pry fitting
gear and shaft from extension. Pry "O" ring from groove
in fitting.
Install new "OM ring in groove in fitting. Coat "O" ring
and driven gear shaft with transmission lubricant and in-
sert shaft.
Hold the assembly so slot in fitting is toward lock plate
boss on extension and install in extension. Push fitting
into extension until lock plate can be inserted in groove
and attach to extension.
EXTENSION OIL SEAL REPLACEMENT
.1.
Remove propeller shaft as outlined in Section 4 and
disconnect any necessary items to obtain clearance.
2.
Pry seal out of extension.
3.
Wash counterbore with cleaning solvent and inspect
for damage.
4.
Prelubricate between sealing lips and coat new seal
O.D. with Permatex or equivalent and start straight
in bore in case extension. Using Tool J-5154, tap
seal into counterbore until flange bottoms against
extension.
Fig.
1A- Shift Linkage Adjustment (Typical)
Fig.
2A - Corvette 3 Speed Control Lever and Bracket Assembly
CHEVROLET CHASSIS SERVICE MANUAL
Page 373 of 659

CLUTCH AND TRANSMISSIONS 7-14
SPEED HEAVY DUTY TRANSMISSION
(WARNER MODEL T 16)
INDEX
General Description ......
Maintenance and Adjustments
Shift Linkage Adjustment
Side Cover ........
Removal .........
Disassembly
7-14
7-14
7-14
7-14
7-14
7-14
Assembly 7-14
Installation • 7-15
Other Maintenance
&
Adjustment
Operations See 3-Speed Saginaw Section
Transmission Replacement . . . See 3-Speed Saginaw Section
GENERAL DESCRIPTION
The Borg-Warner heavy duty three speed fully syn-
chronized (all forward gears) transmission incorporates
helical gears throughout specially designed to provide
high torque capacity, and gear teeth proportion to operate
at high speeds with neither excessive heat generation nor
excessive frictional losses. Shafts, bearings, high ca-
pacity clutches and other precision parts are held to
close limits providing proper clearances necessary for
durability during extended heavy usage.
The main drive gear is supported by a heavy duty ball
bearing at the front end of the transmission case and is
piloted at its front end in an oil impregnated bushing
mounted in the engine crankshaft. The front end of the
mainshaft is piloted in a row of roller bearings set into
the hollow end of the main drive gear and the rear end
is carried by a heavy duty ball bearing mounted in the
front of the extension housing.
The countergear is carried on a double row of rollers
at both ends while thrust is taken on thrust washers lo-
cated between the ends of the gear and the thrust bosses
in the case. An anti-rattle plate assembly at the front
of the countergear provides a constant spring tension be-
tween the counter and clutch gears to reduce torsional
vibrations. The reverse idler gear is carried on 25
roller bearings while thrust is taken on thrust washers
located between the ends of the gear and the thrust bosses
of the case.
Gear shifting is manual through shift control rods from
the shifter tube in the mast jacket to the rearward shift
lever of the side cover assembly for first and reverse
gear; and through a cross shaft assembly attached to the
forward side cover lever for second and third gear. All
three forward gears are fully synchronized. The syn-
chronizer assemblies consist of a clutch hub, clutch
sleeve, two clutch key springs and three energizer clutch
keys and are retained as an assembly on the main shaft
by a snap ring. The transmission may be used as an aid
in deceleration by downshifting in sequence without
double-clutching or any gear clashing. Reverse is not
synchronized, however, it is a helical gear to insure
quiet operation.
MAINTENANCE AND ADJUSTMENTS
Refer to similar procedures under the 3-speed Saginaw
Transmission Section for—Column Mounted Shift Linkage
Adjustment, Speedometer Driven Gear and Oil Seal Re-
placement, Extension Oil Seal Replacement and Trans-
mission Replacement. ~~
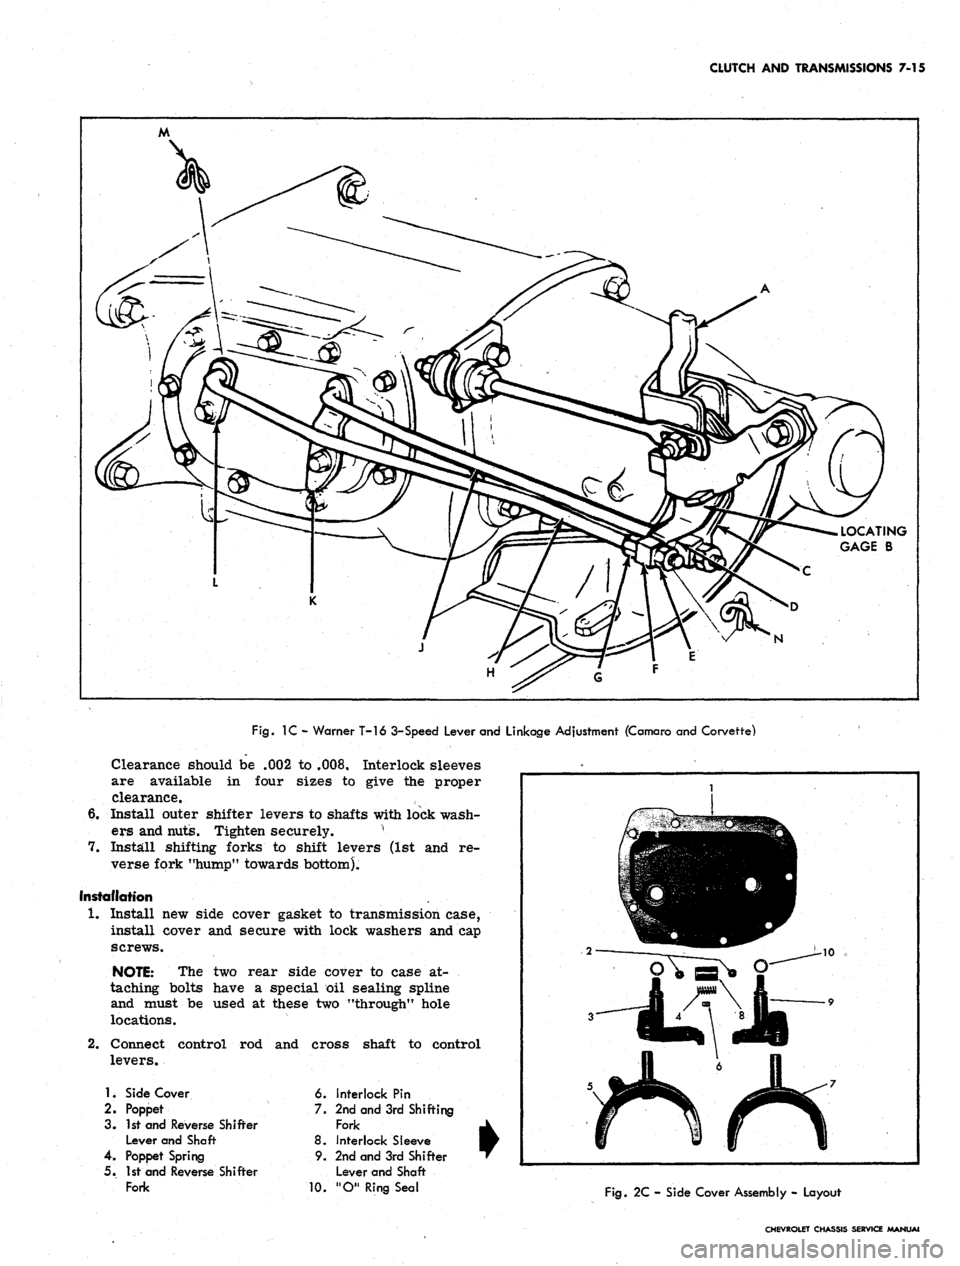
Camaro and Corvette Floor Shift Linkage Adjustment
(Fig.
lc)
1.
Set Lever (L), (K) in neutral position.
2.
Move Lever Assembly (A) and Levers (C), (D) to
neutral position and insert Locating Gauge (B) into
control Lever Bracket Assembly.
3.,
Install Rod (H) with Retainer (M) on Lever (L).
4.
With two Jam Nuts (G), (E) and Swivel (F) loose on
Rod (H) insert and attach Swivel with Retainer (N)
to Lever (D).
5.
Repeat steps 3 and 4 for Rod (J) and Levers (C
&
K).
6. Remove' Locating Gauge and check shift to insure
proper operation.
SIDE COVER ASSEMBLY
Removal
1.
Drain transmission and disconnect control rod and
cross shaft from side cover levers. *
2.
Remove nine cap screws securing the transmission
side cover assembly to transmission, case and re-
move cover assembly, shifting forks, and gasket.
Disassembly (Fig. 2C) '
1.
Remove shifting forks from shift lever assemblies.
2.
Remove nut and lock washer from each shift lever
shaft.
3.
Remove outer shift levers and lightly tap shift lever
shafts from assembly.
4.
Remove two steel balls, poppet spring, interlock pin
and interlock sleeve from cover.
5.
Remove "O" ring seals from shift lever shafts.
Assembly (Fig. 2C)
1.
Install new "O" ring seals to shift lever shafts.
2.
Install low and reverse shifter shaft and plate as-
sembly to cover.
3.
Place shifter shaft and plate assembly in neutral po-
sition, middle detent, and install interlock sleeve,
ball, poppet spring and interlock pin.
4.
Install remaining poppet ball and then install second
and third shifter shaft and plate assembly.
NOTE: Installation is easiest if shifter shaft
and plate assembly passes over ball in its neu-
tral position.
5.
Check clearance between end of interlock sleeve and
shifter shaft and plate cams when one plate is in
neutral and the other is shifted into gear position.
CHEVROLET CHASSIS SERVICE MANUAL
Page 374 of 659
CLUTCH AND TRANSMISSIONS 7-15
LOCATING
GAGE B
N
Fig.
1C - Warner T-16 3-Speed Lever and Linkage Adjustment (Camaro and Corvette)
Clearance should be .002 to .008. Interlock sleeves
are available in four sizes to give the proper
clearance.
6. Install outer shifter levers to shafts with lock wash-
ers and nuts. Tighten securely. v
7.
Instill shifting forks to shift levers (1st and re-
verse fork "hump" towards bottom).
Installation
1.
Install new side cover gasket to transmission case,
install cover and secure with lock washers and cap
screws.
NOTE: The two rear side cover to case at-
taching bolts have a special oil sealing spline
and must be used at these two "through" hole
locations.
2.
Connect control rod and cross shaft to control
levers.
1.
Side Cover
2.
Poppet
3. 1st and Reverse Shifter
Lever and Shaft
4.
Poppet Spring
5. 1st and Reverse Shifter
Fork
6. Interlock Pin
7. 2nd and 3rd Shifting
Fork
8. Interlock Sleeve
9. 2nd and 3rd Shifter
Lever and Shaft
10.
"O11 Ring Seal
Fig.
2C - Side Cover Assembly - Layout
CHEVROLET CHASSIS SERVICE MANUAl
Page 388 of 659
CLUTCH AND TRANSMISSIONS 7-29
ROD
(E)~X\
or
POINT OF-i-7V
CONTACT
i
(2)
-
VIEW
^ROD
(C
LLEVER
r-D
I
j
.——j
A
{
(D)
ETENT
FWD.
B
\_
(?) LOAD (X)
SWIVEL (J)-\
ROD(CK V
NUT (B)-—-^
SPACER
(H)-^
K
/ / n
/LOAD (Y)
I^-NUT
(A)
k-.O94
/^A
VIEWB
L-DETENT
(F)
AQUATING LEVER
-PART
OF
LEVER
&
(G)
BRKT. ASM.
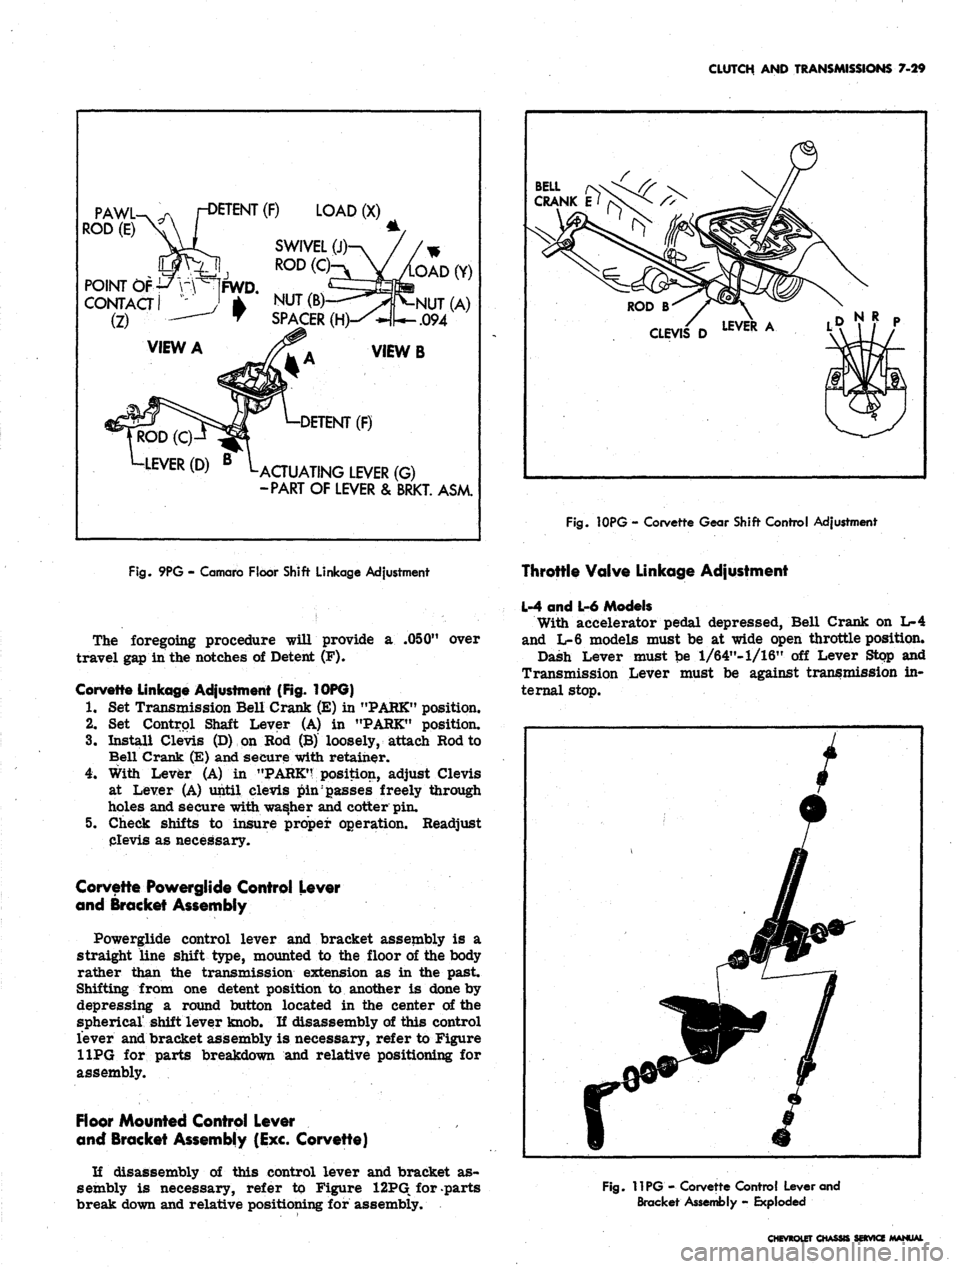
Fig.
10PG - Corvette Gear Shift Control Adjustment
Fig.
9PG - Comoro Floor Shift Linkage Adjustment
The foregoing procedure will provide a .050" over
travel gap in the notches of Detent (F).
Corvette Linkage Adjustment (Fig. 10PG)
1.
Set Transmission Bell Crank (E) in "PARK" position.
2.
Set Control Shaft Lever (A) in "PARK" position.
3.
Install Clevis (D) on Rod (B) loosely, attach Rod to
Bell Crank (E) and secure with retainer.
4.
With Lever (A) in "PARK'? position, adjust Clevis
at Lever (A) until clevis pin passes freely through
holes and secure with washer and cotter pin.
5. Check shifts to insure proper operation. Readjust
Clevis as necessary.
Corvette Powerglide Control Lever
and Bracket Assembly
Powerglide control lever and bracket assembly is a
straight line shift type, mounted to the floor of the body
rather than the transmission extension as in the past.
Shifting from one detent position to another is done by
depressing a round button located in the center of the
spherical' shift lever knob. If disassembly of this control
lever and bracket assembly is necessary, refer to Figure
11PG for parts breakdown and relative positioning for
assembly.
Floor Mounted Control Lever
and Bracket Assembly (Exc. Corvette)
If disassembly of this control lever and bracket as-
sembly is necessary, refer to Figure 12PG for parts
break down and relative positioning for assembly.
Throttle Valve Linkage Adjustment
L-4 and L-6 Models
With accelerator pedal depressed, Bell Crank on L-4
and L-6 models must be at wide open throttle position.
Dash Lever must be 1/64"-1/16" off Lever Stop and
Transmission Lever must be against transmission in-
ternal stop.
Fig.
11PG - Corvette Control Lever and
Bracket Assembly - Exploded
CHEVtOLET CHASSIS SERVICE
Page 407 of 659
SECTION 8
FUEL TANK AND EXHAUST SYSTEMS
CONTENTS OF THIS SECTION
Page
Chevrolet .. . . 8-1
Fuel Tanks 8-1
Exhaust Systems 8-5
Chevelle 8-8
Fuel Tanks 8-8
Exhaust Systems 8-11
Chevy n ...... 8-13
Fuel Tanks 8-13
Page
Exhaust Systems 8-16
Corvette 8-18
Fuel Tanks 8-18
Exhaust Systems 8-24
Camaro 8-26
Fuel Tank 8-26
Exhaust System 8-30
Special Tools 8-33
CHEVROLET
FUEL TANKS
INDEX
Page
Page
General Description
Component Part Replacement
Fuel Tank
8-1 Fuel Lines 8-3
8-2 Fuel Tank Vent Lines 8-4
8-2 Metering Units (Gauge Sending Unit ) 8-4
GENERAL DESCRIPTION
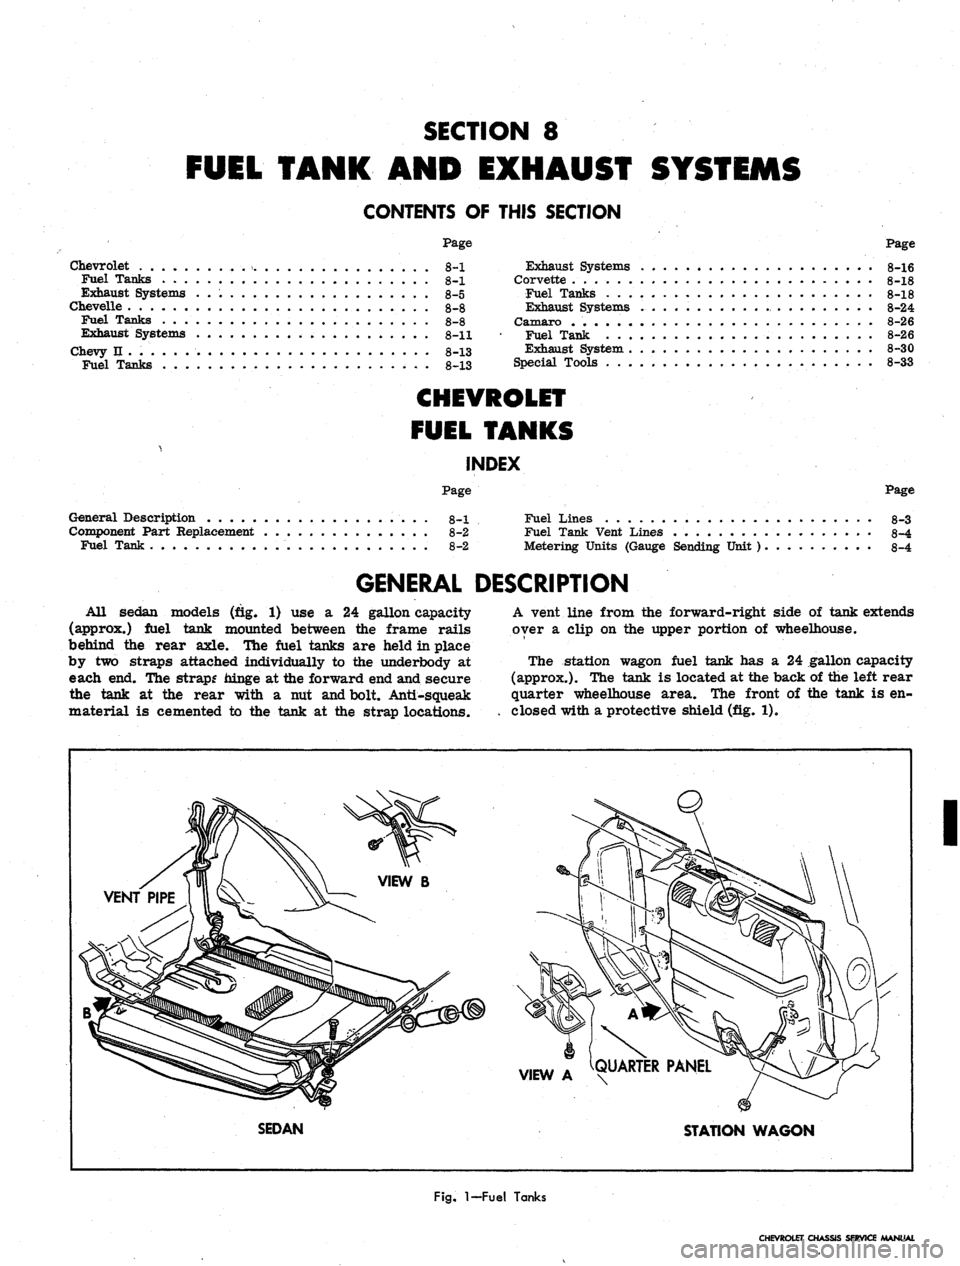
All Sedan models (fig. 1) use a 24 gallon capacity
(approx.) fuel tank mounted between the frame rails
behind the rear axle. The fuel tanks are held in place
by two straps attached individually to the underbody at
each end. The strap? hinge at the forward end and secure
the tank at the rear with a nut and bolt. Anti-squeak
material is cemented to the tank at the strap locations.
A vent line from the forward-right side of tank extends
over a clip on the upper portion of wheelhouse.
The station wagon fuel tank has a 24 gallon capacity
(approx.). The tank is located at the back of the left rear
quarter wheelhouse area. The front of the tank is en-
closed with a protective shield (fig. 1).
VIEW A ^QUARTER PANEL
SEDAN
STATION WAGON
I
Fig.
1-Fuel
Tanks
CHEVROLET CHASSIS SERVICE MANUAL
Page 410 of 659
FUEL TANK AND EXHAUST SYSTEMS 8-4
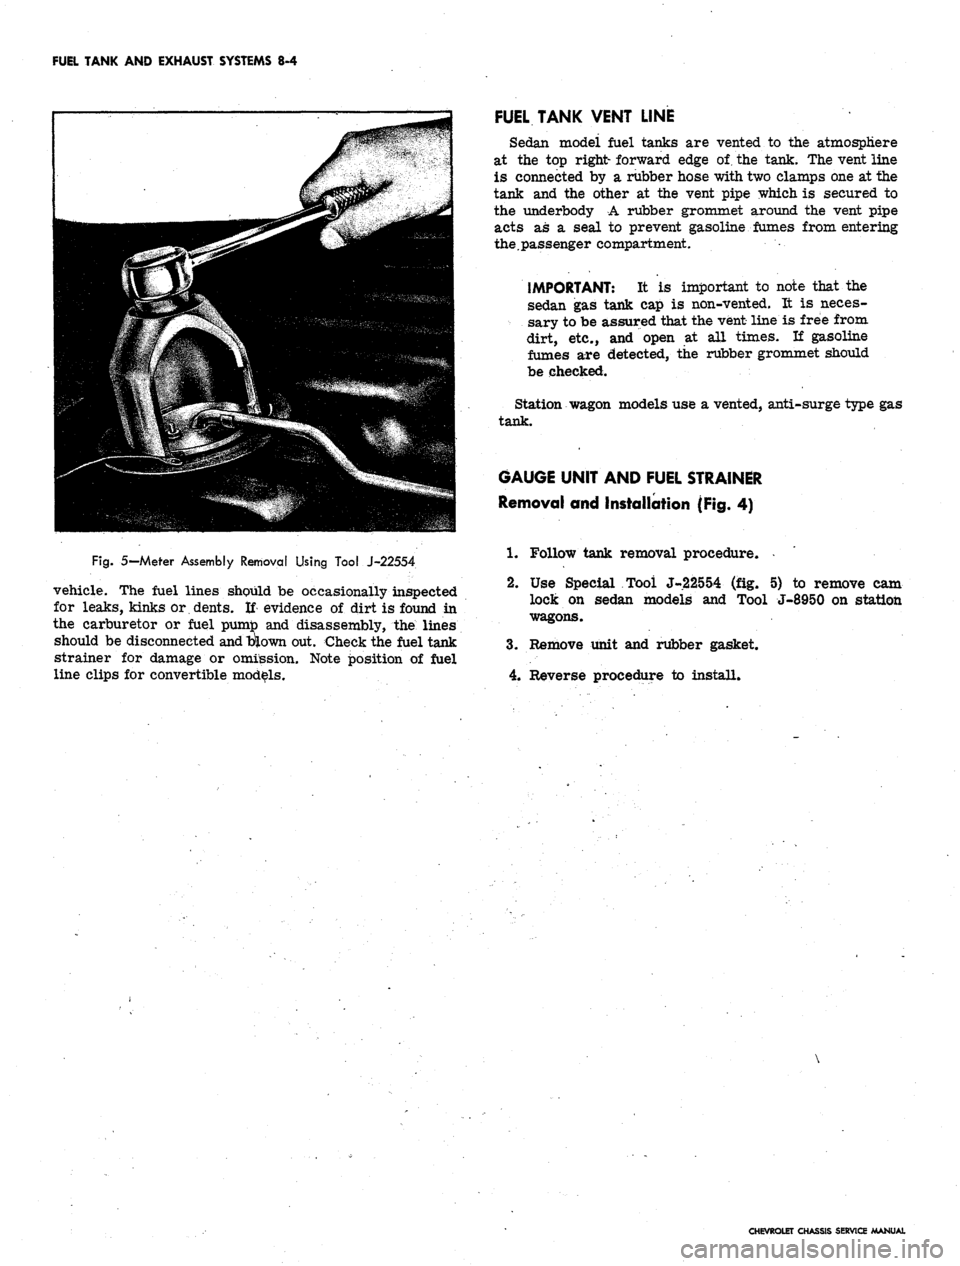
Fig.
5— Meter Assembly Removal Using Tool J-22554
vehicle. The fuel lines should be occasionally inspected
for leaks, kinks or dents. If evidence of dirt is found in
the carburetor or fuel pumto and disassembly, the lines
should be disconnected
and
blown out. Check the fuel tank
strainer for damage or omission. Note position of fuel
line clips for convertible models.
FUEL TANK VENT LINE
Sedan modei fuel tanks are vented to the atmosphere
at the top right- forward edge of. the tank. The vent line
is connected by a rubber hose with two clamps one at the
tank and the other at the vent pipe which is secured to
the underbody A rubber grommet around the vent pipe
acts as a seal to prevent gasoline fumes from entering
the.passenger compartment.
IMPORTANT: It is important to note that the
sedan gas tank cap is non-vented. It is neces-
sary to be assured that the vent line is free from
dirt, etc., and open at all times. If gasoline
fumes are detected, the rubber grommet should
be checked.
Station wagon models use a vented, anti-surge type gas
tank.
GAUGE UNIT AND FUEL STRAINER
Removal and Installation (Fig. 4)
1.
Follow tank removal procedure.
2.
Use Special Tool J-22554 (fig. 5) to remove cam
lock on sedan models and Tool J-8950 on station
wagons.
3.
Remove unit and rubber gasket.
4.
Reverse procedure to install.
CHEVROLET CHASSIS SERVICE MANUAL
Page 411 of 659
FUEL TANK
AND
EXHAUST SYSTEMS
8-5
EXHAUST SYSTEMS
INDEX
Page
General Description
. . 8-5
Component Part Replacement
8-5
Muffler Assembly.
8-5
Exhaust Pipes.
8-5
Tail Pipes.
8-5
GENERAL DESCRIPTION
All exhaust systems used
on the 1967
Chevrolet
are
exhaust systems
(fig. 7) are
available
as
regular produc-
the split system type
in
which the. component parts
are
tion equipment
on the 427 cu. in.
displacement
V-8 en-
secured together with clamps.
The
single exhaust system gines
and as an
option
on the
other (except
283 cu. in.)
used
on L-6
engine models
(fig. 6)
consists
of an
exhaust
V-8
engines. These systems consist
of two
exhaust
pipe, muffler, tailpipe
and
attaching hardware.
On V-8
pipes, mufflers, tailpipes with resonators
and
attaching
engine single exhaust models
a
crossover pipe
is
added hardware.
All
exhaust systems
are
suspended on brackets
to connect
the
right exhaust manifold
to the
system. Dual with insulators
for
rattle free operation.
COMPONENT PART REPLACEMENT
Care should
be
taken
to
have
the
exhaust pipe, muffler
or tail pipe
in
proper relation with each other. Incorrect
alignment frequently causes annoying rattles
due to in-
correct clearances.
MUFFLER ASSEMBLY
Remove
and
Replace
1.
Remove "U" bolt clamp
at
center mounting.
2.
Remove
"U"
bolt clamp
at
forward
end of
muffler
pipe.
3.
Disengage muffler
at
exhaust
and
tail pipe
connections.
4.
Three-fourths inch clearance should
be
allowed
be-
tween
the
muffler bracket (hanger)
and
crossmember
at installation.
5. Install unit with
the
flat side
of the
muffler showing.
EXHAUST PIPE (CROSSOVER WITH
V-8
ENGINE)
Remove
and
Replace
1.
Remove
two
nuts, extension
and
packings-separate
pipe from manifold.
2.
3.
Disassemble
pipe.
"U"
damp from muffler
and
remove
Attach pipe
to
muffler, then secure
to
manifold. Note
clearances
for the
standard
and
automatic control
linkages, underbody
and
crossmember. Contact
of
exhaust pipe
to
engine panrail
is
permissible.
4.
Tighten nuts uniformly.
TAIL PIPE AND/OR RESONATOR
Remove
and
Replace
1.
Remove
"U"
clamp attachment
at
muffler.
2.
Remove screw attachment
at
tail pipe rear hanger
assembly.
3.
Remove tail pipe.
4.
Replace tail pipe
at
muffler, then install
at
hanger
Do
not
secure attachments until clearances have been
checked. Check position
of
hanger
so
that interplates
are parallel.
5. Torque nuts
7-9 ft. lbs. at
hanger
and 10-15 ft. lbs.
at muffler.
CHEVROLET CHASSIS
SEI
Page 414 of 659
FUEL TANK AND EXHAUST SYSTEMS
8-8
CHEVELLE
FUEL TANKS
INDEX
Page
General Description.
g.g
Component Part Replacement
8-8
Fuel Tanks
. 8-8
Fuel Lines
8-8
Metering Units (Gauge, Sending Unit)
Fuel Tank Filler Neck Caps.
. .
Fuel Tank Vent Lines
Page
8-8
8-8
8-9
GENERAL DESCRIPTION
All models
use a 20
gallon capacity (approx.) fuel tank
mounted between
the
frame rails behind
the
rear axle.
The fuel tanks
are
basically
the
same
for
sedan, 2-seat
station wagon
and
pickup models except
for
filler neck
location
and
venting
(fig. 8).
All fuel tanks
are
vented
to the
atmosphere. Sedan
model tanks have
an
external vent hose and pipe assem-
bly
(fig. 11) and use a
non-vented fuel cap. Station wagon
and pickup model tanks
are
vented through
a
hose
and
vent pipe assembly
to the
filler neck
(fig. 8)
and
use a
vented, anti-surge type
gas cap. The
fuel caps
are two
different designs conforming
to SAE
standards
and are
not interchangeable.
The filler neck assembly
on
sedan models
is a
rear
fill design located behind
the
center
bar of the
bumper.
Station wagon
and
sedan pickup model filler neck assem-
blies
are
located
in
the left rear quarter panel.
The fuel pickup pipe
is
built integrally with
the
tank
gauge, located
at the
top-front center
of
the tank.
A
fine
mesh screen
is
located
at
the bottom-end
of the
fuel pick-
up pipe
to
prevent
the
entrance
of
foreign material into
the fuel system.
The sedan fuel tanks
are
held
in
place
by
two metal
straps attached individually
to the
underbody
at
each
end.
The straps hinge
at the
forward end and secure
the
tank
at
the
rear with
an
adjustable bolt
and nut
assembly.
The station wagon
and
pickup models have
a
frame
mounted fuel tank secured with straps
to
front and rear
supports.
COMPONENT PART REPLACEMENT
FUEL TANK
Draining Tank
The absence
of a
drain plug
in the gas
tanks makes
it
necessary
to
siphon fuel from
the
tank when draining
is
needed. Refer
to the
recommended draining procedures
previously outlined under Chevrolet Models
in
this
section.
Removal
and
Installation (Sedan Models)
1.
Raise vehicle.
2.
Drain fuel tank.
3.
Disconnect fuel pickup line
and
gauge wires from
tank unit.
4.
Disconnect vent hose from tank.
5. Remove tank support straps and lower tank carefully.
6.
To
install, reverse
the
removal procedure.
Removal
and
Installation
(Station Wagon
and
Pickup)
1.
Follow Steps
1
thru
3
outlined under sedan models.
2.
Remove tank support straps.
3.
Remove frame screw attachments from
the
front
support
(fig. 8).
4.
Guide tank forward
and
remove.
5.
To
install, reverse removal procedure.
FUEL LINES
The fuel lines, extending from fuel tank toiiuelpump,
are routed
on the
underside
of the
underbody along
the
right side
of the
vehicle opposite
the
single exhaust
sys-
tem.
The
fuel lines should occasionally
be
inspected
for
leaks,
kinks,
or
dents.
If
evidence
of
dirt
is
found
in the
carburetor
or
fuel pump
on
disassembly,
the
lines should
be disconnected
and
blown
out.
Check
the
fuel tank
strainer
for
damage
or
omission. Fuel lines
are of 5/16"
diameter tubing with beaded type ends
for
connections
of
hoses.
FUEL PIPE RETAINER
CUP
Removal
and
Installation
If fuel pipes
and
retainer clips
are
removed, Tool
J-7777 should
be
used
to
install
new
retainer clips
(fig.
10).
After removal
of the old
clip from
the
frame, position
the
new
clip
in the
location
of the old
clip. Index
the
"blind rivet"
and
press hard (hand pressure should
do)
to expand rivet.
GAUGE UNIT
AND
FUEL STRAINER
Removal
and
Installation
(Fig. 11)
1.
Drain tank
to a
level below
the
unit.
2.
Disconnect fuel pickup line
and
gauge unit wire.
3.
Use
special Tool J-8950
to
remove
cam
lock.
Re-
move unit
and
rubber gasket.
CAUTION: Carefully remove unit
so as not to
damage screen
on the end of
the pipe.
4.
Clean screen
by
blowing
out
with compressed
air.
5. Reverse procedure
to
install.
FUEL TANK FILLER NECK CAPS
The fuel tank filler neck caps
are
non-vented with
an
anti-surge feature. Station wagons have vented caps.
(Refer
to
"Fuel Tank Vent Lines").
CHEVROLET CHASSIS SERVICE MANUAL