lock CHEVROLET CAMARO 1967 1.G Chassis Repair Manual
[x] Cancel search | Manufacturer: CHEVROLET, Model Year: 1967, Model line: CAMARO, Model: CHEVROLET CAMARO 1967 1.GPages: 659, PDF Size: 114.24 MB
Page 140 of 659
CORVETTE BODY 1B-33
Fig.
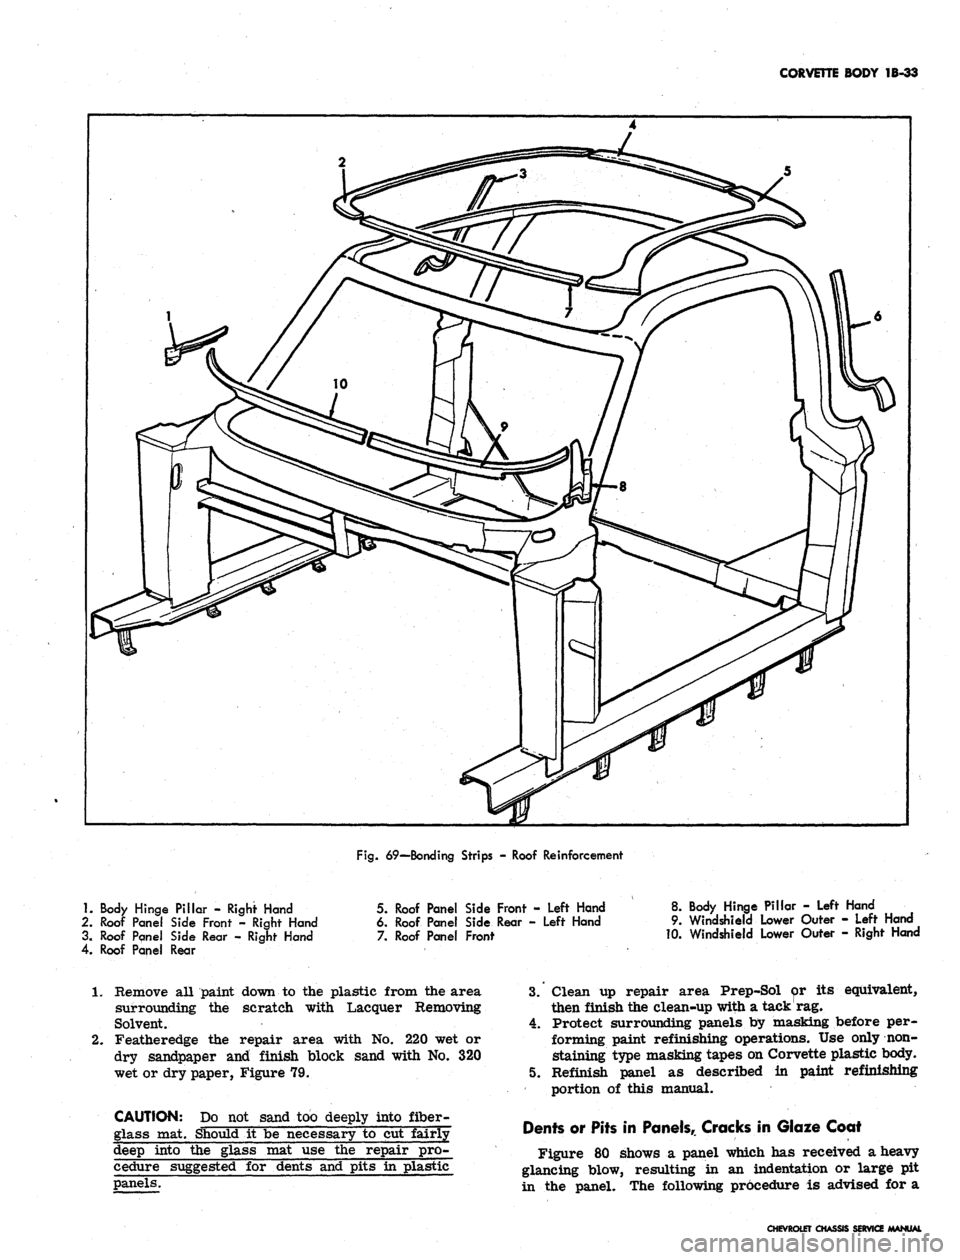
69~Bonding Strips - Roof Reinforcement
1.
Body Hinge Pillar - Right Hand
2.
Roof Panel Side Front - Right Hand
3. Roof Panel Side Rear - Right Hand
4.
Roof Panel Rear
5. Roof Panel Side Front - Left Hand
6. Roof Panel Side Rear - Left Hand
7. Roof Panel Front
8. Body Hinge Pillar - Left Hand
9. Windshield Lower Outer - Left Hand
10.
Windshield Lower Outer - Right Hand
1.
Remove all paint down to the plastic from the area
surrounding the scratch with Lacquer Removing
Solvent.
2.
Featheredge the repair area with No. 220 wet or
dry sandpaper and finish block sand with No. 320
wet or dry paper, Figure 79.
CAUTION: Do not sand too deeply into fiber-
glass mat. Should it be necessary to cut fairly
deep into the glass mat use the repair pro-
cedure suggested for dents and pits in plastic
panels.
3.
Clean up repair area Prep-Sol or its equivalent,
then finish the clean-up with a tack rag.
4.
Protect surrounding panels by masking before per-
forming paint refinishing operations. Use only non-
staining type masking tapes on Corvette plastic body.
5. Refinish panel as described in paint refinishing
portion of this manual.
Dents or Pits in Panels,. Cracks in Glaze Coat
Figure 80 shows a panel which has received a heavy
glancing blow, resulting in an indentation or large pit
in the panel. The following procedure is advised for a
CHEVROLET CHASSIS SERVICE MANUAL
Page 141 of 659
CORVETTE BODY 1B-34
1.
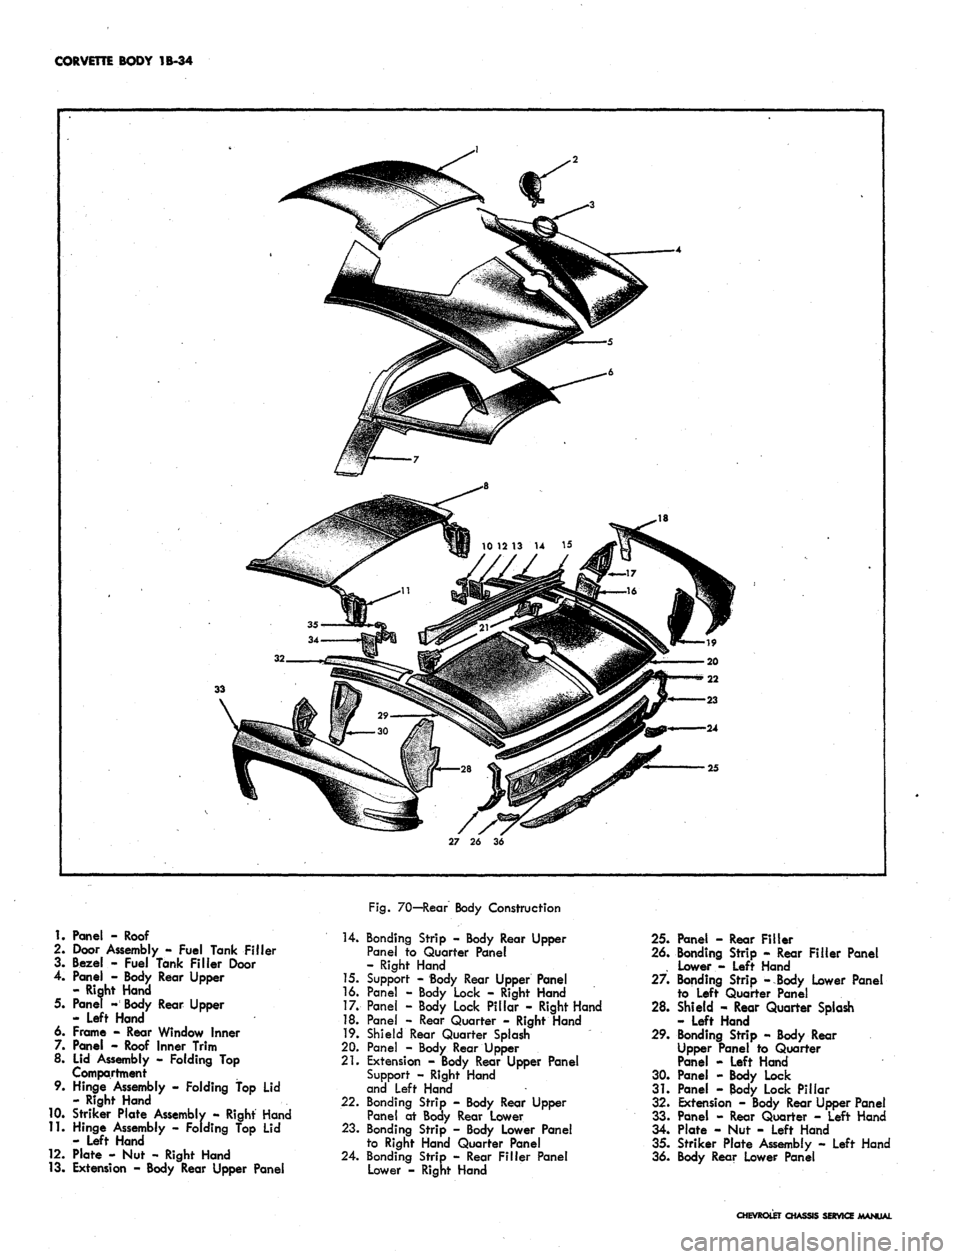
Panel - Roof
2.
Door Assembly - Fuel Tank Filler
3. Bezel - Fuel Tank Filler Door
4.
Panel - Body Rear Upper
- Right Hand
5. Panel - Body Rear Upper
- Left Hand
6. Frame - Rear Window Inner
7. Panel - Roof Inner Trim
8. Lid Assembly - Folding Top
Compartment
9. Hinge Assembly - Folding top Lid
- Right Hand
10.
Striker Plate Assembly - Right Hand
11.
Hinge Assembly - Folding Top Lid
- Left Hand
12.
Plate - Nut - Right Hand
13.
Extension - Body Rear Upper Panel
Fig.
70—Rear Body Construction
14.
Bonding Strip - Body Rear Upper
Panel to Quarter Panel
- Right Hand
15.
Support - Body Rear Upper Panel
16.
Panel - Body Lock - Right Hand
17.
Pane! - Body Lock Pillar - Right Hand
18.
Panel - Rear Quarter - Right Hand
19.
Shield Rear Quarter Splash
20.
Panel - Body Rear Upper
21.
Extension - Body Rear Upper Panel
Support - Right Hand
and Left Hand
22.
Bonding Strip - Body Rear Upper
Panel at Body Rear Lower
23.
Bonding Strip - Body Lower Panel
to Right Hand Quarter Panel
24.
Bonding Strip - Rear Filler Panel
Lower - Right Hand
25.
Panel - Rear Filler
26.
Bonding Strip - Rear Filler Panel
. Lower - Left Hand
27.
Bonding Strip -Body Lower Panel
to Left Quarter Panel
28.
Shield - Rear Quarter Splash
- Left Hand
29.
Bonding Strip - Body Rear
Upper Panel to Quarter
Panel - Left Hand
30.
Panel - Body Lock
31.
Panel - Body Lock Pillar
32.
Extension - Body Rear Upper Panel
33.
Panel - Rear Quarter - Left Hand
34.
Plate - Nut - Left Hand
35.
Striker Plate Assembly - Left Hand
36.
Body Rear Lower Panel
CHEVROLET CHASSIS SERVICE MANUAL
Page 156 of 659
CORVETTE BODY 1B-49
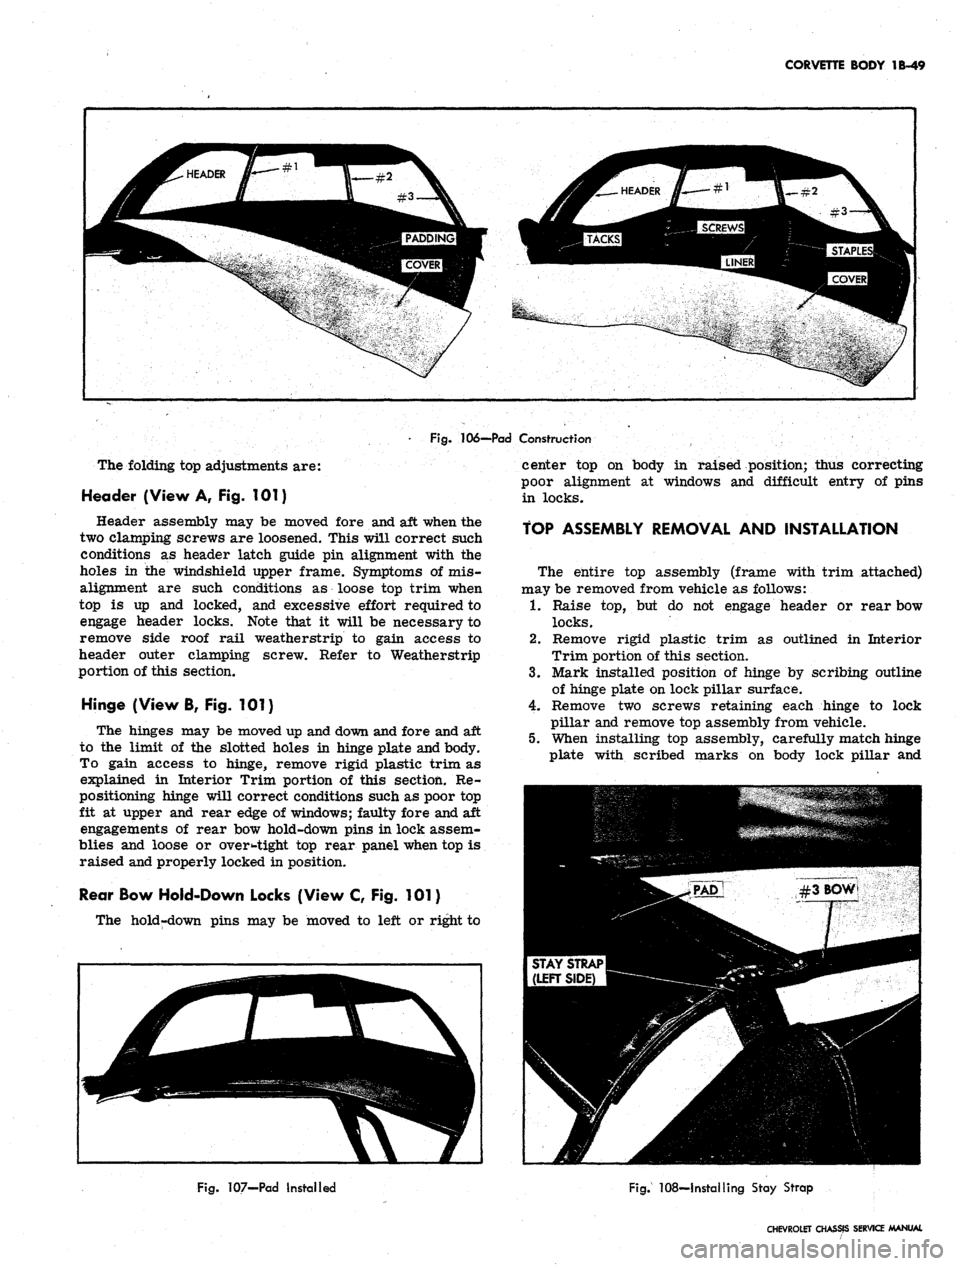
Fig.
106-—Pad Construction
The folding top adjustments are:
Header (View A, Fig. 101)
Header assembly may be moved fore and aft when the
two clamping screws are loosened. This will correct such
conditions as header latch guide pin alignment with the
holes in the windshield upper frame. Symptoms of mis-
alignment are such conditions as loose top trim when
top is up and locked, and excessive effort required to
engage header locks. Note that it will be necessary to
remove side roof rail weatherstrip to gain access to
header outer clamping screw. Refer to Weatherstrip
portion of this section.
Hinge (View B, Fig. 101)
The hinges may be moved up and down and fore and aft
to the limit of the slotted holes in hinge plate and body.
To gain access to hinge, remove rigid plastic trim as
explained in Interior Trim portion of this section. Re-
positioning hinge will correct conditions such as poor top
fit at upper and rear edge of windows; faulty fore and aft
engagements of rear bow hold-down pins in lock assem-
blies and loose or oversight top rear panel when top is
raised and properly locked in position.
Rear Bow Hold-Down Locks (View C, Fig. 101)
The hold-down pins may be moved to left or right to
center top on body in raised position; thus correcting
poor alignment at windows and difficult entry of pins
in locks.
TOP ASSEMBLY REMOVAL AND INSTALLATION
The entire top assembly (frame with trim attached)
may be removed from vehicle as follows:
1.
Raise top, but do not engage header or rear bow
locks.
2.
Remove rigid plastic trim as outlined in Interior
Trim portion of this section.
3.
Mark installed position of hinge by scribing outline
of hinge plate on lock pillar surface.
4.
Remove two screws retaining each hinge to lock
pillar and remove top assembly from vehicle.
5.
When installing top assembly, carefully match hinge
plate with scribed marks on body lock pillar and
Fig.
107-Pad Installed
Fig.
108—Installing Stay Strap
CHEVROLET CHASSIS SERVICE MANUAL
Page 158 of 659
CORVETTE BODY
1B-51
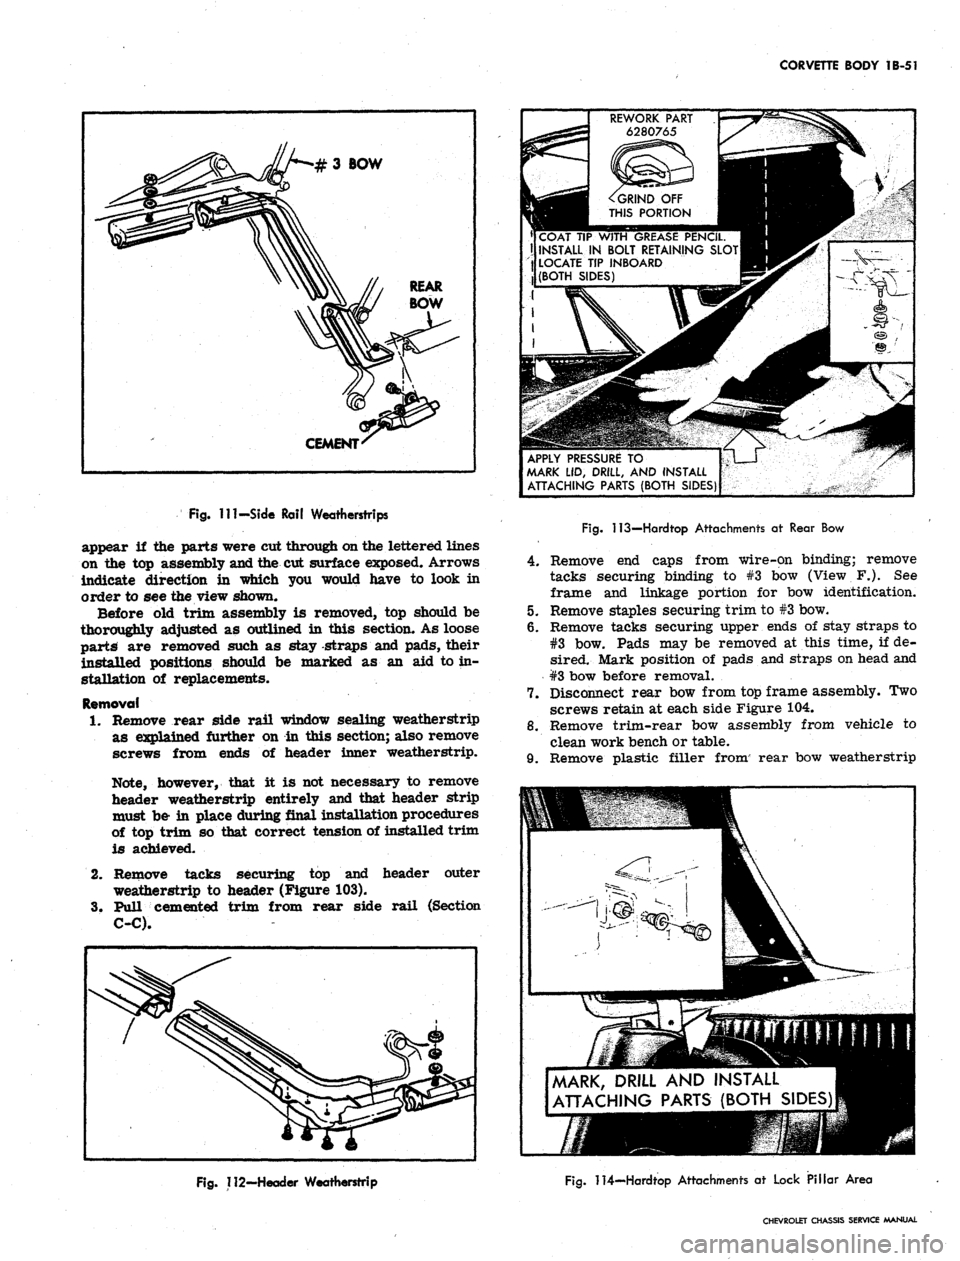
Fig.
Ill-Side Rail Weatherstrips
appear
if the
parts were cut through on the lettered lines
on
the top
assembly and the
cut
surface exposed. Arrows
indicate direction
in
which
you
would have
to
look
in
order
to see
the view shown.
Before
old
trim assembly
is
removed,
top
should
be
thoroughly adjusted
as
outlined
in
this section.
As
loose
parts
are
removed such
as
stay -straps
and
pads, their
installed positions should
be
marked
as an aid to in-
stallation
of
replacements.
Removal
1.
Remove rear side rail window sealing weatherstrip
as explained further
on in
this section; also remove
screws from ends
of
header inner weatherstrip.
Note, however, that
it is not
necessary
to
remove
header weatherstrip entirely
and
that header strip
must
be- in
place during final installation procedures
of
top
trim
so
that correct tension
of
installed trim
is achieved.
2.
Remove tacks securing
top and
header outer
weatherstrip
to
header (Figure
103).
3.
Pull cemented trim from rear side rail (Section
C-C).
REWORK PART
6280765
^GRIND
OFF
THIS PORTION
COAT
TIP
WITH GREASE PENCIL.
II INSTALL
IN
BOLT RETAINING SLOT
LOCATE
TIP
INBOARD
(BOTH SIDES)
APPLY PRESSURE
TO
MARK
LID,
DRILL,
AND
INSTALL
ATTACHING PARTS (BOTH SIDES)
Fig.
113—Hardtop Attachments
at
Rear
Bow
4.
Remove end caps from wire-on binding; remove
tacks securing binding to #3 bow (View F.). See
frame and linkage portion for bow identification.
5.
Remove staples securing trim to #3 bow.
6. Remove tacks securing upper ends of stay straps to
#3 bow. Pads may be removed at this time, if de-
sired. Mark position of pads and straps on head and
#3 bow before removal.
7.
Disconnect rear bow from top frame assembly. Two
screws retain at each side Figure 104.
8. Remove trim-rear bow assembly from vehicle to
clean work bench or table.
9. Remove plastic filler from' rear bow weatherstrip
MARK, DRILL
AND
INSTALL
ATTACHING PARTS (BOTH SIDES)
Fig.
112-Header Weatherstrip
Fig.
114—Hardtop Attachments
at
Lock Pillar Area
CHEVROLET CHASSIS SERVICE MANUAL
Page 159 of 659
CORVETTE BODY 1B-52
and pull weatherstrip and trim from rear bow.
Section A-A shows installed position of these com-
ponents. Refer also to figure 105.
installation
1.
Find and mark center of header, #3 bow, rear bow
and leading and trailing edges of top trim. Align
these marks during installation and recheck their
alignment from time to time while installation is in
progress, especially during tacking or stapling.
2.
Assemble top trim and weatherstrip to rear bow,
referring to Section A-A and Figure 105. Note that
filler strip locks this assembly together and goes
in last. Align center marks.
3.
If new pads are required, install at this time, align-
ing with marks made when old pads were removed.
Figure 106 shows pad construction; Figure 107 shows
pad installed.
4.
Install top trim-rear bow assembly on top frame
with four screws removed at disassembly.
5.
Lock down rear bow in desired "top up" position.
Pull up stay straps and staple or tack to #3 bow
(fig. 108).
6. Pull leading edge of trim iip to header and align
center marks. Smooth out fabric and clamp, tack
or staple temporarily to header.
7.
Draw window extension up to #3 bow, aligning cen-
tering marks. Turn an ample amount of fabric under
and tack to #3 bow. Apply neoprene trim cement,
GM Part #3695016 or equivalent, to area shown in
View D of Figure 102. Follow directions on package.
8. Draw roof portion of trim over #3 bow, align marks
and tack on staple.
9. Trim off excess material and install wire-on binding
as shown in Figure 109 and View D of Figure 102.
Install binding caps.
10.
Remove temporary clamps or fastenings holding trim
to header.
11.
With header locked down, pull trim assembly up tight
and mark for final installation.
12.
Apply trim cement to header and rear side rail.
13.
Release header from windshield. Tack or staple trim
to header (fig. 103).
14.
Apply trim to rear side frame, previously cemented.
15.
Install weatherstrips which were removed at dis-
assembly and install retaining screws in header
weatherstrip.
16.
Make any adjustments necessary, following instruc-
tions listed under Folding Top—Adjustments.
FRAME AND LINKAGE
Figure 110 illustrates construction features of the
folding top frame and linkage. Various cross sections in
Figure 110 show the pivoting joints and their assembly.
If an operation is being performed which requires
removal of folding top trim, follow directions in this
section. The entire frame assembly may be removed and
replaced as a unit. Follow instructions for Folding Top
Trim and Rear Window Assembly and Top Assembly—
Removal and Installation.
The pivoting joints should be lubricated with light
machine oil once a year. Apply oil sparingly so as not
to stain top trim.
WEATHERSTRIP
Side Rail Weatherstrip
Figure 111 illustrates installation of side rail weather-
strip which acts to seal window opening. The weather-
strip is held in place by studs which are part of the
weatherstrip assembly, and by neoprene base cement
which is applied between weatherstrip and side rail
surface.
When replacing weatherstrip remove all rust, old
cement and foreign material from the surfaces to be
cemented, to assure successful bonding. Use only good
quality neoprene cement suitable for weatherstrip
application.
Header Weatherstrip
Weatherstrip assembly is retained to the header panel
by a combination of studs, sheet metal screws and special
fasteners as shown in Figure 112, along with neoprene
base weatherstrip cement.
Figure 99 shows' a cross section of weatherstrip taken
through a special fastener. To replace fastener, rotate
ninety degrees to align fastener head with slot. Follow
directions for cementing in the Side Rail Weatherstrip
instructions preceding this write up.
ADDING HARDTOP (ROOF PANEL ASSEMBLY)
An available roof panel assembly (hardtop) complete
can be added to convertible model Corvettes. The hard-
ware is included with the panel assembly.
Reworking of a plastic part (one for each side of the
roof panel) can be used as a marker for drilling of two
required holes in the folding top compartment lid* Hard-
ware is attached at four locations — two on the lid and
two (one each side) at the lock pillar area as follows:
1.
Rework two plastic retainers (#6280765) (used on
Chevrolet and Corvair door inner panels for trim
retention) as shown by Figure 113.
2.
Slide the reworked plastic retainers into the bolt re-
tainer slots on each side of the hardtop rear bow
(position plastic tip inboard).
3.
Mark the hardtop reveal molding at the approximate
location of the two plastic retainers,
4.
Mark the tips of the two plastic retainers with a
china marker pencil.
5.
Close the soft top compartment lid.
6. With aid of an ^assistant, position front of hardtop
onto header and lower onto vehicle. Do not fasten
latches at windshield header.
7.
Apply hand pressure at reveal molding marks.
8. Mark roof panel attachment hole location at each
lock pillar area (fig. 114).
9. With aid of an assistant, lift roof panel straight up
off body and set roof panel aside.
10.
Mark the drill position at the four china marks with
a center punch.
11.
Place a 2" x 4" board under the top compartment lid
to prevent drill damage to folding top material. Make
certain the compartment lid is securely locked
before drilling.
12.
Drill 1/8" pilot hole at the 4 marked locations.
CHEVROLET CHASSIS SERVICE MANUAL
Page 160 of 659
CORVETTE BODY 1B-53
13.
Drill 1/2" hole at pilot hole locations.
14..
Insert ferrules furnished for holes drilled in top
compartment lid. Crimp ferrule tabs.
15.
With aid of an assistant, place the hardtop onto the
vehicle and install attaching parts at all four loca-
tions.
Lock latches at windshield header.
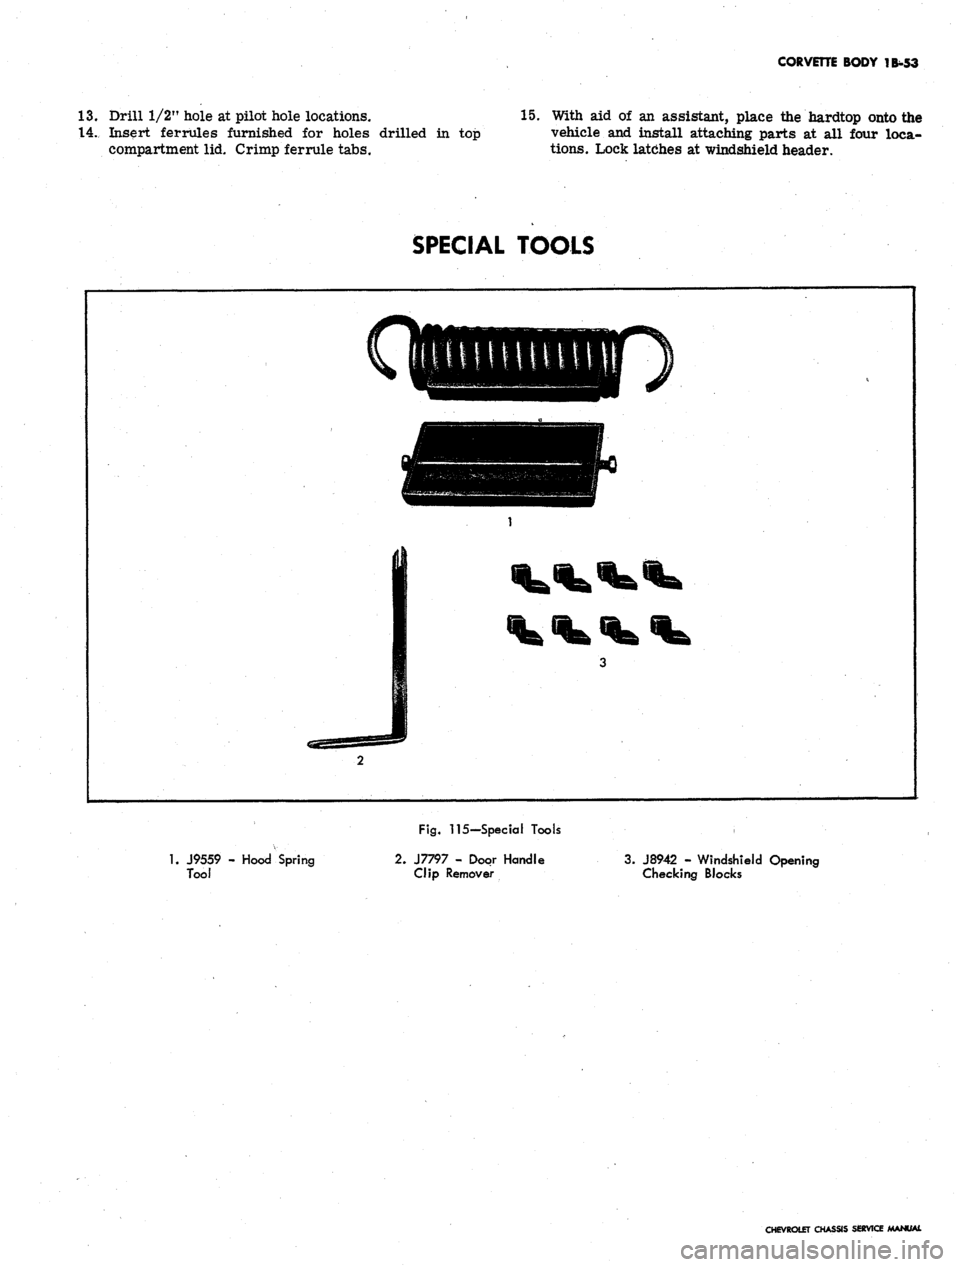
SPECIAL TOOLS
1.
J9559 - Hood Spring
Tool
Fig.
115-Special Tools
2.
J7797 - Door Handle
Clip Remover
3. J8942 - Windshield Opening
Checking Blocks
CHEVROLET CHASSIS SERVICE MANUAL
Page 167 of 659
FRONT SUSPENSION 3-3
by means of a lower control arm inner pivot cam; on the
Chevelle, Camaro and Corvette by means of upper control
arm inner support shaft shims.
Caster angle is adjusted, on the Chevrolet and Chevy n
by means of a strut rod which runs from the lower con-
trol arm forward to a frame brace; on the Chevelle,
Camaro and Corvette by means of upper control arm
inner support shaft shims.
A stabilizer bar is used on all Chevelle and Corvette
models. Chevrolet Impalas, station wagons and V-8
engine equipped models are fitted with the stabilizer bar.
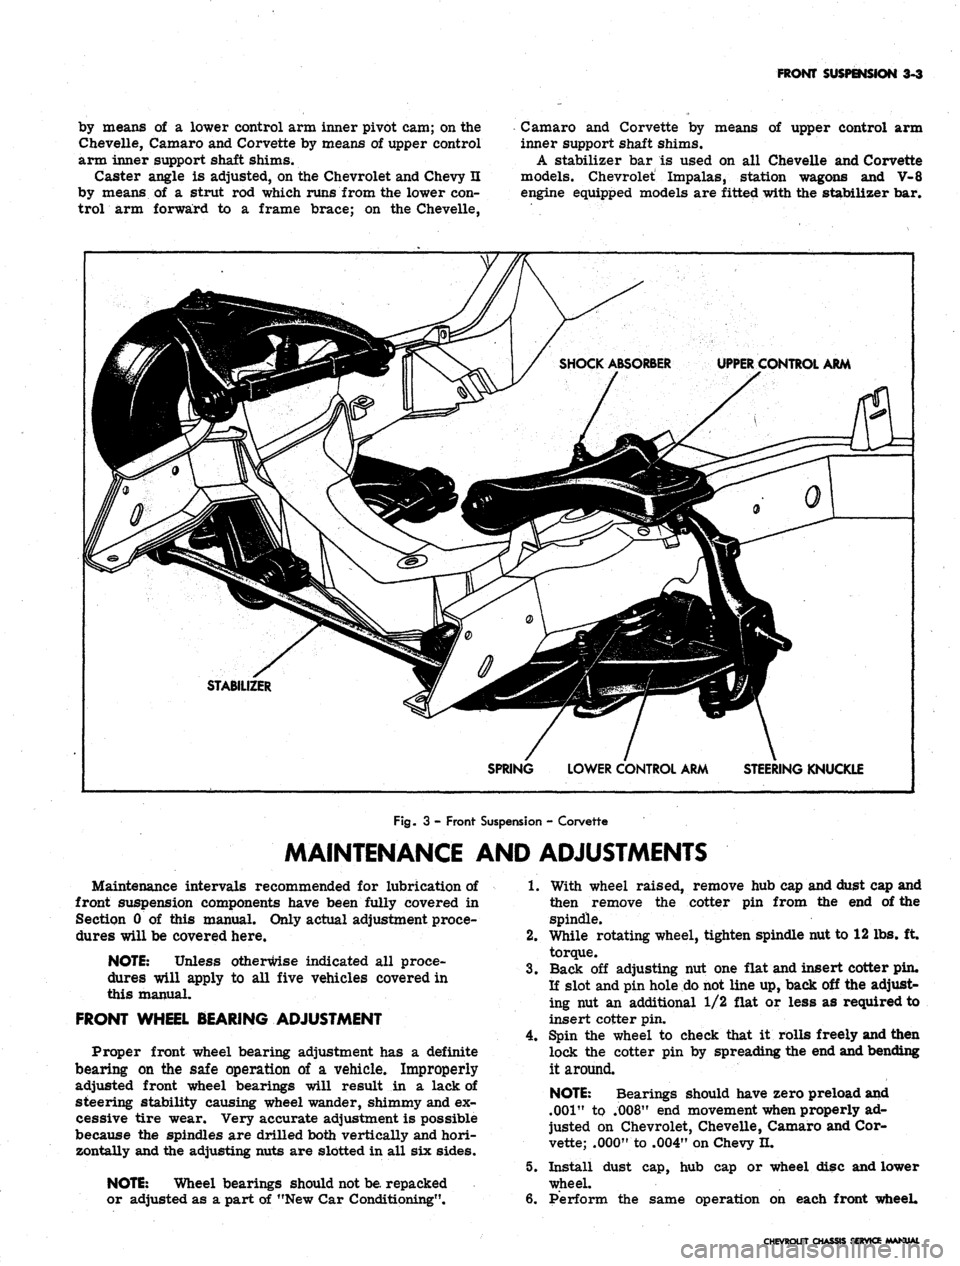
UPPER CONTROL ARM
STABILIZER
SPRING
LOWER CONTROL ARM
STEERING KNUCKLE
Fig.
3 - Front Suspension - Corvette
MAINTENANCE AND ADJUSTMENTS
Maintenance intervals recommended for lubrication of
front suspension components have been fully covered in
Section 0 of this manual. Only actual adjustment proce-
dures will be covered here.
NOTE:
Unless otherwise indicated all proce-
dures will apply to all five vehicles covered in
this manual.
FRONT WHEEL BEARING ADJUSTMENT
Proper front wheel bearing adjustment has a definite
bearing on the safe operation of a vehicle. Improperly
adjusted front wheel bearings will result in a lack of
steering stability causing wheel wander, shimmy and ex-
cessive tire wear. Very accurate adjustment is possible
because the spindles are drilled both vertically and hori-
zontally and the adjusting nuts are slotted in all six sides.
NOTE:
Wheel bearings should not
be.
repacked
or adjusted as a part of "New Car Conditioning".
1.
With wheel raised, remove hub cap and dust cap and
then remove the cotter pin from the end of the
spindle.
2.
While rotating wheel, tighten spindle nut to 12 lbs. ft
torque.
3.
Back off adjusting nut one flat and insert cotter pin.
If slot and pin hole do not line up, back off the adjust-
ing nut an additional 1/2 flat or less as required to
insert cotter pin.
4.
Spin the wheel to check that it rolls freely and then
lock the cotter pin by spreading the end and bending
it around.
NOTE:
Bearings should have zero preload and
.001"
to .008" end movement when properly ad-
justed on Chevrolet, Chevelle, Camaro and Cor-
vette; .000" to .004" on Chevy H.
5.
Install dust cap, hub cap or wheel disc and lower
wheel.
6. Perform the same operation on each front wheel.
CHEVROLET CHASSIS SERVICE MANUAL
Page 169 of 659
FRONT SUSPENSION 3-5
FRONT END ALIGNMENT
Front end alignment, that is alignment of the inter-
related steering components of the front suspension sys-
tem, must be correctly maintained to assure ease and
stability of steering and satisfactory tire life.
Alignment Preliminary Steps
Several different types of machines are available for
checking all the factors of front end alignment. The in-
structions furnished with each particular machine should
be followed. In all cases, however, checks should be
made with the vehicle level and at curb weight.
Since steering complaints are not always the result of
improper alignment a check should be made to see if any
of the following conditions exist. Any such conditions
should be corrected before proceeding further.
1.
Steering gear loose or improperly adjusted.
2.
Steering gear housing loose at frame.
3.
Excessive wear or play in spherical joints or steer-
ing shaft coupling.
4.
Tie rod or steering connections loose.
5.
Improper front spring heights.
6. Unbalanced or underinflated tires.
7.
Improperly adjusted wheel bearings.
8. Shock absorbers not operating properly.
Wheel alignment should always be made with the vehi-
cle rolled forward taking out any slack in the same man-
ner as when the vehicle is traveling forward.
Caster and Camber Adjustment
NOTE: Before adjusting caster and camber
angles, the front bumper should be raised and
quickly released to allow car to return to its
normal height.
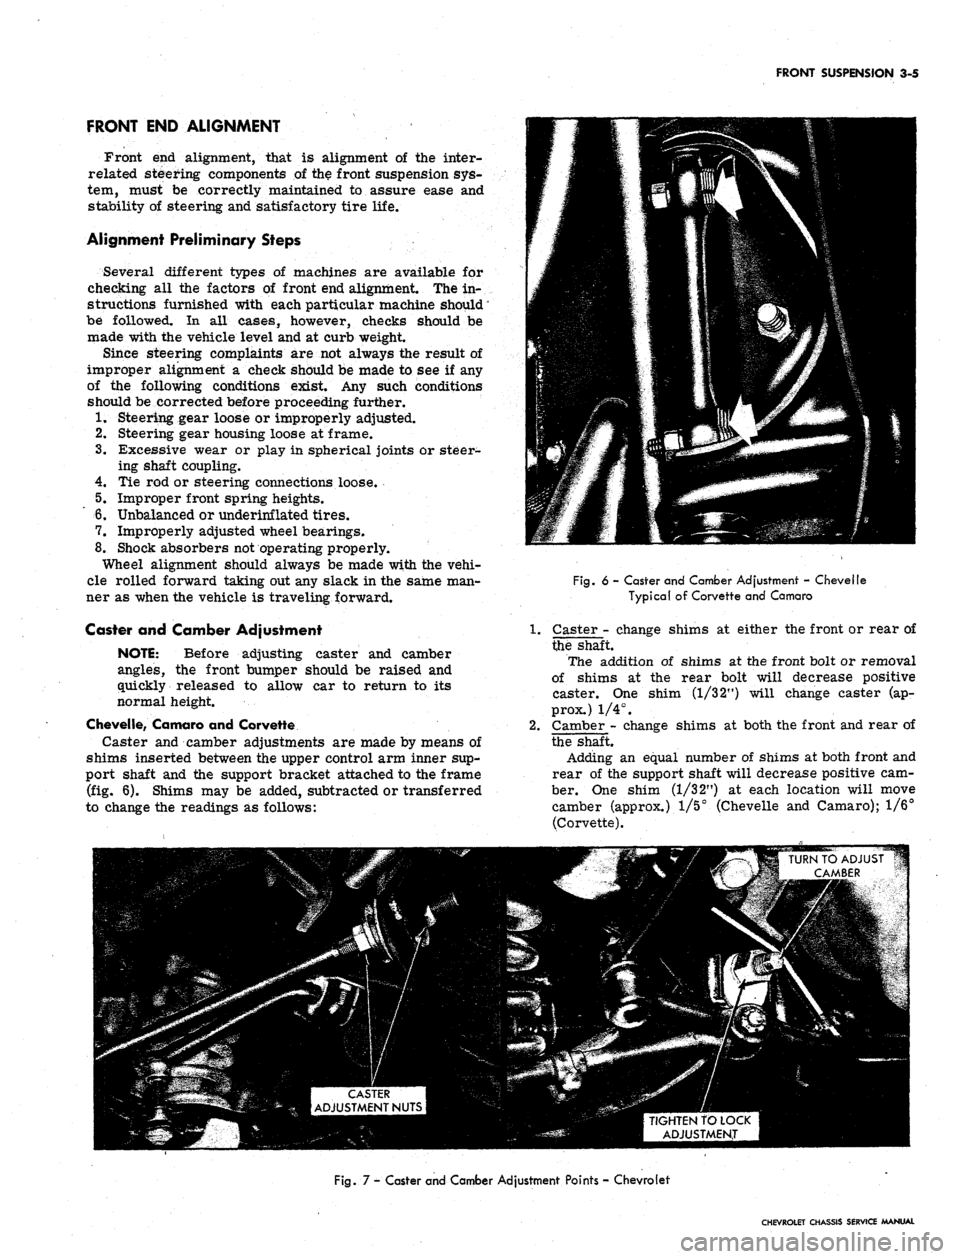
Chevelle, Camaro and Corvette
Caster and camber adjustments are made by means of
shims inserted between the upper control arm inner sup-
port shaft and the support bracket attached to the frame
(fig. 6). Shims may be added, subtracted or transferred
to change the readings as follows:
Fig.
6 - Caster and Camber Adjustment - Chevelle
Typical of Corvette and Camaro
Caster - change shims at either the front or rear of
the shaft.
The addition of shims at the front bolt or removal
of shims at the rear bolt will decrease positive
caster. One shim (1/3 2") will change caster (ap-
prox.) 1/4°.
Camber - change shims at both the front and rear of
the shaft.
Adding an equal number of shims at both front and
rear of the support shaft will decrease positive cam-
ber. One shim (1/32") at each location will move
camber (approx.) 1/5° (Chevelle and Camaro); 1/6°
(Corvette).
TIGHTEN TO LOCK
ADJUSTMENT
Fig.
7 - Caster and Camber Adjustment Points - Chevrolet
CHEVROLET CHASSIS SERVICE MANUAL
Page 170 of 659
FRONT SUSPENSION 3-6
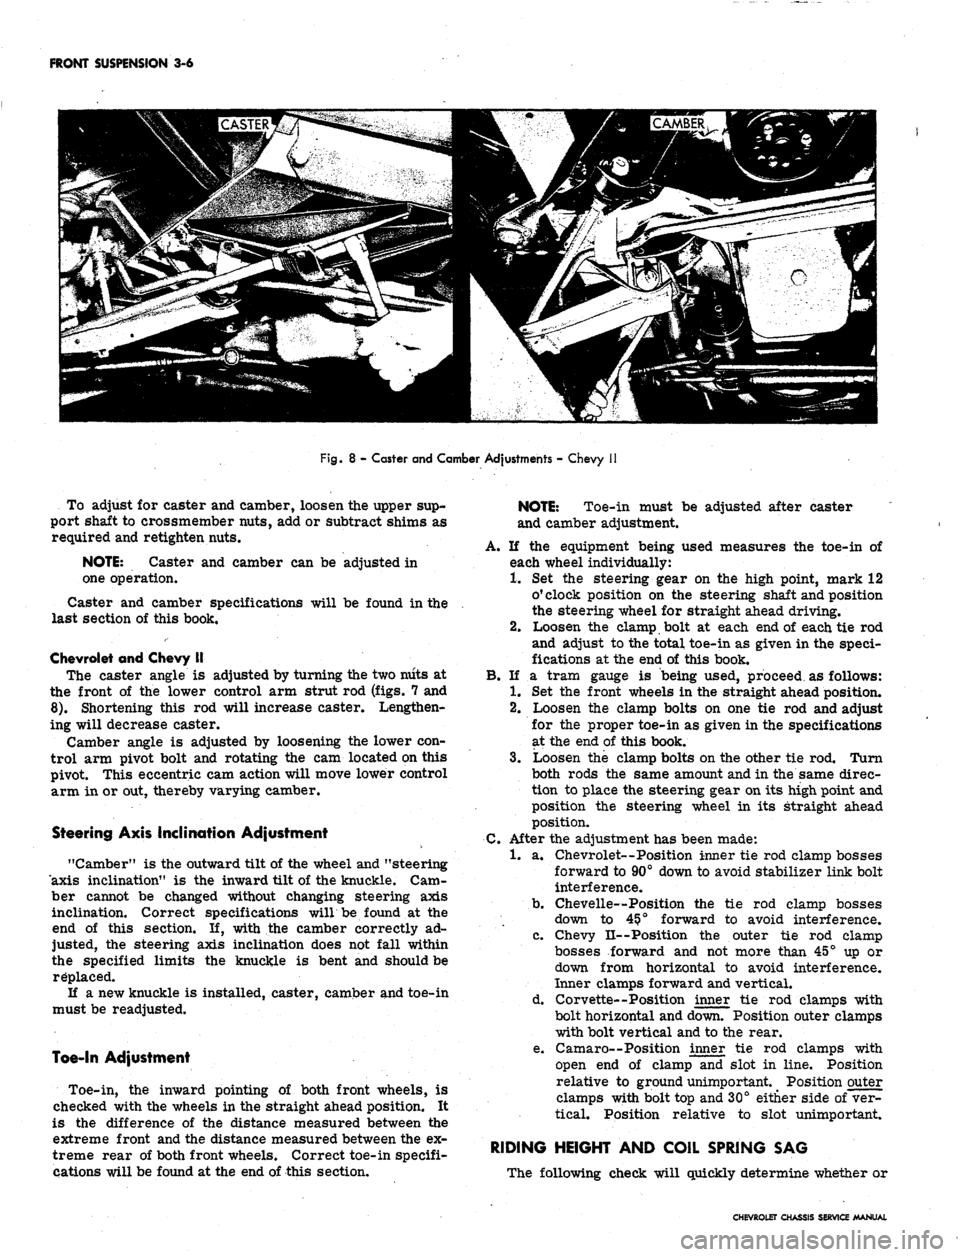
Fig.
8 - Caster and Camber Adjustments - Chevy
To adjust for caster and camber, loosen the upper sup-
port shaft to crossmember nuts, add or subtract shims as
required and retighten nuts.
NOTE:
Caster and camber can be adjusted in
one operation.
Caster and camber specifications will be found in the
last section of this book.
Chevrolet and Chevy II
The caster angle is adjusted by turning the two niits at
the front of the lower control arm strut rod (figs. 7 and
8).
Shortening this rod will increase caster. Lengthen-
ing will decrease caster.
Camber angle is adjusted by loosening the lower con-
trol arm pivot bolt and rotating the cam located on this
pivot. This eccentric cam action will move lower control
arm in or out, thereby varying camber.
Steering Axis Inclination Adjustment
"Camber" is the outward tilt of the wheel and "steering
axis inclination" is the inward tilt of the knuckle. Cam-
ber cannot be changed without changing steering axis
inclination. Correct specifications willbe found at the
end of this section. If, with the camber correctly ad-
justed, the steering axis inclination does not fall within
the specified limits the knuckle is bent and should be
replaced.
If a new knuckle is installed, caster, camber and toe-in
must be readjusted.
Toe-In Adjustment
Toe-in, the inward pointing of both front wheels, is
checked with the wheels in the straight ahead position. It
is the difference of the distance measured between the
extreme front and the distance measured between the ex-
treme rear of both front wheels. Correct toe-in specifi-
cations will be found at the end of this section.
NOTE:
Toe-in must be adjusted after caster
and camber adjustment.
A. If the equipment being used measures the toe-in of
each wheel individually:
1.
Set the steering gear on the high point, mark 12
o'clock position on the steering shaft and position
the steering wheel for straight ahead driving.
2.
Loosen the clamp bolt at each end of each tie rod
and adjust to the total toe-in as given in the speci-
fications at the end of this book.
B.
If a tram gauge is being used, proceed as follows:
1.
Set the front wheels in the straight ahead position.
2.
Loosen the clamp bolts on one tie rod and adjust
for the proper toe-in as given in the specifications
at the end of this book.
3.
Loosen the clamp bolts on the other tie rod. Turn
both rods the same amount and in the same direc-
tion to place the steering gear on its high point and
position the steering wheel in its straight ahead
position.
C.
After the adjustment has been made:
1.
a. Chevrolet—Position inner tie rod clamp bosses
forward to 90° down to avoid stabilizer link bolt
interference.
b.
Chevelle—Position the tie rod clamp bosses
down to 45?° forward to avoid interference.
c. Chevy II--Position the outer tie rod clamp
bosses forward and not more than 45° up or
down from horizontal to avoid interference.
Inner clamps forward and vertical.
d. Corvette--Position inner tie rod clamps with
bolt horizontal and down. Position outer clamps
with bolt vertical and to the rear.
e. Camaro—Position inner tie rod clamps with
open end of clamp and slot in line. Position
relative to ground unimportant. Position outer
clamps with bolt top and 30° either side of ver-
tical. Position relative to slot unimportant.
RIDING HEIGHT AND COIL SPRING SAG
The following check will quickly determine whether or
CHEVROLET CHASSIS SERVICE MANUAL
Page 174 of 659
FRONT SUSPENSION 3-10
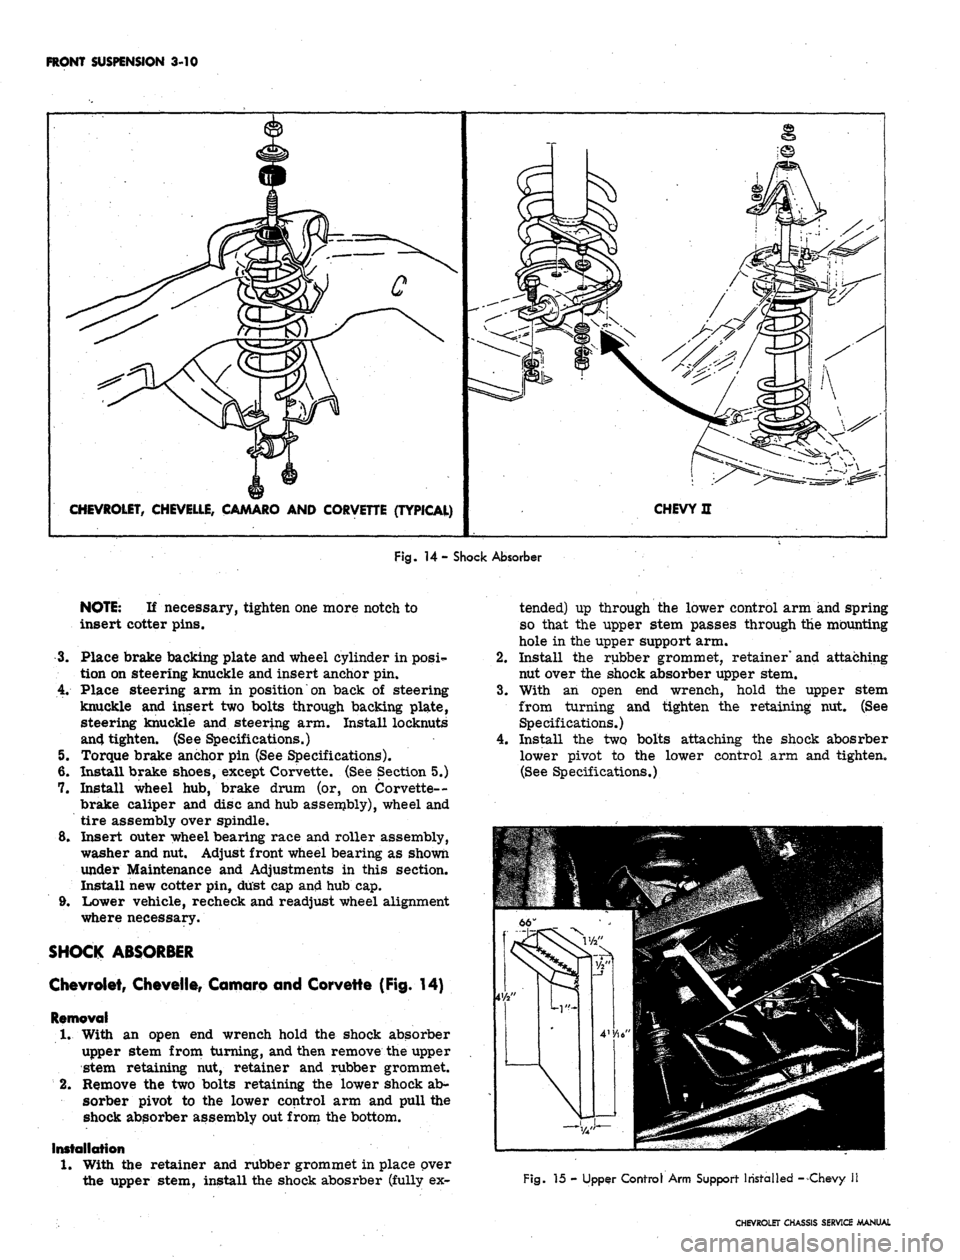
CHEVROLET, CHEVELLE, CAMARO AND CORVETTE (TYPICAL)
CHEVY H
Fig.
14- Shock Absorber
NOTE:
If necessary, tighten one more notch to
insert cotter pins.
3.
Place brake backing plate and wheel cylinder in posi*-
tion on steering knuckle and insert anchor pin.
4.
Place steering arm in position on back of steering
knuckle and insert two bolts through backing plate,
steering knuckle and steering arm. Install locknuts
and tighten. (See Specifications.)
5. Torque brake anchor pin (See Specifications).
6. Install brake shoes, except Corvette. (See Section 5.)
7. Install wheel hub, brake drum (or, on Corvette--
brake caliper and disc and hub assembly), wheel and
tire assembly over spindle.
8. Insert outer wheel bearing race and roller assembly,
washer and nut. Adjust front wheel bearing as shown
under Maintenance and Adjustments in this section.
Install new cotter pin, dust cap and hub cap.
9. Lower vehicle, recheck and readjust wheel alignment
where necessary.
SHOCK ABSORBER
Chevrolet, Chevelle, Comoro and Corvette (Fig. 14)
Removal
1.
With an open end wrench hold the shock absorber
upper stem from turning, and then remove the upper
stem retaining nut, retainer and rubber grommet.
2.
Remove the two bolts retaining the lower shock ab-
sorber pivot to the lower control arm and pull the
shock absorber assembly out from the bottom.
Installation
1.
With the retainer and rubber grommet in place over
the upper stem, install the shock abosrber (fully ex-
tended) up through the lower control arm and spring
so that the upper stem passes through the mounting
hole in the upper support arm.
2.
Install the rubber grommet, retainer' and attaching
nut over the shock absorber upper stem.
3.
With an open end wrench, hold the upper stem
from turning and tighten the retaining nut. (See
Specifications.)
4.
Install the two bolts attaching the shock abosrber
lower pivot to the lower control arm and tighten.
(See Specifications.)
Fig.
15 - Upper Control Arm Support Installed - Chevy II
CHEVROLET CHASSIS SERVICE MANUAL