coil CHEVROLET CAMARO 1967 1.G Chassis Manual PDF
[x] Cancel search | Manufacturer: CHEVROLET, Model Year: 1967, Model line: CAMARO, Model: CHEVROLET CAMARO 1967 1.GPages: 659, PDF Size: 114.24 MB
Page 618 of 659
ACCESSORIES 15-9
Adjustment- Adjust the bead chain so that it is as tight
as possible without holding the throttle open when the
carburetor is set at its lowest idle throttle position.
When connecting the bead chain (engine stopped) manually
set the fast idle cam at its lowest step and connect the
chain so that it does not hold the idle screw off the cam.
If the chain needs to be cut, cut it three beads beyond the
bead which pulls the linkage.
REGULATOR
Service - A defective regulator, that is one which is not
simply out of adjustment, must be replaced. During re-
placement, check the hoses which connect to the regulator
and replace any which are cracked or deteriorated.
Air Filter
The air filter located in the solenoid cover should be
cleaned and re-oiled at engine oil change intervals.
1.
Snap the solenoid cover off.
2.
Remove the filter and wash it in kerosene or mineral
spirits. Squeeze it dry and wet with SAE 10 engine
oil.
Squeeze out excess oil and reinstall into the
cover.
3.
Attach the cover with neoprene seal to the solenoid
housing. Be certain that the cover fits tightly to the
housing.
One regulator adjustment is possible: Engagement-
Cruising Speed Zeroing (to remove any difference be-
tween engagement and cruising speed).
NOTE:
No regulator adjustment should be
made, however, until the following items have
been checked or serviced:
1.
Bead chain properly adjusted.
2.
All hoses in good condition, properly attached, not
leaking, not pinched or kinked.
3.
Regulator air filter clean and properly oiled.
4.
Electric and vacuum release switches properly
adjusted.
Engagement—Cruising Speed Zeroing
If the cruising speed is lower than the engagement
speed, loosen the orifice tube locknut and turn the tube
outward; if higher, turn the tube inward. Each 1/8 turn
will alter the engagement-cruising speed difference one
mph. Tighten the locknut after adjustment and check the
system operation at 50 mph.
ELECTRICAL SYSTEM CHECK OUT
1.
Check fuse and connector.
2.
Check electric brake switch as follows: Unplug con-
nector at brake switch. Connect ohmmeter at points
A and B on brake switch. The ohmmeter must indi-
cate infinity when the brake pedal is depressed and
continuity when pedal is released. The cruise re-
lease brake switch (electric) is adjusted as is the
standard stop light brake switch. Replace electric
brake switch if needed.
3.
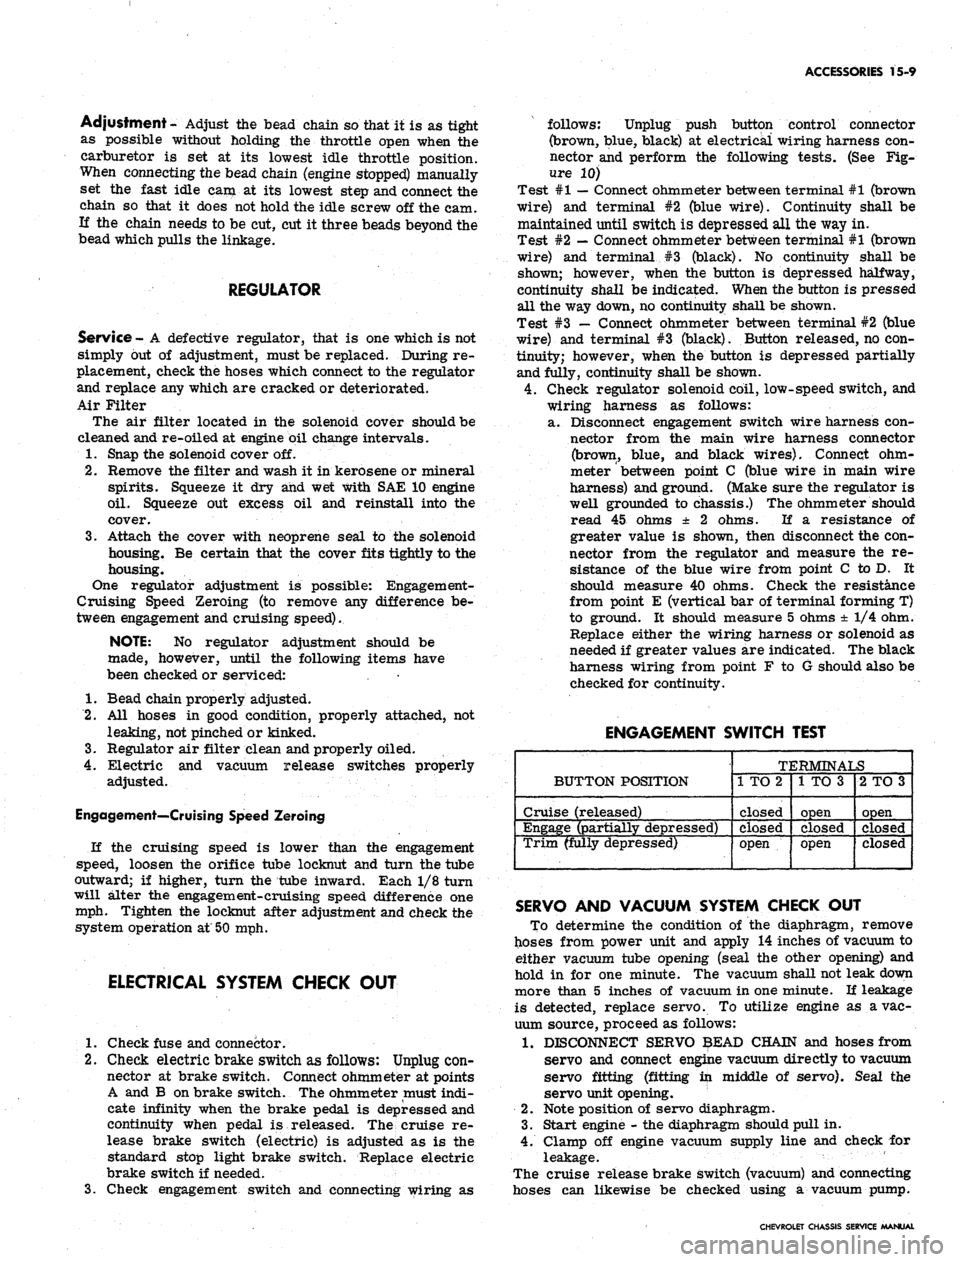
Check engagement switch and connecting wiring as
follows: Unplug push button control connector
(brown, blue, black) at electrical wiring harness con-
nector and perform the following tests. (See Fig-
ure 10)
Test #1
—
Connect ohmmeter between terminal #1 (brown
wire) and terminal #2 (blue wire). Continuity shall be
maintained until switch is depressed all the way in.
Test #2
—
Connect ohmmeter between terminal #1 (brown
wire) and terminal #3 (black). No continuity shall be
shown; however, when the button is depressed halfway,
continuity shall be indicated. When the button is pressed
all the way down, no continuity shall be shown.
Test #3 — Connect ohmmeter between terminal #2 (blue
wire) and terminal #3 (black). Button released, no con-
tinuity; however, when the button is depressed partially
and fully, continuity shall be shown.
4.
Check regulator solenoid coil, low-speed switch, and
wiring harness as follows:
a. Disconnect engagement switch wire harness con-
nector from the main wire harness connector
(brown, blue, and black wires). Connect ohm-
meter
'
between point C (blue wire in main wire
harness) and ground. (Make sure the regulator is
well grounded to chassis.) The ohmmeter should
read 45 ohms ± 2 ohms. If a resistance of
greater value is shown, then disconnect the con-
nector from the regulator and measure the re-
sistance of the blue wire from point C to D. It
should measure 40 ohms. Check the resistance
from point E (vertical bar of terminal forming T)
to ground. It should measure 5 ohms ± 1/4 ohm.
Replace either the wiring harness or solenoid as
needed if greater values are indicated. The black
harness wiring from point F to G should also be
checked for continuity.
ENGAGEMENT SWITCH TEST
BUTTON POSITION
Cruise (released)
Engage (partially depressed)
Trim (fully depressed)
TERMINALS
1 TO 2
closed
Closed
open
1 TO 3
open
closed
open
2 TO 3
open
closed
closed
SERVO AND VACUUM SYSTEM CHECK OUT
To determine the condition of the diaphragm, remove
hoses from power unit and apply 14 inches of vacuum to
either vacuum tube opening (seal the other opening) and
hold in for one minute. The vacuum shall not leak down
more than 5 inches of vacuum in one minute. If leakage
is detected, replace servo. To utilize engine as a vac-
uum source, proceed as follows:
1.
DISCONNECT SERVO $EAD CHAIN and hoses from
servo and connect engine vacuum directly to vacuum
servo fitting (fitting in middle of servo). Seal the
servo unit opening.
2.
Note position of servo diaphragm.
3.
Start engine - the diaphragm should pull in.
4.
Clamp off engine vacuum supply line and check for
leakage. '
The cruise release brake switch (vacuum) and connecting
hoses can likewise be checked using a vacuum pump.
CHEVROLET CHASSIS SERVICE MANUAL
Page 621 of 659
ACCESSORIES 15-12
VACUUM
(WIT
P
VACUUM Llh
, AIR SUPPt
LINES
t
SUPERLIFT F
SHOCK ABSO
OPERATED AIR COMPRESSOR
H STORAGE TANK AND
RESSURE REGULATORJV
\A
4E FROM ENG«NE^"^
/ \-HEIGHT CONTROL
•^-Z n VALVE (WITH TIME
^*
EAR II
RBERS
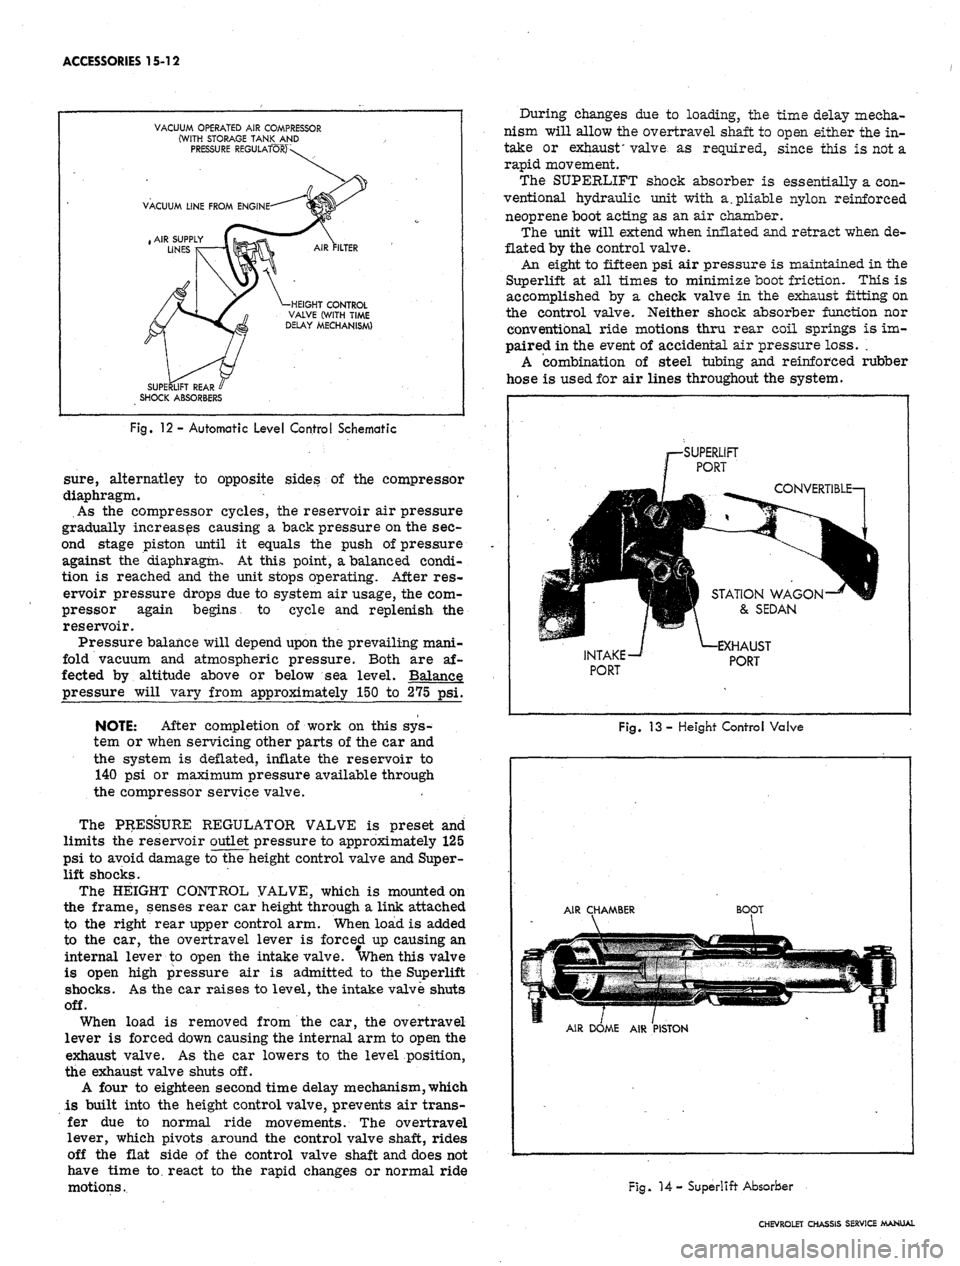
Fig.
12 - Automatic Level Control Schematic
sure,
alternatley to opposite sides of the compressor
diaphragm.
As the compressor cycles, the reservoir air pressure
gradually increases causing a back pressure on the sec-
ond stage piston until it equals the push of pressure
against the diaphragm- At this point, a balanced condi-
tion is reached and the unit stops operating. After res-
ervoir pressure drops due to system air usage, the com-
pressor again begins to cycle and replenish the
reservoir.
Pressure balance will depend upon the prevailing mani-
fold vacuum and atmospheric pressure. Both are af-
fected by altitude above or below sea level. Balance
pressure will vary from approximately 150 to 275 psi.
NOTE: After completion of work on this sys-
tem or when servicing other parts of the car and
the system is deflated, inflate the reservoir to
140 psi or maximum pressure available through
the compressor service valve.
The PRESSURE REGULATOR VALVE is preset and
limits the reservoir outlet pressure to approximately 125
psi to avoid damage to the height control valve and Super-
lift shocks.
The HEIGHT CONTROL VALVE, which is mounted on
the frame, senses rear car height through a link attached
to the right rear upper control arm. When load is added
to the car, the overtravel lever is forced up causing an
internal lever to open the intake valve, when this valve
is open high pressure air is admitted to the Superlift
shocks. As the car raises to level, the intake valve shuts
off.
When load is removed from the car, the overtravel
lever is forced down causing the internal arm to open the
exhaust valve. As the car lowers to the level position,
the exhaust valve shuts off.
A four to eighteen second time delay mechanism, which
is built into the height control valve, prevents air trans-
fer due to normal ride movements. The overtravel
lever, which pivots around the control valve shaft, rides
off the flat side of the control valve shaft and does not
have time to. react to the rapid changes or normal ride
motions.
During changes due to loading, the time delay mecha-
nism will allow the overtravel shaft to open either the in-
take or exhaust' valve as required, since this is not a
rapid movement.
The SUPERLIFT shock absorber is essentially a con-
ventional hydraulic unit with a. pliable nylon reinforced
neoprene boot acting as an air chamber.
The unit will extend when inflated and retract when de-
flated by the control valve.
An eight to fifteen psi air pressure is maintained in the
Superlift at all times to minimize boot friction- This is
accomplished by a check valve in the exhaust fitting on
the control valve. Neither shock absorber function nor
conventional ride motions thru rear coil springs is im-
paired in the event of accidental air pressure loss. .
A combination of steel tubing and reinforced rubber
hose is used for air lines throughout the system.
-SUPERLIFT
PORT
STATION WAGON
& SEDAN
INTAKE
PORT
HAUST
PORT
Fig. 13 - Height Control Valve
AIR CHAMBER
BOOT
AIR DOME AIR PISTON
Fig. 14- Superlift Absorber
CHEVROLET CHASSIS SERVICE MANUAL
Page 628 of 659
SPECIFICATIONS
HEATING
AND AIR
CONDITIONING
SECTION
1A
Compressor
Make Frigidaire
Type
. 6
Cylinder Axial
Displacement
Four-Season
12.6
Cu.
In.
Universal
and
Ail-Weather
.... .10.8 Cu. In.
Rotation Clockwise
Compressor Suction
and
Discharge
Connector Bolt Torque
.......
25 ft lbs.
Compressor Clutch Coil
Ohms
(at
80°F.).
4.18-4.38
Amps
(at
80°F.)
2.86 @ 12
Volts
Torques
Rear Head
to
SheU Stud
Nut 23 lb. ft
Shaft Mounting
Nut 15 lb. ft
Belt Tension.
See
Tune-Up Chart
System Capacities
Refrigerant
R-12
Four-Season
and
Comfortron
Systems.
............
3 lbs., 12 oz.
Universal Systems
Chevrolet, Chevelle,
and
Camaro.
... 3 lbs.
Chevy
n 2 lbs. 8 oz.
All-Weather System
2 lbs. 8 oz.
Compressor
Oil 525
Viscosity
All Systems
11 oz.
Fuses
Comfortron Systems
.
Four-Season Systems
.
Universal Systems
. .
All-Weather System.
.
Fuse
Block
25
amp.
25
amp.
25
amp.
25
amp.
In
Line
30
amp.
30
amp.
20
amp.
20
amp.
SECTION
3
WHEEL ALIGNMENT SPECIFICATIONS (Vehicle
dt
Curb Weight)
Caster*
Camber*
Steering Axis
Inclination
tToe-In (Total)
Wheel Bearing
Adjustment
Preload
End Movement
Chevrolet
Pos.
3/4° ± 1/2°
Pos.
1/4° ± 1/2°
7-1/2° ± 1/2°
@l/8"
to 1/4"
12 ft lbs.
zero
.001"
to .008"
Chevelle •
(SS and El Camino)
Neg. 1/2° ± 1/2°
(All others)
Neg. 1° ± 1/2°
Pos.
1/2° ± 1/2°
8-1/4° ± 1/2°
1/8" to 1/4"
12 ft lbs.
zero
.001"
to .008"
Chevy n
Pos.
1° ± 1/2°
Pos.
1/2° ± 1/2°
7° ± 1/2°
1/4" to 3/8"
12 ft lbs.
zero
.000"
to .004"
Corvette
Pos.
1° ± 1/2°
Pos.
3/4° ± 1/2°
7° ± 1/2°
3/16" to 5/16"
12 ft lbs.
zero
.001"
to .008"
Camaro
Pos.
1/2° £ 1/2°
Pos.
1/4° ±1/2°
8 3/4° ± 1/2°
1/8" to 1/4"
12 ft lbs.
zero
.001"
to .008"
•Must not vary more than 1/2° from side to side.
@Toe-In (Total) should be 5/16" to 7/16" after rebuild using new bushings and ball joints.
tAdjust Toe-in with steering gear on straight ahead location after camber and caster have been set Any change
in caster and camber settings will affect toe; always recheck and set toe to specifications.
LET CHASSIS SERVICE MANUAL
Page 635 of 659
SPECIFICATIONS
8
Displacement
Horsepower
VALVE SYSTEM:
Lifter
Rocker
Arm
Ratio
Valve Lash
Intake
Exhaust
Face Angle
(Int.
&
Exh.
Seat Angle
(Int. & Exh.)
Seat Runout
(Int. & Exh.)
Seat Width
Stem
Clearani
Valve
Spring
(Outer)
Valve
Spring
(Inner)
Damper
Intake
Exhaust
Production
Int.
Exh.
Service
Free Length
Pressure
lbs.
@
in.
Closed
Open
Installed Height
±1/32"
Free Length
Pressure
lbs.
@
in.
Closed
Open
Installed Height
±1/32"
Free Length
Approx,# of Coils
153
90
194
120
230
140
250
155
283
195
327
210
275
300
325
350
350
295
39e
325
350
427
385
390
400
425
435
1.75:1
Hydraulic
1.50:1
One
One
Mechanical
1.70:1
Turn Down From Zero Lash
Turn Down From Zero Lash
.022"*
.024"*
.024"*
.028"*
...••:•:••
••-•. , 45« •
46°**
.002"
(Max.)
1/32" - 1/16"
1/16" - 3/32"
.0015"-.0032"
.0010"
-.0027"
.0010"-.0027"
<0010It-.0025"
.0012
'-.0027"
Hi Limit Production
+ .001"
Intake
- .002"
Exhaust
2.08"
78-86
@
1.66"
170-180
@
1.26"
1.92"
54-64 @
170-184
@
1.33"
1.90"
1.66"
180-
192
@
1.27"
1
21/32
2.03"
.
. N.A. ' ' .
N.A."
1
5/32
2.11"
84-96
@
1.88"
210-
230
@
1.46"
2.09"
94-106
...©••
1.88"
303-327
@
1.38"
1
2.21"
69-81
@
1.88"
181-205
@
1.32"
7/8
N.A.
1.94tf
4
N.A.
N.A.
N.A.
N.A.
N.A.
1,94"
4
: •
1.94"-2.00"
3
3/4
2.12"
37-45
@
1.78"
92-110
@
1.22"
13/4
2.07'*-
1.95
»
4
1/3
2.09"
94-106
®
1.88"
303-327
@
1.38"
N.A.
.
N.A.
NJl.
1.94"-
2.00"
3 3/4
*Engine at operating temperature and running.
••Aluminum Heads 45°
CHEVROLET CHASSIS SERVICE MANUAL
Page 643 of 659
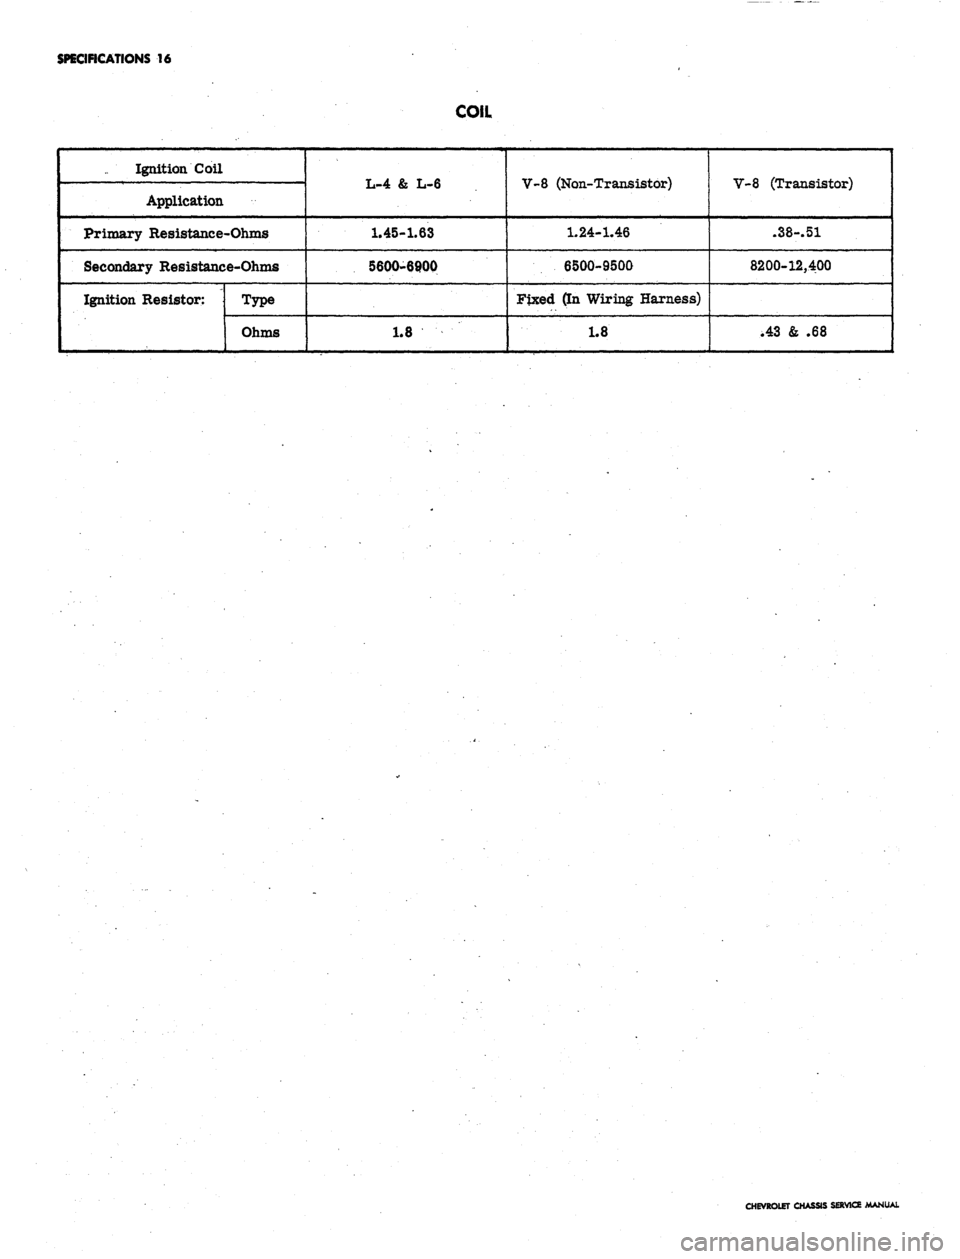
SPECIFICATIONS
16
COIL
Ignition Coil
Application
Primary Resistance-Ohms
Secondary Resistance-Ohms
Ignition Resistor:
Type
Ohms
L-4 & L-6
1.45-1.63
5600-6900
1.8
V-8 (Non-Transistor)
1.24-1.46
6500-9500
Fixed (In Wiring Harness)
1.8
V-8 (Transistor)
.38-.51
8200-12,400
.43 & .68
CHEVROLET CHASSIS SERVICE MANUAL
Page 654 of 659
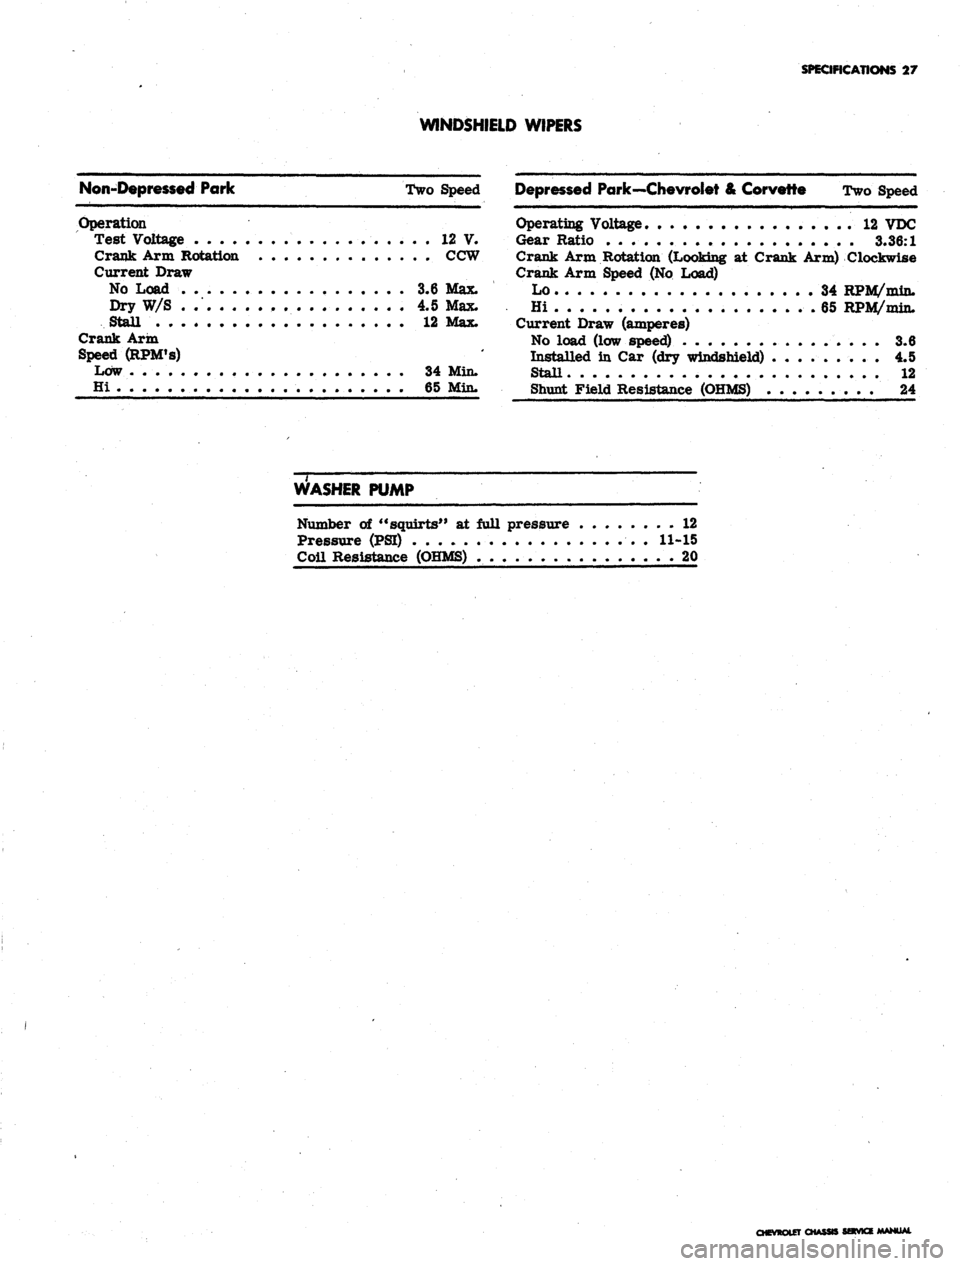
SPECIFICATIONS 27
WINDSHIELD WIPERS
Non-Depressed Park Two
Speed
Operation
Test Voltage 12 V.
Crank Arm Rotation CCW
Current Draw
No Load 3.6 Max.
Dry W/S . . , .4.5 Max.
Stall . 12 Max.
Crank Arm
Speed (RPM's)
Low 34 Min.
Hi 65 Min.
Depressed Park—Chevrolet & Corvette Two Speed
Operating Voltage 12 VDC
Gear Ratio 3.36:1
Crank Arm Rotation (Looking at Crank Arm) Clockwise
Crank Arm Speed (No Load)
Lo.
34 RPH^/min.
Hi .65 RPM/min.
Current Draw (amperes)
No load (low speed) 3.6
Installed in Car (dry windshield) ......... 4.5
Stall . 12
Shunt Field Resistance (OHMS) 24
WASHER PUMP
Number of "squirts" at full pressure 12
Pressure (PSI) . 11-15
Coil Resistance (OHMS) . . 20
CHEVROLET CHASSIS SStVK* MANUAL