lock CHEVROLET CAMARO 1967 1.G Chassis Workshop Manual
[x] Cancel search | Manufacturer: CHEVROLET, Model Year: 1967, Model line: CAMARO, Model: CHEVROLET CAMARO 1967 1.GPages: 659, PDF Size: 114.24 MB
Page 3 of 659
SECTION O
INFORMATION AND LUBRICATION
CONTENTS OF THIS SECTION
Page
General Information o-l
Lubrication 0-13
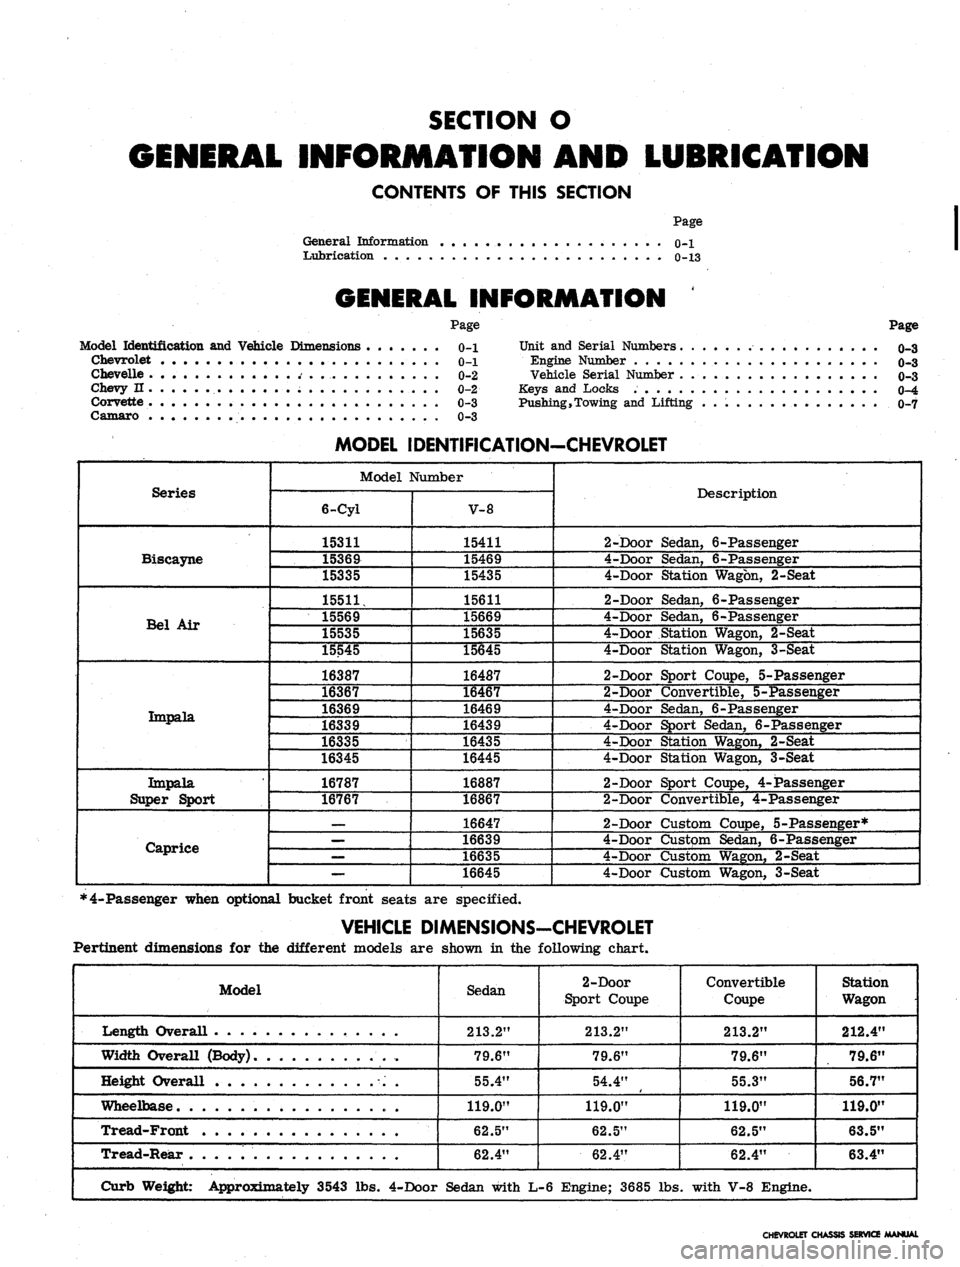
GENERAL INFORMATION
Model Identification and Vehicle Dimensions
Chevrolet
Chevelle
Chevy n
Corvette
Camaro
Page
0-1
0-1
0-2
0-2
0-3
0-3
Page
Unit and Serial Numbers o-3
Engine Number o-3
Vehicle Serial Number 0r3
Keys and Locks 0-4
Pushing,Towing and Lifting 0-7
Series
Biscayne
Bel Air
Tmpala.
Impala
Super Sport
Caprice
MODEL IDENTIFICATION-CHEVROLET
Model Number
6-Cyl
15311
15369
15335
15511,
15569
15535
15545
16387
16367
16369
16339
16335
16345
16787
16767
—
—
—
—
V-8
15411
15469
15435
15611
15669
15635
15645
16487
16467
16469
16439
16435
16445
16887
16867
16647
16639
16635
16645
Description
2-Door Sedan, 6-Passenger
4-Door Sedan, 6-Passenger
4-Door Station Wagon, 2-Seat
2-Door Sedan, 6-Passenger
4-Door Sedan, 6-Passenger
4-Door Station Wagon, 2-Seat
4-Door Station Wagon, 3-Seat
2-Door Sport Coupe, 5-Passenger
2-Door Convertible, 5-Passenger
4-Door Sedan, 6-Passenger
4-Door Sport Sedan, 6-Passenger
4-Door Station Wagon, 2-Seat
4-Door Station Wagon, 3-Seat
2-Door Sport Coupe, 4-Passenger
2-Door Convertible, 4-Passenger
2-Door Custom Coupe, 5-Passenger*
4-Door Custpm Sedan, 6-Passenger
4-Door Custom Wagon, 2-Seat
4-Door Custom Wagon, 3-Seat
*4-Passenger when optional bucket front seats are specified.
VEHICLE DIMENSIONS-CHEVROLET
Pertinent dimensions for the different models are shown in the following chart.
Model
Length Overall . .
Width Overall (Body)
Height Overall
Wheelbase
Tread-Front
Tread-Rear
Curb Weight: Approximately 3543 lbs.
Sedan
213.2"
79.6"
55.4"
119.0"
62.5"
62.4"
4-Door Sedan with
2-Door
Sport Coupe
213.2"
79.6"
54.4"
119.0"
62.5"
62.4"
L-6 Engine; 3685 lbs
Convertible
Coupe
213.2"
79.6"
55.3"
119.0"
62.5"
62.4"
. with V-8 Engine.
Station
Wagon
212.4"
79.6"
56.7"
119.0"
63.5"
63.4"
CHEVROLET CHASSIS SERVICE MANUAL
Page 6 of 659
GENERAL INFORMATION 0-4
Fig.
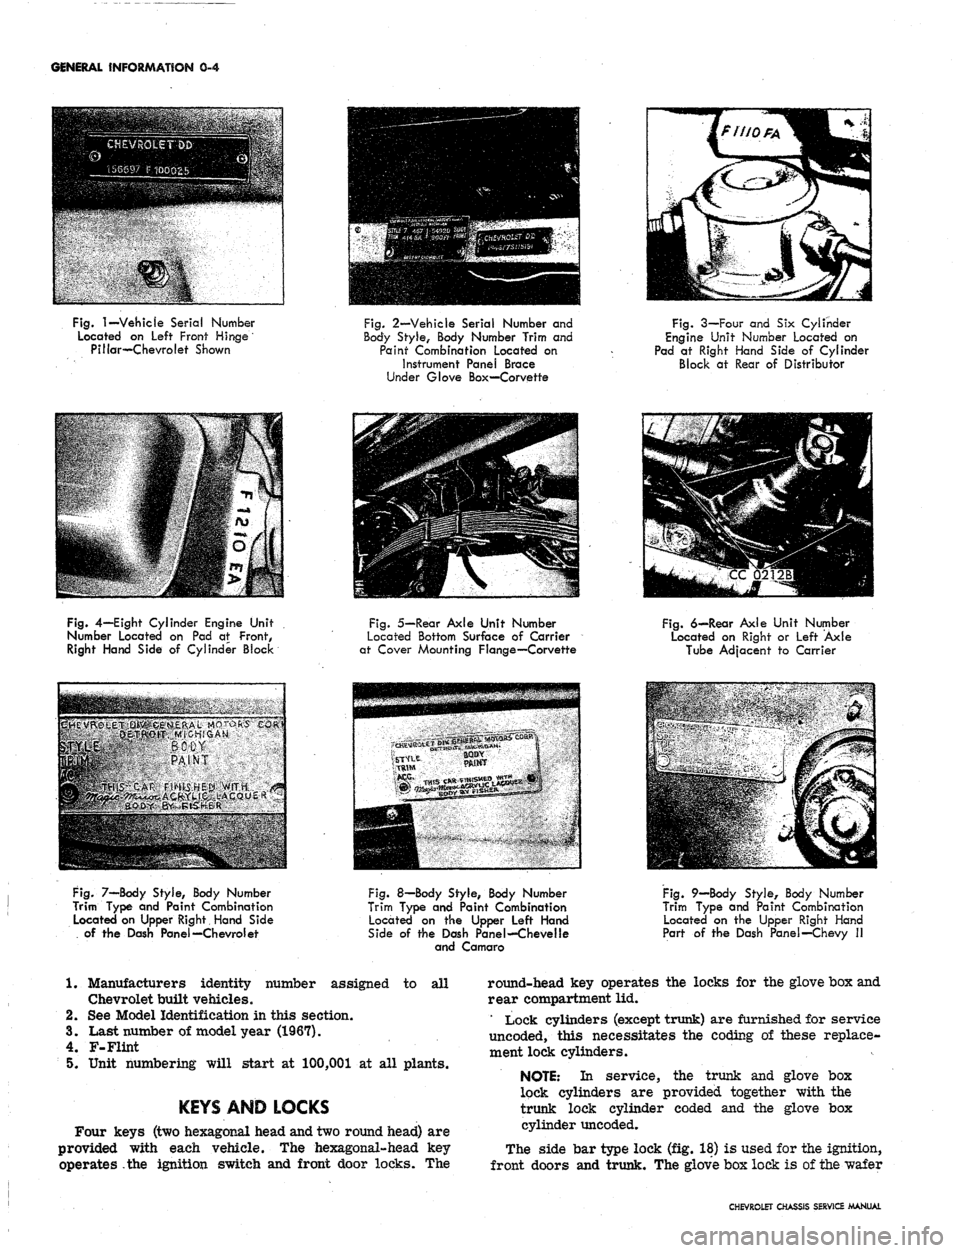
1—Vehicle
Serial Number
Located on Left Front Hinge
Pillar—Chevrolet Shown
Fig.
2—Vehicle Serial Number and
Body Style, Body Number Trim and
Paint Combination Located on
Instrument Panel Brace
Under Glove Box—Corvette
Fig. 3—Four and Six Cylinder
Engine Unit Number Located on
Pad at Right Hand Side of Cylinder
Block at Rear of Distributor
Fig.
4—Eight Cylinder Engine Unit
Number Located on Pad at Front,
Right Hand Side of Cylinder Block
Fig.
5—Rear Axle Unit Number
Located Bottom Surface of Carrier
at Cover Mounting Flange—Corvette
Fig.
6—Rear Axle Unit Number
Located on Right or Left Axle
Tube Adjacent to Carrier
BSHfi^;^
PAINT
HRIKI5"tM>
fIHIsS
HE|St.>MfT*
^^ * *•'"
•<"'
Fig.
7—Body Style, Body Number
Trim Type and Paint Combination
Located on Upper Right Hand Side
of the Dash Panel—Chevrol et
Fig.
8—Body Style, Body Number
Trim Type and Paint Combination
Located on the Upper Left Hand
Side of the Dash Panel—Chevelle
and Camaro
Fig.
9—Body Style, Body Number
Trim Type and Paint Combination
Located on the Upper Right Hand
Part of the Dash Panel—Chevy II
1. Manufacturers identity number assigned to all
Chevrolet built vehicles.
2.
See Model Identification in this section.
3.
Last number of model year (1967).
4.
F-Flint
5.
Unit numbering will start at 100,001 at all plants.
KEYS AND LOCKS
Four keys (two hexagonal head and two round head) are
provided with each vehicle. The hexagonal-head key
operates the ignition switch and front door locks. The
round-head key operates the locks for the glove box and
rear compartment lid.
' Lock cylinders (except trunk) are furnished for service
uncoded, this necessitates the coding of these replace-
ment lock cylinders.
NOTE: In service, the trunk and glove box
lock cylinders are provided together with the
trunk lock cylinder coded and the glove box
cylinder uncoded.
The side bar type lock (fig. 18) is used for the ignition,
front doors and trunk. The glove box lock is of the wafer
CHEVROLET CHASSIS SERVICE MANUAL
Page 7 of 659
GENERAL INFORMATION 0-5
Fig.
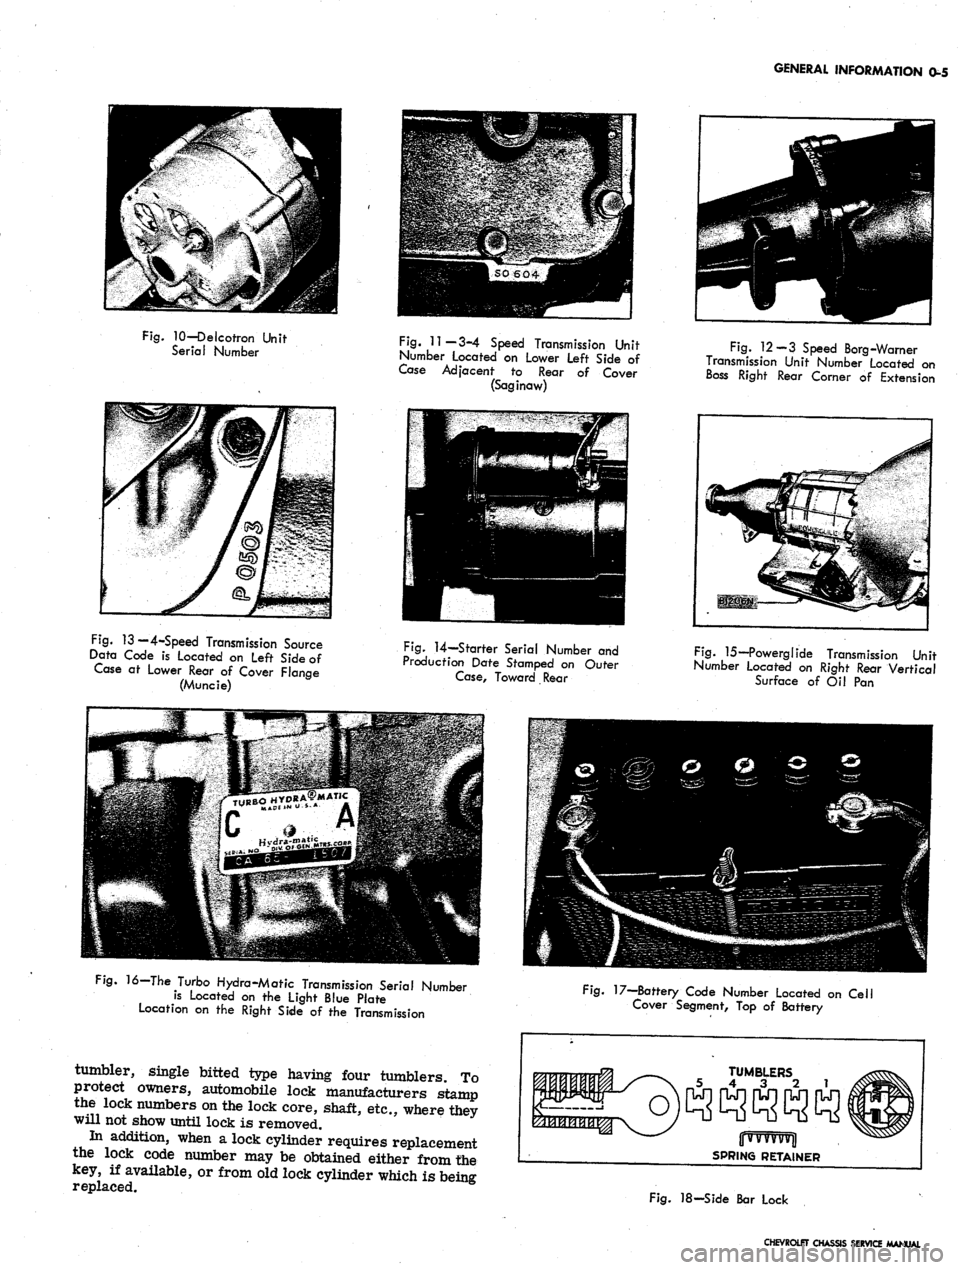
10—Delcotron Unit
Serial Number
Fig.
11—3-4 Speed Transmission Unit
Number Located on Lower Left Side of
Case Adjacent to Rear of Cover
(Saginaw)
Fig.
12-3 Speed Borg-Warner
Transmission Unit Number Located on
Boss Right Rear Comer of Extension
Fig.
13 — 4-Speed Transmission Source
Data Code is Located on Left Side of
Case at Lower Rear of Cover Flange
(Muncie)
Fig.
14—Starter Serial Number and
Production Date Stamped on Outer
Case,
Toward Rear
Fig.
15—Powerglide Transmission Unit
Number located on Right Rear Vertical
Surface of Oil Pan
16—The Turbo Hydra-Matic Transmission Serial Number
is Located on the Light Blue Plate
Location on the Right Side of the Transmission
tumbler, single bitted type having four tumblers. To
protect owners, automobile lock manufacturers stamp
the lock numbers on the lock core, shaft, etc., where they
will not show until lock is removed.
In addition, when a lock cylinder requires replacement
the lock code number may be obtained either from the
key, if available, or from old lock cylinder which is being
replaced.
Fig.
17—Battery Code Number Located on Cell
Cover Segment, Top of Battery
TUMBLERS
5 4 3 2 1
jjwvvvvvjl
SPRING RETAINER
Fig.
18-Side Bar Lock
CHEVROLET CHASSIS SERVICE MANUAL
Page 8 of 659
GENERAL INFORMATION
0-6
Once the code number of the lock is obtained look up
this number in a key cutting book.
All side bar locks (except trunk) furnished to the field
by the Parts' Department are uncoded, that is, they are
furnished without tumblers, springs or spring retainers,
these parts are serviced separately. The tumblers come
in five different depths, indicated by numbers.
The side bar locks have six tumbler positions, and in
looking up the cutting code, the following may be used as
an example. After key code number is determined, either
from key or from number stamped on lock cylinder refer
to your code book and record the key cutting information
as follows:
Key of Lock
Code Number
0V11
Cutting or Tumbler
position from head
of lock
Key Cutting
Code Numerical
545431
123456
NOTE:
Key blanks used for ignition and door
locks are stamped with an "A" while rear com-
partment and glove box blanks are stamped with
a "B".
The number that is written above the cutting or tumbler
position indicates each different tumbler which is to be
dropped into each tumbier slot of the lock.
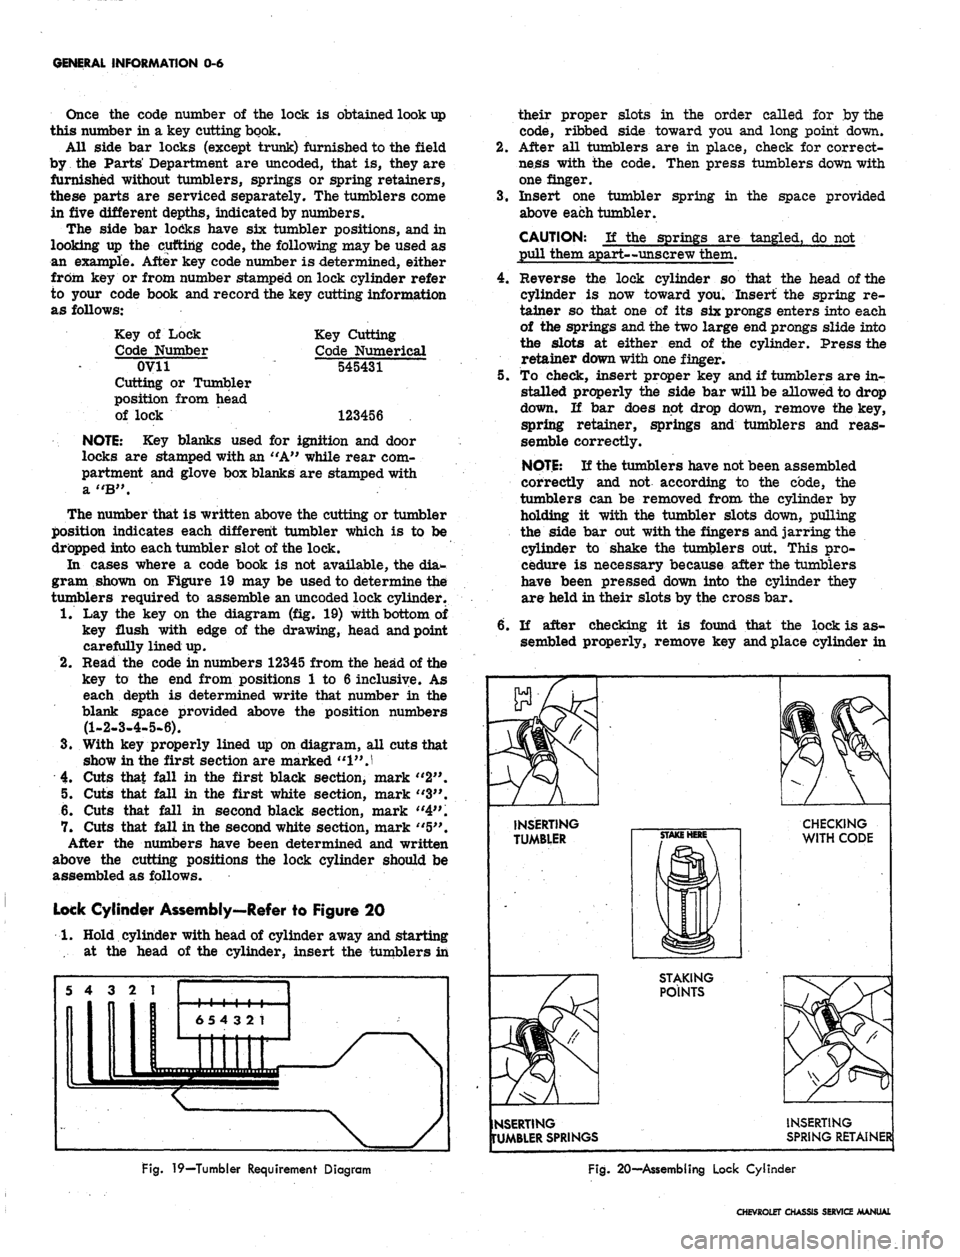
In cases where a code book is not available, the dia-
gram shown on Figure 19 may be used to determine the
tumblers required to assemble an uncoded lock cylinder.
1.
Lay the key on the diagram (fig. 19) with bottom of
key flush with edge of the drawing, head and point
carefully lined up.
2.
Read the code in numbers 12345 from the head of the
key to the end from positions 1 to 6 inclusive. As
each depth is determined write that number in the
blank space provided above the position numbers
(1-2-3-4-5-6).
3.
With key properly lined up on diagram, all cuts that
show in the first section are marked
"1"
J
4.
Cuts that fall in the first black section, mark "2".
5. Cuts that fall in the first white section, mark "3".
6. Cuts that fall in second black section, mark "4".
7. Cuts that fall in the second white section, mark "5".
After the numbers have been determined and written
above the cutting positions the lock cylinder should be
assembled as follows.
Lock Cylinder Assembly—Refer to Figure 20
1.
Hold cylinder with head of cylinder away and starting
•... at the head of the cylinder, insert the tumblers in
their proper slots in the order called for by the
code, ribbed side toward you and long point down.
2.
After all tumblers are in place, check for correct-
ness with the code. Then press tumblers down with
one finger.
3.
Insert one tumbler spring in the space provided
above each tumbler.
CAUTION: If the springs are tangled, do not
pull them apart—unscrew them.
4.
Reverse the lock cylinder so that the head of the
cylinder is now toward you. Insert the spring re-
tainer so that one of its six prongs enters into each
of the springs and the two large end prongs slide into
the slots at either end of the cylinder. Press the
retainer down with one finger.
5. To check, insert proper key and if tumblers are in-
stalled properly the side bar will be allowed to drop
down. If bar does not drop down, remove the key,
spring retainer, springs and tumblers and reas-
semble correctly.
NOTE:
If the tumblers have not been assembled
correctly and not according to the code, the
tumblers can be removed from the cylinder by
holding it with the tumbler slots down, pulling
the side bar out with the fingers and jarring the
cylinder to shake the tumblers out. This pro-
cedure is necessary because after the tumblers
have been pressed down into the cylinder they
are held in their slots by the cross bar.
6. If after checking it is found that the lock is as-
sembled properly, remove key and place cylinder in
INSERTING
TUMBLER
CHECKING
WITH CODE
STAKING
POINTS
NSERTING
TUMBLER SPRINGS
INSERTING
SPRING RETAINER
Fig.
19—Tumbler Requirement Diagram
Fig.
20—Assembling Lock Cylinder
CHEVROLET CHASSIS SERVICE MANUAL
Page 11 of 659
GENERAL INFORMATION
0-9
Fig.
25—Attachment
of
Towing Chain Hooks
to
Axle Tube
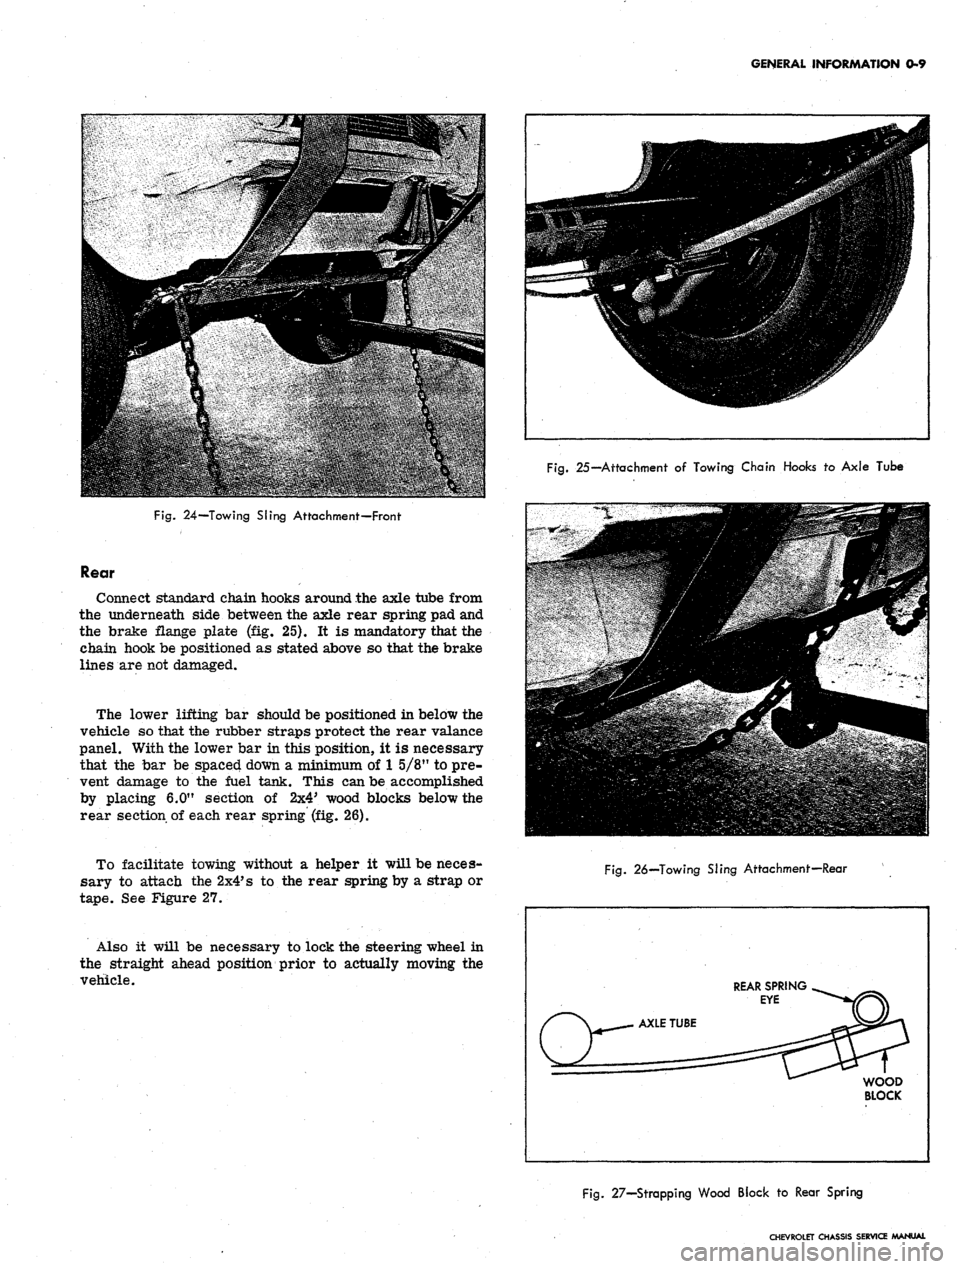
Fig.
24—Towing Sling Attachment—Front
Rear
Connect standard chain hooks around the axle tube from
the underneath side between the axle rear spring pad and
the brake flange plate (fig. 25). It is mandatory that the
chain hook be positioned as stated above so that the brake
lines are not damaged.
The lower lifting bar should be positioned in below the
vehicle so that the rubber straps protect the rear valance
panel. With the lower bar in this position, it is necessary
that the bar be spaced down a minimum of
1
5/8" to pre-
vent damage to the fuel tank. This can be accomplished
by placing 6.0" section of 2x4' wood blocks below the
rear section of each rear spring (fig. 26).
To facilitate towing without a helper it will be neces-
sary to attach the
2x4*
s to the rear spring by a strap or
tape.
See Figure 27.
Also it will be necessary to lock the steering wheel in
the straight ahead position prior to actually moving the
vehicle.
Fig.
26—Towing SJing Attachment—Rear
REAR SPRING
EYE
WOOD
BLOCK
Fig.
27—Strapping Wood Block
to
Rear Spring
CHEVROLET CHASSIS SERVICE MANUAL
Page 12 of 659
GENERAL INFORMATION 0-10
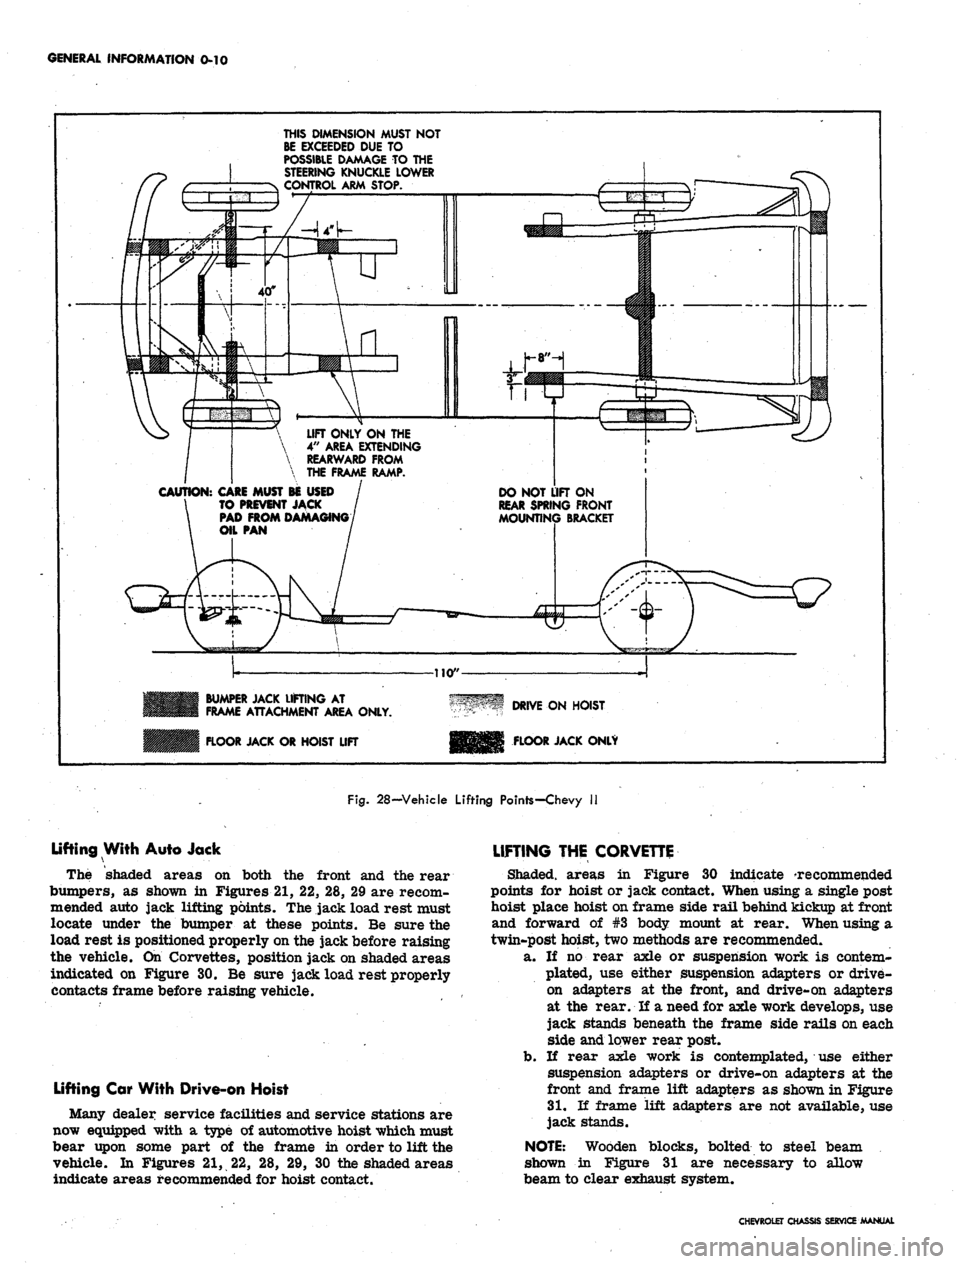
THIS DIMENSION MUST NOT
BE EXCEEDED DUE TO
POSSIBLE DAMAGE TO THE
STEERING KNUCKLE LOWER
CONTROL ARM STOP.
LIFT ONLY ON THE
4"
AREA EXTENDING
REARWARD FROM
THE FRAME RAMP.
CAUTION:
CARE MUST BE USED
TO PREVENT JACK
PAD FROM DAMAGING
DO NOT LIFT ON
REAR SPRING FRONT
MOUNTING BRACKET
BUMPER JACK LIFTING AT
FRAME ATTACHMENT AREA ONLY.
FLOOR JACK OR HOIST LIFT
DRIVE ON HOIST
FLOOR JACK ONLY
Fig.
28-Vehicle Lifting Points-Chevy II
Lifting With Auto Jack
The shaded areas on both the front and the rear
bumpers, as shown in Figures 21, 22, 28, 29 are recom-
mended auto jack lifting points. The jack load rest must
locate under the bumper at these points. Be sure the
load rest is positioned properly on the jack before raising
the vehicle. On Corvettes, position jack on shaded areas
indicated on Figure 30. Be sure jack load rest properly
contacts frame before raising vehicle.
Lifting Car With Drive-on Hoist
Many dealer service facilities and service stations are
now equipped with a type of automotive hoist which must
bear upon some part of the frame in order to lift the
vehicle. In Figures 21, 22, 28, 29, 30 the shaded areas
indicate areas recommended for hoist contact.
LIFTING THE CORVETTE
Shaded, areas in Figure 30 indicate 'recommended
points for hoist or jack contact. When using a single post
hoist place hoist on frame side rail behind kickup at front
and forward of #3 body mount at rear. When using a
twin-post hoist, two methods are recommended.
a. If no rear axle or suspension work is contem-
plated, use either suspension adapters or drive-
on adapters at the front, and drive-on adapters
at the rear. If a need for axle work develops, use
jack stands beneath the frame side rails on each
side and lower rear post.
b.
If rear axle work is contemplated, use either
suspension adapters or drive-on adapters at the
front and frame lift adapters as shown in Figure
31.
If frame lift adapters are not available, use
jack stands.
NOTE:
Wooden blocks, bolted to steel beam
shown in Figure 31 are necessary to allow
beam to clear exhaust system.
CHEVROLET CHASSIS SERVICE MANUAL
Page 16 of 659
LUBRICATION 0-14
SAE 5W-30 oils may be used during periods when
temperatures of 32° and below are to be expected.
Types of Oils
In service, crankcase oils may form sludge and varnish
and under some conditions, corrosive acids unless pro-
tected against oxidation.
To minimize the formation of these harmful products
and to assure the use of oil best suited for present day
operating conditions, automobile manufacturers have de-
veloped a series of sequence tests designed to evaluate
the ability of any oil to properly lubricate automobile
engines.
It is recommended that only those oils which are
certified by their suppliers as meeting or exceeding the
maximum severity requirements of these sequence tests
(or GM Standard 4745-M) be used in Chevrolet engines.
Certified sequence tested oils will be described as such
on their containers.
Maintaining Oil Level
The oil gauge rod is marked "Full" and "Add Oil."
These notations have broad arrows pointing to the level
lines.
The oil level should be maintained between the
two lines, neither going above the "Full" line nor under
the "Add Oil" line. DO NOT OVERFILL. After operating
vehicle allow a few minutes for oil to return to crankcase
before checking oil level.
Check the oil level frequently and add oil when
necessary.
Oil and Filter Change Intervals
NOTE:
Under prolonged dusty driving condi-
tions,
it is recommended that these operations
be performed more often.
OIL
To insure continuation of best performance, low main-
tenance cost and long engine life, it is necessary to
change the crankcase oil whenever it becomes contami-
nated with harmful foreign materials. Under normal
driving conditions draining the crankcase and refilling
with fresh oil every 60 days or every 6000 miles which-
ever occurs first, is recommended.
It is always advisable to drain the crankcase only after
the engine has become thoroughly warmed up or reached
normal operating temperature. The benefit of draining is,
to a large extent, lost if the crankcase is drained when
the engine is cold, as some of the suspended foreign
material will cling to the sides of the oil pan and will not
drain out readily with the cold, slower moving oil.
OIL FILTER
Change engine oil filter every 6000 miles or every 6
months, whichever occurs first.
NOTE:
For Vehicles in heavy duty operation
involving continuous start-stop or prolonged idl-
ing, engine oil should be changed after 2500-
3000 miles of operation. The filter should be
changed after 5000-6000 miles of operation.
Crankcase Dilution
Probably the most serious phase of engine oil deterio-
ration is that of crankcase dilution which is the thinning
of the oil by fuel vapor leaking by pistons and rings and
mixing with the oil and by condensation of water on the
cylinder walls and crankcase.
Leakage of fuel, or fuel vapors, into the oil pan occurs
mostly during the "warming up" period when the fuel is
not thoroughly vaporized and burned. Water vapor enters
the crankcase through normal engine ventilation and
through exhaust gas blow-by. When the engine is not
completely warmed up, these vapors condense, combine
with the condensed fuel and exhaust gases and form acid
compounds in the crankcase.
As long as the gases and internal walls of the crank-
case are hot enough to keep water vapor from con-
densing, no harm will result. However, when the engine
is run in low temperatures moisture will collect and
unite with the gases formed by combustion resulting in
an acid formation. The acid thus formed is likely to
cause serious etching or pitting which will manifest itself
in excessively rapid wear on piston pins, camshaft
bearings and other moving parts of the engine, oftentimes
causing the owner to blame the car manufacturer or the
lubricating oil when in reality the trouble may be traced
back to the character of fuel used, or a condition of the
engine such as excessive blowby or improper carburetor
adjustment.
Automatic Control Devices to Minimize
Crankcase Dilution
All engines are equipped with automatic devices which
aid greatly in minimizing the danger of crankcase
dUution.
The thermostat, mounted in the cylinder head water
outlet, restricts the flow of water to the radiator until a
predetermined temperature is reached, thus minimizing
the length of time required to reach efficient operating
temperature, reducing the time that engine temperatures
are conducive to vapor condensation.
A water by-pass is included in the cooling system,
utilizing a hole in the front of, the cylinder block. This
allows a limited circulation of coolant, bypassing the
thermostat until thermostat opening temperatures are
reached. This system provides a uniform coolant tem-
perature throughout the engine, eliminating localized
hot-spots, improving exhaust valve life, provides fast
warmrup of lubricating oil and fast temperature rise in
the coolant which provides fast heater operation in cold
weather.
A thermostatic heat control on the exhaust manifold
during the warming up period, automatically directs the
hot exhaust gases against the center of the intake mani-
fold, greatly aids in proper vaporization of the fuel.
An automatic choke reduces the danger of raw or
unvaporized fuel entering the combustion chamber and
leaking into the oil reservoir.
An.
efficient crankcase ventilating system drives off
fuel vapors and aids in the evaporation of the raw fuel
and water which may find its way into the oil pan.
CRANKCASE BREATHER CAP
Clean and re-oil at every oil change..
CHEVROLET CHASSIS SERVICE MANUAL
Page 23 of 659
LUBRICATION
0-21
6
3-SPEED
4-SPEED
AUTOMATIC
10
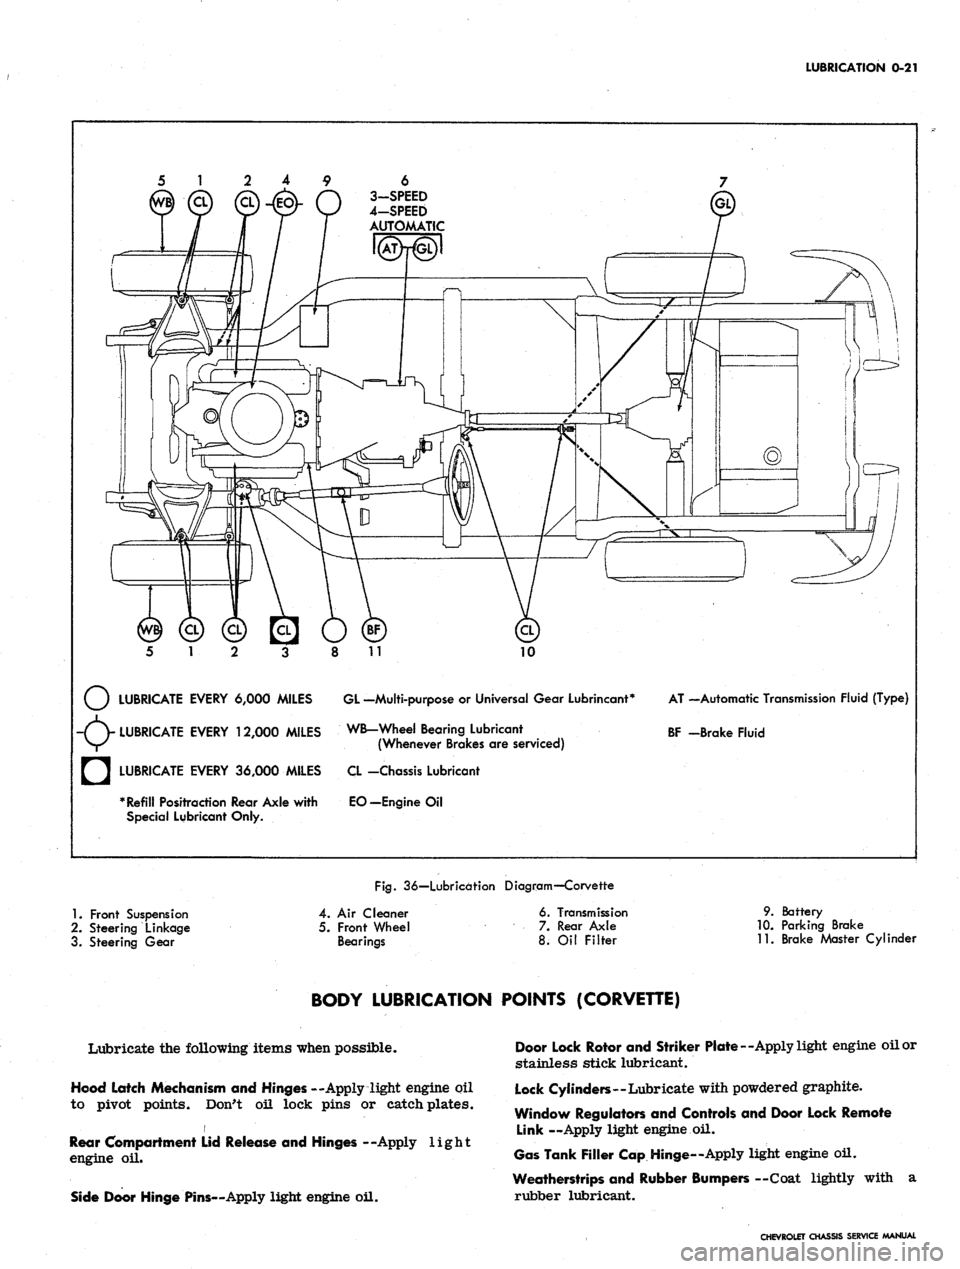
LUBRICATE EVERY 6,000 MILES GL -Multi-purpose
or
Universal Gear Lubrincant*
-(V LUBRICATE EVERY 12,000 MILES WB-Wheel Bearing Lubricant
V/^ (Whenever Brakes
are
serviced)
AT —Automatic Transmission Fluid (Type)
BF -Brake Fluid
a
LUBRICATE EVERY 36,000 MILES
* Refill Positraction Rear Axle with
Special Lubricant Only.
CL -Chassis Lubricant
EO—Engine
Oil
Fig.
36—Lubrication Diagram—Corvette
1.
Front Suspension
2.
Steering Linkage
3. Steering Gear
4.
Air
Cleaner
5. Front Wheel
Bearings
6. Transmission
7. Rear Axle
8.
Oil
Filter
9. Battery
10.
Parking Brake
11.
Brake Master Cylinder
BODY LUBRICATION POINTS (CORVETTE)
Lubricate the following items when possible.
Hood Latch Mechanism and Hinges --Apply light engine oil
to pivot points. Don't oil lock pins or catch plates.
i
Rear Compartment Lid Release and Hinges --Apply light
engine
oil.
Side Door Hinge Pins—Apply light engine oil.
Door Lock Rotor and Striker Plate—Apply light engine oil or
stainless stick lubricant.
Lock Cylinders—Lubricate with powdered graphite.
Window Regulators and Controls and Door Lock Remote
Link —Apply light engine
oil.
Gas Tank Filler Cap Hinge—Apply light engine oil.
Weatherstrips and Rubber Bumpers —Coat lightly with
a
rubber lubricant.
CHEVROLET CHASSIS SERVICE MANUAL
Page 24 of 659
SECTION
1A
HEATER
AND AIR
CONDITIONING
CONTENTS
OF
THIS SECTION
Heater
Air Conditioning
Page
1A-1
1A-13
HEATER
GENERAL DESCRIPTION
CHEVROLET, CHEVELLE,
AND
CAMARO
Components
of the
Chevrolet, Chevelle,
and
Camero
heaters
are
attached
to the
firewall
on the
right side
of
the vehicle. The blower
and air
inlet assembly and water
hoses
are
located on the engine side
of
the firewall while
the heater core and distributor duct
are on the
passenger
side.
The heater operates
on
outside
air
only with
the
blower receiving
its
airflow from
the
cowl vent plenum
chamber.
Since
the
unit
has no
water valve, water circulation
keeps
the
core
hot at all
times.
Air
passing through
the
core receives maximum heat from
the
core.
In operation, three levers control
all
heater opera-
tions.
The
AIR-FAN lever
is a
combination control;
moving
the
lever half-way opens
the
AIR door
(by
means
of
a
bowden cable)
to
supply outside
air to the
three
speed blower. Further movement
of the
lever operates
the blower.
The
other levers depend on bowden cables
to
operate
the
diverter doors located
in the
distributor
duct
to
control heater output and operation.
At
the
heart
of
the heater operation
is the
temperature
door.
Air
from
the
blower follows parallel paths through
the distributor duct, with
one
path passing through
the
heater core
and the
other path bypassing
the
core.
The
temperature door, operated
by the
TEMPERATURE
con-
trol lever,
is
placed
in the
duct
so
that when
it
closes
off
the path from
the
heater core,
it
allows ambient airflow
through
the
unheated path.
In the
opposite position only
heated airflow
is
allowed. Final heater output tempera-
ture
is
dependent upon
the
proportion
of
heated
and
unheated
air
blended together according
to the
setting
of
this temperature door.
To
insure positive closing
of
this
door when
the
heat lever
is in the off
position,
a cam
lock device
is
utilized
in the
control linkage
of the
Chevelle heater only.
Just beyond
the
temperature damper door
is the Air
door, operated
by the
AIR-FAN control lever, which
is
the
air
on-or-off control. This door will
be
open when-
ever
the
heater blower
is in
operation.
The defroster door, operated
by the
DEFROSTER
lever, acts
to
divert
the
heated
air
flow
up
through
the
defroster ducts
for
de-fogging, defrosting
or
de-icing
operations.
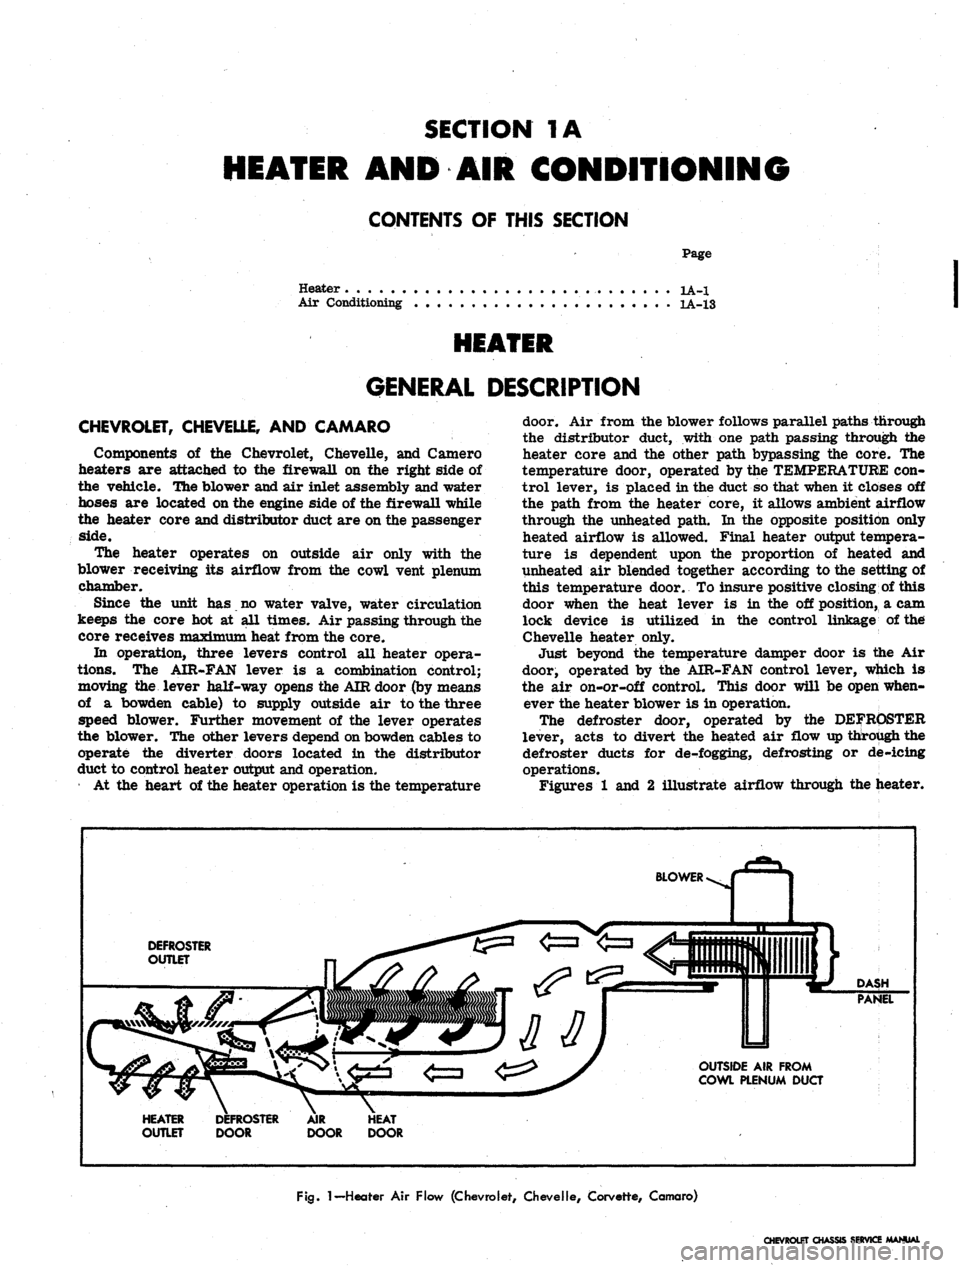
Figures
1 and 2
illustrate airflow through
the
heater.
BLOWER
DEFROSTER
OUTLET
DASH
PANEL
OUTSIDE
AIR
FROM
COWL PLENUM DUCT
HEATER
OUTLET
DOOR
DOOR
Fig.
1
— Heater
Air
Flow (Chevrolet, Chevelle, Corvette, Camaro)
CHEVROLET CHASSIS SERVICE MANUAL
Page 25 of 659
HEATER AND AIR CONDITIONING 1A-2
DEFROSTER-q
DOOR
v-
HEATER
OUTLET
DEFROSTER
OUTSIDE
AIR
FROM PLENUM
OUTLETS
""•—
,
BLOWER
« 1
/ y
r J
\
AIR
DUQ
•*-——
DOOR
—-**
X J
HEAT
DOOR
HEATER
CORE
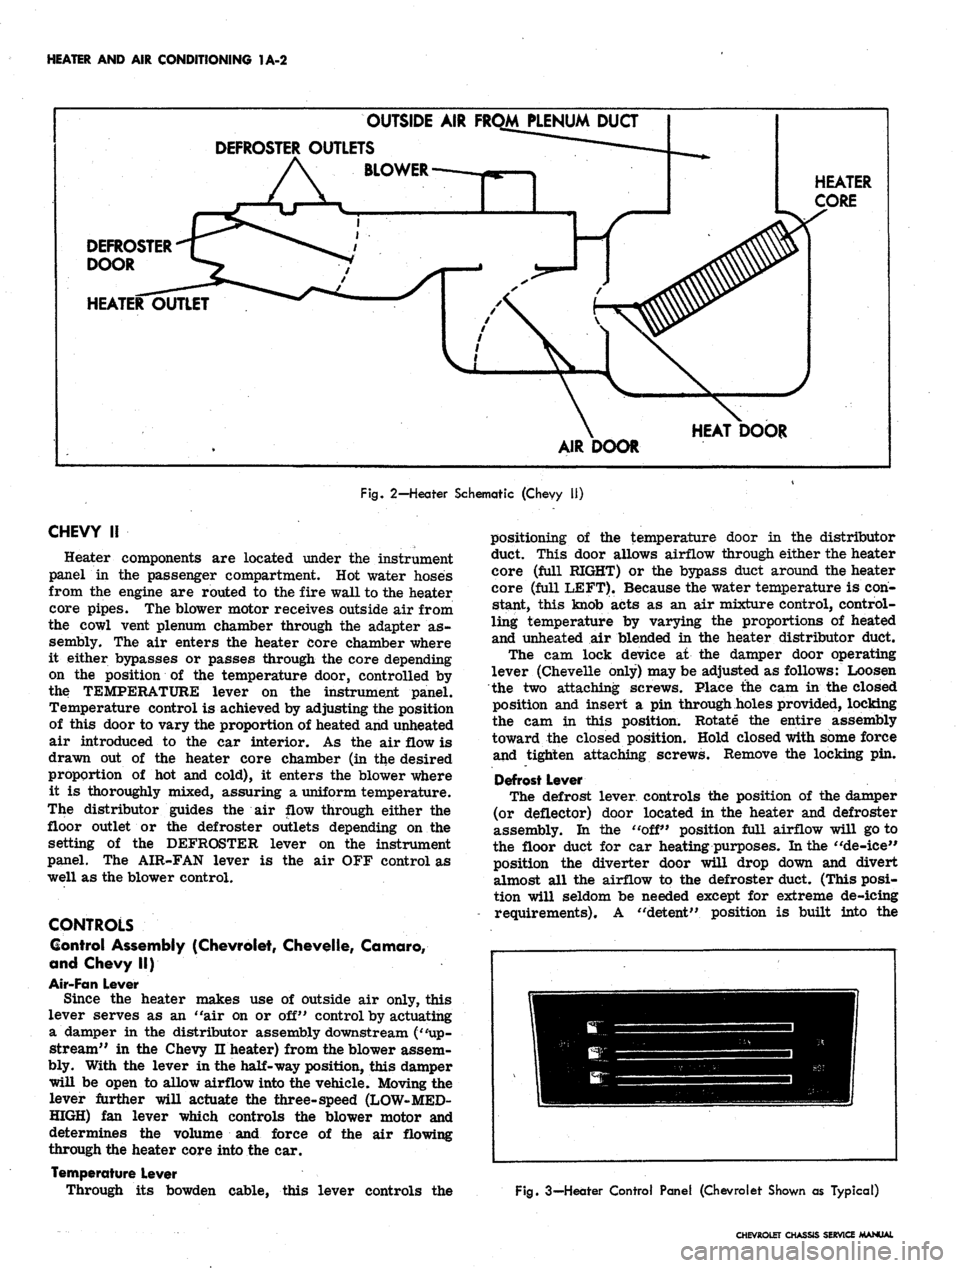
Fig. 2-Heater Schematic (Chevy 11)
CHEVY
II
Heater components are located under the instrument
panel in the passenger compartment. Hot water hoses
from the engine are routed to the fire wall to the heater
core pipes. The blower motor receives outside air from
the cowl vent plenum chamber through the adapter as-
sembly. The air enters the heater core chamber where
it either bypasses or passes through the core depending
on the position of the temperature door, controlled by
the TEMPERATURE lever on the instrument panel.
Temperature control is achieved by adjusting the position
of this door to vary the proportion of heated and unheated
air introduced to the car interior. As the air flow is
drawn out of the heater core chamber (in the desired
proportion of hot and cold), it enters the blower where
it is thoroughly mixed, assuring a uniform temperature.
The distributor guides the air flow through either the
floor outlet or the defroster outlets depending on the
setting of the DEFROSTER lever on the instrument
panel. The AIR-FAN lever is the air OFF control as
well as the blower control.
CONTROLS
Control Assembly (Chevrolet, Chevelle, Camaro,
and Chevy II)
Air-Fan Lever
Since the heater makes use of outside air only, this
lever serves as an "air on or off" control by actuating
a damper in the distributor assembly downstream ("up-
stream" in the Chevy n heater) from the blower assem-
bly. With the lever in the half-way position, this damper
will be open to allow airflow into the vehicle. Moving the
lever further will actuate the three-speed (LOW-MED-
HIGH) fan lever which controls the blower motor and
determines the volume and force of the air flowing
through the heater core into the car.
Temperature Lever
Through its bowden cable, this lever controls the
positioning of the temperature door in the distributor
duct. This door allows airflow through either the heater
core (full RIGHT) or the bypass duct around the heater
core (full LEFT). Because the water temperature is con-
stant, this knob acts as an air mixture control, control-
ling temperature by varying the proportions of heated
and unheated air blended in the heater distributor duct.
The cam lock device at the damper door operating
lever (Chevelle only) may be adjusted as follows: Loosen
the two attaching screws. Place the cam in the closed
position and insert a pin through holes provided, locking
the cam in this position. Rotate the entire assembly
toward the closed position. Hold closed with some force
and tighten attaching screws. Remove the locking pin.
Defrost Lever
The defrost lever controls the position of the damper
(or deflector) door located in the heater and defroster
assembly. In the "off" position full airflow will go to
the floor duct for car heating purposes. In the "de-ice"
position the diverter door will drop down and divert
almost all the airflow to the defroster duct. (This posi-
tion will seldom be needed except for extreme de-icing
requirements). A "detent" position is built into the
Fig. 3—Heater Control Panel (Chevrolet Shown as Typical)
CHEVROLET CHASSIS SERVICE MANUAL