tires CHEVROLET CAMARO 1967 1.G Chassis Workshop Manual
[x] Cancel search | Manufacturer: CHEVROLET, Model Year: 1967, Model line: CAMARO, Model: CHEVROLET CAMARO 1967 1.GPages: 659, PDF Size: 114.24 MB
Page 169 of 659
FRONT SUSPENSION 3-5
FRONT END ALIGNMENT
Front end alignment, that is alignment of the inter-
related steering components of the front suspension sys-
tem, must be correctly maintained to assure ease and
stability of steering and satisfactory tire life.
Alignment Preliminary Steps
Several different types of machines are available for
checking all the factors of front end alignment. The in-
structions furnished with each particular machine should
be followed. In all cases, however, checks should be
made with the vehicle level and at curb weight.
Since steering complaints are not always the result of
improper alignment a check should be made to see if any
of the following conditions exist. Any such conditions
should be corrected before proceeding further.
1.
Steering gear loose or improperly adjusted.
2.
Steering gear housing loose at frame.
3.
Excessive wear or play in spherical joints or steer-
ing shaft coupling.
4.
Tie rod or steering connections loose.
5.
Improper front spring heights.
6. Unbalanced or underinflated tires.
7.
Improperly adjusted wheel bearings.
8. Shock absorbers not operating properly.
Wheel alignment should always be made with the vehi-
cle rolled forward taking out any slack in the same man-
ner as when the vehicle is traveling forward.
Caster and Camber Adjustment
NOTE: Before adjusting caster and camber
angles, the front bumper should be raised and
quickly released to allow car to return to its
normal height.
Chevelle, Camaro and Corvette
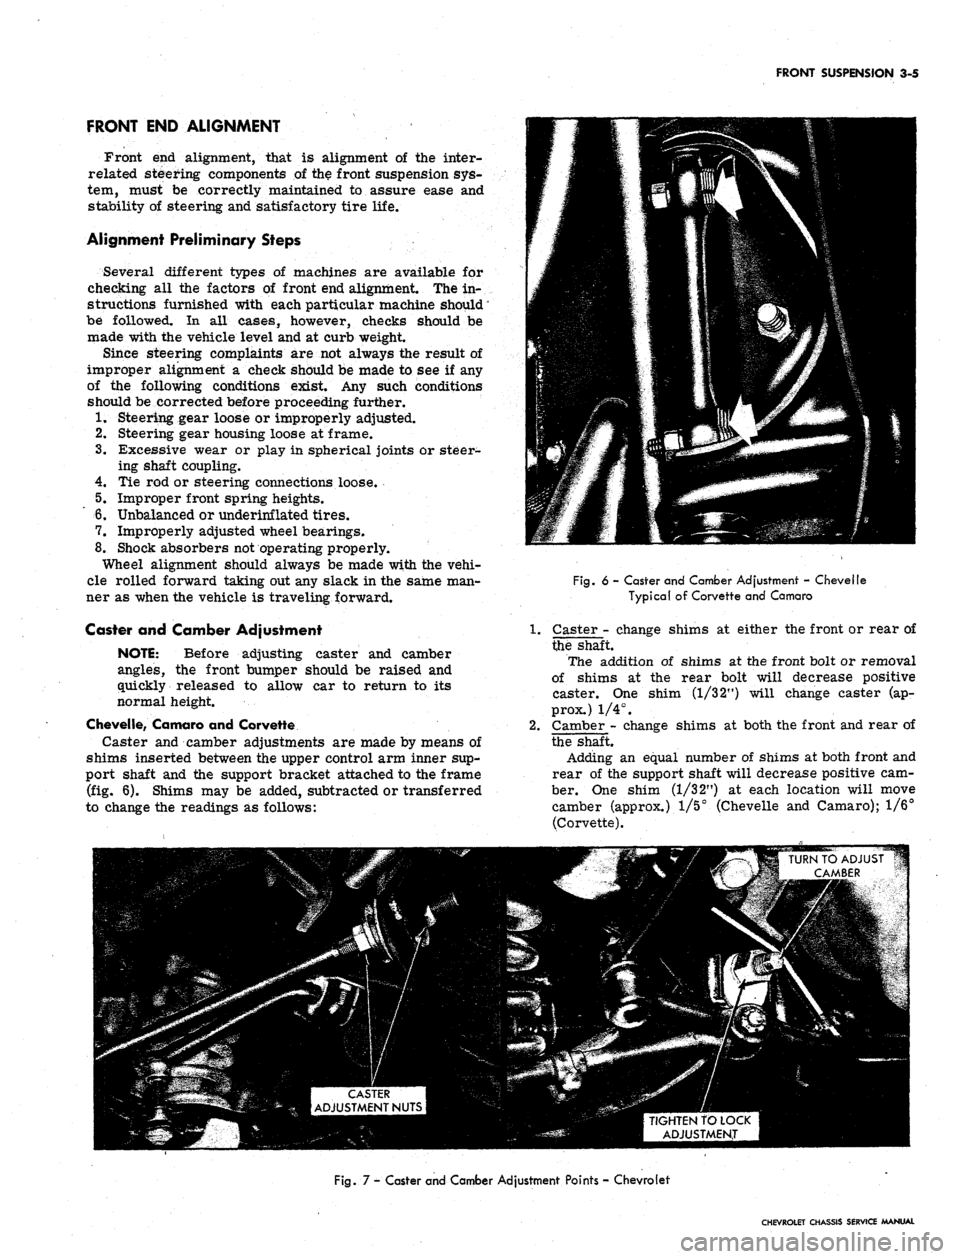
Caster and camber adjustments are made by means of
shims inserted between the upper control arm inner sup-
port shaft and the support bracket attached to the frame
(fig. 6). Shims may be added, subtracted or transferred
to change the readings as follows:
Fig.
6 - Caster and Camber Adjustment - Chevelle
Typical of Corvette and Camaro
Caster - change shims at either the front or rear of
the shaft.
The addition of shims at the front bolt or removal
of shims at the rear bolt will decrease positive
caster. One shim (1/3 2") will change caster (ap-
prox.) 1/4°.
Camber - change shims at both the front and rear of
the shaft.
Adding an equal number of shims at both front and
rear of the support shaft will decrease positive cam-
ber. One shim (1/32") at each location will move
camber (approx.) 1/5° (Chevelle and Camaro); 1/6°
(Corvette).
TIGHTEN TO LOCK
ADJUSTMENT
Fig.
7 - Caster and Camber Adjustment Points - Chevrolet
CHEVROLET CHASSIS SERVICE MANUAL
Page 211 of 659
REAR SUSPENSION AND DRIVE LINE 4-21
Fig.
54—Marking Camber Cam and Bracket (Corvette)
bracket, so they may be reassembled in same loca-
tion (fig. 54).
5.
Loosen camber bolt and nut. Remove four bolts se-
curing strut rod bracket to carrier and lower
bracket.
6. Remove cam bolt nut and cam and bolt assembly.
Pull strut down out of bracket and remove bushing
caps.
7.
Inspect strut rod bushings for wear and replace
where necessary. Replace strut rod if it is bent or
damaged in any way.
Repairs
1.
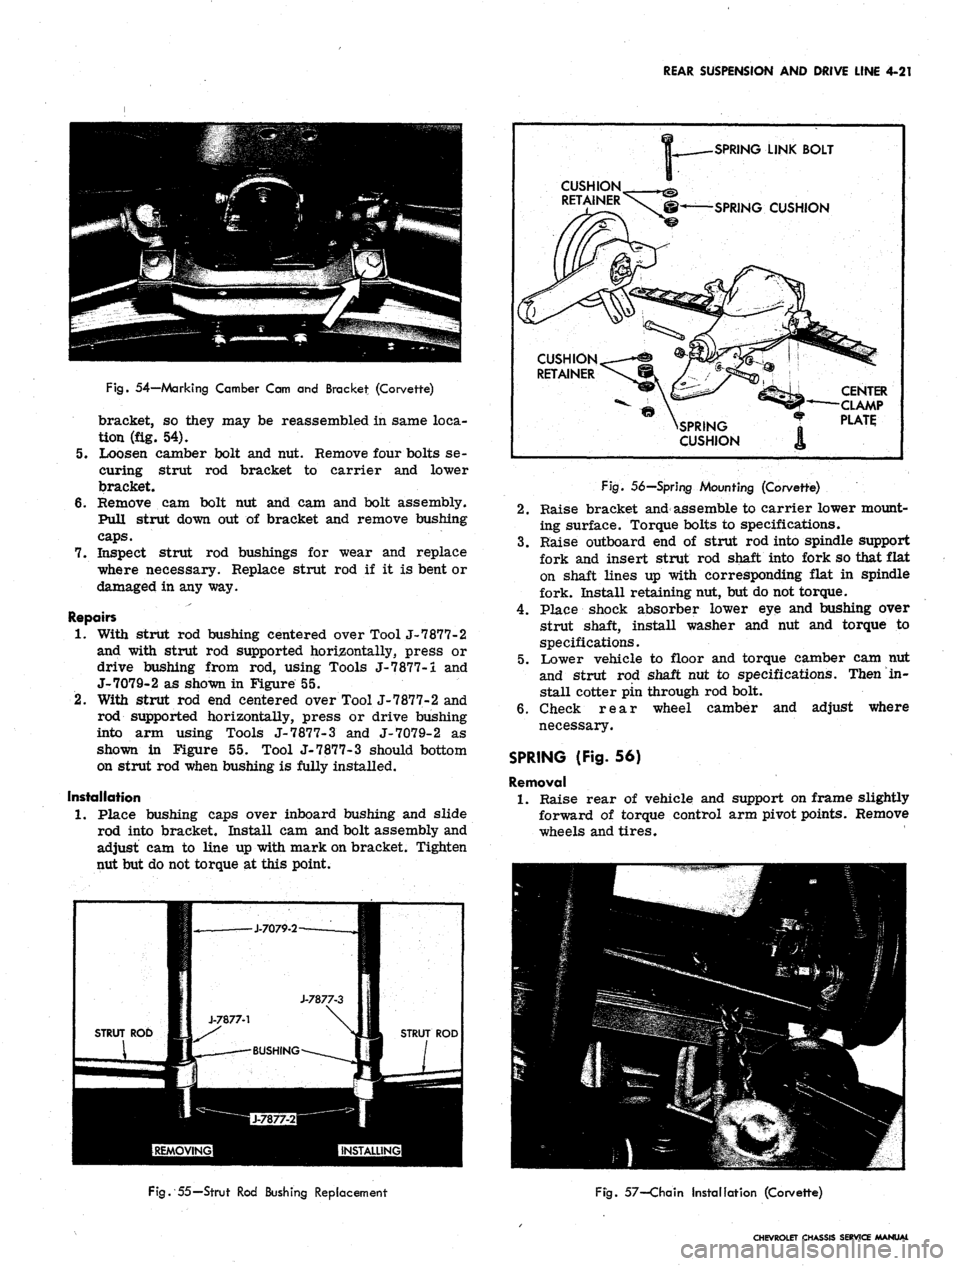
With strut rod bushing centered over Tool J-7877-2
and with strut rod supported horizontally, press or
drive bushing from rod, using Tools J-7877-i and
J-7079-2 as shown in Figure 55.
2.
With strut rod end centered over Tool J-7877-2 and
rod supported horizontally, press or drive bushing
into arm using Tools J-7877-3 and J-7079-2 as
shown in Figure 55. Tool J-7877-3 should bottom
on strut rod when bushing is fully installed.
Installation
1.
Place bushing caps over inboard bushing and slide
rod into bracket. Install cam and bolt assembly and
adjust cam to line up with mark on bracket. Tighten
nut but do not torque at this point.
SPRING
LINK BOLT
SPRING
CUSHION
SPRING
CUSHION
CENTER
CLAMP
PLATE
J-7877-3
J-7877-1
STRUT ROD 11 s* ^#3 STRUT ROD
BUSHING
Fig.
56—Spring Mounting (Corvette)
2.
Raise bracket and assemble to carrier lower mount-
ing surface. Torque bolts to specifications.
3.
Raise outboard end of strut rod into spindle support
fork and insert strut rod shaft into fork so that flat
on shaft lines up with corresponding flat in spindle
fork. Install retaining nut, but do not torque.
4.
Place shock absorber lower eye and bushing over
strut shaft, install washer and nut and torque to
specifications.
5.
Lower vehicle to floor and torque camber cam nut
and strut rod shaft nut to specifications. Then in-
stall cotter pin through rod bolt.
6. Check rear wheel camber and adjust where
necessary.
SPRING (Fig. 56)
Removal
1.
Raise rear of vehicle and support on frame slightly
forward of torque control arm pivot points. Remove
wheels and tires.
Fig.
55—Strut Rod Bushing Replacement
Fig.
57—Chain Installation (Corvette)
CHEVROLET CHASSIS SERVICE MANUAL
Page 213 of 659
REAR SUSPENSION AND DRIVE LINE 4-23
Fig.
62—Torque Control Arm (Corvette)
2.
Place center clamp plate in position and install four
bolts and washers. Tighten bolts and torque to
specifications.
3.
Raise spring outer end with floor jack until spring
is nearly flat and secure with chain as in Step 3-
Removal.
.4.
Lower jack, align torque control arm with spring
end and insert link bolt, rubber cushions and re-
tainers. Install castellated nut on link bolt and
tighten until cotter pin hole in bolt is visible. In-
sert new cotter pin and bend ends around.
5. Raise spring end with jack under link bolt, and re-
move chain and C clamp when loose.
6. Carefully lower jack, making sure rubber cushions
remain indexed in retainers.
7. Remove jack and repeat on opposite side. Install
wheels and tires, remove frame supports and lower
vehicle to floor.
TORQUE CONTROL ARM (Fig. 62)
Removal
1.
Disconnect spring on side torque arm is to be re-
moved. Follow Steps 1-6, Spring-Removal.
NOTE:
If vehicle is so equipped, disconnect
stabilizer rod from torque arm - refer to
"Stabilizer Rod Replacement".
2.
Remove shock absorber lower eye from strut rod
shaft.
3.
Disconnect and remove strut rod shaft and swing
strut rod down.
4.
Remove four bolts securing axle drive shaft to
spindle flange and disconnect drive shaft.
NOTE:
It may be necessary to force torque
arm outboard to provide clearance to drop drive
shaft.
5. Disconnect brake line at wheel cylinder inlet or
caliper and from torque arm. Disconnect parking
brake cable.
6. Remove torque arm pivot bolt and toe-in shims and
pull torque arm out of frame. Tape shims together
and identify for correct reinstallation.
RETAINER
RETAINER
PLATE
BUSHING
CONTROL ARM
Fig.
63—Torque Control Arm Bushing Cross-Sect ion (Corvette)
NOTE:
For service operations pertaining to
the spindle support assembly, refer to service
operations under Wheel Spindle and Support
earlier in this section.
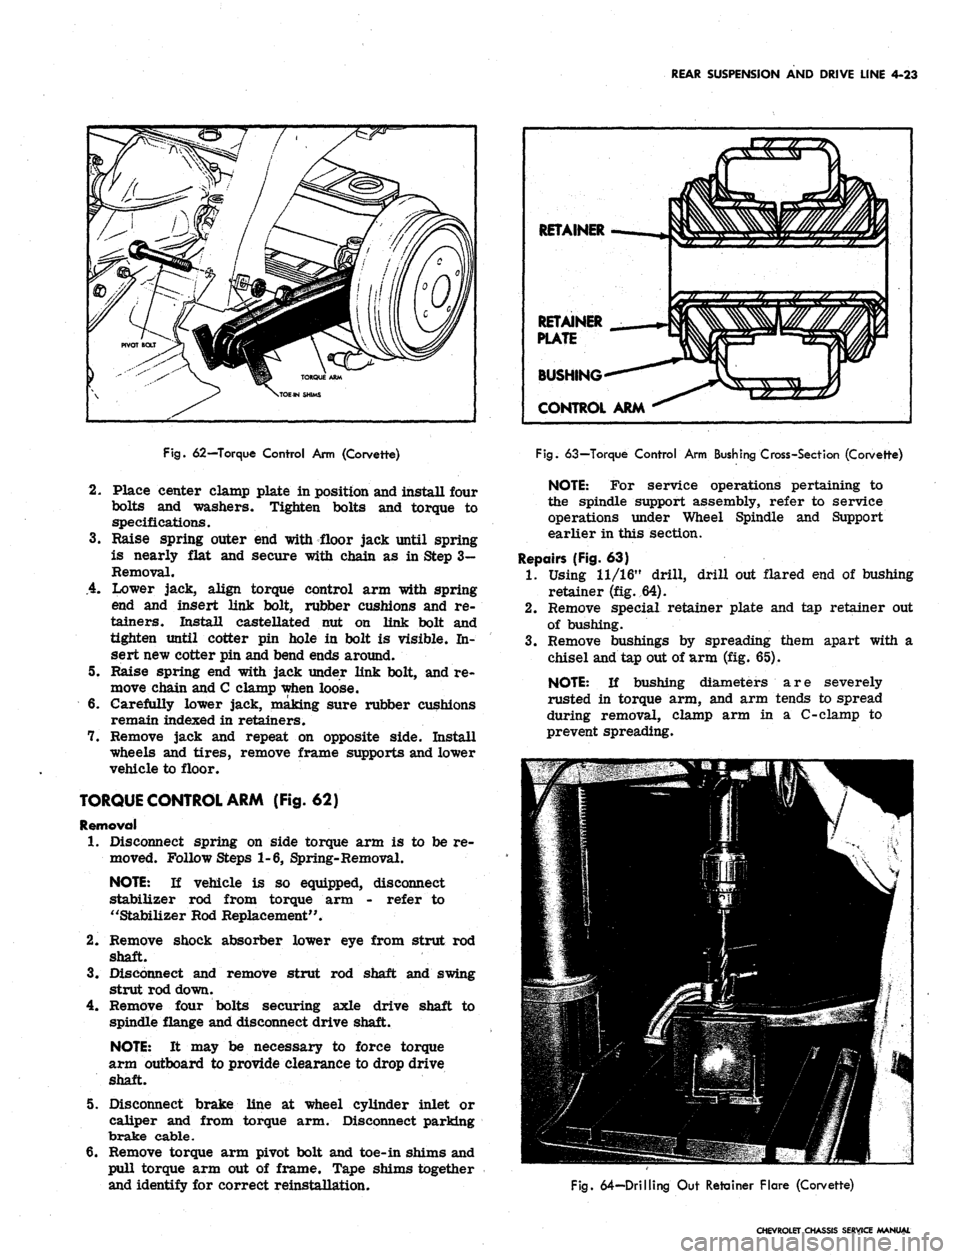
Repairs (Fig. 63)
1.
Using 11/16" drill, drill out flared end of bushing
retainer (fig. 64).
2.
Remove special retainer plate and tap retainer out
of bushing.
3.
Remove bushings by spreading them apart with a
chisel and tap out of arm (fig. 65).
NOTE:
If bushing diameters are severely
rusted in torque arm, and arm tends to spread
during removal, clamp arm in a C-clamp to
prevent spreading.
Fig.
64—Drilling Out Retainer Flare (Corvette)
CHEVROLET CHASSIS SERVICE MANUAL
Page 215 of 659
REAR SUSPENSION AND DRIVE LINE 4-25
Fig.
69—Removing Crossmember (Corvette)
4.
Remove bolts securing carrier cover to cross-
member.
5.
Inspect rubber isolation mounts for aging and re-
place where necessary.
Repairs—Isolation Mount
1.
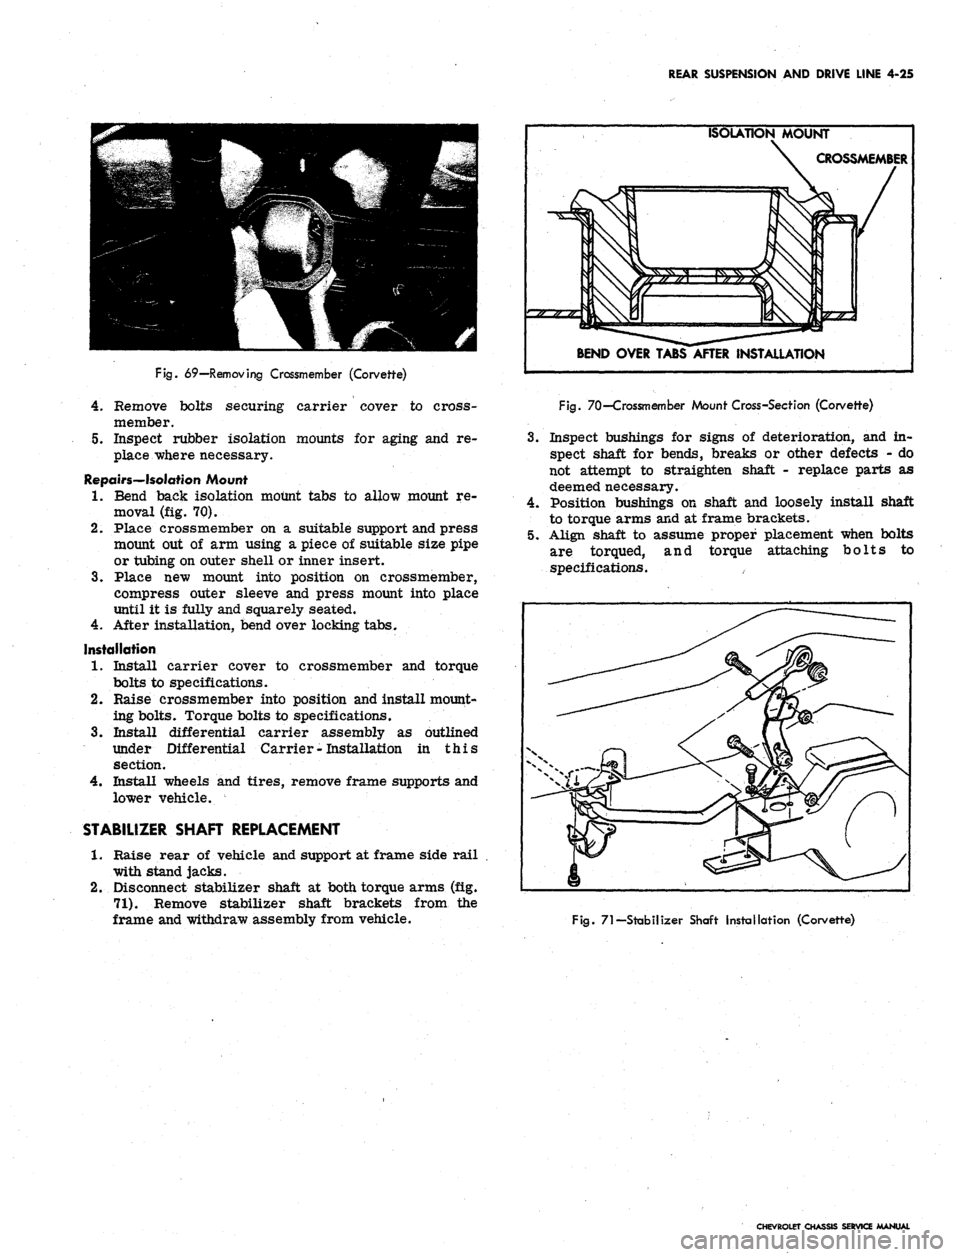
Bend back isolation mount tabs to allow mount re-
moval (fig. 70).
2.
Place crossmember on a suitable support and press
mount out of arm using a piece of suitable size pipe
or tubing on outer shell or inner insert.
3.
Place new mount into position on crossmember,
compress outer sleeve and press mount into place
until it is fully and squarely seated.
4.
After installation, bend over locking tabs.
Installation
1.
Install carrier cover to crossmember and torque
bolts to specifications.
2.
Raise crossmember into position and install mount-
ing bolts. Torque bolts to specifications.
3.
Install differential carrier assembly as outlined
under Differential Carrier
-
Installation in this
section.
4.
Install wheels and tires, remove frame supports and
lower vehicle.
STABILIZER SHAFT REPLACEMENT
1.
Raise rear of vehicle and support at frame side rail
with stand jacks.
2.
Disconnect stabilizer shaft at both torque arms (fig.
71).
Remove stabilizer shaft brackets from the
frame and withdraw assembly from vehicle.
ISOLATION MOUNT
CROSSMEMBER
BEND OVER TABS AFTER INSTALLATION
Fig.
70—Crossmember Mount Cross-Section (Corvette)
3.
Inspect bushings for signs of deterioration, and in-
spect shaft for bends, breaks or other defects - do
not attempt to straighten shaft - replace parts as
deemed necessary.
4.
Position bushings on shaft and loosely install shaft
to torque arms and at frame brackets.
5.
Align shaft to assume proper placement when bolts
are torqued, and torque attaching bolts to
specifications.
Fig.
71—Stabilizer Shaft Installation (Corvette)
CHEVROLET CHASSIS SERVICE MANUAL
Page 474 of 659
STEERING 9-34
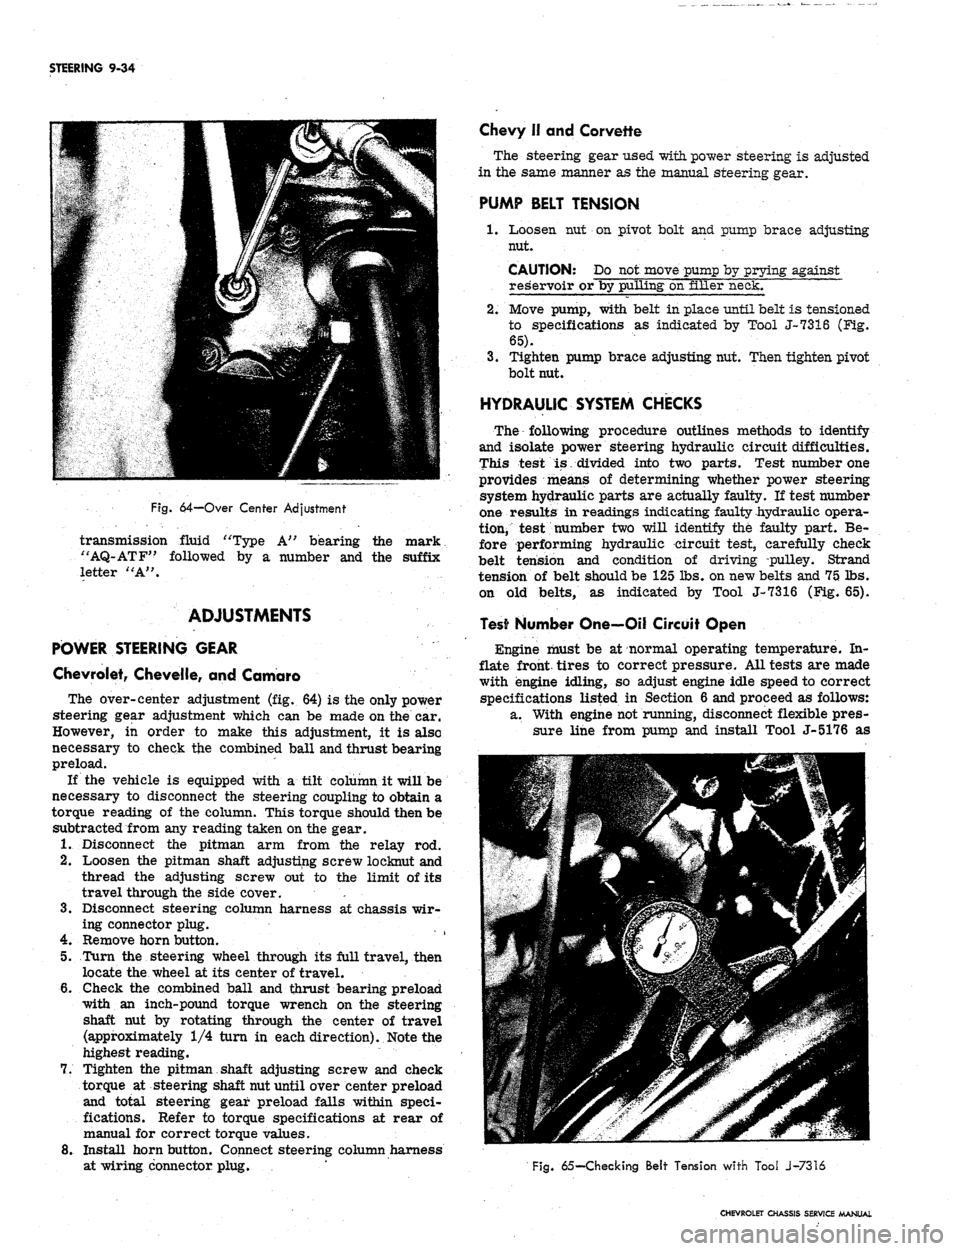
Fig.
64-Over Center Adjustment
transmission fluid "Type A" bearing the mark
"AQ-ATF" followed by a number and the suffix
letter "A".
ADJUSTMENTS
POWER STEERING GEAR
Chevrolet, Chevelle, and Camaro
The over-center adjustment (fig. 64) is the only power
steering gear adjustment which can be made on the car.
However, in order to make this adjustment, it is also
necessary to check the combined ball and thrust bearing
preload.
If the vehicle is equipped with a tilt column it will be
necessary to disconnect the steering coupling to obtain a
torque reading of the column. This torque should then be
subtracted from any reading taken on the gear.
1.
Disconnect the pitman arm from the relay rod.
2.
Loosen the pitman shaft adjusting screw loeknut and
thread the adjusting screw out to the limit of its
travel through the side cover. '. •
3.
Disconnect steering column harness at chassis wir-
ing connector plug.
4.
Remove horn button.
5.
Turn the steering wheel through its full travel, then
locate the wheel at its center of travel.
6. Gheck the combined ball and thrust bearing preload
with an inch-pound torque wrench on the steering
shaft nut by rotating through the center of travel
(approximately 1/4 turn in each direction). Note the
highest reading.
7.
Tighten the pitman shaft adjusting screw and check
torque at steering shaft nut until over center preload
and total steering gear preload falls within speci-
fications. Refer to torque specifications at rear of
manual for correct torque values.
8. Install horn button. Connect steering column harness
at wiring connector plug.
Chevy II and Corvette
The steering gear used with power steering is adjusted
in the same manner as the manual steering gear.
PUMP BELT TENSION
1.
Loosen nut on pivot bolt and pump brace adjusting
nut.
CAUTION: Do not move pump by prying against
reservoir or by pulling on filler neck.
2.
Move pump, with belt in place until belt is tensioned
to specifications as indicated by Tool J-7316 (Fig-.
65).
3.
Tighten pump brace adjusting nut. Then tighten pivot
bolt nut.
HYDRAULIC SYSTEM CHECKS
The following procedure outlines methods to identify
and isolate power steering hydraulic circuit difficulties.
This test is divided into two parts. Test number one
provides means of determining whether power steering
system hydraulic parts are actually faulty. If test number
one results in readings indicating faulty hydraulic opera-
tion, test number two will identify the faulty part. Be-
fore performing hydraulic circuit test, carefully check
belt tension and condition of driving pulley. Strand
tension of belt should be 125 lbs. on new belts and 75 lbs.
on old belts, as indicated by Tool J-7316 (Fig. 65).
Test Number One—Oil Circuit Open
Engine must be at normal operating temperature. In-
flate front, tires to correct pressure. All tests are made
with engine idling, so adjust engine idle speed to correct
specifications listed in Section 6 and proceed as follows:
a. With engine not running, disconnect flexible pres-
sure line from pump and install Tool J-5176 as
Fig.
65— Checking Belt Tension with Tool J-7316
CHEVROLET CHASSIS SERVICE MANUAL
Page 475 of 659
STEERING 9-35
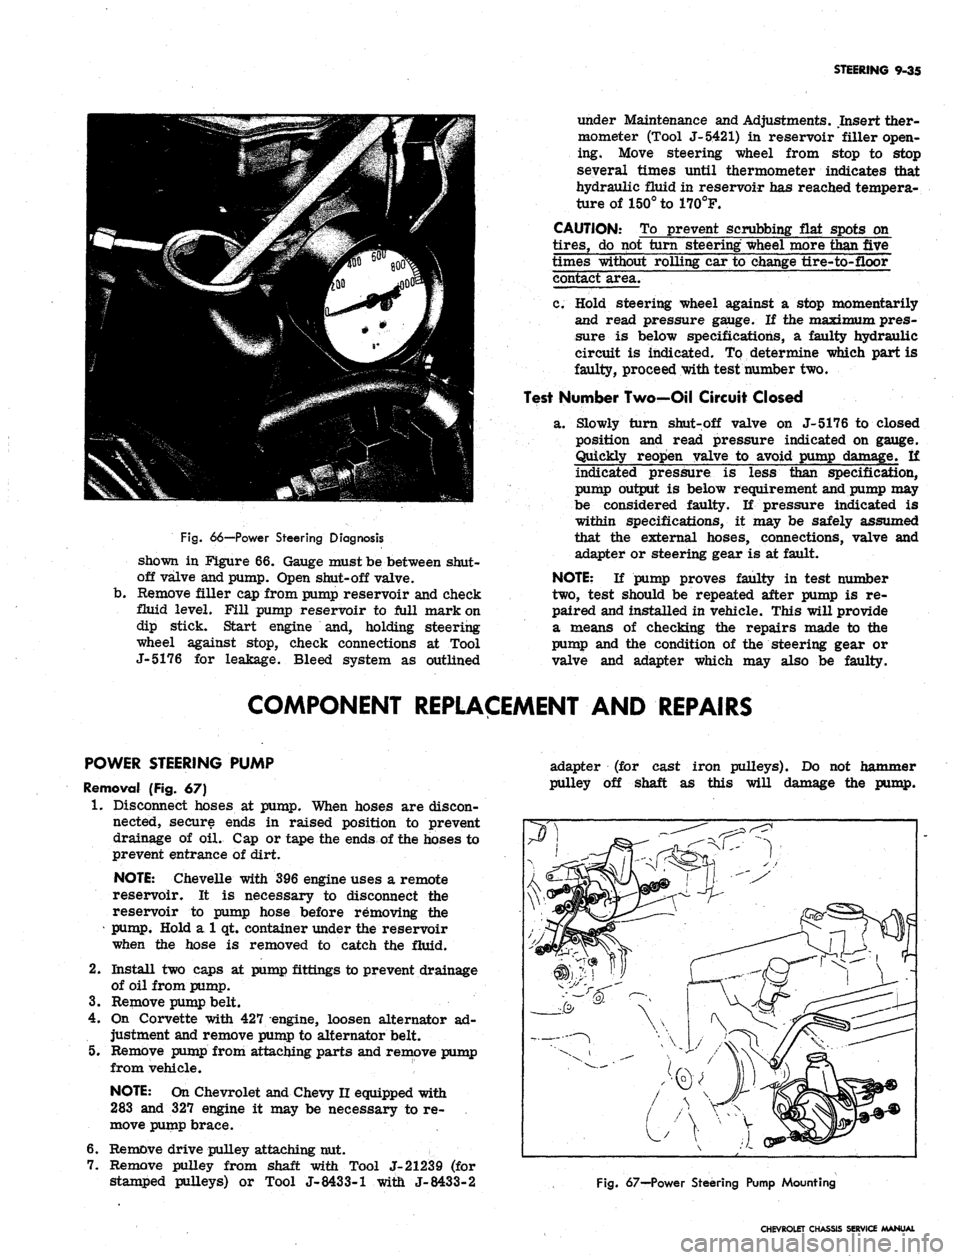
Fig.
66—Power Steering Diagnosis
shown in Figure 66. Gauge must be between shut-
off valve and pump. Open shut-off valve,
b.
Remove filler cap from pump reservoir and check
fluid level. Fill pump reservoir to full mark on
dip stick. Start engine and, holding steering
wheel against stop, check connections at Tool
J-5176 for leakage. Bleed system as outlined
under Maintenance and Adjustments. Insert ther-
mometer (Tool J-5421) in reservoir filler open-
ing. Move steering wheel from stop to stop
several times until thermometer indicates that
hydraulic fluid in reservoir has reached tempera-
ture of 150° to 170°F.
CAUTION: To prevent scrubbing flat spots on
tires,
do not turn steering wheel more than five
times without rolling car to change tire-to-floor
contact area.
c. Hold steering wheel against a stop momentarily
and read pressure gauge. If the maximum pres-
sure is below specifications, a faulty hydraulic
circuit is indicated. To determine which part is
faulty, proceed with test number two.
Test Number Two—Oil Circuit Closed
a. Slowly turn shut-off valve on J-5176 to closed
position and read pressure indicated on gauge.
Quickly reopen valve to avoid pump damage, if
indicated pressure is less than specification,
pump output is below requirement and pump may
be considered faulty. If pressure indicated is
within specifications, it may be safely assumed
that the external hoses, connections, valve and
adapter or steering gear is at fault.
NOTE:
If pump proves faulty in test number
two,
test should be repeated after pump is re-
paired and installed in vehicle. This will provide
a means of checking the repairs made to the
pump and the condition of the steering gear or
valve and adapter which may also be faulty.
COMPONENT REPLACEMENT AND REPAIRS
POWER STEERING PUMP
Removal (Fig. 67)
1.
Disconnect hoses at pump. When hoses are discon-
nected, secure ends in raised position to prevent
drainage of oil. Cap or tape the ends of the hoses to
prevent entrance of dirt.
NOTE:
Chevelle with 396 engine uses a remote
reservoir. It is necessary to disconnect the
reservoir to pump hose before removing the
pump.
Hold a 1 qt. container under the reservoir
when the hose is removed to catch the fluid.
2.
Install two caps at pump fittings to prevent drainage
of oil from pump.
3.
Remove pump belt.
4.
On Corvette with 427 engine, loosen alternator ad-
justment and remove pump to alternator belt.
5. Remove pump from attaching parts and remove pump
from vehicle.
NOTE:
On Chevrolet and Chevy II equipped with
283 and 327 engine it may be necessary to re-
move pump brace.
6. Remove drive pulley attaching nut.
7. Remove pulley from shaft with Tool J-21239 (for
stamped pulleys) or Tool J-8433-1 with J-8433-2
adapter (for cast iron pulleys). Do not hammer
pulley off shaft as this will damage the pump.
Fig.
67—Power Steering Pump Mounting
CHEVROLET CHASSIS SERVICE MANUAL
Page 481 of 659
SECTION 10
WHEELS AND TIRES
INDEX
Page
General Description
10-1
Maintenance
and
Adjustments
.............. 10—1
Tires
10-1
Pressures . 10-1
Inspection 10-1
Wear 10-1
Rotation 10-4
Noise 10-4
Cleaning 10-4
Change (W/Wheels) 10-4
Wheels 10-5
Static Balancing (w/Tire) 10-5
Page
Dynamic Balancing (w/Tire) . 10-5
Run Out (w/o Tire) 10-5
Cleaning 10-5
Service Operations 10-5
Tires 10-5
Removal 10-5
Installation 10-5
Repair 10^6
Wheels . 10-6
Valve Assembly 10-6
Repair (Rim) 10-7
GENERAL DESCRIPTION
WHEELS
Chevrolet, Chevelle, Camaro, Chevy n, and Corvette
are base equipped with welded steel wheels. Five studs
with nuts fasten each wheel to the front hub or rear axle
flange. Disc brake equipped vehicles (except Chevrolet
and Corvette) require special 14 inch diameter wheels
with a revised design for clearance, Chevrolet disc brake
equipped vehicles have 15 in. diameter wheels as do all
Corvettes.
Chevrolet station wagons, Chevelle Super Sport 396,
Corvette and Camaro Super Sport 350 are base equipped
with 6 in. width wheels. All other vehicles have 5 in.
width wheels, except Chevy n 100, 300 and 500 Series
Sedans, which have 4 in. width wheels.
Do not install 6 inch width wheels or snow chains on
Chevrolets equipped with rear fender skirts.
TIRES
The factory installed tires on Chevrolet passenger
cars are selected to provide the best all around tire
performance for all normal operation. They are de-
signed to operate satisfactorily with loads up to and in-
cluding the specified full rated load capacity of the
automobile when inflated as recommended in the Vehicle
Capacity Rating and Recommended Tire Inflation Pres-
sures Table (see Specifications).
Optional Oversize and 8-Ply Rating Tires
{Chevrolet and Chevelle Only)
Oversize or 8-ply rating tires are not necessary on
passenger cars for normal requirements. However, an
extra margin of tire service is available when these
options are used at loads up to and including full rated
load.
Optional oversize 4-ply rating and/or 8-ply rating
tires are available on models as indicated in the Tire
Usage Chart (see Specifications). On some models (ex-
ample—Station Wagon), space limitations do not permit
the use of a larger size tire; hence, the 8-ply rating
tire is an available option.
In either case, these tires are applicable to extended
operation at or near full rated load or for trailer towing
when an extra margin of tire service is desired. How-
ever, use of a larger tire or an 8-ply rating tire should
not be construed as permitting an increase in the full
rated vehicle load (see Specifications).
MAINTENANCE AND ADJUSTMENTS
TIRES
Inflation Pressures
To ensure the proper tire inflation pressure for the
owners particular requirements follow the recommenda-
tions in the Vehicle Capacity Rating and Recommended
Tire Inflation Pressures Table (seeSpecifications). Keep
tires properly inflated, and check inflation pressures
periodically. This will ensure the best tire life and riding
comfort, over the full range of driving conditions.
Inspection
Every few thousand miles and at each lubrication, tires
should be checked for sharp objects or stones in the
tread. H tire is punctured, it should be repaired using
one of several repair kits available through tire manu-
facturers1 outlets.
Wear
Misalignment
This is wear due to excessive toe-in or toe-out. In
CHEVROLET CHASSIS SERVICE MANUAL
Page 482 of 659
WHEELS AND TIRES 10-2
either case, tires will revolve with a side motion and
scrape the tread rubber off. If misalignment is severe,
the rubber will be scraped off of both tires (or all four
tires if front toe is not correct); if slight, only one will
be affected.
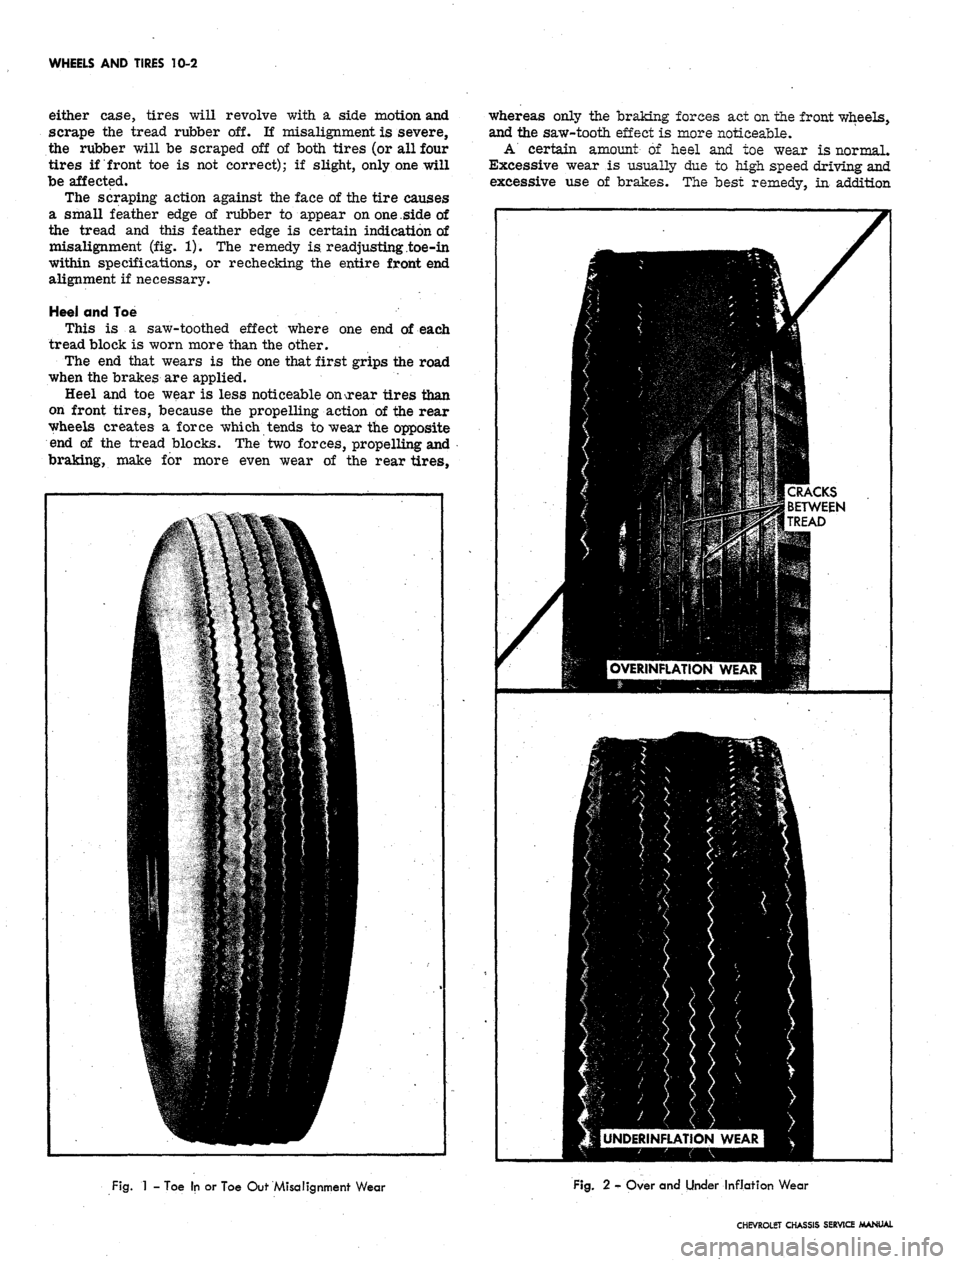
The scraping action against the face of the tire causes
a small feather edge of rubber to appear on
one .side
of
the tread and this feather edge is certain indication of
misalignment (fig. 1). The remedy is. readjusting toe-in
within specifications, or rechecking the entire front end
alignment if necessary.
Heei and Toe
This is a saw-toothed effect where one end of each
tread block is worn more than the other.
The end that wears is the one that first grips the road
when the brakes are applied.
Heel and toe wear is less noticeable onsrear tires than
on front tires, because the propelling action of the rear
wheels creates a force which tends to wear the opposite
end of the tread blocks. The two forces, propelling and
braking, make for more even wear of the rear tires,
whereas only the braking forces act on the front wheels,
and the saw-tooth effect is more noticeable.
A' certain amount of heel and toe wear is normal.
Excessive wear is usually due to high speed driving and
excessive use of brakes. The best remedy, in addition
UNDERINFLATION WEAR
Fig.
1 - Toe In or Toe Out Misalignment Wear
Fig.
2 - Over and Under Inflation Wear
CHEVROLET CHASSIS SERVICE MANUAL
Page 483 of 659
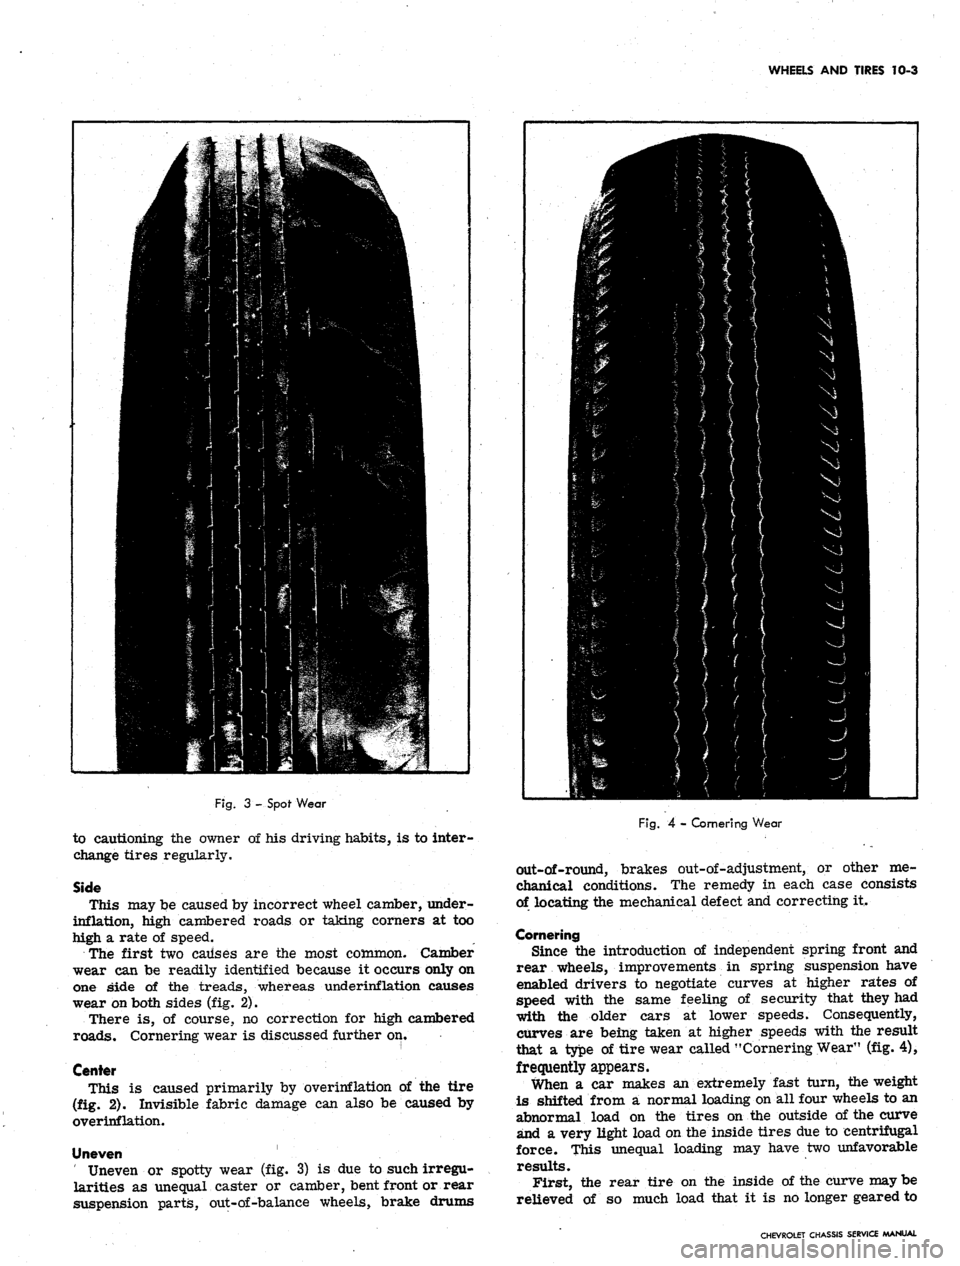
WHEELS AND TIRES 10-3
Fig.
3 - Spof Wear
to cautioning the owner of his driving habits, is to inter-
change tires regularly.
Side
This may be caused by incorrect wheel camber, under-
inflation, high cambered roads or taking corners at too
high a rate of speed.
The first two causes are the most common. Camber
wear can be readily identified because it occurs only on
one side of the treads, whereas underinflation causes
wear on both sides (fig. 2).
There is, of course, no correction for high cambered
roads.
Cornering wear is discussed further on.
Center
This is caused primarily by overinflation pf the tire
(fig. 2). Invisible fabric damage can also be caused by
overinflation.
Uneven
Uneven or spotty wear (fig. 3) is due to such irregu-
larities as unequal caster or camber, bent front or rear
suspension parts, out-of-balance wheels, brake drums
Fig.
4 - Cornering Wear
out-of-round, brakes out-of-adjustment, or other me-
chanical conditions. The remedy in each case consists
of locating the mechanical defect and correcting it.
Cornering
Since the introduction of independent spring front and
rear wheels, improvements in spring suspension have
enabled drivers to negotiate curves at higher rates of
speed with the same feeling of security that they had
with the older cars at lower speeds. Consequently,
curves are being taken at higher speeds with the result
that a type of tire wear called "Cornering Wear" (fig. 4),
frequently appears.
When a car makes an extremely fast turn, the weight
is shifted from a normal loading on all four wheels to an
abnormal load on the tires on the outside of the curve
and a very light load on the inside tires due to centrifugal
force. This unequal loading may have two unfavorable
results.
First, the rear tire on the inside of the curve may be
relieved of so much load that it is no longer geared to
CHEVROLET CHASSIS SERVICE MANUAL
Page 484 of 659
WHEELS AND TIRES 10-4
the road and it slips, grinding off the tread on the inside
half of the tire at an excessive rate. This type of tire
shows much the same appearance of tread wear as tire
wear caused by negative camber.
Second, the transfer of weight may also over-load the
outside tires so much that they are laterally distorted
resulting in excessive wear on the outside half of the
tire producing a type of wear like that caused by ex-
cessive positive camber.
Cornering wear can be most easily distinguished from
abnormal camber wear by the rounding of the outside
shoulder or edge of the tire and by the roughening of the
tread surface which denotes abrasion.
Cornering wear often produces a fin or raised portion
along the inside edge of each row in the tread pattern.
In some cases this fin is almost as pronounced as a
toe-in fin, and in others, it tapers into a row of tread
blocks to such an extent that the tire has a definite step
wear appearance.
The only remedy for cornering wear is proper in-
struction of owners.
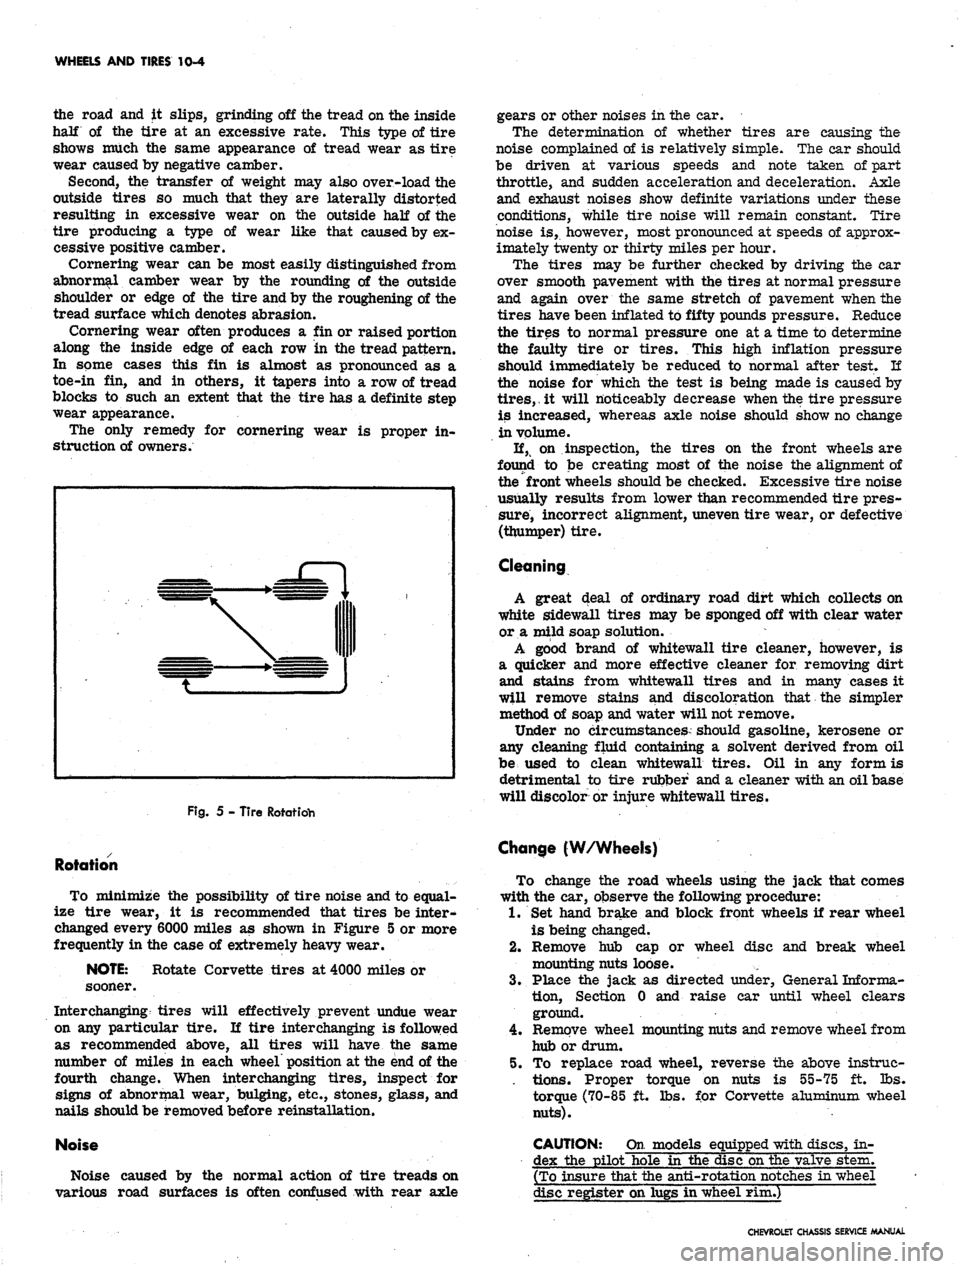
Fig.
5 - Tire Rotatidh
Rotation
To minimize the possibility of tire noise and to equal-
ize tire wear, it is recommended that tires be inter-
changed every 6000 miles as shown in Figure 5 or more
frequently in the case of extremely heavy wear.
NOTE:
Rotate Corvette tires at 4000 miles or
sooner.
Interchanging tires will effectively prevent undue wear
on any particular tire. II tire interchanging is followed
as recommended above, all tires will have the same
number of miles in each wheel position at the end of the
fourth change. When interchanging tires, inspect for
signs of abnormal wear, bulging, etc., stones, glass, and
nails should be removed before reinstallation.
Noise
Noise caused by the normal action of tire treads on
various road surfaces is often confused with rear axle
gears or other noises in the car.
The determination of whether tires are causing the
noise complained of is relatively simple. The car should
be driven at various speeds and note taken of part
throttle, and sudden acceleration and deceleration. Axle
and exhaust noises show definite variations under these
conditions, while tire noise will remain constant. Tire
noise is, however, most pronounced at speeds of approx-
imately twenty or thirty miles per hour.
The tires may be further checked by driving the ear
over smooth pavement with the tires at normal pressure
and again over the same stretch of pavement when the
tires have been inflated to fifty pounds pressure. Reduce
the tires to normal pressure one at a time to determine
the faulty tire or tires. This high inflation pressure
should immediately be reduced to normal after test. If
the noise for which the test is being made is caused by
tires,.
it will noticeably decrease when the tire pressure
is increased, whereas axle noise should show no change
in volume.
If, on inspection, the tires on the front wheels are
found to be creating most of the noise the alignment of
the front wheels should be checked. Excessive tire noise
usually results from lower than recommended tire pres-
sure, incorrect alignment, uneven tire wear, or defective
(thumper) tire.
Cleaning
A great deal of ordinary road dirt which collects on
white sidewall tires may be sponged off with clear water
or a mild soap solution.
A good brand of whitewall tire cleaner, however, is
a quicker and more effective cleaner for removing dirt
and stains from whitewall tires and in many cases it
will remove stains and discoloration that the simpler
method of soap and water will not remove.
Under no circumstances should gasoline, kerosene or
any cleaning fluid containing a solvent derived from oil
be used to clean whitewall tires. Oil in any form is
detrimental to tire rubber and a cleaner with an oil base
will discolor or injure whitewall tires.
Change (W/Wheels)
To change the road wheels using the jack that comes
with the car, observe the following procedure:
1.
Set hand brake and block front wheels if rear wheel
is being changed.
2.
Remove hub cap or wheel disc and break wheel
mounting nuts loose.
3.
Place the jack as directed tinder, General Informa-
tion,
Section 0 and raise car until wheel clears
ground.
4.
Remove wheel mounting nuts and remove wheel from
hub or drum.
5. To replace road wheel, reverse the above instrue-
. tions. Proper torque on nuts is 55-75 ft. lbs.
torque (70-85 ft. lbs. for Corvette aluminum wheel
nuts).
CAUTION: On models equipped with discs, in-
dex the pilot hole in the disc on the valve stem.
(To insure that the anti-rotation notches in wheel
disc register on lugs in wheel rim.)
CHEVROLET CHASSIS SERVICE MANUAL