air condition CHEVROLET CAMARO 1982 Repair Guide
[x] Cancel search | Manufacturer: CHEVROLET, Model Year: 1982, Model line: CAMARO, Model: CHEVROLET CAMARO 1982Pages: 875, PDF Size: 88.64 MB
Page 73 of 875
GM – CAMARO 1982-1992 – Repair Guide (Checked by WxMax) 73
To install:
9. Install the new line or hose, starti
ng with the end farthest from the master
cylinder. Connect the other end, then confirm that both fittings are correctly
threaded and turn smoothly using finger pressure. Make sure the new line
will not rub against any ot her part. Brake lines must be at least 1/2 in.
(13mm) from the steering column and other moving parts. Any protective
shielding or insulators must be rein stalled in the original location.
WARNING - Make sure the hose is NO T kinked or touching any part of the
frame or suspension after installation. These conditions may cause the hose to
fail prematurely.
10. Using two wrenches as bef ore, tighten each fitting.
11. Install any retaining clips or brackets on the lines.
12. If removed, install the wheel and tire assemblies, then carefully lower the
vehicle to the ground.
13. Refill the brake master cylinder re servoir with clean, fresh brake fluid,
meeting DOT 3 specifications. Pr operly bleed the brake system.
14. Connect the negative battery cable.
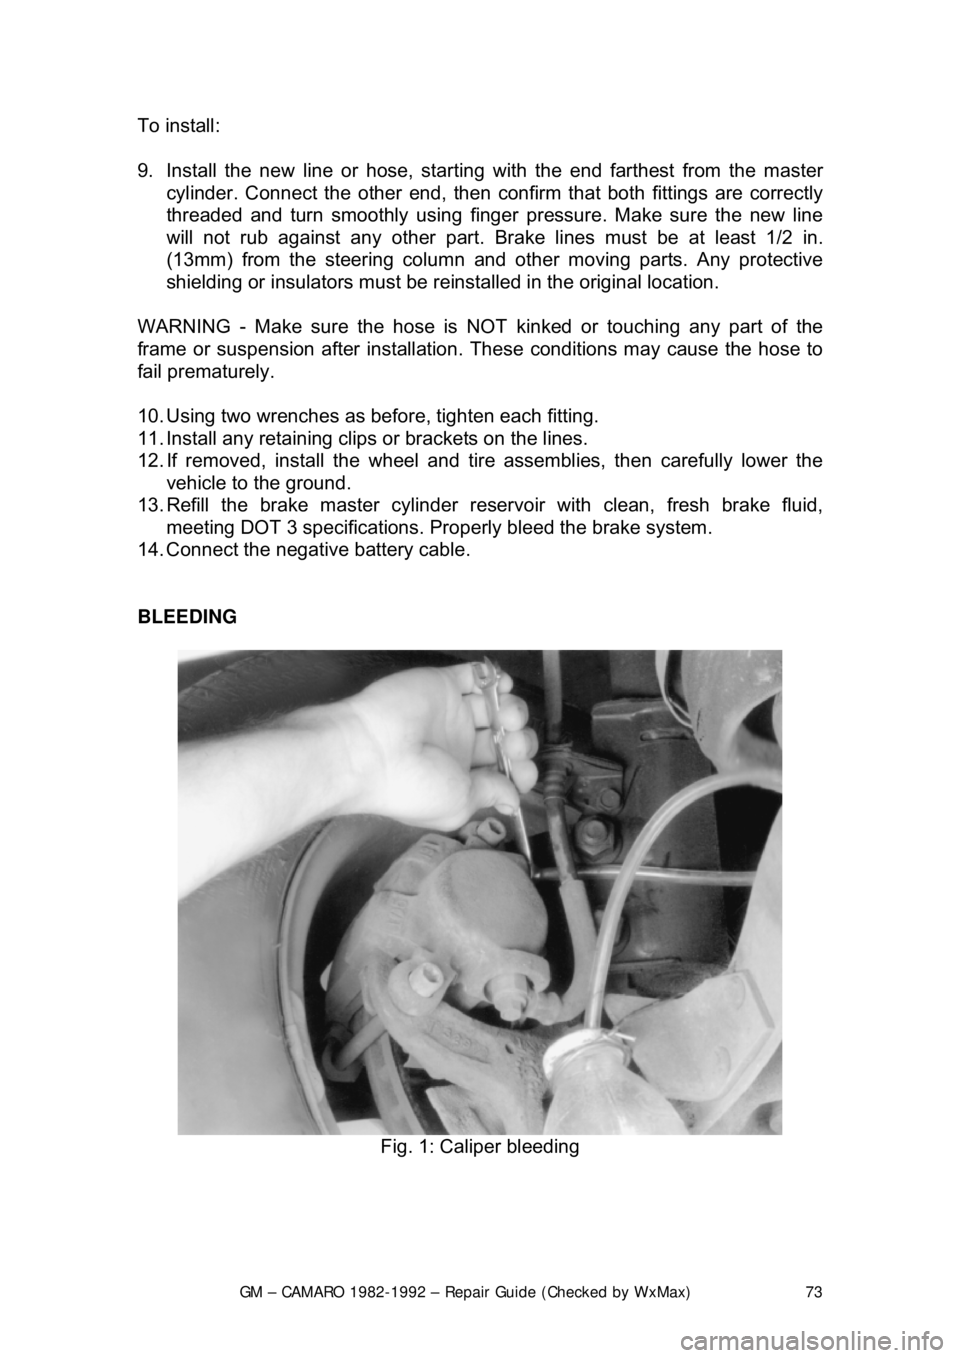
BLEEDING
Fig. 1: Caliper bleeding
Page 82 of 875

GM – CAMARO 1982-1992 – Repair Guide (Checked by WxMax) 82
Avoid inhaling any dust from
any brake surface! When cleaning brake surfaces,
use a commercially available brake cleaning fluid.
1. Remove
2/3 of the brake fluid from the mast er cylinder. Raise the vehicle and
remove the wheel.
2. Place a C-clamp across the caliper, positioned on the brake pads. Tighten it
until the piston is forced into its bore.
3. Remove the C-clamp. Remove the bolt holding the brake hose to the caliper.
4. Remove the Allen head caliper mounting bolts. Inspect them for corrosion
and replace them if necessary. Remove the caliper.
To install:
5. Position the caliper with the brake pad installed and install Allen head caliper
mounting bolts. Mounting bo lt torque is 21-35 ft. lbs. (28-47 Nm.) for the
caliper.
6. Install the bolt holding the brake hos e to the caliper and tighten to 18-30 ft.
lbs. (24-40 Nm.).
7. Fill the master cylinder with brake fluid.
8. Install the wheels and lower the vehicle.
CAUTION - Before moving the vehicle, pump the brakes several times to seat
the brake pad against the rotor
OVERHAUL
Some vehicles may be equipped dual piston calipers. The procedure to
overhaul the caliper is e ssentially the same with t he exception of multiple
pistons, O-rings and dust boots.
1. Remove the caliper from the ve hicle and place on a clean workbench.
CAUTION - NEVER place your finger s in front of the pistons in an attempt to
catch or protect the pistons when applying compressed air. This could result in
personal injury!
Depending upon the vehicle, there are two different ways to remove the piston
from the caliper. Refer to the brake pad replacement procedure to make sure
you have the correct procedure for your vehicle.
2. The first method is as follows: a. Stuff a shop towel or a block of wood into the caliper to catch the piston.
b. Remove the caliper piston using co mpressed air applied into the caliper
inlet hole. Inspect the piston for scor ing, nicks, corrosion and/or worn or
damaged chrome plating. The piston mu st be replaced if any of these
conditions are found.
Page 93 of 875
GM – CAMARO 1982-1992 – Repair Guide (Checked by WxMax) 93
2. Remove the wheel or wheels.
3. Pull the brake drum off. It may be nec
essary to gently tap the rear edges of
the drum to start it off the studs.
4. If extreme resistance to removal is encountered, it will be necessary to
retract the adjusting screw. Knock out the access hole in the backing plate
and turn the adjuster to retract th e linings away from the drum.
5. Install a replacement hole co ver before reinstalling drum.
6. Install the drums in the same position on the hub as removed.
DRUM INSPECTION
1. Check the drums for any cracks, scores, grooves, or an out-of-round
condition. Replace if cracked. Slight scores can be removed with fine emery
cloth while extensive scoring requires turning the drum on a lathe.
2. Never have a drum turned mo re than 0.060 in. (1.524mm).
BRAKE SHOES
ADJUSTMENT
Rotate the star wheel adjuster until a sl ight drag is felt between the shoes and
drum, then back off 12 clicks on the adjusting wheel. Put the car in reverse and,
while backing up, apply the brakes seve ral times. This will allow the self-
adjusters to complete the adjustment.
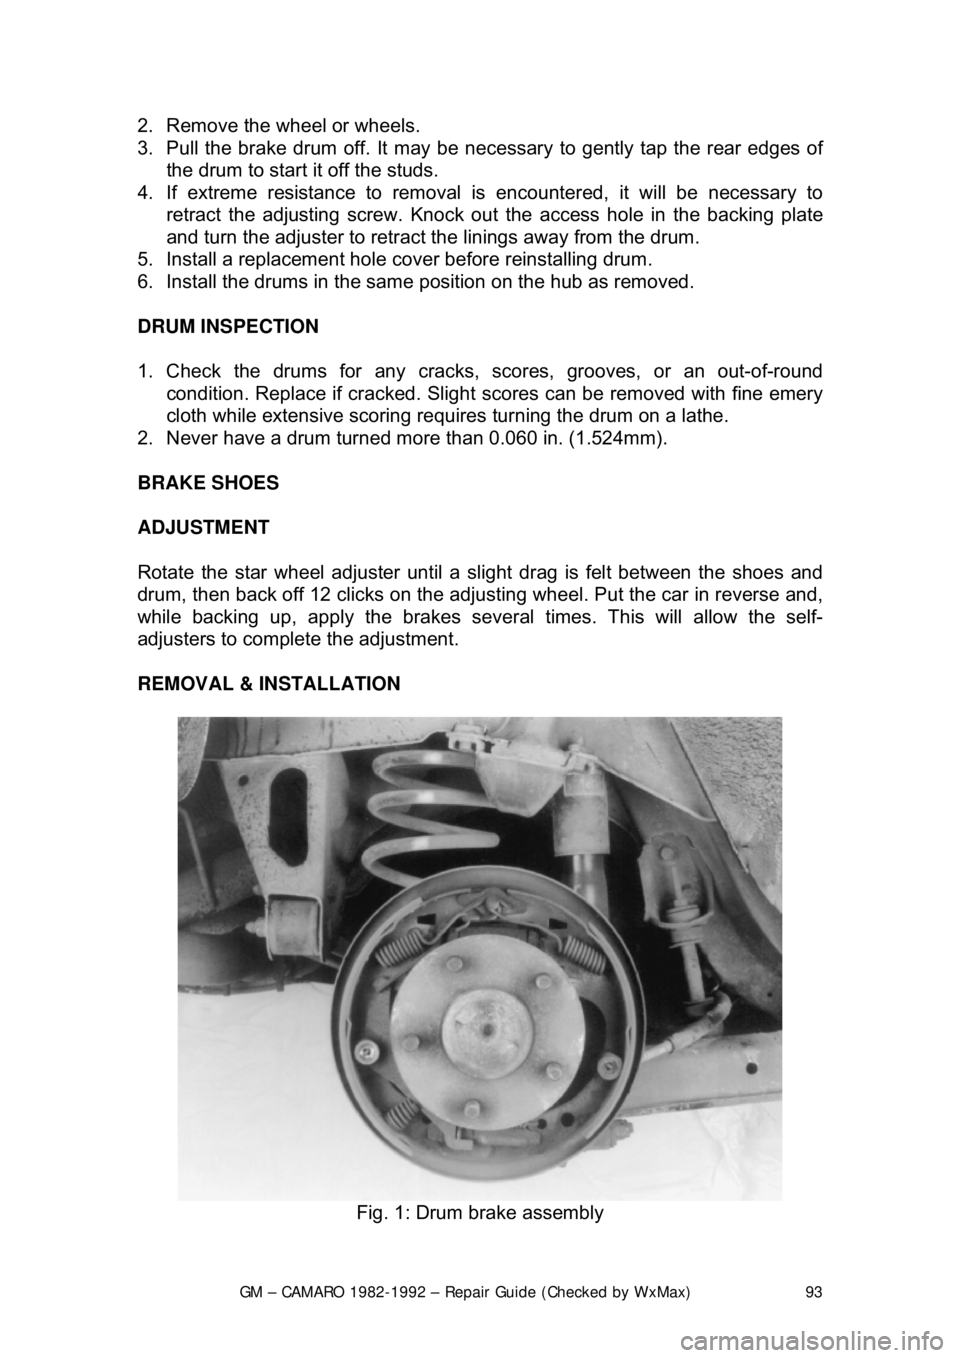
REMOVAL & INSTALLATION
Fig. 1: Drum brake assembly
Page 102 of 875

GM – CAMARO 1982-1992 – Repair Guide (Checked by WxMax) 102
CAUTION
- Brake shoes may contain asbest os, which has been determined to
be a cancer causing agent. Never clean the brake surfaces with compressed
air! Avoid inhaling any dust from any brake surface! When cleaning brake
surfaces, use a commercially available brake cleaning fluid.
1. Raise and support the car. Remove t he wheel. Remove the brake shoes by
following the Brake Shoe R eplacement procedure.
2. Remove dirt from ar ound the wheel cylinder inle t and pilot. Disconnect the
inlet tube.
3. Using 2 awls,
1/8 in. (3mm) in diameter, or J29839, remove the wheel
cylinder retainer. Insert the awls in to the access slots between the wheel
cylinder pilot and retainer. Simultaneous ly, bend both tabs away from each
other. Remove the wheel cylinder.
To install:
4. Place wheel cylinder into position and place a block of wood between it and
the axle flange. Install a new retainer over the end of the wheel cylinder.
Using a 1
1/8 in. 12-point socket with an extensi on, drive the new retainer into
position.
5. Connect the inlet tube and torque 120-280 inch lbs. (13.6-20 Nm). Complete
installation by reversing the remova l procedure. Bleed the brakes.
OVERHAUL
Wheel cylinder overhaul kits may be available, but often at little or no savings
over a reconditioned wheel cylinder. It often makes sense with these
components to substitute a new or re conditioned part instead of attempting an
overhaul.
If no replacement is availabl e, or you would prefer to overhaul your wheel
cylinders, the following procedure may be used. When rebuilding and installing
wheel cylinders, avoid getting any cont aminants into the system. Always use
clean, new, high quality brake fluid. If di rty or improper fluid has been used, it
will be necessary to drain the entire syst em, flush the system with proper brake
fluid, replace all rubber components , then refill and bleed the system.
1. Remove the wheel cylinder from the vehicle and place on a clean
workbench.
2. First remove and discard the old r ubber boots, then withdraw the pistons.
Piston cylinders are equipped with seals and a spring assembly, all located
behind the pistons in the cylinder bore.
Page 119 of 875
GM – CAMARO 1982-1992 – Repair Guide (Checked by WxMax) 119
1. Raise and support the car. Remove the wheel.
2. Remove the caliper by referring to
the Rear Caliper Removal procedure. Pull
the brake disc from the axle.
3. To install, place the rotor ont o the spindle and install caliper.
4. Install the wheel and lower the car.
INSPECTION
1. Raise and support the car. Remove the wheel. Replace wheel nuts to hold rotor in place.
2. Check the rotor surface for wear, sco ring, grooves or rust pitting. Rotor
damage can be corrected by refacing, cons ult your local garage or machine
shop. If the damage exceeds the minimu m thickness, which is stamped on
the rotor, replace the rotor.
3. Using a dial indicator, check the ro tor parallelism at several points around
the circumference. The difference must not vary more than 0.0005 in.
(0.013mm). Make all measur ements at the same distance in from the edge
of the rotor.
4. Using the same dial indicator, meas ure the rotor runout. The runout should
not exceed 0.004 in. (0.10mm).
5. If any of these conditions are not me t, reface or replace the rotor.
PARKING BRAKES
CABLES
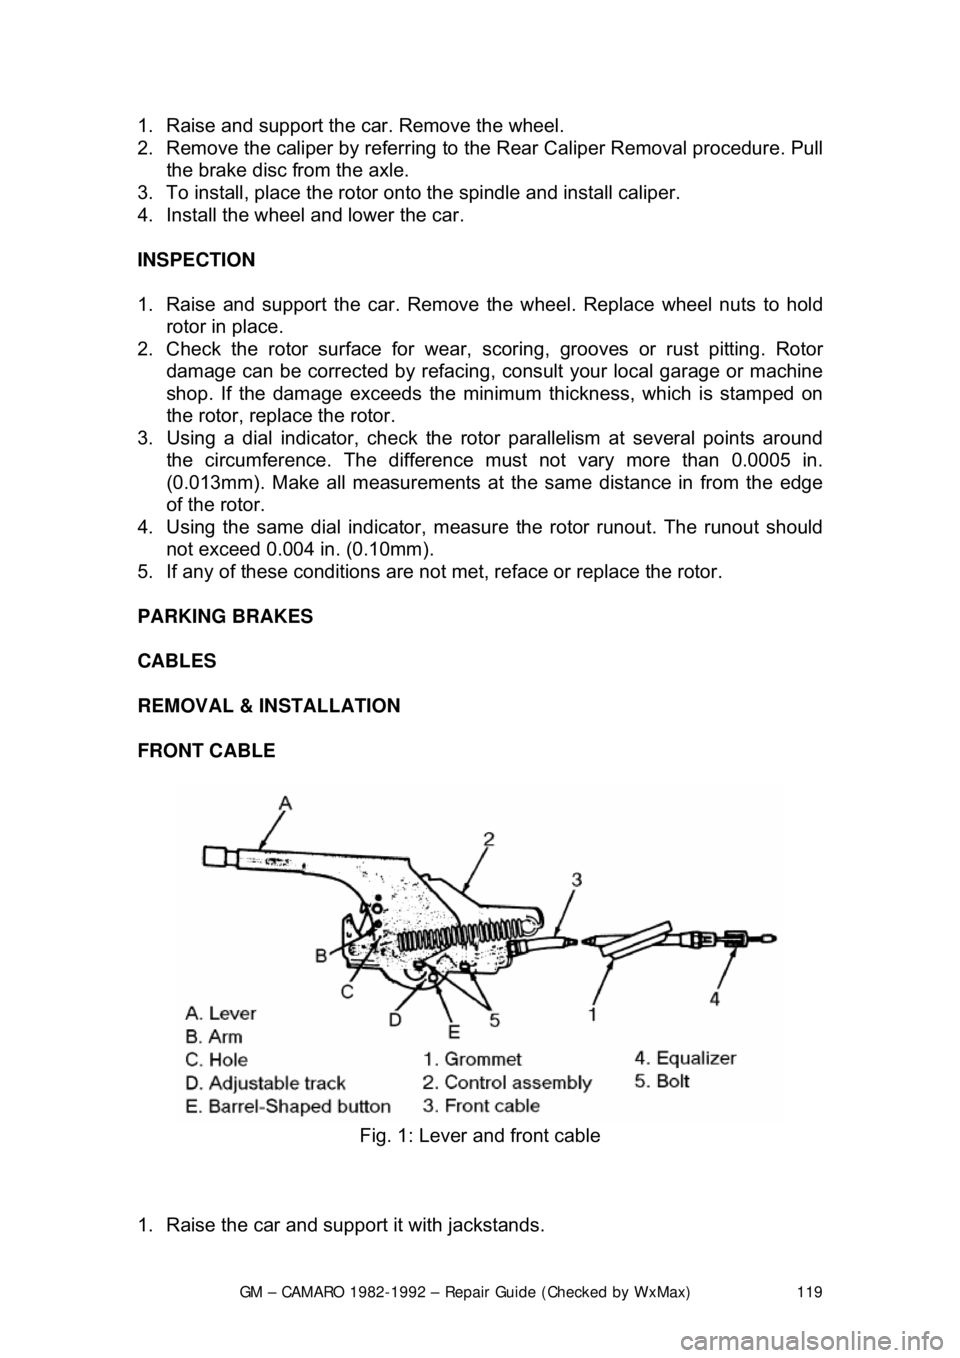
REMOVAL & INSTALLATION
FRONT CABLE
Fig. 1: Lever and front cable
1. Raise the car and support it with jackstands.
Page 123 of 875

GM – CAMARO 1982-1992 – Repair Guide (Checked by WxMax) 123
5. Pull the parking lever 4 clicks. T
he parking brake levers on both calipers
should be against the lever stops on the caliper housings. If the levers are
not against the stops, check for binding in the rear cables and/or loosen the
cables at the equalizer nut until both left and right levers are against their
stops.
6. Adjust the equalizer adjusting nut unt il the parking brake levers on both
calipers just begin to mo ve off their stops.
7. Back off the adjuster nut until the le vers move back, barely touching their
stops.
8. Operate the parking brak e lever several times to check adjustment. After
cable adjustment, the parking brake le ver should travel no more than 14
ratchet clicks. The rear wheels shoul d not turn forward when the parking
brake lever is applied 8-16 ratchet clicks.
9. Release the parking brake lever. Both rear whee ls must turn freely in both
directions. The parking brake levers on both calipers should be resting on
their stops.
10. Remove the wheel nuts retaining t he rotors. Install the wheel and tire
assemblies.
11. Lower the vehicle.
PARKING BRAKE FREE-TRAVEL
ADJUSTMENT
1989-92 MODELS
REAR DISC BRAKES
Disc brake pads must be new or parallel to within 0.006 in. (0.15mm). Parking
brake adjustment is not valid wit h heavily tapered pads and may cause
caliper/parking brake binding. Replace tapered brak e pads. Parking brake free-
travel should only be made if the caliper has been taken apart. This adjustment
will not correct a condition where the caliper levers will not return to their stops.
1. Have an assistant apply a light brake pedal load, enough to stop the rotor
from turning by hand. This takes up all clearances and ensures that
components are correctly aligned.
2. Apply light pressure to the caliper lever.
3. Measure the free-travel between t he caliper lever and the caliper housing.
The free-travel must be 0.0024-0.028 in. (0.6-0.7mm).
4. If the free-travel is incorrect, do the following: a. Remove the adjuster screw.
b. Clean the thread adhesive re sidue from the threads.
c. Coat the threads with adhesive.
d. Screw in the adjuster screw far enough to obtain 0.024-0.028 in. (0.6-
0.7mm) free-travel between the caliper lever and the caliper housing.
5. Have an assistant release the brak e pedal, then apply the brake pedal firmly
3 times. Recheck the free-travel and adjust as necessary.
Page 132 of 875
GM – CAMARO 1982-1992 – Repair Guide (Checked by WxMax) 132
Some electrical components which require
a large amount of current to operate
use a special switch called a relay. Sinc e these circuits carry a large amount of
current, the thickness of the wire in the ci rcuit is also greater. If this large wire
were connected from the load to the c ontrol switch, the switch would have to
carry the high amperage load and the fair ing or dash would be twice as large to
accommodate the increased size of t he wiring harness. To prevent these
problems, a relay is used.
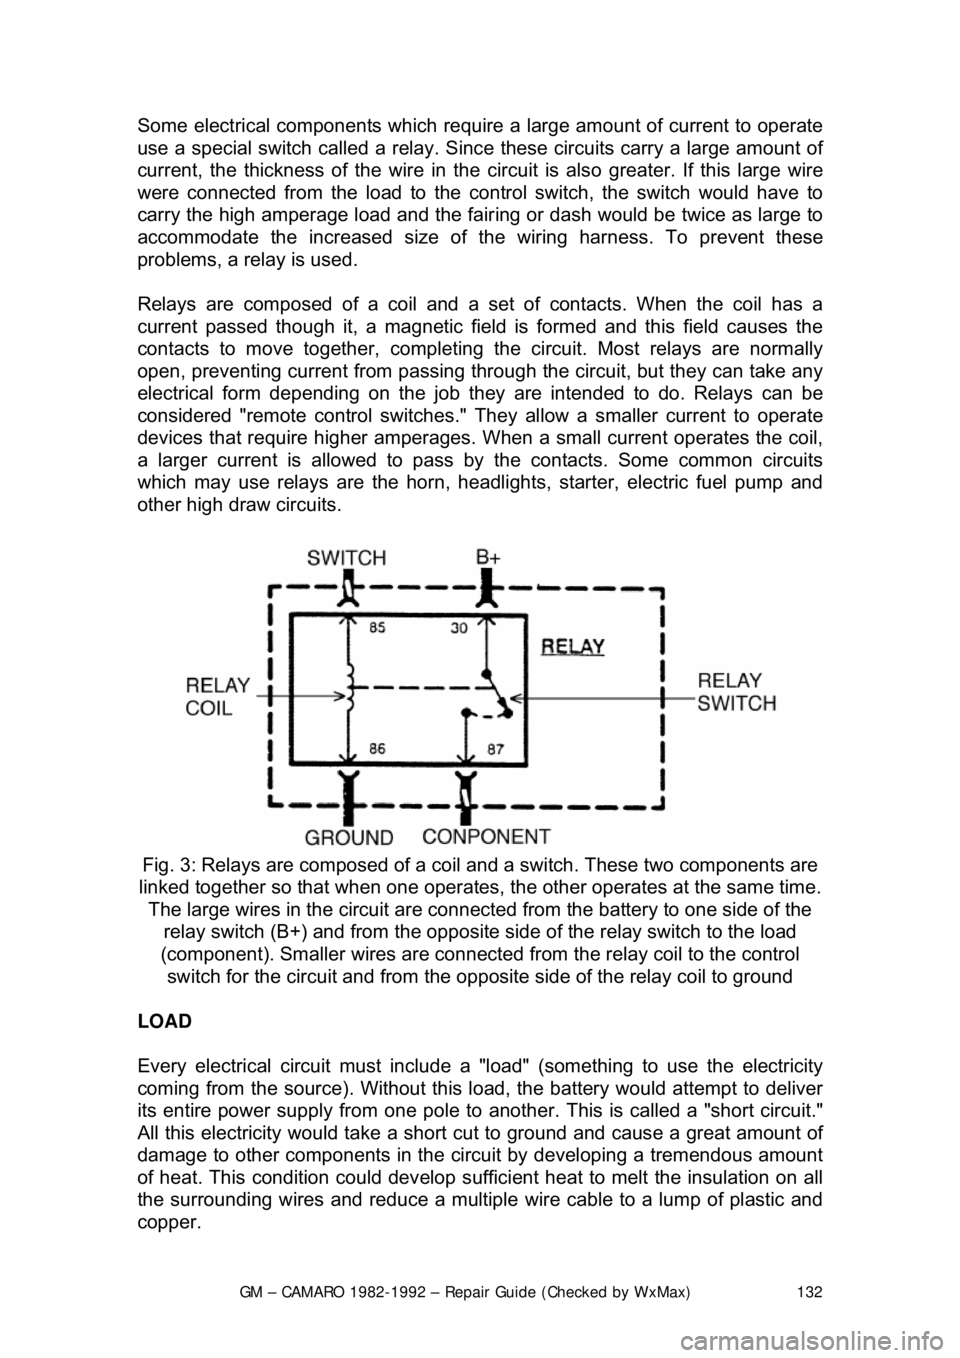
Relays are composed of a coil and a se t of contacts. When the coil has a
current passed though it, a magnetic fiel d is formed and this field causes the
contacts to move together, completing the circuit. Most relays are normally
open, preventing current from passing thr ough the circuit, but they can take any
electrical form depending on th e job they are intended to do. Relays can be
considered "remote control switches." They allow a smaller current to operate
devices that require higher amperages. W hen a small current operates the coil,
a larger current is allo wed to pass by the contacts. Some common circuits
which may use relays are the horn, headlight s, starter, electric fuel pump and
other high draw circuits.
Fig. 3: Relays are composed of a coil and a switch. These two components are
linked together so that w hen one operates, the other operat es at the same time.
The large wires in the circuit are connect ed from the battery to one side of the
relay switch (B+) and from the opposite side of the re lay switch to the load
(component). Smaller wires are connected from the relay coil to the control
switch for the circuit and from the opposite side of the relay coil to ground
LOAD
Every electrical circuit must include a "load" (something to use the electricity
coming from the source). Without this l oad, the battery would attempt to deliver
its entire power supply from one pole to another. This is called a "short circuit."
All this electricity would take a short cut to ground and cause a great amount of
damage to other components in the circui t by developing a tremendous amount
of heat. This condition could develop suffici ent heat to melt the insulation on all
the surrounding wires and reduce a multiple wire cable to a lump of plastic and
copper.
Page 139 of 875

GM – CAMARO 1982-1992 – Repair Guide (Checked by WxMax) 139
TROUBLESHOOTING ELECTRICAL SYSTEMS
When diagnosing a specific problem, or
ganized troubleshooting is a must. The
complexity of a modern automotive v ehicle demands that you approach any
problem in a logical, organized m anner. There are certain troubleshooting
techniques, however, which are standard:
• Establish when the problem occurs. D oes the problem appear only under
certain conditions? Were there any noises, odors or other unusual
symptoms? Isolate the problem area. To do this, make some simple tests
and observations, then eliminate the syst ems that are working properly.
Check for obvious problems, such as broken wires and loose or dirty
connections. Always check the obvious before assuming something
complicated is the cause.
• Test for problems systematically to determine the cause once the
problem area is isolated. Are all t he components functioning properly? Is
there power going to electrical switc hes and motors. Performing careful,
systematic checks will often turn up mo st causes on the first inspection,
without wasting time checking co mponents that have little or no
relationship to the problem.
• Test all repairs after the work is done to make sure that the problem is
fixed. Some causes can be traced to more than one component, so a
careful verification of repair work is important in order to pick up
additional malfunctions that may cause a problem to reappear or a
different problem to arise. A blown fu se, for example, is a simple problem
that may require more than another fuse to repair. If you don't look for a
problem that caused a fuse to blow, a shorted wire (for example) may go
undetected.
Experience has shown that most problem s tend to be the result of a fairly
simple and obvious cause, such as loose or corroded connectors, bad grounds
or damaged wire insulation which causes a short. This makes careful visual
inspection of components during testing essential to quick and accurate
troubleshooting.
Page 151 of 875

GM – CAMARO 1982-1992 – Repair Guide (Checked by WxMax) 151
ARMING THE SYSTEM
1. Turn the ignition key to the LO CK position and remove the key.
2. On vehicles with a passenger side ai r bag, reconnect the yellow two-way
connector assembly located near the yellow 24-way DERM harness
connector. Install the glov e box door assembly.
3. Connect the yellow two-way connector assembly at the base of the
steering column.
Always be sure to reinstall the Connec tor Position Assurance (CPA) device.
4. Install the left side trim panel and rein stall the fuse in the fuse block.
5. Turn the ignition key to the RUN posit ion and verify that the warning lamp
flashes seven to nine times and then turn s OFF. If it does not operate as
described, have the system repair ed by a qualified technician.
HEATING AND AIR CONDITIONING
BLOWER MOTOR
REMOVAL & INSTALLATION 1. Disconnect the negative battery cable. If necessary, remove the diagonal
fender brace at the right rear corner of the engine compartment to gain
access to the blower motor.
2. Disconnect the electrical wiring fr om the blower motor. If equipped with
air conditioning, remove the blower relay and bracket as an assembly
and swing them aside.
3. Remove the blower motor cooling tube.
4. Remove the blower mo tor retaining screws.
5. Remove the blower motor and fan as an assembly from the case.
To install: 6. Position the blower motor into pl ace and install the retaining screws.
7. Install the blower motor cooling tube.
8. Connect all the electrical connections.
9. Connect the negative battery cable.
Page 159 of 875
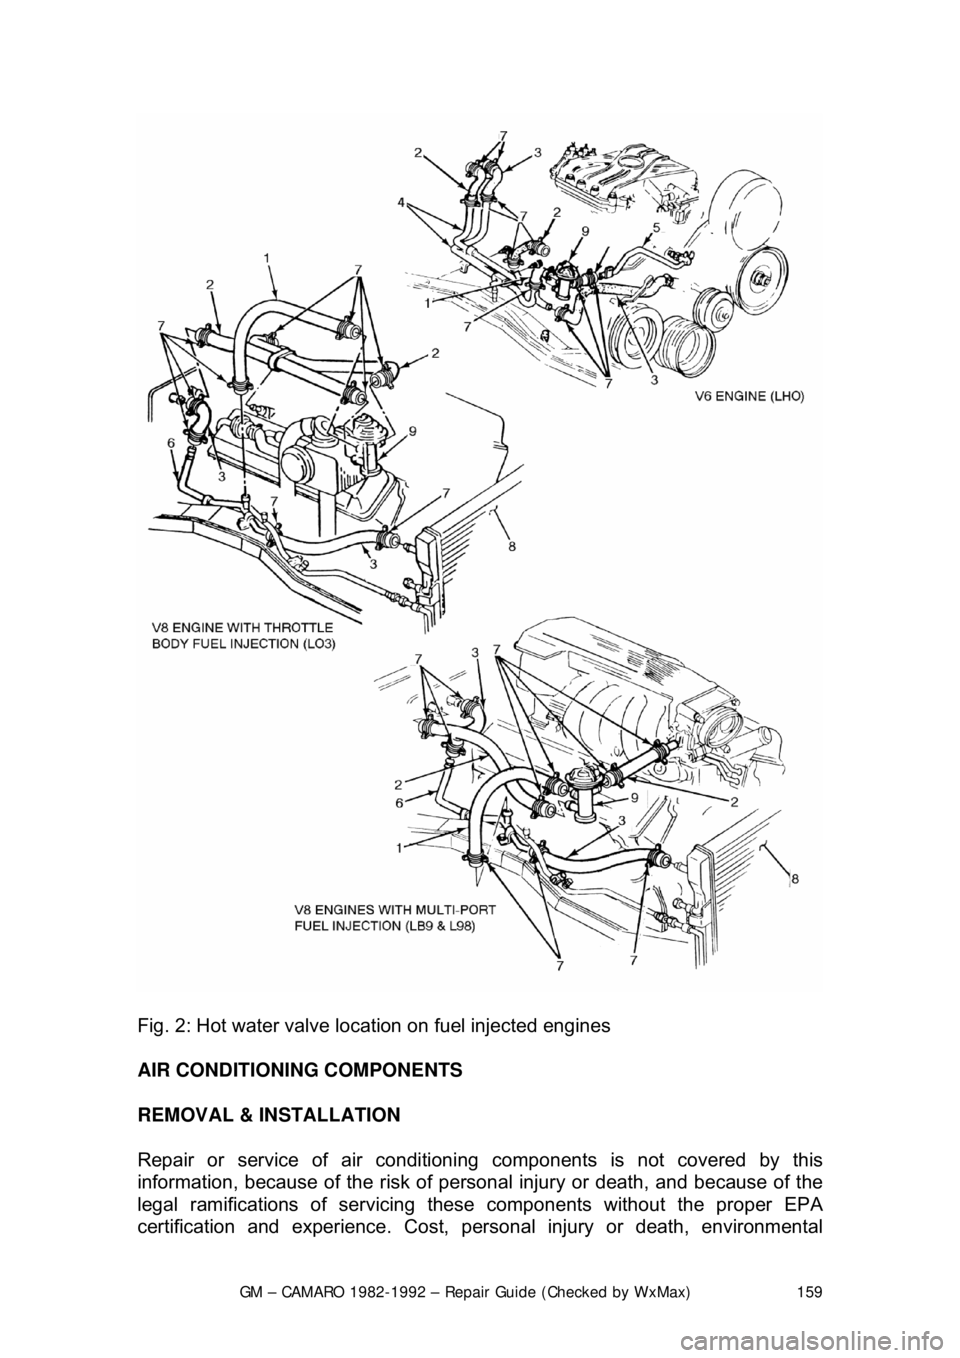
GM – CAMARO 1982-1992 – Repair Guide (Checked by WxMax) 159
Fig. 2: Hot water valve location on fuel injected engines
AIR CONDITIONING COMPONENTS
REMOVAL & INSTALLATION
Repair or service of air conditioni ng components is not covered by this
information, because of the risk of personal injury or death, and because of the
legal ramifications of servicing these components without the proper EPA
certification and experience. Cost, perso nal injury or death, environmental