CHEVROLET CAVALIER 1984 1.G Repair Manual
Manufacturer: CHEVROLET, Model Year: 1984, Model line: CAVALIER, Model: CHEVROLET CAVALIER 1984 1.GPages: 105, PDF Size: 24.23 MB
Page 61 of 105
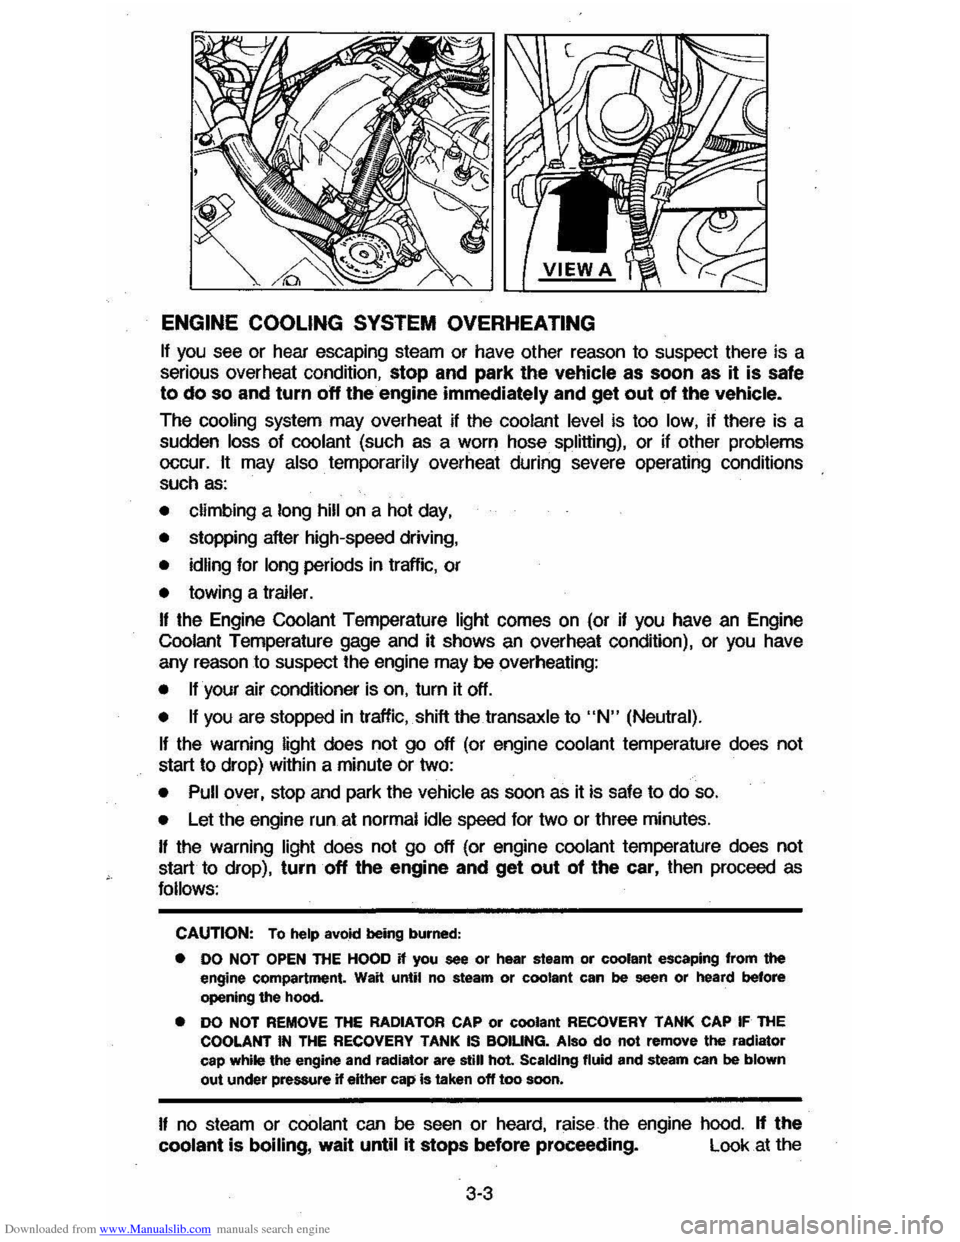
Downloaded from www.Manualslib.com manuals search engine ENGINE COOLING SYSTEM OVERHEATING
If you see or hear escaping steam or have other reason to suspect there is a
serious overheat condition, stop and park the vehicle as soon as it is safe
to do so and turn off the engine immediately and get out of the vehicle.
The cooling system may overheat if the coolant level is too low, if there is a
sudden
loss of coolant (such as a worn hose splitting), or if other problems occur. It may also temporarily overheat during severe operating conditions
such as:
• climbing a long hill on a hot day,
• stopping after high-speed driving,
• idling for long periods in trallic, or
• towing a trailer.
I! the Engine Coolant Temperature light comes on (or if you have an Engine
Coolant Temperature gage and it shows an overheat condition), or you have
any reason to suspect the engine may be overheating:
• tfyour air conditioner is on, turn it off.
• If you are stopped in traffic, shift the transaxle to "N" (Neutral).
If the warning light does not go off (or engine coolant temperature does not
start to drop) within a minute
Or two:
• Pull over, stop and park the vehicle as soon as it is safe to do so.
• Let the engine run at normal idle speed for two or three minutes.
I! the warning light does not go off (or engine coolant temperature does not
start to drop),
turn off the engine and get out of the car, then proceed as
follows:
CAUTION: To help avokt being burned:
• DO NOT OPEN ntE HOOD if you see or hear steam or coolant escaping from the engine compartment. Wait until no steam or coolant can be seen or heard before opening the hood.
• DO NOT REMOVE THE RADIATOR CAP or coolant RECOVERY TANK CAP IF THE COOLANT IN THE RECOVERY TANK IS BOIUNG. Also do not remove the radiator
cap while the engine and radiator are still hot Scalding fluid and steam can be blown out under pressure if eHher cap is taken off too soon.
I! no steam or coolant can be seen or heard, raise the engine hood. If the
coolant is boiling, wait until it stops before proceeding. Look at the
3-3
Page 62 of 105
Downloaded from www.Manualslib.com manuals search engine coolant level in the see-through recovery tank. The coolant level should be at
or above the
"FULL HOT" mark on the recovery tank.
CAUTION: Keep hand., toots and clothing -away from the engine COOling fa", to help prevent personIl intUry. lhiIlan is electric and can come on whether Or not the engine Is rUnning. 111. tan can start automatically In .respon .. to a heat sensor when the ignition Is in "Run."
Make sure the water pu"",, belts are not broken, or off the pulleys , and that the fan runs when the engine is running and there is an indication on the instrument panel of an overheat condition.
If the coolant level in the recovery tank is low, look for leaks at the radiator
hoses and connections, heater hoses and connections, radiator I and water pump. If you find major leaks, or spot other problems that may have caused
the engine to overheat,
do not run the engine untilthese problems have been
corrected. If you do not find a leak or other problem, caretully add coolant to
the recovery tank. (Coolant is a mixture of ethylene glycol antifreeze and water; see "Engine Cooling System" in "'Service and Maintenance," Section 5, for the proper antifreeze and mixture.) .
CAUTION: Under: some:' conditione, the ethylen~ glycol In engine coolant Is . combustible. -To help avoid being burned, DO NOT spill antifreeze or coolant on the exhauat system or hot engine parts..
If the coolant level in the recovery tank is at the correct level but there is still
an indication on the instrument panel of an overheat condition:
•
You may add coolant directly to the radiator. YOU MUST LET ENGINE COOL FIRST. See "Coolant Replacement" under "Engine Cooling
System"
in Section 5, "Service and Maintenance" in this manual. Follow steps t through 3 for the correct way to remove the radiator
cap
and add coolant.
Once the Engine Coolant Temperature light has gone out (or the Engine Coolant Temperature gage no longer signals an overheat condition), you can
resume
driving at a reduced speed. Return to normal driving after about ten
minutes If the light does not come back on (or the gage pointer does not again
show
ao overheat condition).
tf no cause for the overheat condition was found, see a qualified service technician.
JACKING
CAUTION
To help avoid personal injury:
• FollOW all jacking and stowage instructions .
• Use jack only for lifting this vehicle during wheel change.
• Never get beneath the vehicle, start or run engine while vehicle is
supported by jack.
• Always securely restow spare tire (or flat tire) and all jacking equipment.
3-4
Page 63 of 105
Downloaded from www.Manualslib.com manuals search engine JACKING INSTRUCTIONS
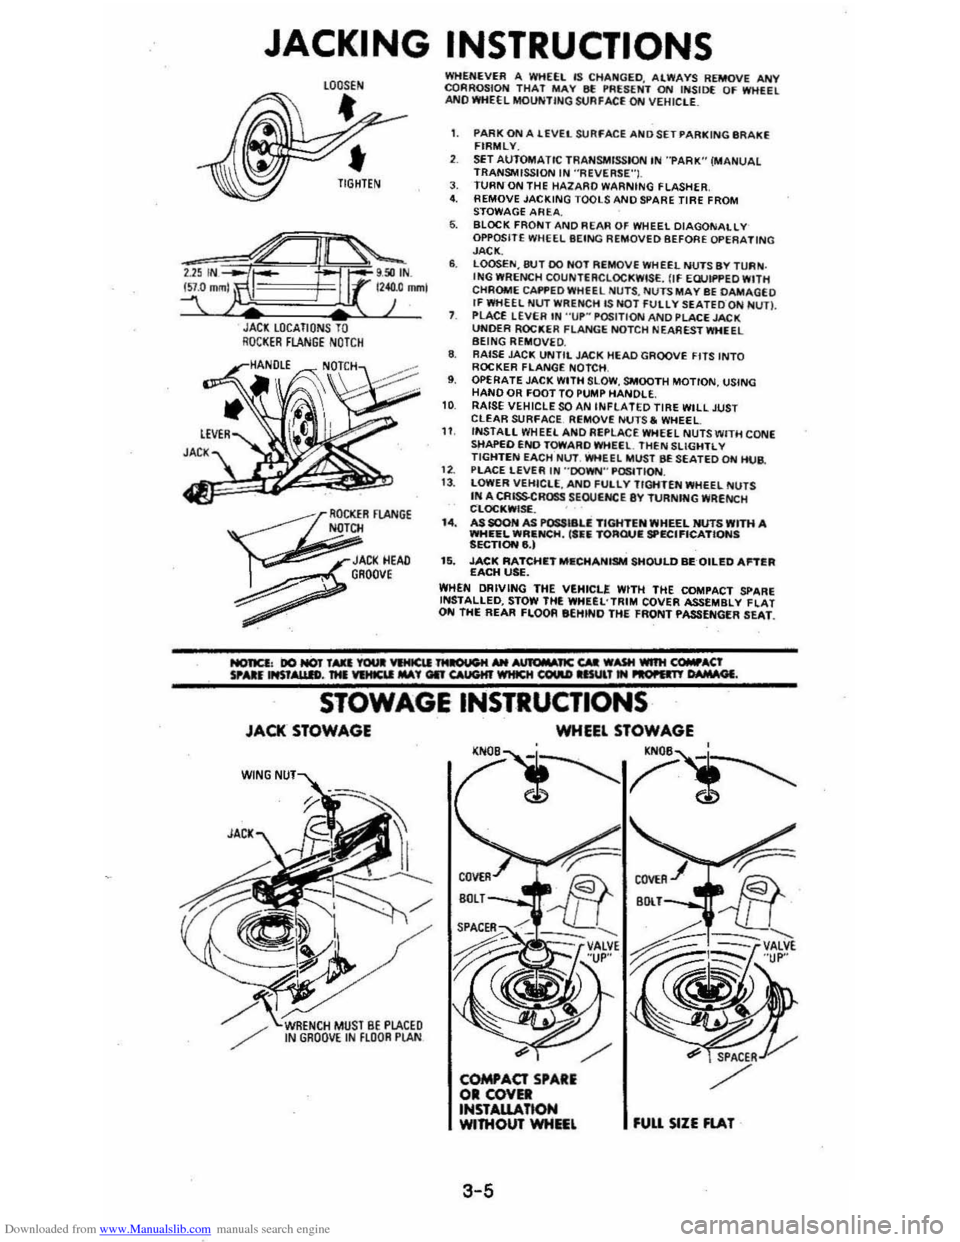
JACl LOCATIONS TO RQCI(ER FLANGE NOTCH
~
OCKER FlANGE N
JACI(HEAD , GROOve
~
WHENEVER A WHEEL IS CHA~GED. ALWAYS REMOVE ANY CQRROSIOH THAT MAY 8f !'RUENT ON INSID( OF WHEEL ANO WHEEL MOUNTING StJAFACE ON VEHIClE_
1. PARK ON A lEVEL SURFACE AND SET PARKING IIR AKE FIRMLY.
SET AUTOMATIC TRANSMISSION IN "PARK" (MANUAL TRANSMISSION IN ·'ReVERSE"I. J. TURN ON THE HAlARO WARNING FLASHER 4. REMOVE JACKING TOOLS AND SPARE TIRE FROM
STOWAGE AREA. 6. BLOCK FRONT AND REAR OF WHEEL DIAGONALLY OPPOSITE WHEEL BEING REMOVED BEFORE OPERATING JACK. 6. LOOSEN,8tH DO HOT REMOVE WHEEL NUTS BY TURN . ING WRENCH COUNTERCLOCKWISE. flf EWIf'PED WITH
CHROME CAI'f'EDWHfEL NU TS , NUTS MAY BE DAMAGEO If WHEEL NUT WRENCH lS NOT FUllY SEATEDQN NUn. PLACE LEVER IN "UP~ POSITION AND PLACE JACK UNOER ROCKER FLANGE NOTCH NEA REST WHEEL BEING REMOVE D. 8. RAISE JAC!!; UNTIL JACK HEAD GROOVE FITS INTO ROCKER FLANGE NOTCH , 9. OPERATE JACK WITH SLOW , SMOOTH MOTION, USING HAND OR FOOT TO PUMP HANDLE. 10 RAISE VEHICLE SOAN INfLATED TIRE WILL JUST CLEAR SURfACE. Ri;MOVE NUTS. WHEEL 11 INSTALL WHEEL ANO Ai;PLACE WHEEL NUTS WITH CONE sttAPEO END TOWARO WHEEl. THEN SLiGHTL V TIGHTEN EACH Nl.IT. WHEEL MUST BE SEATED ON HUB.
1 2. PlACE LEVER IN "'DOWN'" P~TION. 13 . lOWER VEHICLE, ANO fULlY TIGHTEN WHEEL NUTS IN A CRISSCROSS SEOUtNCE 8Y TURNfNG WRENCH CLOC!!;WISf. . I.. AS SOON AS POSSI8U TIGHTEN WHEEL NUTS WITH A WHEEL WRIlNCH, ('fiIi TORQUIE SPECIFICATIONS SECTIONe,) 15. JACK RATCHIETMIlCHANISM SHOULD BEQILED Antill EACH USE. WHEN DRIVING THE VEHICLE WITH THE COMPACT SPARE INSTALLED, STOW THE WHUL'TRIM COVER ASSEMBLY flAT ON THE REAR FLOOR eEHINO THE FRONT PASSENGER SEAT.
STOWAGE INSTRUCTIONS
JACK STOWAGE
W(NG
WHEEL STOWAGE
'N
3-5
fUU SIZE FlAT
Page 64 of 105
Downloaded from www.Manualslib.com manuals search engine Stowage of Tire and Jack
CAUTION: Always securely reatow the, spare tire assembly (or flat tir.), all jacking
equipment, and the cover , using the means provided . When driving the car with the Compact Spare instel~. stow the ",Met COYer in the trunk. In station wagons and hatchbecks, when the rear seat Is folded down, stow the wheel cover nat on the rear floor behind the right front seat. When the r •• r' seat is up, stow the wheel cover in the rear area . This will help keep SUch1tung. trom being thrown about and injuring people during II colhion or • sudden maneuver ..
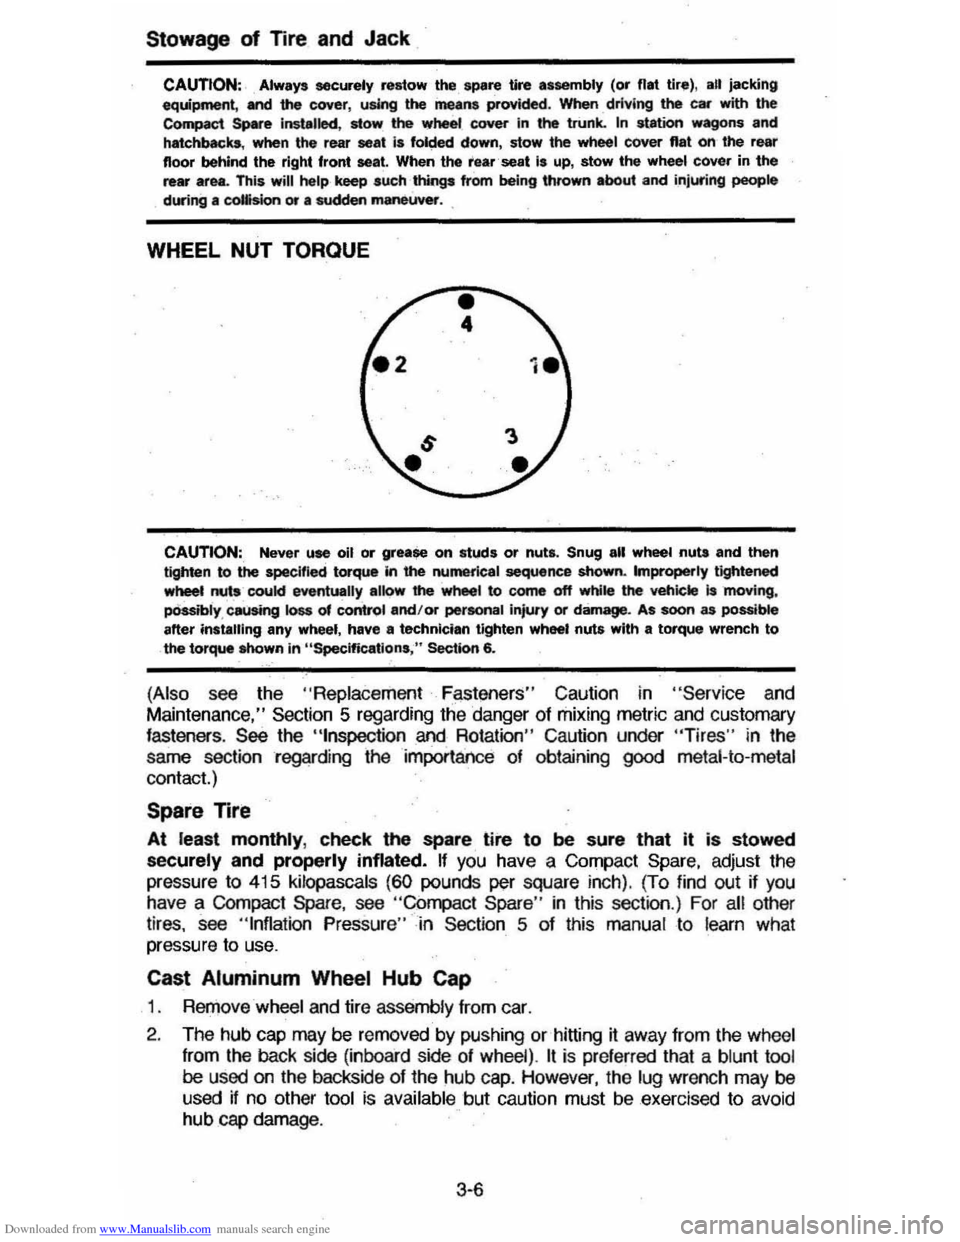
WHEEL NUT TORQUE
CAUTION:, Never use oil or grease on studs or nuts. Snug all wheel nuta and then tighten to the specified torque In the numerical sequence shown. Improperly tightened wheet nuts coukl eventually alk>w' the wheel to come off while the veh;ckt is 'moving, pOssibly , causing loss of control and/or pertonal injury or damage. As soon as possible after instilling any wheel, have II technician tighten wheel nuts with a torque wrench to the torque Mlown in "Specifications ," Section 6.
(Also see the "Replace ment F~st!3ners" Caution in "Servic e and
Maintenance," Section 5 regarding the danger of mixing metric and customary fasteners . See the "tnspection and Rotation" Caution under "Tires" in the
same section regarding the importance of obtaining
good metal-to-metal
contact.)
Spare Tire
At least monthly, check the spare tire to be sure that it is stowed
securely and properly inflated. If you have a Compact Spare, adjust the
pressure
to 415 kilopascals (60 pounds per square inch). (To find out if you have a COmpact Spare, see "Compact Spare " in this section .) For all other
tires, see "Inflation Pressure"-in Section 5 of this manual to learn what
pressure to use.
Cast Aluminum Wheel Hub Cap
1 . RerJ)ove wheel and tire assemb ly from car.
2 . The hub
cap may be removed by pushing or hitting it away from the wheel
from
the back side (inboard side of wheel) . It is pre ferred that a blunt tool be used on the backside of the hub cap. However, the lug wrench may be
used if no other tool is available but caution must be exercised to avoid hub cap damage .
3·6
Page 65 of 105
Downloaded from www.Manualslib.com manuals search engine 3. Install wheel and tire assembly and install hub cap by pushing or hitting
into place (the wheel can be mounted with hub cap in place). The hub cap
must be oriented by engaging the bump on the side of the hub cap
retention tab with the cutout on the side of the wheel pilot hole.
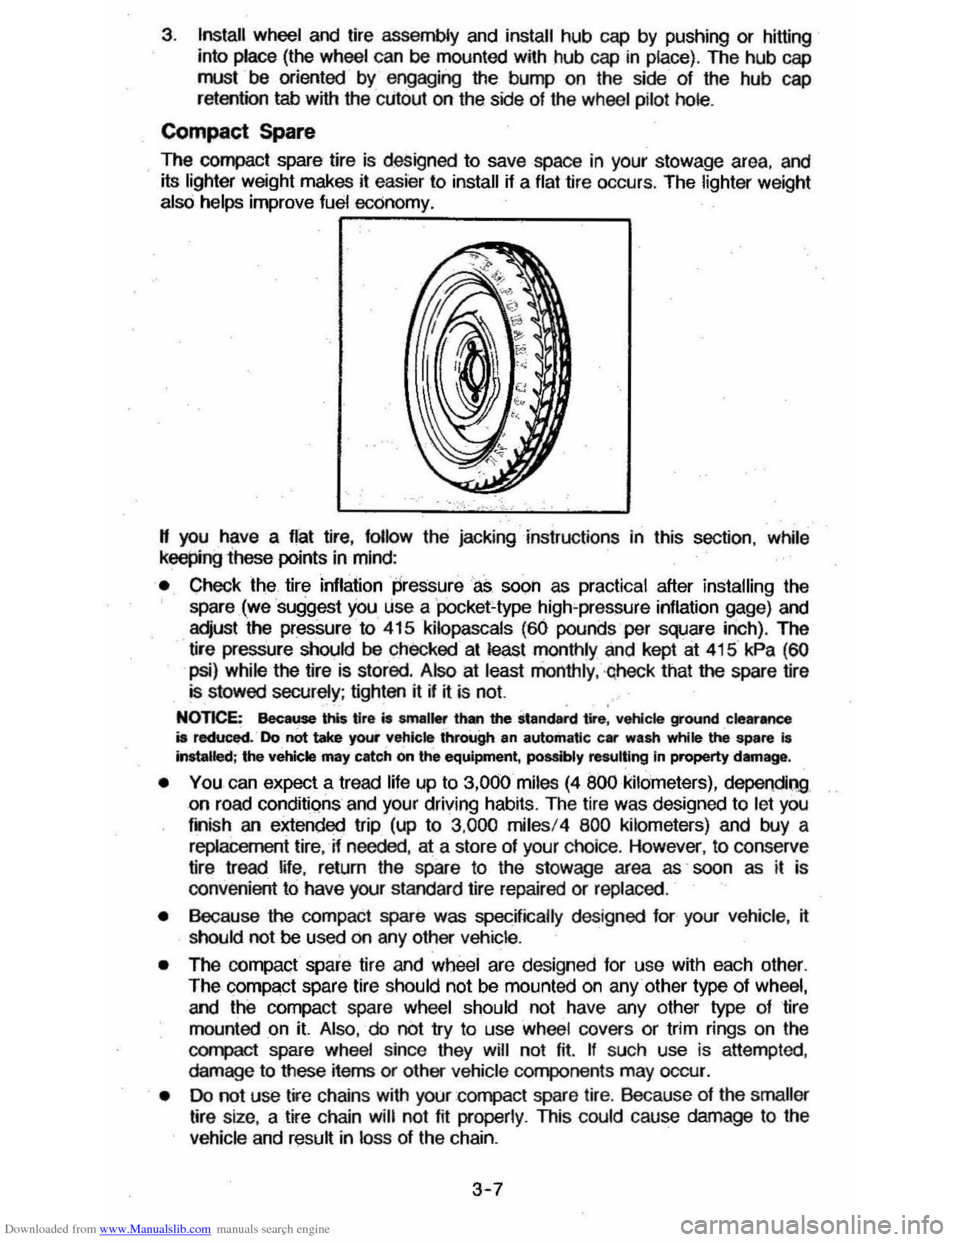
Compact Spare
The compact spare tire is designed to save space in your stowage area, and
its lighter weight makes it easier to install if a flat tire occurs. The lighter weight also helps improve fuel economy. ~--~------~~
" you have a flat tire, follow the jacking Instructions in this section, while keepingihese points in mind:
• Check the tire inflaiionpressureas soon as practical after installing the
spare (we suggest you use a 'pocket-type high'pressure inflation gage) and
adjust the pressure to 415
kilopascals (60 pounds per square inch). The
tire pressure should be checked at least monthly and kept at 415 kPa (60
psi) while the tire is stored . Also at least monthly , ·qheck that the spare lire is stowed securely ; tighten it if ~ is not.
NOTICE: Bee ... this tire is smaller than the standard tire, vehicle ground clearance is reduced. Do not take your vehicle through an automatic car wash while ~ spare I. Installed; the vehicle may catch on the equipment, possibly resulting In property damag_.
• YOU can expect a tread life up to 3,000 miles (4 800 kilometers), dependiQg on road conditions and your driving habits. The tire was designed to let you
finish an extended trip (up to 3,000 miles/4 800 kilometers) and buy a replacement tire, -if needed, at a store of your choice. However, to conserve
tire tread ~fe, return the spare to the stowage area as' soon as it is
convenient to have your standard tire repaired or replaced.
• Because the compact spare was specnically designed for your vehicle , ~ should not be used on any other vehicle.
• The compact spare tire and wheel are designed for use with each other.
The compact spare tire should not be mounted on any other type of wheel, and the compact spare wheel should not have any other type of tire
mounted on it. Also, do not try to use wheel covers or trim rings on the
CQr1l>aCt spare whe el since they will not fit. If such use is attempted,
damage to tIlese items or other vehicle components may occur.
• Do not use tire chains with your :compact spare tire. Because of the smaller tire size, a tire chain will not fit properly. This could cause damage to the
vehicle and result in loss of the chain.
3-7
Page 66 of 105
Downloaded from www.Manualslib.com manuals search engine TOWING
Proper equipment must be used to prevent damage to vehicles during any
towing . State (provincial in
Canada) and local laws which apply to vehicles in .'
tow must be foltowed. Gel detailed towing instructions from your dealer.
Your vehicle, if equipped with
an automatic transaxle, may be towed on alt four
wheels at speeds less than
35 mph (55 km/h) for distances up to 50 miles (80
kilometers). These speed and distance restrictions do not apply if your vehicle
has a manual transaxle . The driveline and steering must be normalty operable.
For such towing, the steering must
be unlocked, transaxle in neutral and the
parking brake released.
Connect to main structural parts of the vehicle. Do NOT attach to bumpers or brackets. Remember also that power assist for
brakes
and steering wilt not be available when the engine is off.
n the vehicle is to be towed by a wrecker , use only equipment designed for this
purpose, following
the instructions of the wrecker manufacturer . Towing on the rear wheels is preferred because of the front-wheel drive. However, if
necessary, your vehicle may be towed backwards on the front drive wheels at speeds up to 35 mph (55 km/h) for distances of 50 miles (80 kilometers) if it is
equipped with
an automatic transaxle. These speed and distance restrictions do not apply ij your vehicle has a manual transaxle. Severe damage to the
transaxle may result
II speeder distance ~m~s are exceeded.
A safety chain system must
be used. for alt towing .
FREEING VEHICLE FROM SAND, MUD, SNOW OR ICE
n your vehicle gets stuck in sand, mUd, snow or ice, shift the transaxle from a
forward range to reverse in a repeat pattern.
(On manual transaxle models, shift the Ifansaxle from First or Second to Reverse .) Apply a tight pressure to
the accelerator pedal
while the transaxle is in gear. Remove your foot from the
accelerator while shifting.
Do not race the engine. For best traction, avoid
spinning the wheels. Incorrect rocking of your' vehicle while it is stuck may
resuh in damage to vehicle components.
CAUTION: Do ............ -.. _ IN. 35 ""'" ,55 Om/h). _ In)ufy .... .-nave (including tire, vehicle body parte. and/or tr.., .. xle failure) mIIy mutt from exCQ:live wheel spinning.
If the vehicle remains stuck after several rocking attempts, seek other
assistance. Also
see the Notice under "Automatic Transaxles" in "Starting and
Operating", Section 2 01 this manual .
Extended Vehicle Storage
If you plan to store your vehicle over an extended period of time, certain steps
should
be taken to give it maximum protection. It is recommended that you
write the Consumer Relations Department , Chevrolet Motor Division, Warren,
Michigan 48090,
(in Canada, write to General Motors of canada Um~ed,
Customer Services Departmeht, Oshawa, Ontario L 1 J5Z6) for detailed
instructions on how to prepare your vehicle for storage .
3-8
Page 67 of 105
Downloaded from www.Manualslib.com manuals search engine SECTION 4
APPEARANCE CARE
CAUTION: Follow the manufacturer'. advic:e WHENEVER cleaning agents or other chemicals are used, inside, or outaide the vehicle. Some clelner. may be poisonous or flammable, and improper UM may cause personal injury or daf1lllge. When cleaning the Inaide or outsideot the vehic~, DO NOT USE volatile cleaning aolYents such Ia: acetone, lacquer thinners, enamel reducers, nail poUsh removers; or such cleaning mmeriliis .. laundry soaps, bleaches or redudng agents except as noted In the fIIbric clHning MtYlce on stein removal which: faNow. . NEVER use carbon tetrlChlorkle, gasoline, benzene, or naphtha for any cleaning purpose .
()pen aM vehicle doors tor ventlillUon when ANY c5unlng agenu or other -chemk:ata _. uaed In the interior. Overexposure to some YIjIpOI'S may Nautt In a health -probtem which I. more likely to occur in small, unvent8ated spaces.
NonCE: Toavoidpoasible permanent discoloration ,Of, white or light COlored leN, DO NOT let triaterials with un .. able dyes come in contact with seat trim material, until
these rMterials are totally dry. (ThIs Includes cet:t-~YP8' of casual clothing. such •• colored denims, corduroys , IeMhers and suedes; alsodecorltive paper, etc.)
CARE AND CLEANING OF THE INTERIOR
With the use of modern trim materials, ~ is VERY IMPORTANT that you use
proper cleaning techniques and cleaners. Failing to do this on the fi'st cleaning may result in water spots, spot rings, or setting of stains or soilage -all of
which are more difficult to remove in a second cleaning :
Dust
and loose dirt that collect on interior fabrics should be removed often with
a vacuum
cleaner or soft bristle brush. Wipe vinyl or leather trim regularly with
a clean damp cloth. Normal trim soilage, spots, or stains can be cleaned with
these
GM c leaners :
GMCLEANERS
Container GM Part Cleaner Size Number
GM"Spot Lifter 80z. 1051398 (Solv en t Type) 10.237 L)
GM Multj-Purpose SIbs. P owdered Clean er 12.72 kg.} 1050429 (Foa m Type)
The above products are excellent cleaners when used properly. Tlley are
available through your authorized
dealer.
Remember these basic steps before cleaning:
t. Remove stains as quickly as possible before they beoome "set."
2. Use a clean Cloth or sponge, and change to a clean area often. (A soft
brush may be used if stains persist.)
3 . Use solvent-type cleaners
only in a well ventilated area; also, do not
saturate the stained area.
4 .
If a ring forms after spot cleaning , clean the entire area immediately .
5. Follow specific instruction s on cleaner labels.
4-1
Page 68 of 105
Downloaded from www.Manualslib.com manuals search engine Cleaning General Soilage Or Water Spots From Fabric-Type
Trim
(Including Fleece and Pigskin Suede Leather) With Foam
Type
Cleaner
GM Multi-Purpose Powdered Cleaner is excellent for this type of cleaning and for cleaning panel sections where small cleaning rings may be left from spot
cleaning .
• Vacuum the area thoroughly to remove any loose dirt.
• ALWAYS clean a full trim assembly or complete trim section . Mask
surrounding trim along stitch or welt lines.
•
Mix Muiji -Purpose Powdered Cleaner in strict accordance with the
directions
on the container label. Mix in proportion for smaller quantities .
• USE SUDS ONlY ON A CLEAN SPONGE OR SOFT BRISTLE BRUSH . 00 NOT SATURATE THE FABRIC OR RUB IT HARSHLY WITH A BRUSH.
IMMEDIATELY
AFTER CLEANING, WIPE OFF EXCESS SUDS WITH A SLIGHTLY DAMP ABSORBENT TOWEL OR CLOTH.
•
IMPORTANT -IMMEDIATELY AFTER WIPING, FORCE-DRY THE FABRIC
WITH . AN AIR HOSE. FOR MATERIALS OTHER THAN PIGSKIN SUEDE
LEATHER A HEAT DRYER OR HEAT LAMP MAY BE USED. (Use caution wijh heat dryer or lamp to help prevent fabric damage. )
• When trim materials wijh a sheen or luster finish are dry, wipe the fabric
lightly with a soft, dry, clean cloth to restore ijs sheen or luster.
Spot Cleaning Fabric Type Trim (Except Pigskin Suede
Leather) with Solvent Type Cleaner
Before trying to remove a spot or stain from fabric, determine as accurately as
you can the type and age
of the spot or stain . Some spots or stains can be
removed with water
or mild soap solulion (see "Removal of Spec~ic Stains").
Spots or stains should always be removed as soon as possible .
Some types of stains or soilage, such as lipstick, inks and grease, are very
difficufl (sometimes impossible) to completely remove. When cleaning this type
of stain
or soilage, be sure not to. enlarge the soiled area .
GM Fabric
Cleaner (Solvent Type) is excellent for spot cleaning grease, oil, or fat stains .
NonCE: Solvent type cle.ners MUST NOT be used on pigskin suede leather. Damage 10 the materia' may result from such use.
• Gently scrape excess stain from the trim material with a clean , DULL kn~e or scraper. USE VERY LITTLE CLEANER , light pressure and clean cloths
(preferably cheesecloth) . Cleaning should start at the outside of the stain,
"FEATHERING" toward the center. Keep changing to a clean section of the cloth.
• When you clean a stain from fabric, immediately dry the area with an air
hose, heat dryer, or heat lamp to help prevent a cleaning ring. (Use caution
with a heat dryer or lamp to help prevent fabric damage).
• ij a ring forms, immediately repeat the cleaning operation over a slightly larger area with emphasis on '.'FEATHERING" towards its center . ij a ring
remains, mask
off surrounding trim sections and clean the entire ajijected
area wijh GM Mufti-Purpose Powdered Cleaner (as described under "Cleaning General Soilage or Water Spots from Fabric Type Trim with
Foam Type Cleaner").
4-2
Page 69 of 105
Downloaded from www.Manualslib.com manuals search engine Removal Of Specific Stains (Except from Pigskin Suede
Leather)
Grease or Oil Stains ~ Includes grease, oil, butter, margarine, shoe polish, coffee with cream, chewing gum, cosmetic creams, vegetable oils, wax crayon,
tar and asphalts.
•
Carefully scrape off excess stain, then use GM Fabric Cleaner (Solvent Type) as previously described.
• Shoe polish, wax crayons, tar and asphalts will stain if left on trim; they
should be removed as soon as possible. Use caution as the cleaner will
dissolve them and may cause them to "bleed."
Non-Greasy Stains -Includes catsup, coffee (black), egg, fruit, fruit juice, milk,
soft drinks, wine, vomit and blood.
• Carefully scrape off excess stain, then sponge the stain with cool water.
• If a stain remains, use Multi-Purpose Powdered Cleaner (Foam Type) as previously described.
• If an odor lingers after cleaning vomit or urine, treat the area with a water /
baking soda solution: 5 milliliters (1 teaspoon) of baking soda to 250 milliliters (1 cup) of lukewarm water.
• Finally, if needed, clean lightly with Fabric Cleaner (Solvent Type).
Combination
Stains -Includes candy, ice cream, mayonnaise, chili sauce and
unknown stains.
• Carefully scrape off excess stain, then clean with cool water and allow to
dry.
• U a stain remains, clean it with Fabric Cleaner (Solvent Type).
Removal of Specific Stains from Pigskin Suede Leather
For the removal of all grease or oil, non-greasy and combination stains on
Pigskin Suede Leather, GM recommends the use of a qualified professional
cleaner who has been trained to care for suede leather.
Cleaning Vinyl Or Leather Trim (Except Pigskin Suede
Leather)
Ordinary soilage can be removed from vinyl or leather wlth warm water and a
mild soap such as saddle soap or oil soap, or an equivalent.
• Apply a small amount of soap solution and let it soak for a few minutes to loosen dirt; then, rub briskly with a clean, damp cloth to remove dirt and
traces of soap. (This may ba repeated several times, if needed.)
• Soilage such as tars, asphalts, shoe polish, etc. will stain if left on trim.
They should be wiped off as quickly as possible and the area cleaned with
a
clean cloth dampened with GM Vinyl/Leather Cleaner (Solvent Type).
Seat Belt Care
• Keep belts clean and dry.
• Clean seat belts only with mild soap and lukewarm water.
• Do not bleach or dye belts since this may severely weaken them.
4-3
Page 70 of 105
Downloaded from www.Manualslib.com manuals search engine Glass Surfaces
Glass surfaces should be cleaned on a regular baSis. Use of GM Glass
Cleaner
or a commercial househo .1d glass cleaner will remove normal tobacco
srooke and dust films sometimes caused by ingredients used in vinyls and
interior plastics.
Never use abrasive cleaners on any vehicle gl~s, as they may cause,
scratches. If abrasive cleaners are used on the insieje of the rear window, any electric defogger element may be damaged. Avoid placing decals on the inside
rear window , since they may have to be scraped off later. Any temporary
license , etc. should not be 'att ached across the defogger grid.
Cleaning Glass Roof Panels
Never use abrasive cleaners on any glass roof panels, such as Vista-Vent
panels , as such cleaners may cause scratches. Also, if you use such cleaners on the inside surface, the tinted coating may be damaged . Avoid placing decals on the inside surface, since they may later have to be scraped off.
CARE AND CLEANING OF THE EXTERIOR
Exterior Rnish
The paint finish on your vehicle prOVides-beauty, depth 01 color , gloss retention
and durabiMy .
Washing Your Vehicle
The best way to preserve your vehicle's finish is to keep it clean by frequent
washings. Wash the
vehicle in lukewarm or cold water.
Do not use hot water or wash your
vehicle in the direct rays 01 the sun. Do not
use strong soap or
chemical detergents. All cleaning agents should be flushed proinptly from the surface and not allowed to dry on the linish .
POlishing and Waxing
Polishing is recommended to remove built-up residue and eliminate any "weathered" appearance.
Your dealer offers several polishes and cleaners which have proven value in maintaining original finish appearance and durability.
Protecting Exterior Bright Metal Parts
Bright metal parts should be cleaned regularly to keep their luster. Washing
with water
is all that is usually needed. However , you may use GM Chrome polish on chrome or stainless steel trim, n necessary .
Use special care with
aluminum trim. To avoid damag ing protective trim, never use auto or chrome polish, steam or caustic soap to clean aluminum. A coating
of wax, rubbed to a high polish, is recommended for all bright metal parts.
Cleaning Aluminum Wheels
Preserve the original appearance of aluminum wheels (il your vehicle has
them) by keeping them
clean and free from build-up of road dirt and/or road salt. Regular cleaning followed by a' coat Of wax is recommended. Do not use
abrasive
cleaners , as they could damage the protective coating.
4-4