torque CHEVROLET DYNASTY 1993 Service Manual
[x] Cancel search | Manufacturer: CHEVROLET, Model Year: 1993, Model line: DYNASTY, Model: CHEVROLET DYNASTY 1993Pages: 2438, PDF Size: 74.98 MB
Page 2103 of 2438
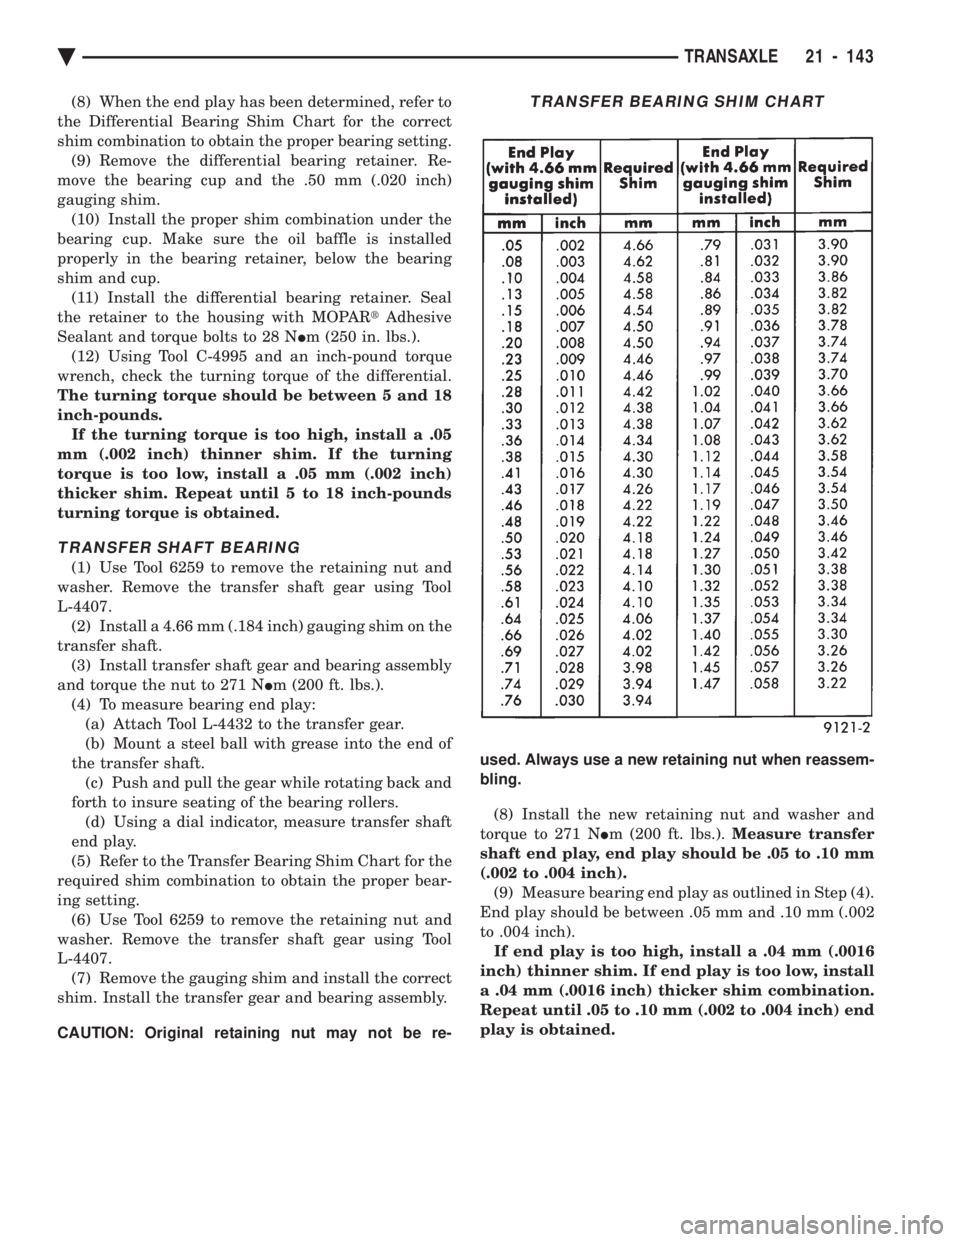
(8) When the end play has been determined, refer to
the Differential Bearing Shim Chart for the correct
shim combination to obtain the proper bearing setting. (9) Remove the differential bearing retainer. Re-
move the bearing cup and the .50 mm (.020 inch)
gauging shim. (10) Install the proper shim combination under the
bearing cup. Make sure the oil baffle is installed
properly in the bearing retainer, below the bearing
shim and cup. (11) Install the differential bearing retainer. Seal
the retainer to the housing with MOPAR tAdhesive
Sealant and torque bolts to 28 N Im (250 in. lbs.).
(12) Using Tool C-4995 and an inch-pound torque
wrench, check the turning torque of the differential.
The turning torque should be between 5 and 18
inch-pounds. If the turning torque is too high, install a .05
mm (.002 inch) thinner shim. If the turning
torque is too low, install a .05 mm (.002 inch)
thicker shim. Repeat until 5 to 18 inch-pounds
turning torque is obtained.
TRANSFER SHAFT BEARING
(1) Use Tool 6259 to remove the retaining nut and
washer. Remove the transfer shaft gear using Tool
L-4407. (2) Install a 4.66 mm (.184 inch) gauging shim on the
transfer shaft. (3) Install transfer shaft gear and bearing assembly
and torque the nut to 271 N Im (200 ft. lbs.).
(4) To measure bearing end play: (a) Attach Tool L-4432 to the transfer gear.
(b) Mount a steel ball with grease into the end of
the transfer shaft. (c) Push and pull the gear while rotating back and
forth to insure seating of the bearing rollers. (d) Using a dial indicator, measure transfer shaft
end play.
(5) Refer to the Transfer Bearing Shim Chart for the
required shim combination to obtain the proper bear-
ing setting. (6) Use Tool 6259 to remove the retaining nut and
washer. Remove the transfer shaft gear using Tool
L-4407. (7) Remove the gauging shim and install the correct
shim. Install the transfer gear and bearing assembly.
CAUTION: Original retaining nut may not be re- used. Always use a new retaining nut when reassem-
bling.
(8) Install the new retaining nut and washer and
torque to 271 N Im (200 ft. lbs.). Measure transfer
shaft end play, end play should be .05 to .10 mm
(.002 to .004 inch). (9) Measure bearing end play as outlined in Step (4).
End play should be between .05 mm and .10 mm (.002
to .004 inch). If end play is too high, install a .04 mm (.0016
inch) thinner shim. If end play is too low, install
a .04 mm (.0016 inch) thicker shim combination.
Repeat until .05 to .10 mm (.002 to .004 inch) end
play is obtained.
TRANSFER BEARING SHIM CHART
Ä TRANSAXLE 21 - 143
Page 2151 of 2438
ponents. Under extremes of suspension and steering
travel tire damage may occur.
WARNING: FAILURE TO EQUIP THE VEHICLE WITH
TIRES HAVING ADEQUATE SPEED RATING CAN
CAUSE SUDDEN TIRE FAILURE.
ROTATION
DIRECTIONAL TREAD PATTERN TIRES
Some vehicles are fitted with special high-perfor-
mance tires having a directional tread pattern de-
signed to improve traction on wet pavement. To obtain the full benefits of this design, the tires
must be installed so that they rotate in the correct
direction. This is indicated by arrows on the tire
sidewalls. When wheels and tires are being installed, extra
care is needed to ensure that this direction of rota-
tion is maintained. Refer to Owner's Manual for rotation schedule.
NONDIRECTIONAL TIRES
Tires on the front and rear axles of vehicles oper-
ate at different loads and perform different steering,
driving, and braking functions. For these reasons,
they wear at unequal rates, and tend to develop ir-
regular wear patterns. These effects can be reduced
by timely rotation of tires. Rotation will increase
tread life, help to maintain mud, snow, and wet trac-
tion levels, and contribute to a smooth, quiet ride. The suggested rotation method is the forward-cross
tire rotation method. This method takes advantage of
current tire industry practice which now allows cross
rotation of radial-ply tires. Refer to the owner's man-
ual (usually found in the glove box) for additional in-
formation. Other rotation methods may be used, but
may not have all the benefits of the recommended
method. Always check air pressure and wheel nut tightness
after rotation. Do NOT use oil or grease on studs
or nuts. Refer to Owner's Manual for rotation schedule.
TREAD WEAR INDICATORS
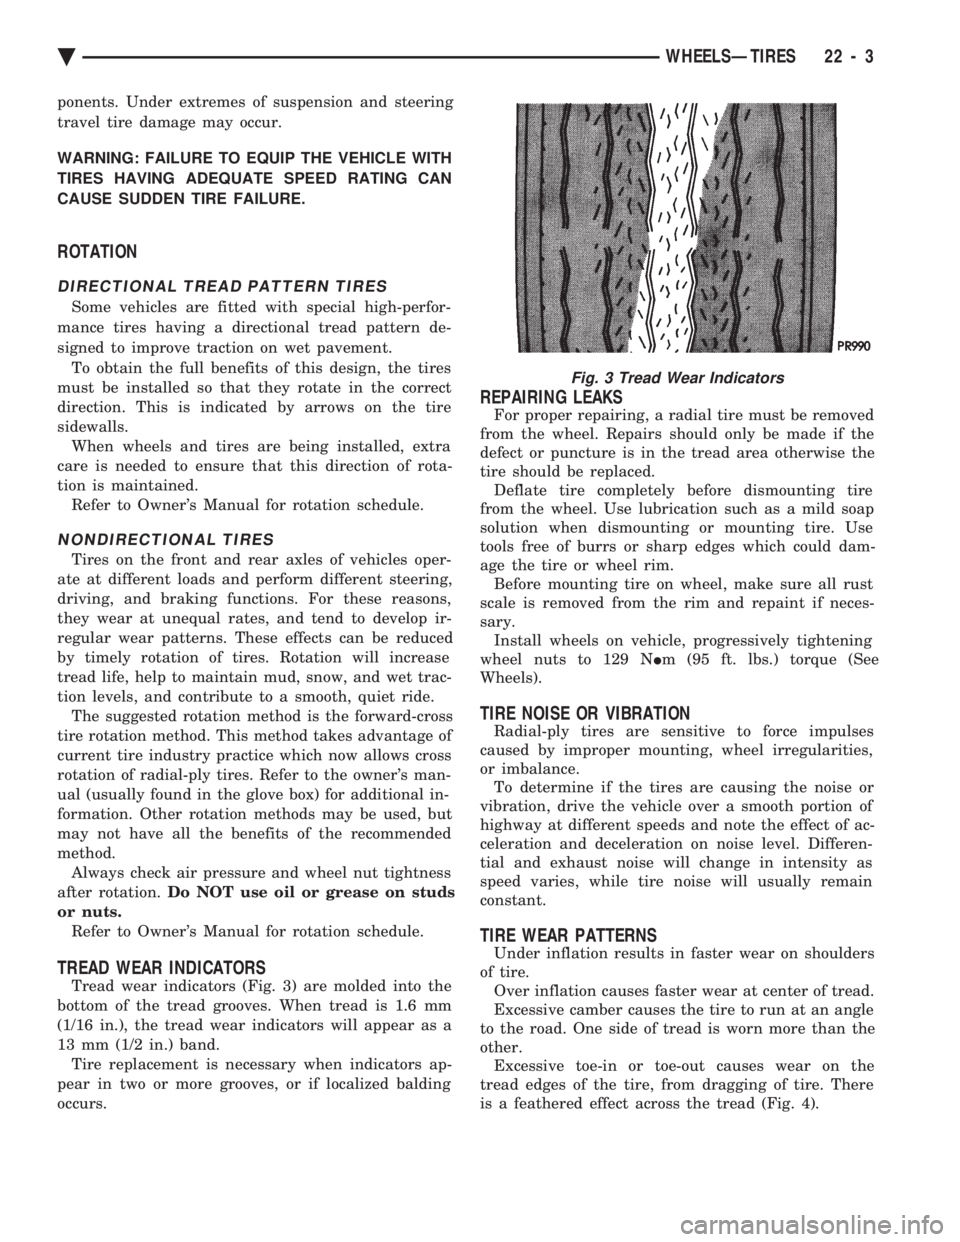
Tread wear indicators (Fig. 3) are molded into the
bottom of the tread grooves. When tread is 1.6 mm
(1/16 in.), the tread wear indicators will appear as a
13 mm (1/2 in.) band. Tire replacement is necessary when indicators ap-
pear in two or more grooves, or if localized balding
occurs.
REPAIRING LEAKS
For proper repairing, a radial tire must be removed
from the wheel. Repairs should only be made if the
defect or puncture is in the tread area otherwise the
tire should be replaced. Deflate tire completely before dismounting tire
from the wheel. Use lubrication such as a mild soap
solution when dismounting or mounting tire. Use
tools free of burrs or sharp edges which could dam-
age the tire or wheel rim. Before mounting tire on wheel, make sure all rust
scale is removed from the rim and repaint if neces-
sary. Install wheels on vehicle, progressively tightening
wheel nuts to 129 N Im (95 ft. lbs.) torque (See
Wheels).
TIRE NOISE OR VIBRATION
Radial-ply tires are sensitive to force impulses
caused by improper mounting, wheel irregularities,
or imbalance. To determine if the tires are causing the noise or
vibration, drive the vehicle over a smooth portion of
highway at different speeds and note the effect of ac-
celeration and deceleration on noise level. Differen-
tial and exhaust noise will change in intensity as
speed varies, while tire noise will usually remain
constant.
TIRE WEAR PATTERNS
Under inflation results in faster wear on shoulders
of tire. Over inflation causes faster wear at center of tread.
Excessive camber causes the tire to run at an angle
to the road. One side of tread is worn more than the
other. Excessive toe-in or toe-out causes wear on the
tread edges of the tire, from dragging of tire. There
is a feathered effect across the tread (Fig. 4).
Fig. 3 Tread Wear Indicators
Ä WHEELSÐTIRES 22 - 3
Page 2155 of 2438
It is recommended that a two plane dynamic bal-
ancing machine be used when a wheel and tire as-
sembly require balancing. Static balancing should be
used only when a two plane dynamic balancing is not
available. For static imbalance, find location of heavy spot
causing imbalance and counterbalance wheel directly
opposite the heavy spot. Determine weight required
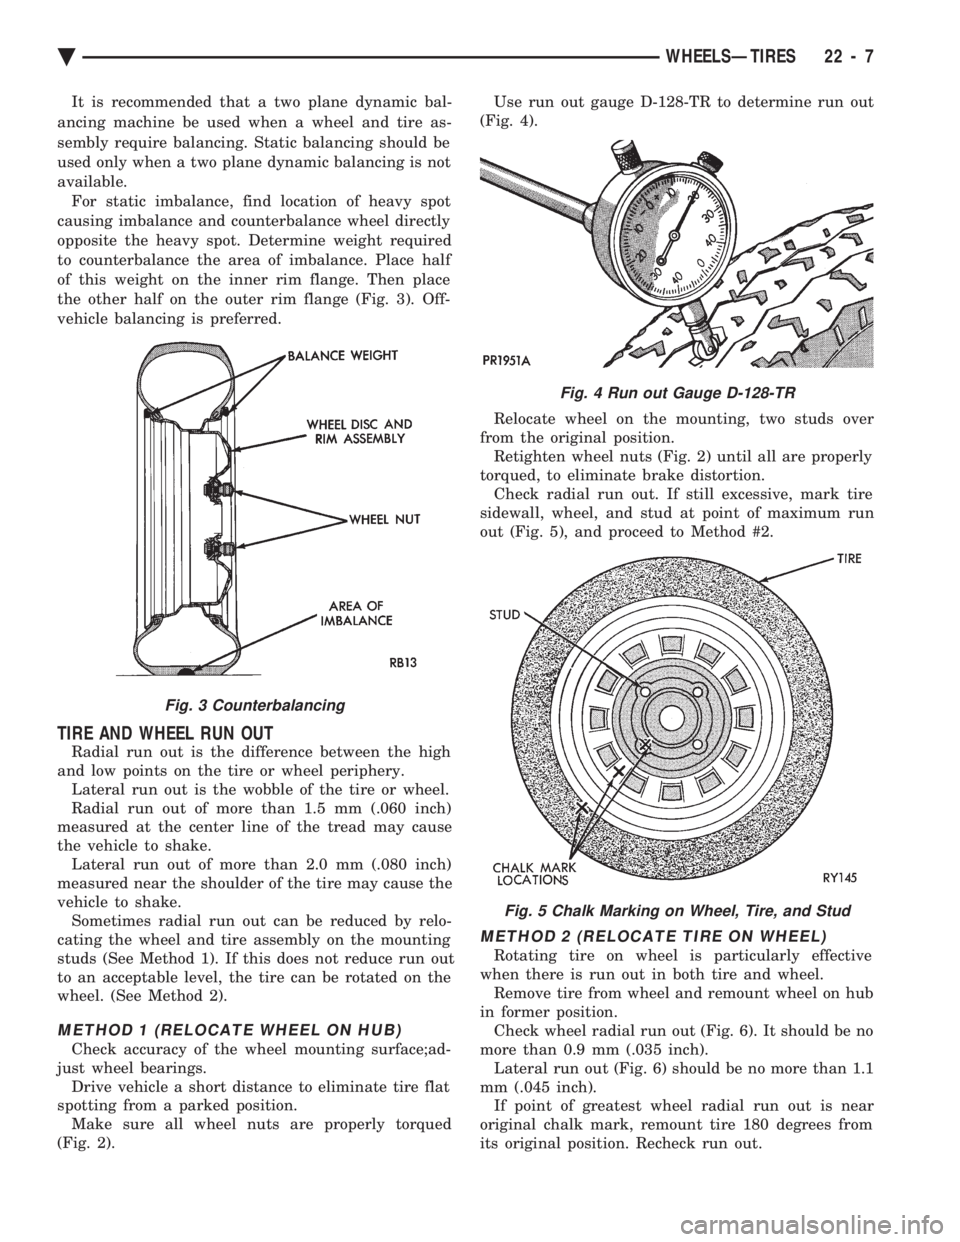
to counterbalance the area of imbalance. Place half
of this weight on the inner rim flange. Then place
the other half on the outer rim flange (Fig. 3). Off-
vehicle balancing is preferred.
TIRE AND WHEEL RUN OUT
Radial run out is the difference between the high
and low points on the tire or wheel periphery. Lateral run out is the wobble of the tire or wheel.
Radial run out of more than 1.5 mm (.060 inch)
measured at the center line of the tread may cause
the vehicle to shake. Lateral run out of more than 2.0 mm (.080 inch)
measured near the shoulder of the tire may cause the
vehicle to shake. Sometimes radial run out can be reduced by relo-
cating the wheel and tire assembly on the mounting
studs (See Method 1). If this does not reduce run out
to an acceptable level, the tire can be rotated on the
wheel. (See Method 2).
METHOD 1 (RELOCATE WHEEL ON HUB)
Check accuracy of the wheel mounting surface;ad-
just wheel bearings. Drive vehicle a short distance to eliminate tire flat
spotting from a parked position. Make sure all wheel nuts are properly torqued
(Fig. 2). Use run out gauge D-128-TR to determine run out
(Fig. 4).
Relocate wheel on the mounting, two studs over
from the original position. Retighten wheel nuts (Fig. 2) until all are properly
torqued, to eliminate brake distortion. Check radial run out. If still excessive, mark tire
sidewall, wheel, and stud at point of maximum run
out (Fig. 5), and proceed to Method #2.
METHOD 2 (RELOCATE TIRE ON WHEEL)
Rotating tire on wheel is particularly effective
when there is run out in both tire and wheel. Remove tire from wheel and remount wheel on hub
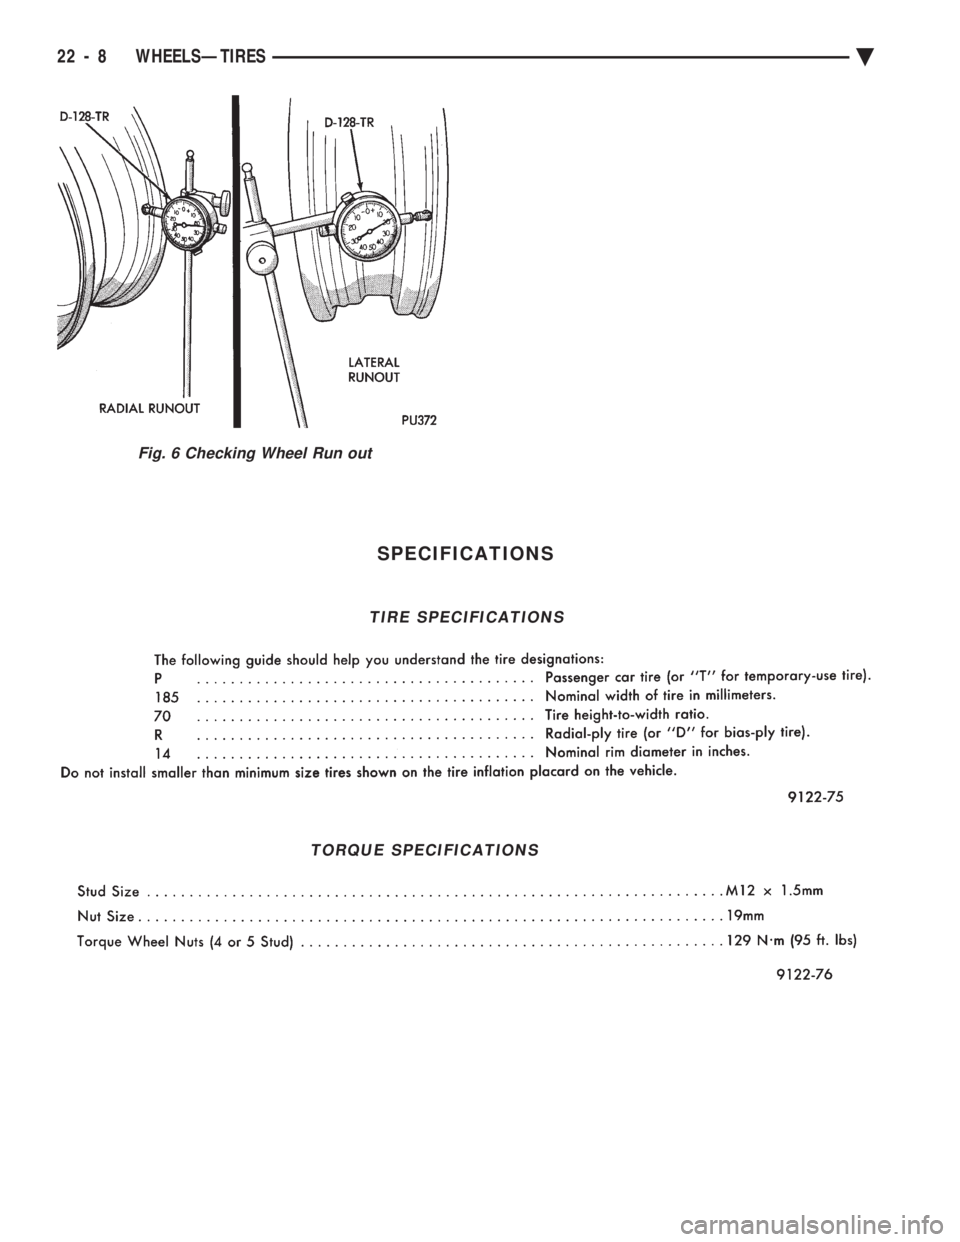
in former position. Check wheel radial run out (Fig. 6). It should be no
more than 0.9 mm (.035 inch). Lateral run out (Fig. 6) should be no more than 1.1
mm (.045 inch). If point of greatest wheel radial run out is near
original chalk mark, remount tire 180 degrees from
its original position. Recheck run out.
Fig. 3 Counterbalancing
Fig. 4 Run out Gauge D-128-TR
Fig. 5 Chalk Marking on Wheel, Tire, and Stud
Ä WHEELSÐTIRES 22 - 7
Page 2156 of 2438
SPECIFICATIONS
Fig. 6 Checking Wheel Run out
TIRE SPECIFICATIONS
TORQUE SPECIFICATIONS
22 - 8 WHEELSÐTIRES Ä
Page 2331 of 2438
(7) Check bearing for roughness or excessive leak-
age of grease. Replace bearing as required.
INSTALLATION
(1) Align pin in back of field coil with hole in com-
pressor end housing, and position field coil into place.
Make sure that lead wires are properly routed, and
fasten with the wire clip retaining screw. (2) Install field coil retaining snap ring with Snap
Ring Pliers (C-4574). The bevel side of the snap ring
must be outward. Also both eyelets must be to the
right or left of the pin on the compressor. Press snap
ring to make sure it is properly seated in the groove.
CAUTION: If snap ring is not fully seated it will vi-
brate out, resulting in a clutch failure and severe
damage to the front face of the compressor.
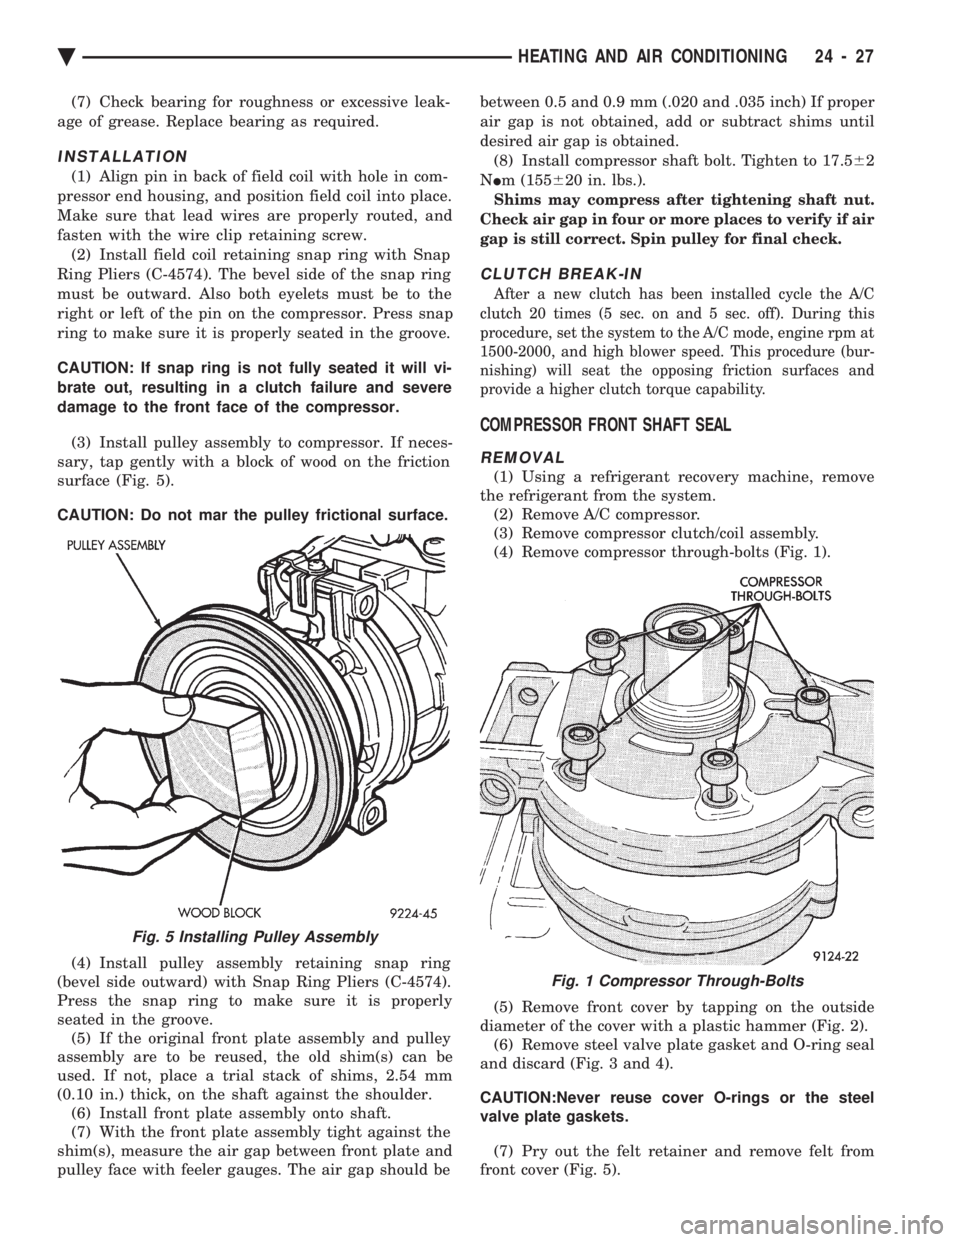
(3) Install pulley assembly to compressor. If neces-
sary, tap gently with a block of wood on the friction
surface (Fig. 5).
CAUTION: Do not mar the pulley frictional surface.
(4) Install pulley assembly retaining snap ring
(bevel side outward) with Snap Ring Pliers (C-4574).
Press the snap ring to make sure it is properly
seated in the groove. (5) If the original front plate assembly and pulley
assembly are to be reused, the old shim(s) can be
used. If not, place a trial stack of shims, 2.54 mm
(0.10 in.) thick, on the shaft against the shoulder. (6) Install front plate assembly onto shaft.
(7) With the front plate assembly tight against the
shim(s), measure the air gap between front plate and
pulley face with feeler gauges. The air gap should be between 0.5 and 0.9 mm (.020 and .035 inch) If proper
air gap is not obtained, add or subtract shims until
desired air gap is obtained.
(8) Install compressor shaft bolt. Tighten to 17.5 62
N Im (155 620 in. lbs.).
Shims may compress after tightening shaft nut.
Check air gap in four or more places to verify if air
gap is still correct. Spin pulley for final check.
CLUTCH BREAK-IN
After a new clutch has been installed cycle the A/C
clutch 20 times (5 sec. on and 5 sec. off). During this
procedure, set the system to the A/C mode, engine rpm at
1500-2000, and high blower speed. This procedure (bur-
nishing) will seat the opposing friction surfaces and
provide a higher clutch torque capability.
COMPRESSOR FRONT SHAFT SEAL
REMOVAL
(1) Using a refrigerant recovery machine, remove
the refrigerant from the system. (2) Remove A/C compressor.
(3) Remove compressor clutch/coil assembly.
(4) Remove compressor through-bolts (Fig. 1).
(5) Remove front cover by tapping on the outside
diameter of the cover with a plastic hammer (Fig. 2). (6) Remove steel valve plate gasket and O-ring seal
and discard (Fig. 3 and 4).
CAUTION:Never reuse cover O-rings or the steel
valve plate gaskets.
(7) Pry out the felt retainer and remove felt from
front cover (Fig. 5).
Fig. 5 Installing Pulley Assembly
Fig. 1 Compressor Through-Bolts
Ä HEATING AND AIR CONDITIONING 24 - 27
Page 2333 of 2438
(5) Lubricate crankshaft seal seat cavity of front
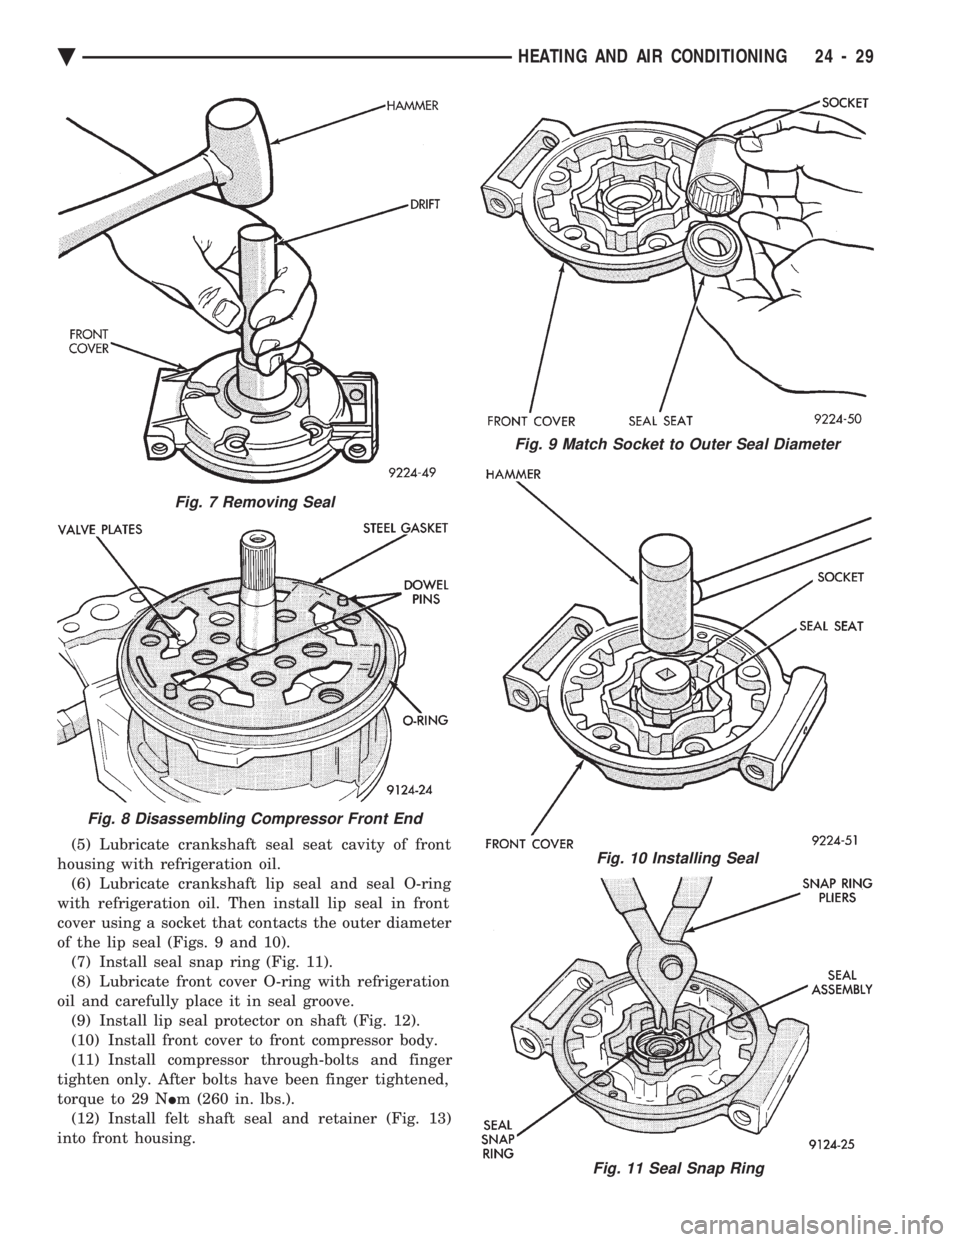
housing with refrigeration oil. (6) Lubricate crankshaft lip seal and seal O-ring
with refrigeration oil. Then install lip seal in front
cover using a socket that contacts the outer diameter
of the lip seal (Figs. 9 and 10). (7) Install seal snap ring (Fig. 11).
(8) Lubricate front cover O-ring with refrigeration
oil and carefully place it in seal groove. (9) Install lip seal protector on shaft (Fig. 12).
(10) Install front cover to front compressor body.
(11) Install compressor through-bolts and finger
tighten only. After bolts have been finger tightened,
torque to 29 N Im (260 in. lbs.).
(12) Install felt shaft seal and retainer (Fig. 13)
into front housing.
Fig. 9 Match Socket to Outer Seal Diameter
Fig. 10 Installing Seal
Fig. 11 Seal Snap Ring
Fig. 7 Removing Seal
Fig. 8 Disassembling Compressor Front End
Ä HEATING AND AIR CONDITIONING 24 - 29
Page 2336 of 2438
FIXED DISPLACEMENT COMPRESSORÐMODEL TR105 INDEX
page page
Compressor ............................. 32
Compressor Clutch/Coil Assembly ............ 32
Compressor Shaft Bearing/Seal .............. 35 Refrigerant System Diagnosis
............... 36
Thermal Limiter Switch .................... 34
COMPRESSOR
Cleanliness is extremely important when disassem-
bly of the compressor is necessary. The surfaces
around the suction and discharge ports of the com-
pressor should be cleaned thoroughly before opening
the system at these points. If compressor is removed
from vehicle, apply tape to the opened ports to pre-
vent any contamination.
REMOVAL
(1) Disconnect battery negative cable.
(2) Loosen and remove drive belts (refer to Group
7, Cooling System). (3) Disconnect compressor clutch wire lead.
(4) Using a refrigerant recovery machine, remove
refrigerant from the A/C system. (5) Remove refrigerant lines from compressor.
(6) Remove compressor attaching bolts.
(7) Remove compressor.
INSTALLATION
(1) Position the compressor on the mount and fit
drive belt. (2) Tighten the compressor attaching bolts to 41
N Im (30 ft. lbs.) torque.
(3) Adjust drive belt (see Group 7, Cooling Sys-
tem). (4) Install refrigerant hoses.
(5) Connect the clutch wire.
(6) Evacuate and charge the system.
(7) Connect the battery negative cable.
COMPRESSOR CLUTCH/COIL ASSEMBLY
CLUTCH INOPERATIVE
The air conditioning compressor clutch electrical
circuit is controlled by the engine controller. The
controller is located in the engine compartment out-
board of the battery. If the compressor clutch does not engage:
Verify refrigerant charge.
If the compressor clutch still does not engage check
for battery voltage at the low pressure or differential
pressure cut-off switch located on the expansion
valve. If voltage is not detected, refer to:
² Group 8W, Wiring Diagrams.
² The appropriate Powertrain Diagnostic Procedures
Manual for diagnostic information. If voltage is detected at the cut-off switch, recon-
nect switch. Then check for battery voltage between
the compressor clutch connector terminals. If voltage is detected, perform A/C Clutch Coil
Tests.
CLUTCH COIL TESTS
(1) Verify battery state of charge. (Test indicator
in battery should be green). (2) Connect an ammeter (0-10 ampere scale) in se-
ries with the clutch coil terminal. Use a volt meter
(0-20 volt scale) with clip leads measuring voltage
across the battery and A/C clutch. (3) With A/C control in A/C mode and blower at
low speed, start the engine and run at normal idle. (4) The A/C clutch should engage immediately and
the clutch voltage should be within two volts of the
battery voltage. If the A/C clutch does not engage,
test the fusible link. (5) The A/C clutch coil is acceptable if the current
draw is 2.0 to 3.7 amperes at 11.5-12.5 volts at clutch
coil. This is with the work area temperature at 21ÉC
(70ÉF). If voltage is more than 12.5 volts, add electri-
cal loads by turning on electrical accessories until
voltage reads below 12.5 volts. If coil current reads zero, the coil is open and
should be replaced. If the ammeter reading is 4 am-
peres or more, the coil is shorted and should be re-
placed. If the coil voltage is not within two volts of
the battery voltage, test clutch coil feed circuit for
excessive voltage drop.
REMOVAL
(1) Remove the compressor from the mount.
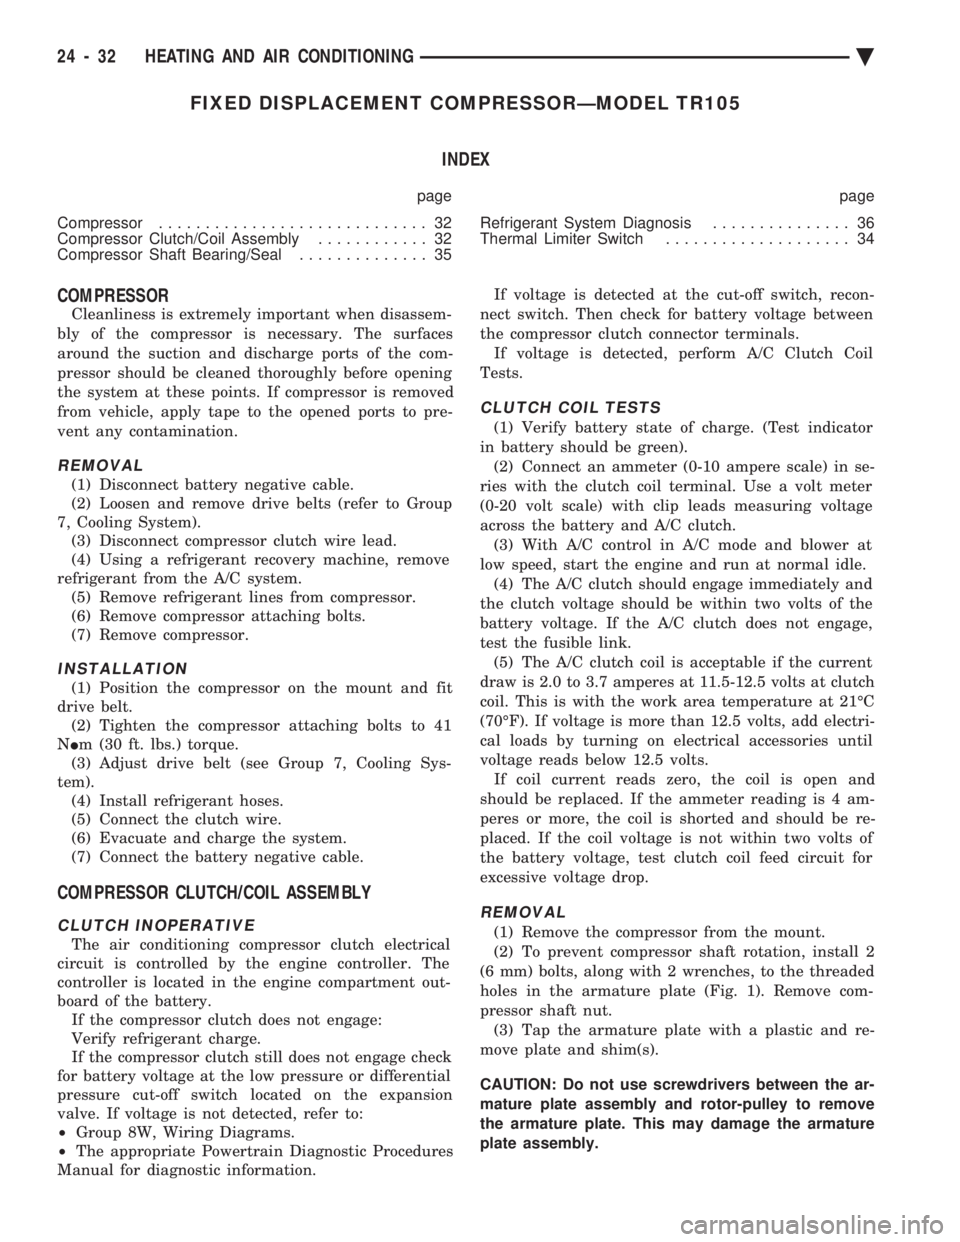
(2) To prevent compressor shaft rotation, install 2
(6 mm) bolts, along with 2 wrenches, to the threaded
holes in the armature plate (Fig. 1). Remove com-
pressor shaft nut. (3) Tap the armature plate with a plastic and re-
move plate and shim(s).
CAUTION: Do not use screwdrivers between the ar-
mature plate assembly and rotor-pulley to remove
the armature plate. This may damage the armature
plate assembly.
24 - 32 HEATING AND AIR CONDITIONING Ä
Page 2338 of 2438
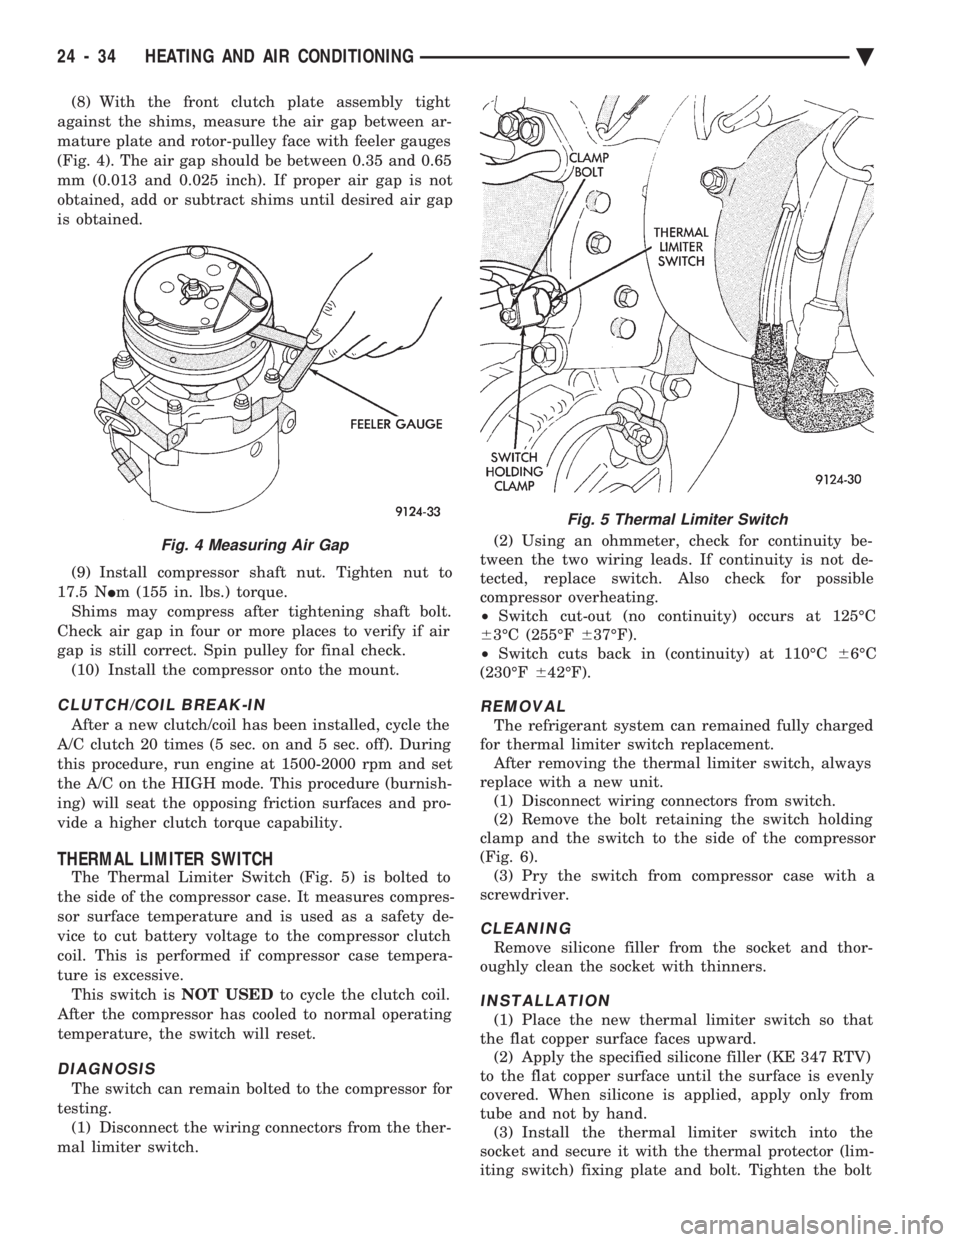
(8) With the front clutch plate assembly tight
against the shims, measure the air gap between ar-
mature plate and rotor-pulley face with feeler gauges
(Fig. 4). The air gap should be between 0.35 and 0.65
mm (0.013 and 0.025 inch). If proper air gap is not
obtained, add or subtract shims until desired air gap
is obtained.
(9) Install compressor shaft nut. Tighten nut to
17.5 N Im (155 in. lbs.) torque.
Shims may compress after tightening shaft bolt.
Check air gap in four or more places to verify if air
gap is still correct. Spin pulley for final check. (10) Install the compressor onto the mount.
CLUTCH/COIL BREAK-IN
After a new clutch/coil has been installed, cycle the
A/C clutch 20 times (5 sec. on and 5 sec. off). During
this procedure, run engine at 1500-2000 rpm and set
the A/C on the HIGH mode. This procedure (burnish-
ing) will seat the opposing friction surfaces and pro-
vide a higher clutch torque capability.
THERMAL LIMITER SWITCH
The Thermal Limiter Switch (Fig. 5) is bolted to
the side of the compressor case. It measures compres-
sor surface temperature and is used as a safety de-
vice to cut battery voltage to the compressor clutch
coil. This is performed if compressor case tempera-
ture is excessive. This switch is NOT USEDto cycle the clutch coil.
After the compressor has cooled to normal operating
temperature, the switch will reset.
DIAGNOSIS
The switch can remain bolted to the compressor for
testing. (1) Disconnect the wiring connectors from the ther-
mal limiter switch. (2) Using an ohmmeter, check for continuity be-
tween the two wiring leads. If continuity is not de-
tected, replace switch. Also check for possible
compressor overheating.
² Switch cut-out (no continuity) occurs at 125ÉC
6 3ÉC (255ÉF 637ÉF).
² Switch cuts back in (continuity) at 110ÉC 66ÉC
(230ÉF 642ÉF).
REMOVAL
The refrigerant system can remained fully charged
for thermal limiter switch replacement. After removing the thermal limiter switch, always
replace with a new unit. (1) Disconnect wiring connectors from switch.
(2) Remove the bolt retaining the switch holding
clamp and the switch to the side of the compressor
(Fig. 6). (3) Pry the switch from compressor case with a
screwdriver.
CLEANING
Remove silicone filler from the socket and thor-
oughly clean the socket with thinners.
INSTALLATION
(1) Place the new thermal limiter switch so that
the flat copper surface faces upward. (2) Apply the specified silicone filler (KE 347 RTV)
to the flat copper surface until the surface is evenly
covered. When silicone is applied, apply only from
tube and not by hand. (3) Install the thermal limiter switch into the
socket and secure it with the thermal protector (lim-
iting switch) fixing plate and bolt. Tighten the bolt
Fig. 4 Measuring Air Gap
Fig. 5 Thermal Limiter Switch
24 - 34 HEATING AND AIR CONDITIONING Ä
Page 2339 of 2438
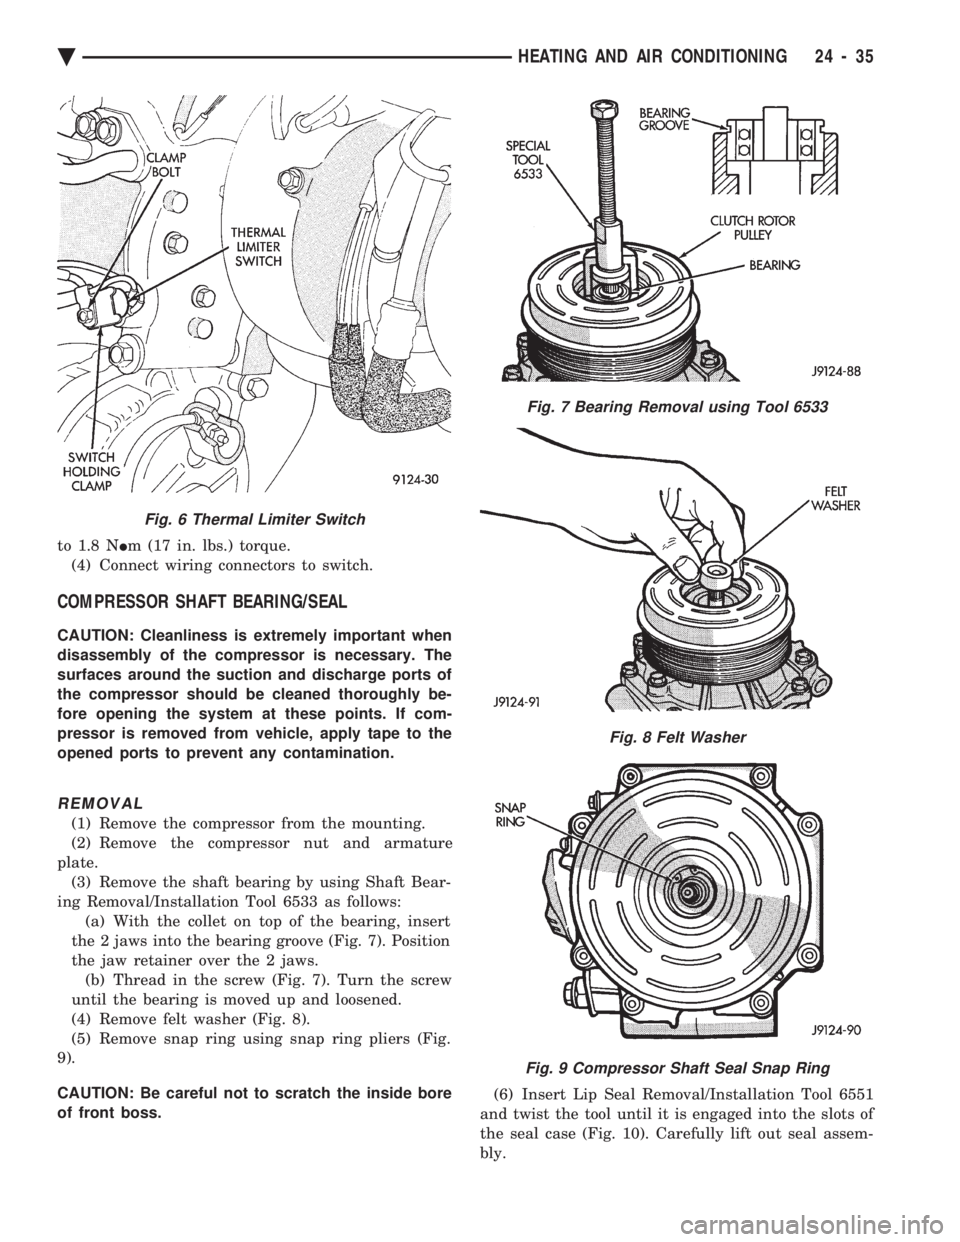
to 1.8 N Im (17 in. lbs.) torque.
(4) Connect wiring connectors to switch.
COMPRESSOR SHAFT BEARING/SEAL
CAUTION: Cleanliness is extremely important when
disassembly of the compressor is necessary. The
surfaces around the suction and discharge ports of
the compressor should be cleaned thoroughly be-
fore opening the system at these points. If com-
pressor is removed from vehicle, apply tape to the
opened ports to prevent any contamination.
REMOVAL
(1) Remove the compressor from the mounting.
(2) Remove the compressor nut and armature
plate. (3) Remove the shaft bearing by using Shaft Bear-
ing Removal/Installation Tool 6533 as follows: (a) With the collet on top of the bearing, insert
the 2 jaws into the bearing groove (Fig. 7). Position
the jaw retainer over the 2 jaws. (b) Thread in the screw (Fig. 7). Turn the screw
until the bearing is moved up and loosened.
(4) Remove felt washer (Fig. 8).
(5) Remove snap ring using snap ring pliers (Fig.
9).
CAUTION: Be careful not to scratch the inside bore
of front boss. (6) Insert Lip Seal Removal/Installation Tool 6551
and twist the tool until it is engaged into the slots of
the seal case (Fig. 10). Carefully lift out seal assem-
bly.
Fig. 6 Thermal Limiter Switch
Fig. 7 Bearing Removal using Tool 6533
Fig. 8 Felt Washer
Fig. 9 Compressor Shaft Seal Snap Ring
Ä HEATING AND AIR CONDITIONING 24 - 35
Page 2340 of 2438
INSTALLATION
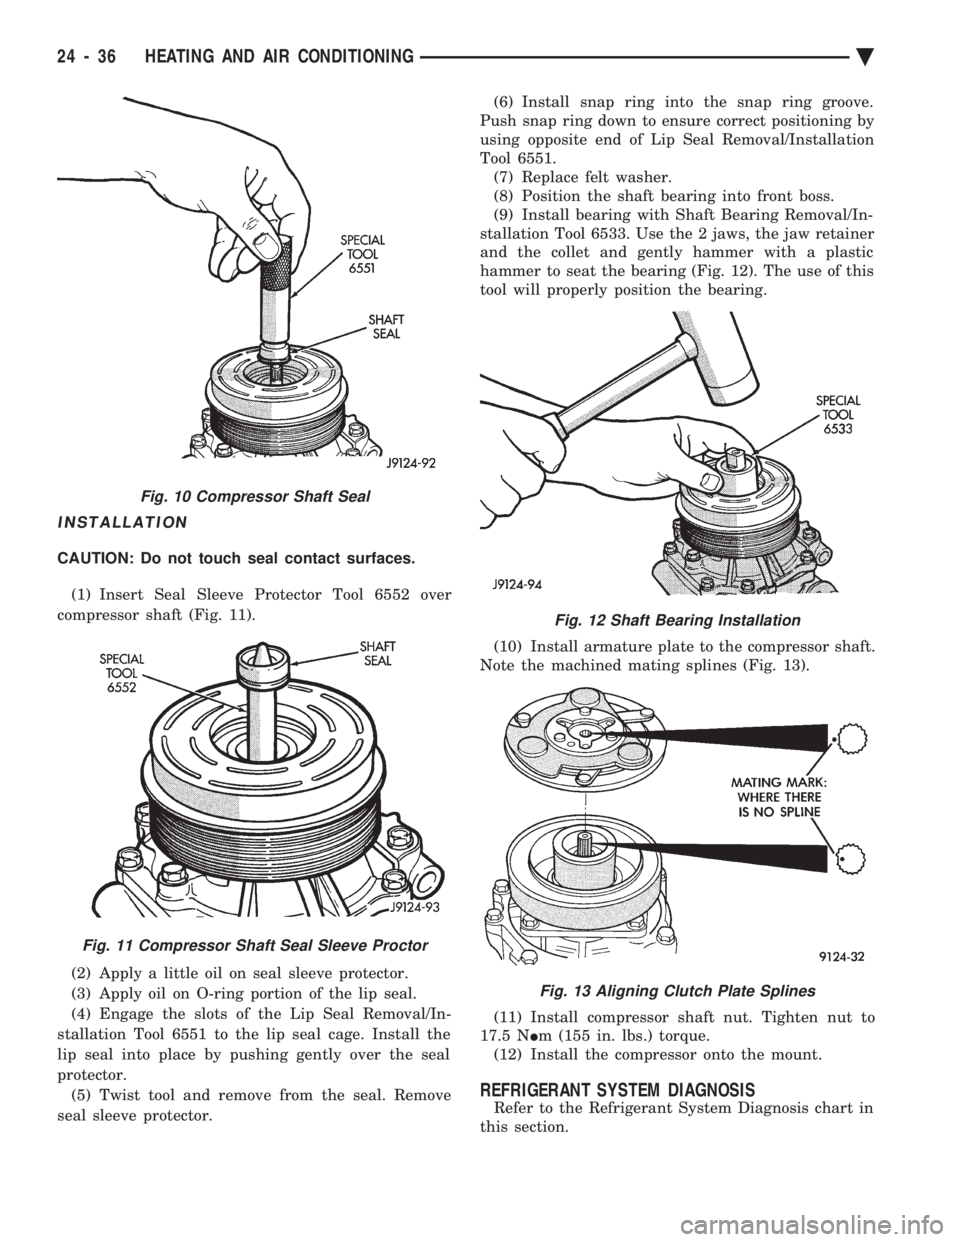
CAUTION: Do not touch seal contact surfaces. (1) Insert Seal Sleeve Protector Tool 6552 over
compressor shaft (Fig. 11).
(2) Apply a little oil on seal sleeve protector.
(3) Apply oil on O-ring portion of the lip seal.
(4) Engage the slots of the Lip Seal Removal/In-
stallation Tool 6551 to the lip seal cage. Install the
lip seal into place by pushing gently over the seal
protector. (5) Twist tool and remove from the seal. Remove
seal sleeve protector. (6) Install snap ring into the snap ring groove.
Push snap ring down to ensure correct positioning by
using opposite end of Lip Seal Removal/Installation
Tool 6551. (7) Replace felt washer.
(8) Position the shaft bearing into front boss.
(9) Install bearing with Shaft Bearing Removal/In-
stallation Tool 6533. Use the 2 jaws, the jaw retainer
and the collet and gently hammer with a plastic
hammer to seat the bearing (Fig. 12). The use of this
tool will properly position the bearing.
(10) Install armature plate to the compressor shaft.
Note the machined mating splines (Fig. 13).
(11) Install compressor shaft nut. Tighten nut to
17.5 N Im (155 in. lbs.) torque.
(12) Install the compressor onto the mount.
REFRIGERANT SYSTEM DIAGNOSIS
Refer to the Refrigerant System Diagnosis chart in
this section.
Fig. 10 Compressor Shaft Seal
Fig. 11 Compressor Shaft Seal Sleeve Proctor
Fig. 12 Shaft Bearing Installation
Fig. 13 Aligning Clutch Plate Splines
24 - 36 HEATING AND AIR CONDITIONING Ä