CHEVROLET PLYMOUTH ACCLAIM 1993 Service Manual
Manufacturer: CHEVROLET, Model Year: 1993, Model line: PLYMOUTH ACCLAIM, Model: CHEVROLET PLYMOUTH ACCLAIM 1993Pages: 2438, PDF Size: 74.98 MB
Page 2291 of 2438
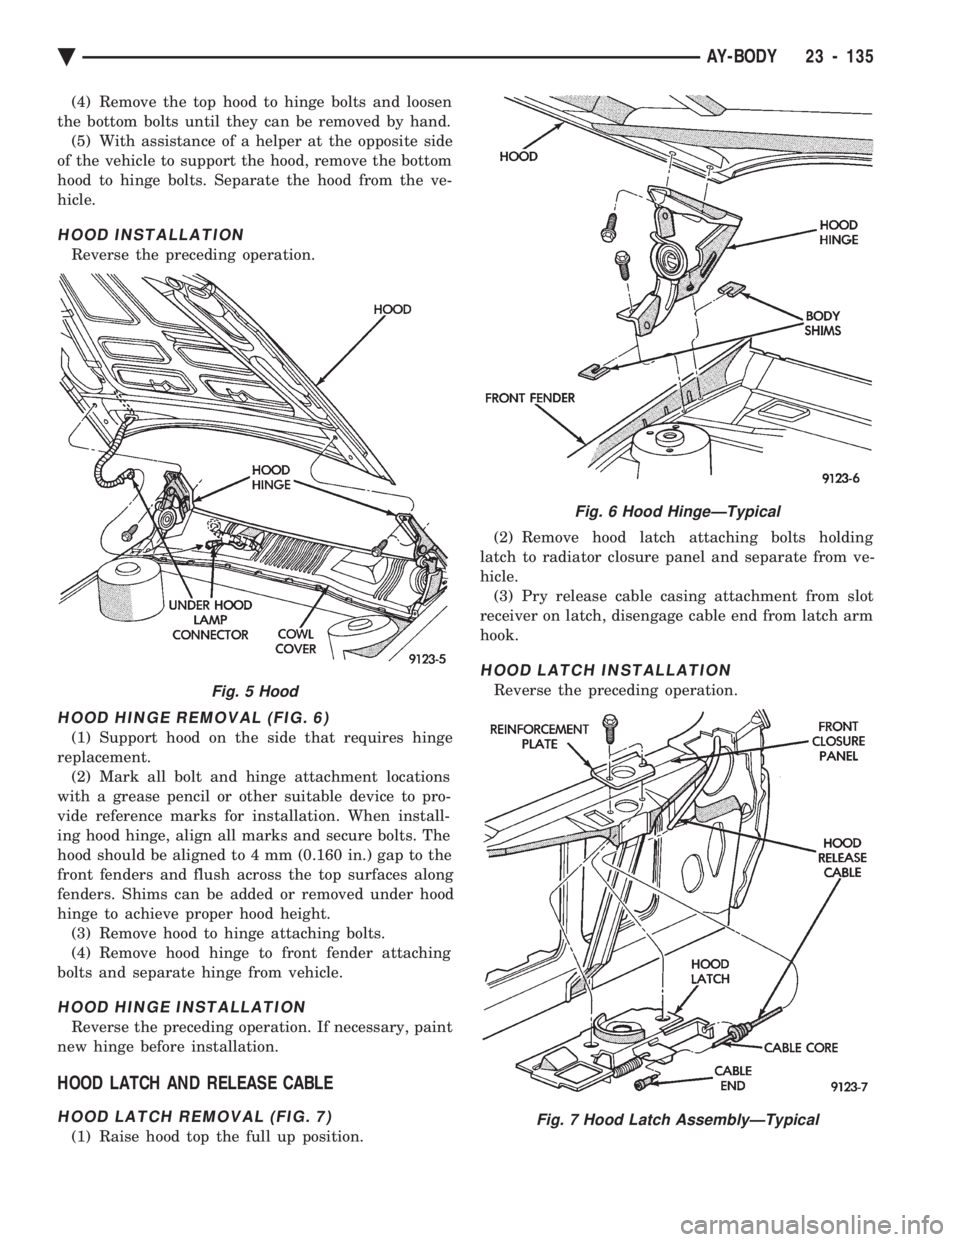
(4) Remove the top hood to hinge bolts and loosen
the bottom bolts until they can be removed by hand. (5) With assistance of a helper at the opposite side
of the vehicle to support the hood, remove the bottom
hood to hinge bolts. Separate the hood from the ve-
hicle.
HOOD INSTALLATION
Reverse the preceding operation.
HOOD HINGE REMOVAL (FIG. 6)
(1) Support hood on the side that requires hinge
replacement. (2) Mark all bolt and hinge attachment locations
with a grease pencil or other suitable device to pro-
vide reference marks for installation. When install-
ing hood hinge, align all marks and secure bolts. The
hood should be aligned to 4 mm (0.160 in.) gap to the
front fenders and flush across the top surfaces along
fenders. Shims can be added or removed under hood
hinge to achieve proper hood height. (3) Remove hood to hinge attaching bolts.
(4) Remove hood hinge to front fender attaching
bolts and separate hinge from vehicle.
HOOD HINGE INSTALLATION
Reverse the preceding operation. If necessary, paint
new hinge before installation.
HOOD LATCH AND RELEASE CABLE
HOOD LATCH REMOVAL (FIG. 7)
(1) Raise hood top the full up position. (2) Remove hood latch attaching bolts holding
latch to radiator closure panel and separate from ve-
hicle. (3) Pry release cable casing attachment from slot
receiver on latch, disengage cable end from latch arm
hook.
HOOD LATCH INSTALLATION
Reverse the preceding operation.Fig. 5 Hood
Fig. 6 Hood HingeÐTypical
Fig. 7 Hood Latch AssemblyÐTypical
Ä AY-BODY 23 - 135
Page 2292 of 2438
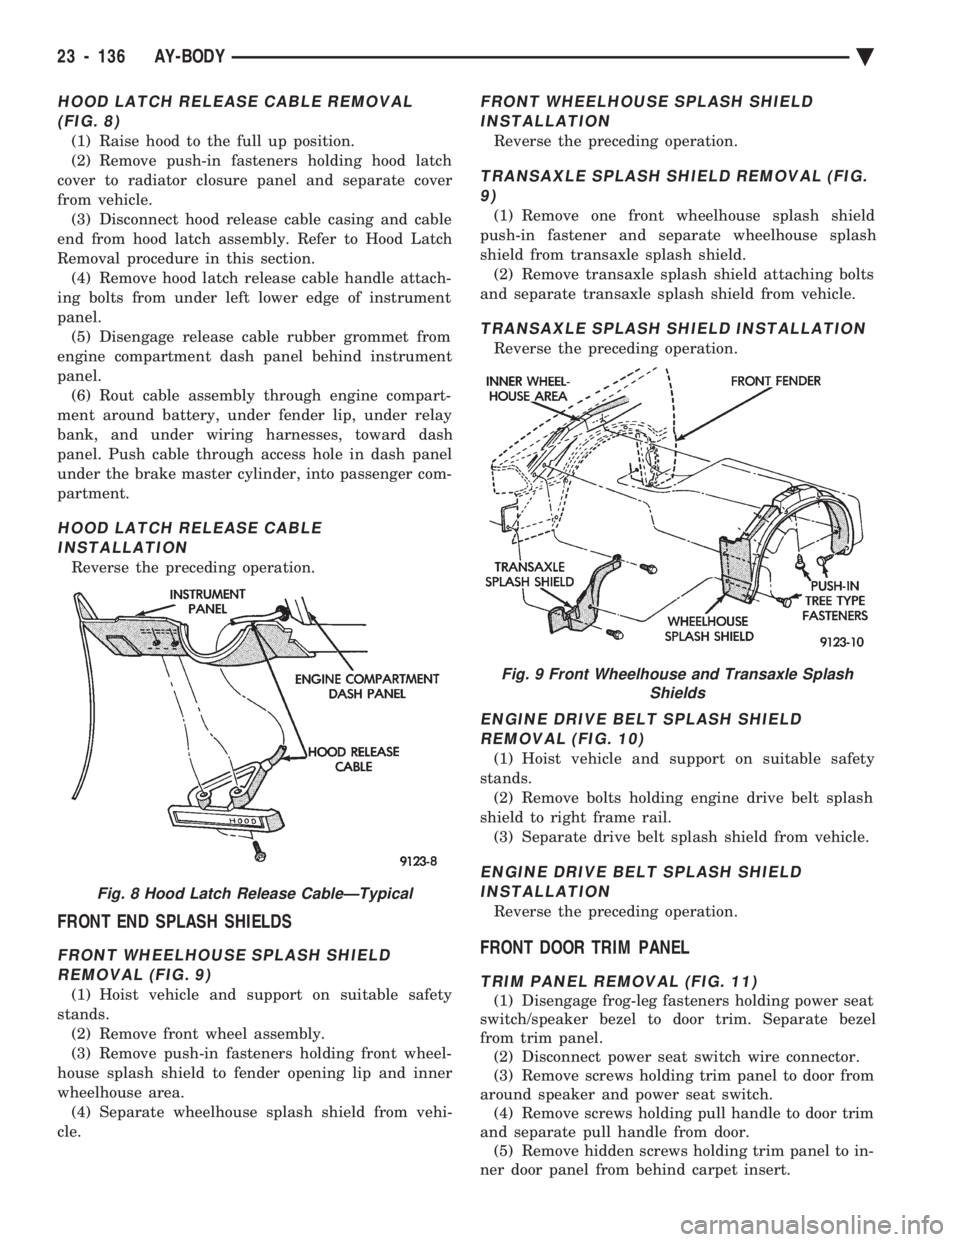
HOOD LATCH RELEASE CABLE REMOVAL (FIG. 8)
(1) Raise hood to the full up position.
(2) Remove push-in fasteners holding hood latch
cover to radiator closure panel and separate cover
from vehicle. (3) Disconnect hood release cable casing and cable
end from hood latch assembly. Refer to Hood Latch
Removal procedure in this section. (4) Remove hood latch release cable handle attach-
ing bolts from under left lower edge of instrument
panel. (5) Disengage release cable rubber grommet from
engine compartment dash panel behind instrument
panel. (6) Rout cable assembly through engine compart-
ment around battery, under fender lip, under relay
bank, and under wiring harnesses, toward dash
panel. Push cable through access hole in dash panel
under the brake master cylinder, into passenger com-
partment.
HOOD LATCH RELEASE CABLE INSTALLATION
Reverse the preceding operation.
FRONT END SPLASH SHIELDS
FRONT WHEELHOUSE SPLASH SHIELDREMOVAL (FIG. 9)
(1) Hoist vehicle and support on suitable safety
stands. (2) Remove front wheel assembly.
(3) Remove push-in fasteners holding front wheel-
house splash shield to fender opening lip and inner
wheelhouse area. (4) Separate wheelhouse splash shield from vehi-
cle.
FRONT WHEELHOUSE SPLASH SHIELD INSTALLATION
Reverse the preceding operation.
TRANSAXLE SPLASH SHIELD REMOVAL (FIG.9)
(1) Remove one front wheelhouse splash shield
push-in fastener and separate wheelhouse splash
shield from transaxle splash shield. (2) Remove transaxle splash shield attaching bolts
and separate transaxle splash shield from vehicle.
TRANSAXLE SPLASH SHIELD INSTALLATION
Reverse the preceding operation.
ENGINE DRIVE BELT SPLASH SHIELD REMOVAL (FIG. 10)
(1) Hoist vehicle and support on suitable safety
stands. (2) Remove bolts holding engine drive belt splash
shield to right frame rail. (3) Separate drive belt splash shield from vehicle.
ENGINE DRIVE BELT SPLASH SHIELDINSTALLATION
Reverse the preceding operation.
FRONT DOOR TRIM PANEL
TRIM PANEL REMOVAL (FIG. 11)
(1) Disengage frog-leg fasteners holding power seat
switch/speaker bezel to door trim. Separate bezel
from trim panel. (2) Disconnect power seat switch wire connector.
(3) Remove screws holding trim panel to door from
around speaker and power seat switch. (4) Remove screws holding pull handle to door trim
and separate pull handle from door. (5) Remove hidden screws holding trim panel to in-
ner door panel from behind carpet insert.
Fig. 8 Hood Latch Release CableÐTypical
Fig. 9 Front Wheelhouse and Transaxle Splash Shields
23 - 136 AY-BODY Ä
Page 2293 of 2438
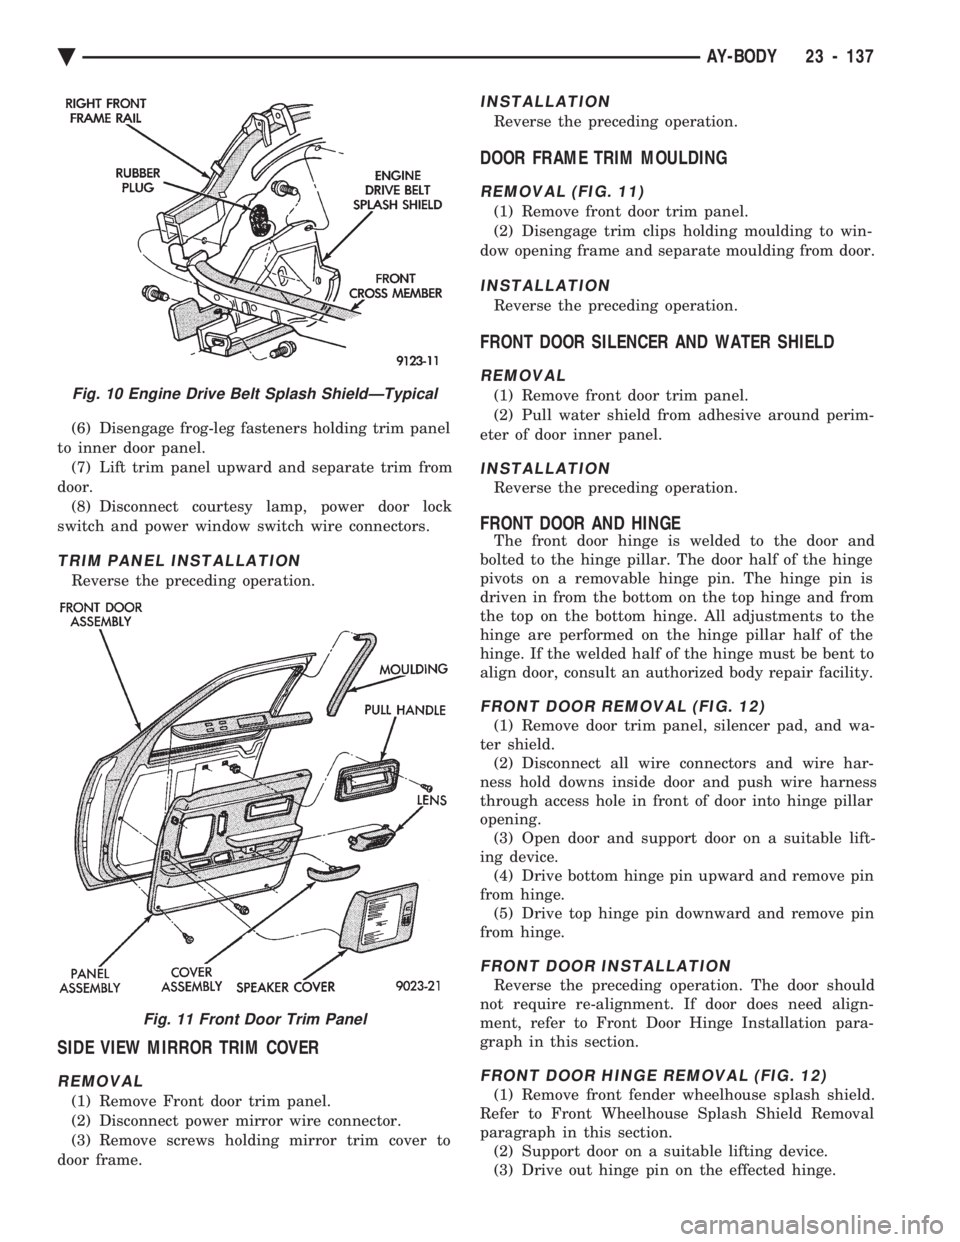
(6) Disengage frog-leg fasteners holding trim panel
to inner door panel. (7) Lift trim panel upward and separate trim from
door. (8) Disconnect courtesy lamp, power door lock
switch and power window switch wire connectors.
TRIM PANEL INSTALLATION
Reverse the preceding operation.
SIDE VIEW MIRROR TRIM COVER
REMOVAL
(1) Remove Front door trim panel.
(2) Disconnect power mirror wire connector.
(3) Remove screws holding mirror trim cover to
door frame.
INSTALLATION
Reverse the preceding operation.
DOOR FRAME TRIM MOULDING
REMOVAL (FIG. 11)
(1) Remove front door trim panel.
(2) Disengage trim clips holding moulding to win-
dow opening frame and separate moulding from door.
INSTALLATION
Reverse the preceding operation.
FRONT DOOR SILENCER AND WATER SHIELD
REMOVAL
(1) Remove front door trim panel.
(2) Pull water shield from adhesive around perim-
eter of door inner panel.
INSTALLATION
Reverse the preceding operation.
FRONT DOOR AND HINGE
The front door hinge is welded to the door and
bolted to the hinge pillar. The door half of the hinge
pivots on a removable hinge pin. The hinge pin is
driven in from the bottom on the top hinge and from
the top on the bottom hinge. All adjustments to the
hinge are performed on the hinge pillar half of the
hinge. If the welded half of the hinge must be bent to
align door, consult an authorized body repair facility.
FRONT DOOR REMOVAL (FIG. 12)
(1) Remove door trim panel, silencer pad, and wa-
ter shield. (2) Disconnect all wire connectors and wire har-
ness hold downs inside door and push wire harness
through access hole in front of door into hinge pillar
opening. (3) Open door and support door on a suitable lift-
ing device. (4) Drive bottom hinge pin upward and remove pin
from hinge. (5) Drive top hinge pin downward and remove pin
from hinge.
FRONT DOOR INSTALLATION
Reverse the preceding operation. The door should
not require re-alignment. If door does need align-
ment, refer to Front Door Hinge Installation para-
graph in this section.
FRONT DOOR HINGE REMOVAL (FIG. 12)
(1) Remove front fender wheelhouse splash shield.
Refer to Front Wheelhouse Splash Shield Removal
paragraph in this section. (2) Support door on a suitable lifting device.
(3) Drive out hinge pin on the effected hinge.
Fig. 10 Engine Drive Belt Splash ShieldÐTypical
Fig. 11 Front Door Trim Panel
Ä AY-BODY 23 - 137
Page 2294 of 2438
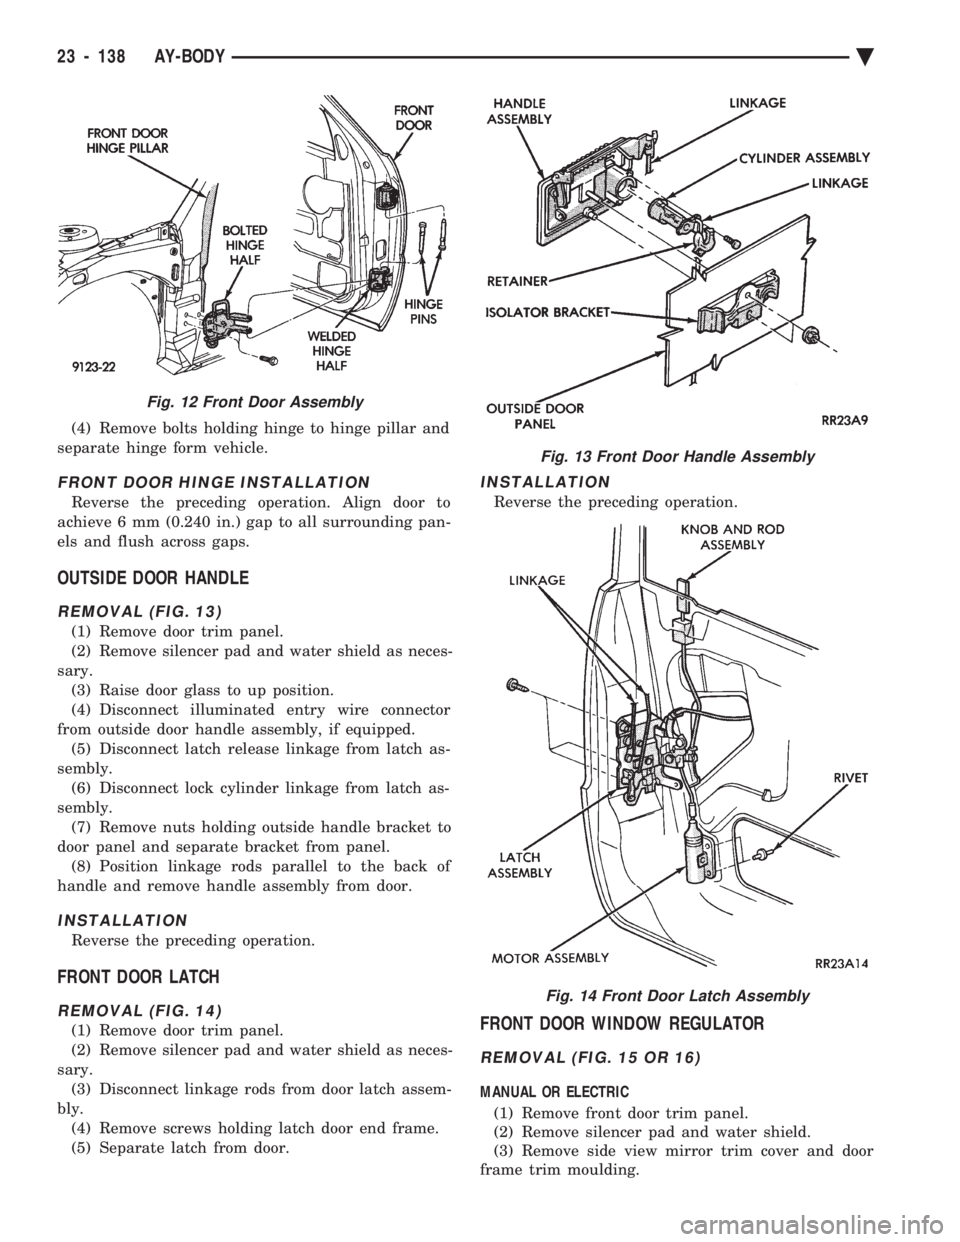
(4) Remove bolts holding hinge to hinge pillar and
separate hinge form vehicle.
FRONT DOOR HINGE INSTALLATION
Reverse the preceding operation. Align door to
achieve 6 mm (0.240 in.) gap to all surrounding pan-
els and flush across gaps.
OUTSIDE DOOR HANDLE
REMOVAL (FIG. 13)
(1) Remove door trim panel.
(2) Remove silencer pad and water shield as neces-
sary. (3) Raise door glass to up position.
(4) Disconnect illuminated entry wire connector
from outside door handle assembly, if equipped. (5) Disconnect latch release linkage from latch as-
sembly. (6) Disconnect lock cylinder linkage from latch as-
sembly. (7) Remove nuts holding outside handle bracket to
door panel and separate bracket from panel. (8) Position linkage rods parallel to the back of
handle and remove handle assembly from door.
INSTALLATION
Reverse the preceding operation.
FRONT DOOR LATCH
REMOVAL (FIG. 14)
(1) Remove door trim panel.
(2) Remove silencer pad and water shield as neces-
sary. (3) Disconnect linkage rods from door latch assem-
bly. (4) Remove screws holding latch door end frame.
(5) Separate latch from door.
INSTALLATION
Reverse the preceding operation.
FRONT DOOR WINDOW REGULATOR
REMOVAL (FIG. 15 OR 16)
MANUAL OR ELECTRIC
(1) Remove front door trim panel.
(2) Remove silencer pad and water shield.
(3) Remove side view mirror trim cover and door
frame trim moulding.
Fig. 12 Front Door Assembly
Fig. 13 Front Door Handle Assembly
Fig. 14 Front Door Latch Assembly
23 - 138 AY-BODY Ä
Page 2295 of 2438
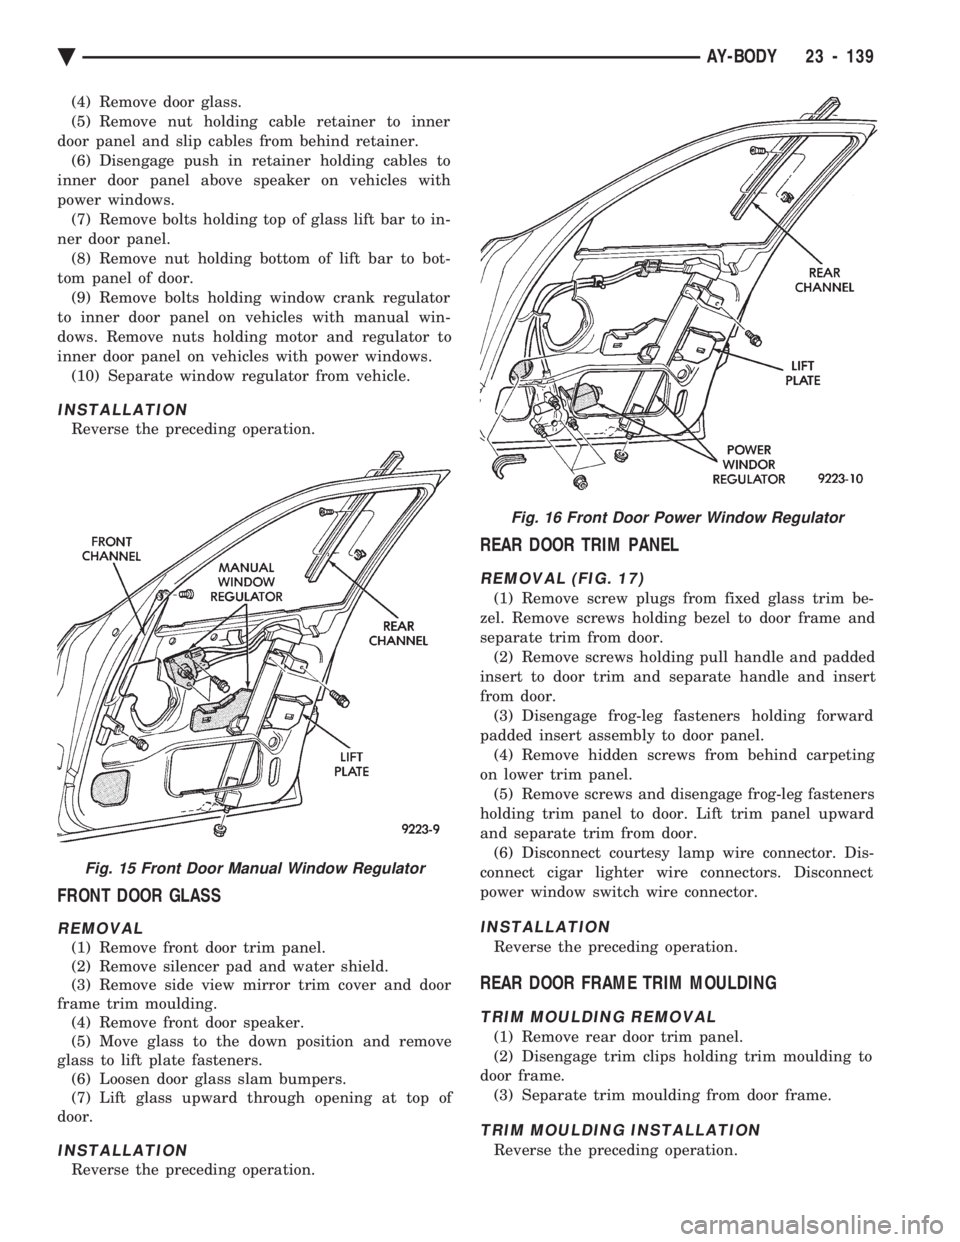
(4) Remove door glass.
(5) Remove nut holding cable retainer to inner
door panel and slip cables from behind retainer. (6) Disengage push in retainer holding cables to
inner door panel above speaker on vehicles with
power windows. (7) Remove bolts holding top of glass lift bar to in-
ner door panel. (8) Remove nut holding bottom of lift bar to bot-
tom panel of door. (9) Remove bolts holding window crank regulator
to inner door panel on vehicles with manual win-
dows. Remove nuts holding motor and regulator to
inner door panel on vehicles with power windows. (10) Separate window regulator from vehicle.
INSTALLATION
Reverse the preceding operation.
FRONT DOOR GLASS
REMOVAL
(1) Remove front door trim panel.
(2) Remove silencer pad and water shield.
(3) Remove side view mirror trim cover and door
frame trim moulding. (4) Remove front door speaker.
(5) Move glass to the down position and remove
glass to lift plate fasteners. (6) Loosen door glass slam bumpers.
(7) Lift glass upward through opening at top of
door.
INSTALLATION
Reverse the preceding operation.
REAR DOOR TRIM PANEL
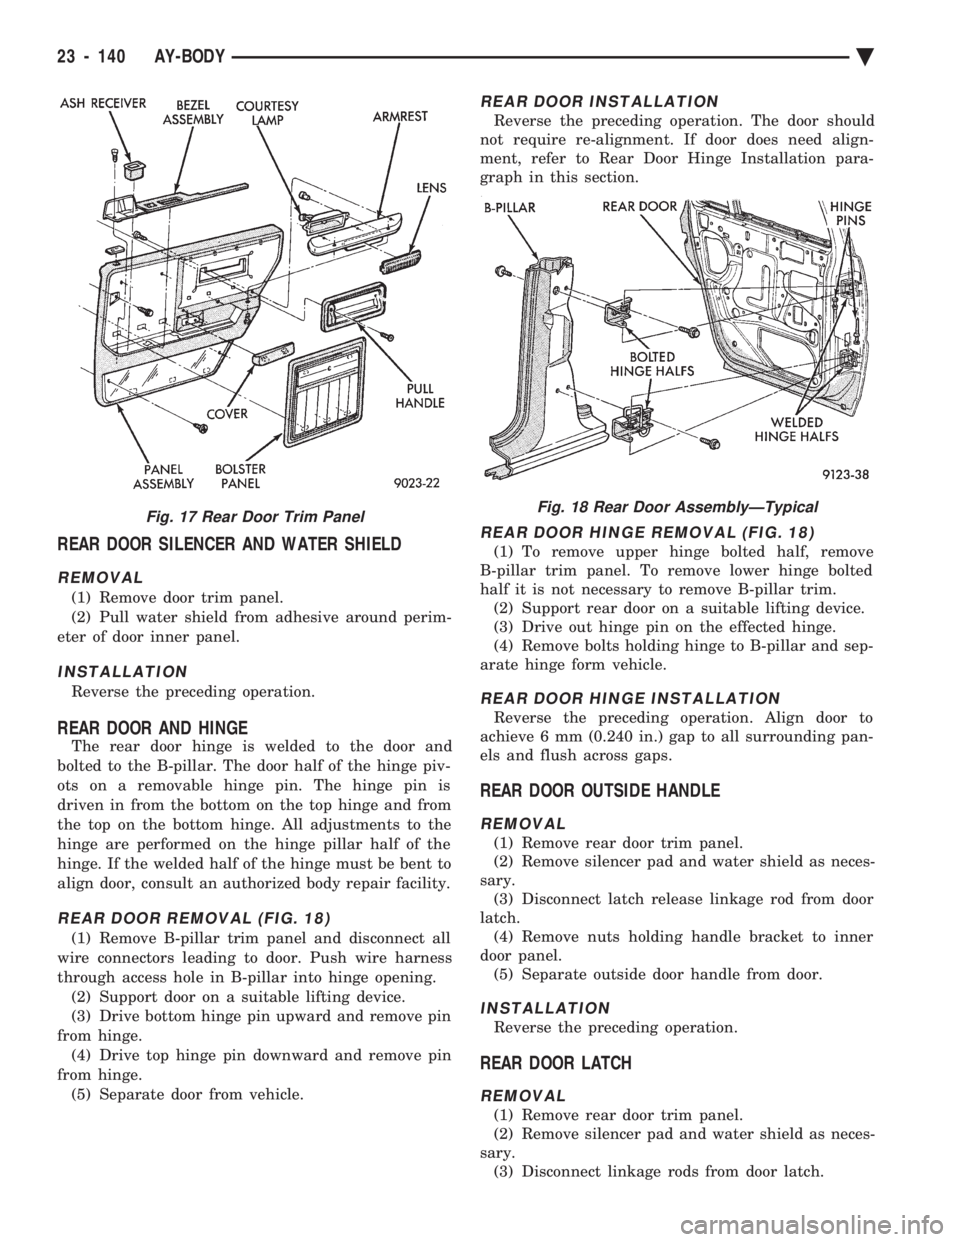
REMOVAL (FIG. 17)
(1) Remove screw plugs from fixed glass trim be-
zel. Remove screws holding bezel to door frame and
separate trim from door. (2) Remove screws holding pull handle and padded
insert to door trim and separate handle and insert
from door. (3) Disengage frog-leg fasteners holding forward
padded insert assembly to door panel. (4) Remove hidden screws from behind carpeting
on lower trim panel. (5) Remove screws and disengage frog-leg fasteners
holding trim panel to door. Lift trim panel upward
and separate trim from door. (6) Disconnect courtesy lamp wire connector. Dis-
connect cigar lighter wire connectors. Disconnect
power window switch wire connector.
INSTALLATION
Reverse the preceding operation.
REAR DOOR FRAME TRIM MOULDING
TRIM MOULDING REMOVAL
(1) Remove rear door trim panel.
(2) Disengage trim clips holding trim moulding to
door frame. (3) Separate trim moulding from door frame.
TRIM MOULDING INSTALLATION
Reverse the preceding operation.
Fig. 15 Front Door Manual Window Regulator
Fig. 16 Front Door Power Window Regulator
Ä AY-BODY 23 - 139
Page 2296 of 2438
REAR DOOR SILENCER AND WATER SHIELD
REMOVAL
(1) Remove door trim panel.
(2) Pull water shield from adhesive around perim-
eter of door inner panel.
INSTALLATION
Reverse the preceding operation.
REAR DOOR AND HINGE
The rear door hinge is welded to the door and
bolted to the B-pillar. The door half of the hinge piv-
ots on a removable hinge pin. The hinge pin is
driven in from the bottom on the top hinge and from
the top on the bottom hinge. All adjustments to the
hinge are performed on the hinge pillar half of the
hinge. If the welded half of the hinge must be bent to
align door, consult an authorized body repair facility.
REAR DOOR REMOVAL (FIG. 18)
(1) Remove B-pillar trim panel and disconnect all
wire connectors leading to door. Push wire harness
through access hole in B-pillar into hinge opening. (2) Support door on a suitable lifting device.
(3) Drive bottom hinge pin upward and remove pin
from hinge. (4) Drive top hinge pin downward and remove pin
from hinge. (5) Separate door from vehicle.
REAR DOOR INSTALLATION
Reverse the preceding operation. The door should
not require re-alignment. If door does need align-
ment, refer to Rear Door Hinge Installation para-
graph in this section.
REAR DOOR HINGE REMOVAL (FIG. 18)
(1) To remove upper hinge bolted half, remove
B-pillar trim panel. To remove lower hinge bolted
half it is not necessary to remove B-pillar trim. (2) Support rear door on a suitable lifting device.
(3) Drive out hinge pin on the effected hinge.
(4) Remove bolts holding hinge to B-pillar and sep-
arate hinge form vehicle.
REAR DOOR HINGE INSTALLATION
Reverse the preceding operation. Align door to
achieve 6 mm (0.240 in.) gap to all surrounding pan-
els and flush across gaps.
REAR DOOR OUTSIDE HANDLE
REMOVAL
(1) Remove rear door trim panel.
(2) Remove silencer pad and water shield as neces-
sary. (3) Disconnect latch release linkage rod from door
latch. (4) Remove nuts holding handle bracket to inner
door panel. (5) Separate outside door handle from door.
INSTALLATION
Reverse the preceding operation.
REAR DOOR LATCH
REMOVAL
(1) Remove rear door trim panel.
(2) Remove silencer pad and water shield as neces-
sary. (3) Disconnect linkage rods from door latch.
Fig. 17 Rear Door Trim PanelFig. 18 Rear Door AssemblyÐTypical
23 - 140 AY-BODY Ä
Page 2297 of 2438
(4) Remove screws holding latch to door end frame.
(5) Separate latch from rear door.
INSTALLATION
Reverse the preceding operation.
REAR DOOR GLASS
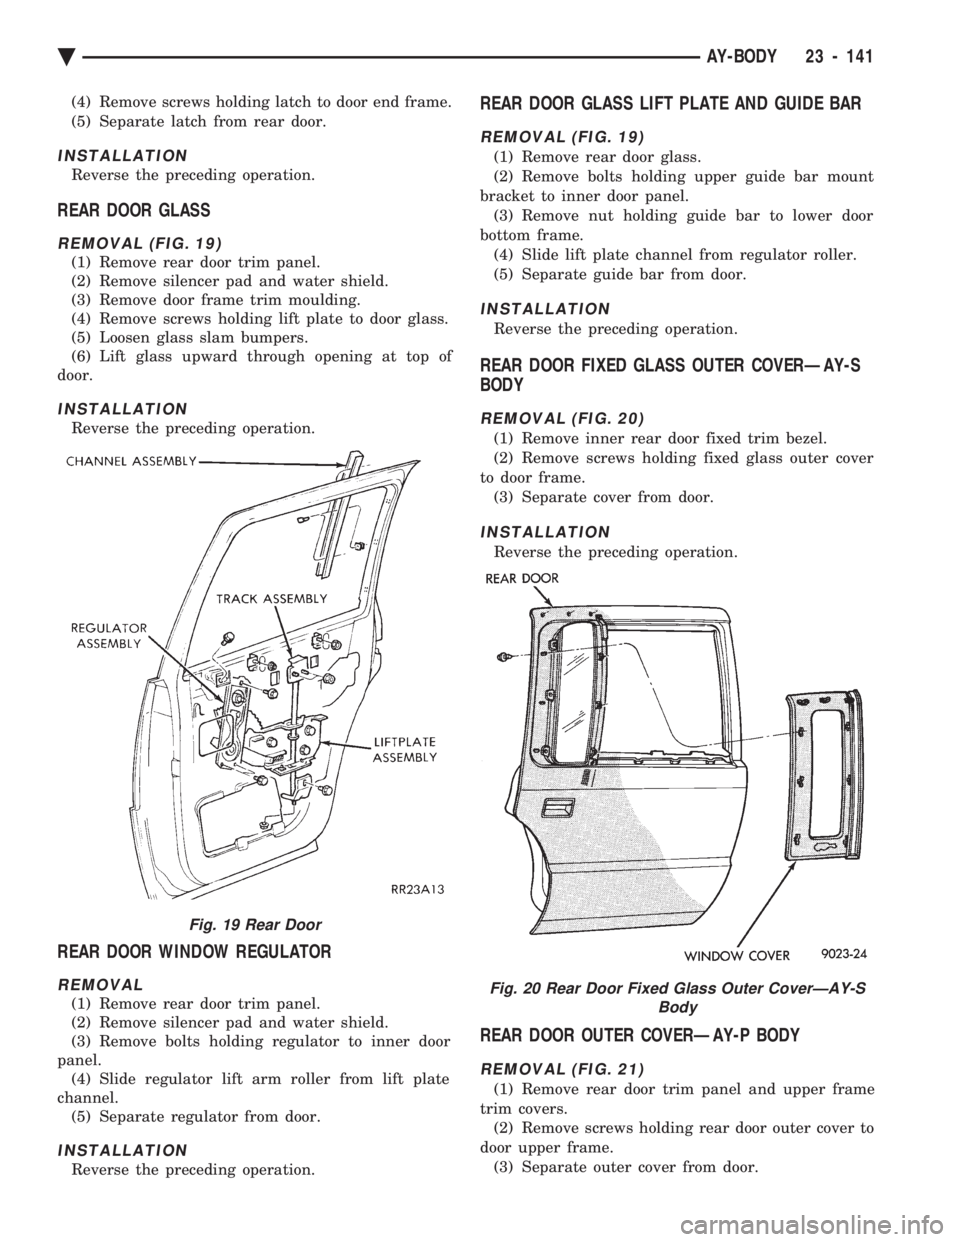
REMOVAL (FIG. 19)
(1) Remove rear door trim panel.
(2) Remove silencer pad and water shield.
(3) Remove door frame trim moulding.
(4) Remove screws holding lift plate to door glass.
(5) Loosen glass slam bumpers.
(6) Lift glass upward through opening at top of
door.
INSTALLATION
Reverse the preceding operation.
REAR DOOR WINDOW REGULATOR
REMOVAL
(1) Remove rear door trim panel.
(2) Remove silencer pad and water shield.
(3) Remove bolts holding regulator to inner door
panel. (4) Slide regulator lift arm roller from lift plate
channel. (5) Separate regulator from door.
INSTALLATION
Reverse the preceding operation.
REAR DOOR GLASS LIFT PLATE AND GUIDE BAR
REMOVAL (FIG. 19)
(1) Remove rear door glass.
(2) Remove bolts holding upper guide bar mount
bracket to inner door panel. (3) Remove nut holding guide bar to lower door
bottom frame. (4) Slide lift plate channel from regulator roller.
(5) Separate guide bar from door.
INSTALLATION
Reverse the preceding operation.
REAR DOOR FIXED GLASS OUTER COVERÐAY-S
BODY
REMOVAL (FIG. 20)
(1) Remove inner rear door fixed trim bezel.
(2) Remove screws holding fixed glass outer cover
to door frame. (3) Separate cover from door.
INSTALLATION
Reverse the preceding operation.
REAR DOOR OUTER COVERÐAY-P BODY
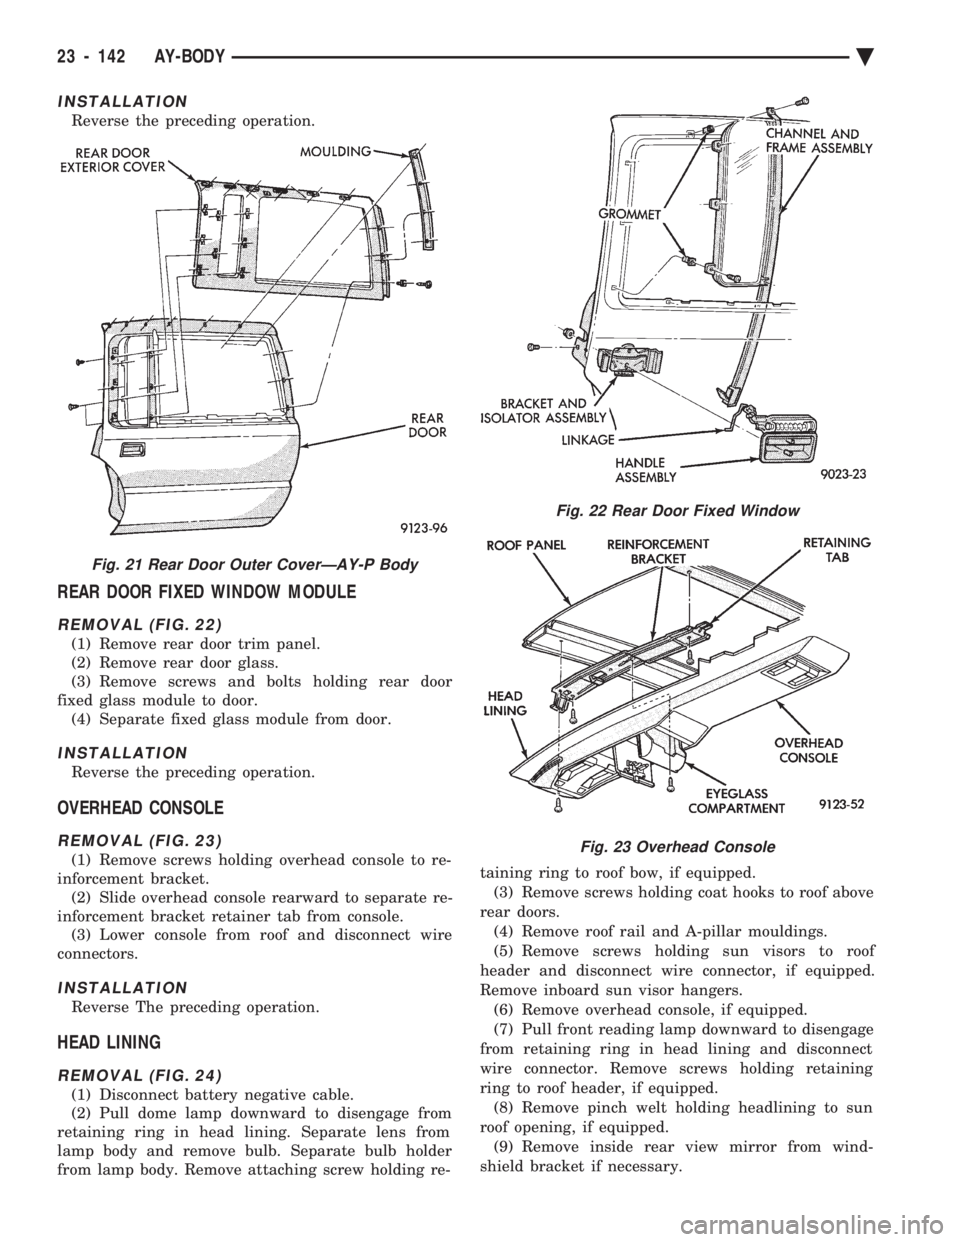
REMOVAL (FIG. 21)
(1) Remove rear door trim panel and upper frame
trim covers. (2) Remove screws holding rear door outer cover to
door upper frame. (3) Separate outer cover from door.
Fig. 19 Rear Door
Fig. 20 Rear Door Fixed Glass Outer CoverÐAY-S Body
Ä AY-BODY 23 - 141
Page 2298 of 2438
INSTALLATION
Reverse the preceding operation.
REAR DOOR FIXED WINDOW MODULE
REMOVAL (FIG. 22)
(1) Remove rear door trim panel.
(2) Remove rear door glass.
(3) Remove screws and bolts holding rear door
fixed glass module to door. (4) Separate fixed glass module from door.
INSTALLATION
Reverse the preceding operation.
OVERHEAD CONSOLE
REMOVAL (FIG. 23)
(1) Remove screws holding overhead console to re-
inforcement bracket. (2) Slide overhead console rearward to separate re-
inforcement bracket retainer tab from console. (3) Lower console from roof and disconnect wire
connectors.
INSTALLATION
Reverse The preceding operation.
HEAD LINING
REMOVAL (FIG. 24)
(1) Disconnect battery negative cable.
(2) Pull dome lamp downward to disengage from
retaining ring in head lining. Separate lens from
lamp body and remove bulb. Separate bulb holder
from lamp body. Remove attaching screw holding re- taining ring to roof bow, if equipped.
(3) Remove screws holding coat hooks to roof above
rear doors. (4) Remove roof rail and A-pillar mouldings.
(5) Remove screws holding sun visors to roof
header and disconnect wire connector, if equipped.
Remove inboard sun visor hangers. (6) Remove overhead console, if equipped.
(7) Pull front reading lamp downward to disengage
from retaining ring in head lining and disconnect
wire connector. Remove screws holding retaining
ring to roof header, if equipped. (8) Remove pinch welt holding headlining to sun
roof opening, if equipped. (9) Remove inside rear view mirror from wind-
shield bracket if necessary.
Fig. 21 Rear Door Outer CoverÐAY-P Body
Fig. 22 Rear Door Fixed Window
Fig. 23 Overhead Console
23 - 142 AY-BODY Ä
Page 2299 of 2438
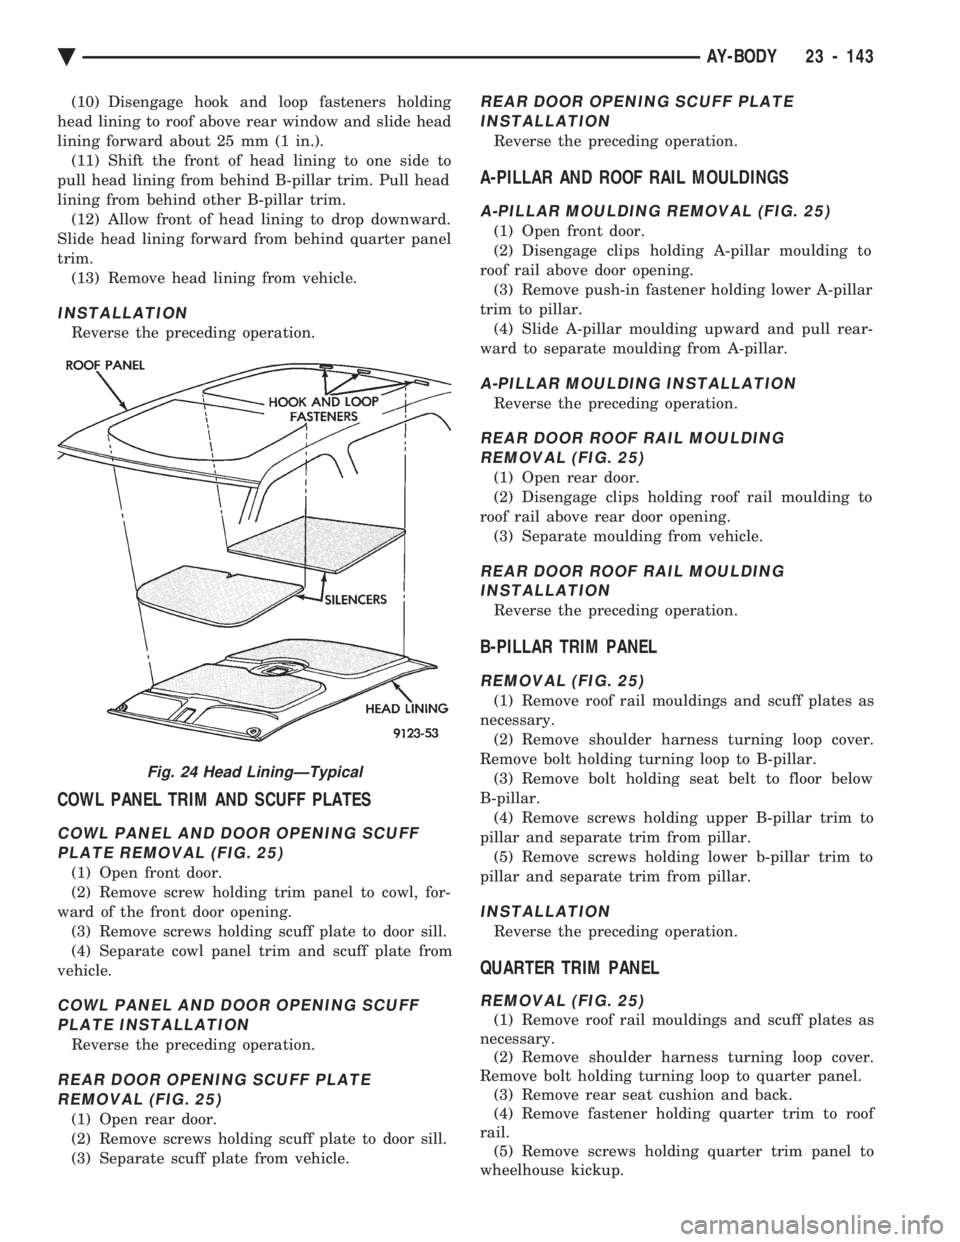
(10) Disengage hook and loop fasteners holding
head lining to roof above rear window and slide head
lining forward about 25 mm (1 in.). (11) Shift the front of head lining to one side to
pull head lining from behind B-pillar trim. Pull head
lining from behind other B-pillar trim. (12) Allow front of head lining to drop downward.
Slide head lining forward from behind quarter panel
trim. (13) Remove head lining from vehicle.
INSTALLATION
Reverse the preceding operation.
COWL PANEL TRIM AND SCUFF PLATES
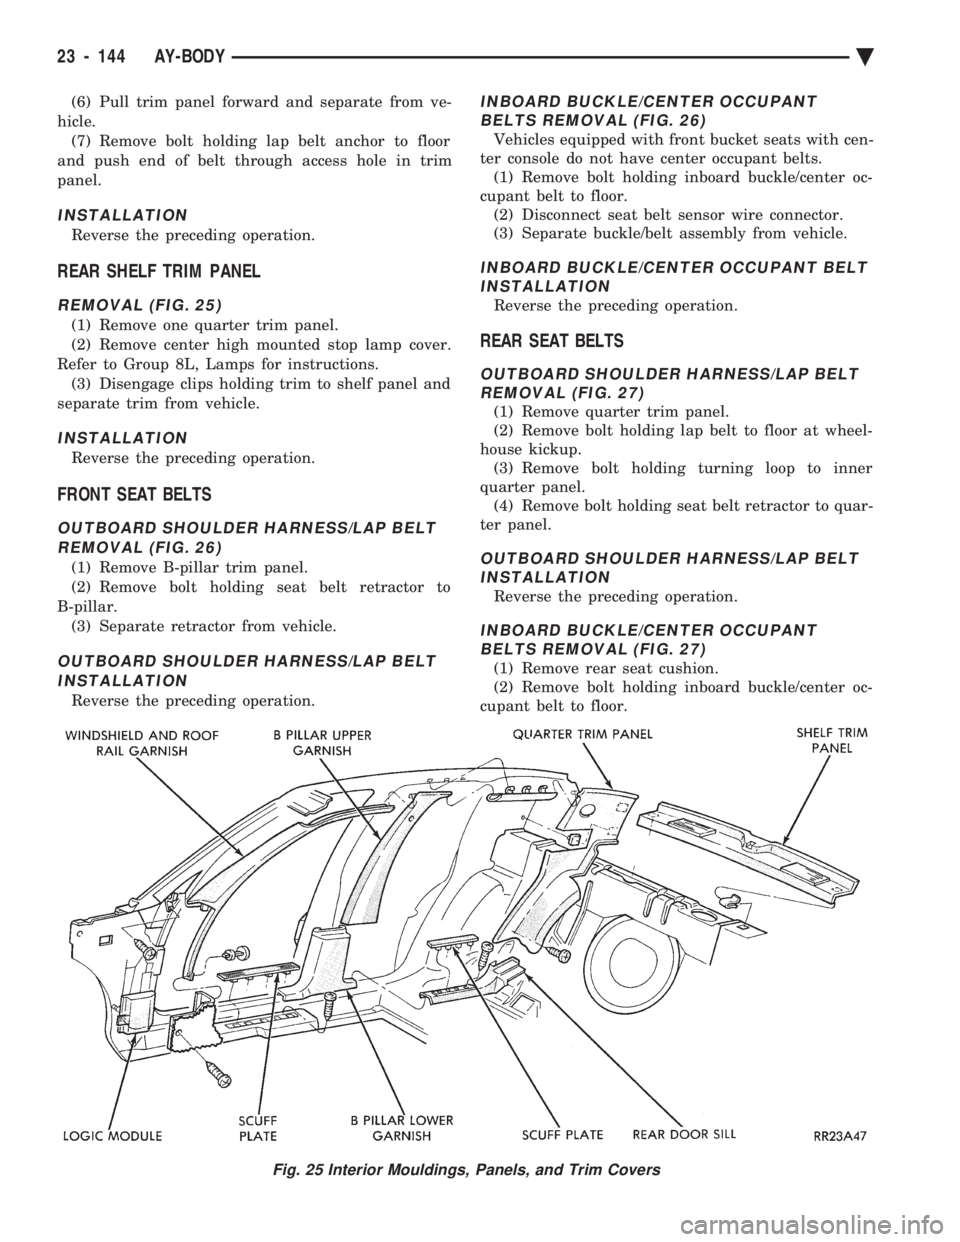
COWL PANEL AND DOOR OPENING SCUFFPLATE REMOVAL (FIG. 25)
(1) Open front door.
(2) Remove screw holding trim panel to cowl, for-
ward of the front door opening. (3) Remove screws holding scuff plate to door sill.
(4) Separate cowl panel trim and scuff plate from
vehicle.
COWL PANEL AND DOOR OPENING SCUFF PLATE INSTALLATION
Reverse the preceding operation.
REAR DOOR OPENING SCUFF PLATEREMOVAL (FIG. 25)
(1) Open rear door.
(2) Remove screws holding scuff plate to door sill.
(3) Separate scuff plate from vehicle.
REAR DOOR OPENING SCUFF PLATEINSTALLATION
Reverse the preceding operation.
A-PILLAR AND ROOF RAIL MOULDINGS
A-PILLAR MOULDING REMOVAL (FIG. 25)
(1) Open front door.
(2) Disengage clips holding A-pillar moulding to
roof rail above door opening. (3) Remove push-in fastener holding lower A-pillar
trim to pillar. (4) Slide A-pillar moulding upward and pull rear-
ward to separate moulding from A-pillar.
A-PILLAR MOULDING INSTALLATION
Reverse the preceding operation.
REAR DOOR ROOF RAIL MOULDING REMOVAL (FIG. 25)
(1) Open rear door.
(2) Disengage clips holding roof rail moulding to
roof rail above rear door opening. (3) Separate moulding from vehicle.
REAR DOOR ROOF RAIL MOULDINGINSTALLATION
Reverse the preceding operation.
B-PILLAR TRIM PANEL
REMOVAL (FIG. 25)
(1) Remove roof rail mouldings and scuff plates as
necessary. (2) Remove shoulder harness turning loop cover.
Remove bolt holding turning loop to B-pillar. (3) Remove bolt holding seat belt to floor below
B-pillar. (4) Remove screws holding upper B-pillar trim to
pillar and separate trim from pillar. (5) Remove screws holding lower b-pillar trim to
pillar and separate trim from pillar.
INSTALLATION
Reverse the preceding operation.
QUARTER TRIM PANEL
REMOVAL (FIG. 25)
(1) Remove roof rail mouldings and scuff plates as
necessary. (2) Remove shoulder harness turning loop cover.
Remove bolt holding turning loop to quarter panel. (3) Remove rear seat cushion and back.
(4) Remove fastener holding quarter trim to roof
rail. (5) Remove screws holding quarter trim panel to
wheelhouse kickup.
Fig. 24 Head LiningÐTypical
Ä AY-BODY 23 - 143
Page 2300 of 2438
(6) Pull trim panel forward and separate from ve-
hicle. (7) Remove bolt holding lap belt anchor to floor
and push end of belt through access hole in trim
panel.
INSTALLATION
Reverse the preceding operation.
REAR SHELF TRIM PANEL
REMOVAL (FIG. 25)
(1) Remove one quarter trim panel.
(2) Remove center high mounted stop lamp cover.
Refer to Group 8L, Lamps for instructions. (3) Disengage clips holding trim to shelf panel and
separate trim from vehicle.
INSTALLATION
Reverse the preceding operation.
FRONT SEAT BELTS
OUTBOARD SHOULDER HARNESS/LAP BELT REMOVAL (FIG. 26)
(1) Remove B-pillar trim panel.
(2) Remove bolt holding seat belt retractor to
B-pillar. (3) Separate retractor from vehicle.
OUTBOARD SHOULDER HARNESS/LAP BELTINSTALLATION
Reverse the preceding operation.
INBOARD BUCKLE/CENTER OCCUPANT BELTS REMOVAL (FIG. 26)
Vehicles equipped with front bucket seats with cen-
ter console do not have center occupant belts. (1) Remove bolt holding inboard buckle/center oc-
cupant belt to floor. (2) Disconnect seat belt sensor wire connector.
(3) Separate buckle/belt assembly from vehicle.
INBOARD BUCKLE/CENTER OCCUPANT BELT INSTALLATION
Reverse the preceding operation.
REAR SEAT BELTS
OUTBOARD SHOULDER HARNESS/LAP BELTREMOVAL (FIG. 27)
(1) Remove quarter trim panel.
(2) Remove bolt holding lap belt to floor at wheel-
house kickup. (3) Remove bolt holding turning loop to inner
quarter panel. (4) Remove bolt holding seat belt retractor to quar-
ter panel.
OUTBOARD SHOULDER HARNESS/LAP BELT INSTALLATION
Reverse the preceding operation.
INBOARD BUCKLE/CENTER OCCUPANTBELTS REMOVAL (FIG. 27)
(1) Remove rear seat cushion.
(2) Remove bolt holding inboard buckle/center oc-
cupant belt to floor.
Fig. 25 Interior Mouldings, Panels, and Trim Covers
23 - 144 AY-BODY Ä