manual radio set CHRYSLER 300 2015 2.G User Guide
[x] Cancel search | Manufacturer: CHRYSLER, Model Year: 2015, Model line: 300, Model: CHRYSLER 300 2015 2.GPages: 180, PDF Size: 30.54 MB
Page 3 of 180
INTRODUCTION/WELCOME
WELCOME FROM FCA US LLC . . . . . . . 2
CONTROLS AT A GLANCE
DRIVER COCKPIT...............4INSTRUMENT CLUSTER...........6
GETTING STARTED
KEY FOB . . . . . . . . . . . . . . . . . . . . 8REMOTE START...............10KEYLESS ENTER-N-GO™..........10VEHICLE SECURITY ALARM . .......14SEAT BELT SYSTEMS.............14SUPPLEMENTAL RESTRAINT SYSTEM (SRS)—AIRBAGS . . . . . . . . . . . . . . . . . . 15CHILD RESTRAINTS.............18HEAD RESTRAINTS..............22FRONT SEATS . . . . . . . . . . . . . . . . 24REAR SEAT...................27HEATED SEATS . . . . . . . . . . . . . . . . 27HEATED AND COOLED CUPHOLDERS...28ADJUSTABLE PEDALS............29TILT/TELESCOPING STEERINGCOLUMN . . . . . . . . . . . . . . . . . . . 30
OPERATING YOUR VEHICLE
ENGINE BREAK-INRECOMMENDATIONS............31TURN SIGNAL/WIPER/WASHER/HIGH BEAMLEVER.....................32HEADLIGHT SWITCH............33ELECTRONIC SPEED CONTROL.....35ADAPTIVE CRUISE CONTROL (ACC) . . . 37LANESENSE..................42PA R K V I E W ® R E A R B AC K- U P C A M E R A . . 4 2EIGHT-SPEED AUTOMATICTRANSMISSION................43AUTOSTICK . . . . . . . . . . . . . . . . . . 44AUTOMATIC TEMPERATURE CONTROLS(ATC) . . . . . . . . . . . . . . . . . . . . . 46BLIND SPOT MONITORING........48POWER SUNROOF..............49WIND BUFFETING..............51
ELECTRONICS
YO U R V E H I C L E ' S S O U N D SYS T E M....52IDENTIFYING YOUR RADIO........54Uconnect® ACCESS..............55Uconnect® 8.4A.................71Uconnect® 8.4AN...............94Uconnect® PHONE ..............109STEERING WHEEL AUDIO CONTROLS...118SETTING THE ANALOG CLOCK.....118DRIVER INFORMATION DISPLAY (DID). . 119PROGRAMMABLE FEATURES.......120UNIVERSAL GARAGE DOOR OPENER(HomeLink®)..................121
POWER OUTLETS.............123
UTILITY
TRAILER TOWING WEIGHTS (MAXIMUMTRAILER WEIGHT RATINGS).......124RECREATIONAL TOWING (BEHINDMOTORHOME, ETC.)...........125
WHAT TO DO IN EMERGENCIES
ROADSIDE ASSISTANCE..........126INSTRUMENT CLUSTER WARNINGLIGHTS . . . . . . . . . . . . . . . . . . . . 126INSTRUMENT CLUSTER INDICATORLIGHTS . . . . . . . . . . . . . . . . . . . . 130IF YOUR ENGINE OVERHEATS......132JACKING AND TIRE CHANGING.....132BATTERY LOCATION............139JUMP-STARTING..............139MANUAL PARK RELEASE..........141TOWING A DISABLED VEHICLE.....142FREEING A STUCK VEHICLE.......143EVENT DATA RECORDER (EDR).....144
MAINTAINING YOUR VEHICLE
OPENING THE HOOD . . .........145ENGINE COMPARTMENT — 3.6L.....146ENGINE COMPARTMENT — 5.7L.....148FLUID CAPACITIES . . . . . . . . . . . . . 150FLUIDS, LUBRICANTS, AND GENUINEPA RTS . . . . . . . . . . . . . . . . . . . . . 1 5 0MAINTENANCE PROCEDURES . . . . . . 152MAINTENANCE SCHEDULE . . .....152FUSES.....................157TIRE PRESSURES...............161SPARE TIRES — IF EQUIPPED . . . . . . . 162FUEL DOOR RELEASE ...........164WHEEL AND WHEEL TRIM CARE.....165REPLACEMENT BULBS...........166
CONSUMER ASSISTANCE
FCA US LLC CUSTOMER CENTER . . . . 167FCA CANADA INC. CUSTOMERCENTER...................167PUBLICATIONS ORDERING........167ASSISTANCE FOR THE HEARINGIMPAIRED . . . . . . . . . . . . . . . . . . 167REPORTING SAFETY DEFECTS IN THEUNITED STATES . . . . . . . . . . . . . . . 168
MOPAR® ACCESSORIES
AUTHENTIC ACCESSORIES BYMOPAR® . . . . . . . . . . . . . . . . . . . 169
FREQUENTLY ASKED QUESTIONSFREQUENTLY ASKED QUESTIONS....170
INDEX................... 171
TA B L E O F CO N T E N TS
Page 27 of 180
Memory Seat
The memory seat feature allows you to save
two different driver seating positions, driver's
outside mirror, adjustable brake and accelera-
tor pedals, power tilt and telescopic steering
column and radio station preset settings. The
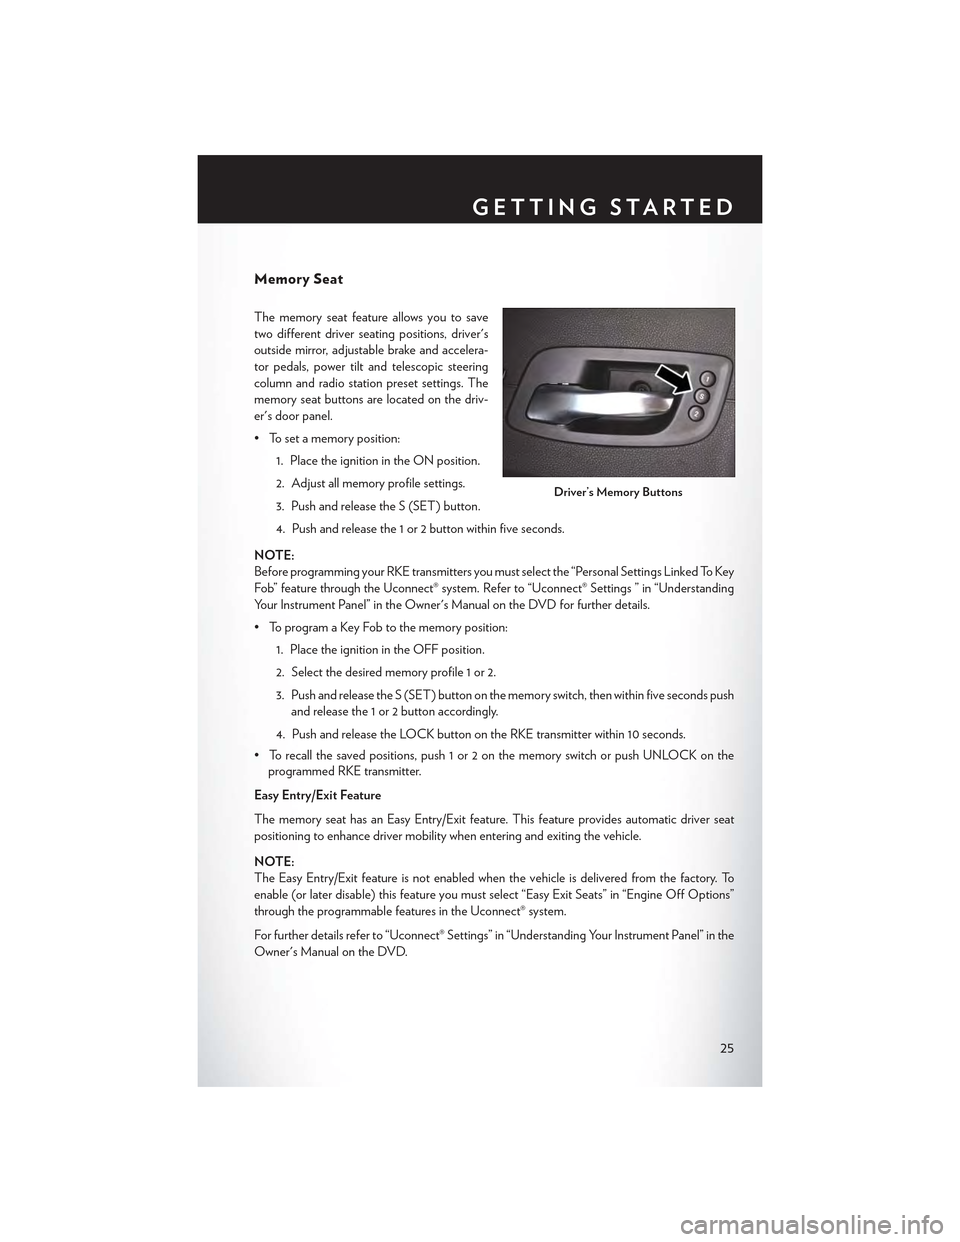
memory seat buttons are located on the driv-
er's door panel.
• To set a memory position:
1. Place the ignition in the ON position.
2. Adjust all memory profile settings.
3. Push and release the S (SET) button.
4. Push and release the 1 or 2 button within five seconds.
NOTE:
Before programming your RKE transmitters you must select the “Personal Settings Linked To Key
Fob” feature through the Uconnect® system. Refer to “Uconnect® Settings ” in “Understanding
Yo u r I n s t r u m e n t P a n e l ” i n t h e O w n e r ' s M a n u a l o n t h e D V D f o r f u r t h e r d e t a i l s .
• To program a Key Fob to the memory position:
1. Place the ignition in the OFF position.
2. Select the desired memory profile 1 or 2.
3. Push and release the S (SET) button on the memory switch, then within five seconds push
and release the 1 or 2 button accordingly.
4. Push and release the LOCK button on the RKE transmitter within 10 seconds.
•Torecallthesavedpositions,push1or2onthememoryswitchorpushUNLOCKonthe
programmed RKE transmitter.
Easy Entry/Exit Feature
The memory seat has an Easy Entry/Exit feature. This feature provides automatic driver seat
positioning to enhance driver mobility when entering and exiting the vehicle.
NOTE:
The Easy Entry/Exit feature is not enabled when the vehicle is delivered from the factory. To
enable (or later disable) this feature you must select “Easy Exit Seats” in “Engine Off Options”
through the programmable features in the Uconnect® system.
For further details refer to “Uconnect® Settings” in “Understanding Your Instrument Panel” in the
Owner's Manual on the DVD.
Driver’s Memory Buttons
GETTING STARTED
25
Page 36 of 180
Automatic High Beams
The Automatic High Beams system provides increased forward lighting at night by automating
high beam control through the use of a digital camera mounted above the inside rearview mirror.
This camera detects vehicle specific light and automatically switches from high beams to low
beams until the approaching vehicle is out of view. This feature is programmable through the
Uconnect® system. Refer to “Uconnect® Settings” in “Understanding Your Instrument Panel” in
the Owner's Manual on the DVD for further details.
Instrument Panel Dimmer
•Rotatethedimmercontroltotheextremebottompositiontofullydimtheinstrumentpanel
lights and prevent the interior lights from illuminating when a door is opened.
•Rotatethedimmercontroluptoincreasethebrightnessoftheinstrumentpaneland
cupholders when the parking lights or headlights are on.
• Rotate the dimmer control up to the next detent position to fully brighten the odometer and
radio when the parking lights or headlights are on.
• Rotate the dimmer control up to the last detent position to turn on the interior lighting.
•Ifyourvehicleisequippedwithatouchscreen,thedimmingisprogrammablethroughthe
Uconnect® system. Refer to “Uconnect® Settings” in “Understanding Your Instrument Panel”
in the Owner's Manual on the DVD for further details.
Ambient Light Dimmer
• Rotate the ambient light control up or down to increase or decrease the brightness of the
release handle, map pocket (if equipped), overhead and floor lighting when the parking lights
or headlights are on.
• Rotate to extreme bottom position to turn off.
OPERATING YOUR VEHICLE
34
Page 50 of 180
MAX A/C
MAX A/C sets the control for maximum cooling performance.
• Press and release to toggle between MAX A/C and the prior settings. The button on the
touchscreen illuminates when MAX A/C is ON.
In MAX A/C, the blower level and mode position can be adjusted to desired user settings.
Pressing other settings will cause the MAX A/C operation to switch to the prior settings and the
MAX A/C indicator will turn off.
SYNC Temperature Button
•Pressthe“SYNC”buttononcetocontroldriverandpassengertemperaturessimultaneously.
• Press the “SYNC” button a second time to control the temperatures individually.
Air Recirculation
• Use Recirculation for maximum A/C operation.
• For window defogging, turn the Recirculation button off.
• If the Recirculation button is pushed while in the AUTO mode, the indicator light may flash
three times to indicate the cabin air is being controlled automatically. The Recirculation button
will be greyed out in these conditions.
Heated Mirrors
The mirrors are heated to melt frost or ice. This feature is activated whenever you turn on the rear
window defroster.
BLIND SPOT MONITORING
The Blind Spot Monitoring (BSM) system uses two radar-based sensors, located inside the rear
bumper fascia, to detect Highway licensable vehicles (automobiles, trucks, motorcycles etc.) that
enter the blind spot zones from the rear/front/side of the vehicle.
The Blind Spot Monitoring (BSM) system warning light, located in the outside mirrors, will
illuminate if a vehicle moves into a blind spot zone.
The BSM system can also be configured to sound an audible (chime) alert and mute the radio to
notify you of objects that have entered the detection zones.
Refer to “Blind Spot Monitoring” in “Understanding The Features Of Your Vehicle” in your
Owner's Manual on the DVD for further details.
OPERATING YOUR VEHICLE
48
Page 73 of 180
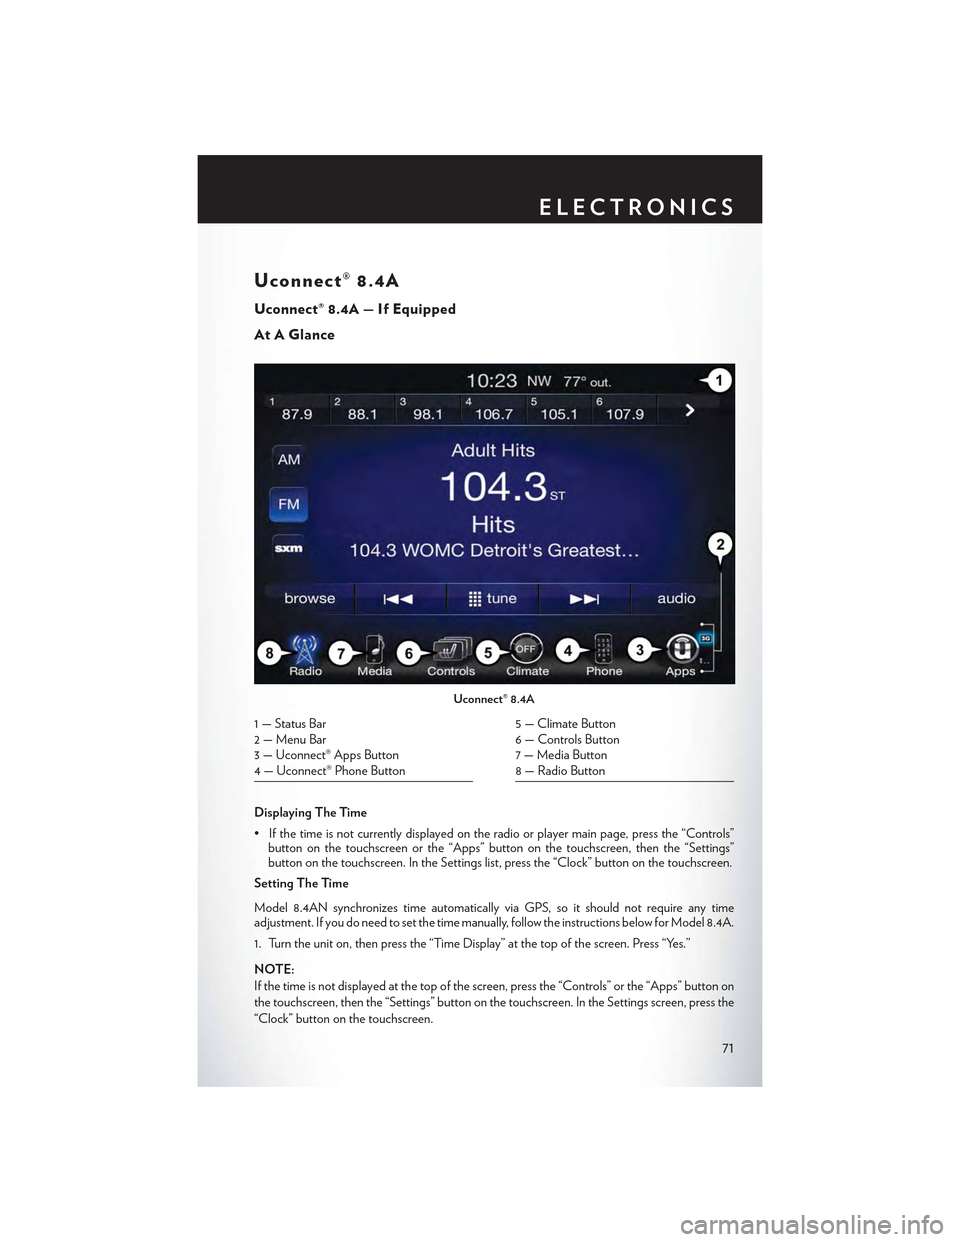
Uconnect® 8.4A
Uconnect® 8.4A — If Equipped
At A Glance
Displaying The Time
•Ifthetimeisnotcurrentlydisplayedontheradioorplayermainpage,pressthe“Controls”button on the touchscreen or the “Apps” button on the touchscreen, then the “Settings”button on the touchscreen. In the Settings list, press the “Clock” button on the touchscreen.
Setting The Time
Model 8.4AN synchronizes time automatically via GPS, so it should not require any timeadjustment. If you do need to set the time manually, follow the instructions below for Model 8.4A.
1. Turn the unit on, then press the “Time Display” at the top of the screen. Press “Yes.”
NOTE:
If the time is not displayed at the top of the screen, press the “Controls” or the “Apps” button on
the touchscreen, then the “Settings” button on the touchscreen. In the Settings screen, press the
“Clock” button on the touchscreen.
Uconnect® 8.4A
1 — Status Bar2 — Menu Bar3 — Uconnect® Apps Button4 — Uconnect® Phone Button
5 — Climate Button6 — Controls Button7 — Media Button8 — Radio Button
ELECTRONICS
71
Page 76 of 180
Selecting Radio Stations
•Pressthedesiredradioband(AM,FMorSXM)buttononthetouchscreen.
Seek Up/Seek Down
• Press the “Seek arrow” up or down button on the touchscreen for less than two seconds to seek
through radio stations.
•Pressandholdeither“arrow”buttononthetouchscreenformorethantwosecondstobypass
stations without stopping. The radio will stop at the next listenable station once the “arrow”
button on the touchscreen is released.
Direct Tune
• Tune directly to a radio station by pressing the “Tune” button on the screen, and entering the
desired station number.
Store Radio Presets Manually
Yo u r r a d i o c a n s t o r e 3 6 t o t a l p r e s e t s t a t i o n s , 1 2 p r e s e t s p e r b a n d ( A M , F M a n d S X M ) . T h e y a r e
shown at the top of your radio screen. To see the 12 preset stations per band, press the “arrow”
button on the touchscreen at the top right of the screen to toggle between the two sets of six
presets.
To store a radio preset manually, follow the steps below:
1. Tune to the desired station.
2. Press and hold the desired numbered button on the touchscreen for more than two seconds
or until you hear a confirmation beep.
SiriusXM Premier Over 160 Channels
Get every channel available on your satellite radio, and enjoy all you want, all in one place. Hear
commercial-free music plus sports, news, talk and entertainment. Get all the premium program-
ming, including Howard Stern, every NFL game, Oprah Radio®, every MLB® and NHL® game,
every NASCAR® race and more. And get 20+ Xtra channels, including SiriusXM Latino, a
selection of channels dedicated to Spanish language programming.
•ToaccessSiriusXMSatelliteRadio,pressthe“SXM”buttononthetouchscreenonthemain
Radio screen.
The following describes features that are available when in SiriusXM Satellite Radio mode.
Seek Up/Seek Down
• Press the “Seek arrow” button on the touchscreen for less than two seconds to seek through
channels in SXM mode.
• Press and hold either “Seek arrow” button on the touchscreen for more than two seconds to
bypass channels without stopping. The radio will stop at the next listenable channel once the
arrow button on the touchscreen is released.
ELECTRONICS
74
Page 97 of 180
Setting The Time
Model 8.4AN synchronizes time automatically via GPS, so it should not require any time
adjustment. If you do need to set the time manually, follow the instructions below for Model 8.4A.
1. Turn the unit on, then press the “Time Display” at the top of the screen. Press “Yes.”
NOTE:
If the time is not displayed at the top of the screen, press the “Controls” or the “Apps” button on
the touchscreen, then the “Settings” button on the touchscreen. In the Settings screen, press the
“Clock” button on the touchscreen.
2. Press “+” or “–” next to Set Time Hours and Set Time Minutes to adjust the time.
3. If these features are not available, uncheck the Sync with GPS box.
4. Press “X” to save your settings and exit out of the Clock Setting screen.
Audio Settings
To adjust the Audio settings:
1. Press the “Media” or “Radio” button on the touchscreen.
2. Press the “Audio” button on the touchscreen to activate the Audio settings screen to adjust
Balance/Fade, Equalizer and Speed Adjusted Volume.
3. You can return to the Radio screen by pressing the “X” located at the top right.
Balance/Fade
To adjust the Balance/Fade settings:
1. Press the “Media” or “Radio” button on the touchscreen.
2. Press the “Audio” button on the touchscreen to activate the Audio settings screen to adjust
Balance/Fade, Equalizer and Speed Adjusted Volume.
3. Press the “Balance/Fade” button on the touchscreen to Balance audio between the front
speakers or fade the audio between the rear and front speakers.
4. Pressing the “Front,” “Rear,” “Left” or “Right” button on the touchscreens or press and drag the
Speaker Icon to adjust the Balance/Fade.
ELECTRONICS
95
Page 100 of 180
Direct Tune
• Tune directly to a radio station by pressing the “Tune” button on the screen, and entering the
desired station number.
Store Radio Presets Manually
Yo u r r a d i o c a n s t o r e 3 6 t o t a l p r e s e t s t a t i o n s , 1 2 p r e s e t s p e r b a n d ( A M , F M a n d S X M ) . T h e y a r e
shown at the top of your radio screen. To see the 12 preset stations per band, press the “arrow”
button on the touchscreen at the top right of the screen to toggle between the two sets of six
presets.
To store a radio preset manually, follow the steps below:
1. Tune to the desired station.
2. Press and hold the desired numbered button on the touchscreen for more than two seconds
or until you hear a confirmation beep.
HD Radio
HD Radio technology (available on Uconnect® 8.4AN) allows broadcasters to transmit a
high-quality digital signal.
With an HD radio receiver, the listener is provided with a clear sound that enhances the listening
experience. HD radio can also transmit data such as song title or artist.
SiriusXM Premier Over 160 Channels
Get every channel available on your satellite radio, and enjoy all you want, all in one place. Hear
commercial-free music plus sports, news, talk and entertainment. Get all the premium program-
ming, including Howard Stern, every NFL game, Oprah Radio®, every MLB® and NHL® game,
every NASCAR® race and more. And get 20+ Xtra channels, including SiriusXM Latino, a
selection of channels dedicated to Spanish language programming.
•ToaccessSiriusXMSatelliteRadio,pressthe“SXM”buttononthetouchscreenonthemain
Radio screen.
The following describes features that are available when in SiriusXM Satellite Radio mode.
Seek Up/Seek Down
• Press the “Seek arrow” button on the touchscreen for less than two seconds to seek through
channels in SXM mode.
• Press and hold either “Seek arrow” button on the touchscreen for more than two seconds to
bypass channels without stopping. The radio will stop at the next listenable channel once the
arrow button on the touchscreen is released.
Direct Tune
• Tune directly to a SXM channel by pressing the “Tune” button on the touchscreen, and
entering the desired station number.
ELECTRONICS
98
Page 112 of 180
Refer to theUnderstand The Features Of Your Vehiclesection of your vehicle's Owner's
Manual on the DVD for further details.
NOTE:
• The Uconnect® Phone requires a mobile phone equipped with the Bluetooth® Hands-Free
Profile, Version 1.0 or higher.
•Mostmobilephones/devicesarecompatiblewiththeUconnect®system,howeversome
mobile phones/devices may not be equipped with all of the required features to utilize all of
the Uconnect® system features.
•ForUconnect®CustomerCare:
• U.S. residents visit UconnectPhone.com or call 1-877-855-8400.
• Canadian Residents visit UconnectPhone.com or call, 1-800-465–2001 (English) or
1-800-387-9983 (French).
Pairing (Wirelessly Connecting) Your Mobile Phone To The Uconnect®
System
Mobile phone pairing is the process of establishing a wireless connection between a cellular
phone and the Uconnect system.
NOTE:
•TousetheUconnect®Phonefeature,youfirstmustdetermineifyourmobilephoneand
software are compatible with the Uconnect® system. Please visit UconnectPhone.com for
complete mobile phone compatibility information.
•Mobilephonepairingisnotavailablewhilethevehicleisinmotion.
•Amaximumof10mobilephonescanbepairedtotheUconnect®system.
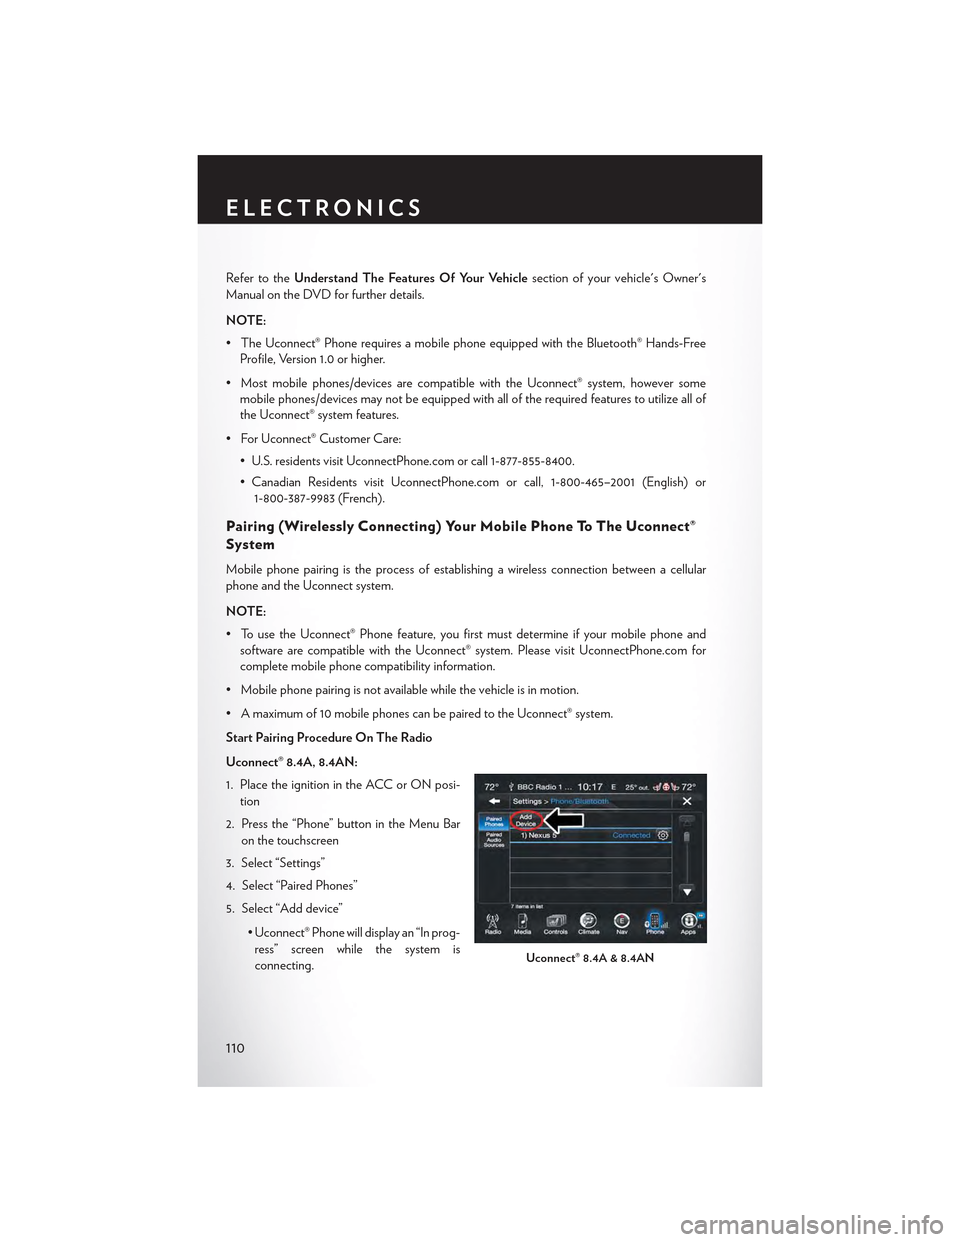
Start Pairing Procedure On The Radio
Uconnect® 8.4A, 8.4AN:
1. Place the ignition in the ACC or ON posi-
tion
2. Press the “Phone” button in the Menu Bar
on the touchscreen
3. Select “Settings”
4. Select “Paired Phones”
5. Select “Add device”
• Uconnect® Phone will display an “In prog-
ress” screen while the system is
connecting.Uconnect® 8.4A & 8.4AN
ELECTRONICS
110
Page 175 of 180
Glass Cleaning..............152
Hands-Free Phone (Uconnect)......109HeadlightsAutomatic...............33Cleaning...............152Dimmer Switch............34High Beam . . . . . . . . . . . . . .33Head Restraints..............22Head Rests.................22Heated Mirrors..............48Heated Seats................27High Beam Indicator...........130High Beam/Low Beam Select (Dimmer)Switch.................33HomeLink (Garage Door Opener) . . . .121Hood Release...............145
Identifying Your Radio...........54Instrument Cluster Indicator Lights . . . .130Instrument Panel Cover..........152Instrument Panel Lens Cleaning......152Interior And Instrument Lights.......5Interior Appearance Care.........152Intermittent Wipers (Delay Wipers)....32Introduction.................2In Vehicle FeaturesUconnect Access............61iPod/USB/MP3 ControlBluetooth Streaming Audio......109
Jacking Instructions............135Jack Location...............132Jack Operation..............135Jump Starting...............139
Key Fob . . . . . . . . . . . . . . . . . . .8Lock The Doors.............8Unlock The Doors............8Keyless Enter-N-Go............10Lock The Vehicle’s Doors........8Lock/Unlock............10, 11Starting/Stopping...........12
Lane Change Assist............32LaneSense.................42Lap/Shoulder Belts.............14
LATCH (Lower Anchors And Tether For
CHildren)................19
Light Bulbs................166
Lights
Fog . . . . . . . . . . . . . . . . ..130
High Beam Indicator.........130
SecurityAlarm............130
Service................166Tire Pressure Monitoring (TPMS) . .126LocksDoor . . . . . . . . . . . . . . . . . .8Lubrication, Body.............152
Maintenance Free Battery.........152Maintenance, General...........152Maintenance Procedures.........152Maintenance Record...........156Maintenance Schedule..........152Malfunction Indicator Light (CheckEngine)................128ManualTilt/Telescoping Steering Column . . .30Master Cylinder (Brakes).........152Memory Seat...............25MirrorsHeated................48MOPAR Accessories...........169
Navigation..............79, 103New Vehicle Break-In Period........31
Octane Rating, Gasoline (Fuel)......150Oil Change Indicator...........131Oil Change Indicator, Reset........131Oil, Engine..............150, 152Capacity...............150Change Interval.........131, 152Checking...............152Disposal...............152Filter...............150, 152Filter Disposal............152Materials Added To..........152Recommendation........150, 152Viscosity.............150, 152Oil Filter, Selection............152Oil Pressure Light.............129OutletPower . . . . . . . . . . . . . . . ..123
INDEX
173