high CHRYSLER PACIFICA 2022 User Guide
[x] Cancel search | Manufacturer: CHRYSLER, Model Year: 2022, Model line: PACIFICA, Model: CHRYSLER PACIFICA 2022Pages: 384, PDF Size: 23.92 MB
Page 72 of 384
70GETTING TO KNOW YOUR VEHICLE
At the top detent of the instrument panel dimmer,
all the interior lights will illuminate. At the bottom
most setting (extreme bottom) interior lights are
turned off (dome off), and the cluster, radio and
instrument lighting go to their lowest dimmable
setting.
WINDSHIELD WIPER AND WASHERS
The windshield wiper/washer controls are located
on the right side of the steering column. The front
wipers are operated by rotating a switch, located
on the end of the lever.
WINDSHIELD WIPER OPERATION
The wipers and washers are operated by a switch
within the wiper lever. Rotate the switch at the end
of the lever upward, to the first detent past the
intermittent settings for low-speed wiper
operation. Rotate the switch at the end of the lever
upward to the second detent past the intermittent
settings for high-speed wiper operation. To turn the
windshield wipers off, rotate the switch within the
lever all the way down to OFF.
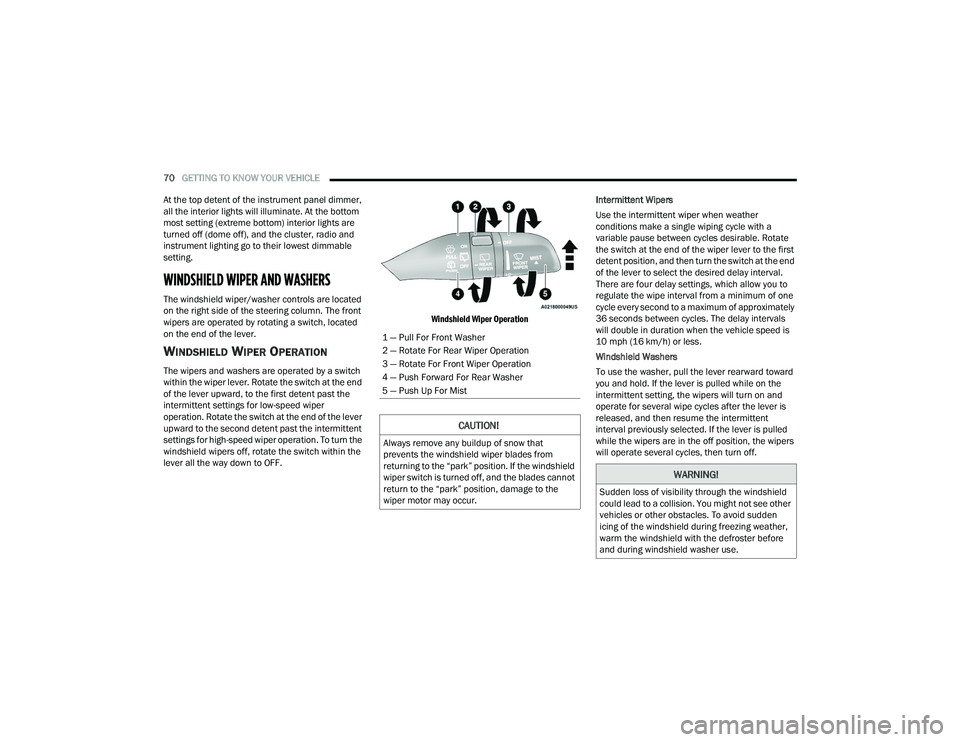
Windshield Wiper Operation
Intermittent Wipers
Use the intermittent wiper when weather
conditions make a single wiping cycle with a
variable pause between cycles desirable. Rotate
the switch at the end of the wiper lever to the first
detent position, and then turn the switch at the end
of the lever to select the desired delay interval.
There are four delay settings, which allow you to
regulate the wipe interval from a minimum of one
cycle every second to a maximum of approximately
36 seconds between cycles. The delay intervals
will double in duration when the vehicle speed is
10 mph (16 km/h) or less.
Windshield Washers
To use the washer, pull the lever rearward toward
you and hold. If the lever is pulled while on the
intermittent setting, the wipers will turn on and
operate for several wipe cycles after the lever is
released, and then resume the intermittent
interval previously selected. If the lever is pulled
while the wipers are in the off position, the wipers
will operate several cycles, then turn off.
1 — Pull For Front Washer
2 — Rotate For Rear Wiper Operation
3 — Rotate For Front Wiper Operation
4 — Push Forward For Rear Washer
5 — Push Up For Mist
CAUTION!
Always remove any buildup of snow that
prevents the windshield wiper blades from
returning to the “park” position. If the windshield
wiper switch is turned off, and the blades cannot
return to the “park” position, damage to the
wiper motor may occur.
WARNING!
Sudden loss of visibility through the windshield
could lead to a collision. You might not see other
vehicles or other obstacles. To avoid sudden
icing of the windshield during freezing weather,
warm the windshield with the defroster before
and during windshield washer use.
22_RUP_OM_EN_USC_t.book Page 70
Page 73 of 384
GETTING TO KNOW YOUR VEHICLE71
Mist
Push the lever upward to the MIST position and
release for a single wiping cycle.
NOTE:The Mist feature does not activate the washer
pump; therefore, no washer fluid will be sprayed on
the windshield. The wash function must be used in
order to spray the windshield with washer fluid.
For information on wiper care and replacement,
see Ú page 320.
RAIN SENSING WIPERS — IF EQUIPPED
This feature senses rain or snowfall on the
windshield and automatically activates the wipers.
Rotate the end of the windshield wiper lever to one
of the four detent positions to activate this feature.
The sensitivity of the system is adjustable from the
windshield wiper lever. Wiper sensitivity position 1
is the least sensitive, and wiper sensitivity position
4 is the most sensitive.
NOTE:
The Rain Sensing feature will not operate when
the wiper switch is in the low or high position.
The Rain Sensing feature may not function prop -
erly when ice or dried saltwater is present on the
windshield.
Use of Rain-X or products containing wax or sili-
cone may reduce rain sensor performance.
The Rain Sensing feature can be turned on and
off through the Uconnect system Ú page 188.
The Rain Sensing system has protective features
for the wiper blades and arms. It will not operate
under the following conditions:
Low Temperature Wipe Inhibit — The Rain
Sensing feature will not operate when the igni -
tion is first placed in the ON position, when the
vehicle is stationary and the outside tempera -
ture is below 32°F (0°C), unless the wiper
control on the windshield wiper lever is moved,
the vehicle speed becomes greater than 3 mph
(5 km/h) or the outside temperature rises
above freezing.
Neutral Wipe Inhibit — The Rain Sensing feature
will not operate when the ignition is ON, when
the transmission gear selector is in the
NEUTRAL position and the vehicle speed is less
than 3 mph (5 km/h), unless the wiper control
on the windshield wiper lever is moved, the
vehicle speed is greater than 3 mph (5 km/h) or the gear selector is moved out of the NEUTRAL
position.
Remote Start Mode Inhibit — On vehicles
equipped with the Remote Start system, Rain
Sensing wipers are not operational when the
vehicle is in the Remote Start mode. Once the
operator is in the vehicle and has placed the
ignition switch in the ON/RUN position, rain
sensing wiper operation can resume, if it has
been selected, and no other inhibit conditions
(mentioned previously) exist.
REAR WIPER AND WASHER
The rear wiper/washer is operated by rotating a
switch, located at the middle of the lever.
Rotate the center portion of the lever
upward to the first detent for intermittent
operation and to the second detent for
continuous rear wiper operation.
Rear Window Washer Operation Pushing the windshield wiper lever
forward activates the rear window
washer. If the lever is pushed while on
the intermittent setting, the wipers will
turn on and operate for several wipe cycles after
the lever is released, and then resume the
intermittent interval previously selected. If the
lever is pushed while the wipers are in the off
position, the wipers will operate several wipe
cycles, then turn off.
2
22_RUP_OM_EN_USC_t.book Page 71
Page 74 of 384
72GETTING TO KNOW YOUR VEHICLE
CLIMATE CONTROLS
AUTOMATIC CLIMATE CONTROL
D
ESCRIPTIONS AND FUNCTIONS
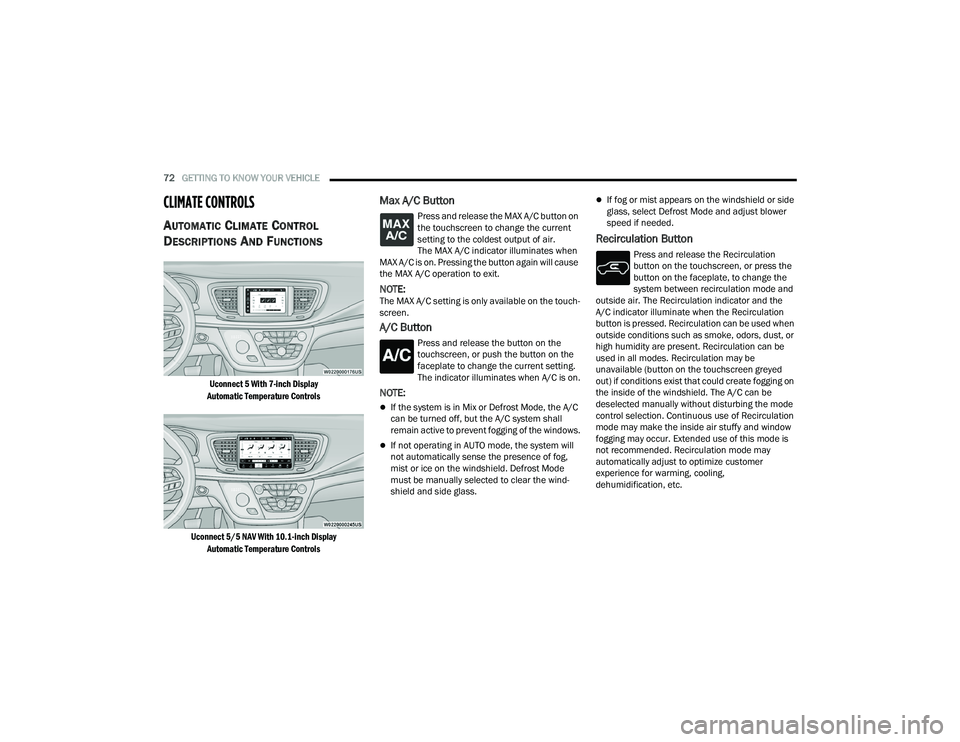
Uconnect 5 With 7-inch Display
Automatic Temperature Controls
Uconnect 5/5 NAV With 10.1-inch Display Automatic Temperature Controls
Max A/C Button
Press and release the MAX A/C button on
the touchscreen to change the current
setting to the coldest output of air.
The MAX A/C indicator illuminates when
MAX A/C is on. Pressing the button again will cause
the MAX A/C operation to exit.
NOTE:The MAX A/C setting is only available on the touch -
screen.
A/C Button
Press and release the button on the
touchscreen, or push the button on the
faceplate to change the current setting.
The indicator illuminates when A/C is on.
NOTE:
If the system is in Mix or Defrost Mode, the A/C
can be turned off, but the A/C system shall
remain active to prevent fogging of the windows.
If not operating in AUTO mode, the system will
not automatically sense the presence of fog,
mist or ice on the windshield. Defrost Mode
must be manually selected to clear the wind -
shield and side glass.
If fog or mist appears on the windshield or side
glass, select Defrost Mode and adjust blower
speed if needed.
Recirculation Button
Press and release the Recirculation
button on the touchscreen, or press the
button on the faceplate, to change the
system between recirculation mode and
outside air. The Recirculation indicator and the
A/C indicator illuminate when the Recirculation
button is pressed. Recirculation can be used when
outside conditions such as smoke, odors, dust, or
high humidity are present. Recirculation can be
used in all modes. Recirculation may be
unavailable (button on the touchscreen greyed
out) if conditions exist that could create fogging on
the inside of the windshield. The A/C can be
deselected manually without disturbing the mode
control selection. Continuous use of Recirculation
mode may make the inside air stuffy and window
fogging may occur. Extended use of this mode is
not recommended. Recirculation mode may
automatically adjust to optimize customer
experience for warming, cooling,
dehumidification, etc.
22_RUP_OM_EN_USC_t.book Page 72
Page 75 of 384
GETTING TO KNOW YOUR VEHICLE73
AUTO Button
Set your desired temperature and press
the AUTO button on the touchscreen, or
push the button on the faceplate. AUTO
will achieve and maintain your desired
temperature by automatically adjusting the blower
speed and air distribution. Air Conditioning (A/C)
may be active during AUTO operation to improve
performance. AUTO mode is highly recommended
for efficiency. You can turn AUTO on in one of two
ways:
Press and release this button on the touch -
screen
Push the button on the faceplate
Toggling this function will cause the system to
switch between manual mode and automatic
mode Ú page 82.
Front Defrost Button
Press and release the Front Defrost
button on the touchscreen, or push the
button on the faceplate to change the
current airflow setting to Defrost mode.
The indicator illuminates when this feature is on.
Air comes from the windshield and side window
demist outlets. When the defrost button is
selected, the blower level may increase. Use
Defrost mode with maximum temperature settings
for best windshield and side window defrosting
and defogging. Performing this function will cause the Automatic Temperature Control (ATC) to switch
into manual mode. If the Front Defrost mode is
turned off the climate system will return to the
previous setting.
Rear Defrost Button
Press and release the Rear Defrost
Control button on the touchscreen or
push and release the button on the
faceplate to turn on the rear window
defroster and the heated outside mirrors (if
equipped). An indicator will illuminate when the
rear window defroster is on. The rear window
defroster automatically turns off after 15 minutes.
Front Temperature Control
These buttons provide the driver and passenger
with independent temperature control.
Push the red button on the faceplate or
touchscreen or press and slide the
temperature bar towards the red arrow
button on the touchscreen for warmer
temperature settings.
Push the blue button on the faceplate or
touchscreen or press and slide the
temperature bar towards the blue arrow
button on the touchscreen for cooler
temperature settings.
NOTE:The temperature can also be adjusted by pressing
the Temperature readout on the top left and right
corners of the status bar.
SYNC Button
Press the SYNC button on the
touchscreen to toggle the SYNC feature
on/off. The SYNC indicator is illuminated
when this feature is enabled. SYNC is
used to synchronize the front and rear passenger
temperature settings with the driver temperature
setting. Changing the front or rear passenger
temperature setting while in SYNC will
automatically exit this feature.
NOTE:
The SYNC setting is only available on the touchscreen.
CAUTION!
Failure to follow these cautions can cause
damage to the heating elements:
Use care when washing the inside of the rear
window. Do not use abrasive window cleaners
on the interior surface of the window. Use a
soft cloth and a mild washing solution, wiping
parallel to the heating elements. Labels can
be peeled off after soaking with warm water.
Do not use scrapers, sharp instruments, or
abrasive window cleaners on the interior
surface of the window.
Keep all objects a safe distance from the
window.
2
22_RUP_OM_EN_USC_t.book Page 73
Page 80 of 384
78GETTING TO KNOW YOUR VEHICLE
Recirculation Button
Press and release this button to change
the system between recirculation mode
and outside air mode. The Recirculation
indicator and the A/C indicator illuminate
when the Recirculation button is pressed.
Recirculation can be used when outside conditions
such as smoke, odors, dust, or high humidity are
present. Recirculation can be used in all modes
except for Defrost. Recirculation may be
unavailable (button on the touchscreen greyed
out) if conditions exist that could create fogging on
the inside of the windshield. The A/C (Air
Conditioning) can be deselected manually without
disturbing the mode control selection. Continuous
use of the Recirculation mode may make the
inside air stuffy and window fogging may occur.
Extended use of this mode is not recommended.
On systems with Manual Climate Controls, the
Recirculation mode (if equipped) is not allowed in
Defrost mode to improve window clearing
operation. Recirculation is disabled automatically
if this mode is selected. Attempting to use
Recirculation while in this mode causes the LED on
the control button to blink and then turn off.
Front Defrost Button
Press and release the Front Defrost
button to change the current airflow
setting to Defrost mode. The indicator
illuminates when this feature is on.
Air comes from the windshield and side window
demist outlets. When the defrost button is
selected, the blower level may increase. Use
Defrost mode with maximum temperature settings
for best windshield and side window defrosting
and defogging. Performing this function will cause
the Automatic Temperature Control (ATC) to switch
into manual mode. If the Front Defrost mode is
turned off the climate system will return the
previous setting.
Rear Defrost Button
Push and release the Rear Defrost
Control button to turn on the rear window
defroster and the heated outside mirrors
(if equipped). An indicator will illuminate
when the rear window defroster is on. The rear
window defroster automatically turns off after
15 minutes.Front Temperature Control
These buttons provide the driver and passenger
with independent temperature control.
Push the red button on the faceplate or
touchscreen or press and slide the
temperature bar towards the red arrow
button on the touchscreen for warmer
temperature settings.
CAUTION!
Failure to follow these cautions can cause
damage to the heating elements:
Use care when washing the inside of the rear
window. Do not use abrasive window cleaners
on the interior surface of the window. Use a
soft cloth and a mild washing solution, wiping
parallel to the heating elements. Labels can
be peeled off after soaking with warm water.
Do not use scrapers, sharp instruments, or
abrasive window cleaners on the interior
surface of the window.
Keep all objects a safe distance from the
window.
22_RUP_OM_EN_USC_t.book Page 78
Page 85 of 384
GETTING TO KNOW YOUR VEHICLE83
CLIMATE VOICE COMMANDS
Adjust vehicle temperatures hands-free and keep
everyone comfortable while you keep moving
ahead. (If vehicle is equipped with climate control.)
Push the VR button on the steering wheel. After the
beep, say one of the following commands:
“Set driver temperature to 70 degrees ”
“Set passenger temperature to 70 degrees ”
Did you know : Voice Command for Climate may only
be used to adjust the interior temperature of your
vehicle. Voice Command will not work to adjust the
heated seats or steering wheel if equipped.
OPERATING TIPS
Refer to the chart at the end of this section for
suggested control settings for various weather
conditions.
Summer Operation
The engine cooling system must be protected with
a high-quality antifreeze coolant to provide proper
corrosion protection and to protect against engine
overheating. OAT coolant (conforming to
MS.90032) is recommended.
Winter Operation
To ensure the best possible heater and defroster
performance, make sure the engine cooling
system is functioning properly and the proper amount, type, and concentration of coolant is
used. Use of the Air Recirculation mode during
Winter months is not recommended, because it
may cause window fogging.
Vacation/Storage
For information on maintaining the Climate Control
system when the vehicle is being stored for an
extended period of time, see Ú
page 357.
Window Fogging
Vehicle windows tend to fog on the inside in mild,
rainy, and/or humid weather. To clear the
windows, select Defrost or Mix mode and increase
the front blower speed. Do not use the
Recirculation mode without A/C for long periods,
as fogging may occur.
Outside Air Intake
Make sure the air intake, located directly in front of
the windshield, is free of obstructions, such as
leaves. Leaves collected in the air intake may
reduce airflow, and if they enter the air distribution
box, they could plug the water drains. In Winter
months, make sure the air intake is clear of ice,
slush, and snow.
Cabin Air Filter
The Climate Control system filters out dust and
pollen from the air. Contact an authorized dealer to
service your cabin air filter, and to have it replaced
when needed.
Stop/Start System — If Equipped
While in an Autostop, the Climate Control system
may automatically adjust airflow to maintain cabin
comfort. Customer settings will be maintained
upon return to an engine running condition.
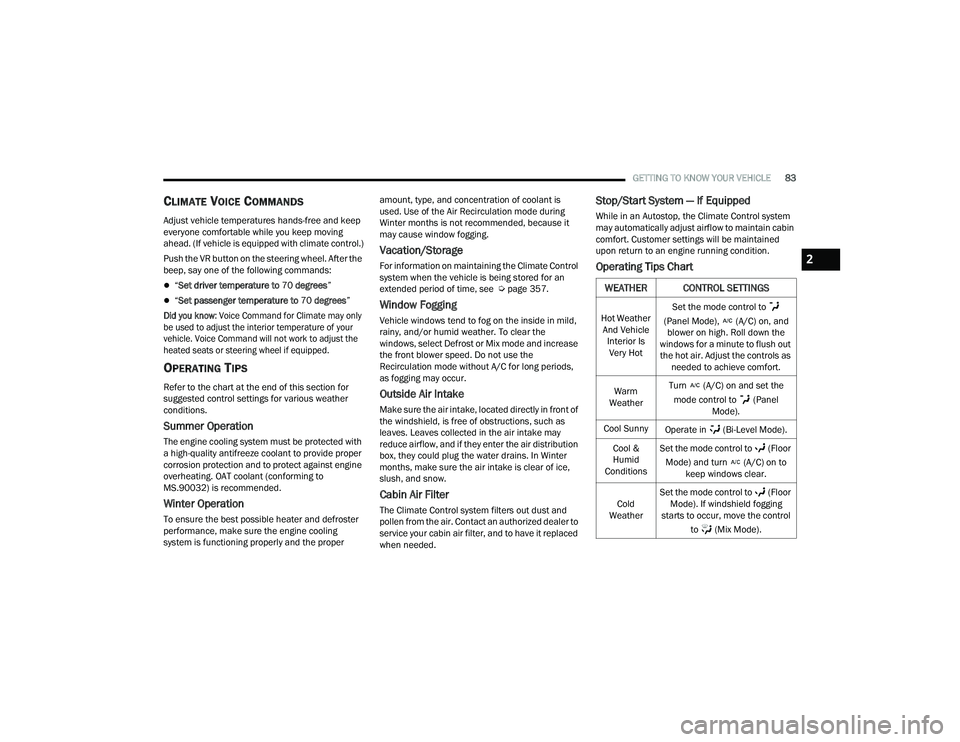
Operating Tips Chart
WEATHER CONTROL SETTINGS
Hot Weather
And Vehicle Interior Is Very Hot Set the mode control to
(Panel Mode), (A/C) on, and blower on high. Roll down the
windows for a minute to flush out the hot air. Adjust the controls as needed to achieve comfort.
Warm
Weather Turn (A/C) on and set the
mode control to (Panel Mode).
Cool Sunny Operate in (Bi-Level Mode).
Cool &
Humid
Conditions Set the mode control to (Floor
Mode) and turn (A/C) on to keep windows clear.
Cold
Weather Set the mode control to (Floor
Mode). If windshield fogging
starts to occur, move the control
to (Mix Mode).
2
22_RUP_OM_EN_USC_t.book Page 83
Page 92 of 384
90GETTING TO KNOW YOUR VEHICLE
(Continued)
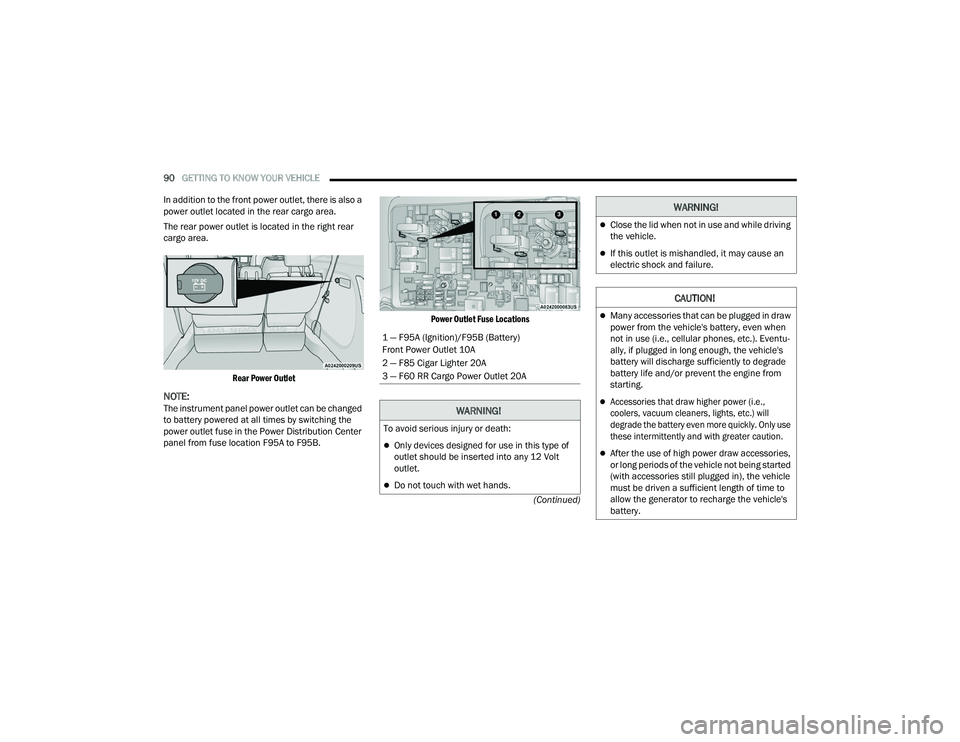
In addition to the front power outlet, there is also a
power outlet located in the rear cargo area.
The rear power outlet is located in the right rear
cargo area.
Rear Power Outlet
NOTE:The instrument panel power outlet can be changed
to battery powered at all times by switching the
power outlet fuse in the Power Distribution Center
panel from fuse location F95A to F95B.
Power Outlet Fuse Locations
1 — F95A (Ignition)/F95B (Battery)
Front Power Outlet 10A
2 — F85 Cigar Lighter 20A
3 — F60 RR Cargo Power Outlet 20A
WARNING!
To avoid serious injury or death:
Only devices designed for use in this type of
outlet should be inserted into any 12 Volt
outlet.
Do not touch with wet hands.
Close the lid when not in use and while driving
the vehicle.
If this outlet is mishandled, it may cause an
electric shock and failure.
CAUTION!
Many accessories that can be plugged in draw
power from the vehicle's battery, even when
not in use (i.e., cellular phones, etc.). Eventu
-
ally, if plugged in long enough, the vehicle's
battery will discharge sufficiently to degrade
battery life and/or prevent the engine from
starting.
Accessories that draw higher power (i.e.,
coolers, vacuum cleaners, lights, etc.) will
degrade the battery even more quickly. Only use
these intermittently and with greater caution.
After the use of high power draw accessories,
or long periods of the vehicle not being started
(with accessories still plugged in), the vehicle
must be driven a sufficient length of time to
allow the generator to recharge the vehicle's
battery.
WARNING!
22_RUP_OM_EN_USC_t.book Page 90
Page 99 of 384

GETTING TO KNOW YOUR VEHICLE97
LIFTGATE
TO UNLOCK/OPEN THE LIFTGATE
The liftgate may be released in several ways:
Key fob
Liftgate Release Handle
Button on overhead console
Push the liftgate button on the key fob twice within
five seconds to release the liftgate.
The key fob and the overhead console button will
release the liftgate when the liftgate is locked. The
outside handle requires the liftgate to be unlocked.
If the vehicle is equipped with Passive Entry,
pulling the electronic liftgate release handle will
unlock and release the liftgate, with a valid Passive
Entry key fob within 5 ft (1.5 m) of the liftgate.
Electronic Liftgate
NOTE:When you push the Passive Entry button, either
only the liftgate will unlock, or all the doors and the
liftgate will unlock, depending on the selected
setting in the Uconnect system Ú
page 188.
TO LOCK/CLOSE THE LIFTGATE
To manually close the liftgate, grab the liftgate
closing handle and pull in a downward motion.
With a valid Passive Entry key fob within 5 ft
(1.5 m) of the liftgate, push the Passive Entry lock
button located to the right of the outside handle to
lock the vehicle.
POWER LIFTGATE — IF EQUIPPED
The power liftgate may be opened or closed in
several ways:
Overhead console liftgate button
Key fob
Outside handle (opens liftgate only)
Rear Interior Power Liftgate button
(when liftgate is open)
Hands-Free Liftgate (if equipped) —
opens liftgate only
CAUTION!
To prevent possible damage, do not slam the
hood to close it. Lower hood to approximately
12 inches (30 cm) and drop the hood to close.
Make sure hood is fully closed for both latches.
Never drive vehicle unless hood is fully closed,
with both latches engaged.
1 — Electronic Liftgate Release Handle
2 — Passive Entry Lock Button
WARNING!
Driving with the liftgate open can allow
poisonous exhaust gases into your vehicle.
You and your passengers could be injured by
these fumes. Keep the liftgate closed when
you are operating the vehicle.
If you are required to drive with the liftgate
open, make sure that all windows are closed,
and the climate control blower switch is set at
high speed. Do not use the recirculation
mode.
2
22_RUP_OM_EN_USC_t.book Page 97
Page 102 of 384
100GETTING TO KNOW YOUR VEHICLE
If the power liftgate encounters multiple
obstructions within the same cycle, the system
will automatically stop. If this occurs, the liftgate
must be operated manually.
The power liftgate will release, but not power
open, in temperatures below −12°F (−24°C).
Be sure to remove any buildup of snow or ice
from the liftgate before opening the liftgate.
If the liftgate is left open for an extended period
of time, the liftgate may need to be closed
manually to reset power liftgate functionality.
The Hands-Free Liftgate only works to open the
liftgate. Gas props support the liftgate in the open position.
However, because the gas pressure drops with
temperature, it may be necessary to assist the
props when opening the liftgate in cold weather.
NOTE:Allow the power system to open the liftgate.
Manually pushing or pulling the liftgate may
activate the liftgate obstacle detection feature and
stop the power operation or reverse its direction.
CARGO AREA FEATURES
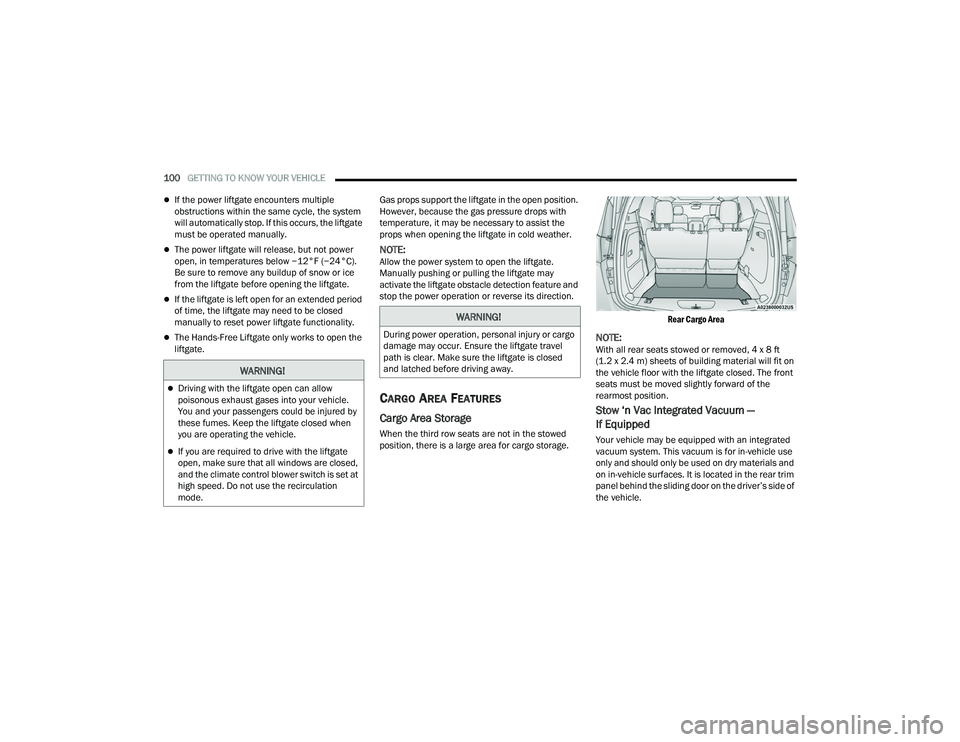
Cargo Area Storage
When the third row seats are not in the stowed
position, there is a large area for cargo storage.
Rear Cargo Area
NOTE:With all rear seats stowed or removed, 4 x 8 ft
(1.2 x 2.4 m) sheets of building material will fit on
the vehicle floor with the liftgate closed. The front
seats must be moved slightly forward of the
rearmost position.
Stow ‘n Vac Integrated Vacuum —
If Equipped
Your vehicle may be equipped with an integrated
vacuum system. This vacuum is for in-vehicle use
only and should only be used on dry materials and
on in-vehicle surfaces. It is located in the rear trim
panel behind the sliding door on the driver’s side of
the vehicle.
WARNING!
Driving with the liftgate open can allow
poisonous exhaust gases into your vehicle.
You and your passengers could be injured by
these fumes. Keep the liftgate closed when
you are operating the vehicle.
If you are required to drive with the liftgate
open, make sure that all windows are closed,
and the climate control blower switch is set at
high speed. Do not use the recirculation
mode.
WARNING!
During power operation, personal injury or cargo
damage may occur. Ensure the liftgate travel
path is clear. Make sure the liftgate is closed
and latched before driving away.
22_RUP_OM_EN_USC_t.book Page 100
Page 111 of 384
GETTING TO KNOW YOUR VEHICLE109
(Continued)
NOTE:
To help control wind noise, stow the crossbars in
the side rails when they are not in use.
If any metallic object is placed over the satellite
radio antenna (if equipped), you may experience
interruption of satellite radio reception.
WARNING!
Cargo must be securely tied down before driving
your vehicle. Improperly secured loads can fly off
the vehicle, particularly at high speeds, resulting
in personal injury or property damage. Follow
the roof rack cautions when carrying cargo on
your roof rack.
CAUTION!
To prevent damage to the roof of your vehicle,
DO NOT carry any loads on the roof rack
without the crossbars deployed. The load
should be secured and placed on top of the
crossbars, not directly on the roof. If it is
necessary to place the load on the roof, place
a blanket or other protective layer between
the load and the roof surface.
To avoid damage to the roof rack and vehicle,
do not exceed the maximum roof rack load
capacity of 150 lb (68 kg). Always distribute
heavy loads as evenly as possible and secure
the load appropriately.
Load should always be secured to cross bars
first, with tie down loops used as additional
securing points if needed. Tie loops are
intended as supplementary tie down points
only. Do not use ratcheting mechanisms with
the tie loops. Check the straps and thumb
wheels frequently to be sure that the load
remains securely attached.
Long loads that extend over the windshield,
such as wood panels or surfboards, or loads
with large frontal area should be secured to
both the front and rear of the vehicle.
Travel at reduced speeds and turn corners
carefully when carrying large or heavy loads
on the roof rack. Wind forces, due to natural
causes or nearby truck traffic, can add sudden
upward lift to a load. This is especially true on
large flat loads and may result in damage to
the cargo or your vehicle.
CAUTION!
2
22_RUP_OM_EN_USC_t.book Page 109