high CHRYSLER PACIFICA 2022 Workshop Manual
[x] Cancel search | Manufacturer: CHRYSLER, Model Year: 2022, Model line: PACIFICA, Model: CHRYSLER PACIFICA 2022Pages: 384, PDF Size: 23.92 MB
Page 225 of 384
223
(Continued)
SAFETY
SAFETY FEATURES
ANTI-LOCK BRAKE SYSTEM (ABS)
If applicable, refer to the “Hybrid Supplement” for
additional information.
The ABS provides increased vehicle stability and
brake performance under most braking conditions.
The system automatically prevents wheel lock and
enhances vehicle control during braking.
The ABS performs a self-check cycle to ensure that
the ABS is working properly each time the vehicle
is started and driven. During this self-check, you
may hear a slight clicking sound as well as some
related motor noises.
The ABS is activated during braking when the
system detects one or more wheels are beginning
to lock. Road conditions such as ice, snow, gravel,
bumps, railroad tracks, loose debris, or panic stops
may increase the likelihood of ABS activation(s).You also may experience the following normal
characteristics when the ABS activates:
ABS motor noise or clicking sounds (you may
continue to hear for a short time after the stop)
Brake pedal pulsations
A slight drop of the brake pedal at the end of the
stop
The ABS is designed to function with the Original
Equipment Manufacturer (OEM) tires. Modification
may result in degraded ABS performance.
WARNING!
The ABS contains sophisticated electronic
equipment that may be susceptible to interfer -
ence caused by improperly installed or high
output radio transmitting equipment. This
interference can cause possible loss of
anti-lock braking capability. Installation of
such equipment should be performed by qual -
ified professionals.
Pumping of the Anti-Lock Brakes will diminish
their effectiveness and may lead to a collision.
Pumping makes the stopping distance longer.
Just press firmly on your brake pedal when you
need to slow down or stop.
The ABS cannot prevent the natural laws of
physics from acting on the vehicle, nor can it
increase braking or steering efficiency beyond
that afforded by the condition of the vehicle
brakes and tires or the traction afforded.
The ABS cannot prevent collisions, including
those resulting from excessive speed in turns,
following another vehicle too closely, or hydro -
planing.
The capabilities of an ABS equipped vehicle
must never be exploited in a reckless or
dangerous manner that could jeopardize the
user’s safety or the safety of others.
WARNING!
6
22_RUP_OM_EN_USC_t.book Page 223
Page 227 of 384
SAFETY225
Dynamic Steering Torque (DST)
DST is a feature of the ESC and Electric Power
Steering (EPS) modules that provides torque at the
steering wheel for certain driving conditions in
which the ESC module is detecting vehicle
instability. The torque that the steering wheel
receives is only meant to help the driver
realize optimal steering behavior in order to
reach/maintain vehicle stability. The only
notification the driver receives that the feature is
active, is the torque applied to the steering wheel.
NOTE:The DST feature is only meant to help the driver
realize the correct course of action through small
torques on the steering wheel, which means the
effectiveness of the DST feature is highly
dependent on the driver’s sensitivity and overall
reaction to the applied torque. It is very important
to realize that this feature will not steer the vehicle,
meaning the driver is still responsible for steering
the vehicle.
Electronic Brake Force Distribution (EBD)
The EBD function manages the distribution of the
braking torque between the front and rear axles by
limiting braking pressure to the rear axle. This is
done to prevent overslip of the rear wheels to avoid
vehicle instability, and to prevent the rear axle from
entering the Anti-Lock Brake System (ABS) before
the front axle.
Electronic Roll Mitigation (ERM)
ERM anticipates the potential for wheel lift by
monitoring the driver’s steering wheel input and
the speed of the vehicle. When ERM determines
that the rate of change of the steering wheel angle
and vehicle’s speed are sufficient to potentially
cause wheel lift, it then applies the appropriate
brake and may also reduce engine power to lessen
the chance that wheel lift will occur. ERM can only
reduce the chance of wheel lift occurring during
severe or evasive driving maneuvers; it cannot
prevent wheel lift due to other factors, such as
road conditions, leaving the roadway, striking
objects or other vehicles.
Electronic Stability Control (ESC)
ESC enhances directional control and stability of
the vehicle under various driving conditions. ESC
corrects for oversteering or understeering of the
vehicle by applying the brake of the appropriate
wheel(s) to assist in counteracting the above
conditions. Engine power may also be reduced to
help the vehicle maintain the desired path.
Oversteer — when the vehicle is turning more
than appropriate for the steering wheel position.
Understeer — when the vehicle is turning less
than appropriate for the steering wheel position.
ESC uses sensors in the vehicle to determine the
vehicle path intended by the driver and compares
it to the actual path of the vehicle. When the actual
path does not match the intended path, ESC
applies the brake of the appropriate wheel to
assist in counteracting the oversteer or understeer
condition.
WARNING!
Many factors, such as vehicle loading, road
conditions and driving conditions, influence the
chance that wheel lift or rollover may occur. ERM
cannot prevent all wheel lift or rollovers,
especially those that involve leaving the roadway
or striking objects or other vehicles. The
capabilities of an ERM-equipped vehicle must
never be exploited in a reckless or dangerous
manner which could jeopardize the user's safety
or the safety of others.
6
22_RUP_OM_EN_USC_t.book Page 225
Page 231 of 384

SAFETY229
If one wheel on a driven axle is spinning faster than
the other, the system will apply the brake of the
spinning wheel. This will allow more vehicle torque
to be applied to the wheel that is not spinning. BLD
may remain enabled even if TCS and the Electronic
Stability Control (ESC) are in reduced modes.
Trailer Sway Control (TSC)
TSC uses sensors in the vehicle to recognize an
excessively swaying trailer and will take the
appropriate actions to attempt to stop the sway.
Note that TSC cannot stop all trailers from swaying.
Always use caution when towing a trailer and follow
the trailer tongue weight recommendations
Ú page 174.
When TSC is functioning, the ESC Activation/
Malfunction Indicator Light will flash, the engine
power may be reduced and you may feel the
brakes being applied to individual wheels to
attempt to stop the trailer from swaying. TSC is
disabled when the ESC system is in the “Partial
Off” mode.
AUXILIARY DRIVING SYSTEMS
BLIND SPOT MONITORING (BS M) —
I
F EQUIPPED
The BSM system uses two radar sensors, located
inside the rear fascia/bumper, to detect highway
licensable vehicles (automobiles, trucks,
motorcycles, etc.) that enter the blind spot zones
from the rear/front/side of the vehicle.
Rear Detection Zones
When the vehicle is started, the BSM Warning Light
will momentarily illuminate in both outside
rearview mirrors to let the driver know that the
system is operational. The BSM system sensors
operate when the vehicle is in any forward gear
and enters standby mode when the vehicle is in
PARK (P). The BSM detection zone covers approximately one
lane width on both sides of the vehicle 12 ft
(3.7 m). The zone length starts at the outside
rearview mirror and extends approximately 10 ft
(3 m) beyond the rear fascia/bumper of the
vehicle. The BSM system monitors the detection
zones on both sides of the vehicle when the vehicle
speed reaches approximately 6 mph (10 km/h) or
higher and will alert the driver of vehicles in these
areas.
NOTE:
The BSM system DOES NOT alert the driver
about rapidly approaching vehicles that are
outside the detection zones.
The BSM system detection zone DOES NOT
change if your vehicle is towing a trailer. There
-
fore, visually verify the adjacent lane is clear for
both your vehicle and trailer before making a
lane change. If the trailer or other object
(i.e., bicycle, sports equipment) extends beyond
the side of your vehicle, this may result in false
detections. The BSM Warning Light may even
remain illuminated the entire time the vehicle is
in a forward gear.
WARNING!
If TSC activates while driving, slow the vehicle
down, stop at the nearest safe location, and
adjust the trailer load to eliminate trailer sway.
6
22_RUP_OM_EN_USC_t.book Page 229
Page 236 of 384
234SAFETY
It is unsafe to test the FCW system. To prevent
such misuse of the system, after four Active
Braking events within a key cycle, the Active
Braking portion of FCW will be deactivated until
the next key cycle.
The FCW system is intended for on-road use
only. If the vehicle is taken off-road, the FCW
system should be deactivated to prevent unnec -
essary warnings to the surroundings.
Turning FCW On Or Off
The Forward Collision menu setting is located in
the Uconnect settings.
NOTE:The default status of FCW is “on”, this allows the
system to warn you of a possible collision with the
vehicle in front of you.
Changing the FCW status to “off” deactivates the
system, so no warning or active braking will be
available in case of a possible collision.
NOTE:
The FCW system state is kept in memory from
one key cycle to the next. If the system is turned
off, it will remain off when the vehicle is
restarted.
FCW can work in conjunction with the KeySense
function of the vehicle (if equipped)
Ú page 115.
FCW Braking Status And Sensitivity
The FCW Sensitivity and Active Braking status are
programmable through the Uconnect system
Úpage 188.
The default sensitivity of FCW is the “Medium”
setting and the system status is “Warning &
Braking”. This allows the system to warn the driver
of a possible collision with the vehicle in front using
audible/visual warnings and it applies
autonomous braking.
By changing the FCW status setting to "Far", the
system provides possible collision warnings on
objects farther away. This results in earlier
warnings and provides the most reaction time to
avoid possible collisions.
NOTE:The “Far” setting may result in a greater number of
FCW possible collision warnings experienced.
By changing the FCW status setting to “Near”, the
system provides possible collision warnings on
objects closer to the vehicle. This results in later warnings and provides less
reaction time than the "Far" and "Medium"
settings, which allows for a more dynamic driving
experience.
NOTE:The “Near” setting may result in a lesser number of
FCW possible collision warnings experienced.
NOTE:
Changing the FCW status to “Only Warning”
prevents the system from providing limited
active braking, or additional brake support if the
driver is not braking adequately in the event of
a potential frontal collision, but maintains the
audible and visual warnings.
Changing the FCW status to “Off” prevents the
system from providing autonomous braking, or
additional brake support if the driver is not
braking adequately in the event of a potential
frontal collision.
The system will retain the last setting selected
by the driver after ignition shut down.
FCW may not react to irrelevant objects such as
overhead objects, ground reflections, objects
not in the path of the vehicle, stationary objects
that are far away, oncoming traffic, or leading
vehicles with the same or higher rates of speed.
FCW will be disabled like ACC, with the
unavailable screens.
WARNING!
Forward Collision Warning (FCW) is not intended
to avoid a collision on its own, nor can FCW
detect every type of potential collision. The driver
has the responsibility to avoid a collision by
controlling the vehicle via braking and steering.
Failure to follow this warning could lead to
serious injury or death.
22_RUP_OM_EN_USC_t.book Page 234
Page 244 of 384
242SAFETY
(Continued)
Be sure everyone in your vehicle is in a seat
and using a seat belt properly. Occupants,
including the driver, should always wear their
seat belts whether or not an air bag is also
provided at their seating position to minimize
the risk of severe injury or death in the event
of a crash.
Wearing your seat belt incorrectly could make
your injuries in a collision much worse. You
might suffer internal injuries, or you could
even slide out of the seat belt. Follow these
instructions to wear your seat belt safely and
to keep your passengers safe, too.
Two people should never be belted into a
single seat belt. People belted together can
crash into one another in a collision, hurting
one another badly. Never use a lap/shoulder
belt or a lap belt for more than one person, no
matter what their size.
WARNING!WARNING!
A lap belt worn too high can increase the risk
of injury in a collision. The seat belt forces
won’t be at the strong hip and pelvic bones,
but across your abdomen. Always wear the lap
part of your seat belt as low as possible and
keep it snug.
A twisted seat belt may not protect you prop-
erly. In a collision, it could even cut into you.
Be sure the seat belt is flat against your body,
without twists. If you can’t straighten a seat
belt in your vehicle, take it to an authorized
dealer immediately and have it fixed.
A seat belt that is buckled into the wrong
buckle will not protect you properly. The lap
portion could ride too high on your body,
possibly causing internal injuries. Always
buckle your seat belt into the buckle nearest
you.
A seat belt that is too loose will not protect you
properly. In a sudden stop, you could move too
far forward, increasing the possibility of injury.
Wear your seat belt snugly.
A seat belt that is worn under your arm is
dangerous. Your body could strike the inside
surfaces of the vehicle in a collision,
increasing head and neck injury. A seat belt
worn under the arm can cause internal inju -
ries. Ribs aren’t as strong as shoulder bones.
Wear the seat belt over your shoulder so that
your strongest bones will take the force in a
collision.
A shoulder belt placed behind you will not
protect you from injury during a collision. You
are more likely to hit your head in a collision if
you do not wear your shoulder belt. The lap
and shoulder belt are meant to be used
together.
A frayed or torn seat belt could rip apart in a
collision and leave you with no protection.
Inspect the seat belt system periodically,
checking for cuts, frays, or loose parts.
Damaged parts must be replaced immedi -
ately. Do not disassemble or modify the seat
belt system. If your vehicle is involved in a
collision, or if you have questions regarding
seat belt or retractor conditions, take your
vehicle to an authorized FCA dealer or autho -
rized FCA Certified Collision Care Program
facility for inspection.
WARNING!
22_RUP_OM_EN_USC_t.book Page 242
Page 246 of 384
244SAFETY
Adjustable Upper Shoulder Belt Anchorage
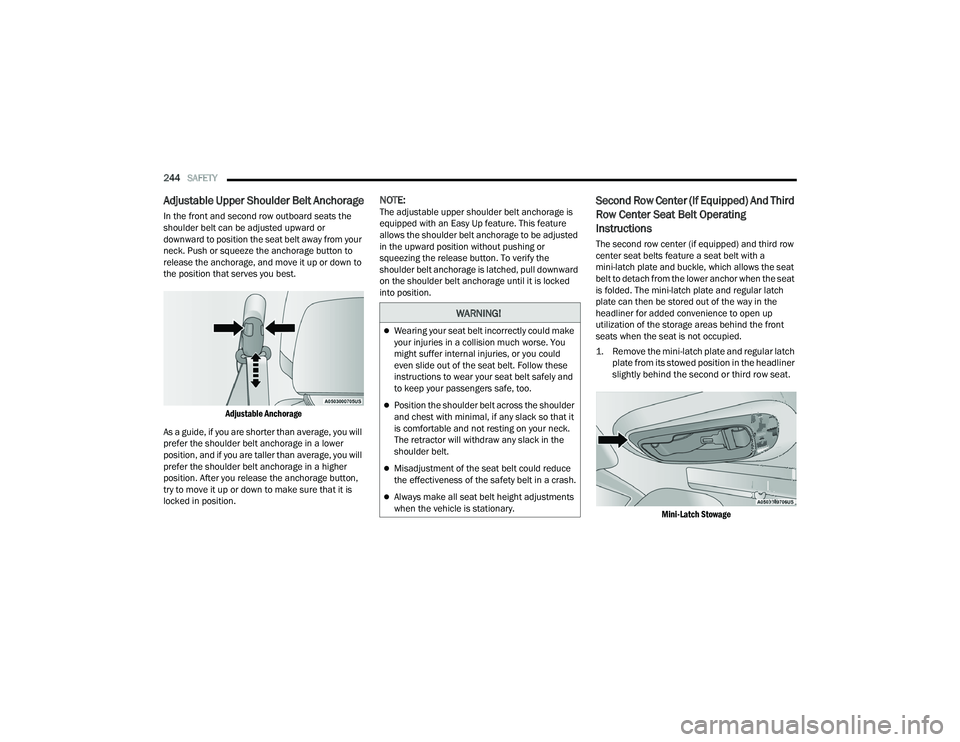
In the front and second row outboard seats the
shoulder belt can be adjusted upward or
downward to position the seat belt away from your
neck. Push or squeeze the anchorage button to
release the anchorage, and move it up or down to
the position that serves you best.
Adjustable Anchorage
As a guide, if you are shorter than average, you will
prefer the shoulder belt anchorage in a lower
position, and if you are taller than average, you will
prefer the shoulder belt anchorage in a higher
position. After you release the anchorage button,
try to move it up or down to make sure that it is
locked in position.
NOTE:The adjustable upper shoulder belt anchorage is
equipped with an Easy Up feature. This feature
allows the shoulder belt anchorage to be adjusted
in the upward position without pushing or
squeezing the release button. To verify the
shoulder belt anchorage is latched, pull downward
on the shoulder belt anchorage until it is locked
into position.Second Row Center (If Equipped) And Third
Row Center Seat Belt Operating
Instructions
The second row center (if equipped) and third row
center seat belts feature a seat belt with a
mini-latch plate and buckle, which allows the seat
belt to detach from the lower anchor when the seat
is folded. The mini-latch plate and regular latch
plate can then be stored out of the way in the
headliner for added convenience to open up
utilization of the storage areas behind the front
seats when the seat is not occupied.
1. Remove the mini-latch plate and regular latch plate from its stowed position in the headliner
slightly behind the second or third row seat.
Mini-Latch Stowage
WARNING!
Wearing your seat belt incorrectly could make
your injuries in a collision much worse. You
might suffer internal injuries, or you could
even slide out of the seat belt. Follow these
instructions to wear your seat belt safely and
to keep your passengers safe, too.
Position the shoulder belt across the shoulder
and chest with minimal, if any slack so that it
is comfortable and not resting on your neck.
The retractor will withdraw any slack in the
shoulder belt.
Misadjustment of the seat belt could reduce
the effectiveness of the safety belt in a crash.
Always make all seat belt height adjustments
when the vehicle is stationary.
22_RUP_OM_EN_USC_t.book Page 244
Page 253 of 384
SAFETY251
(Continued)
Redundant Air Bag Warning Light
If a fault with the Air Bag Warning Light is
detected, which could affect the
Supplemental Restraint System (SRS),
the Redundant Air Bag Warning Light will
illuminate on the instrument panel. The
Redundant Air Bag Warning Light will stay on until
the fault is cleared. In addition, a single chime will
sound to alert you that the Redundant Air Bag
Warning Light has come on and a fault has been
detected. If the Redundant Air Bag Warning Light
comes on intermittently or remains on while driving
have an authorized dealer service the vehicle
immediately Ú page 121.
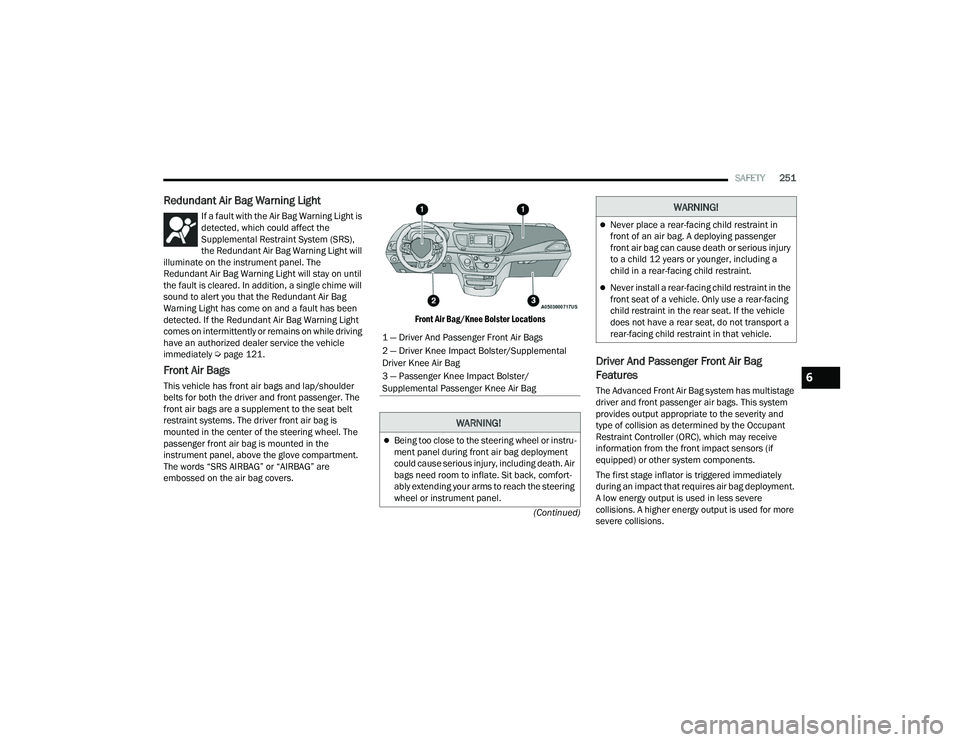
Front Air Bags
This vehicle has front air bags and lap/shoulder
belts for both the driver and front passenger. The
front air bags are a supplement to the seat belt
restraint systems. The driver front air bag is
mounted in the center of the steering wheel. The
passenger front air bag is mounted in the
instrument panel, above the glove compartment.
The words “SRS AIRBAG” or “AIRBAG” are
embossed on the air bag covers.
Front Air Bag/Knee Bolster Locations
Driver And Passenger Front Air Bag
Features
The Advanced Front Air Bag system has multistage
driver and front passenger air bags. This system
provides output appropriate to the severity and
type of collision as determined by the Occupant
Restraint Controller (ORC), which may receive
information from the front impact sensors (if
equipped) or other system components.
The first stage inflator is triggered immediately
during an impact that requires air bag deployment.
A low energy output is used in less severe
collisions. A higher energy output is used for more
severe collisions.
1 — Driver And Passenger Front Air Bags
2 — Driver Knee Impact Bolster/Supplemental
Driver Knee Air Bag
3 — Passenger Knee Impact Bolster/
Supplemental Passenger Knee Air Bag
WARNING!
Being too close to the steering wheel or instru
-
ment panel during front air bag deployment
could cause serious injury, including death. Air
bags need room to inflate. Sit back, comfort -
ably extending your arms to reach the steering
wheel or instrument panel.
Never place a rear-facing child restraint in
front of an air bag. A deploying passenger
front air bag can cause death or serious injury
to a child 12 years or younger, including a
child in a rear-facing child restraint.
Never install a rear-facing child restraint in the
front seat of a vehicle. Only use a rear-facing
child restraint in the rear seat. If the vehicle
does not have a rear seat, do not transport a
rear-facing child restraint in that vehicle.
WARNING!
6
22_RUP_OM_EN_USC_t.book Page 251
Page 259 of 384
SAFETY257
Supplemental Driver And Front Passenger
Knee Air Bags
This vehicle is equipped with a Supplemental
Driver Knee Air Bag mounted in the instrument
panel below the steering column and a
Supplemental Passenger Knee Air Bag mounted in
the instrument panel below the glove
compartment. The Supplemental Knee Air Bags
provide enhanced protection during a frontal
impact by working together with the seat belts,
pretensioners, and front air bags.
Supplemental Side Air Bags
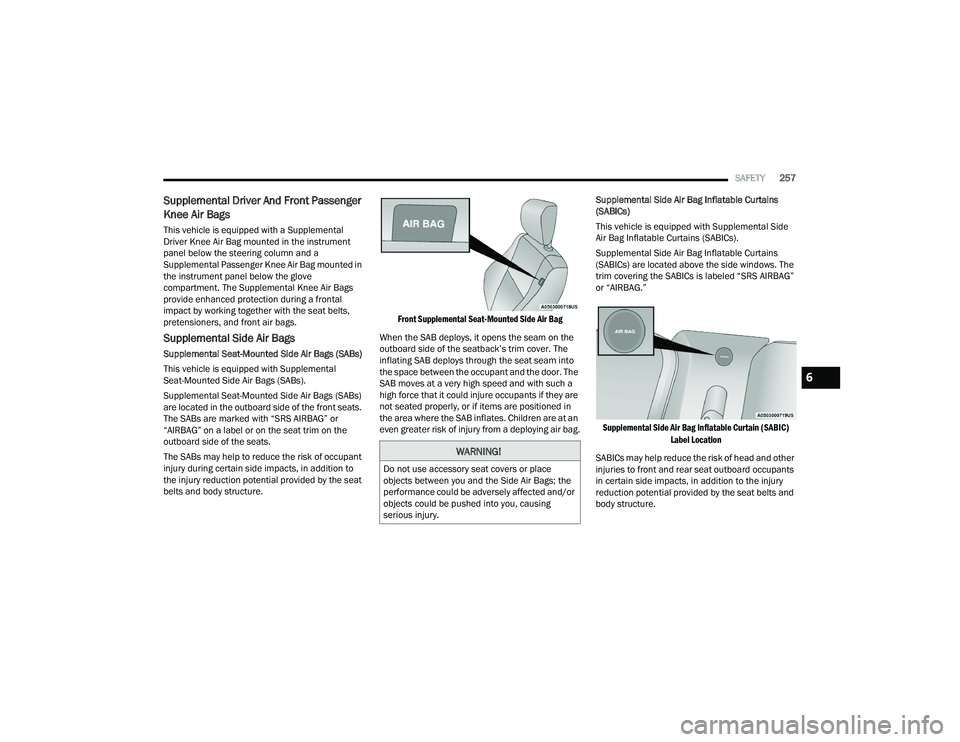
Supplemental Seat-Mounted Side Air Bags (SABs)
This vehicle is equipped with Supplemental
Seat-Mounted Side Air Bags (SABs).
Supplemental Seat-Mounted Side Air Bags (SABs)
are located in the outboard side of the front seats.
The SABs are marked with “SRS AIRBAG” or
“AIRBAG” on a label or on the seat trim on the
outboard side of the seats.
The SABs may help to reduce the risk of occupant
injury during certain side impacts, in addition to
the injury reduction potential provided by the seat
belts and body structure.
Front Supplemental Seat-Mounted Side Air Bag
When the SAB deploys, it opens the seam on the
outboard side of the seatback’s trim cover. The
inflating SAB deploys through the seat seam into
the space between the occupant and the door. The
SAB moves at a very high speed and with such a
high force that it could injure occupants if they are
not seated properly, or if items are positioned in
the area where the SAB inflates. Children are at an
even greater risk of injury from a deploying air bag. Supplemental Side Air Bag Inflatable Curtains
(SABICs)
This vehicle is equipped with Supplemental Side
Air Bag Inflatable Curtains (SABICs).
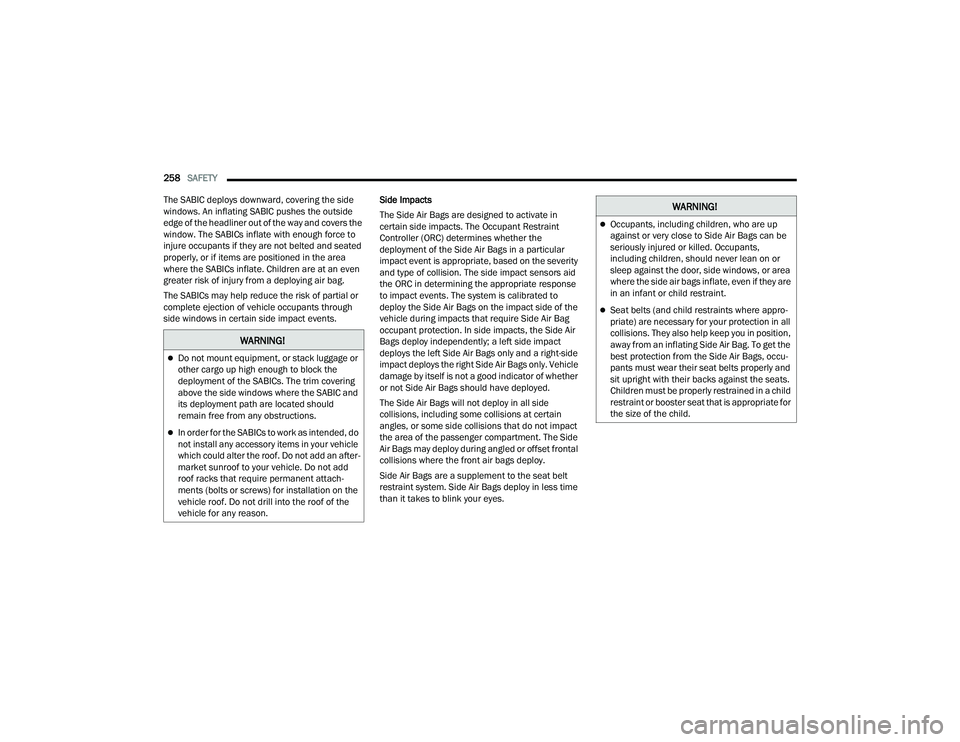
Supplemental Side Air Bag Inflatable Curtains
(SABICs) are located above the side windows. The
trim covering the SABICs is labeled “SRS AIRBAG”
or “AIRBAG.”
Supplemental Side Air Bag Inflatable Curtain (SABIC) Label Location
SABICs may help reduce the risk of head and other
injuries to front and rear seat outboard occupants
in certain side impacts, in addition to the injury
reduction potential provided by the seat belts and
body structure.
WARNING!
Do not use accessory seat covers or place
objects between you and the Side Air Bags; the
performance could be adversely affected and/or
objects could be pushed into you, causing
serious injury.
6
22_RUP_OM_EN_USC_t.book Page 257
Page 260 of 384
258SAFETY
The SABIC deploys downward, covering the side
windows. An inflating SABIC pushes the outside
edge of the headliner out of the way and covers the
window. The SABICs inflate with enough force to
injure occupants if they are not belted and seated
properly, or if items are positioned in the area
where the SABICs inflate. Children are at an even
greater risk of injury from a deploying air bag.
The SABICs may help reduce the risk of partial or
complete ejection of vehicle occupants through
side windows in certain side impact events. Side Impacts
The Side Air Bags are designed to activate in
certain side impacts. The Occupant Restraint
Controller (ORC) determines whether the
deployment of the Side Air Bags in a particular
impact event is appropriate, based on the severity
and type of collision. The side impact sensors aid
the ORC in determining the appropriate response
to impact events. The system is calibrated to
deploy the Side Air Bags on the impact side of the
vehicle during impacts that require Side Air Bag
occupant protection. In side impacts, the Side Air
Bags deploy independently; a left side impact
deploys the left Side Air Bags only and a right-side
impact deploys the right Side Air Bags only. Vehicle
damage by itself is not a good indicator of whether
or not Side Air Bags should have deployed.
The Side Air Bags will not deploy in all side
collisions, including some collisions at certain
angles, or some side collisions that do not impact
the area of the passenger compartment. The Side
Air Bags may deploy during angled or offset frontal
collisions where the front air bags deploy.
Side Air Bags are a supplement to the seat belt
restraint system. Side Air Bags deploy in less time
than it takes to blink your eyes.
WARNING!
Do not mount equipment, or stack luggage or
other cargo up high enough to block the
deployment of the SABICs. The trim covering
above the side windows where the SABIC and
its deployment path are located should
remain free from any obstructions.
In order for the SABICs to work as intended, do
not install any accessory items in your vehicle
which could alter the roof. Do not add an after
-
market sunroof to your vehicle. Do not add
roof racks that require permanent attach -
ments (bolts or screws) for installation on the
vehicle roof. Do not drill into the roof of the
vehicle for any reason.
WARNING!
Occupants, including children, who are up
against or very close to Side Air Bags can be
seriously injured or killed. Occupants,
including children, should never lean on or
sleep against the door, side windows, or area
where the side air bags inflate, even if they are
in an infant or child restraint.
Seat belts (and child restraints where appro -
priate) are necessary for your protection in all
collisions. They also help keep you in position,
away from an inflating Side Air Bag. To get the
best protection from the Side Air Bags, occu -
pants must wear their seat belts properly and
sit upright with their backs against the seats.
Children must be properly restrained in a child
restraint or booster seat that is appropriate for
the size of the child.
22_RUP_OM_EN_USC_t.book Page 258
Page 265 of 384
SAFETY263
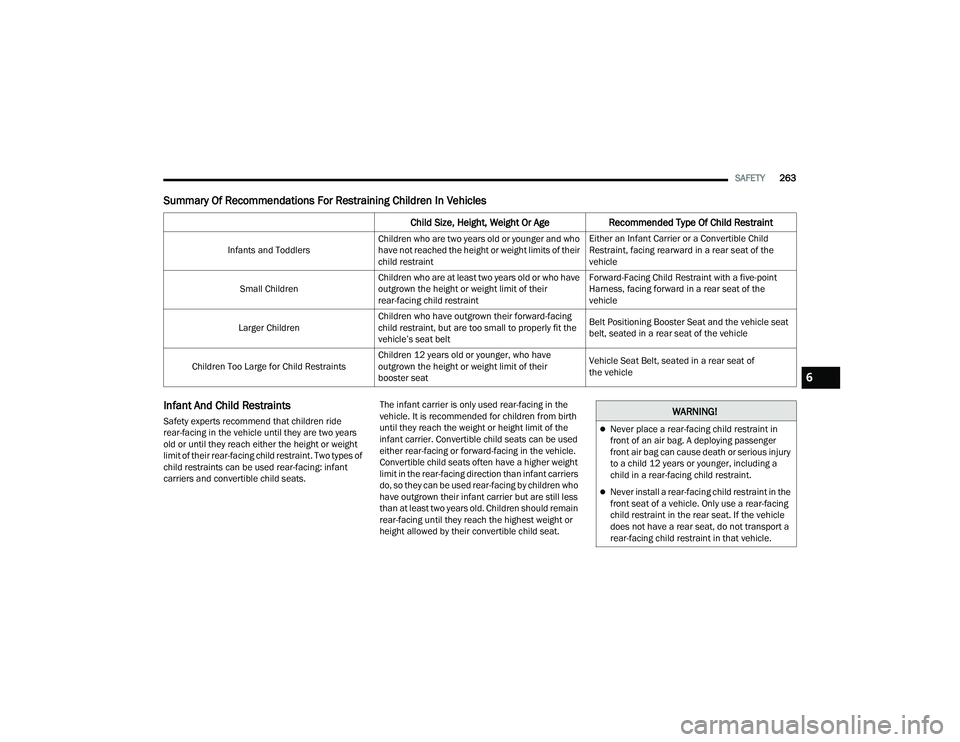
Summary Of Recommendations For Restraining Children In Vehicles
Infant And Child Restraints
Safety experts recommend that children ride
rear-facing in the vehicle until they are two years
old or until they reach either the height or weight
limit of their rear-facing child restraint. Two types of
child restraints can be used rear-facing: infant
carriers and convertible child seats. The infant carrier is only used rear-facing in the
vehicle. It is recommended for children from birth
until they reach the weight or height limit of the
infant carrier. Convertible child seats can be used
either rear-facing or forward-facing in the vehicle.
Convertible child seats often have a higher weight
limit in the rear-facing direction than infant carriers
do, so they can be used rear-facing by children who
have outgrown their infant carrier but are still less
than at least two years old. Children should remain
rear-facing until they reach the highest weight or
height allowed by their convertible child seat.
Child Size, Height, Weight Or Age
Recommended Type Of Child Restraint
Infants and ToddlersChildren who are two years old or younger and who
have not reached the height or weight limits of their
child restraint Either an Infant Carrier or a Convertible Child
Restraint, facing rearward in a rear seat of the
vehicle
Small Children Children who are at least two years old or who have
outgrown the height or weight limit of their
rear-facing child restraint Forward-Facing Child Restraint with a five-point
Harness, facing forward in a rear seat of the
vehicle
Larger Children Children who have outgrown their forward-facing
child restraint, but are too small to properly fit the
vehicle’s seat belt Belt Positioning Booster Seat and the vehicle seat
belt, seated in a rear seat of the vehicle
Children Too Large for Child Restraints Children 12 years old or younger, who have
outgrown the height or weight limit of their
booster seat Vehicle Seat Belt, seated in a rear seat of
the vehicle
WARNING!
Never place a rear-facing child restraint in
front of an air bag. A deploying passenger
front air bag can cause death or serious injury
to a child 12 years or younger, including a
child in a rear-facing child restraint.
Never install a rear-facing child restraint in the
front seat of a vehicle. Only use a rear-facing
child restraint in the rear seat. If the vehicle
does not have a rear seat, do not transport a
rear-facing child restraint in that vehicle.
6
22_RUP_OM_EN_USC_t.book Page 263