high CHRYSLER PACIFICA 2022 Service Manual
[x] Cancel search | Manufacturer: CHRYSLER, Model Year: 2022, Model line: PACIFICA, Model: CHRYSLER PACIFICA 2022Pages: 384, PDF Size: 23.92 MB
Page 175 of 384
STARTING AND OPERATING173
6. Remove the fuel filler nozzle.
7. To close the fuel filler door, push the center-rear edge (3 o’clock position) of the fuel
filler door and then release. The fuel filler door
will latch closed.
NOTE:In certain cold conditions, ice may prevent the fuel
filler door from opening. If this occurs, lightly push
on the fuel filler door around the perimeter to
break the ice buildup.
VEHICLE LOADING
CERTIFICATION LABEL
As required by National Highway Traffic Safety
Administration regulations, your vehicle has a
certification label affixed to the driver's side door or
pillar.
This label contains the month and year of
manufacture, Gross Vehicle Weight Rating
(GVWR), front and rear Gross Axle Weight Rating
(GAWR), and Vehicle Identification Number (VIN). A
Month-Day-Hour (MDH) number is included on this
label and indicates the Month, Day and Hour of
manufacture. The bar code that appears on the
bottom of the label is your VIN.
Gross Vehicle Weight Rating (GVWR)
The GVWR is the total permissible weight of your
vehicle including driver, passengers, vehicle,
options and cargo. The label also specifies
maximum capacities of front and rear GAWR.
Total load must be limited so GVWR and front and
rear GAWR are not exceeded.
Payload
The payload of a vehicle is defined as the allowable
load weight a truck can carry, including the weight
of the driver, all passengers, options and cargo.
Gross Axle Weight Rating (GAWR)
The GAWR is the maximum permissible load on the
front and rear axles. The load must be distributed
in the cargo area so that the GAWR of each axle is
not exceeded.
Each axle GAWR is determined by the components
in the system with the lowest load carrying capacity
(axle, springs, tires or wheels). Heavier axles or
suspension components sometimes specified by
purchasers for increased durability does not
necessarily increase the vehicle's GVWR.
Tire Size
The tire size on the Vehicle Certification Label
represents the actual tire size on your vehicle.
Replacement tires must be equal to the load
capacity of this tire size.
Rim Size
This is the rim size that is appropriate for the tire
size listed.
Inflation Pressure
This is the cold tire inflation pressure for your
vehicle for all loading conditions up to full GAWR.
Curb Weight
The curb weight of a vehicle is defined as the total
weight of the vehicle with all fluids, including
vehicle fuel, at full capacity conditions, and with no
occupants or cargo loaded into the vehicle. The
front and rear curb weight values are determined
by weighing your vehicle on a commercial scale
before any occupants or cargo are added.
4
22_RUP_OM_EN_USC_t.book Page 173
Page 183 of 384
STARTING AND OPERATING181
(Continued)
Towing Requirements — Tires
Do not attempt to tow a trailer while using a
compact spare tire.
Do not drive more than 50 mph (80 km/h) when
towing while using a full size spare tire.
Proper tire inflation pressures are essential to
the safe and satisfactory operation of your
vehicle.
Check the trailer tires for proper tire inflation
pressures before trailer usage.
Check for signs of tire wear or visible tire
damage before towing a trailer.
Replacing tires with a higher load carrying
capacity will not increase the vehicle's GVWR
and GAWR limits.
For further information Ú page 346.
WARNING!
Make certain that the load is secured in the
trailer and will not shift during travel. When
trailering cargo that is not fully secured,
dynamic load shifts can occur that may be
difficult for the driver to control. You could lose
control of your vehicle and have a collision.
When hauling cargo or towing a trailer, do not
overload your vehicle or trailer. Overloading
can cause a loss of control, poor performance
or damage to brakes, axle, engine, transmis -
sion, steering, suspension, chassis structure
or tires.
Safety chains must always be used between
your vehicle and trailer. Always connect the
chains to the hook retainers of the vehicle
hitch. Cross the chains under the trailer
tongue and allow enough slack for turning
corners.
Vehicles with trailers should not be parked on
a grade. When parking, apply the parking
brake on the tow vehicle. Put the tow vehicle
transmission in PARK. For four-wheel drive
vehicles, make sure the transfer case is not in
NEUTRAL. Always, block or "chock" the trailer
wheels.
GCWR must not be exceeded.
Total weight must be distributed between the
tow vehicle and the trailer such that the
following four ratings are not exceeded :
GVWR
GTW
GAWR
Tongue weight rating for the trailer hitch
utilized.
WARNING!
4
22_RUP_OM_EN_USC_t.book Page 181
Page 184 of 384

182STARTING AND OPERATING
Towing Requirements — Trailer Brakes
Do not interconnect the hydraulic brake system
or vacuum system of your vehicle with that of
the trailer. This could cause inadequate braking
and possible personal injury.
An electronically actuated trailer brake
controller is required when towing a trailer with
electronically actuated brakes. When towing a
trailer equipped with a hydraulic surge actuated
brake system, an electronic brake controller is
not required.
Trailer brakes are recommended for trailers
over 1,000 lb (453 kg) and required for trailers
in excess of 2,000 lb (907 kg).
Towing Requirements — Trailer Lights And
Wiring
Whenever you pull a trailer, regardless of the trailer
size, stop lights and turn signals on the trailer are
required for motoring safety.
The Trailer Tow Package may include a four and
seven-pin wiring harness. Use a factory approved
trailer harness and connector.
NOTE:Do not cut or splice wiring into the vehicle’s wiring
harness.
The electrical connections are all complete to the
vehicle but you must mate the harness to a trailer
connector. Refer to the following illustrations.
NOTE:
Disconnect trailer wiring connector from the
vehicle before launching a boat (or any other
device plugged into vehicle’s electrical connect)
into water.
Be sure to reconnect once clear from water
area.
WARNING!
Do not connect trailer brakes to your vehicle's
hydraulic brake lines. It can overload your
brake system and cause it to fail. You might
not have brakes when you need them and
could have an accident.
Towing any trailer will increase your stopping
distance. When towing, you should allow for
additional space between your vehicle and the
vehicle in front of you. Failure to do so could
result in an accident.
CAUTION!
If the trailer weighs more than 1,000 lb (453 kg)
loaded, it should have its own brakes and they
should be of adequate capacity. Failure to do
this could lead to accelerated brake lining wear,
higher brake pedal effort, and longer stopping
distances.
22_RUP_OM_EN_USC_t.book Page 182
Page 186 of 384
184STARTING AND OPERATING
RECREATIONAL TOWING (BEHIND MOTORHOME)
TOWING THIS VEHICLE BEHIND ANOTHER VEHICLE
NOTE:
To avoid inadvertent Electric Park Brake (EPB) engagement, you must ensure that the Auto Park Brake feature is disabled before towing this vehicle
(if rear wheels are on the ground). The Auto Park Brake feature is enabled or disabled via the customer programmable features Ú page 188.
When towing your vehicle, always follow applicable state and provincial laws. Contact state and provincial Highway Safety offices for additional details.
If your vehicle is disabled and in need of commercial towing service, for further information Úpage 306.
DO NOT flat tow this vehicle. Damage to the drivetrain will result.
Towing Condition Wheel OFF The Ground FWD ModelsAWD Models
Flat Tow NONENOT ALLOWED NOT ALLOWED
Dolly Tow Front
OKNOT ALLOWED
Rear NOT ALLOWED NOT ALLOWED
On Trailer ALLOKOK
CAUTION!
DO NOT flat tow this vehicle. Damage to the drivetrain will result. If this vehicle requires towing, make sure the drive wheels are OFF the ground.
Ensure that the EPB is released, and remains released, while being towed.
Towing this vehicle in violation of the above requirements can cause severe transmission damage. Damage from improper towing is not covered under
the New Vehicle Limited Warranty.
22_RUP_OM_EN_USC_t.book Page 184
Page 191 of 384
MULTIMEDIA189
For the Uconnect 5 With 7-inch Display and the Uconnect 5/5 NAV With 10.1-inch Display
KeySense
The vehicle’s KeySense settings are protected by a unique four-digit PIN, which the vehicle owner creates when accessing the specific settings for the first
time. This four-digit PIN can only be reset by an authorized dealer.
After pressing the KeySense button on the touchscreen, and entering the KeySense PIN, the following settings will be available:
NOTE:Depending on the vehicle’s options, feature settings may vary.
Setting Name Description
Forward Collision Warning Sensitivity This setting will change the distance at which the Forward Collision Warning
(FCW) alert sounds. The “Medium” setting will have the FCW system signal
when an object is in view, and the possibility of a collision is detected. The
“Near” setting will have the FCW system signal when the object is closer to the
vehicle. The “Far” setting will have the FCW system signal when an object is at
a far distance from the vehicle.
Forward Collision Warning This setting will turn the Forward Collision Warning (FCW) system on or off. The
“Warning Only” setting will provide only an audible chime when a collision is
detected. The “Warning + Active Braking” setting will provide an audible chime
and apply some brake pressure when a collision is detected.
ParkSense This setting will change the type of ParkSense alert when a close object is
detected. The “Sound Only” setting will provide an audible chime when an
object is detected. The “Sound and Display” setting will provide both an
audible chime and a visual display when an object is detected.
Front ParkSense Volume This setting adjusts the volume of the Front ParkSense system. The available
settings are “Low”, “Medium”, and “High”.
5
22_RUP_OM_EN_USC_t.book Page 189
Page 192 of 384
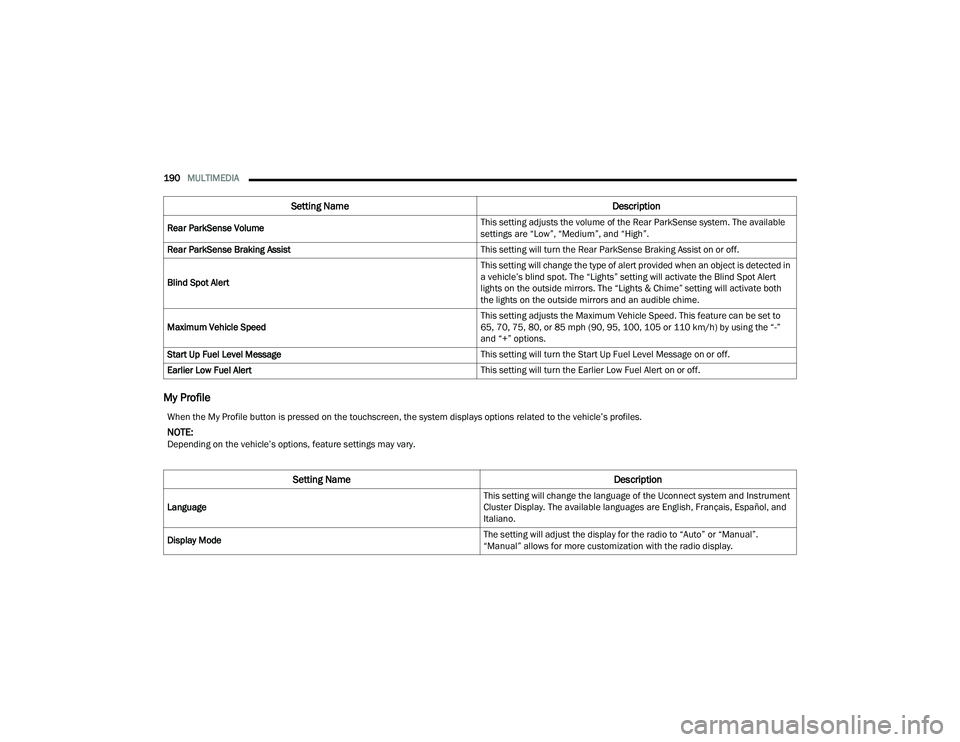
190MULTIMEDIA
My Profile
Rear ParkSense Volume This setting adjusts the volume of the Rear ParkSense system. The available
settings are “Low”, “Medium”, and “High”.
Rear ParkSense Braking Assist This setting will turn the Rear ParkSense Braking Assist on or off.
Blind Spot Alert This setting will change the type of alert provided when an object is detected in
a vehicle’s blind spot. The “Lights” setting will activate the Blind Spot Alert
lights on the outside mirrors. The “Lights & Chime” setting will activate both
the lights on the outside mirrors and an audible chime.
Maximum Vehicle Speed This setting adjusts the Maximum Vehicle Speed. This feature can be set to
65, 70, 75, 80, or 85 mph (90, 95, 100, 105 or 110 km/h) by using the “-”
and “+” options.
Start Up Fuel Level Message This setting will turn the Start Up Fuel Level Message on or off.
Earlier Low Fuel Alert This setting will turn the Earlier Low Fuel Alert on or off.
Setting NameDescription
When the My Profile button is pressed on the touchscreen, the system displays options related to the vehicle’s profiles.
NOTE:Depending on the vehicle’s options, feature settings may vary.
Setting NameDescription
Language This setting will change the language of the Uconnect system and Instrument
Cluster Display. The available languages are English, Français, Español, and
Italiano.
Display Mode The setting will adjust the display for the radio to “Auto” or “Manual”.
“Manual” allows for more customization with the radio display.
22_RUP_OM_EN_USC_t.book Page 190
Page 198 of 384
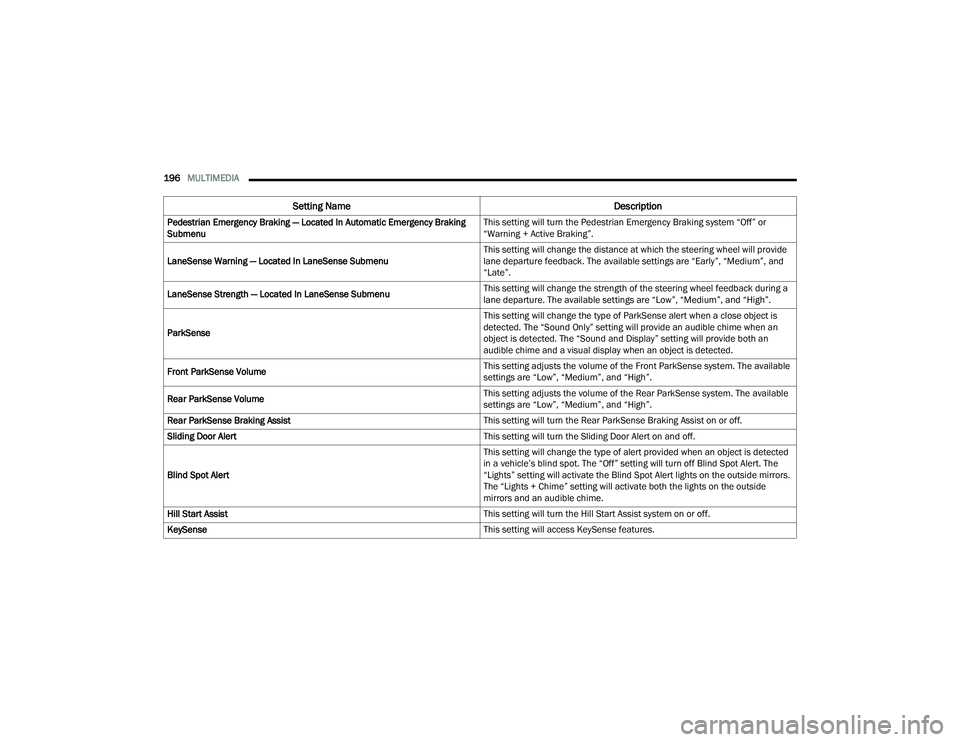
196MULTIMEDIA
Pedestrian Emergency Braking — Located In Automatic Emergency Braking
Submenu This setting will turn the Pedestrian Emergency Braking system “Off” or
“Warning + Active Braking”.
LaneSense Warning — Located In LaneSense Submenu This setting will change the distance at which the steering wheel will provide
lane departure feedback. The available settings are “Early”, “Medium”, and
“Late”.
LaneSense Strength — Located In LaneSense Submenu This setting will change the strength of the steering wheel feedback during a
lane departure. The available settings are “Low”, “Medium”, and “High”.
ParkSense This setting will change the type of ParkSense alert when a close object is
detected. The “Sound Only” setting will provide an audible chime when an
object is detected. The “Sound and Display” setting will provide both an
audible chime and a visual display when an object is detected.
Front ParkSense Volume This setting adjusts the volume of the Front ParkSense system. The available
settings are “Low”, “Medium”, and “High”.
Rear ParkSense Volume This setting adjusts the volume of the Rear ParkSense system. The available
settings are “Low”, “Medium”, and “High”.
Rear ParkSense Braking Assist This setting will turn the Rear ParkSense Braking Assist on or off.
Sliding Door Alert This setting will turn the Sliding Door Alert on and off.
Blind Spot Alert This setting will change the type of alert provided when an object is detected
in a vehicle’s blind spot. The “Off” setting will turn off Blind Spot Alert. The
“Lights” setting will activate the Blind Spot Alert lights on the outside mirrors.
The “Lights + Chime” setting will activate both the lights on the outside
mirrors and an audible chime.
Hill Start Assist This setting will turn the Hill Start Assist system on or off.
KeySense This setting will access KeySense features.
Setting NameDescription
22_RUP_OM_EN_USC_t.book Page 196
Page 204 of 384
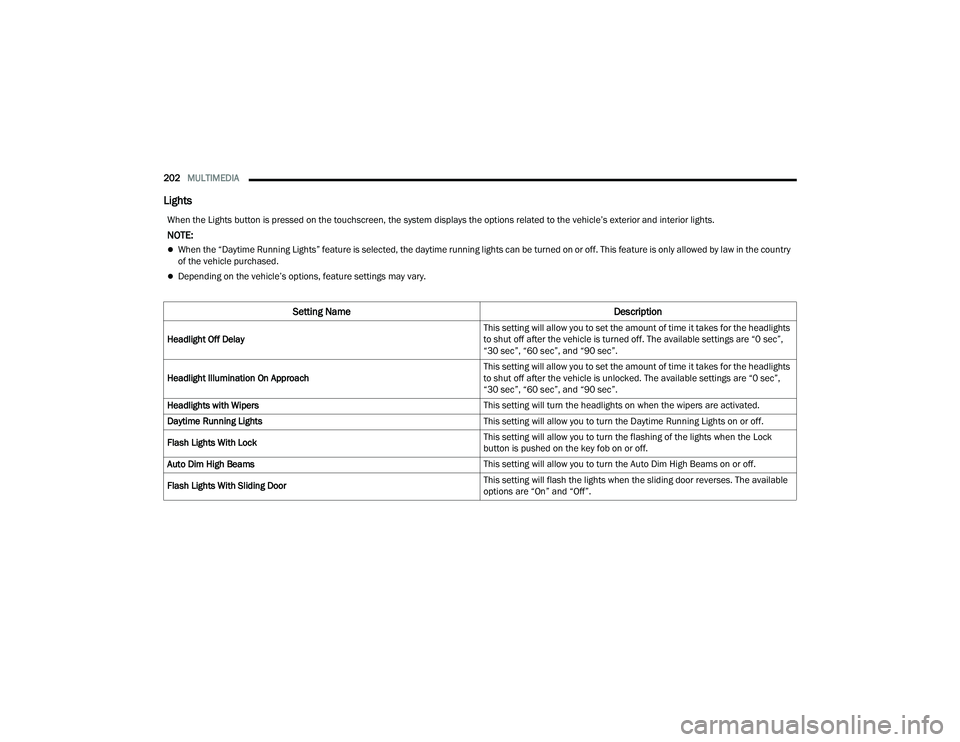
202MULTIMEDIA
Lights
When the Lights button is pressed on the touchscreen, the system displays the options related to the vehicle’s exterior and interior lights.
NOTE:
When the “Daytime Running Lights” feature is selected, the daytime running lights can be turned on or off. This feature is only allowed by law in the country
of the vehicle purchased.
Depending on the vehicle’s options, feature settings may vary.
Setting Name Description
Headlight Off Delay This setting will allow you to set the amount of time it takes for the headlights
to shut off after the vehicle is turned off. The available settings are “0 sec”,
“30 sec”, “60 sec”, and “90 sec”.
Headlight Illumination On Approach This setting will allow you to set the amount of time it takes for the headlights
to shut off after the vehicle is unlocked. The available settings are “0 sec”,
“30 sec”, “60 sec”, and “90 sec”.
Headlights with Wipers This setting will turn the headlights on when the wipers are activated.
Daytime Running Lights This setting will allow you to turn the Daytime Running Lights on or off.
Flash Lights With Lock This setting will allow you to turn the flashing of the lights when the Lock
button is pushed on the key fob on or off.
Auto Dim High Beams This setting will allow you to turn the Auto Dim High Beams on or off.
Flash Lights With Sliding Door This setting will flash the lights when the sliding door reverses. The available
options are “On” and “Off”.
22_RUP_OM_EN_USC_t.book Page 202
Page 209 of 384
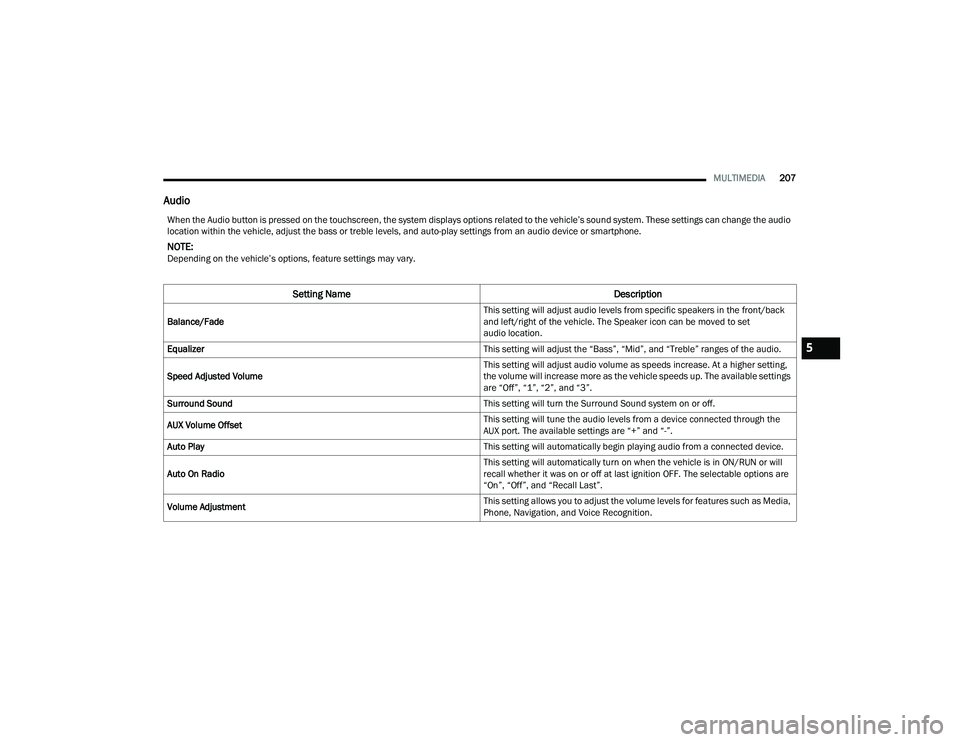
MULTIMEDIA207
Audio
When the Audio button is pressed on the touchscreen, the system displays options related to the vehicle’s sound system. These settings can change the audio
location within the vehicle, adjust the bass or treble levels, and auto-play settings from an audio device or smartphone.
NOTE:Depending on the vehicle’s options, feature settings may vary.
Setting Name Description
Balance/Fade This setting will adjust audio levels from specific speakers in the front/back
and left/right of the vehicle. The Speaker icon can be moved to set
audio location.
Equalizer This setting will adjust the “Bass”, “Mid”, and “Treble” ranges of the audio.
Speed Adjusted Volume This setting will adjust audio volume as speeds increase. At a higher setting,
the volume will increase more as the vehicle speeds up. The available settings
are “Off”, “1”, “2”, and “3”.
Surround Sound This setting will turn the Surround Sound system on or off.
AUX Volume Offset This setting will tune the audio levels from a device connected through the
AUX port. The available settings are “+” and “-”.
Auto Play This setting will automatically begin playing audio from a connected device.
Auto On Radio This setting will automatically turn on when the vehicle is in ON/RUN or will
recall whether it was on or off at last ignition OFF. The selectable options are
“On”, “Off”, and “Recall Last”.
Volume Adjustment This setting allows you to adjust the volume levels for features such as Media,
Phone, Navigation, and Voice Recognition.
5
22_RUP_OM_EN_USC_t.book Page 207
Page 221 of 384
MULTIMEDIA219
4. To play a Blu-ray™ or DVD disc on both screens simultaneously, select “Launch Source” and
then under Inputs, select “View Screen 1 or 2”.
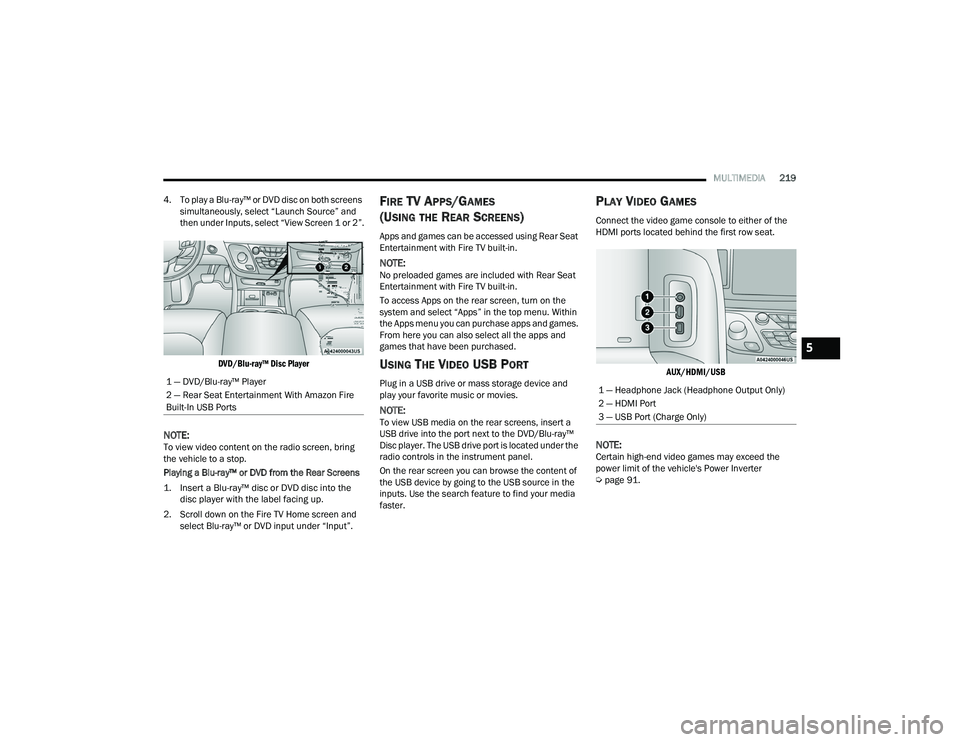
DVD/Blu-ray™ Disc Player
NOTE:To view video content on the radio screen, bring
the vehicle to a stop.
Playing a Blu-ray™ or DVD from the Rear Screens
1. Insert a Blu-ray™ disc or DVD disc into the disc player with the label facing up.
2. Scroll down on the Fire TV Home screen and select Blu-ray™ or DVD input under “Input”.
FIRE TV APPS/GAMES
(U
SING THE REAR SCREENS)
Apps and games can be accessed using Rear Seat
Entertainment with Fire TV built-in.
NOTE:No preloaded games are included with Rear Seat
Entertainment with Fire TV built-in.
To access Apps on the rear screen, turn on the
system and select “Apps” in the top menu. Within
the Apps menu you can purchase apps and games.
From here you can also select all the apps and
games that have been purchased.
USING THE VIDEO USB PORT
Plug in a USB drive or mass storage device and
play your favorite music or movies.
NOTE:To view USB media on the rear screens, insert a
USB drive into the port next to the DVD/Blu-ray™
Disc player. The USB drive port is located under the
radio controls in the instrument panel.
On the rear screen you can browse the content of
the USB device by going to the USB source in the
inputs. Use the search feature to find your media
faster.
PLAY VIDEO GAMES
Connect the video game console to either of the
HDMI ports located behind the first row seat.
AUX/HDMI/USB
NOTE:Certain high-end video games may exceed the
power limit of the vehicle's Power Inverter
Úpage 91.
1 — DVD/Blu-ray™ Player
2 — Rear Seat Entertainment With Amazon Fire
Built-In USB Ports
1 — Headphone Jack (Headphone Output Only)
2 — HDMI Port
3 — USB Port (Charge Only)
5
22_RUP_OM_EN_USC_t.book Page 219