high CHRYSLER PACIFICA 2022 Manual PDF
[x] Cancel search | Manufacturer: CHRYSLER, Model Year: 2022, Model line: PACIFICA, Model: CHRYSLER PACIFICA 2022Pages: 384, PDF Size: 23.92 MB
Page 318 of 384

316SERVICING AND MAINTENANCE
American Petroleum Institute (API)
Approved Engine Oil
These symbols mean that the oil has been certified
by the API. The manufacturer only recommends API
trademark oils.
The API Starburst trademark certifies
0W-20, 0W-30 and 5W-30 engine oils.
The API Donut trademark certifies 0W-40
and 5W-40 engine oil.
Synthetic Engine Oils
Your engine was designed for synthetic engine oils,
only use synthetic API approved engine oils.
Synthetic engine oils which do not have both the
correct API trademark and the correct SAE viscosity
grade numbers should not be used.
Materials Added To Engine Oil
The manufacturer strongly recommends against
the addition of any additives (other than leak
detection dyes) to the engine oil. Engine oil is an
engineered product and its performance may be
impaired by supplemental additives.
Disposing Of Used Engine Oil And Oil
Filters
Care should be taken in disposing of used engine
oil and oil filters from your vehicle. Used oil and oil
filters, indiscriminately discarded, can present a
problem to the environment. Contact an
authorized dealer, service station or governmental
agency for advice on how and where used oil and
oil filters can be safely discarded in your area.
ENGINE OIL FILTER
The engine oil filter should be replaced with a new
filter at every engine oil change.
Engine Oil Filter Selection
A full-flow type disposable oil filter should be used
for replacement. The quality of replacement filters
varies considerably. Only high quality Mopar®
certified filters should be used.
ENGINE AIR CLEANER FILTER
For the proper maintenance intervals Úpage 310.
Engine Air Cleaner Filter Selection
The quality of replacement filters varies
considerably. Only high quality Mopar® certified
filters should be used.
CAUTION!
Do not use chemical flushes in your engine oil as
the chemicals can damage your engine. Such
damage is not covered by the New Vehicle
Limited Warranty.
WARNING!
The air induction system (air cleaner, hoses,
etc.) can provide a measure of protection in the
case of engine backfire. Do not remove the air
induction system (air cleaner, hoses, etc.) unless
such removal is necessary for repair or
maintenance. Make sure that no one is near the
engine compartment before starting the vehicle
with the air induction system (air cleaner, hoses,
etc.) removed. Failure to do so can result in
serious personal injury.
22_RUP_OM_EN_USC_t.book Page 316
Page 320 of 384

318SERVICING AND MAINTENANCE
Refrigerant Recovery And Recycling —
R–1234yf
R–1234yf Air Conditioning Refrigerant is a
Hydrofluoroolefin (HFO) that is endorsed by the
Environmental Protection Agency and is an
ozone-friendly substance with a low
global-warming potential. It is recommended that
air conditioning service be performed by an
authorized dealer using recovery and recycling
equipment.
NOTE:Use only manufacturer approved A/C system PAG
compressor oil, and refrigerants.
Cabin Air Filter
The cabin air filter is located in the fresh air inlet
behind the glove compartment. Perform the
following procedure to replace the filter:
1. Remove all contents from the glove
compartment.
Glove Compartment
2. Open the glove compartment door partially, leaving extra slack on the glove compartment
tension tether. Detach the glove compartment
tension tether by sliding the black tension
tether clip down, and popping it out of the slot
on the side of the glove compartment door.WARNING!
Use only refrigerants and compressor lubri -
cants approved by the manufacturer for your
air conditioning system. Some unapproved
refrigerants are flammable and can explode,
injuring you. Other unapproved refrigerants or
lubricants can cause the system to fail,
requiring costly repairs. Refer to Warranty
Information located online, for further
warranty information.
The air conditioning system contains refrig -
erant under high pressure. To avoid risk of
personal injury or damage to the system,
adding refrigerant or any repair requiring lines
to be disconnected should be done by an
experienced technician.
CAUTION!
Do not use chemical flushes in your air
conditioning system as the chemicals can
damage your air conditioning components. Such
damage is not covered by the New Vehicle
Limited Warranty.
WARNING!
Do not remove the cabin air filter while the
vehicle is running, or while the ignition is in the
ACC or ON/RUN mode. With the cabin air filter
removed and the blower operating, the blower
can contact hands and may propel dirt and
debris into your eyes, resulting in personal injury.1 — Glove Compartment Travel Stops
2 — Glove Compartment Tension Tether Clip
22_RUP_OM_EN_USC_t.book Page 318
Page 322 of 384
320SERVICING AND MAINTENANCE
BODY LUBRICATION
Locks and all body pivot points, including such
items as seat tracks, door hinge pivot points and
rollers, liftgate, tailgate, decklid, sliding doors and
hood hinges, should be lubricated periodically. Use
a lithium-based grease, such as Mopar® Spray
White Lube to ensure quiet, easy operation and to
protect against rust and wear. Prior to the
application of any lubricant, the parts concerned
should be wiped clean to remove dust and grit;
after lubricating, excess oil and grease should be
removed. Particular attention should also be given
to hood latching components to ensure proper
function. When performing other underhood
services, the hood latch release mechanism, and
safety catch should be cleaned and lubricated.
The external lock cylinders should be lubricated
twice a year, preferably in the Autumn and Spring.
Apply a small amount of a high quality lubricant,
such as Mopar® Lock Cylinder Lubricant directly
into the lock cylinder.
WINDSHIELD WIPER BLADES
Clean the rubber edges of the wiper blades and the
windshield periodically with a sponge or soft cloth
and a mild nonabrasive cleaner. This will remove
accumulations of salt or road film. Operation of the wipers on dry glass for long
periods may cause deterioration of the wiper
blades. Always use washer fluid when using the
wipers to remove salt or dirt from a dry windshield.
Avoid using the wiper blades to remove frost or ice
from the windshield. Keep the blade rubber out of
contact with petroleum products such as engine
oil, gasoline, etc.
NOTE:Life expectancy of wiper blades varies depending
on geographical area and frequency of use. If chat
-
tering, marks, water lines or wet spots are present,
clean the wiper blades or replace as necessary.
The wiper blades and wiper arms should be
inspected periodically, not just when wiper
performance problems are experienced. This
inspection should include the following points:
Wear or uneven edges
Foreign material
Hardening or cracking
Deformation or fatigue
If a wiper blade or wiper arm is damaged, replace
the affected wiper arm or blade with a new unit. Do
not attempt to repair a wiper arm or blade that is
damaged.
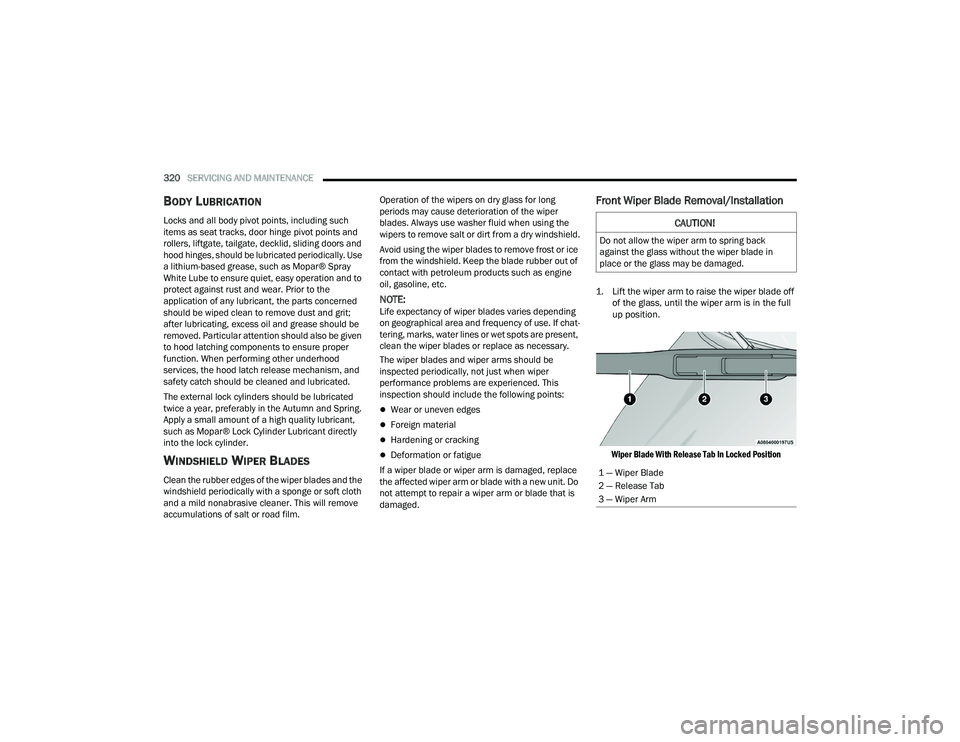
Front Wiper Blade Removal/Installation
1. Lift the wiper arm to raise the wiper blade off of the glass, until the wiper arm is in the full
up position.
Wiper Blade With Release Tab In Locked Position
CAUTION!
Do not allow the wiper arm to spring back
against the glass without the wiper blade in
place or the glass may be damaged.
1 — Wiper Blade
2 — Release Tab
3 — Wiper Arm
22_RUP_OM_EN_USC_t.book Page 320
Page 327 of 384
SERVICING AND MAINTENANCE325
Selection Of Coolant
For further information Úpage 365.
NOTE:
Mixing of engine coolant (antifreeze) other than
specified Organic Additive Technology (OAT)
engine coolant, may result in engine damage
and may decrease corrosion protection.
OAT engine coolant is different and should not
be mixed with Hybrid Organic Additive Tech -
nology (HOAT) engine coolant or any “globally
compatible” coolant. If a non-OAT engine
coolant is introduced into the cooling system in
an emergency, the cooling system will need to
be drained, flushed, and refilled with fresh OAT
coolant (conforming to MS.90032), by an autho -
rized dealer as soon as possible.
Do not use water alone or alcohol-based engine
coolant products. Do not use additional rust
inhibitors or anti-rust products, as they may not
be compatible with the radiator engine coolant
and may plug the radiator.
This vehicle has not been designed for use with
propylene glycol-based engine coolant. Use of
propylene glycol-based engine coolant is not
recommended.
Some vehicles require special tools to add
coolant properly. Failure to fill these systems
properly could lead to severe internal engine
damage. If any coolant is needed to be added to
the system please contact an authorized dealer.
Adding Coolant
Your vehicle has been built with an improved
engine coolant (OAT coolant conforming to
MS.90032) that allows extended maintenance
intervals. This engine coolant (antifreeze) can be
used up to ten years or 150,000 miles
(240,000 km) before replacement. To prevent
reducing this extended maintenance period, it is
important that you use the same engine coolant
(OAT coolant conforming to MS.90032) throughout
the life of your vehicle.
Please review these recommendations for using
OAT engine coolant that meets the requirements of
the manufacturer Material Standard MS.90032.
When adding engine coolant:
We recommend using Mopar® Antifreeze/
Coolant 10 Year/150,000 Mile (240,000 km)
Formula OAT that meets the requirements of the
manufacturer Material Standard MS.90032.
Mix a minimum solution of 50% OAT engine
coolant that meets the requirements of the
manufacturer Material Standard MS.90032
and distilled water. Use higher concentrations
(not to exceed 70%) if temperatures
below −34°F (−37°C) are anticipated. Please
contact an authorized dealer for assistance.
Use only high purity water such as distilled or
deionized water when mixing the water/engine
coolant solution. The use of lower quality water
will reduce the amount of corrosion protection
in the engine cooling system.
NOTE:
It is the owner's responsibility to maintain the
proper level of protection against freezing
according to the temperatures occurring in the
area where the vehicle is operated.
Some vehicles require special tools to add
coolant properly. Failure to fill these systems
properly could lead to severe internal engine
damage. If any coolant is needed to be added to
the system, please contact an authorized
dealer.
Mixing engine coolant types is not recom -
mended and can result in cooling system
damage. If HOAT and OAT coolant are mixed in
an emergency, have an authorized dealer drain,
flush, and refill with OAT coolant (conforming to
MS.90032) as soon as possible.
8
22_RUP_OM_EN_USC_t.book Page 325
Page 328 of 384
326SERVICING AND MAINTENANCE
Cooling System Pressure Cap
The cap must be fully tightened to prevent loss of
engine coolant (antifreeze), and to ensure that
engine coolant will return to the radiator from the
coolant expansion bottle/recovery tank (if
equipped).
The cap should be inspected and cleaned if there
is any accumulation of foreign material on the
sealing surfaces.
Disposal Of Used Coolant
Used ethylene glycol-based coolant (antifreeze) is
a regulated substance requiring proper disposal.
Check with your local authorities to determine the
disposal rules for your community. To prevent
ingestion by animals or children, do not store
ethylene glycol-based coolant in open containers
or allow it to remain in puddles on the ground. If
ingested by a child or pet, seek emergency
assistance immediately. Clean up any ground spills
immediately.
Coolant Level
The coolant expansion bottle provides a quick
visual method for determining that the coolant
level is adequate. With the engine off and cold, the
level of the coolant (antifreeze) in the bottle should
be between the “MAX” and “MIN” lines marked on
the bottle.
As long as the engine operating temperature is
satisfactory, the coolant bottle need only be
checked once a month.
When additional coolant is needed to maintain the
proper level, it should be added to the coolant
bottle. Do not overfill.
See an authorized dealer for service.
Cooling System Notes
NOTE:When the vehicle is stopped after a few miles/kilo -
meters of operation, you may observe vapor
coming from the front of the engine compartment.
This is normally a result of moisture from rain,
snow, or high humidity accumulating on the
radiator and being vaporized when the thermostat
opens, allowing hot engine coolant (antifreeze) to
enter the radiator.
If an examination of your engine compartment
shows no evidence of radiator or hose leaks, the
vehicle may be safely driven. The vapor will soon
dissipate.
Do not overfill the coolant expansion bottle.
Check the coolant freeze point in the radiator
and in the coolant expansion bottle. If engine
coolant needs to be added, the contents of the
coolant expansion bottle must also be protected
against freezing.
If frequent engine coolant additions are
required, the cooling system should be pressure
tested for leaks.
Maintain engine coolant concentration at a
minimum of 50% OAT coolant (conforming to
MS.90032) and distilled water for proper corro -
sion protection of your engine which contains
aluminum components.
WARNING!
Do not open a hot engine cooling system.
Never add engine coolant (antifreeze) when
the engine is overheated. Do not loosen or
remove the cap to cool an overheated engine.
Heat causes pressure to build-up in the
cooling system. To prevent scalding or injury,
do not remove the pressure cap while the
system is hot or under pressure.
Do not use a pressure cap other than the one
specified for your vehicle. Personal injury or
engine damage may result.
22_RUP_OM_EN_USC_t.book Page 326
Page 329 of 384
SERVICING AND MAINTENANCE327
(Continued)
Make sure that the coolant expansion bottle
overflow hoses are not kinked or obstructed.
Keep the front of the radiator clean. If your
vehicle is equipped with air conditioning, keep
the front of the condenser clean.
Do not change the thermostat for Summer or
Winter operation. If replacement is ever neces -
sary, install ONLY the correct type thermostat.
Other designs may result in unsatisfactory
engine cooling performance, poor gas mileage,
and increased emissions.
BRAKE SYSTEM
In order to ensure brake system performance, all
brake system components should be inspected
periodically. For the proper maintenance intervals
Ú page 310.
Brake Master Cylinder
The fluid in the master cylinder should be checked
when performing under hood services or
immediately if the Brake Warning Light is
illuminated.
Be sure to clean the top of the master cylinder area
before removing the cap. If necessary, add fluid to
bring the fluid level up to the requirements
described on the brake fluid reservoir. With disc
brakes, fluid level can be expected to fall as the
brake pads wear. Brake fluid level should be
checked when pads are replaced. However, low
fluid level may be caused by a leak and a checkup
may be needed.
Use only manufacturer recommended brake fluid
Úpage 366.
WARNING!
Riding the brakes can lead to brake failure and
possibly a collision. Driving with your foot resting
or riding on the brake pedal can result in
abnormally high brake temperatures, excessive
lining wear, and possible brake damage. You
would not have your full braking capacity in an
emergency.
WARNING!
Use only manufacturer recommended brake
fluid Ú page 366. Using the wrong type of
brake fluid can severely damage your brake
system and/or impair its performance. The
proper type of brake fluid for your vehicle is
also identified on the original factory installed
hydraulic master cylinder reservoir.
To avoid contamination from foreign matter or
moisture, use only new brake fluid or fluid that
has been in a tightly closed container. Keep
the master cylinder reservoir cap secured at
all times. Brake fluid in an open container
absorbs moisture from the air resulting in a
lower boiling point. This may cause it to boil
unexpectedly during hard or prolonged
braking, resulting in sudden brake failure. This
could result in a collision.
Overfilling the brake fluid reservoir can result
in spilling brake fluid on hot engine parts,
causing the brake fluid to catch fire. Brake
fluid can also damage painted and vinyl
surfaces, care should be taken to avoid its
contact with these surfaces.
Do not allow petroleum-based fluid to contam -
inate the brake fluid. Brake seal components
could be damaged, causing partial or
complete brake failure. This could result in a
collision.
WARNING!
8
22_RUP_OM_EN_USC_t.book Page 327
Page 331 of 384

SERVICING AND MAINTENANCE329
FUSES
General Information
The fuses protect electrical systems against
excessive current. When a device does not work, you must check the
fuse element inside the blade fuse for a break/
melt.
Also, please be aware that using power outlets for
extended periods of time with the engine off may
result in vehicle battery discharge.
Blade Fuses
Underhood Fuses
The Power Distribution Center (PDC) is located in
the engine compartment near the battery. This
center contains cartridge fuses, mini-fuses,
micro-fuses, circuit breakers and relays. A label
that identifies each component is printed on the
inside of the cover.
Before any procedure is done on the PDC, make
sure engine is turned off.
Remove the cover by unlatching the two locks
located at each side of the PDC cover, avoid using
screwdrivers or any other tool to remove the cover,
since they may apply excessive force and result in
a broken/damaged part.
After service is done, secure the cover with its two
locks.
NOTE:The function and amperage of the following fuses
are different, depending on vehicle trim level and
content.
WARNING!
When replacing a blown fuse, always use an
appropriate replacement fuse with the same
amp rating as the original fuse. Never replace
a fuse with another fuse of higher amp rating.
Never replace a blown fuse with metal wires or
any other material. Do not place a fuse inside
a circuit breaker cavity or vice versa. Failure to
use proper fuses may result in serious
personal injury, fire and/or property damage.
Before replacing a fuse, make sure that the
ignition is off and that all the other services
are switched off and/or disengaged.
If the replaced fuse blows again, contact an
authorized dealer.
If a general protection fuse for safety systems
(air bag system, braking system), power unit
systems (engine system, transmission
system) or steering system blows, contact an
authorized dealer.
1 — Fuse Element
2 — Blade Fuse with a good/functional fuse
element
3 — Blade fuse with a bad/not functional fuse
element (blown fuse)CAUTION!
When installing the power distribution center
cover, it is important to ensure the cover is
properly positioned and fully latched. Failure to
do so may allow water to get into the power
distribution center and possibly result in an
electrical system failure.8
22_RUP_OM_EN_USC_t.book Page 329
Page 341 of 384
SERVICING AND MAINTENANCE339
TIRES
TIRE SAFETY INFORMATION
Tire safety information will cover aspects of the
following information: Tire Markings, Tire
Identification Numbers, Tire Terminology and
Definitions, Tire Pressures, and Tire Loading.
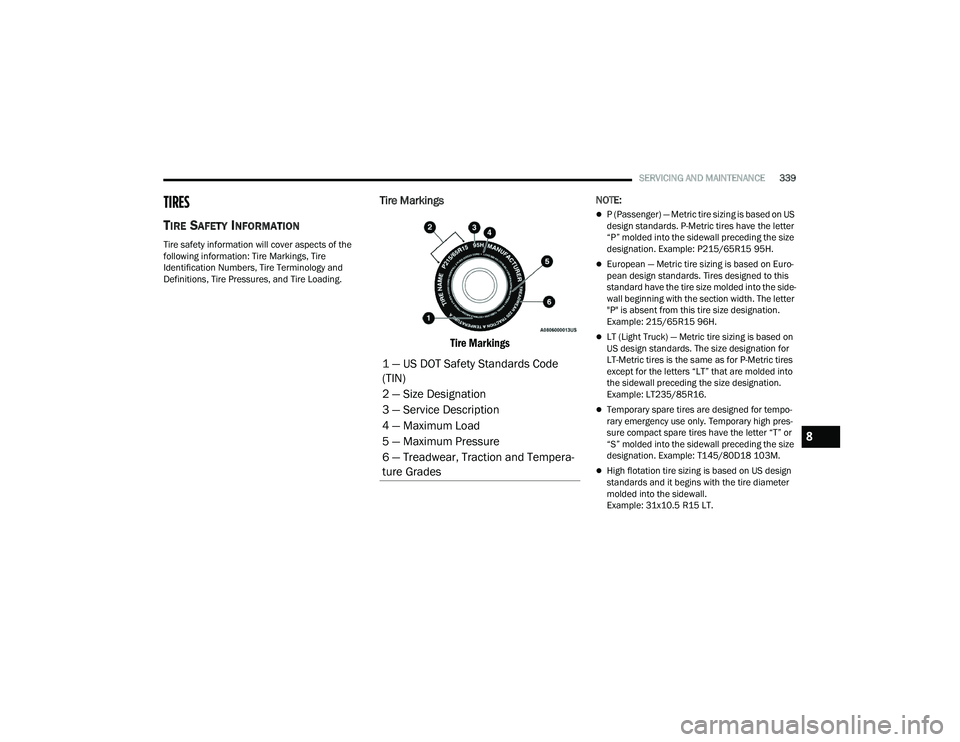
Tire Markings
Tire Markings
NOTE:
P (Passenger) — Metric tire sizing is based on US
design standards. P-Metric tires have the letter
“P” molded into the sidewall preceding the size
designation. Example: P215/65R15 95H.
European — Metric tire sizing is based on Euro -
pean design standards. Tires designed to this
standard have the tire size molded into the side -
wall beginning with the section width. The letter
"P" is absent from this tire size designation.
Example: 215/65R15 96H.
LT (Light Truck) — Metric tire sizing is based on
US design standards. The size designation for
LT-Metric tires is the same as for P-Metric tires
except for the letters “LT” that are molded into
the sidewall preceding the size designation.
Example: LT235/85R16.
Temporary spare tires are designed for tempo -
rary emergency use only. Temporary high pres -
sure compact spare tires have the letter “T” or
“S” molded into the sidewall preceding the size
designation. Example: T145/80D18 103M.
High flotation tire sizing is based on US design
standards and it begins with the tire diameter
molded into the sidewall.
Example: 31x10.5 R15 LT.
1 — US DOT Safety Standards Code
(TIN)
2 — Size Designation
3 — Service Description
4 — Maximum Load
5 — Maximum Pressure
6 — Treadwear, Traction and Tempera -
ture Grades
8
22_RUP_OM_EN_USC_t.book Page 339
Page 343 of 384
SERVICING AND MAINTENANCE341
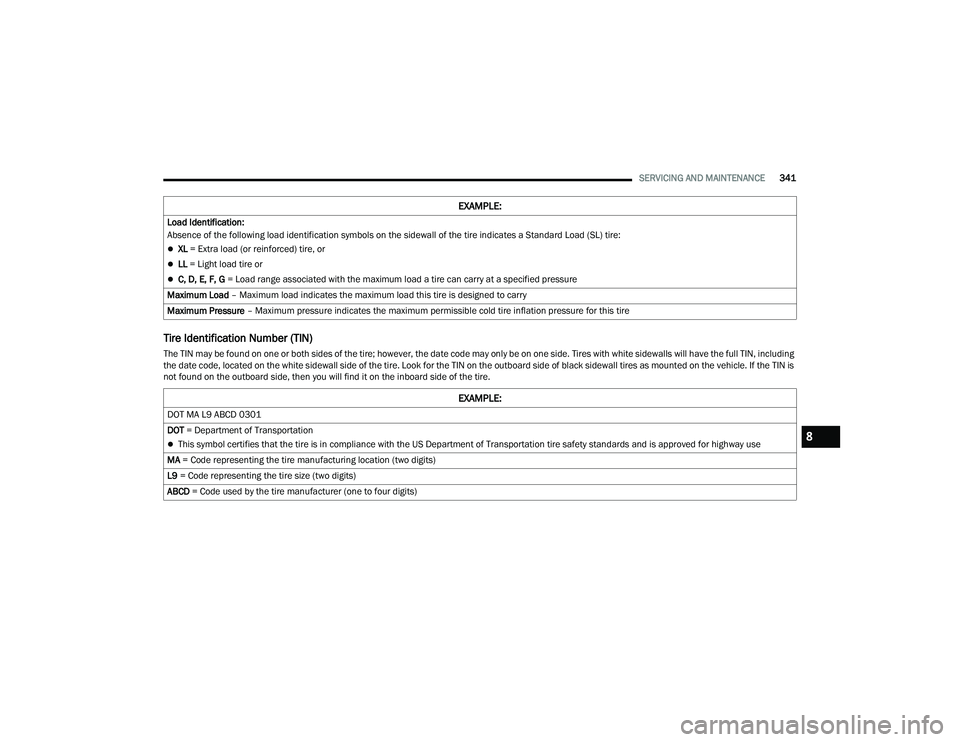
Tire Identification Number (TIN)
The TIN may be found on one or both sides of the tire; however, the date code may only be on one side. Tires with white sidewalls will have the full TIN, including
the date code, located on the white sidewall side of the tire. Look for the TIN on the outboard side of black sidewall tires as mounted on the vehicle. If the TIN is
not found on the outboard side, then you will find it on the inboard side of the tire.Load Identification:
Absence of the following load identification symbols on the sidewall of the tire indicates a Standard Load (SL) tire:
XL = Extra load (or reinforced) tire, or
LL
= Light load tire or
C, D, E, F, G = Load range associated with the maximum load a tire can carry at a specified pressure
Maximum Load – Maximum load indicates the maximum load this tire is designed to carry
Maximum Pressure – Maximum pressure indicates the maximum permissible cold tire inflation pressure for this tire
EXAMPLE:
EXAMPLE:
DOT MA L9 ABCD 0301
DOT = Department of Transportation
This symbol certifies that the tire is in compliance with the US Department of Transportation tire safety standards and is approved for highway use
MA = Code representing the tire manufacturing location (two digits)
L9 = Code representing the tire size (two digits)
ABCD = Code used by the tire manufacturer (one to four digits)8
22_RUP_OM_EN_USC_t.book Page 341
Page 348 of 384
346SERVICING AND MAINTENANCE
TIRES — GENERAL INFORMATION
Tire Pressure
Proper tire inflation pressure is essential to the
safe and satisfactory operation of your vehicle.
Four primary areas are affected by improper tire
pressure:
Safety
Fuel Economy
Tread Wear
Ride Comfort and Vehicle Stability Safety
Both underinflation and overinflation affect the
stability of the vehicle and can produce a feeling of
sluggish response or over responsiveness in the
steering.
NOTE:
Unequal tire pressures from side to side may
cause erratic and unpredictable steering
response.
Unequal tire pressure from side to side may
cause the vehicle to drift left or right.
Fuel Economy
Underinflated tires will increase tire rolling
resistance resulting in higher fuel consumption.
Tread Wear
Improper cold tire inflation pressures can cause
abnormal wear patterns and reduced tread life,
resulting in the need for earlier tire replacement.
Ride Comfort And Vehicle Stability
Proper tire inflation contributes to a comfortable
ride. Overinflation produces a jarring and
uncomfortable ride.
WARNING!
Overloading of your tires is dangerous.
Overloading can cause tire failure, affect vehicle
handling, and increase your stopping distance.
Use tires of the recommended load capacity for
your vehicle. Never overload them.WARNING!
Improperly inflated tires are dangerous and
can cause collisions.
Underinflation increases tire flexing and can
result in overheating and tire failure.
Overinflation reduces a tire's ability to cushion
shock. Objects on the road and chuckholes
can cause damage that result in tire failure.
Overinflated or underinflated tires can affect
vehicle handling and can fail suddenly,
resulting in loss of vehicle control.
Unequal tire pressures can cause steering
problems. You could lose control of your
vehicle.
Unequal tire pressures from one side of the
vehicle to the other can cause the vehicle to
drift to the right or left.
Always drive with each tire inflated to the
recommended cold tire inflation pressure.
22_RUP_OM_EN_USC_t.book Page 346