CHRYSLER PACIFICA HYBRID 2020 Owners Manual
Manufacturer: CHRYSLER, Model Year: 2020, Model line: PACIFICA HYBRID, Model: CHRYSLER PACIFICA HYBRID 2020Pages: 516, PDF Size: 28.69 MB
Page 341 of 516
IN CASE OF EMERGENCY339
REFUELING IN EMERGENCY
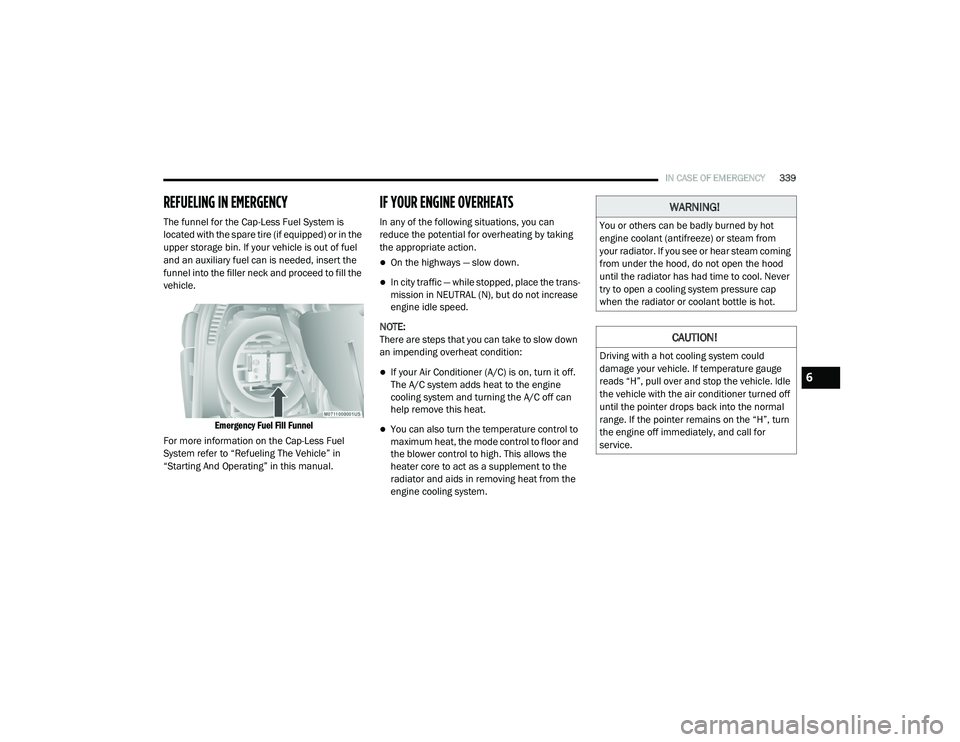
The funnel for the Cap-Less Fuel System is
located with the spare tire (if equipped) or in the
upper storage bin. If your vehicle is out of fuel
and an auxiliary fuel can is needed, insert the
funnel into the filler neck and proceed to fill the
vehicle.
Emergency Fuel Fill Funnel
For more information on the Cap-Less Fuel
System refer to “Refueling The Vehicle” in
“Starting And Operating” in this manual.
IF YOUR ENGINE OVERHEATS
In any of the following situations, you can
reduce the potential for overheating by taking
the appropriate action.
On the highways — slow down.
In city traffic — while stopped, place the trans -
mission in NEUTRAL (N), but do not increase
engine idle speed.
NOTE:
There are steps that you can take to slow down
an impending overheat condition:
If your Air Conditioner (A/C) is on, turn it off.
The A/C system adds heat to the engine
cooling system and turning the A/C off can
help remove this heat.
You can also turn the temperature control to
maximum heat, the mode control to floor and
the blower control to high. This allows the
heater core to act as a supplement to the
radiator and aids in removing heat from the
engine cooling system.
WARNING!
You or others can be badly burned by hot
engine coolant (antifreeze) or steam from
your radiator. If you see or hear steam coming
from under the hood, do not open the hood
until the radiator has had time to cool. Never
try to open a cooling system pressure cap
when the radiator or coolant bottle is hot.
CAUTION!
Driving with a hot cooling system could
damage your vehicle. If temperature gauge
reads “H”, pull over and stop the vehicle. Idle
the vehicle with the air conditioner turned off
until the pointer drops back into the normal
range. If the pointer remains on the “H”, turn
the engine off immediately, and call for
service.
6
20_RU_OM_EN_US_t.book Page 339
Page 342 of 516
340IN CASE OF EMERGENCY
MANUAL PARK RELEASE
To move the vehicle in cases where the
transmission will not shift out of PARK (P) (such
as a depleted battery), a Manual Park Release
is available.
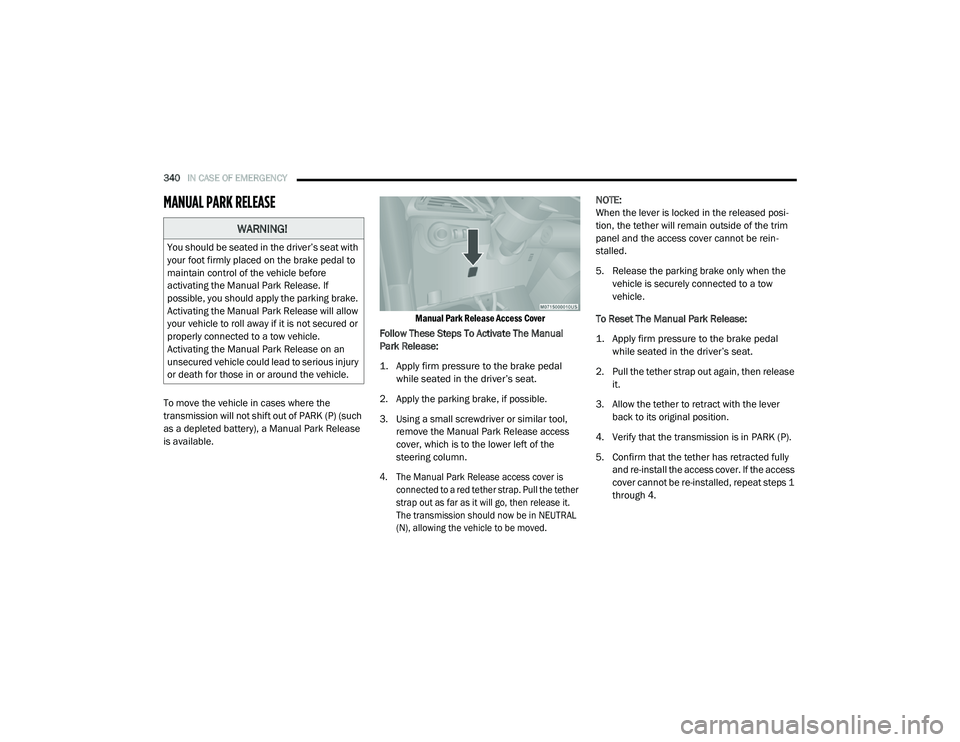
Manual Park Release Access Cover
Follow These Steps To Activate The Manual
Park Release:
1. Apply firm pressure to the brake pedal while seated in the driver’s seat.
2. Apply the parking brake, if possible.
3. Using a small screwdriver or similar tool, remove the Manual Park Release access
cover, which is to the lower left of the
steering column.
4. The Manual Park Release access cover is connected to a red tether strap. Pull the tether
strap out as far as it will go, then release it.
The transmission should now be in NEUTRAL
(N), allowing the vehicle to be moved.
NOTE:
When the lever is locked in the released posi
-
tion, the tether will remain outside of the trim
panel and the access cover cannot be rein -
stalled.
5. Release the parking brake only when the vehicle is securely connected to a tow
vehicle.
To Reset The Manual Park Release:
1. Apply firm pressure to the brake pedal while seated in the driver’s seat.
2. Pull the tether strap out again, then release it.
3. Allow the tether to retract with the lever back to its original position.
4. Verify that the transmission is in PARK (P).
5. Confirm that the tether has retracted fully and re-install the access cover. If the access
cover cannot be re-installed, repeat steps 1
through 4.
WARNING!
You should be seated in the driver’s seat with
your foot firmly placed on the brake pedal to
maintain control of the vehicle before
activating the Manual Park Release. If
possible, you should apply the parking brake.
Activating the Manual Park Release will allow
your vehicle to roll away if it is not secured or
properly connected to a tow vehicle.
Activating the Manual Park Release on an
unsecured vehicle could lead to serious injury
or death for those in or around the vehicle.
20_RU_OM_EN_US_t.book Page 340
Page 343 of 516
IN CASE OF EMERGENCY341
FREEING A STUCK VEHICLE
If your vehicle becomes stuck in mud, sand or
snow, it can often be moved using a rocking
motion. Turn the steering wheel right and left to
clear the area around the front wheels. Then
shift back and forth between DRIVE (D) and
REVERSE (R) while gently pressing the
accelerator.
NOTE:
Shifts between DRIVE and REVERSE can only be
achieved at wheel speeds of 5 mph (8 km/h) or
less. Whenever the transmission remains in
NEUTRAL (N) for more than two seconds, you
must press the brake pedal to engage DRIVE or
REVERSE.
Use the least amount of accelerator pedal
pressure that will maintain the rocking motion
without spinning the wheels or racing the
engine. NOTE:
Push the "ESC OFF" switch to place the Elec
-
tronic Stability Control (ESC) system in "Partial
Off" mode, before rocking the vehicle. Refer to
“Electronic Brake Control System” in “Safety”
for further information. Once the vehicle has
been freed, push the "ESC OFF" switch again to
restore "ESC On" mode.
WARNING!
Fast spinning tires can be dangerous. Forces
generated by excessive wheel speeds may
cause damage, or even failure, of the axle
and tires. A tire could explode and injure
someone. Do not spin your vehicle's wheels
faster than 30 mph (48 km/h) or for longer than 30 seconds continuously without
stopping when you are stuck and do not let
anyone near a spinning wheel, no matter
what the speed.
CAUTION!
Racing the engine or spinning the wheels
may lead to transmission overheating and
failure. Allow the engine to idle with the
transmission in NEUTRAL for at least one
minute after every five rocking-motion
cycles. This will minimize overheating and
reduce the risk of transmission failure
during prolonged efforts to free a stuck
vehicle.
When “rocking” a stuck vehicle by shifting
between DRIVE and REVERSE, do not spin
the wheels faster than 15 mph (24 km/h), or drivetrain damage may result.
Revving the engine or spinning the wheels
too fast may lead to transmission over -
heating and failure. It can also damage the
tires. Do not spin the wheels above 30 mph
(48 km/h) while in gear (no transmission
shifting occurring).
6
20_RU_OM_EN_US_t.book Page 341
Page 344 of 516
342IN CASE OF EMERGENCY
TOWING A DISABLED VEHICLE
This section describes procedures for towing a disabled vehicle using a commercial towing service.
Proper towing or lifting equipment is required to
prevent damage to your vehicle. Use only tow bars
and other equipment designed for this purpose,
following equipment manufacturer’s instructions.
Use of safety chains is mandatory. Attach a tow
bar or other towing device to main structural
members of the vehicle, not to bumpers or
associated brackets. State and local laws
regarding vehicles under tow must be observed.
NOTE:
You must ensure that the Auto Park Brake
feature is disabled before towing this vehicle (if
rear wheels are on the ground), to avoid inad -
vertent Electric Park Brake (EPB) engagement.
The Auto Park Brake feature is enabled or
disabled via the customer programmable
features in the Uconnect Settings.
Vehicles with a discharged battery or total elec -
trical failure when the Electric Parking Brake
(EPB) is engaged, will need a wheel dolly or jack
to raise the rear wheels off the ground when
moving the vehicle onto a flatbed.
The manufacturer recommends towing your vehicle
with all four wheels OFF the ground using a flatbed.
If flatbed equipment is not available, this
vehicle must be towed with the front wheels
OFF the ground (using a towing dolly, or wheel
lift equipment with the front wheels raised).
NOTE:
Ensure that the Electric Park Brake is released,
and remains released, while being towed. Vehicle Recovery Tow Points
Your vehicle is equipped with Vehicle Recovery
Points that can be used to recover a disabled
vehicle, located on the underbody of the
vehicle.
Towing Condition
Wheel OFF The Ground ALL MODELS
Flat Tow NONENOT ALLOWED
Wheel Lift Or Dolly Tow Front
OK
Rear NOT ALLOWED
Flatbed ALLBEST METHODCAUTION!
Towing this vehicle in violation of the above
requirements can cause severe transmission
damage. Damage from improper towing is not
covered under the New Vehicle Limited
Warranty.
20_RU_OM_EN_US_t.book Page 342
Page 345 of 516
IN CASE OF EMERGENCY343
(Continued)
NOTE:
Ensure that the towing service tow hooks are
properly seated and secured in the attach -
ment points.
This recovery tow feature should be used by
a trained professional only.
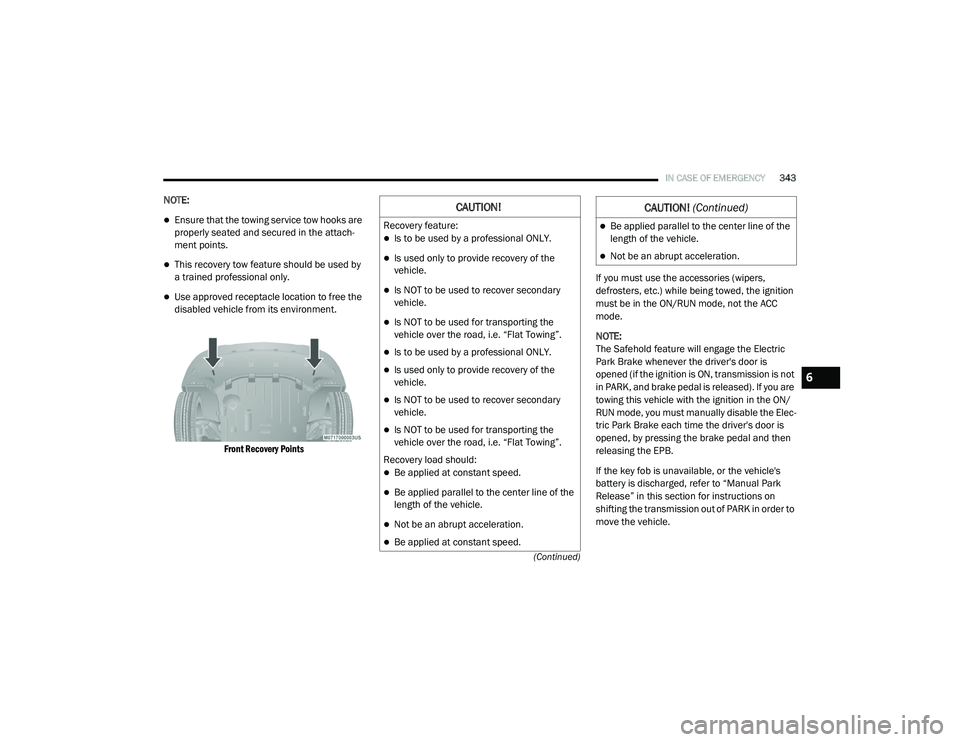
Use approved receptacle location to free the
disabled vehicle from its environment.
Front Recovery Points
If you must use the accessories (wipers,
defrosters, etc.) while being towed, the ignition
must be in the ON/RUN mode, not the ACC
mode.
NOTE:
The Safehold feature will engage the Electric
Park Brake whenever the driver's door is
opened (if the ignition is ON, transmission is not
in PARK, and brake pedal is released). If you are
towing this vehicle with the ignition in the ON/
RUN mode, you must manually disable the Elec
-
tric Park Brake each time the driver's door is
opened, by pressing the brake pedal and then
releasing the EPB.
If the key fob is unavailable, or the vehicle's
battery is discharged, refer to “Manual Park
Release” in this section for instructions on
shifting the transmission out of PARK in order to
move the vehicle.
CAUTION!
Recovery feature:
Is to be used by a professional ONLY.
Is used only to provide recovery of the
vehicle.
Is NOT to be used to recover secondary
vehicle.
Is NOT to be used for transporting the
vehicle over the road, i.e. “Flat Towing”.
Is to be used by a professional ONLY.
Is used only to provide recovery of the
vehicle.
Is NOT to be used to recover secondary
vehicle.
Is NOT to be used for transporting the
vehicle over the road, i.e. “Flat Towing”.
Recovery load should:
Be applied at constant speed.
Be applied parallel to the center line of the
length of the vehicle.
Not be an abrupt acceleration.
Be applied at constant speed.
Be applied parallel to the center line of the
length of the vehicle.
Not be an abrupt acceleration.
CAUTION! (Continued)
6
20_RU_OM_EN_US_t.book Page 343
Page 346 of 516
344IN CASE OF EMERGENCY
ENHANCED ACCIDENT RESPONSE SYSTEM
(EARS)
This vehicle is equipped with an Enhanced
Accident Response System.
Please refer to “Occupant Restraint Systems” in
“Safety” for further information on the
Enhanced Accident Response System (EARS)
function.
EVENT DATA RECORDER (EDR)
This vehicle is equipped with an Event Data
Recorder (EDR). The main purpose of an EDR is
to record data that will assist in understanding
how a vehicle’s systems performed under
certain crash or near crash-like situations, such
as an air bag deployment or hitting a road
obstacle.
Please refer to “Occupant Restraint Systems” in
“Safety” for further information on the Event
Data Recorder (EDR).
CAUTION!
Do not use sling-type equipment when
towing. Vehicle damage may occur.
When securing the vehicle to a flatbed
truck, do not attach to front or rear suspen -
sion components. Damage to your vehicle
may result from improper towing.
Ensure that the Electric Park Brake is
released, and remains released, while
being towed.
20_RU_OM_EN_US_t.book Page 344
Page 347 of 516
345
SERVICING AND MAINTENANCE
SCHEDULED SERVICING
Your vehicle is equipped with an automatic oil
change indicator system. The oil change
indicator system will remind you that it is time to
take your vehicle in for scheduled maintenance.
Based on engine operation conditions, the oil
change indicator message will illuminate. This
means that service is required for your vehicle.
Operating conditions such as frequent short-trips,
trailer tow, extremely hot or cold ambient
temperatures will influence when the “Oil Change
Required” message is displayed. Severe
Operating Conditions can cause the change oil
message to illuminate as early as 3,500 miles
(5,600 km) since last reset. Have your vehicle
serviced as soon as possible, within the next
500 miles (805 km).
An authorized dealer will reset the oil change
indicator message after completing the
scheduled oil change. If a scheduled oil change
is performed by someone other than an
authorized dealer, the message can be reset by
referring to “Instrument Cluster Display” in
“Getting To Know Your Instrument Panel”.NOTE:
Under no circumstances should oil change
intervals exceed 10,000 miles (16,000 km),
12 months or 350 hours of engine run time,
whichever comes first. The 350 hours of engine
run or idle time is generally only a concern for
fleet customers.
Severe Duty All Models
Change Engine Oil at 4,000 miles (6,500 km) or
350 hours of engine run time if the vehicle is
operated in a dusty and off road environment or
is operated predominately at idle or only very
low engine RPM. This type of vehicle use is
considered Severe Duty.
Once A Month Or Before A Long Trip:Check engine oil level
Check windshield washer fluid level
Check tire pressure and look for unusual
wear or damage. Rotate tires at the first sign
of irregular wear, even if it occurs before the
oil indicator system turns on
Check the fluid levels of the coolant reservoir
and brake master cylinder, fill as needed
Check function of all interior and exterior
lights
Maintenance Plan
Required Maintenance Intervals
Refer to the required maintenance intervals.
7
20_RU_OM_EN_US_t.book Page 345
Page 348 of 516
346SERVICING AND MAINTENANCE
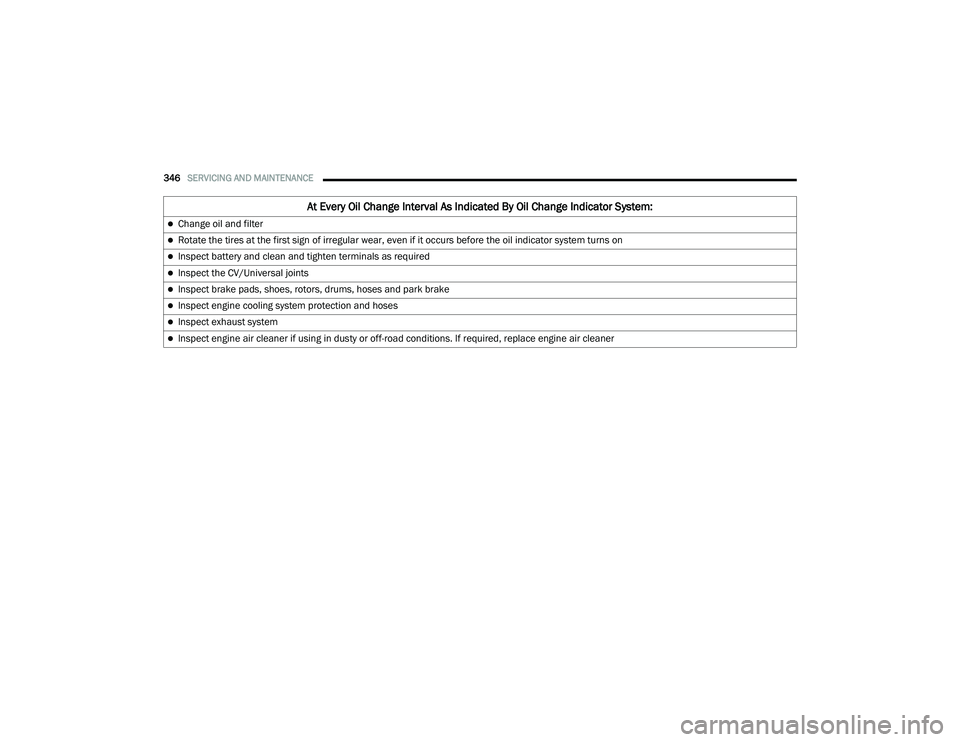
At Every Oil Change Interval As Indicated By Oil Change Indicator System:
Change oil and filter
Rotate the tires at the first sign of irregular wear, even if it occurs before the oil indicator system turns on
Inspect battery and clean and tighten terminals as required
Inspect the CV/Universal joints
Inspect brake pads, shoes, rotors, drums, hoses and park brake
Inspect engine cooling system protection and hoses
Inspect exhaust system
Inspect engine air cleaner if using in dusty or off-road conditions. If required, replace engine air cleaner
20_RU_OM_EN_US_t.book Page 346
Page 349 of 516
SERVICING AND MAINTENANCE347
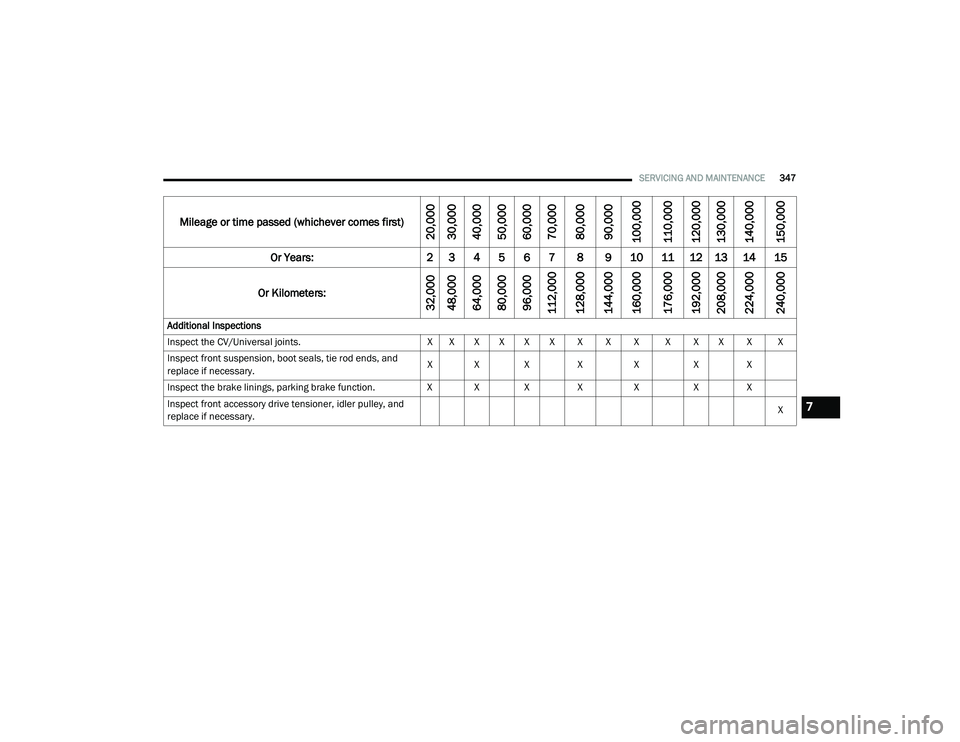
Mileage or time passed (whichever comes first)
20,000
30,000
40,000
50,000
60,000
70,000
80,000
90,000
100,000
110,000
120,000
130,000
140,000
150,000
Or Years: 2 3 4 5 6 7 8 9 10 11 12 13 14 15
Or Kilometers:
32,000
48,000
64,000
80,000
96,000
112,000
128,000
144,000
160,000
176,000
192,000
208,000
224,000
240,000
Additional Inspections
Inspect the CV/Universal joints. X X X X X X X X X X X X X X
Inspect front suspension, boot seals, tie rod ends, and
replace if necessary. X X X X
XX X
Inspect the brake linings, parking brake function. X X X XXX X
Inspect front accessory drive tensioner, idler pulley, and
replace if necessary. X
7
20_RU_OM_EN_US_t.book Page 347
Page 350 of 516
348SERVICING AND MAINTENANCE
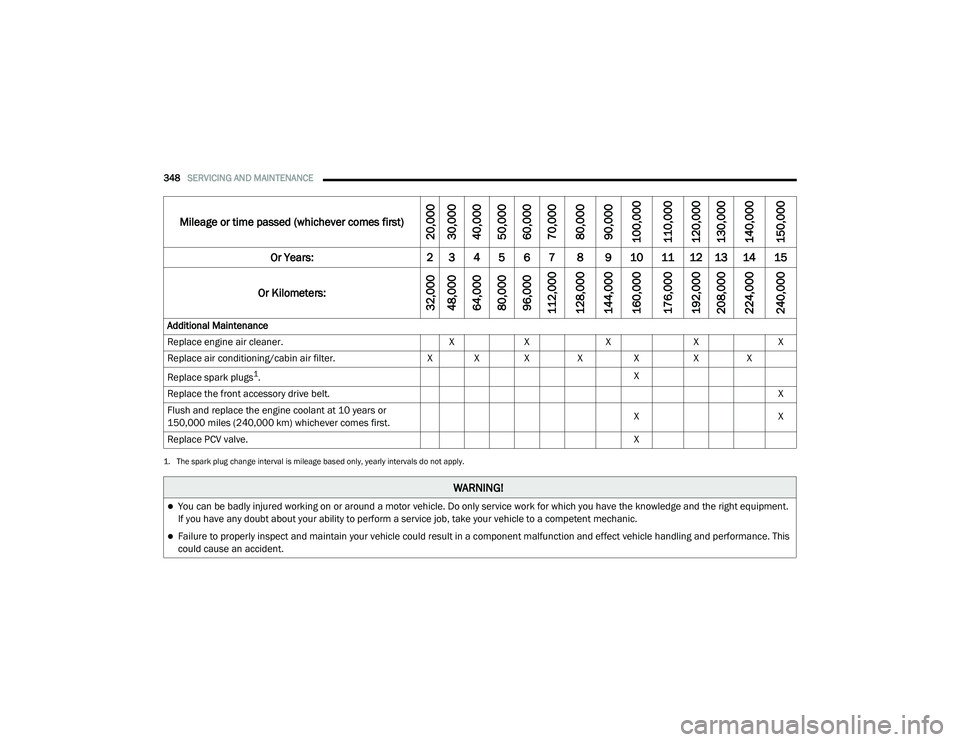
Additional Maintenance
Replace engine air cleaner. XX X XX
Replace air conditioning/cabin air filter. X X X XXX X
Replace spark plugs
1. X
Replace the front accessory drive belt. X
Flush and replace the engine coolant at 10 years or
150,000 miles (240,000 km) whichever comes first. X
X
Replace PCV valve. X
1. The spark plug change interval is mileage based only, yearly intervals do not apply.
WARNING!
You can be badly injured working on or around a motor vehicle. Do only service work for which you have the knowledge and the right equipment.
If you have any doubt about your ability to perform a service job, take your vehicle to a competent mechanic.
Failure to properly inspect and maintain your vehicle could result in a component malfunction and effect vehicle handling and performance. This
could cause an accident.
Mileage or time passed (whichever comes first)
20,000
30,000
40,000
50,000
60,000
70,000
80,000
90,000
100,000
110,000
120,000
130,000
140,000
150,000
Or Years: 2 3 4 5 6 7 8 9 10 11 12 13 14 15
Or Kilometers:
32,000
48,000
64,000
80,000
96,000
112,000
128,000
144,000
160,000
176,000
192,000
208,000
224,000
240,000
20_RU_OM_EN_US_t.book Page 348