display CHRYSLER VOYAGER 1996 User Guide
[x] Cancel search | Manufacturer: CHRYSLER, Model Year: 1996, Model line: VOYAGER, Model: CHRYSLER VOYAGER 1996Pages: 1938, PDF Size: 55.84 MB
Page 339 of 1938
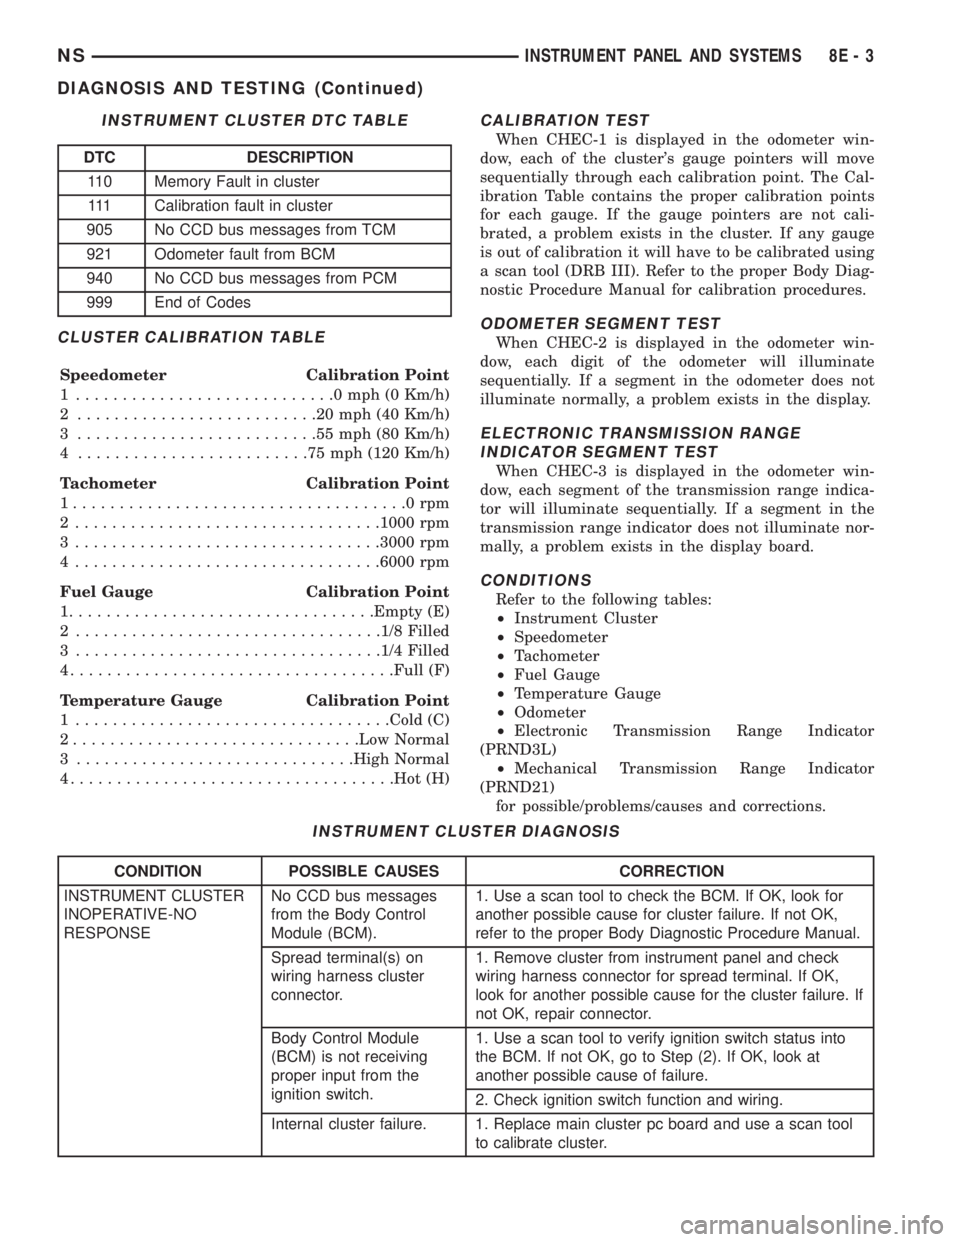
CLUSTER CALIBRATION TABLE
Speedometer Calibration Point
1 ............................0mph(0Km/h)
2 ..........................20mph(40Km/h)
3 ..........................55mph(80Km/h)
4 .........................75mph(120 Km/h)
Tachometer Calibration Point
1....................................0rpm
2 .................................1000 rpm
3 .................................3000 rpm
4 .................................6000 rpm
Fuel Gauge Calibration Point
1.................................Empty (E)
2 .................................1/8 Filled
3 .................................1/4 Filled
4...................................Full (F)
Temperature Gauge Calibration Point
1 ..................................Cold (C)
2...............................Low Normal
3 ..............................High Normal
4...................................Hot (H)
CALIBRATION TEST
When CHEC-1 is displayed in the odometer win-
dow, each of the cluster's gauge pointers will move
sequentially through each calibration point. The Cal-
ibration Table contains the proper calibration points
for each gauge. If the gauge pointers are not cali-
brated, a problem exists in the cluster. If any gauge
is out of calibration it will have to be calibrated using
a scan tool (DRB III). Refer to the proper Body Diag-
nostic Procedure Manual for calibration procedures.
ODOMETER SEGMENT TEST
When CHEC-2 is displayed in the odometer win-
dow, each digit of the odometer will illuminate
sequentially. If a segment in the odometer does not
illuminate normally, a problem exists in the display.
ELECTRONIC TRANSMISSION RANGE
INDICATOR SEGMENT TEST
When CHEC-3 is displayed in the odometer win-
dow, each segment of the transmission range indica-
tor will illuminate sequentially. If a segment in the
transmission range indicator does not illuminate nor-
mally, a problem exists in the display board.
CONDITIONS
Refer to the following tables:
²Instrument Cluster
²Speedometer
²Tachometer
²Fuel Gauge
²Temperature Gauge
²Odometer
²Electronic Transmission Range Indicator
(PRND3L)
²Mechanical Transmission Range Indicator
(PRND21)
for possible/problems/causes and corrections.
INSTRUMENT CLUSTER DTC TABLE
DTC DESCRIPTION
110 Memory Fault in cluster
111 Calibration fault in cluster
905 No CCD bus messages from TCM
921 Odometer fault from BCM
940 No CCD bus messages from PCM
999 End of Codes
INSTRUMENT CLUSTER DIAGNOSIS
CONDITION POSSIBLE CAUSES CORRECTION
INSTRUMENT CLUSTER
INOPERATIVE-NO
RESPONSENo CCD bus messages
from the Body Control
Module (BCM).1. Use a scan tool to check the BCM. If OK, look for
another possible cause for cluster failure. If not OK,
refer to the proper Body Diagnostic Procedure Manual.
Spread terminal(s) on
wiring harness cluster
connector.1. Remove cluster from instrument panel and check
wiring harness connector for spread terminal. If OK,
look for another possible cause for the cluster failure. If
not OK, repair connector.
Body Control Module
(BCM) is not receiving
proper input from the
ignition switch.1. Use a scan tool to verify ignition switch status into
the BCM. If not OK, go to Step (2). If OK, look at
another possible cause of failure.
2. Check ignition switch function and wiring.
Internal cluster failure. 1. Replace main cluster pc board and use a scan tool
to calibrate cluster.
NSINSTRUMENT PANEL AND SYSTEMS 8E - 3
DIAGNOSIS AND TESTING (Continued)
Page 340 of 1938
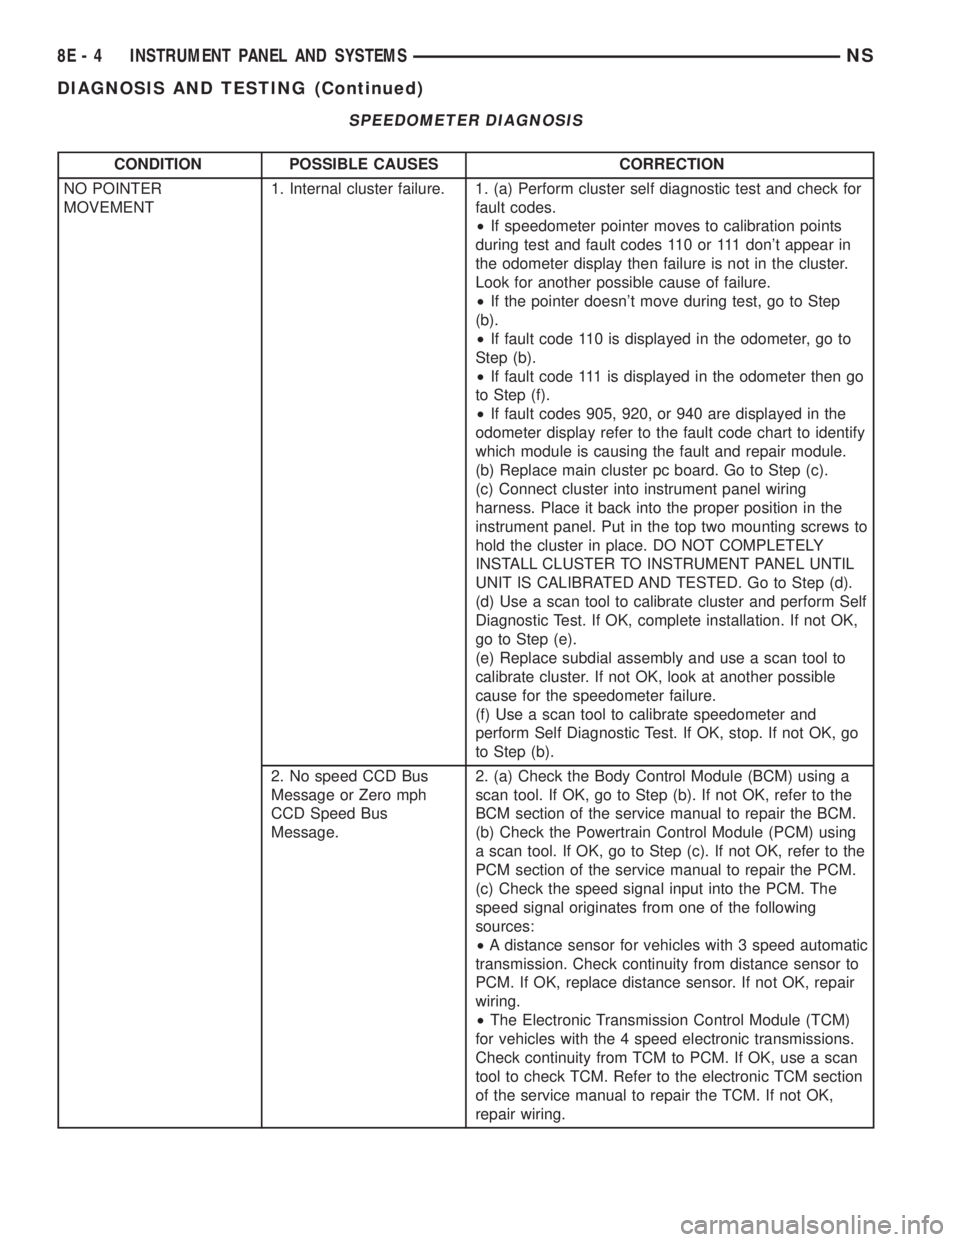
SPEEDOMETER DIAGNOSIS
CONDITION POSSIBLE CAUSES CORRECTION
NO POINTER
MOVEMENT1. Internal cluster failure. 1. (a) Perform cluster self diagnostic test and check for
fault codes.
²If speedometer pointer moves to calibration points
during test and fault codes 110 or 111 don't appear in
the odometer display then failure is not in the cluster.
Look for another possible cause of failure.
²If the pointer doesn't move during test, go to Step
(b).
²If fault code 110 is displayed in the odometer, go to
Step (b).
²If fault code 111 is displayed in the odometer then go
to Step (f).
²If fault codes 905, 920, or 940 are displayed in the
odometer display refer to the fault code chart to identify
which module is causing the fault and repair module.
(b) Replace main cluster pc board. Go to Step (c).
(c) Connect cluster into instrument panel wiring
harness. Place it back into the proper position in the
instrument panel. Put in the top two mounting screws to
hold the cluster in place. DO NOT COMPLETELY
INSTALL CLUSTER TO INSTRUMENT PANEL UNTIL
UNIT IS CALIBRATED AND TESTED. Go to Step (d).
(d) Use a scan tool to calibrate cluster and perform Self
Diagnostic Test. If OK, complete installation. If not OK,
go to Step (e).
(e) Replace subdial assembly and use a scan tool to
calibrate cluster. If not OK, look at another possible
cause for the speedometer failure.
(f) Use a scan tool to calibrate speedometer and
perform Self Diagnostic Test. If OK, stop. If not OK, go
to Step (b).
2. No speed CCD Bus
Message or Zero mph
CCD Speed Bus
Message.2. (a) Check the Body Control Module (BCM) using a
scan tool. If OK, go to Step (b). If not OK, refer to the
BCM section of the service manual to repair the BCM.
(b) Check the Powertrain Control Module (PCM) using
a scan tool. If OK, go to Step (c). If not OK, refer to the
PCM section of the service manual to repair the PCM.
(c) Check the speed signal input into the PCM. The
speed signal originates from one of the following
sources:
²A distance sensor for vehicles with 3 speed automatic
transmission. Check continuity from distance sensor to
PCM. If OK, replace distance sensor. If not OK, repair
wiring.
²The Electronic Transmission Control Module (TCM)
for vehicles with the 4 speed electronic transmissions.
Check continuity from TCM to PCM. If OK, use a scan
tool to check TCM. Refer to the electronic TCM section
of the service manual to repair the TCM. If not OK,
repair wiring.
8E - 4 INSTRUMENT PANEL AND SYSTEMSNS
DIAGNOSIS AND TESTING (Continued)
Page 341 of 1938
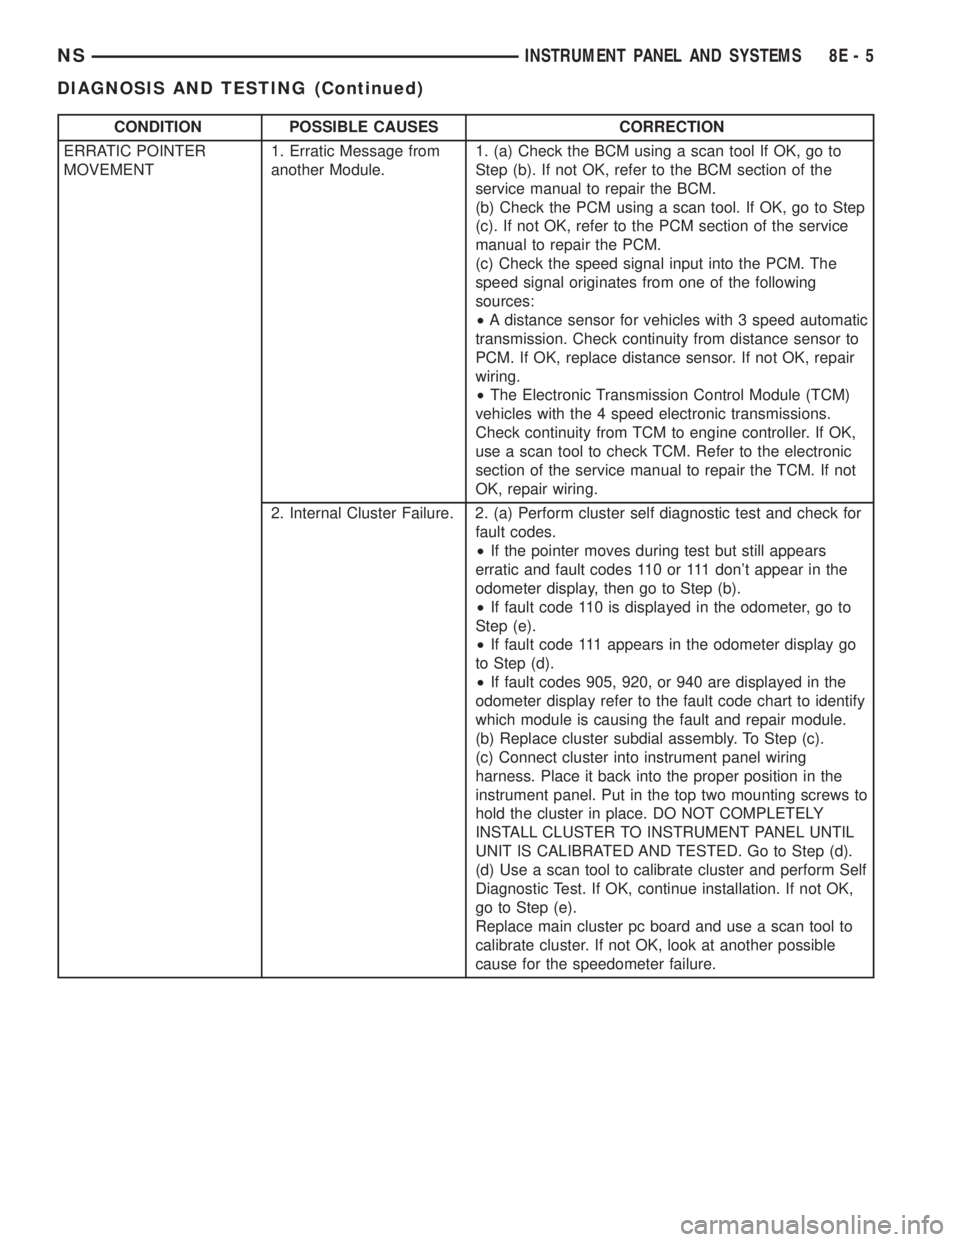
CONDITION POSSIBLE CAUSES CORRECTION
ERRATIC POINTER
MOVEMENT1. Erratic Message from
another Module.1. (a) Check the BCM using a scan tool If OK, go to
Step (b). If not OK, refer to the BCM section of the
service manual to repair the BCM.
(b) Check the PCM using a scan tool. If OK, go to Step
(c). If not OK, refer to the PCM section of the service
manual to repair the PCM.
(c) Check the speed signal input into the PCM. The
speed signal originates from one of the following
sources:
²A distance sensor for vehicles with 3 speed automatic
transmission. Check continuity from distance sensor to
PCM. If OK, replace distance sensor. If not OK, repair
wiring.
²The Electronic Transmission Control Module (TCM)
vehicles with the 4 speed electronic transmissions.
Check continuity from TCM to engine controller. If OK,
use a scan tool to check TCM. Refer to the electronic
section of the service manual to repair the TCM. If not
OK, repair wiring.
2. Internal Cluster Failure. 2. (a) Perform cluster self diagnostic test and check for
fault codes.
²If the pointer moves during test but still appears
erratic and fault codes 110 or 111 don't appear in the
odometer display, then go to Step (b).
²If fault code 110 is displayed in the odometer, go to
Step (e).
²If fault code 111 appears in the odometer display go
to Step (d).
²If fault codes 905, 920, or 940 are displayed in the
odometer display refer to the fault code chart to identify
which module is causing the fault and repair module.
(b) Replace cluster subdial assembly. To Step (c).
(c) Connect cluster into instrument panel wiring
harness. Place it back into the proper position in the
instrument panel. Put in the top two mounting screws to
hold the cluster in place. DO NOT COMPLETELY
INSTALL CLUSTER TO INSTRUMENT PANEL UNTIL
UNIT IS CALIBRATED AND TESTED. Go to Step (d).
(d) Use a scan tool to calibrate cluster and perform Self
Diagnostic Test. If OK, continue installation. If not OK,
go to Step (e).
Replace main cluster pc board and use a scan tool to
calibrate cluster. If not OK, look at another possible
cause for the speedometer failure.
NSINSTRUMENT PANEL AND SYSTEMS 8E - 5
DIAGNOSIS AND TESTING (Continued)
Page 343 of 1938
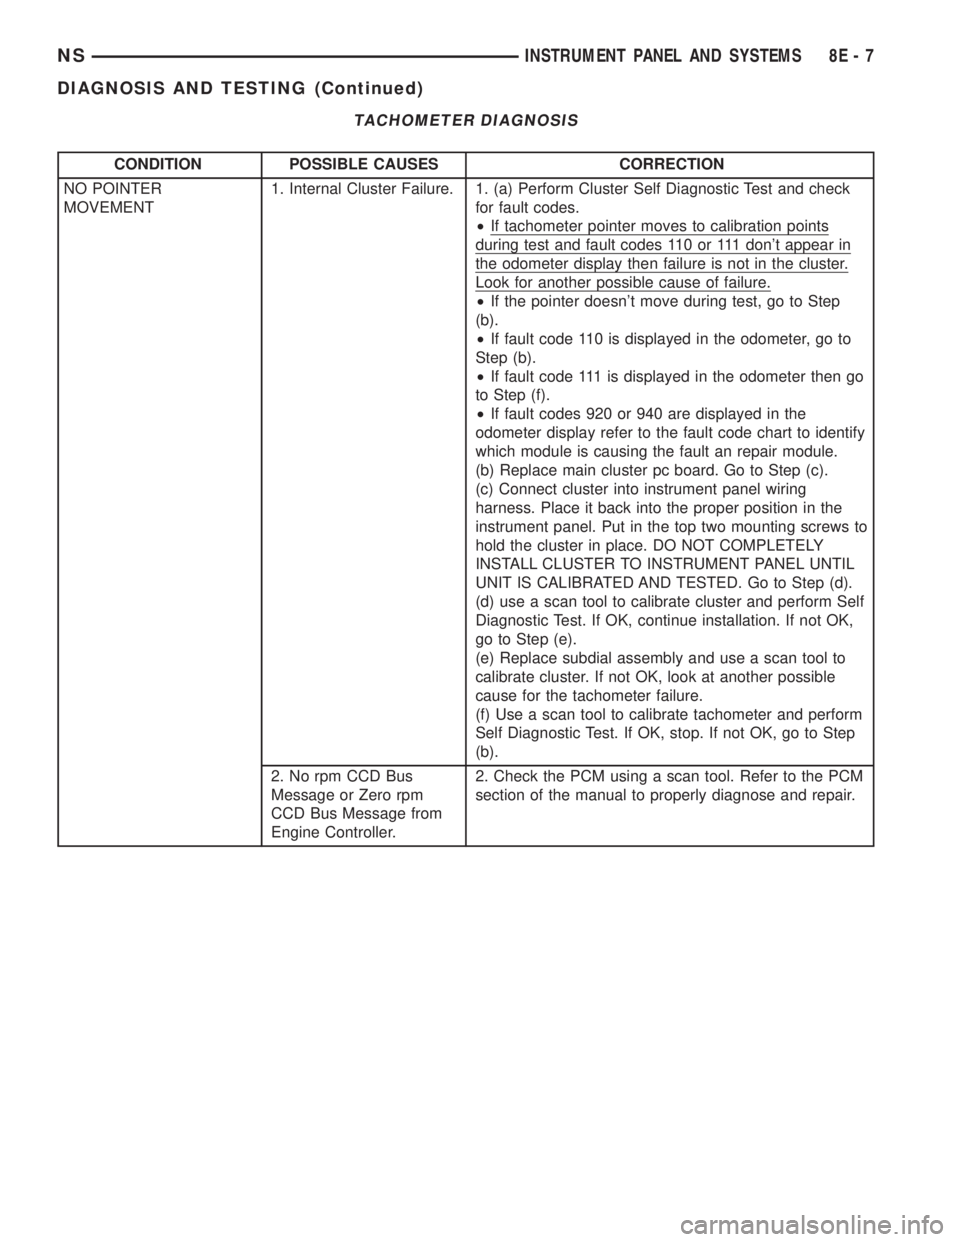
TACHOMETER DIAGNOSIS
CONDITION POSSIBLE CAUSES CORRECTION
NO POINTER
MOVEMENT1. Internal Cluster Failure. 1. (a) Perform Cluster Self Diagnostic Test and check
for fault codes.
²If tachometer pointer moves to calibration points
during test and fault codes 110 or 111 don't appear in
the odometer display then failure is not in the cluster.
Look for another possible cause of failure.
²If the pointer doesn't move during test, go to Step
(b).
²If fault code 110 is displayed in the odometer, go to
Step (b).
²If fault code 111 is displayed in the odometer then go
to Step (f).
²If fault codes 920 or 940 are displayed in the
odometer display refer to the fault code chart to identify
which module is causing the fault an repair module.
(b) Replace main cluster pc board. Go to Step (c).
(c) Connect cluster into instrument panel wiring
harness. Place it back into the proper position in the
instrument panel. Put in the top two mounting screws to
hold the cluster in place. DO NOT COMPLETELY
INSTALL CLUSTER TO INSTRUMENT PANEL UNTIL
UNIT IS CALIBRATED AND TESTED. Go to Step (d).
(d) use a scan tool to calibrate cluster and perform Self
Diagnostic Test. If OK, continue installation. If not OK,
go to Step (e).
(e) Replace subdial assembly and use a scan tool to
calibrate cluster. If not OK, look at another possible
cause for the tachometer failure.
(f) Use a scan tool to calibrate tachometer and perform
Self Diagnostic Test. If OK, stop. If not OK, go to Step
(b).
2. No rpm CCD Bus
Message or Zero rpm
CCD Bus Message from
Engine Controller.2. Check the PCM using a scan tool. Refer to the PCM
section of the manual to properly diagnose and repair.
NSINSTRUMENT PANEL AND SYSTEMS 8E - 7
DIAGNOSIS AND TESTING (Continued)
Page 344 of 1938
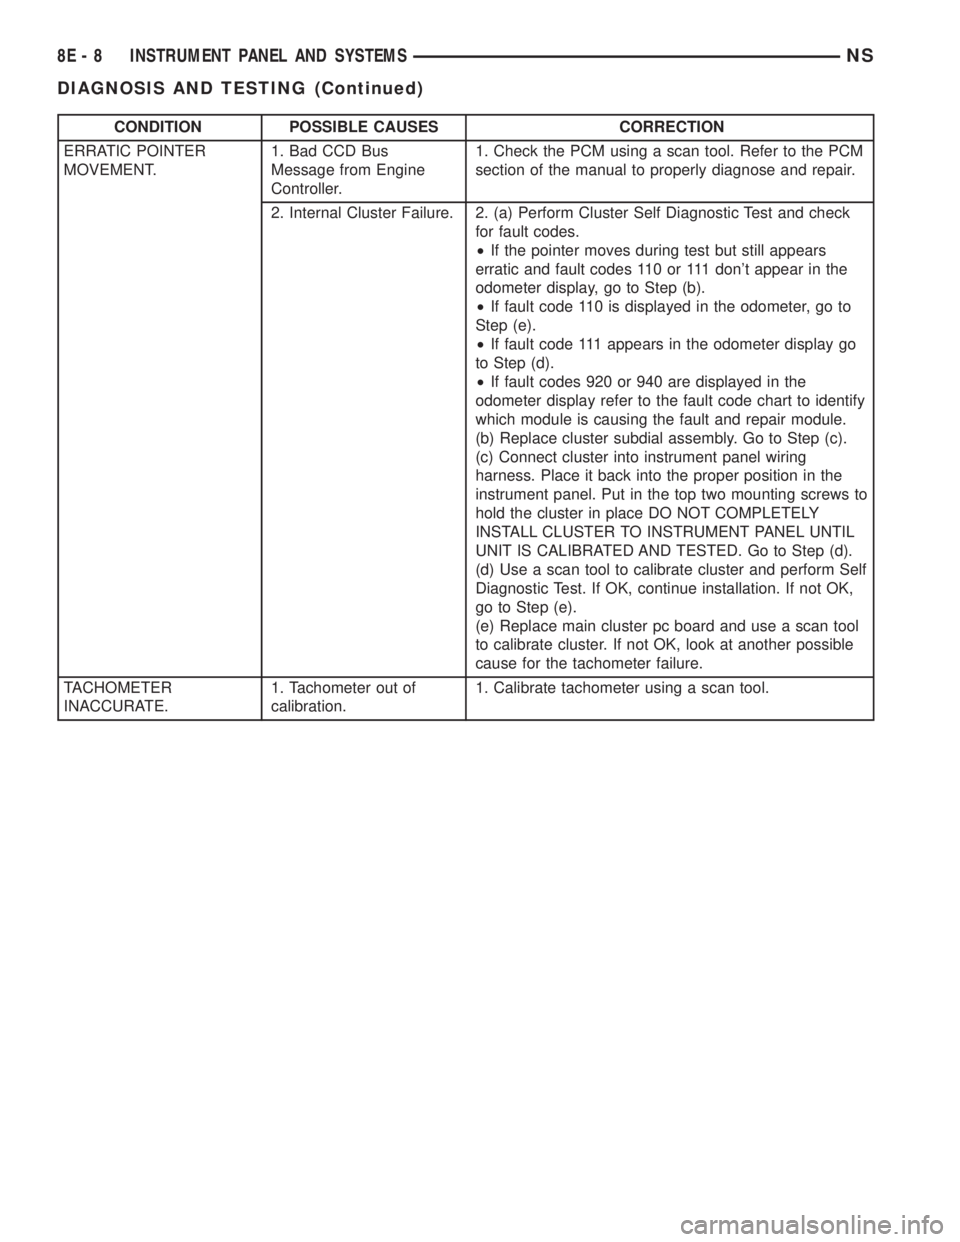
CONDITION POSSIBLE CAUSES CORRECTION
ERRATIC POINTER
MOVEMENT.1. Bad CCD Bus
Message from Engine
Controller.1. Check the PCM using a scan tool. Refer to the PCM
section of the manual to properly diagnose and repair.
2. Internal Cluster Failure. 2. (a) Perform Cluster Self Diagnostic Test and check
for fault codes.
²If the pointer moves during test but still appears
erratic and fault codes 110 or 111 don't appear in the
odometer display, go to Step (b).
²If fault code 110 is displayed in the odometer, go to
Step (e).
²If fault code 111 appears in the odometer display go
to Step (d).
²If fault codes 920 or 940 are displayed in the
odometer display refer to the fault code chart to identify
which module is causing the fault and repair module.
(b) Replace cluster subdial assembly. Go to Step (c).
(c) Connect cluster into instrument panel wiring
harness. Place it back into the proper position in the
instrument panel. Put in the top two mounting screws to
hold the cluster in place DO NOT COMPLETELY
INSTALL CLUSTER TO INSTRUMENT PANEL UNTIL
UNIT IS CALIBRATED AND TESTED. Go to Step (d).
(d) Use a scan tool to calibrate cluster and perform Self
Diagnostic Test. If OK, continue installation. If not OK,
go to Step (e).
(e) Replace main cluster pc board and use a scan tool
to calibrate cluster. If not OK, look at another possible
cause for the tachometer failure.
TACHOMETER
INACCURATE.1. Tachometer out of
calibration.1. Calibrate tachometer using a scan tool.
8E - 8 INSTRUMENT PANEL AND SYSTEMSNS
DIAGNOSIS AND TESTING (Continued)
Page 345 of 1938
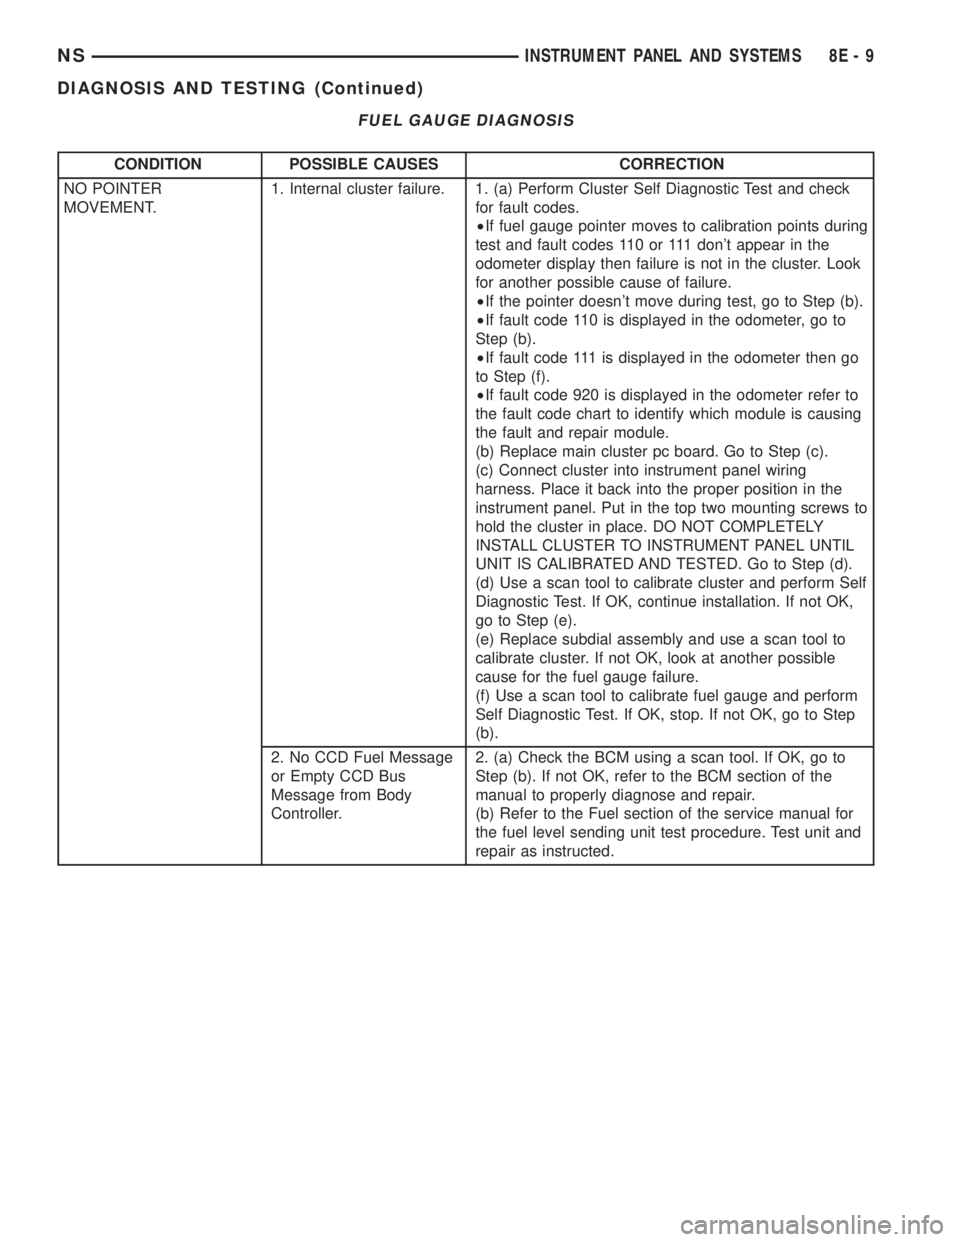
FUEL GAUGE DIAGNOSIS
CONDITION POSSIBLE CAUSES CORRECTION
NO POINTER
MOVEMENT.1. Internal cluster failure. 1. (a) Perform Cluster Self Diagnostic Test and check
for fault codes.
²If fuel gauge pointer moves to calibration points during
test and fault codes 110 or 111 don't appear in the
odometer display then failure is not in the cluster. Look
for another possible cause of failure.
²If the pointer doesn't move during test, go to Step (b).
²If fault code 110 is displayed in the odometer, go to
Step (b).
²If fault code 111 is displayed in the odometer then go
to Step (f).
²If fault code 920 is displayed in the odometer refer to
the fault code chart to identify which module is causing
the fault and repair module.
(b) Replace main cluster pc board. Go to Step (c).
(c) Connect cluster into instrument panel wiring
harness. Place it back into the proper position in the
instrument panel. Put in the top two mounting screws to
hold the cluster in place. DO NOT COMPLETELY
INSTALL CLUSTER TO INSTRUMENT PANEL UNTIL
UNIT IS CALIBRATED AND TESTED. Go to Step (d).
(d) Use a scan tool to calibrate cluster and perform Self
Diagnostic Test. If OK, continue installation. If not OK,
go to Step (e).
(e) Replace subdial assembly and use a scan tool to
calibrate cluster. If not OK, look at another possible
cause for the fuel gauge failure.
(f) Use a scan tool to calibrate fuel gauge and perform
Self Diagnostic Test. If OK, stop. If not OK, go to Step
(b).
2. No CCD Fuel Message
or Empty CCD Bus
Message from Body
Controller.2. (a) Check the BCM using a scan tool. If OK, go to
Step (b). If not OK, refer to the BCM section of the
manual to properly diagnose and repair.
(b) Refer to the Fuel section of the service manual for
the fuel level sending unit test procedure. Test unit and
repair as instructed.
NSINSTRUMENT PANEL AND SYSTEMS 8E - 9
DIAGNOSIS AND TESTING (Continued)
Page 346 of 1938
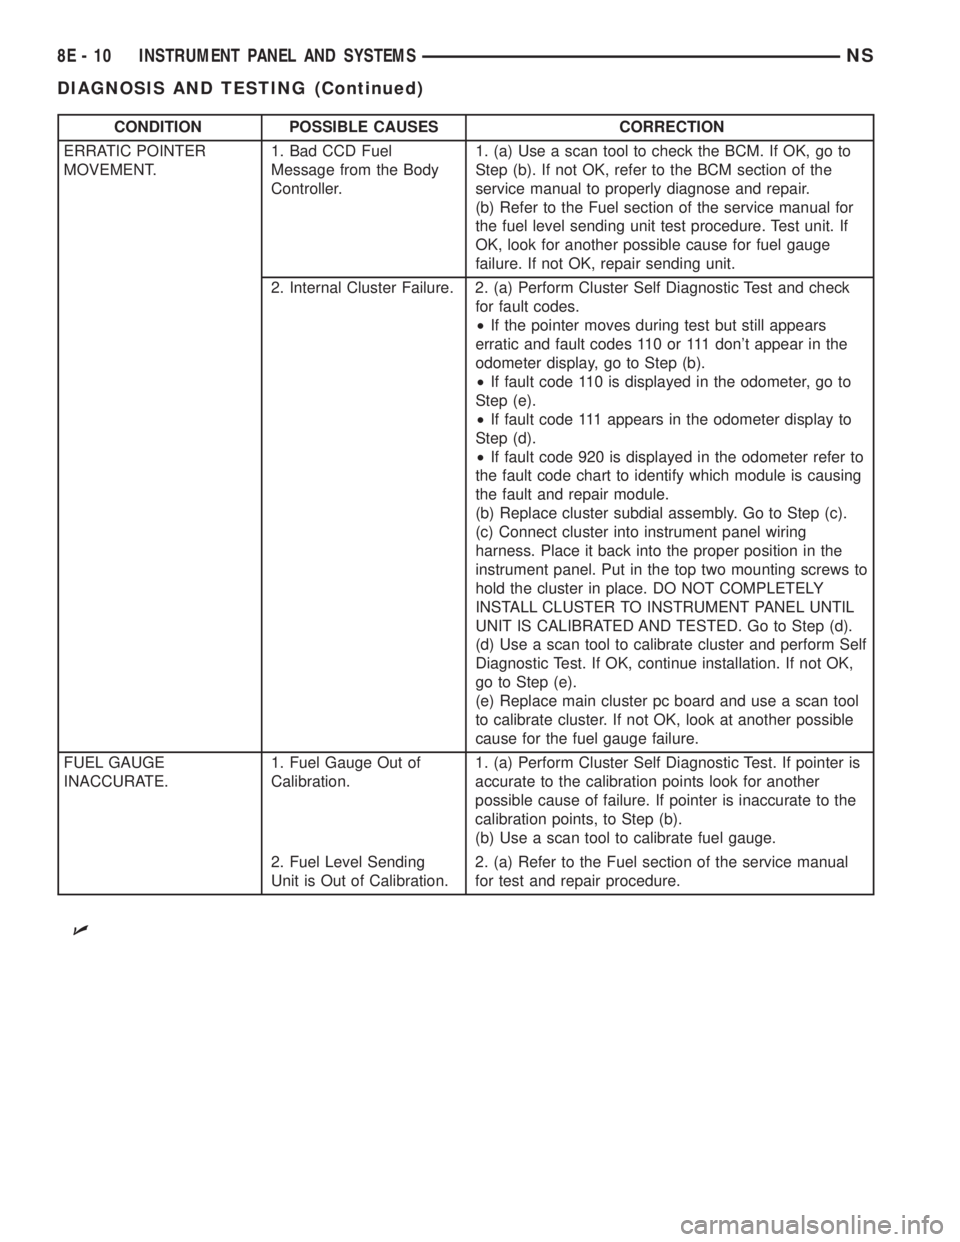
CONDITION POSSIBLE CAUSES CORRECTION
ERRATIC POINTER
MOVEMENT.1. Bad CCD Fuel
Message from the Body
Controller.1. (a) Use a scan tool to check the BCM. If OK, go to
Step (b). If not OK, refer to the BCM section of the
service manual to properly diagnose and repair.
(b) Refer to the Fuel section of the service manual for
the fuel level sending unit test procedure. Test unit. If
OK, look for another possible cause for fuel gauge
failure. If not OK, repair sending unit.
2. Internal Cluster Failure. 2. (a) Perform Cluster Self Diagnostic Test and check
for fault codes.
²If the pointer moves during test but still appears
erratic and fault codes 110 or 111 don't appear in the
odometer display, go to Step (b).
²If fault code 110 is displayed in the odometer, go to
Step (e).
²If fault code 111 appears in the odometer display to
Step (d).
²If fault code 920 is displayed in the odometer refer to
the fault code chart to identify which module is causing
the fault and repair module.
(b) Replace cluster subdial assembly. Go to Step (c).
(c) Connect cluster into instrument panel wiring
harness. Place it back into the proper position in the
instrument panel. Put in the top two mounting screws to
hold the cluster in place. DO NOT COMPLETELY
INSTALL CLUSTER TO INSTRUMENT PANEL UNTIL
UNIT IS CALIBRATED AND TESTED. Go to Step (d).
(d) Use a scan tool to calibrate cluster and perform Self
Diagnostic Test. If OK, continue installation. If not OK,
go to Step (e).
(e) Replace main cluster pc board and use a scan tool
to calibrate cluster. If not OK, look at another possible
cause for the fuel gauge failure.
FUEL GAUGE
INACCURATE.1. Fuel Gauge Out of
Calibration.1. (a) Perform Cluster Self Diagnostic Test. If pointer is
accurate to the calibration points look for another
possible cause of failure. If pointer is inaccurate to the
calibration points, to Step (b).
(b) Use a scan tool to calibrate fuel gauge.
2. Fuel Level Sending
Unit is Out of Calibration.2. (a) Refer to the Fuel section of the service manual
for test and repair procedure.
U
8E - 10 INSTRUMENT PANEL AND SYSTEMSNS
DIAGNOSIS AND TESTING (Continued)
Page 347 of 1938
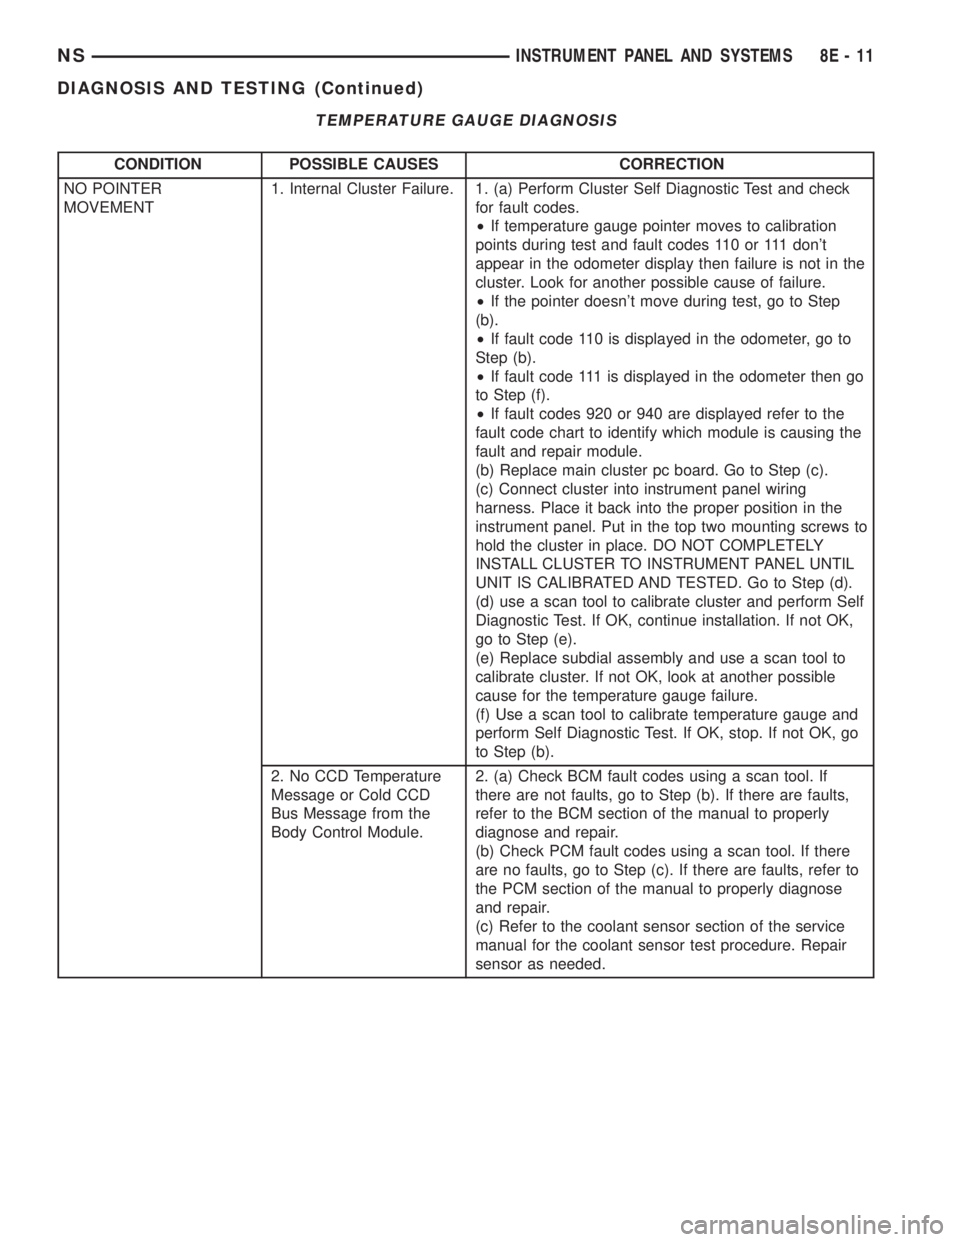
TEMPERATURE GAUGE DIAGNOSIS
CONDITION POSSIBLE CAUSES CORRECTION
NO POINTER
MOVEMENT1. Internal Cluster Failure. 1. (a) Perform Cluster Self Diagnostic Test and check
for fault codes.
²If temperature gauge pointer moves to calibration
points during test and fault codes 110 or 111 don't
appear in the odometer display then failure is not in the
cluster. Look for another possible cause of failure.
²If the pointer doesn't move during test, go to Step
(b).
²If fault code 110 is displayed in the odometer, go to
Step (b).
²If fault code 111 is displayed in the odometer then go
to Step (f).
²If fault codes 920 or 940 are displayed refer to the
fault code chart to identify which module is causing the
fault and repair module.
(b) Replace main cluster pc board. Go to Step (c).
(c) Connect cluster into instrument panel wiring
harness. Place it back into the proper position in the
instrument panel. Put in the top two mounting screws to
hold the cluster in place. DO NOT COMPLETELY
INSTALL CLUSTER TO INSTRUMENT PANEL UNTIL
UNIT IS CALIBRATED AND TESTED. Go to Step (d).
(d) use a scan tool to calibrate cluster and perform Self
Diagnostic Test. If OK, continue installation. If not OK,
go to Step (e).
(e) Replace subdial assembly and use a scan tool to
calibrate cluster. If not OK, look at another possible
cause for the temperature gauge failure.
(f) Use a scan tool to calibrate temperature gauge and
perform Self Diagnostic Test. If OK, stop. If not OK, go
to Step (b).
2. No CCD Temperature
Message or Cold CCD
Bus Message from the
Body Control Module.2. (a) Check BCM fault codes using a scan tool. If
there are not faults, go to Step (b). If there are faults,
refer to the BCM section of the manual to properly
diagnose and repair.
(b) Check PCM fault codes using a scan tool. If there
are no faults, go to Step (c). If there are faults, refer to
the PCM section of the manual to properly diagnose
and repair.
(c) Refer to the coolant sensor section of the service
manual for the coolant sensor test procedure. Repair
sensor as needed.
NSINSTRUMENT PANEL AND SYSTEMS 8E - 11
DIAGNOSIS AND TESTING (Continued)
Page 348 of 1938
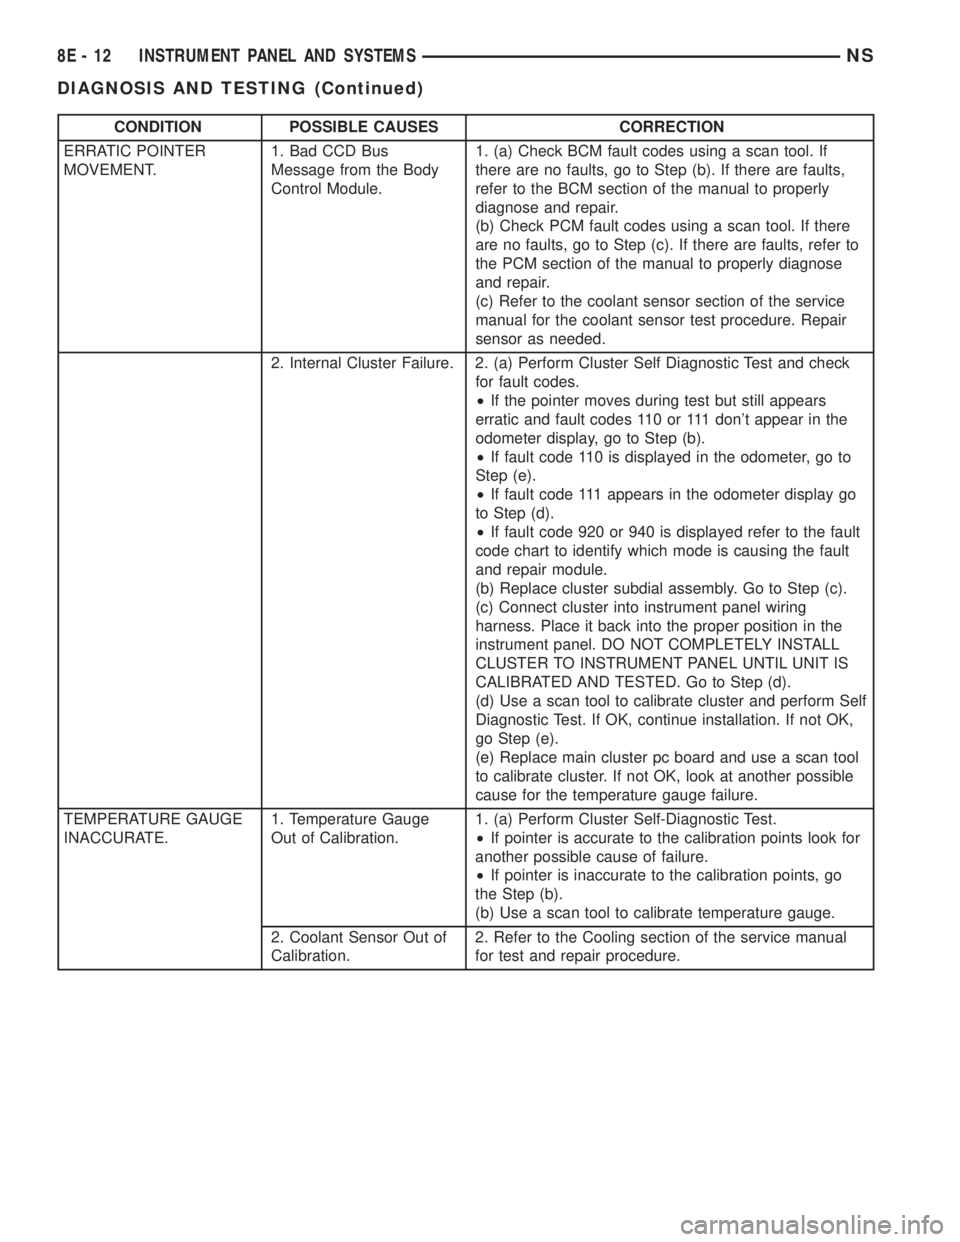
CONDITION POSSIBLE CAUSES CORRECTION
ERRATIC POINTER
MOVEMENT.1. Bad CCD Bus
Message from the Body
Control Module.1. (a) Check BCM fault codes using a scan tool. If
there are no faults, go to Step (b). If there are faults,
refer to the BCM section of the manual to properly
diagnose and repair.
(b) Check PCM fault codes using a scan tool. If there
are no faults, go to Step (c). If there are faults, refer to
the PCM section of the manual to properly diagnose
and repair.
(c) Refer to the coolant sensor section of the service
manual for the coolant sensor test procedure. Repair
sensor as needed.
2. Internal Cluster Failure. 2. (a) Perform Cluster Self Diagnostic Test and check
for fault codes.
²If the pointer moves during test but still appears
erratic and fault codes 110 or 111 don't appear in the
odometer display, go to Step (b).
²If fault code 110 is displayed in the odometer, go to
Step (e).
²If fault code 111 appears in the odometer display go
to Step (d).
²If fault code 920 or 940 is displayed refer to the fault
code chart to identify which mode is causing the fault
and repair module.
(b) Replace cluster subdial assembly. Go to Step (c).
(c) Connect cluster into instrument panel wiring
harness. Place it back into the proper position in the
instrument panel. DO NOT COMPLETELY INSTALL
CLUSTER TO INSTRUMENT PANEL UNTIL UNIT IS
CALIBRATED AND TESTED. Go to Step (d).
(d) Use a scan tool to calibrate cluster and perform Self
Diagnostic Test. If OK, continue installation. If not OK,
go Step (e).
(e) Replace main cluster pc board and use a scan tool
to calibrate cluster. If not OK, look at another possible
cause for the temperature gauge failure.
TEMPERATURE GAUGE
INACCURATE.1. Temperature Gauge
Out of Calibration.1. (a) Perform Cluster Self-Diagnostic Test.
²If pointer is accurate to the calibration points look for
another possible cause of failure.
²If pointer is inaccurate to the calibration points, go
the Step (b).
(b) Use a scan tool to calibrate temperature gauge.
2. Coolant Sensor Out of
Calibration.2. Refer to the Cooling section of the service manual
for test and repair procedure.
8E - 12 INSTRUMENT PANEL AND SYSTEMSNS
DIAGNOSIS AND TESTING (Continued)
Page 349 of 1938
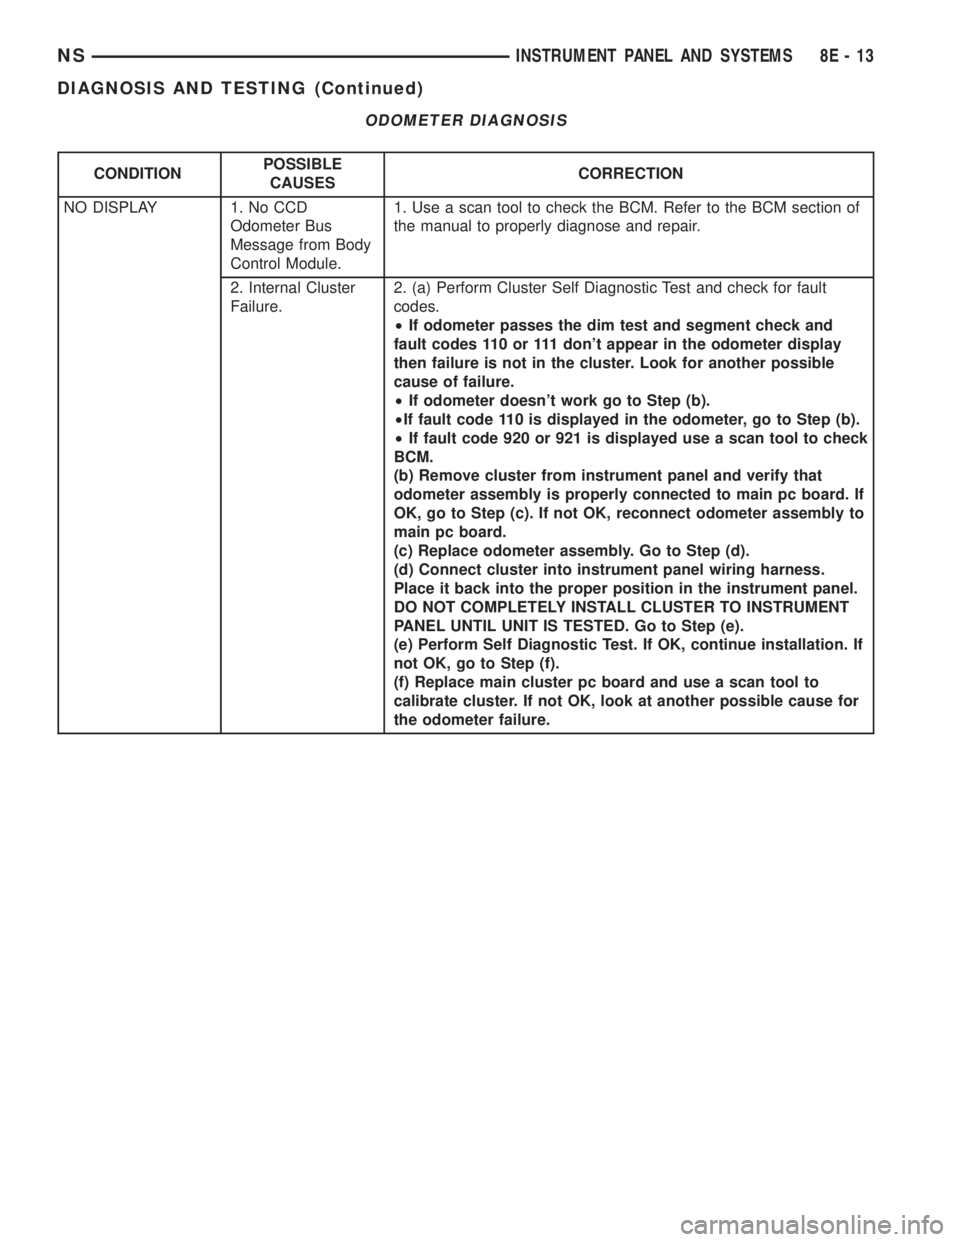
ODOMETER DIAGNOSIS
CONDITIONPOSSIBLE
CAUSESCORRECTION
NO DISPLAY 1. No CCD
Odometer Bus
Message from Body
Control Module.1. Use a scan tool to check the BCM. Refer to the BCM section of
the manual to properly diagnose and repair.
2. Internal Cluster
Failure.2. (a) Perform Cluster Self Diagnostic Test and check for fault
codes.
²If odometer passes the dim test and segment check and
fault codes 110 or 111 don't appear in the odometer display
then failure is not in the cluster. Look for another possible
cause of failure.
²If odometer doesn't work go to Step (b).
²If fault code 110 is displayed in the odometer, go to Step (b).
²If fault code 920 or 921 is displayed use a scan tool to check
BCM.
(b) Remove cluster from instrument panel and verify that
odometer assembly is properly connected to main pc board. If
OK, go to Step (c). If not OK, reconnect odometer assembly to
main pc board.
(c) Replace odometer assembly. Go to Step (d).
(d) Connect cluster into instrument panel wiring harness.
Place it back into the proper position in the instrument panel.
DO NOT COMPLETELY INSTALL CLUSTER TO INSTRUMENT
PANEL UNTIL UNIT IS TESTED. Go to Step (e).
(e) Perform Self Diagnostic Test. If OK, continue installation. If
not OK, go to Step (f).
(f) Replace main cluster pc board and use a scan tool to
calibrate cluster. If not OK, look at another possible cause for
the odometer failure.
NSINSTRUMENT PANEL AND SYSTEMS 8E - 13
DIAGNOSIS AND TESTING (Continued)