Egr CHRYSLER VOYAGER 1996 Repair Manual
[x] Cancel search | Manufacturer: CHRYSLER, Model Year: 1996, Model line: VOYAGER, Model: CHRYSLER VOYAGER 1996Pages: 1938, PDF Size: 55.84 MB
Page 1073 of 1938
need to be reground to prevent seal damage when
the valve is installed.
VALVE INSTALLATION
(1) Coat valve stems with clean engine oil and
insert in cylinder head.
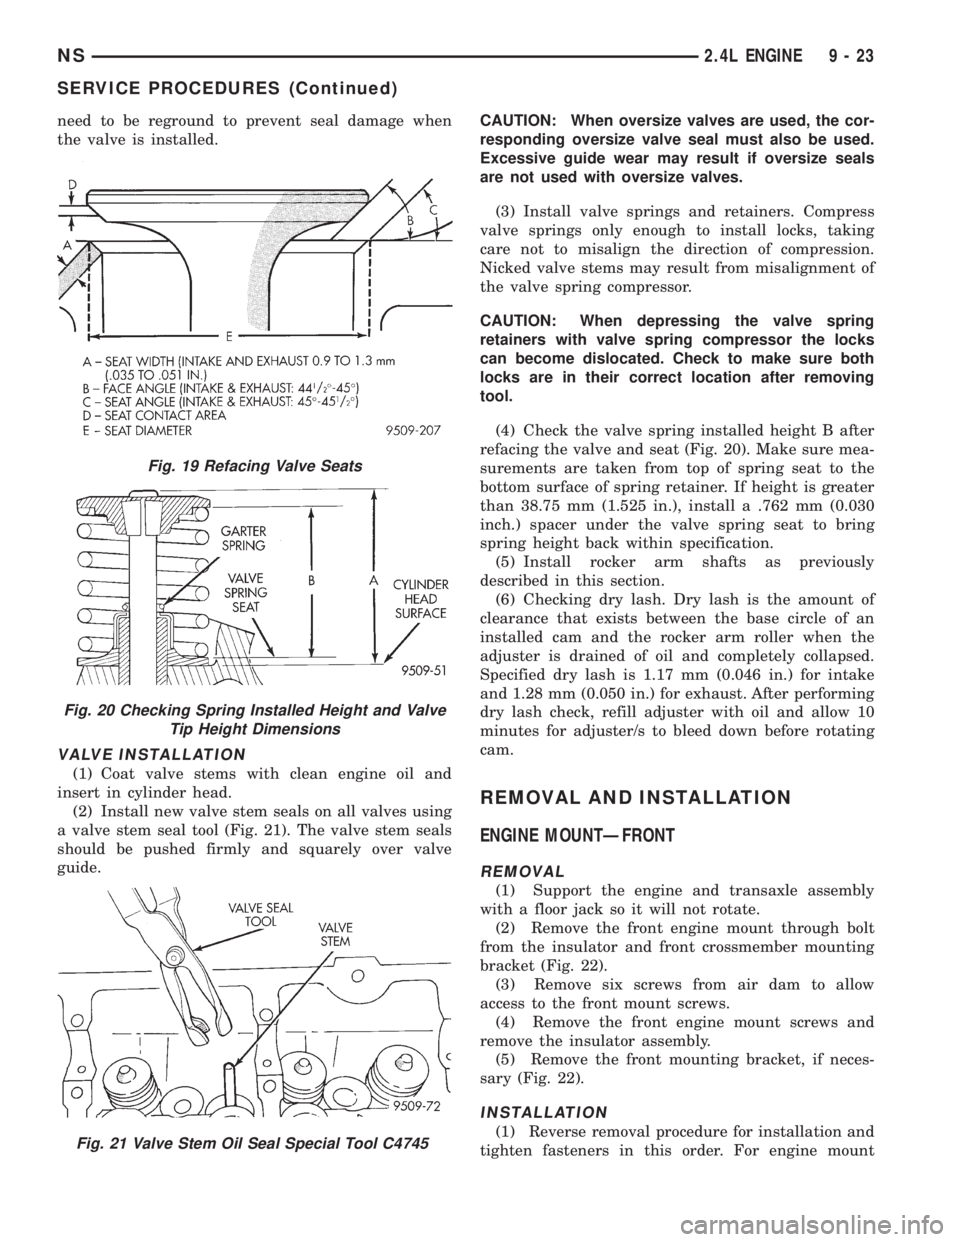
(2) Install new valve stem seals on all valves using
a valve stem seal tool (Fig. 21). The valve stem seals
should be pushed firmly and squarely over valve
guide.CAUTION: When oversize valves are used, the cor-
responding oversize valve seal must also be used.
Excessive guide wear may result if oversize seals
are not used with oversize valves.
(3) Install valve springs and retainers. Compress
valve springs only enough to install locks, taking
care not to misalign the direction of compression.
Nicked valve stems may result from misalignment of
the valve spring compressor.
CAUTION: When depressing the valve spring
retainers with valve spring compressor the locks
can become dislocated. Check to make sure both
locks are in their correct location after removing
tool.
(4) Check the valve spring installed height B after
refacing the valve and seat (Fig. 20). Make sure mea-
surements are taken from top of spring seat to the
bottom surface of spring retainer. If height is greater
than 38.75 mm (1.525 in.), install a .762 mm (0.030
inch.) spacer under the valve spring seat to bring
spring height back within specification.
(5) Install rocker arm shafts as previously
described in this section.
(6) Checking dry lash. Dry lash is the amount of
clearance that exists between the base circle of an
installed cam and the rocker arm roller when the
adjuster is drained of oil and completely collapsed.
Specified dry lash is 1.17 mm (0.046 in.) for intake
and 1.28 mm (0.050 in.) for exhaust. After performing
dry lash check, refill adjuster with oil and allow 10
minutes for adjuster/s to bleed down before rotating
cam.
REMOVAL AND INSTALLATION
ENGINE MOUNTÐFRONT
REMOVAL
(1) Support the engine and transaxle assembly
with a floor jack so it will not rotate.
(2) Remove the front engine mount through bolt
from the insulator and front crossmember mounting
bracket (Fig. 22).
(3) Remove six screws from air dam to allow
access to the front mount screws.
(4) Remove the front engine mount screws and
remove the insulator assembly.
(5) Remove the front mounting bracket, if neces-
sary (Fig. 22).
INSTALLATION
(1) Reverse removal procedure for installation and
tighten fasteners in this order. For engine mount
Fig. 19 Refacing Valve Seats
Fig. 20 Checking Spring Installed Height and Valve
Tip Height Dimensions
Fig. 21 Valve Stem Oil Seal Special Tool C4745
NS2.4L ENGINE 9 - 23
SERVICE PROCEDURES (Continued)
Page 1102 of 1938
(3) If valve stems are worn more than 0.05 mm
(.002 in.), replace valve.
VALVE SPRINGS
(1) Whenever valves have been removed for
inspection, reconditioning or replacement, valve
springs should be tested for correct tension. Discard
the springs that do not meet specifications. The fol-
lowing specifications apply to both intake and
exhaust valves springs:
²Valve Closed Nominal TensionÐ 76 lbs. @ 38.0
mm (1.50 in.)
²Valve Open Nominal TensionÐ 136 lbs. @ 29.75
mm (1.17 in.)
(2) Inspect each valve spring for squareness with
a steel square and surface plate, test springs from
both ends. If the spring is more than 1.5 mm (1/16
inch) out of square, install a new spring.
CRANKSHAFT
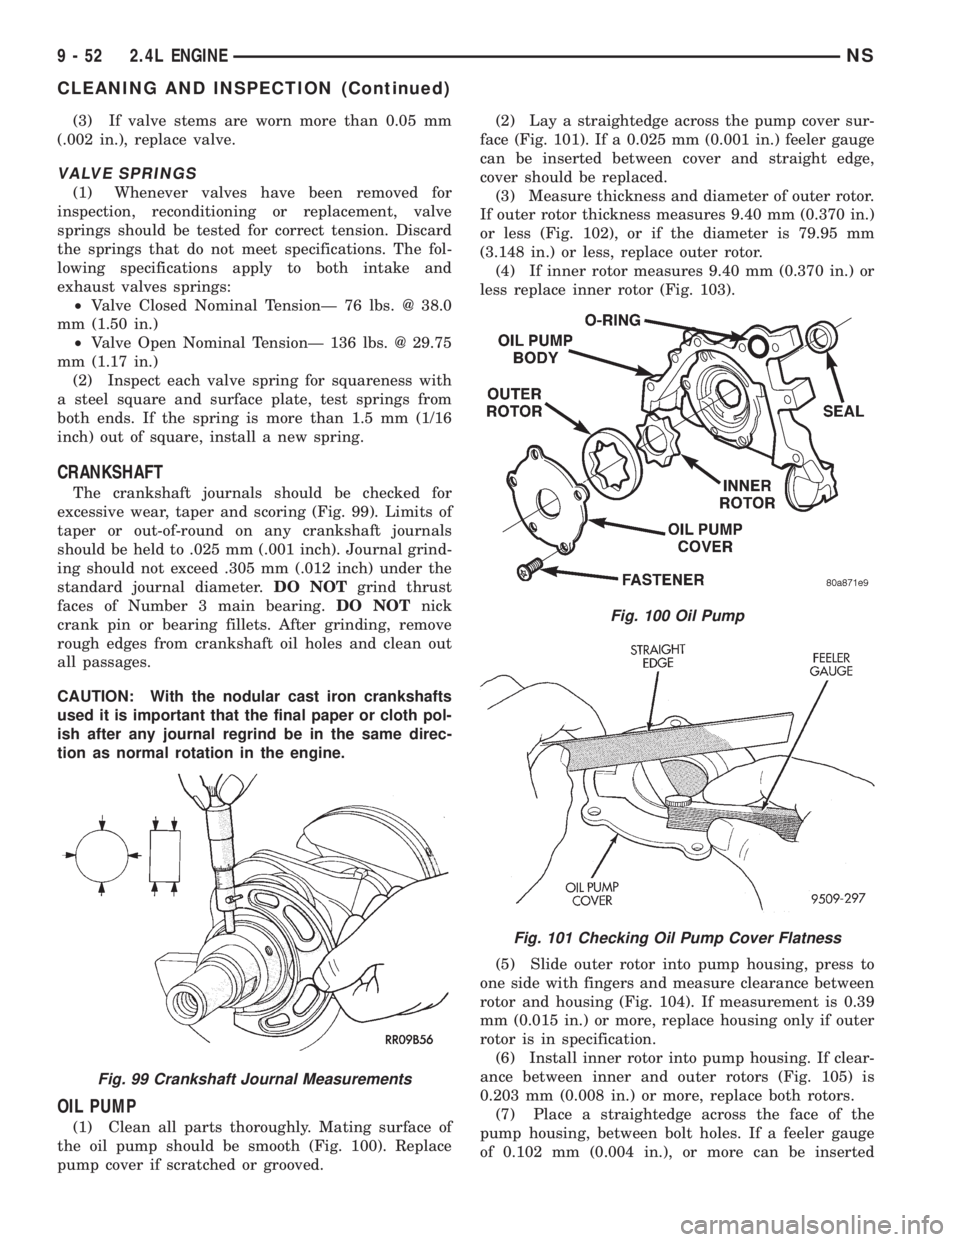
The crankshaft journals should be checked for
excessive wear, taper and scoring (Fig. 99). Limits of
taper or out-of-round on any crankshaft journals
should be held to .025 mm (.001 inch). Journal grind-
ing should not exceed .305 mm (.012 inch) under the
standard journal diameter.DO NOTgrind thrust
faces of Number 3 main bearing.DO NOTnick
crank pin or bearing fillets. After grinding, remove
rough edges from crankshaft oil holes and clean out
all passages.
CAUTION: With the nodular cast iron crankshafts
used it is important that the final paper or cloth pol-
ish after any journal regrind be in the same direc-
tion as normal rotation in the engine.
OIL PUMP
(1) Clean all parts thoroughly. Mating surface of
the oil pump should be smooth (Fig. 100). Replace
pump cover if scratched or grooved.(2) Lay a straightedge across the pump cover sur-
face (Fig. 101). If a 0.025 mm (0.001 in.) feeler gauge
can be inserted between cover and straight edge,
cover should be replaced.
(3) Measure thickness and diameter of outer rotor.
If outer rotor thickness measures 9.40 mm (0.370 in.)
or less (Fig. 102), or if the diameter is 79.95 mm
(3.148 in.) or less, replace outer rotor.
(4) If inner rotor measures 9.40 mm (0.370 in.) or
less replace inner rotor (Fig. 103).
(5) Slide outer rotor into pump housing, press to
one side with fingers and measure clearance between
rotor and housing (Fig. 104). If measurement is 0.39
mm (0.015 in.) or more, replace housing only if outer
rotor is in specification.
(6) Install inner rotor into pump housing. If clear-
ance between inner and outer rotors (Fig. 105) is
0.203 mm (0.008 in.) or more, replace both rotors.
(7) Place a straightedge across the face of the
pump housing, between bolt holes. If a feeler gauge
of 0.102 mm (0.004 in.), or more can be inserted
Fig. 99 Crankshaft Journal Measurements
Fig. 100 Oil Pump
Fig. 101 Checking Oil Pump Cover Flatness
9 - 52 2.4L ENGINENS
CLEANING AND INSPECTION (Continued)
Page 1117 of 1938
VALVE SEAT
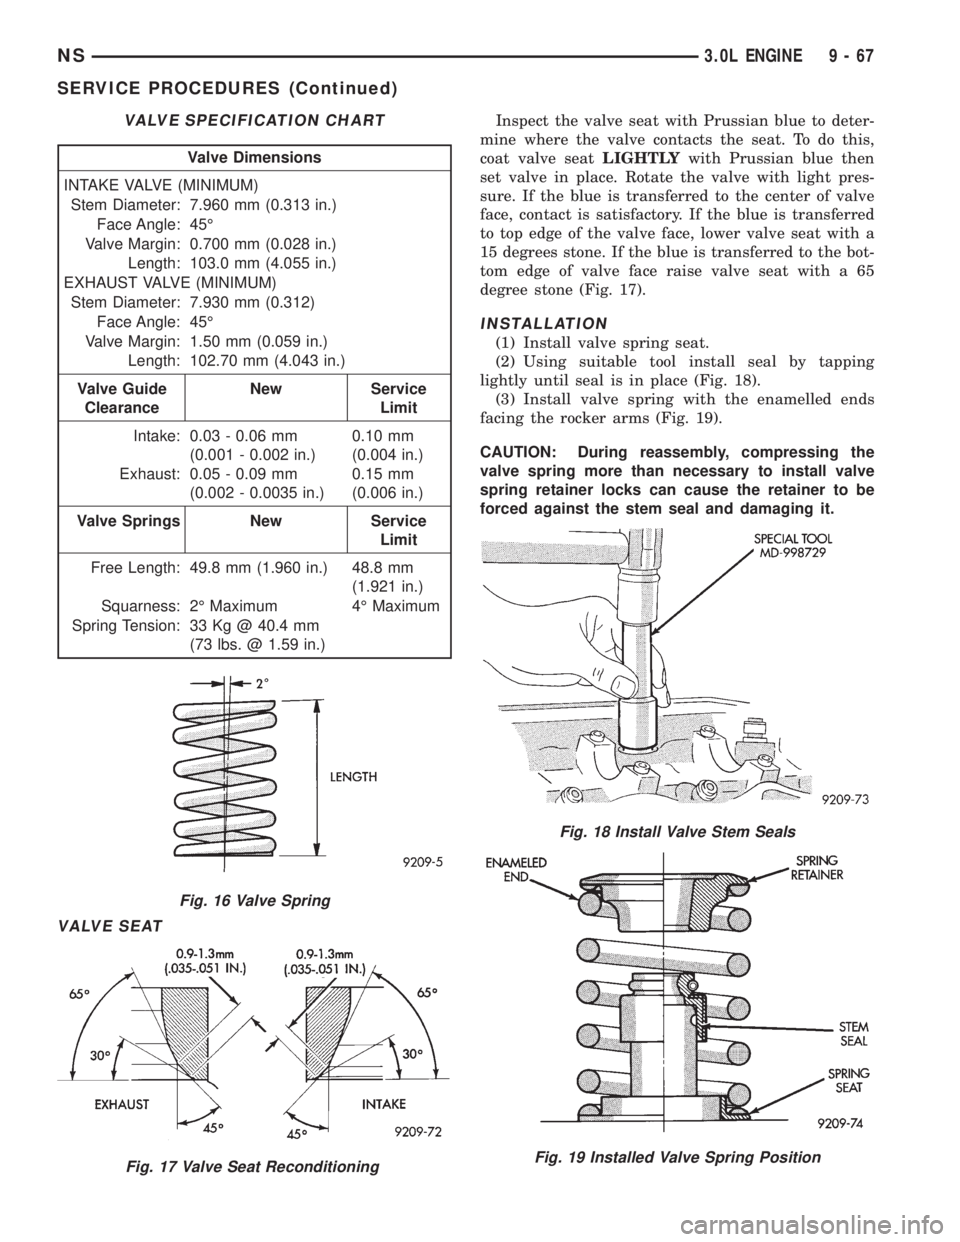
Inspect the valve seat with Prussian blue to deter-
mine where the valve contacts the seat. To do this,
coat valve seatLIGHTLYwith Prussian blue then
set valve in place. Rotate the valve with light pres-
sure. If the blue is transferred to the center of valve
face, contact is satisfactory. If the blue is transferred
to top edge of the valve face, lower valve seat with a
15 degrees stone. If the blue is transferred to the bot-
tom edge of valve face raise valve seat with a 65
degree stone (Fig. 17).
INSTALLATION
(1) Install valve spring seat.
(2) Using suitable tool install seal by tapping
lightly until seal is in place (Fig. 18).
(3) Install valve spring with the enamelled ends
facing the rocker arms (Fig. 19).
CAUTION: During reassembly, compressing the
valve spring more than necessary to install valve
spring retainer locks can cause the retainer to be
forced against the stem seal and damaging it.
VALVE SPECIFICATION CHART
Valve Dimensions
INTAKE VALVE (MINIMUM)
Stem Diameter: 7.960 mm (0.313 in.)
Face Angle: 45É
Valve Margin: 0.700 mm (0.028 in.)
Length: 103.0 mm (4.055 in.)
EXHAUST VALVE (MINIMUM)
Stem Diameter: 7.930 mm (0.312)
Face Angle: 45É
Valve Margin: 1.50 mm (0.059 in.)
Length: 102.70 mm (4.043 in.)
Valve Guide
ClearanceNew Service
Limit
Intake: 0.03 - 0.06 mm
(0.001 - 0.002 in.)0.10 mm
(0.004 in.)
Exhaust: 0.05 - 0.09 mm
(0.002 - 0.0035 in.)0.15 mm
(0.006 in.)
Valve Springs New Service
Limit
Free Length: 49.8 mm (1.960 in.) 48.8 mm
(1.921 in.)
Squarness: 2É Maximum 4É Maximum
Spring Tension: 33 Kg @ 40.4 mm
(73 lbs. @ 1.59 in.)
Fig. 16 Valve Spring
Fig. 17 Valve Seat Reconditioning
Fig. 18 Install Valve Stem Seals
Fig. 19 Installed Valve Spring Position
NS3.0L ENGINE 9 - 67
SERVICE PROCEDURES (Continued)
Page 1119 of 1938
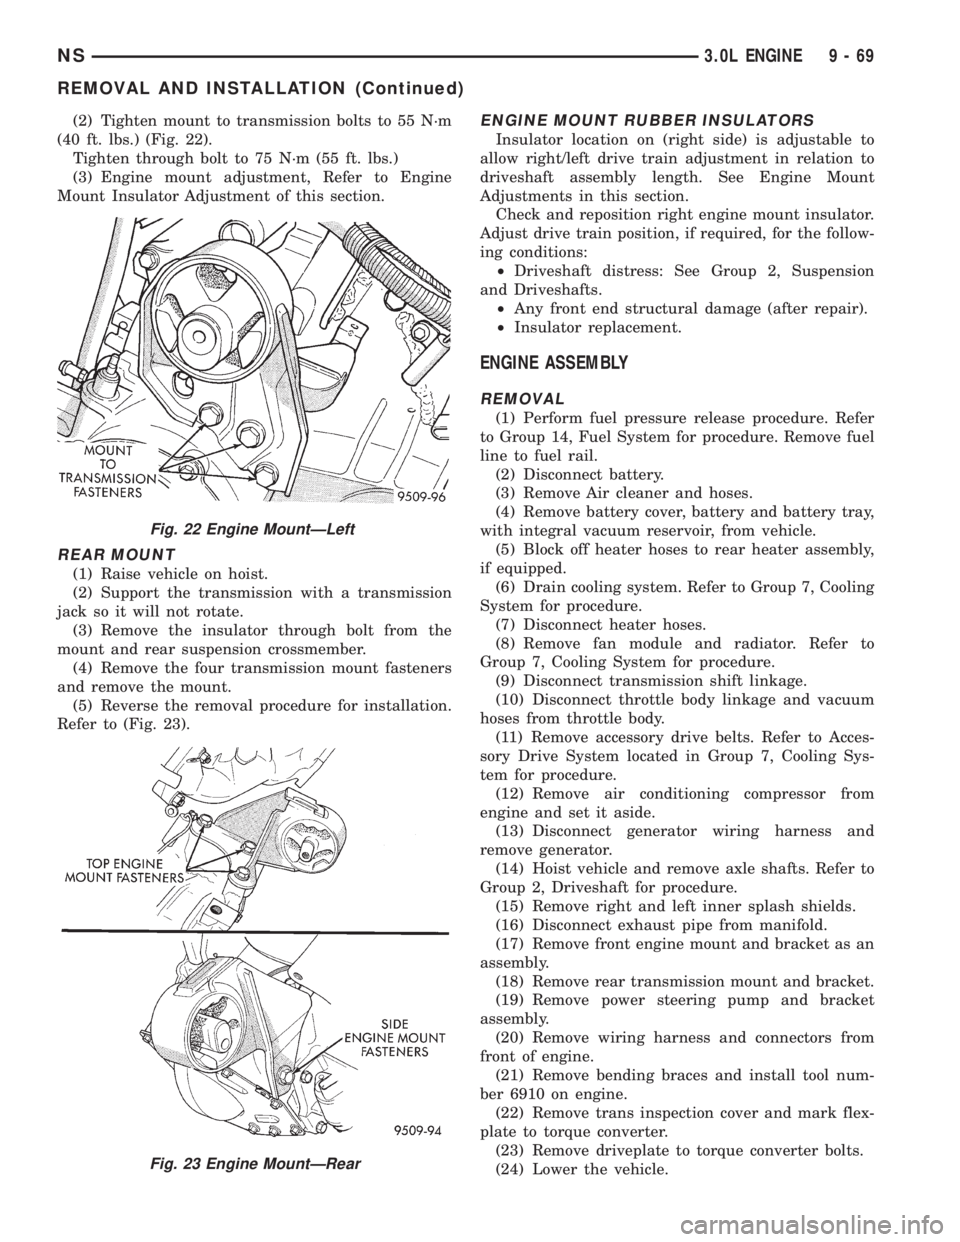
(2) Tighten mount to transmission bolts to 55 N´m
(40 ft. lbs.) (Fig. 22).
Tighten through bolt to 75 N´m (55 ft. lbs.)
(3) Engine mount adjustment, Refer to Engine
Mount Insulator Adjustment of this section.
REAR MOUNT
(1) Raise vehicle on hoist.
(2) Support the transmission with a transmission
jack so it will not rotate.
(3) Remove the insulator through bolt from the
mount and rear suspension crossmember.
(4) Remove the four transmission mount fasteners
and remove the mount.
(5) Reverse the removal procedure for installation.
Refer to (Fig. 23).
ENGINE MOUNT RUBBER INSULATORS
Insulator location on (right side) is adjustable to
allow right/left drive train adjustment in relation to
driveshaft assembly length. See Engine Mount
Adjustments in this section.
Check and reposition right engine mount insulator.
Adjust drive train position, if required, for the follow-
ing conditions:
²Driveshaft distress: See Group 2, Suspension
and Driveshafts.
²Any front end structural damage (after repair).
²Insulator replacement.
ENGINE ASSEMBLY
REMOVAL
(1) Perform fuel pressure release procedure. Refer
to Group 14, Fuel System for procedure. Remove fuel
line to fuel rail.
(2) Disconnect battery.
(3) Remove Air cleaner and hoses.
(4) Remove battery cover, battery and battery tray,
with integral vacuum reservoir, from vehicle.
(5) Block off heater hoses to rear heater assembly,
if equipped.
(6) Drain cooling system. Refer to Group 7, Cooling
System for procedure.
(7) Disconnect heater hoses.
(8) Remove fan module and radiator. Refer to
Group 7, Cooling System for procedure.
(9) Disconnect transmission shift linkage.
(10) Disconnect throttle body linkage and vacuum
hoses from throttle body.
(11) Remove accessory drive belts. Refer to Acces-
sory Drive System located in Group 7, Cooling Sys-
tem for procedure.
(12) Remove air conditioning compressor from
engine and set it aside.
(13) Disconnect generator wiring harness and
remove generator.
(14) Hoist vehicle and remove axle shafts. Refer to
Group 2, Driveshaft for procedure.
(15) Remove right and left inner splash shields.
(16) Disconnect exhaust pipe from manifold.
(17) Remove front engine mount and bracket as an
assembly.
(18) Remove rear transmission mount and bracket.
(19) Remove power steering pump and bracket
assembly.
(20) Remove wiring harness and connectors from
front of engine.
(21) Remove bending braces and install tool num-
ber 6910 on engine.
(22) Remove trans inspection cover and mark flex-
plate to torque converter.
(23) Remove driveplate to torque converter bolts.
(24) Lower the vehicle.
Fig. 22 Engine MountÐLeft
Fig. 23 Engine MountÐRear
NS3.0L ENGINE 9 - 69
REMOVAL AND INSTALLATION (Continued)
Page 1144 of 1938
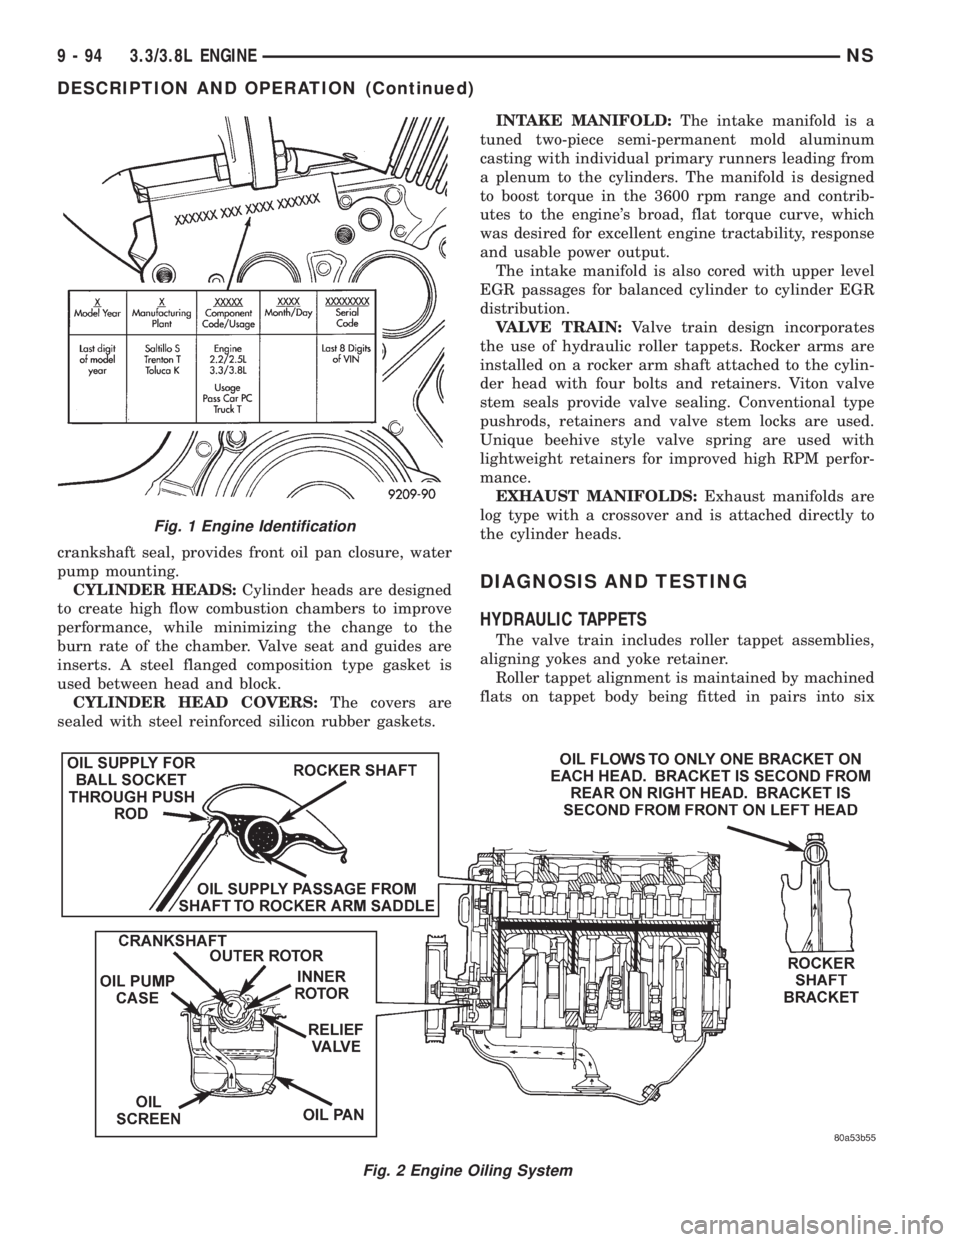
crankshaft seal, provides front oil pan closure, water
pump mounting.
CYLINDER HEADS:Cylinder heads are designed
to create high flow combustion chambers to improve
performance, while minimizing the change to the
burn rate of the chamber. Valve seat and guides are
inserts. A steel flanged composition type gasket is
used between head and block.
CYLINDER HEAD COVERS:The covers are
sealed with steel reinforced silicon rubber gaskets.INTAKE MANIFOLD:The intake manifold is a
tuned two-piece semi-permanent mold aluminum
casting with individual primary runners leading from
a plenum to the cylinders. The manifold is designed
to boost torque in the 3600 rpm range and contrib-
utes to the engine's broad, flat torque curve, which
was desired for excellent engine tractability, response
and usable power output.
The intake manifold is also cored with upper level
EGR passages for balanced cylinder to cylinder EGR
distribution.
VALVE TRAIN:Valve train design incorporates
the use of hydraulic roller tappets. Rocker arms are
installed on a rocker arm shaft attached to the cylin-
der head with four bolts and retainers. Viton valve
stem seals provide valve sealing. Conventional type
pushrods, retainers and valve stem locks are used.
Unique beehive style valve spring are used with
lightweight retainers for improved high RPM perfor-
mance.
EXHAUST MANIFOLDS:Exhaust manifolds are
log type with a crossover and is attached directly to
the cylinder heads.
DIAGNOSIS AND TESTING
HYDRAULIC TAPPETS
The valve train includes roller tappet assemblies,
aligning yokes and yoke retainer.
Roller tappet alignment is maintained by machined
flats on tappet body being fitted in pairs into six
Fig. 2 Engine Oiling System
Fig. 1 Engine Identification
9 - 94 3.3/3.8L ENGINENS
DESCRIPTION AND OPERATION (Continued)
Page 1146 of 1938
NOTE: Worn valve guides or cocked springs are
sometimes mistaken for noisy tappets. If such is
the case, noise may be dampened by applying side
thrust on the valve spring. If noise is not apprecia-
bly reduced, it can be assumed the noise is in the
tappet. Inspect the rocker arm push rod sockets
and push rod ends for wear.
Valve tappet noise ranges from light noise to a
heavy click. A light noise is usually caused by exces-
sive leak-down around the unit plunger which will
necessitate replacing the tappet, or by the plunger
partially sticking in the tappet body cylinder. A heavy
click is caused either by a tappet check valve not
seating, or by foreign particles becoming wedged
between the plunger and the tappet body causing the
plunger to stick in the down position. This heavy
click will be accompanied by excessive clearance
between the valve stem and rocker arm as valve
closes. In either case, tappet assembly should be
removed for inspection and cleaning.
CHECKING ENGINE OIL PRESSURE
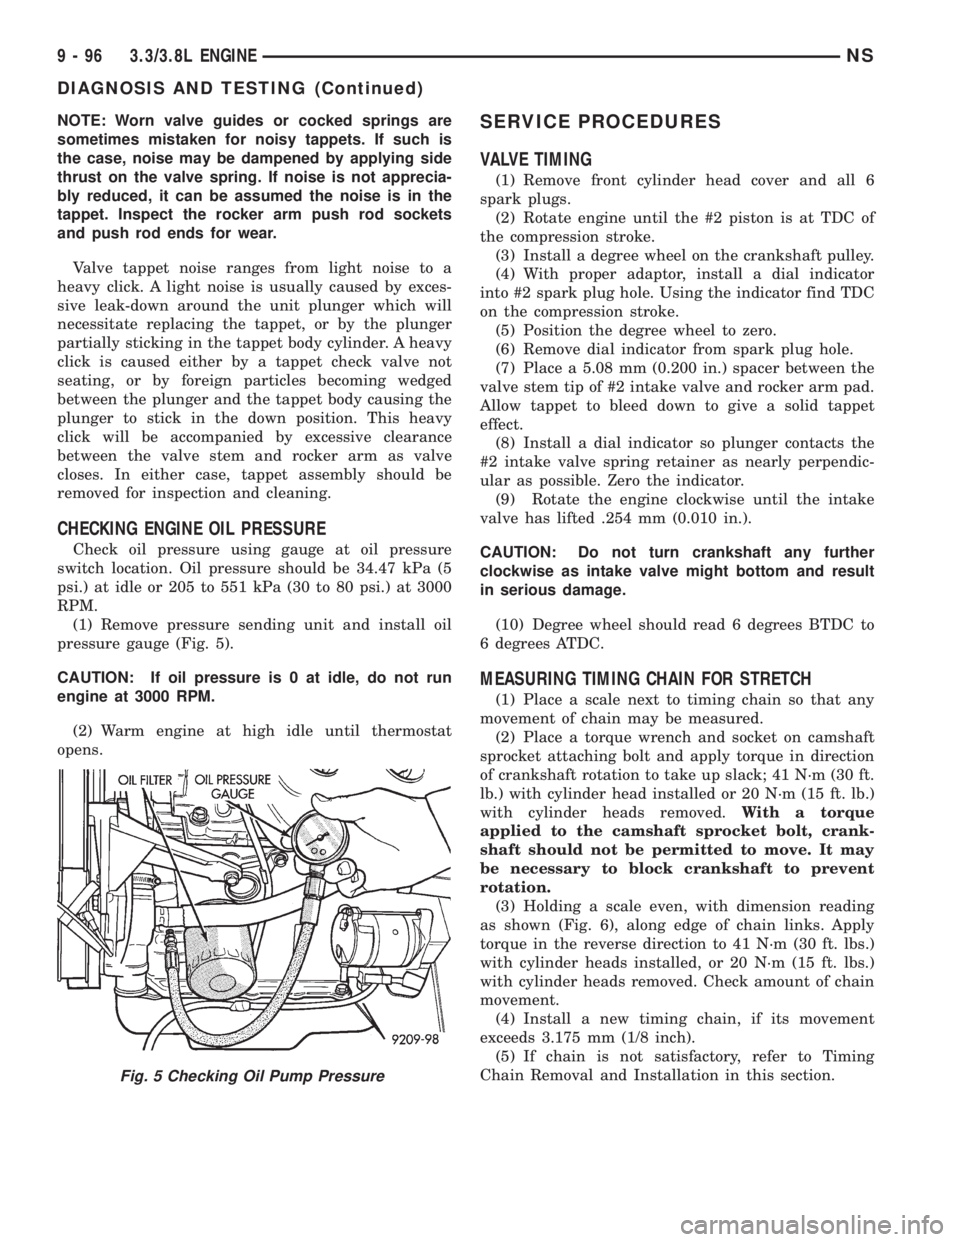
Check oil pressure using gauge at oil pressure
switch location. Oil pressure should be 34.47 kPa (5
psi.) at idle or 205 to 551 kPa (30 to 80 psi.) at 3000
RPM.
(1) Remove pressure sending unit and install oil
pressure gauge (Fig. 5).
CAUTION: If oil pressure is 0 at idle, do not run
engine at 3000 RPM.
(2) Warm engine at high idle until thermostat
opens.
SERVICE PROCEDURES
VALVE TIMING
(1) Remove front cylinder head cover and all 6
spark plugs.
(2) Rotate engine until the #2 piston is at TDC of
the compression stroke.
(3) Install a degree wheel on the crankshaft pulley.
(4) With proper adaptor, install a dial indicator
into #2 spark plug hole. Using the indicator find TDC
on the compression stroke.
(5) Position the degree wheel to zero.
(6) Remove dial indicator from spark plug hole.
(7) Place a 5.08 mm (0.200 in.) spacer between the
valve stem tip of #2 intake valve and rocker arm pad.
Allow tappet to bleed down to give a solid tappet
effect.
(8) Install a dial indicator so plunger contacts the
#2 intake valve spring retainer as nearly perpendic-
ular as possible. Zero the indicator.
(9) Rotate the engine clockwise until the intake
valve has lifted .254 mm (0.010 in.).
CAUTION: Do not turn crankshaft any further
clockwise as intake valve might bottom and result
in serious damage.
(10) Degree wheel should read 6 degrees BTDC to
6 degrees ATDC.
MEASURING TIMING CHAIN FOR STRETCH
(1) Place a scale next to timing chain so that any
movement of chain may be measured.
(2) Place a torque wrench and socket on camshaft
sprocket attaching bolt and apply torque in direction
of crankshaft rotation to take up slack; 41 N´m (30 ft.
lb.) with cylinder head installed or 20 N´m (15 ft. lb.)
with cylinder heads removed.With a torque
applied to the camshaft sprocket bolt, crank-
shaft should not be permitted to move. It may
be necessary to block crankshaft to prevent
rotation.
(3) Holding a scale even, with dimension reading
as shown (Fig. 6), along edge of chain links. Apply
torque in the reverse direction to 41 N´m (30 ft. lbs.)
with cylinder heads installed, or 20 N´m (15 ft. lbs.)
with cylinder heads removed. Check amount of chain
movement.
(4) Install a new timing chain, if its movement
exceeds 3.175 mm (1/8 inch).
(5) If chain is not satisfactory, refer to Timing
Chain Removal and Installation in this section.
Fig. 5 Checking Oil Pump Pressure
9 - 96 3.3/3.8L ENGINENS
DIAGNOSIS AND TESTING (Continued)
Page 1147 of 1938
FITTING PISTONS AND RINGS
FITTING PISTONS
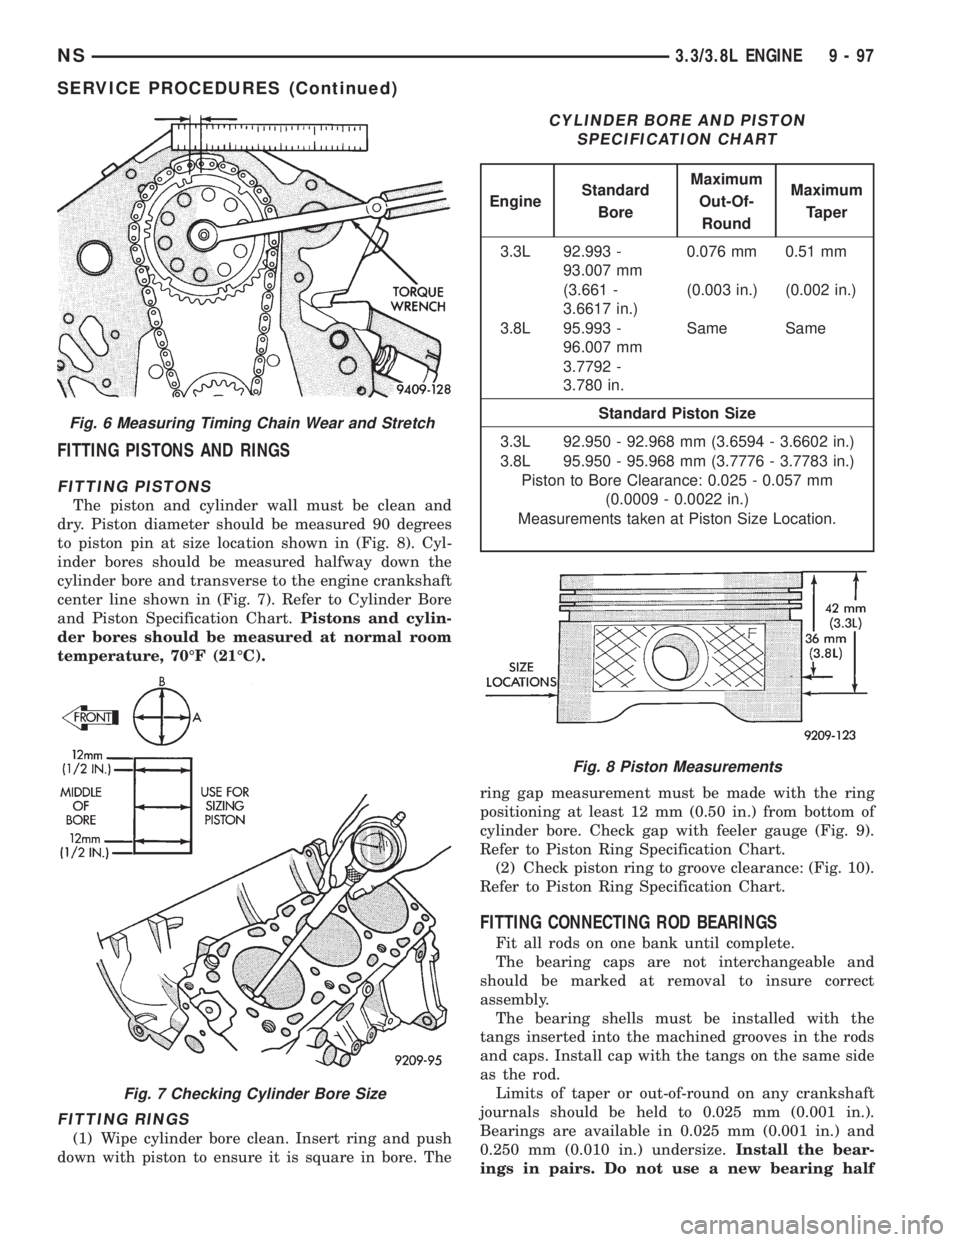
The piston and cylinder wall must be clean and
dry. Piston diameter should be measured 90 degrees
to piston pin at size location shown in (Fig. 8). Cyl-
inder bores should be measured halfway down the
cylinder bore and transverse to the engine crankshaft
center line shown in (Fig. 7). Refer to Cylinder Bore
and Piston Specification Chart.Pistons and cylin-
der bores should be measured at normal room
temperature, 70ÉF (21ÉC).
FITTING RINGS
(1) Wipe cylinder bore clean. Insert ring and push
down with piston to ensure it is square in bore. Thering gap measurement must be made with the ring
positioning at least 12 mm (0.50 in.) from bottom of
cylinder bore. Check gap with feeler gauge (Fig. 9).
Refer to Piston Ring Specification Chart.
(2) Check piston ring to groove clearance: (Fig. 10).
Refer to Piston Ring Specification Chart.
FITTING CONNECTING ROD BEARINGS
Fit all rods on one bank until complete.
The bearing caps are not interchangeable and
should be marked at removal to insure correct
assembly.
The bearing shells must be installed with the
tangs inserted into the machined grooves in the rods
and caps. Install cap with the tangs on the same side
as the rod.
Limits of taper or out-of-round on any crankshaft
journals should be held to 0.025 mm (0.001 in.).
Bearings are available in 0.025 mm (0.001 in.) and
0.250 mm (0.010 in.) undersize.Install the bear-
ings in pairs. Do not use a new bearing half
Fig. 6 Measuring Timing Chain Wear and Stretch
Fig. 7 Checking Cylinder Bore Size
CYLINDER BORE AND PISTON
SPECIFICATION CHART
EngineStandard
BoreMaximum
Out-Of-
RoundMaximum
Taper
3.3L 92.993 -
93.007 mm0.076 mm 0.51 mm
(3.661 -
3.6617 in.)(0.003 in.) (0.002 in.)
3.8L 95.993 -
96.007 mmSame Same
3.7792 -
3.780 in.
Standard Piston Size
3.3L 92.950 - 92.968 mm (3.6594 - 3.6602 in.)
3.8L 95.950 - 95.968 mm (3.7776 - 3.7783 in.)
Piston to Bore Clearance: 0.025 - 0.057 mm
(0.0009 - 0.0022 in.)
Measurements taken at Piston Size Location.
Fig. 8 Piston Measurements
NS3.3/3.8L ENGINE 9 - 97
SERVICE PROCEDURES (Continued)
Page 1151 of 1938
dure of 0.15 mm (0.005 in.), 0.40 mm (0.015 in.)
and 0.80 mm (0.030 in.) so the valve guides may
be reamed true in relation to the valve seat.
After reaming guides, the seat runout should be
measured and resurfaced if necessary. See
Refacing Valves and Valve Seats.VALVE GUIDES
NOTE: Replace cylinder head if guide does not
clean up with 0.80 mm (0.030 in.) oversize reamer,
or if guide is loose in cylinder head.
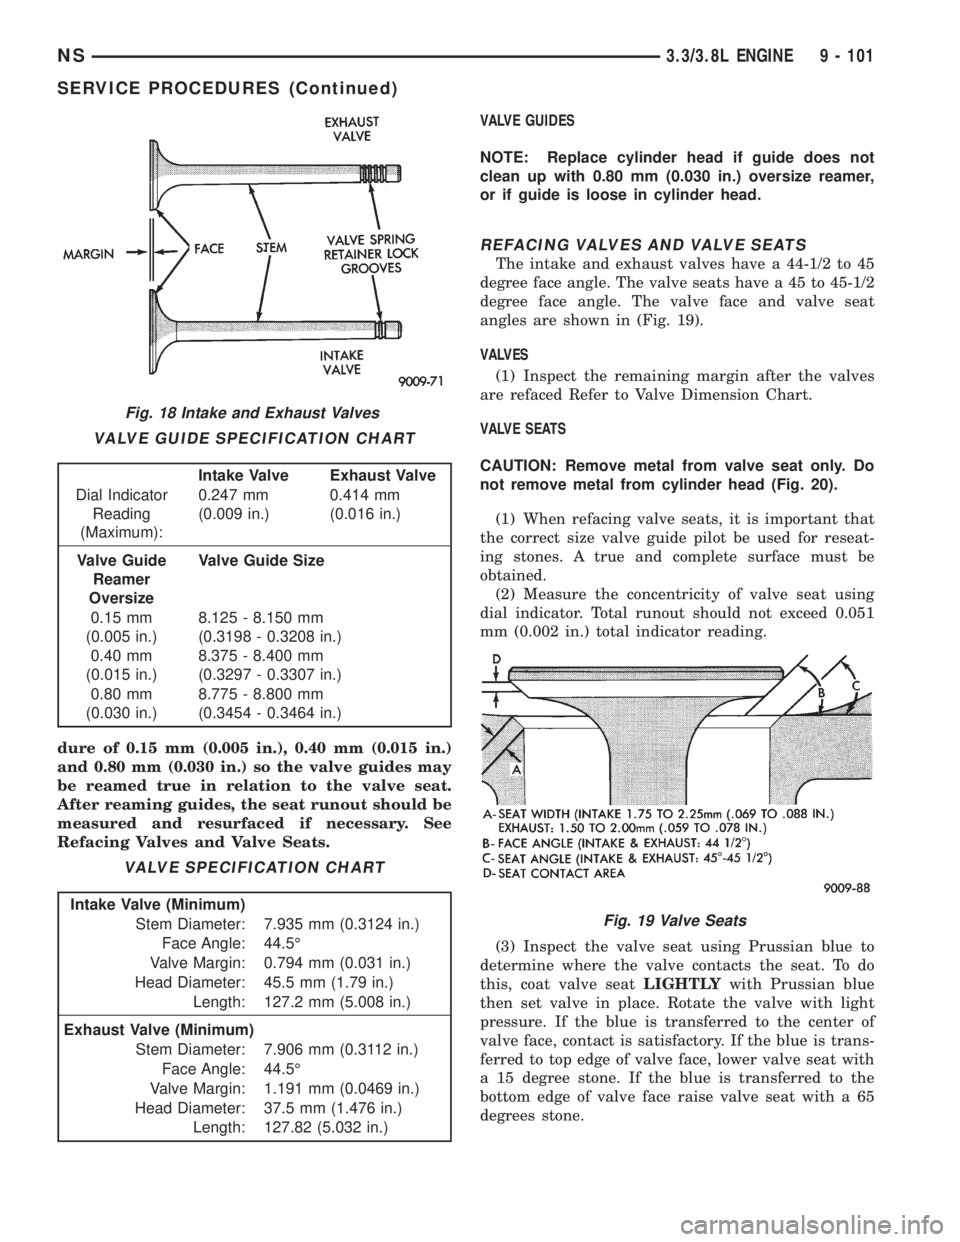
REFACING VALVES AND VALVE SEATS
The intake and exhaust valves have a 44-1/2 to 45
degree face angle. The valve seats have a 45 to 45-1/2
degree face angle. The valve face and valve seat
angles are shown in (Fig. 19).
VALVES
(1) Inspect the remaining margin after the valves
are refaced Refer to Valve Dimension Chart.
VALVE SEATS
CAUTION: Remove metal from valve seat only. Do
not remove metal from cylinder head (Fig. 20).
(1) When refacing valve seats, it is important that
the correct size valve guide pilot be used for reseat-
ing stones. A true and complete surface must be
obtained.
(2) Measure the concentricity of valve seat using
dial indicator. Total runout should not exceed 0.051
mm (0.002 in.) total indicator reading.
(3) Inspect the valve seat using Prussian blue to
determine where the valve contacts the seat. To do
this, coat valve seatLIGHTLYwith Prussian blue
then set valve in place. Rotate the valve with light
pressure. If the blue is transferred to the center of
valve face, contact is satisfactory. If the blue is trans-
ferred to top edge of valve face, lower valve seat with
a 15 degree stone. If the blue is transferred to the
bottom edge of valve face raise valve seat with a 65
degrees stone.
Fig. 18 Intake and Exhaust Valves
VALVE GUIDE SPECIFICATION CHART
Intake Valve Exhaust Valve
Dial Indicator
Reading
(Maximum):0.247 mm
(0.009 in.)0.414 mm
(0.016 in.)
Valve Guide
Reamer
OversizeValve Guide Size
0.15 mm
(0.005 in.)8.125 - 8.150 mm
(0.3198 - 0.3208 in.)
0.40 mm
(0.015 in.)8.375 - 8.400 mm
(0.3297 - 0.3307 in.)
0.80 mm
(0.030 in.)8.775 - 8.800 mm
(0.3454 - 0.3464 in.)
VALVE SPECIFICATION CHART
Intake Valve (Minimum)
Stem Diameter: 7.935 mm (0.3124 in.)
Face Angle: 44.5É
Valve Margin: 0.794 mm (0.031 in.)
Head Diameter: 45.5 mm (1.79 in.)
Length: 127.2 mm (5.008 in.)
Exhaust Valve (Minimum)
Stem Diameter: 7.906 mm (0.3112 in.)
Face Angle: 44.5É
Valve Margin: 1.191 mm (0.0469 in.)
Head Diameter: 37.5 mm (1.476 in.)
Length: 127.82 (5.032 in.)
Fig. 19 Valve Seats
NS3.3/3.8L ENGINE 9 - 101
SERVICE PROCEDURES (Continued)
Page 1154 of 1938
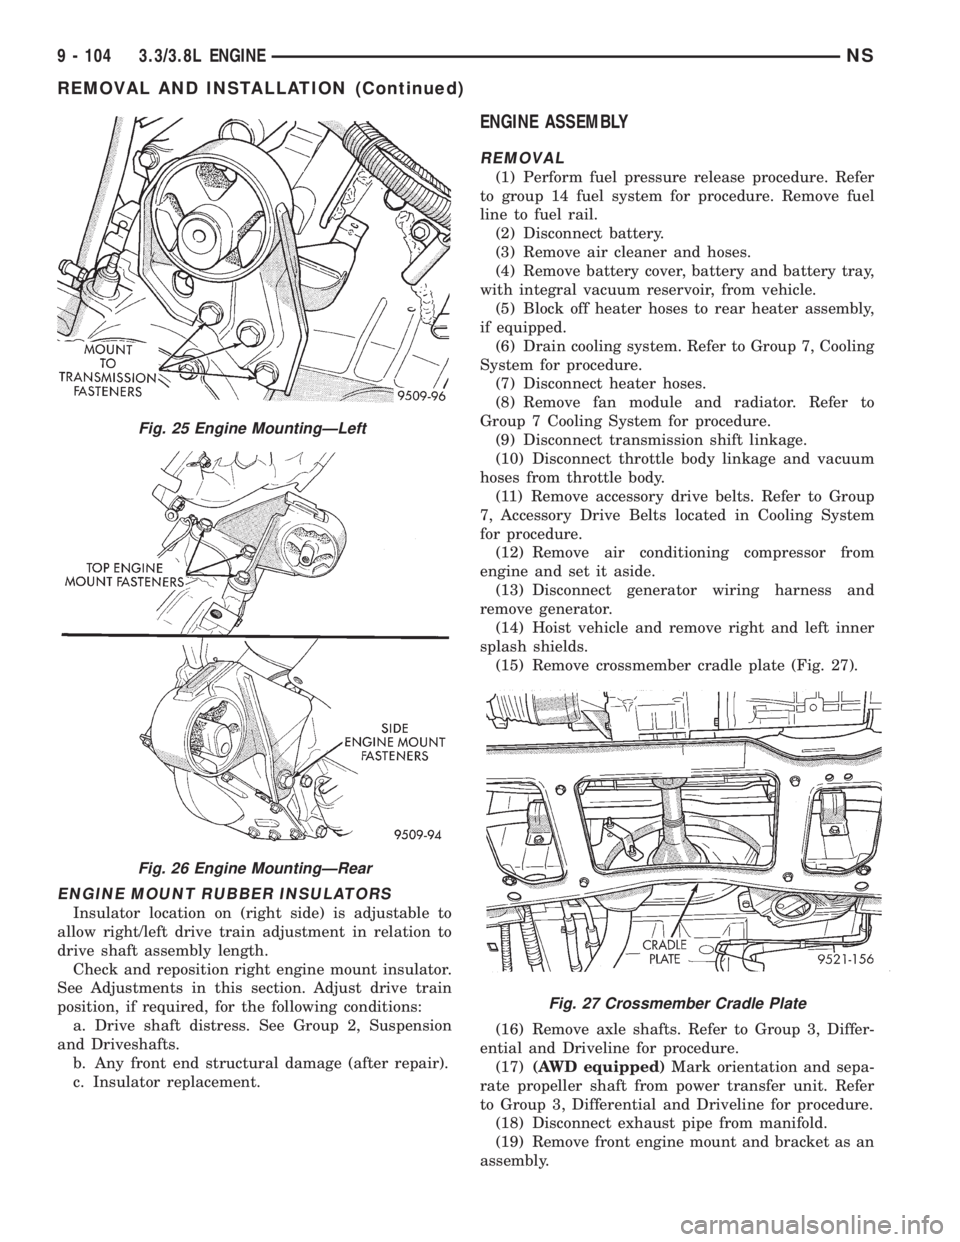
ENGINE MOUNT RUBBER INSULATORS
Insulator location on (right side) is adjustable to
allow right/left drive train adjustment in relation to
drive shaft assembly length.
Check and reposition right engine mount insulator.
See Adjustments in this section. Adjust drive train
position, if required, for the following conditions:
a. Drive shaft distress. See Group 2, Suspension
and Driveshafts.
b. Any front end structural damage (after repair).
c. Insulator replacement.
ENGINE ASSEMBLY
REMOVAL
(1) Perform fuel pressure release procedure. Refer
to group 14 fuel system for procedure. Remove fuel
line to fuel rail.
(2) Disconnect battery.
(3) Remove air cleaner and hoses.
(4) Remove battery cover, battery and battery tray,
with integral vacuum reservoir, from vehicle.
(5) Block off heater hoses to rear heater assembly,
if equipped.
(6) Drain cooling system. Refer to Group 7, Cooling
System for procedure.
(7) Disconnect heater hoses.
(8) Remove fan module and radiator. Refer to
Group 7 Cooling System for procedure.
(9) Disconnect transmission shift linkage.
(10) Disconnect throttle body linkage and vacuum
hoses from throttle body.
(11) Remove accessory drive belts. Refer to Group
7, Accessory Drive Belts located in Cooling System
for procedure.
(12) Remove air conditioning compressor from
engine and set it aside.
(13) Disconnect generator wiring harness and
remove generator.
(14) Hoist vehicle and remove right and left inner
splash shields.
(15) Remove crossmember cradle plate (Fig. 27).
(16) Remove axle shafts. Refer to Group 3, Differ-
ential and Driveline for procedure.
(17)(AWD equipped)Mark orientation and sepa-
rate propeller shaft from power transfer unit. Refer
to Group 3, Differential and Driveline for procedure.
(18) Disconnect exhaust pipe from manifold.
(19) Remove front engine mount and bracket as an
assembly.
Fig. 25 Engine MountingÐLeft
Fig. 26 Engine MountingÐRear
Fig. 27 Crossmember Cradle Plate
9 - 104 3.3/3.8L ENGINENS
REMOVAL AND INSTALLATION (Continued)
Page 1160 of 1938
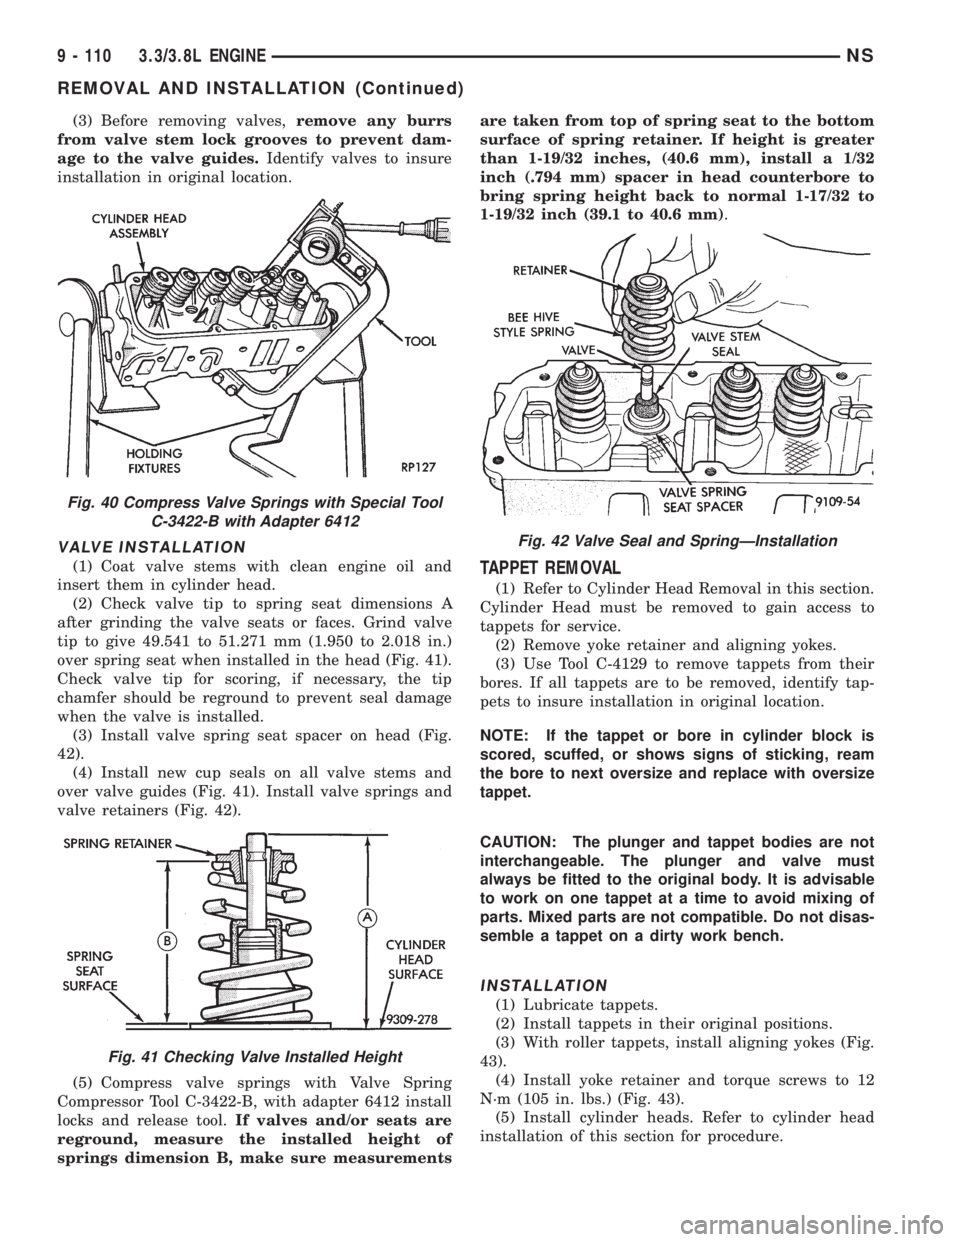
(3) Before removing valves,remove any burrs
from valve stem lock grooves to prevent dam-
age to the valve guides.Identify valves to insure
installation in original location.
VALVE INSTALLATION
(1) Coat valve stems with clean engine oil and
insert them in cylinder head.
(2) Check valve tip to spring seat dimensions A
after grinding the valve seats or faces. Grind valve
tip to give 49.541 to 51.271 mm (1.950 to 2.018 in.)
over spring seat when installed in the head (Fig. 41).
Check valve tip for scoring, if necessary, the tip
chamfer should be reground to prevent seal damage
when the valve is installed.
(3) Install valve spring seat spacer on head (Fig.
42).
(4) Install new cup seals on all valve stems and
over valve guides (Fig. 41). Install valve springs and
valve retainers (Fig. 42).
(5) Compress valve springs with Valve Spring
Compressor Tool C-3422-B, with adapter 6412 install
locks and release tool.If valves and/or seats are
reground, measure the installed height of
springs dimension B, make sure measurementsare taken from top of spring seat to the bottom
surface of spring retainer. If height is greater
than 1-19/32 inches, (40.6 mm), install a 1/32
inch (.794 mm) spacer in head counterbore to
bring spring height back to normal 1-17/32 to
1-19/32 inch (39.1 to 40.6 mm).TAPPET REMOVAL
(1) Refer to Cylinder Head Removal in this section.
Cylinder Head must be removed to gain access to
tappets for service.
(2) Remove yoke retainer and aligning yokes.
(3) Use Tool C-4129 to remove tappets from their
bores. If all tappets are to be removed, identify tap-
pets to insure installation in original location.
NOTE: If the tappet or bore in cylinder block is
scored, scuffed, or shows signs of sticking, ream
the bore to next oversize and replace with oversize
tappet.
CAUTION: The plunger and tappet bodies are not
interchangeable. The plunger and valve must
always be fitted to the original body. It is advisable
to work on one tappet at a time to avoid mixing of
parts. Mixed parts are not compatible. Do not disas-
semble a tappet on a dirty work bench.
INSTALLATION
(1) Lubricate tappets.
(2) Install tappets in their original positions.
(3) With roller tappets, install aligning yokes (Fig.
43).
(4) Install yoke retainer and torque screws to 12
N´m (105 in. lbs.) (Fig. 43).
(5) Install cylinder heads. Refer to cylinder head
installation of this section for procedure.
Fig. 40 Compress Valve Springs with Special Tool
C-3422-B with Adapter 6412
Fig. 41 Checking Valve Installed Height
Fig. 42 Valve Seal and SpringÐInstallation
9 - 110 3.3/3.8L ENGINENS
REMOVAL AND INSTALLATION (Continued)