Egr CHRYSLER VOYAGER 1996 Workshop Manual
[x] Cancel search | Manufacturer: CHRYSLER, Model Year: 1996, Model line: VOYAGER, Model: CHRYSLER VOYAGER 1996Pages: 1938, PDF Size: 55.84 MB
Page 945 of 1938

POWER SEAT
CIRCUIT BREAKER
2 1GRAY
2F35 14RD* F35 14RD A3 12PK/BK 1 CAV FUSED B(+) FUSED B(+) FUNCTION CIRCUIT
* MEMORY SEAT
(DIESEL) MODULE CONTROL POWERTRAIN
46 68
23
1
CONTINUED ON NEXT PAGE V37 20RD/LG SPEED CONTROL SWITCH SIGNAL- - - - - - - - SLEEVE POSITION SENSOR K134 20LB/BKA/C COMPRESSOR CLUTCH RELAY CONTROL C13 20DB/ORSPEED CONTROL LAMP DRIVER V38 20LB/RDGROUND Z12 16BK/TNDIESEL POWER RELAY OUTPUT A142 16DG/OR- ENGINE SPEED SENSOR RETURN K3 20BK/VT5 VOLT SUPPLY K7 20OR- - ACCELERATOR PEDAL SENSOR SIGNAL ENGINE COOLANT TEMPERATURE SENSOR SIGNAL
K22 20OR/DB K2 20TN/BKNEEDLE MOVEMENT SENSOR SIGNAL K67 20BR/BKFUEL QUANTITY ACTUATOR SIGNAL
- -
- - FUEL QUANTITY ACTUATOR SIGNAL K140 18TN/WTGROUND Z12 16BK/TN
ENGINE SPEED SENSOR SIGNAL K159 20VT/RD
FUNCTION
-
-
-
- CIRCUIT
-
-
- ENGINE STARTER MOTOR RELAY CONTROL
LOW SPEED RADIATOR FAN RELAY NO. 2 CONTROL
CONTROL SLEEVE POSITION SENSOR
ENGINE SPEED SENSOR FEED
NEEDLE MOVEMENT SENSOR RETURN
A/C PRESSURE SWITCH SIGNAL
CLUTCH SWITCH SIGNAL
GLOW PLUG LAMP DRIVER
SENSOR GROUND
A/C SWITCH SIGNAL
BOOST PRESSURE SENSOR SIGNALCAV
1
2
3
4
5
6
7
8
9
10
11
12
13
14
15
16
17
18
19
20
21
22
23
24
25
26
27
28
29
30
31
32
33
34
35
36
37
38
39
40 K90 20TN
K140 18TN/WT
C24 20DB/PK
K57 20LG/OR
K24 18GY/BK
K68 20LG/YL
C18 20DB
K119 20LG/BK
K29 20WT/PK
G85 20OR/BK
K4 20BK/LB
C103 20DG/LB
K1 20DG/RD
EGR SOLENOID CONTROL K35 20GY/YL
FUSED IGNITION (ST-RUN) F87 18WT/BK
(2.0L/2.4L) PRESSURE SWITCHPOWER STEERING
21
BLACK
Z1 18BK K10 18DB/OR
2 1 CAV GROUND POWER STEERING PRESSURE SWITCH SENSE FUNCTION CIRCUIT
BRAKE SWITCH SENSE
NS/GS8W-80 CONNECTOR PIN-OUTS 8W - 80 - 69
NSGS8069J988W-3
Page 947 of 1938

MODULE - C1CONTROL POWERTRAIN
- -
K90 18TN ENGINE STARTER MOTOR RELAY CONTROL
C103 18DG/LB A/C SWITCH SIGNALKNOCK SENSOR SIGNAL K42 18DB/LG- - BLACK
10 20 30 40
1 11 21 31
K35 18GY/YL K1 18DG/RD K22 18OR/DB K44 18TN/YL K24 18GY/BK K41 18BK/DG K2 18TN/BK G3 18BK/PK F87 18WT/BK K12 18TN/WT K14 18LB/BR
K38 18GY K58 18BR/DB K11 18WT/DB K19 18GY/RD Z12 18BK/TN K20 18DG K13 18YL/WT
A142 18DG/OR V32 18YL/RD K17 18DB/TN K18 18RD/YL
40 39 38
37 36 35
34 33 32
31
30 29 28
27 26 25 24 23
22 21 20
19 18 17
16 15 14
13 12 11
10 9 8
7 6 5
4 3 2
1 CAV EGR SOLENOID CONTROL MANIFOLD ABSOLUTE PRESSURE SENSOR SIGNAL THROTTLE POSITION SENSOR SIGNAL CAMSHAFT POSITION SENSOR SIGNAL CRANKSHAFT POSITION SENSOR SIGNAL HEATED OXYGEN SENSOR SIGNAL ENGINE COOLANT TEMPERATURE SENSOR SIGNAL SERVICE ENGINE SOON INDICATOR LAMP DRIVER FUSED IGNITION SWITCH OUTPUT (ST-RUN) INJECTOR NO. 2 DRIVER INJECTOR NO. 4 DRIVER
INJECTOR NO. 5 DRIVER (3.3L/3.8L) INJECTOR NO. 6 DRIVER (3.3L/3.8L) INJECTOR NO. 1 DRIVER IGNITION COIL NO. 1 DRIVER GROUND GENERATOR FIELD DRIVER INJECTOR NO. 3 DRIVER
AUTOMATIC SHUT DOWN RELAY OUTPUT SPEED CONTROL ON/OFF SWITCH SENSE IGNITION COIL NO. 2 DRIVER IGNITION COIL NO. 3 DRIVER (3.3L/3.8L)
- - - - - - -
- - - - - CIRCUIT
- - - - - - -
- - - - - FUNCTION
K21 18BK/RD* INTAKE AIR TEMPERATURE SENSOR SIGNAL
* 2.0L
NS/GS8W-80 CONNECTOR PIN-OUTS 8W - 80 - 71
NSGS8071J988W-3
Page 966 of 1938
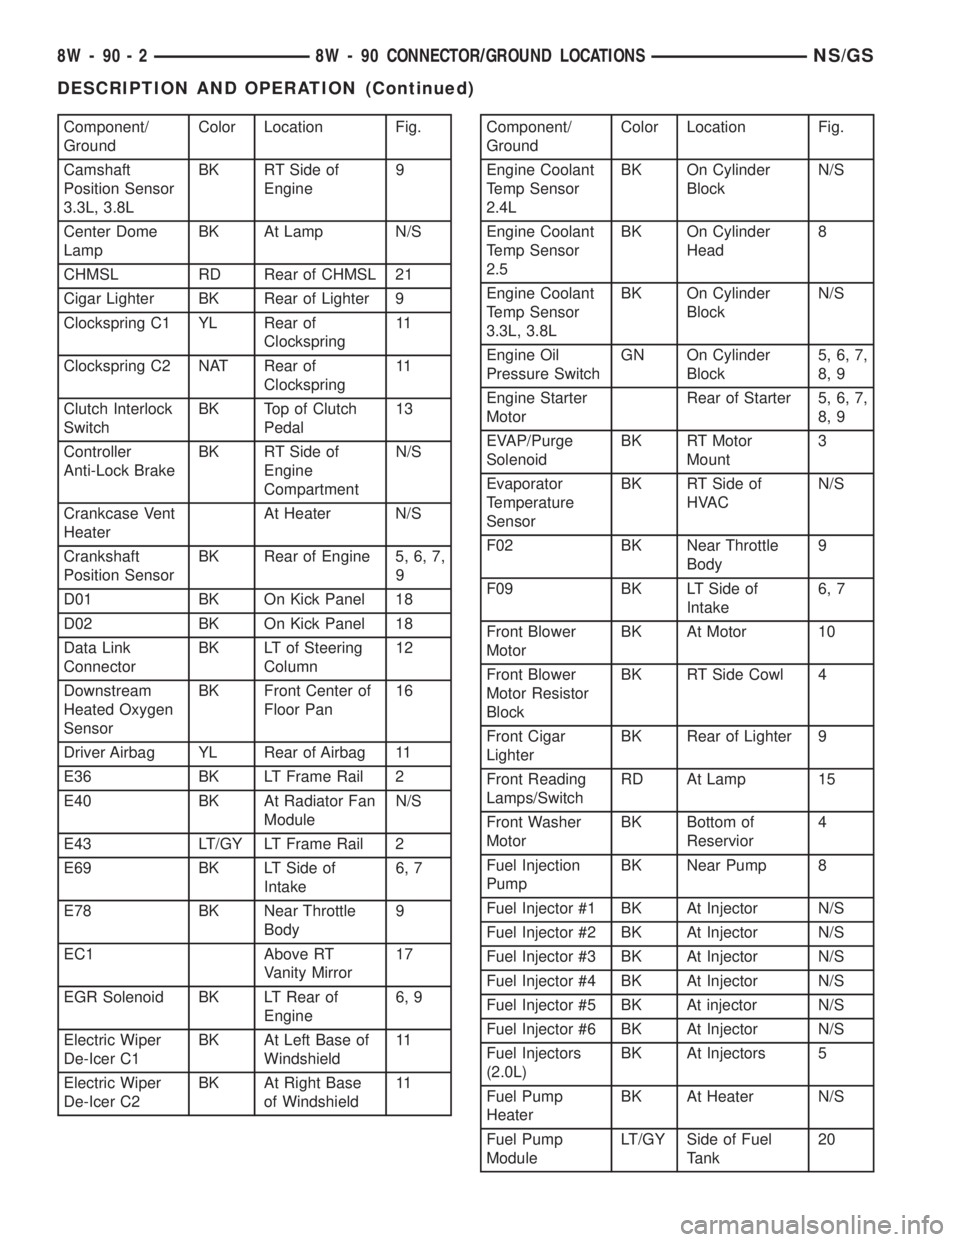
Component/
GroundColor Location Fig.
Camshaft
Position Sensor
3.3L, 3.8LBK RT Side of
Engine9
Center Dome
LampBK At Lamp N/S
CHMSL RD Rear of CHMSL 21
Cigar Lighter BK Rear of Lighter 9
Clockspring C1 YL Rear of
Clockspring11
Clockspring C2 NAT Rear of
Clockspring11
Clutch Interlock
SwitchBK Top of Clutch
Pedal13
Controller
Anti-Lock BrakeBK RT Side of
Engine
CompartmentN/S
Crankcase Vent
HeaterAt Heater N/S
Crankshaft
Position SensorBK Rear of Engine 5, 6, 7,
9
D01 BK On Kick Panel 18
D02 BK On Kick Panel 18
Data Link
ConnectorBK LT of Steering
Column12
Downstream
Heated Oxygen
SensorBK Front Center of
Floor Pan16
Driver Airbag YL Rear of Airbag 11
E36 BK LT Frame Rail 2
E40 BK At Radiator Fan
ModuleN/S
E43 LT/GY LT Frame Rail 2
E69 BK LT Side of
Intake6, 7
E78 BK Near Throttle
Body9
EC1 Above RT
Vanity Mirror17
EGR Solenoid BK LT Rear of
Engine6, 9
Electric Wiper
De-Icer C1BK At Left Base of
Windshield11
Electric Wiper
De-Icer C2BK At Right Base
of Windshield11Component/
GroundColor Location Fig.
Engine Coolant
Temp Sensor
2.4LBK On Cylinder
BlockN/S
Engine Coolant
Temp Sensor
2.5BK On Cylinder
Head8
Engine Coolant
Temp Sensor
3.3L, 3.8LBK On Cylinder
BlockN/S
Engine Oil
Pressure SwitchGN On Cylinder
Block5, 6, 7,
8, 9
Engine Starter
MotorRear of Starter 5, 6, 7,
8, 9
EVAP/Purge
SolenoidBK RT Motor
Mount3
Evaporator
Temperature
SensorBK RT Side of
HVACN/S
F02 BK Near Throttle
Body9
F09 BK LT Side of
Intake6, 7
Front Blower
MotorBK At Motor 10
Front Blower
Motor Resistor
BlockBK RT Side Cowl 4
Front Cigar
LighterBK Rear of Lighter 9
Front Reading
Lamps/SwitchRD At Lamp 15
Front Washer
MotorBK Bottom of
Reservior4
Fuel Injection
PumpBK Near Pump 8
Fuel Injector #1 BK At Injector N/S
Fuel Injector #2 BK At Injector N/S
Fuel Injector #3 BK At Injector N/S
Fuel Injector #4 BK At Injector N/S
Fuel Injector #5 BK At injector N/S
Fuel Injector #6 BK At Injector N/S
Fuel Injectors
(2.0L)BK At Injectors 5
Fuel Pump
HeaterBK At Heater N/S
Fuel Pump
ModuleLT/GY Side of Fuel
Tank20
8W - 90 - 2 8W - 90 CONNECTOR/GROUND LOCATIONSNS/GS
DESCRIPTION AND OPERATION (Continued)
Page 996 of 1938

Component/
GroundColor Location Fig.
Downstream
Heated Oxygen
SensorBK Front Center of
Floor Pan16
Driver Airbag YL Rear of Airbag 11
E36 BK LT Frame Rail 2
E40 BK At Radiator Fan
ModuleN/S
E43 LT/GY LT Frame Rail 2
E69 BK LT Side of
Intake6, 7
E78 BK Near Throttle
Body9
EC1 At Top Center
of Windshield17
EGR Solenoid BK LT Rear of
Engine6, 9
Electric Wiper
De-Icer C1BK At Right Base
of Windshield11
Electric Wiper
De-Icer C2BK At Left Base of
Windshield11
Engine Coolant
Temp Sensor
2.4LBK On Cylinder
BlockN/S
Engine Coolant
Temp Sensor
3.3L, 3.8LBK On Cylinder
BlockN/S
Engine Oil
Pressure SwitchGN On Cylinder
Block5, 6, 7,
8, 9
Engine Starter
MotorRear of Starter 5, 6, 7,
8, 9
EVAP/Purge
SolenoidBK RT Motor
Mount3
Evaporator
Temperature
SensorBK RT Side of
HVACN/S
F02 BK Near Throttle
Body9
F09 BK LT Side of
Intake6, 7
Front Blower
MotorBK At Motor 10
Front Blower
Motor Resistor
BlockBK LT Side of
Engine2
Front Cigar
LighterBK Rear of Lighter 11Component/
GroundColor Location Fig.
Front Reading
Lamps/SwitchBL At Lamp 17
Front Washer
MotorBK Bottom of
Reservior4
Fuel Injector #1 BK At Injector N/S
Fuel Injector #2 BK At Injector N/S
Fuel Injector #3 BK At Injector N/S
Fuel Injector #4 BK At Injector N/S
Fuel Injector #5 BK At Injector N/S
Fuel Injector #6 BK At Injector N/S
Fuel Pump
ModuleGY Side of Fuel
Tank20
G100 LT Frame Rail 3
G101 2.4L Rear of
Cylinder Head6, 7
G101 3.3L, 3.8L Rear of
Cylinder Block9
G102 LT Frame Rail 3
G103 2.4L Rear of
Cylinder Head6, 7
G103 3.3L, 3.8L Rear of
Cylinder Block9
G104 Near T/O for
RT HeadlampN/S
G200 Left of I.P.
Center Stack10
G201 I.P. Center
Support10
G202 I.P. Center
Support10
G204 I.P. Center
Support10
G300 BK LT Kick Panel 13
G301 RT Kick Panel 13, 14
G302 BK LT Quarter
Panel21
G400 BK In Liftgate 23
Generator BK Rear of
Generator5, 6, 7,
8, 9
Glove Box
LampBL Rear of Glove
Box11
Headlamp
Dimmer SwitchBK Part of
Multifunction
Switch11
8W - 90 - 32 8W - 90 CONNECTOR/GROUND LOCATIONSNS/GS
DESCRIPTION AND OPERATION (Continued)
Page 1053 of 1938
(5) Test resistance of spark plug cables. Refer to
Group 8D, Ignition System.
(6) Test ignition coils primary and secondary resis-
tance. Replace parts as necessary. Refer to Group 8D,
Ignition System.
(7) Check fuel pump pressure at idle and different
RPM ranges. Refer to Group 14, Fuel System for
Specifications.
(8) The air filter elements should be replaced as
specified in Group 0, Lubrication and Maintenance.
(9) Inspect crankcase ventilation system as out-
lined in Group 25, Emission Control Systems.
(10) Road test vehicle as a final test.
HONING CYLINDER BORES
(1) Used carefully, the cylinder bore resizing hone
C-823 equipped with 220 grit stones, is the best tool
for this job. In addition to deglazing, it will reduce
taper and out-of-round as well as removing light
scuffing, scoring or scratches. Usually a few strokes
will clean up a bore and maintain the required lim-
its.
(2) Deglazing of the cylinder walls may be done
using a cylinder surfacing hone, Tool C-3501,
equipped with 280 grit stones, if the cylinder bore is
straight and round. 20-60 strokes depending on the
bore condition, will be sufficient to provide a satisfac-
tory surface. Inspect cylinder walls after each 20
strokes, using a light honing oil.Do not use engine
or transmission oil, mineral spirits or kerosene.
(3) Honing should be done by moving the hone up
and down fast enough to get a cross-hatch pattern.
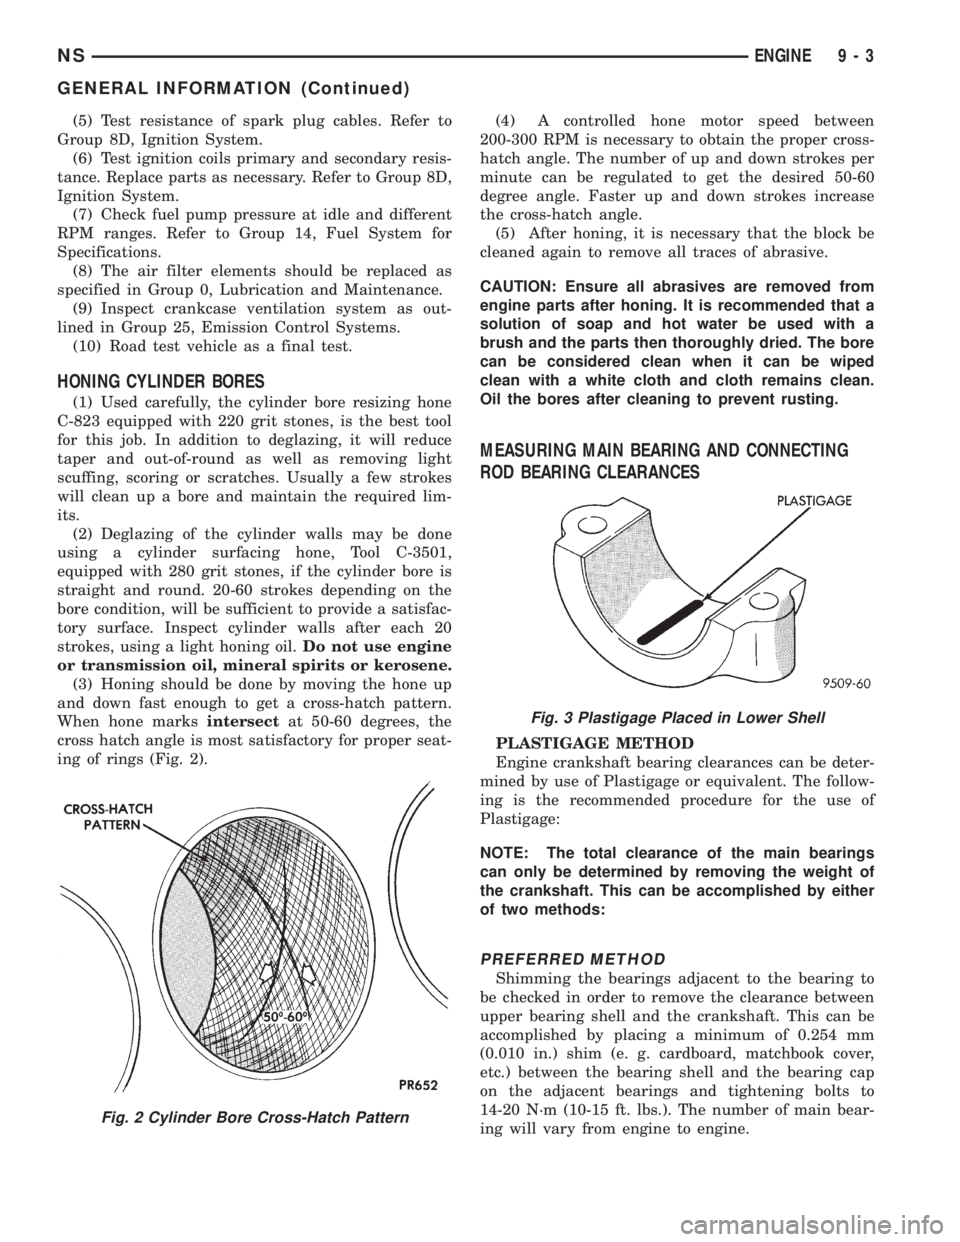
When hone marksintersectat 50-60 degrees, the
cross hatch angle is most satisfactory for proper seat-
ing of rings (Fig. 2).(4) A controlled hone motor speed between
200-300 RPM is necessary to obtain the proper cross-
hatch angle. The number of up and down strokes per
minute can be regulated to get the desired 50-60
degree angle. Faster up and down strokes increase
the cross-hatch angle.
(5) After honing, it is necessary that the block be
cleaned again to remove all traces of abrasive.
CAUTION: Ensure all abrasives are removed from
engine parts after honing. It is recommended that a
solution of soap and hot water be used with a
brush and the parts then thoroughly dried. The bore
can be considered clean when it can be wiped
clean with a white cloth and cloth remains clean.
Oil the bores after cleaning to prevent rusting.
MEASURING MAIN BEARING AND CONNECTING
ROD BEARING CLEARANCES
PLASTIGAGE METHOD
Engine crankshaft bearing clearances can be deter-
mined by use of Plastigage or equivalent. The follow-
ing is the recommended procedure for the use of
Plastigage:
NOTE: The total clearance of the main bearings
can only be determined by removing the weight of
the crankshaft. This can be accomplished by either
of two methods:
PREFERRED METHOD
Shimming the bearings adjacent to the bearing to
be checked in order to remove the clearance between
upper bearing shell and the crankshaft. This can be
accomplished by placing a minimum of 0.254 mm
(0.010 in.) shim (e. g. cardboard, matchbook cover,
etc.) between the bearing shell and the bearing cap
on the adjacent bearings and tightening bolts to
14-20 N´m (10-15 ft. lbs.). The number of main bear-
ing will vary from engine to engine.
Fig. 2 Cylinder Bore Cross-Hatch Pattern
Fig. 3 Plastigage Placed in Lower Shell
NSENGINE 9 - 3
GENERAL INFORMATION (Continued)
Page 1058 of 1938
cause of low compression unless some malfunc-
tion is present.
(11) Clean or replace spark plugs as necessary
and adjust gap as specified in Group 8, Electrical.
Tighten to specifications.
(12) Test resistance of spark plug cables. Refer to
Group 8, Electrical Ignition System Secondary Cir-
cuit Inspection.
(13) Test coil output voltage, primary and second-
ary resistance. Replace parts as necessary. Refer to
Group 8, Electrical Ignition System.
(14) Check fuel pump pressure at idle and differ-
ent RPM ranges. Refer to Group 14, Fuel System for
Specifications.
(15) The air filter elements should be replaced as
specified in Group 0, Lubrication and Maintenance,.
(16) Inspect crankcase ventilation system as out
lined in Group 0, Lubrication and Maintenance. For
emission controls see Group 25, Emission Controls
for service procedures.
(17) Inspect and adjust accessory belt drives refer-
ring to Group 7, Cooling System, Accessory Drive
Belts for proper adjustments.
(18) Road test vehicle as a final test.
CYLINDER COMBUSTION PRESSURE LEAKAGE
TEST
The combustion pressure leakage test provides an
accurate means for determining engine condition.
Combustion pressure leakage testing will detect:
²Exhaust and intake valve leaks (improper seat-
ing).
²Leaks between adjacent cylinders or into water
jacket.
²Any causes for combustion/compression pressure
loss.
WARNING: DO NOT REMOVE THE RADIATOR CAP
WITH THE SYSTEM HOT AND UNDER PRESSURE
BECAUSE SERIOUS BURNS FROM COOLANT CAN
OCCUR.
Check the coolant level and fill as required. DO
NOT install the radiator cap.
Start and operate the engine until it attains nor-
mal operating temperature, then turn the engine
OFF.
Clean spark plug recesses with compressed air.
Remove the spark plugs.
Remove the oil filler cap.
Remove the air cleaner.
Calibrate the tester according to the manufactur-
er's instructions. The shop air source for testing
should maintain 483 kPa (70 psi) minimum, 1 379
kPa (200 psi) maximum and 552 kPa (80 psi) recom-
mended.Perform the test procedures on each cylinder
according to the tester manufacturer's instructions.
While testing, listen for pressurized air escaping
through the throttle body, tailpipe and oil filler cap
opening. Check for bubbles in the radiator coolant.
All gauge pressure indications should be equal,
with no more than 25% leakage.
FOR EXAMPLE:At 552 kPa (80 psi) input pres-
sure, a minimum of 414 kPa (60 psi) should be main-
tained in the cylinder.
LASH ADJUSTER (TAPPET) NOISE DIAGNOSIS
A tappet-like noise may be produced from several
items. Check the following items.
(1) Engine oil level too high or too low. This may
cause aerated oil to enter the adjusters and cause
them to be spongy.
(2) Insufficient running time after rebuilding cylin-
der head. Low speed running up to 1 hour may be
required.
(3) During this time, turn engine off and let set for
a few minutes before restarting. Repeat this several
times after engine has reached normal operating
temperature.
(4) Low oil pressure.
(5) The oil restrictor pressed into the vertical oil
passage to the cylinder head is plugged with debris.
(6) Air ingested into oil due to broken or cracked
oil pump pick up.
(7) Worn valve guides.
(8) Rocker arm ears contacting valve spring
retainer.
(9) Rocker arm loose, adjuster stuck or at maxi-
mum extension and still leaves lash in the system.
(10) Faulty lash adjuster.
a. Check lash adjusters for sponginess while
installed in cylinder head. Depress part of rocker
arm over adjuster. Normal adjusters should feel very
firm. Spongy adjusters can be bottomed out easily.
b. Remove suspected lash adjusters, and disassem-
bleDo not reuse retainer caps. Do not inter-
change parts and make sure that care and
cleanliness is exercised in the handling of parts.
c. Clean out dirt and varnish with solvent.
d. Reassemble with engine oil.
e. Check for sponginess.
f. If still spongy, replace with new adjuster.
INSPECTION (ENGINE OIL LEAKS IN GENERAL)
Begin with a through visual inspection of the
engine, particularly at the area of the suspected leak.
If an oil leak source is not readily identifiable, the
following steps should be followed:
(1) Do not clean or degrease the engine at this
time because some solvents may cause rubber to
swell, temporarily stopping the leak.
9 - 8 ENGINENS
DIAGNOSIS AND TESTING (Continued)
Page 1065 of 1938
BALANCE SHAFTS
Balance shaft lubrication is provided through an
oil passage from the number 1 main bearing cap
through the balance shaft carrier support leg. This
passage directly supplies oil to the front bearings and
internal machined passages in the shafts that routes
oil from front to rear shaft bearing journals
SPLASH LUBRICATION
Oil returning to the pan from pressurized compo-
nents supplies lubrication to the valve stems. Cylin-
der bores and wrist pins are splash lubricated from
directed slots on the connecting rod thrust collars.
ENGINE COMPONENTS
BALANCE SHAFTS:2.4L engines are equipped
with two balance shafts installed in a carrier
attached to the lower crankcase. The shafts intercon-
nect through gears to rotate in opposite directions.These gears are driven by a short chain from the
crankshaft, to rotate at two times crankshaft speed.
This counterbalances certain engine reciprocating
masses.
CYLINDER BLOCK AND BEDPLATE ASSEM-
B LY:A closed deck design is used for cooling and
weight reduction with water pump molded into the
block. Nominal wall thickness is 4.5 mm. The bed-
plate incorporates main bearing caps. Rear seal
retainer is integral with the block.
CRANKSHAFT:A nodular cast iron crankshaft is
used. The engine has 5 main bearings, with number
3 flanged to control thrust. The 60 mm diameter
main and 50 mm diameter crank pin journals (all)
have undercut fillets that are deep rolled for added
strength. To evenly distribute bearing loads and min-
imize internal stress, 8 counterweights are used.
Hydrodynamic seals provide end sealing, where the
crankshaft exits the block. Anaerobic gasket material
is used for parting line sealing in the block. A sin-
tered powder metal timing belt sprocket is mounted
on the crankshaft nose. This sprocket provides
motive power; via timing belt to the camshaft sprock-
ets (providing timed valve actuation) and to the
water pump.
PISTONS:There is provisions for free wheeling
valve train. Piston has a unique height. All engines
use pressed in piston pins to attach forged powder
metal connecting rods. Incorporate hex head cap
screw threaded into the connecting rod. Piston and
Rods are serviced as a assembly.
PISTONS RINGS:The piston rings include a
molybdenum faced top ring for reliable compression
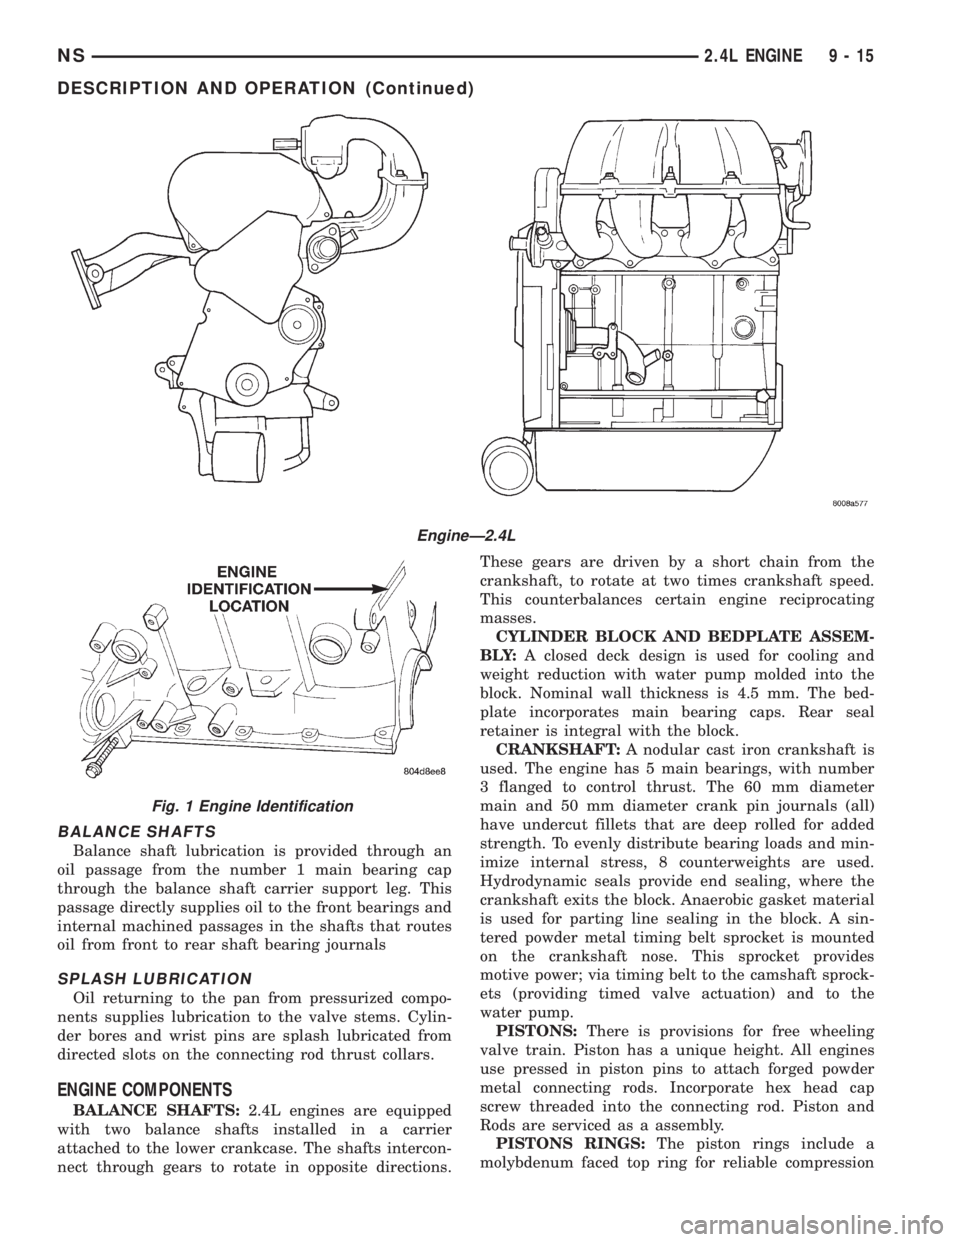
EngineÐ2.4L
Fig. 1 Engine Identification
NS2.4L ENGINE 9 - 15
DESCRIPTION AND OPERATION (Continued)
Page 1066 of 1938

sealing and a chrome plated taper faced intermediate
ring for additional cylinder pressure control. There
are also standard oil control rings.
CYLINDER HEAD:Features a Dual Over Head
Camshaft (DOHC) 4 valves per cylinder cross flow
design. The valves are arranged in two inline banks,
with the ports of the bank of two intake valves per
cylinder facing toward the radiator side of engine
and ports of the bank of two exhaust valves per cyl-
inder facing toward the dash panel. Incorporates
powder metal valve guides and seats. Integral oil gal-
leys within the cylinder head supplies oil to the
hydraulic lash adjusters, camshaft and valve mecha-
nisms.
CAMSHAFTS:The nodular iron camshafts have
six bearing journals and 2 cam lobes per cylinder.
Flanges at the rear journals control camshaft end
play. Provision for cam position sensor is located on
the intake camshaft at the rear of cylinder head. A
hydrodynamic oil seal is used for oil control at the
front of the camshaft.
VALVES:4 valves per cylinder are actuated by
roller cam followers which pivot on stationary
hydraulic lash adjusters. All valves have 6 mm diam-
eter chrome plated valve stems. The valve sizes are
34.8 mm (1.370 inch.) diameter intake valves and
30.5 mm (1.20 inch.) diameter exhaust valves. Viton
rubber valve stem seals are integral with the spring
seats. Valve springs, spring retainers, and locks are
conventional.
INTAKE MANIFOLD:The intake manifold is a
two piece aluminum casting, attached to the cylinder
head with ten screws. This long branch fan design
enhances low and midspeed torque, while minimizing
undesirable inlet noise.
EXHAUST MANIFOLD:The exhaust manifold is
made of cast iron for strength and high tempera-
tures.
ENGINE LUBRICATION:Refer to Group 0
Lubrication and Maintenance for recommended oil to
be used in various engine application. System is full
flow filtration, pressure feed type. The oil pump is
mounted in the front engine cover and driven by the
crankshaft. Pressurized oil is then routed through
the main oil gallery, running the length of the cylin-
der block, supplying main and rod bearings with fur-
ther routing. Pistons are lubricated from rod bearing
throw off and lubricating slots on the connecting rod
assemblies. Camshaft and valve mechanisms are
lubricated from a full length cylinder head oil gallery
supplied from the crankcase main oil gallery.DIAGNOSIS AND TESTING
CHECKING ENGINE OIL PRESSURE
(1) Remove oil pressure sending unit and install
gauge assembly C-3292.
(2) Run engine until thermostat opens.
CAUTION: If oil pressure is 0 at idle, Do Not Run
engine at 3000 RPM
(3) Oil Pressure:Curb Idle25 kPa (4 psi) mini-
mum3000 RPM170/550 kPa (25/80 psi).
(4) If oil pressure is 0 at idle. Shut off engine,
check for pressure relief valve stuck open or a
clogged oil pickup screen.
SERVICE PROCEDURES
FITTING PISTONS
Piston and cylinder wall must be clean and dry.
Piston diameter should be measured 90 degrees to
piston pin about 14 mm (9/16 inch.) from the bottom
of the skirt as shown in (Fig. 3). Cylinder bores
should be measured halfway down the cylinder bore
and transverse to the engine crankshaft center line
shown in (Fig. 2). Refer to Cylinder Bore and Piston
Specification Chart.
Correct piston to bore clearance must be estab-
lished in order to assure quiet and economical oper-
ation.
Chrysler engines use pistons designed specifically
for each engine model. Clearance and sizing locations
vary with respect to engine model.
NOTE: Pistons and cylinder bores should be mea-
sured at normal room temperature, 70ÉF (21ÉC).
FITTING PISTON RINGS
(1) Wipe cylinder bore clean. Insert ring and push
down with piston to ensure it is square in bore. The
ring gap measurement must be made with the ring
positioning at least 12 mm (0.50 inch) from bottom of
cylinder bore. Check gap with feeler gauge (Fig. 4).
Refer to specification in Piston Ring Specification
Chart.
(2) Check piston ring to groove side clearance (Fig.
5). Refer to specification in Piston Ring Specification
Chart.
9 - 16 2.4L ENGINENS
DESCRIPTION AND OPERATION (Continued)
Page 1071 of 1938
OPTIONAL CRANKSHAFT END PLAY CHECK
(1) Move crankshaft all the way to the rear of its
travel using a lever inserted between a main bearing
cap and a crankshaft cheek, using care not to dam-
age any bearing surface.DO NOTloosen main bear-
ing cap.
(2) Use a feeler gauge between number three
thrust bearing and machined crankshaft surface to
determine end play.
VALVE SERVICE RECONDITION
VALVE REMOVAL
(1) With cylinder head removed, compress valve
springs using Special Tool C-3422-B or equivalent.
(2) Remove valve retaining locks, valve spring
retainers, valve stem seals and valve springs.
(3) Before removing valves,remove any burrs
from valve stem lock grooves to prevent dam-
age to the valve guides.Identify valves to insure
installation in original location.
VALVE INSPECTION
(1) Clean valves thoroughly and discard burned,
warped and cracked valves.
(2) Measure valve stems for wear. Measure stem
about 60 mm beneath the valve lock grooves.
(3) If valve stems are worn more than 0.05 mm
(0.002 in.), replace valve.
VALVE GUIDES
(1) Remove carbon and varnish deposits from
inside of valve guides with a reliable guide cleaner.
(2) Using a small hole gauge and a micrometer,
measure valve guides in 3 places top, middle and bot-
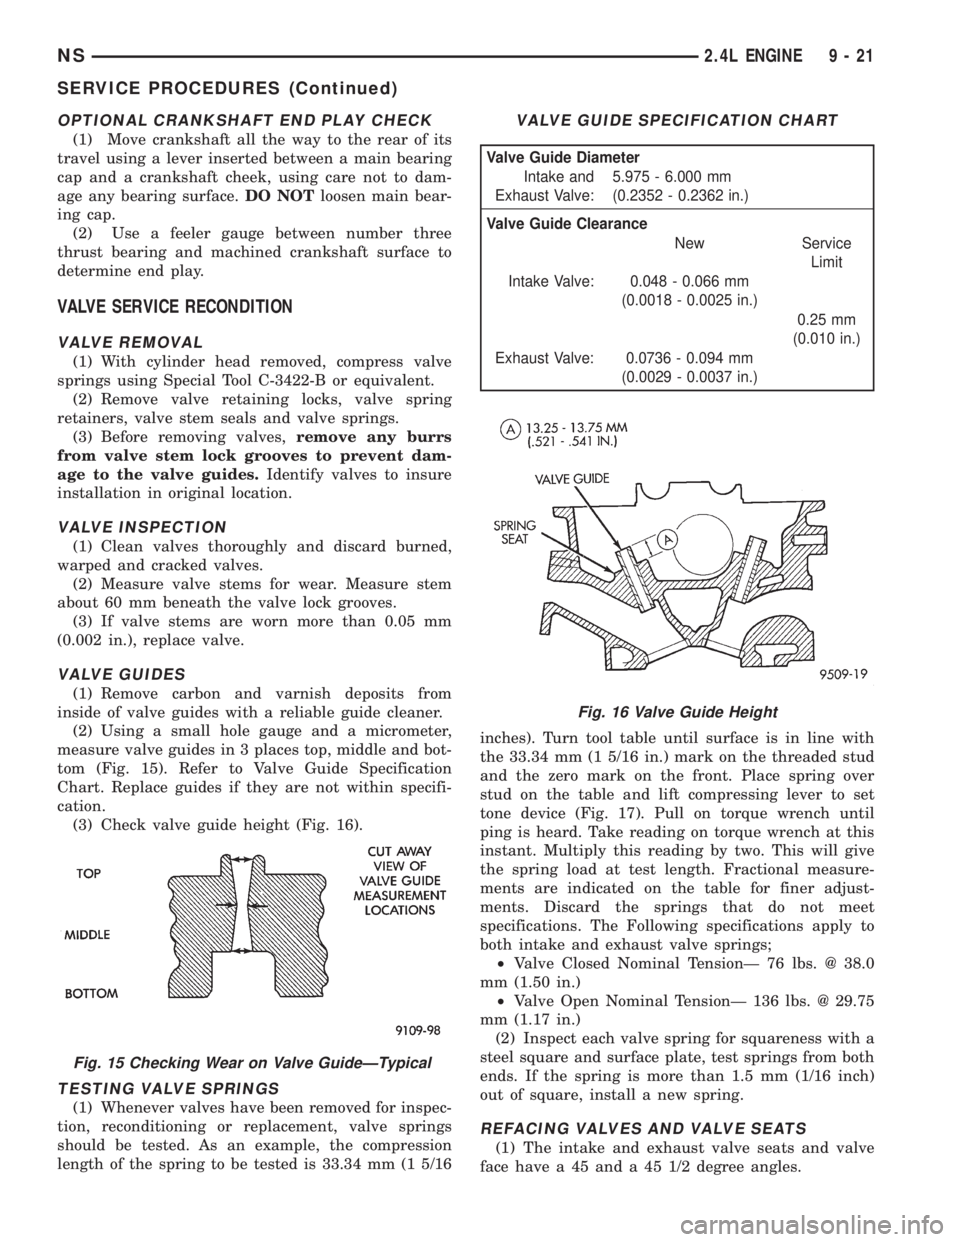
tom (Fig. 15). Refer to Valve Guide Specification
Chart. Replace guides if they are not within specifi-
cation.
(3) Check valve guide height (Fig. 16).
TESTING VALVE SPRINGS
(1) Whenever valves have been removed for inspec-
tion, reconditioning or replacement, valve springs
should be tested. As an example, the compression
length of the spring to be tested is 33.34 mm (1 5/16inches). Turn tool table until surface is in line with
the 33.34 mm (1 5/16 in.) mark on the threaded stud
and the zero mark on the front. Place spring over
stud on the table and lift compressing lever to set
tone device (Fig. 17). Pull on torque wrench until
ping is heard. Take reading on torque wrench at this
instant. Multiply this reading by two. This will give
the spring load at test length. Fractional measure-
ments are indicated on the table for finer adjust-
ments. Discard the springs that do not meet
specifications. The Following specifications apply to
both intake and exhaust valve springs;
²Valve Closed Nominal TensionÐ 76 lbs. @ 38.0
mm (1.50 in.)
²Valve Open Nominal TensionÐ 136 lbs. @ 29.75
mm (1.17 in.)
(2) Inspect each valve spring for squareness with a
steel square and surface plate, test springs from both
ends. If the spring is more than 1.5 mm (1/16 inch)
out of square, install a new spring.
REFACING VALVES AND VALVE SEATS
(1) The intake and exhaust valve seats and valve
face have a 45 and a 45 1/2 degree angles.
Fig. 15 Checking Wear on Valve GuideÐTypical
VALVE GUIDE SPECIFICATION CHART
Valve Guide Diameter
Intake and
Exhaust Valve:5.975 - 6.000 mm
(0.2352 - 0.2362 in.)
Valve Guide Clearance
New Service
Limit
Intake Valve: 0.048 - 0.066 mm
(0.0018 - 0.0025 in.)
0.25 mm
(0.010 in.)
Exhaust Valve: 0.0736 - 0.094 mm
(0.0029 - 0.0037 in.)
Fig. 16 Valve Guide Height
NS2.4L ENGINE 9 - 21
SERVICE PROCEDURES (Continued)
Page 1072 of 1938
(2) Inspect the remaining margin after the valves
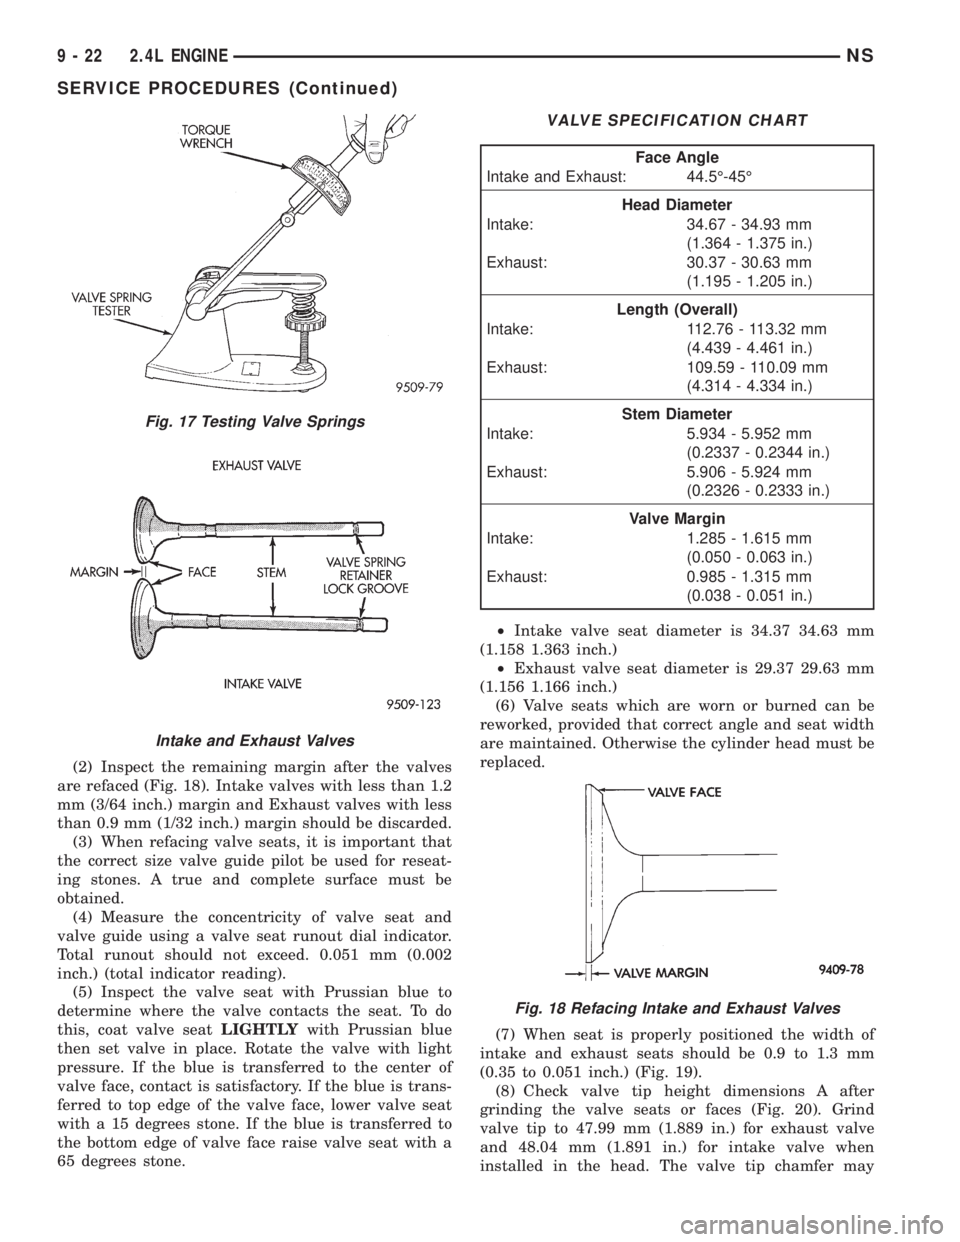
are refaced (Fig. 18). Intake valves with less than 1.2
mm (3/64 inch.) margin and Exhaust valves with less
than 0.9 mm (1/32 inch.) margin should be discarded.
(3) When refacing valve seats, it is important that
the correct size valve guide pilot be used for reseat-
ing stones. A true and complete surface must be
obtained.
(4) Measure the concentricity of valve seat and
valve guide using a valve seat runout dial indicator.
Total runout should not exceed. 0.051 mm (0.002
inch.) (total indicator reading).
(5) Inspect the valve seat with Prussian blue to
determine where the valve contacts the seat. To do
this, coat valve seatLIGHTLYwith Prussian blue
then set valve in place. Rotate the valve with light
pressure. If the blue is transferred to the center of
valve face, contact is satisfactory. If the blue is trans-
ferred to top edge of the valve face, lower valve seat
with a 15 degrees stone. If the blue is transferred to
the bottom edge of valve face raise valve seat with a
65 degrees stone.²Intake valve seat diameter is 34.37 34.63 mm
(1.158 1.363 inch.)
²Exhaust valve seat diameter is 29.37 29.63 mm
(1.156 1.166 inch.)
(6) Valve seats which are worn or burned can be
reworked, provided that correct angle and seat width
are maintained. Otherwise the cylinder head must be
replaced.
(7) When seat is properly positioned the width of
intake and exhaust seats should be 0.9 to 1.3 mm
(0.35 to 0.051 inch.) (Fig. 19).
(8) Check valve tip height dimensions A after
grinding the valve seats or faces (Fig. 20). Grind
valve tip to 47.99 mm (1.889 in.) for exhaust valve
and 48.04 mm (1.891 in.) for intake valve when
installed in the head. The valve tip chamfer may
Fig. 17 Testing Valve Springs
Intake and Exhaust Valves
VALVE SPECIFICATION CHART
Face Angle
Intake and Exhaust: 44.5É-45É
Head Diameter
Intake: 34.67 - 34.93 mm
(1.364 - 1.375 in.)
Exhaust: 30.37 - 30.63 mm
(1.195 - 1.205 in.)
Length (Overall)
Intake: 112.76 - 113.32 mm
(4.439 - 4.461 in.)
Exhaust: 109.59 - 110.09 mm
(4.314 - 4.334 in.)
Stem Diameter
Intake: 5.934 - 5.952 mm
(0.2337 - 0.2344 in.)
Exhaust: 5.906 - 5.924 mm
(0.2326 - 0.2333 in.)
Valve Margin
Intake: 1.285 - 1.615 mm
(0.050 - 0.063 in.)
Exhaust: 0.985 - 1.315 mm
(0.038 - 0.051 in.)
Fig. 18 Refacing Intake and Exhaust Valves
9 - 22 2.4L ENGINENS
SERVICE PROCEDURES (Continued)