CHRYSLER VOYAGER 2001 Service Manual
Manufacturer: CHRYSLER, Model Year: 2001, Model line: VOYAGER, Model: CHRYSLER VOYAGER 2001Pages: 4284, PDF Size: 83.53 MB
Page 1411 of 4284
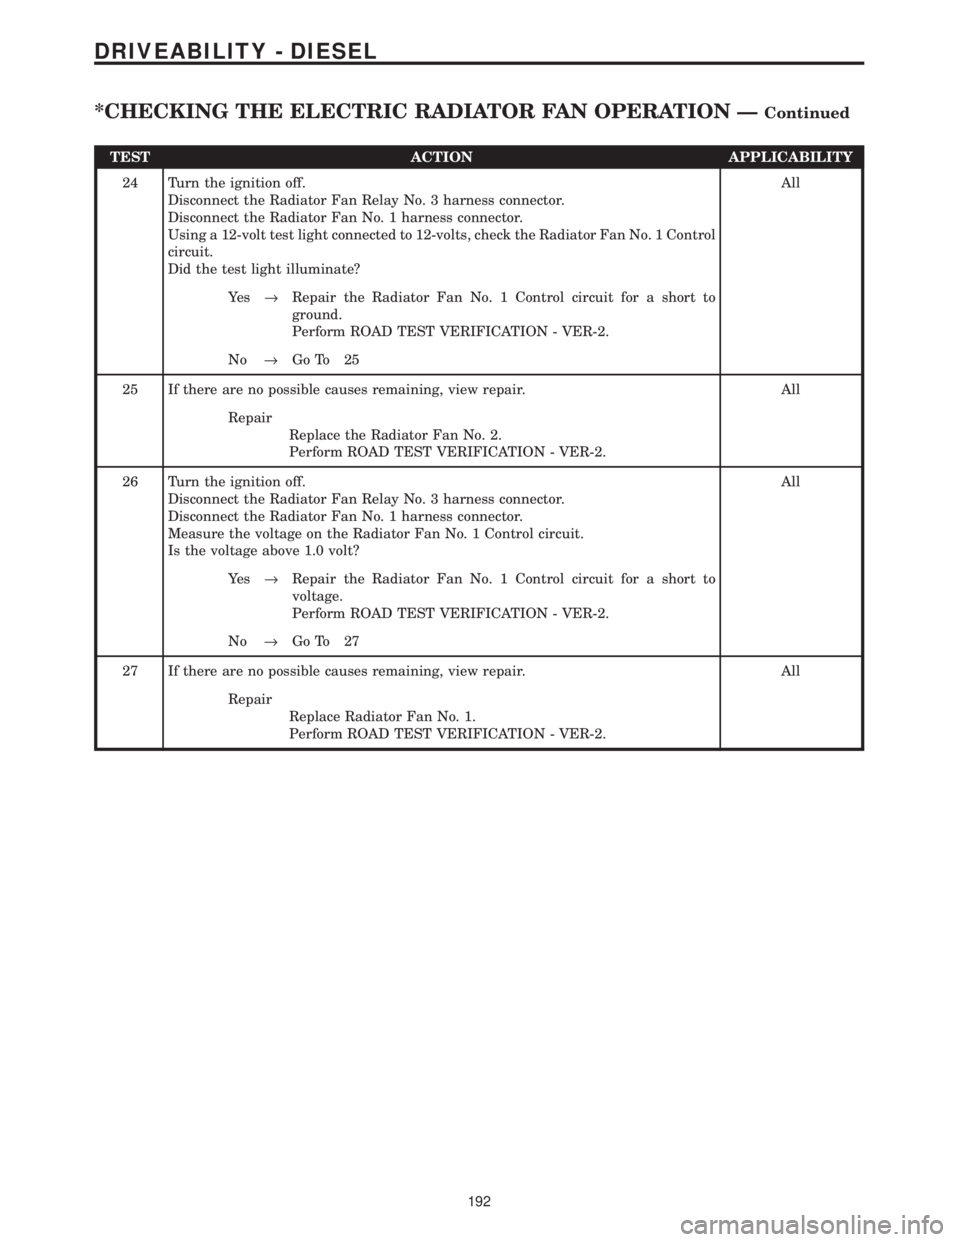
TEST ACTION APPLICABILITY
24 Turn the ignition off.
Disconnect the Radiator Fan Relay No. 3 harness connector.
Disconnect the Radiator Fan No. 1 harness connector.
Using a 12-volt test light connected to 12-volts, check the Radiator Fan No. 1 Control
circuit.
Did the test light illuminate?All
Ye s®Repair the Radiator Fan No. 1 Control circuit for a short to
ground.
Perform ROAD TEST VERIFICATION - VER-2.
No®Go To 25
25 If there are no possible causes remaining, view repair. All
Repair
Replace the Radiator Fan No. 2.
Perform ROAD TEST VERIFICATION - VER-2.
26 Turn the ignition off.
Disconnect the Radiator Fan Relay No. 3 harness connector.
Disconnect the Radiator Fan No. 1 harness connector.
Measure the voltage on the Radiator Fan No. 1 Control circuit.
Is the voltage above 1.0 volt?All
Ye s®Repair the Radiator Fan No. 1 Control circuit for a short to
voltage.
Perform ROAD TEST VERIFICATION - VER-2.
No®Go To 27
27 If there are no possible causes remaining, view repair. All
Repair
Replace Radiator Fan No. 1.
Perform ROAD TEST VERIFICATION - VER-2.
192
DRIVEABILITY - DIESEL
*CHECKING THE ELECTRIC RADIATOR FAN OPERATION ÐContinued
Page 1412 of 4284

Symptom:
*CHECKING THE ENGINE COOLANT TEMPERATURE SENSOR
CALIBRATION
POSSIBLE CAUSES
ECT SENSOR - COLD
ECT SENSOR - HOT
TEST ACTION APPLICABILITY
1NOTE: The thermostat must be operating correctly for this test to be valid.
With the DRB, read and note the engine coolant temperature.
Using a temperature probe, measure the engine block temperature near the ECT
Sensor.
NOTE: The engine temperature should be below 50*C (120*F)
Are the readings within 7ÉC (13ÉF) of each other?All
Ye s®Go To 2
No®Replace the Engine Coolant Temperature Sensor.
Perform ROAD TEST VERIFICATION - VER-2.
2NOTE: The thermostat must be operating correctly for this test to be valid.
Start the engine and bring the engine to operating temperature (thermostat open).
Turn the engine off and wait 10 minutes to allow the engine temperature to stabilize.
Using a temperature probe, measure the engine block temperature near the ECT
Sensor.
Using the DRB, select Engine, then Sensors and read the engine coolant tempera-
ture.
Are the readings within 7ÉC (13ÉF) of each other?All
Ye s®Test Complete.
No®Replace the Engine Coolant Temperature Sensor.
Perform ROAD TEST VERIFICATION - VER-2.
193
DRIVEABILITY - DIESEL
Page 1413 of 4284
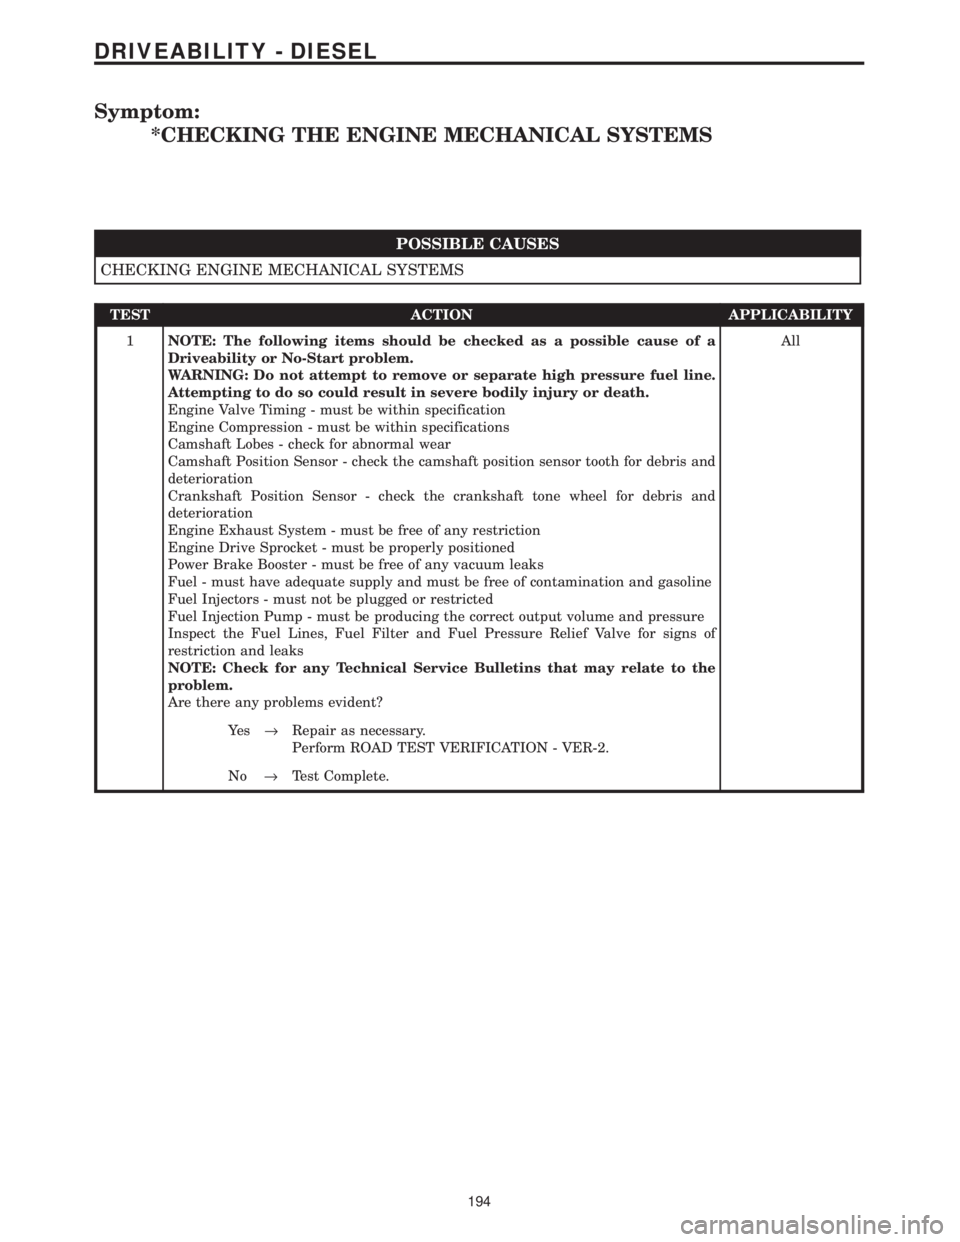
Symptom:
*CHECKING THE ENGINE MECHANICAL SYSTEMS
POSSIBLE CAUSES
CHECKING ENGINE MECHANICAL SYSTEMS
TEST ACTION APPLICABILITY
1NOTE: The following items should be checked as a possible cause of a
Driveability or No-Start problem.
WARNING: Do not attempt to remove or separate high pressure fuel line.
Attempting to do so could result in severe bodily injury or death.
Engine Valve Timing - must be within specification
Engine Compression - must be within specifications
Camshaft Lobes - check for abnormal wear
Camshaft Position Sensor - check the camshaft position sensor tooth for debris and
deterioration
Crankshaft Position Sensor - check the crankshaft tone wheel for debris and
deterioration
Engine Exhaust System - must be free of any restriction
Engine Drive Sprocket - must be properly positioned
Power Brake Booster - must be free of any vacuum leaks
Fuel - must have adequate supply and must be free of contamination and gasoline
Fuel Injectors - must not be plugged or restricted
Fuel Injection Pump - must be producing the correct output volume and pressure
Inspect the Fuel Lines, Fuel Filter and Fuel Pressure Relief Valve for signs of
restriction and leaks
NOTE: Check for any Technical Service Bulletins that may relate to the
problem.
Are there any problems evident?All
Ye s®Repair as necessary.
Perform ROAD TEST VERIFICATION - VER-2.
No®Test Complete.
194
DRIVEABILITY - DIESEL
Page 1414 of 4284
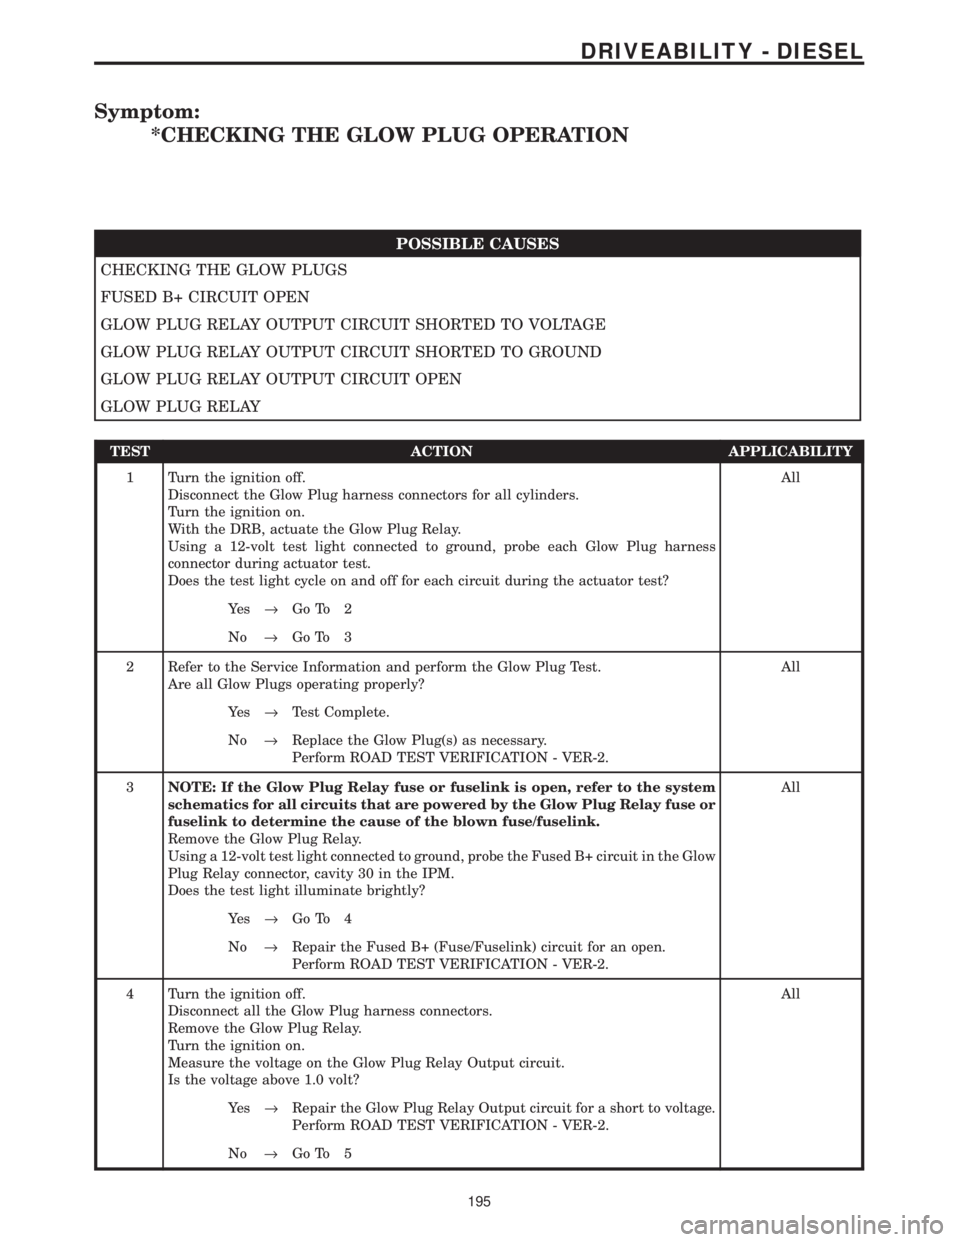
Symptom:
*CHECKING THE GLOW PLUG OPERATION
POSSIBLE CAUSES
CHECKING THE GLOW PLUGS
FUSED B+ CIRCUIT OPEN
GLOW PLUG RELAY OUTPUT CIRCUIT SHORTED TO VOLTAGE
GLOW PLUG RELAY OUTPUT CIRCUIT SHORTED TO GROUND
GLOW PLUG RELAY OUTPUT CIRCUIT OPEN
GLOW PLUG RELAY
TEST ACTION APPLICABILITY
1 Turn the ignition off.
Disconnect the Glow Plug harness connectors for all cylinders.
Turn the ignition on.
With the DRB, actuate the Glow Plug Relay.
Using a 12-volt test light connected to ground, probe each Glow Plug harness
connector during actuator test.
Does the test light cycle on and off for each circuit during the actuator test?All
Ye s®Go To 2
No®Go To 3
2 Refer to the Service Information and perform the Glow Plug Test.
Are all Glow Plugs operating properly?All
Ye s®Test Complete.
No®Replace the Glow Plug(s) as necessary.
Perform ROAD TEST VERIFICATION - VER-2.
3NOTE: If the Glow Plug Relay fuse or fuselink is open, refer to the system
schematics for all circuits that are powered by the Glow Plug Relay fuse or
fuselink to determine the cause of the blown fuse/fuselink.
Remove the Glow Plug Relay.
Using a 12-volt test light connected to ground, probe the Fused B+ circuit in the Glow
Plug Relay connector, cavity 30 in the IPM.
Does the test light illuminate brightly?All
Ye s®Go To 4
No®Repair the Fused B+ (Fuse/Fuselink) circuit for an open.
Perform ROAD TEST VERIFICATION - VER-2.
4 Turn the ignition off.
Disconnect all the Glow Plug harness connectors.
Remove the Glow Plug Relay.
Turn the ignition on.
Measure the voltage on the Glow Plug Relay Output circuit.
Is the voltage above 1.0 volt?All
Ye s®Repair the Glow Plug Relay Output circuit for a short to voltage.
Perform ROAD TEST VERIFICATION - VER-2.
No®Go To 5
195
DRIVEABILITY - DIESEL
Page 1415 of 4284
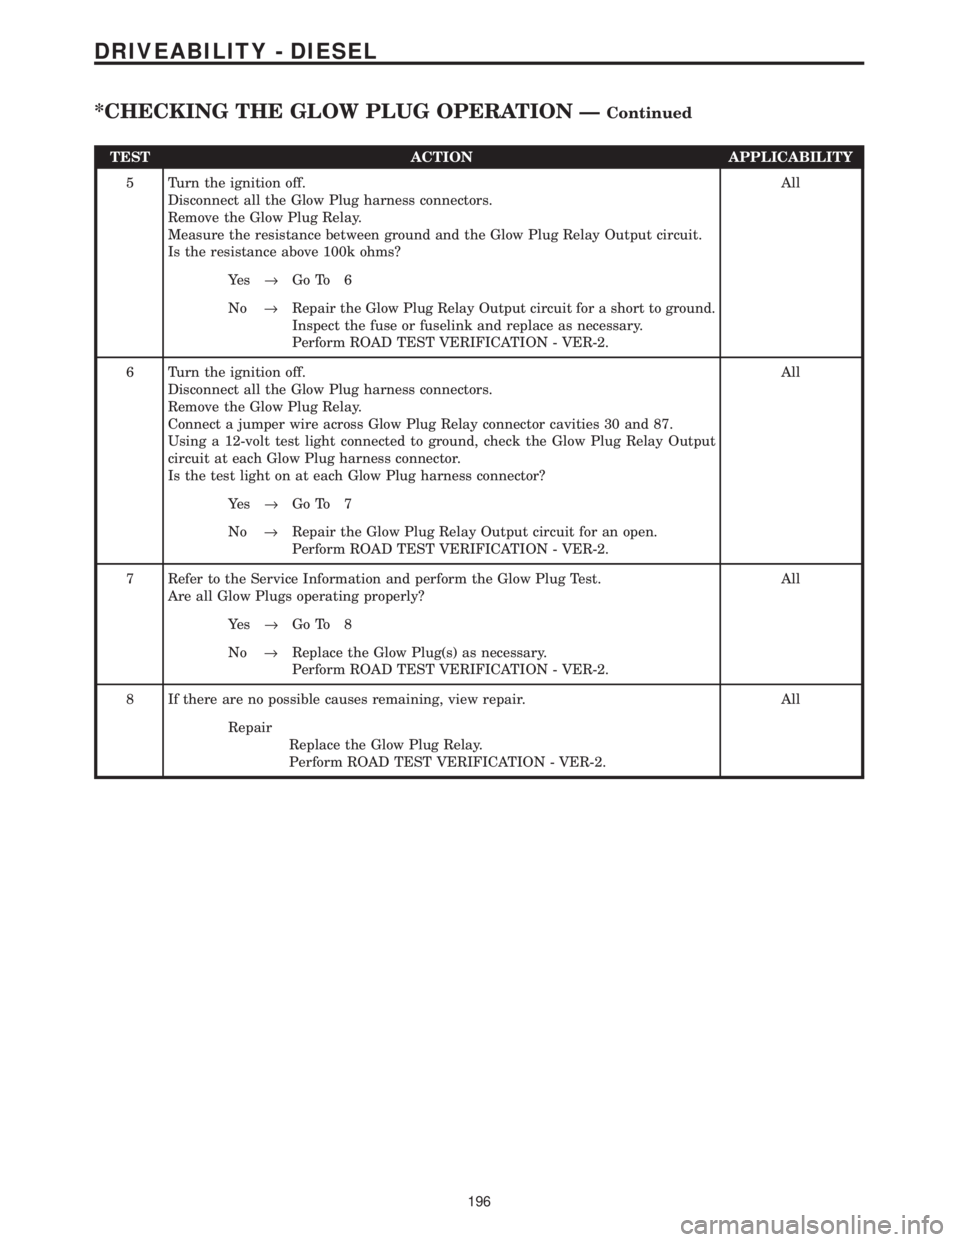
TEST ACTION APPLICABILITY
5 Turn the ignition off.
Disconnect all the Glow Plug harness connectors.
Remove the Glow Plug Relay.
Measure the resistance between ground and the Glow Plug Relay Output circuit.
Is the resistance above 100k ohms?All
Ye s®Go To 6
No®Repair the Glow Plug Relay Output circuit for a short to ground.
Inspect the fuse or fuselink and replace as necessary.
Perform ROAD TEST VERIFICATION - VER-2.
6 Turn the ignition off.
Disconnect all the Glow Plug harness connectors.
Remove the Glow Plug Relay.
Connect a jumper wire across Glow Plug Relay connector cavities 30 and 87.
Using a 12-volt test light connected to ground, check the Glow Plug Relay Output
circuit at each Glow Plug harness connector.
Is the test light on at each Glow Plug harness connector?All
Ye s®Go To 7
No®Repair the Glow Plug Relay Output circuit for an open.
Perform ROAD TEST VERIFICATION - VER-2.
7 Refer to the Service Information and perform the Glow Plug Test.
Are all Glow Plugs operating properly?All
Ye s®Go To 8
No®Replace the Glow Plug(s) as necessary.
Perform ROAD TEST VERIFICATION - VER-2.
8 If there are no possible causes remaining, view repair. All
Repair
Replace the Glow Plug Relay.
Perform ROAD TEST VERIFICATION - VER-2.
196
DRIVEABILITY - DIESEL
*CHECKING THE GLOW PLUG OPERATION ÐContinued
Page 1416 of 4284
Symptom:
*CHECKING THE LIFT PUMP MOTOR OPERATION
POSSIBLE CAUSES
LIFT PUMP OUTPUT TEST
FUSED B+ CIRCUIT OPEN
LIFT PUMP RELAY
LIFT PUMP RELAY OUTPUT CIRCUIT SHORTED TO VOLTAGE
LIFT PUMP RELAY OUTPUT CIRCUIT SHORTED TO GROUND
LIFT PUMP RELAY OUTPUT CIRCUIT OPEN
LIFT PUMP GROUND CIRCUIT OPEN
LIFT PUMP MOTOR
TEST ACTION APPLICABILITY
1NOTE: If any Fuel Lift Pump DTCs are present, diagnose the DTCs first.
Turn the ignition on.
With the DRB, actuate the Lift Pump Relay.
Gain access to the Lift Pump Motor to determine if it is cycling on and off.
Does the Lift Pump Motor cycle on and off?All
Ye s®Go To 2
No®Go To 3
2NOTE: The Lift Pump fuel output must be sufficient to prime the Injector
Pump.
Refer to the Service Information to test the Lift Pump pressure and volume output.
Did the Lift Pump pass the Lift Pump pressure and volume test?All
Ye s®Test Complete.
No®Repair as necessary.
Perform ROAD TEST VERIFICATION - VER-2.
3NOTE: If the Lift Pump Relay fuse is open, refer to the system schematics
for all circuits that are powered by the Lift Pump Relay fuse to determine
the cause of the blown fuse.
Remove the Lift Pump Relay from the IPM.
Using a 12-volt test light connected to ground, probe the Fused B+ circuit in the Lift
Pump Relay connector in the IPM.
Does the test light illuminate brightly?All
Ye s®Go To 4
No®Repair the Fused B+ (Fuse) circuit for an open.
Perform ROAD TEST VERIFICATION - VER-2.
197
DRIVEABILITY - DIESEL
Page 1417 of 4284
TEST ACTION APPLICABILITY
4 Turn the ignition off.
Install a substitute relay in place of the Lift Pump Relay.
Turn the ignition on.
With the DRB, actuate the Lift Pump Relay.
Does the Lift Pump Motor cycle on and off?All
Ye s®Replace the Lift Pump Relay.
Perform ROAD TEST VERIFICATION - VER-2.
No®Go To 5
5 Turn the ignition off.
Disconnect the Lift Pump Motor harness connector.
Remove the Lift Pump Relay.
Turn the ignition on.
Measure the voltage on the Lift Pump Relay Output circuit.
Is the voltage above 1.0 volt?All
Ye s®Repair the Lift Pump Relay Output circuit for a short to voltage.
Perform ROAD TEST VERIFICATION - VER-2.
No®Go To 6
6 Turn the ignition off.
Disconnect the Lift Pump Motor harness connector.
Remove the Lift Pump Relay.
Measure the resistance between ground and the Lift Pump Relay Output circuit.
Is the resistance above 100k ohms?All
Ye s®Go To 7
No®Repair the Lift Pump Relay Output circuit for a short to ground.
Inspect the fuse and replace as necessary.
Perform ROAD TEST VERIFICATION - VER-2.
7 Turn the ignition off.
Disconnect the Lift Pump Motor harness connector.
Remove the Lift Pump Relay.
Connect a jumper wire across Lift Pump Relay connector cavities 30 and 87.
Using a 12-volt test light connected to ground, check the Lift Pump Relay Output
circuit.
Is the test light illuminated brightly?All
Ye s®Go To 8
No®Repair the Lift Pump Relay Output circuit for an open.
Perform ROAD TEST VERIFICATION - VER-2.
8 Turn the ignition off.
Disconnect the Lift Pump Motor harness connector.
Using a 12-volt test light connected to 12-volts, check the Lift Pump Ground circuit.
Is the test light illuminated brightly?All
Ye s®Go To 9
No®Repair the Lift Pump Ground circuit for an open.
Perform ROAD TEST VERIFICATION - VER-2.
198
DRIVEABILITY - DIESEL
*CHECKING THE LIFT PUMP MOTOR OPERATION ÐContinued
Page 1418 of 4284

TEST ACTION APPLICABILITY
9 If there are no possible causes remaining, view repair. All
Repair
Replace the Lift Pump Motor in accordance with the Service
Information.
Perform ROAD TEST VERIFICATION - VER-2.
199
DRIVEABILITY - DIESEL
*CHECKING THE LIFT PUMP MOTOR OPERATION ÐContinued
Page 1419 of 4284
Symptom:
*CHECKING THE MAF SENSOR CALIBRATION
POSSIBLE CAUSES
CHECKING THE MAF SIGNAL AT 2000 RPM
CHECKING THE MAF SIGNAL AT 3000 RPM
CHECKING THE MAF SIGNAL AT 4000 RPM
CHECKING THE MAF SIGNAL AT IDLE
TEST ACTION APPLICABILITY
1 Allow the engine to idle for 2 minutes.
NOTE: The induction tubes connected to the MAF Sensor and the turbo-
charger must be properly connected and without damage or restrictions.
With the DRBIIItin Sensors, read the MASS AIR FLOW Volts.
Is the voltage between 2.0 and 2.7 volts?All
Ye s®Go To 2
No®Replace the Mass Air Flow Sensor.
2 Allow the engine to idle for 2 minutes.
NOTE: The induction tubes connected to the MAF Sensor and the turbo-
charger must be properly connected and without damage or restrictions.
With the DRBIIItin Sensors, read the MASS AIR FLOW Volts.
With the transmission in Neutral and the parking brake set, increase engine speed
to 2000 rpm and note the DRB reading.
Is the voltage between 2.8 and 3.5 volts?All
Ye s®Go To 3
No®Replace the Mass Air Flow Sensor.
3 Allow the engine to idle for 2 minutes.
NOTE: The induction tubes connected to the MAF Sensor and the turbo-
charger must be properly connected and without damage or restrictions.
With the DRBIIItin Sensors, read the MASS AIR FLOW Volts.
With the transmission in Neutral and the parking brake set, increase engine speed
to 3000 rpm and note the DRB reading.
Is the voltage between 3.5 and 4.1 volts?All
Ye s®Go To 4
No®Replace the Mass Air Flow Sensor.
4 Allow the engine to idle for 2 minutes.
NOTE: The induction tubes connected to the MAF Sensor and the turbo-
charger must be properly connected and without damage or restrictions.
With the DRBIIItin Sensors, read the MASS AIR FLOW Volts.
With the transmission in Neutral and the parking brake set, increase engine speed
to 4000 rpm for 5.0 seconds and note DRB reading.
Is the voltage between 3.8 and 4.5 volts?All
Ye s®Test Complete.
No®Replace the Mass Air Flow Sensor.
200
DRIVEABILITY - DIESEL
Page 1420 of 4284

Symptom:
*CHECKING THE SPEED CONTROL OPERATION
POSSIBLE CAUSES
CHECKING CRUISE SWITCHES
CHECKING THE BRAKE SWITCH INPUT
CHECKING THE ECM FOR DTC'S
CHECKING THE VSS SIGNAL
CLUTCH PEDAL SWITCH
CLUTCH PEDAL SWITCH SENSE CIRCUIT OPEN
CLUTCH PEDAL SWITCH SENSE CIRCUIT SHORTED TO GROUND
ECM
ECM
INTERMITTENT CONDITION
TEST ACTION APPLICABILITY
1 Turn the ignition on.
With the DRBIIIt, read the ECM DTCs.
Are there any ECM DTC's present?All
Ye s®Refer to symptom list for problems related to the ECM DTC.
Perform SPEED CONTROL VERIFICATION - VER-4.
No®Go To 2
2 Test drive the vehicle above 60 Km/h (35 mph).
Attempt to Set the Speed Control.
Is the Speed Control function operating properly?All
Ye s®Test Complete.
No®Go To 3
3 Start the engine.
With the DRB, read the CRUISE SW VOLTS.
Observe the cruise switch volts on the DRB while pressing and holding each cruise
button separately.
NOTE: Pressing each cruise button should result in the following voltages:
ON/OFF 0.0 - 0.3v, SET 3.58 - 3.99v, RESUME/ACCEL 4.19 - 4.59v, CANCEL 1.28
- 1.68v, COAST 2.69 - 3.01v, No Button Pressed 4.8 - 5.2v
Does each switch provide the correct voltage?All
Ye s®Go To 4
No®Refer to symptom list for problems related to S/C Switches.
Perform SPEED CONTROL VERIFICATION - VER-4.
201
DRIVEABILITY - DIESEL