display CHRYSLER VOYAGER 2001 Service Manual
[x] Cancel search | Manufacturer: CHRYSLER, Model Year: 2001, Model line: VOYAGER, Model: CHRYSLER VOYAGER 2001Pages: 4284, PDF Size: 83.53 MB
Page 1436 of 4284
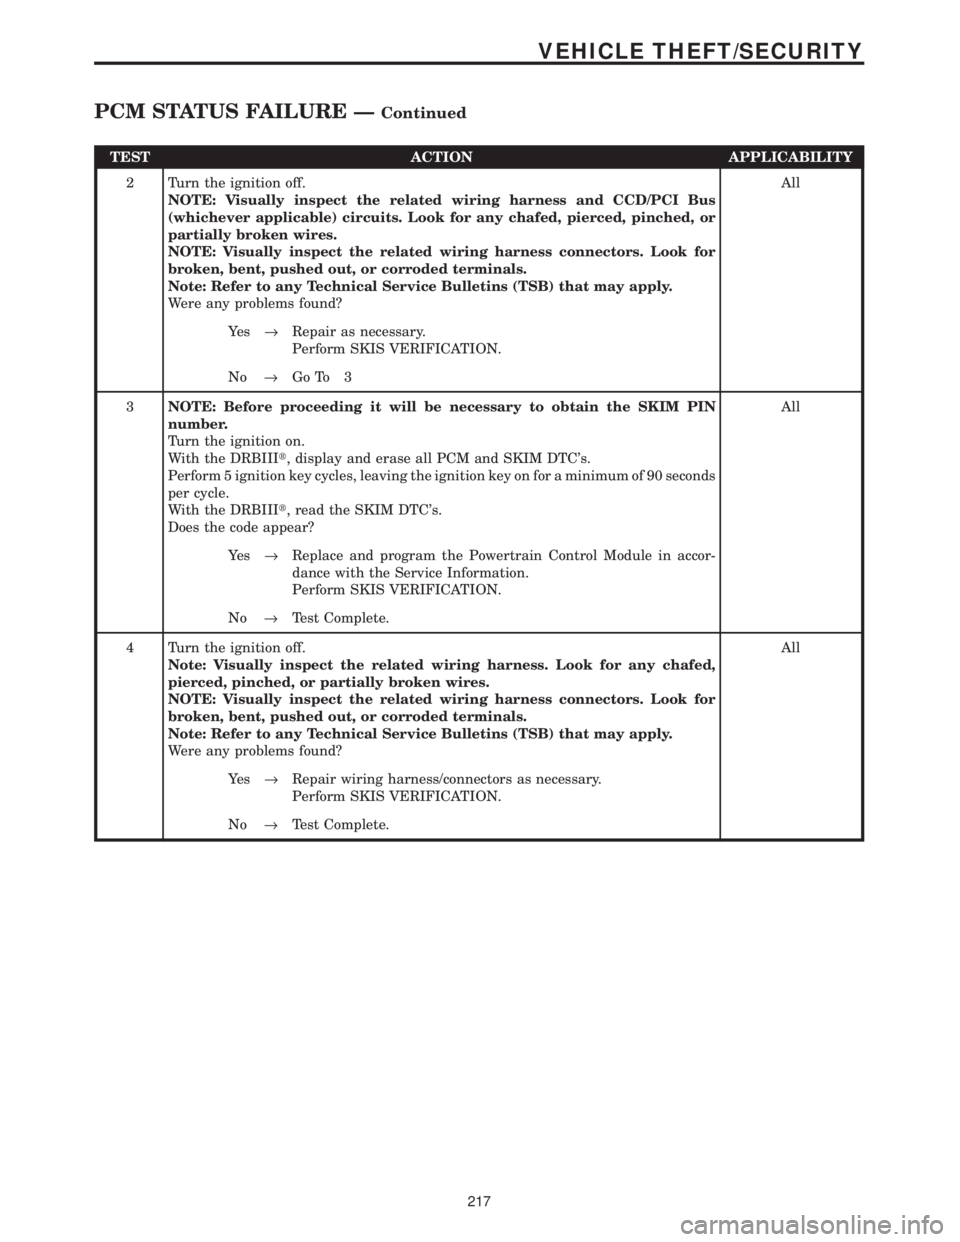
TEST ACTION APPLICABILITY
2 Turn the ignition off.
NOTE: Visually inspect the related wiring harness and CCD/PCI Bus
(whichever applicable) circuits. Look for any chafed, pierced, pinched, or
partially broken wires.
NOTE: Visually inspect the related wiring harness connectors. Look for
broken, bent, pushed out, or corroded terminals.
Note: Refer to any Technical Service Bulletins (TSB) that may apply.
Were any problems found?All
Ye s®Repair as necessary.
Perform SKIS VERIFICATION.
No®Go To 3
3NOTE: Before proceeding it will be necessary to obtain the SKIM PIN
number.
Turn the ignition on.
With the DRBIIIt, display and erase all PCM and SKIM DTC's.
Perform 5 ignition key cycles, leaving the ignition key on for a minimum of 90 seconds
per cycle.
With the DRBIIIt, read the SKIM DTC's.
Does the code appear?All
Ye s®Replace and program the Powertrain Control Module in accor-
dance with the Service Information.
Perform SKIS VERIFICATION.
No®Test Complete.
4 Turn the ignition off.
Note: Visually inspect the related wiring harness. Look for any chafed,
pierced, pinched, or partially broken wires.
NOTE: Visually inspect the related wiring harness connectors. Look for
broken, bent, pushed out, or corroded terminals.
Note: Refer to any Technical Service Bulletins (TSB) that may apply.
Were any problems found?All
Ye s®Repair wiring harness/connectors as necessary.
Perform SKIS VERIFICATION.
No®Test Complete.
217
VEHICLE THEFT/SECURITY
PCM STATUS FAILURE ÐContinued
Page 1437 of 4284
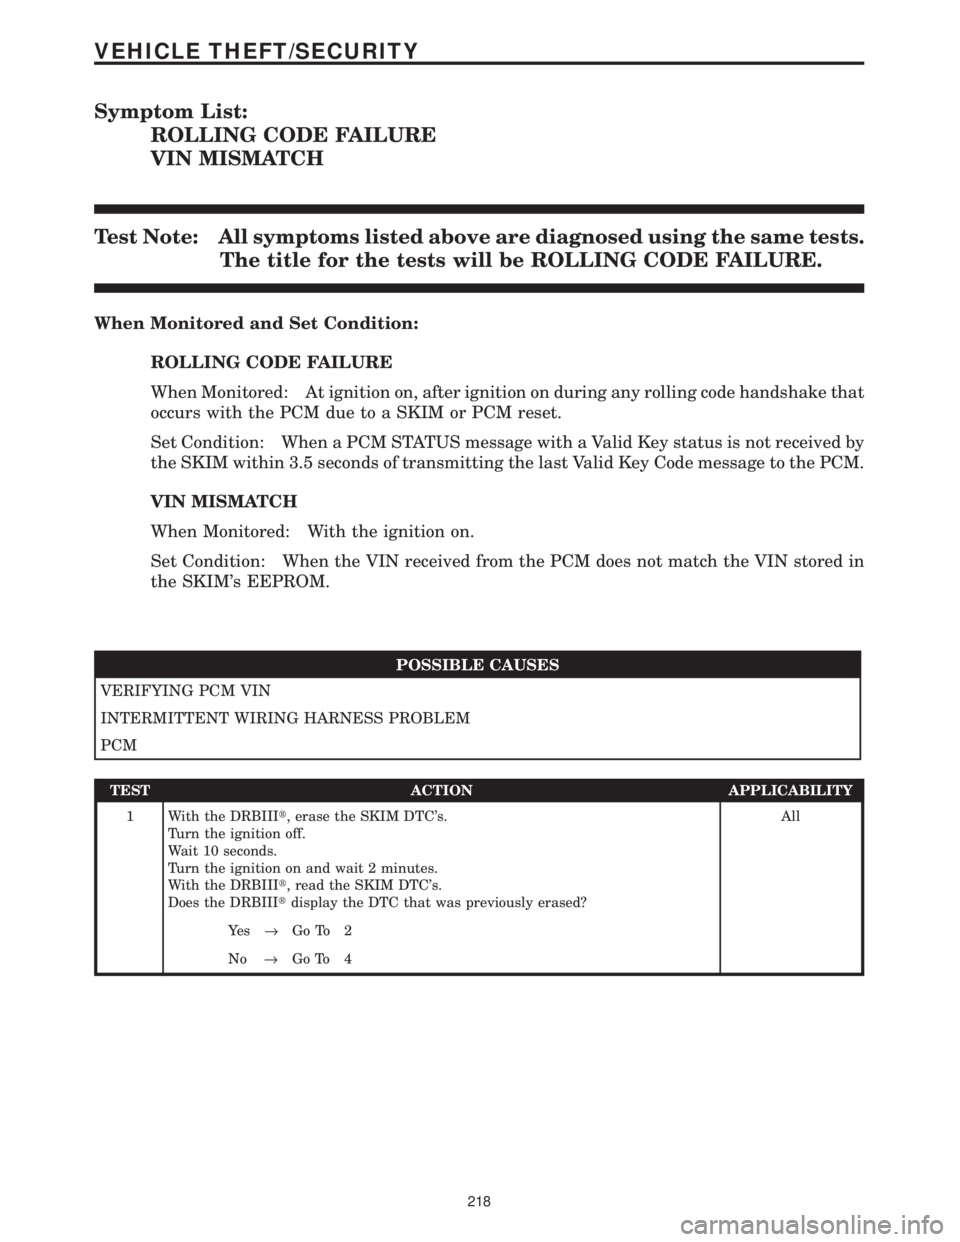
Symptom List:
ROLLING CODE FAILURE
VIN MISMATCH
Test Note: All symptoms listed above are diagnosed using the same tests.
The title for the tests will be ROLLING CODE FAILURE.
When Monitored and Set Condition:
ROLLING CODE FAILURE
When Monitored: At ignition on, after ignition on during any rolling code handshake that
occurs with the PCM due to a SKIM or PCM reset.
Set Condition: When a PCM STATUS message with a Valid Key status is not received by
the SKIM within 3.5 seconds of transmitting the last Valid Key Code message to the PCM.
VIN MISMATCH
When Monitored: With the ignition on.
Set Condition: When the VIN received from the PCM does not match the VIN stored in
the SKIM's EEPROM.
POSSIBLE CAUSES
VERIFYING PCM VIN
INTERMITTENT WIRING HARNESS PROBLEM
PCM
TEST ACTION APPLICABILITY
1 With the DRBIIIt, erase the SKIM DTC's.
Turn the ignition off.
Wait 10 seconds.
Turn the ignition on and wait 2 minutes.
With the DRBIIIt, read the SKIM DTC's.
Does the DRBIIItdisplay the DTC that was previously erased?All
Ye s®Go To 2
No®Go To 4
218
VEHICLE THEFT/SECURITY
Page 1438 of 4284

TEST ACTION APPLICABILITY
2NOTE: Ensure that a VIN has been programmed into the PCM. If a VIN is not
displayed, attempt to program the PCM with the correct vehicle VIN before
continuing.
Turn the ignition on.
With the DRBIIIt, select Engine system from the main menu.
Display and record the Vehicle Identification Number.
Does the VIN recorded from the PCM match the VIN of the vehicle?All
Ye s®Go To 3
No®Replace and program the Powertrain Control Module in accor-
dance with the Service Information.
Perform SKIS VERIFICATION.
3 Turn the ignition off.
Replace and program the Sentry Key Immobilizer Module in accordance with the
Service Information.
Turn the ignition on.
With the DRBIIIt, display and clear all PCM and SKIM DTC's.
Perform 5 ignition key cycles leaving the ignition key on for 90 seconds per cycle.
With the DRBIIIt, check for SKIM DTC's.
Does the DRBIIItdisplay the same DTC?All
Ye s®Replace and program the Powertrain Control Module in accor-
dance with the Service Information.
Perform SKIS VERIFICATION.
No®Test Complete.
4 Turn the ignition off.
Note: Visually inspect the related wiring harness. Look for any chafed,
pierced, pinched, or partially broken wires.
NOTE: Visually inspect the related wiring harness connectors. Look for
broken, bent, pushed out, or corroded terminals.
Note: Refer to any Technical Service Bulletins (TSB) that may apply.
Were any problems found?All
Ye s®Repair wiring harness/connectors as necessary.
Perform SKIS VERIFICATION.
No®Test Complete.
219
VEHICLE THEFT/SECURITY
ROLLING CODE FAILURE ÐContinued
Page 1440 of 4284
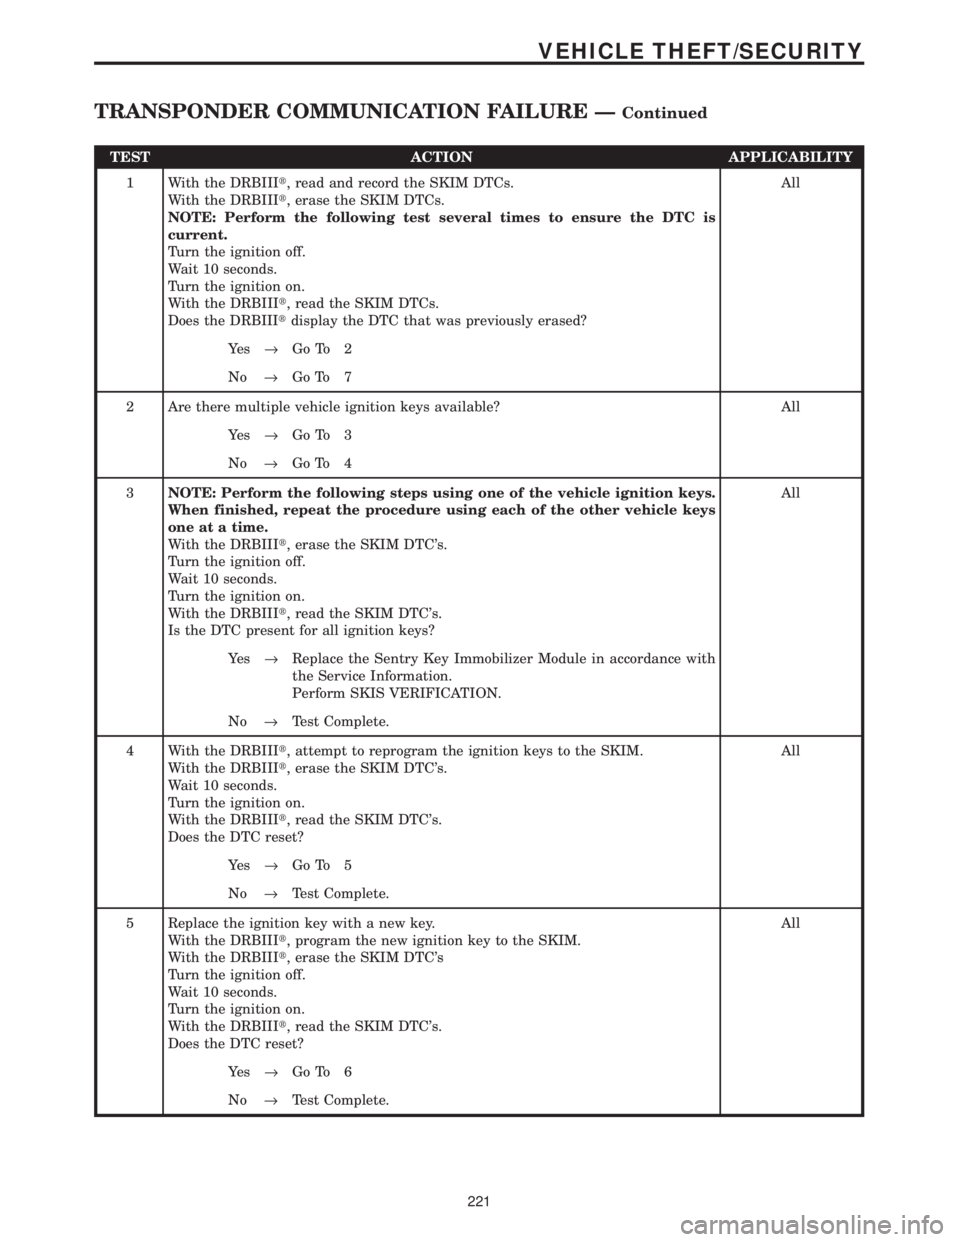
TEST ACTION APPLICABILITY
1 With the DRBIIIt, read and record the SKIM DTCs.
With the DRBIIIt, erase the SKIM DTCs.
NOTE: Perform the following test several times to ensure the DTC is
current.
Turn the ignition off.
Wait 10 seconds.
Turn the ignition on.
With the DRBIIIt, read the SKIM DTCs.
Does the DRBIIItdisplay the DTC that was previously erased?All
Ye s®Go To 2
No®Go To 7
2 Are there multiple vehicle ignition keys available? All
Ye s®Go To 3
No®Go To 4
3NOTE: Perform the following steps using one of the vehicle ignition keys.
When finished, repeat the procedure using each of the other vehicle keys
one at a time.
With the DRBIIIt, erase the SKIM DTC's.
Turn the ignition off.
Wait 10 seconds.
Turn the ignition on.
With the DRBIIIt, read the SKIM DTC's.
Is the DTC present for all ignition keys?All
Ye s®Replace the Sentry Key Immobilizer Module in accordance with
the Service Information.
Perform SKIS VERIFICATION.
No®Test Complete.
4 With the DRBIIIt, attempt to reprogram the ignition keys to the SKIM.
With the DRBIIIt, erase the SKIM DTC's.
Wait 10 seconds.
Turn the ignition on.
With the DRBIIIt, read the SKIM DTC's.
Does the DTC reset?All
Ye s®Go To 5
No®Test Complete.
5 Replace the ignition key with a new key.
With the DRBIIIt, program the new ignition key to the SKIM.
With the DRBIIIt, erase the SKIM DTC's
Turn the ignition off.
Wait 10 seconds.
Turn the ignition on.
With the DRBIIIt, read the SKIM DTC's.
Does the DTC reset?All
Ye s®Go To 6
No®Test Complete.
221
VEHICLE THEFT/SECURITY
TRANSPONDER COMMUNICATION FAILURE ÐContinued
Page 1443 of 4284

ROAD TEST VERIFICATION - VER-2 APPLICABILITY
1. Inspect the vehicle to ensure that all engine components are properly installed and
connected. Reassemble and reconnect components as necessary.
2. If this verification procedure is being performed after a non-DTC test, perform steps 3 and
4.
3. Check to see if the initial symptom still exists. If there are no trouble codes and the symptom
no longer exists, the repair was successful and testing is now complete.
4. If the initial or another symptom exists, the repair is not complete. Check all pertinent
Technical Service Bulletins (TSBs) and return to the Symptom List if necessary.
5. For previously read DTCs that have not been dealt with, return to the Symptom List and
follow the diagnostic path for that DTC; otherwise, continue.
6. If the Engine Control Module (ECM) (diesel only) or Powertrain Control Module (PCM) has
not been changed, perform steps 7 and 8, otherwise, continue with step 9.
7. With the DRB, erase all diagnostic trouble codes (DTCs), then disconnect the DRB.
8. Turn the ignition off for at least 10 seconds.
9. Ensure no DTCs remain by performing steps 10 through 13.
10. Road test the vehicle. For some of the road test, go at least 64 km/h (40 MPH). If this test
is for an A/C Relay Control Circuit, drive the vehicle for at least 5 minutes with the A/C on.
11. At some point, stop the vehicle and turn the engine off for at least 10 seconds, then restart
the engine and continue.
12. Upon completion of the road test, turn the engine off and check for DTCs with the DRB.
13. If the repaired DTC has reset, the repair is not complete. Check for any pertinent Technical
Service Bulletins (TSBs) and return to the Symptom List. If there are no DTCs, the repair was
successful and is now complete.
Are any DTCs or symptoms remaining?All
Ye s®Repair is not complete, refer to appropriate symptom.
No®Repair is complete.
SKIS VERIFICATION APPLICABILITY
1. Reconnect all previously disconnected components and connectors.
2. Obtain the vehicle's unique Personal Identification Number (PIN) assigned to it's original
SKIM. This number can be obtained from the vehicle's invoice or Chrysler's Customer Center
(1-800-992-1997).
3. NOTE: When entering the PIN, care should be taken because the SKIM will only
allow 3 consecutive attempts to enter the correct PIN. If 3 consecutive incorrect
PINs are entered, the SKIM will Lock Out the DRB III for 1 hour.
4. To exit Lock Out mode, the ignition key must remain in the Run position continually for 1
hour. Turn off all accessories and connect a battery charger if necessary.
5. With the DRBIIIt, select Theft Alarm, SKIM and Miscellaneous. Then, select the desired
procedure and follow the steps that will be displayed.
6. If the SKIM has been replaced, ensure all of the vehicle ignition keys are programmed to the
new SKIM.
7. NOTE: Prior to returning vehicle to the customer, perform a module scan to be
sure that all DTCs are erased. Erase any DTCs that are found.
8. With the DRBIIIt, erase all DTCs. Perform 5 ignition key cycles leaving the key on for at
least 90 seconds per cycle.
9. With the DRBIIIt, read the SKIM DTCs.
Are there any SKIM DTCs?All
Ye s®Repair is not complete, refer to appropriate symptom.
No®Repair is complete.
224
VERIFICATION TESTS
Verification Tests ÐContinued
Page 1472 of 4284

DIGIT 13 AND 14
Open Space
DIGITS 15 THROUGH 18
Interior Trim Code
DIGIT 19
Open Space
DIGITS 20, 21, AND 22
Engine Code
²EDZ = 2.4 L 4 cyl. DOHC Gasoline
²EFA = 3.0 L 6 cyl. Gasoline
²EGA = 3.3 L 6 cyl. Gasoline
²EGH = 3.8 L 6 cyl. Gasoline
²EGM = 3.3 L 6 cyl. Ethanol Flexible Fuel
DIGIT 23
Open Space
BODY CODE PLATE LINE 1
DIGITS 1, 2, AND 3
Transaxle Codes
²DGB = 41TH 4-speed Automatic Transaxle
²DGL = 41TE 4-speed Electronic Automatic Tran-
saxle
²DGM = 31TH 3-speed Automatic Transaxle
DIGIT 4
Open SpaceDIGIT 5
Market Code
²C = Canada
²B = International
²M = Mexico
²U = United States
DIGIT 6
Open Space
DIGITS 7 THROUGH 23
Vehicle Identification Number
²Refer to Vehicle Identification Number (VIN)
paragraph for proper breakdown of VIN code.
IF TWO BODY CODE PLATES ARE REQUIRED
The last code shown on either plate will be fol-
lowed by END. When two plates are required, the
last code space on the first plate will indicate (CTD)
When a second plate is required, the first four
spaces of each line will not be used due to overlap of
the plates.
INTERNATIONAL SYMBOLS
DESCRIPTION
The graphic symbols illustrated in the following
International Control and Display Symbols Chart are
used to identify various instrument controls. The
symbols correspond to the controls and displays that
are located on the instrument panel.
4 INTRODUCTIONRS
BODY CODE PLATE (Continued)
Page 1479 of 4284
INTRODUCTION
TABLE OF CONTENTS
page page
BODY CODE PLATE
DESCRIPTION............................1
FASTENER IDENTIFICATION
DESCRIPTION............................2
FASTENER USAGE
DESCRIPTION............................5
THREADED HOLE REPAIR
DESCRIPTION............................5
INTERNATIONAL VEHICLE CONTROL &
DISPLAY SYMBOLS
DESCRIPTION............................5
METRIC SYSTEM
DESCRIPTION............................6TORQUE REFERENCES
DESCRIPTION............................8
VEHICLE IDENTIFICATION NUMBER
DESCRIPTION............................9
VEHICLE SAFETY CERTIFICATION LABEL
DESCRIPTION...........................10
E-MARK LABEL
DESCRIPTION...........................10
VECI LABEL
DESCRIPTION...........................10
MANUFACTURE PLATE
DESCRIPTION...........................10
BODY CODE PLATE
DESCRIPTION
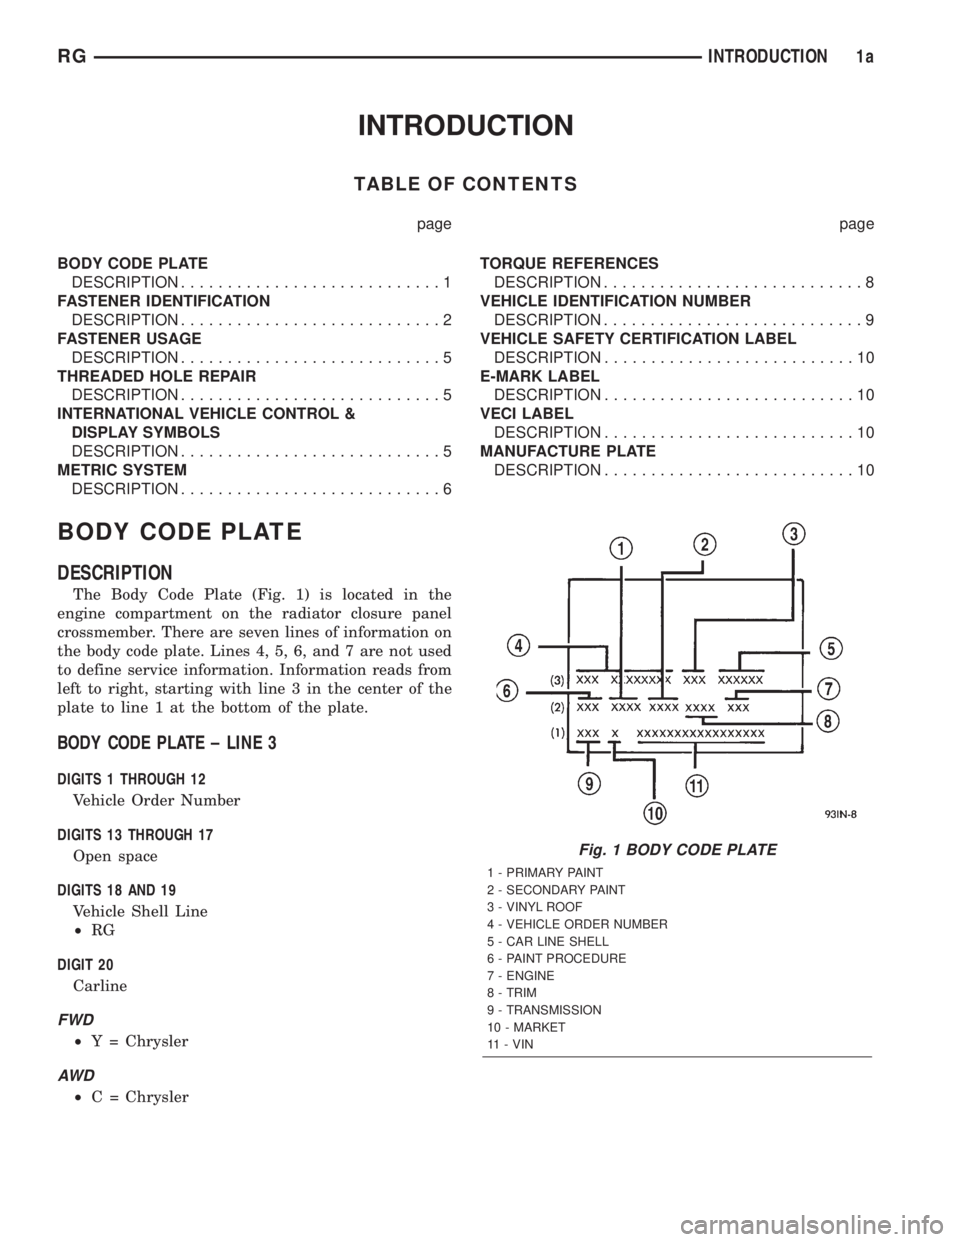
The Body Code Plate (Fig. 1) is located in the
engine compartment on the radiator closure panel
crossmember. There are seven lines of information on
the body code plate. Lines 4, 5, 6, and 7 are not used
to define service information. Information reads from
left to right, starting with line 3 in the center of the
plate to line 1 at the bottom of the plate.
BODY CODE PLATE ± LINE 3
DIGITS 1 THROUGH 12
Vehicle Order Number
DIGITS 13 THROUGH 17
Open space
DIGITS 18 AND 19
Vehicle Shell Line
²RG
DIGIT 20
Carline
FWD
²Y = Chrysler
AW D
²C = Chrysler
Fig. 1 BODY CODE PLATE
1 - PRIMARY PAINT
2 - SECONDARY PAINT
3 - VINYL ROOF
4 - VEHICLE ORDER NUMBER
5 - CAR LINE SHELL
6 - PAINT PROCEDURE
7 - ENGINE
8 - TRIM
9 - TRANSMISSION
10 - MARKET
11 - VIN
RGINTRODUCTION1a
Page 1483 of 4284

FASTENER USAGE
DESCRIPTION
WARNING: USE OF AN INCORRECT FASTENER
MAY RESULT IN COMPONENT DAMAGE OR PER-
SONAL INJURY.
Figure art, specifications and torque references in
this Service Manual are identified in metric and SAE
format.
During any maintenance or repair procedures, it is
important to salvage all fasteners (nuts, bolts, etc.)
for reassembly. If the fastener is not salvageable, a
fastener of equivalent specification must be used.
THREADED HOLE REPAIR
DESCRIPTION
Most stripped threaded holes can be repaired using
a Helicoilt. Follow the vehicle or Helicoiltrecommen-
dations for application and repair procedures.
INTERNATIONAL VEHICLE
CONTROL & DISPLAY
SYMBOLS
DESCRIPTION
The graphic symbols illustrated in the following
International Control and Display Symbols Chart
(Fig. 4) are used to identify various instrument con-
trols. The symbols correspond to the controls and dis-
plays that are located on the instrument panel.
Fig. 4 INTERNATIONAL CONTROL AND DISPLAY SYMBOLS
1 High Beam 13 Rear Window Washer
2 Fog Lamps 14 Fuel
3 Headlamp, Parking Lamps, Panel Lamps 15 Engine Coolant Temperature
4 Turn Warning 16 Battery Charging Condition
5 Hazard Warning 17 Engine Oil
6 Windshield Washer 18 Seat Belt
7 Windshield Wiper 19 Brake Failure
8 Windshield Wiper and Washer 20 Parking Brake
9 Windscreen Demisting and Defrosting 21 Front Hood
10 Ventilating Fan 22 Rear hood (Decklid)
11 Rear Window Defogger 23 Horn
12 Rear Window Wiper 24 Lighter
RGINTRODUCTION5a
Page 1693 of 4284
BRAKES - ABS
TABLE OF CONTENTS
page page
BRAKES - ABS
DESCRIPTION...........................67
OPERATION.............................67
CAUTION...............................69
STANDARD PROCEDURE..................70
ANTILOCK BRAKE SYSTEM BLEEDING.....70
SPECIFICATIONS........................71
FRONT WHEEL SPEED SENSOR
REMOVAL..............................71
INSTALLATION...........................71
REAR WHEEL SPEED SENSOR - AWD
REMOVAL..............................72
INSTALLATION...........................72
REAR WHEEL SPEED SENSOR - FWD
REMOVAL..............................73INSTALLATION...........................74
TONE WHEEL
INSPECTION............................74
TRACTION CONTROL SWITCH
DIAGNOSIS AND TESTING.................74
TRACTION CONTROL SWITCH............74
ICU (INTEGRATED CONTROL UNIT)
DESCRIPTION...........................75
OPERATION.............................75
REMOVAL..............................76
DISASSEMBLY...........................77
ASSEMBLY.............................77
INSTALLATION...........................77
BRAKES - ABS
DESCRIPTION - ANTILOCK BRAKE SYSTEM
This section covers the physical and operational
descriptions and the on-car service procedures for the
Mark 20e Antilock Brake System and the Mark 20e
Antilock Brake System with traction control.
The purpose of the antilock brake system (ABS) is
to prevent wheel lockup under braking conditions on
virtually any type of road surface. Antilock braking is
desirable because a vehicle that is stopped without
locking the wheels retains directional stability and
some steering capability. This allows the driver to
retain greater control of the vehicle during braking.
DESCRIPTION - ELECTRONIC BRAKE
DISTRIBUTION
Vehicles equipped with ABS use electronic brake
distribution (EBD) to balance front-to-rear braking.
The EBD is used in place of a rear proportioning
valve. The EBD system uses the ABS system to con-
trol the slip of the rear wheels in partial braking
range. The braking force of the rear wheels is con-
trolled electronically by using the inlet and outlet
valves located in the integrated control unit (ICU).
DESCRIPTION - TRACTION CONTROL SYSTEM
Traction control reduces wheel slip and maintains
traction at the driving wheels at speeds below 56
km/h (35 mph) when road surfaces are slippery. The
traction control system reduces wheel slip by braking
the wheel that is losing traction.
HYDRAULIC SHUTTLE VALVES
Two pressure relief hydraulic shuttle valves are
included on vehicles with traction control. These
valves are located inside the HCU and cannot be ser-
viced separately from the HCU.
TRACTION CONTROL LAMP
The traction control function lamp is located in the
transmission range indicator display of the instru-
ment cluster, displaying TRAC, TRAC OFF or nei-
ther depending on system mode.
The TRAC OFF lamp is controlled by a Traction
Control Off switch that is a momentary contact type
switch. The Traction Control Off switch is located on
the steering column upper shroud.
OPERATION - ANTILOCK BRAKE SYSTEM
There are a few performance characteristics of the
Mark 20e Antilock Brake System that may at first
seem abnormal, but in fact are normal. These char-
acteristics are described below.
NORMAL BRAKING
Under normal braking conditions, the ABS func-
tions the same as a standard base brake system with
a diagonally split master cylinder and conventional
vacuum assist.
ABS BRAKING
ABS operation is available at all vehicle speeds
above 3±5 mph. If a wheel locking tendency is
detected during a brake application, the brake sys-
RSBRAKES - ABS5-67
Page 1695 of 4284
the rear brake pressure, the outlet valve is switched
off and the inlet valve is pulsed. This increases the
pressure to the rear brakes. This back-and-forth pro-
cess will continue until the required slip difference is
obtained. At the end of EBD braking (brakes
released) the fluid in the LPA drains back to the
master cylinder by switching on the outlet valve and
draining through the inlet valve check valve. At the
same time the inlet valve is switched on in case of
another brake application.
The EBD will remain functional during many ABS
fault modes. If both the red BRAKE, and amber ABS
warning indicators are illuminated, the EBD may not
be functioning.
OPERATION - TRACTION CONTROL SYSTEM
The traction control module monitors wheel speed.
During acceleration, if the module detects front
(drive) wheel slip and the brakes are not applied, the
module enters traction control mode. Traction control
operation proceeds in the following order:
(1) Close the normally open isolation valves.
(2) Start the pump/motor and supply volume and
pressure to the front (drive) hydraulic circuit. (The
pump/motor runs continuously during traction con-
trol operation.)
(3) Open and close the build and decay valves to
maintain minimum wheel slip and maximum trac-
tion.
The cycling of the build and decay valves during
traction control is similar to that during antilock
braking, except the valves work to control wheel spin
by applying the brakes, whereas the ABS function is
to control wheel skid by releasing the brakes.
If the brakes are applied at anytime during a trac-
tion control cycle, the brake lamp switch triggers the
controller to switch off traction control.
HYDRAULIC SHUTTLE VALVES
Two pressure relief hydraulic shuttle valves allow
pressure and volume to return to the master cylinder
reservoir when not consumed by the build and decay
valves. These valves are necessary because the
pump/motor supplies more volume than the system
requires.
TRACTION CONTROL LAMP
The traction control system is enabled at each igni-
tion cycle. It may be turned off by depressing the
Traction Control Off switch button when the ignition
is in the ON position. The traction control function
lamp (TRAC OFF) illuminates immediately upon
depressing the button.
The traction control function lamp illuminates dur-
ing a traction control cycle, displaying TRAC.If the CAB calculates that the brake temperatures
are high, the traction control system becomes inoper-
ative until a time-out period has elapsed. During this
ªthermo-protection mode,º the traction control func-
tion lamp illuminates TRAC OFF; note that no trou-
ble code is registered.
CAUTION
The ABS uses an electronic control module, the
CAB. This module is designed to withstand normal
current draws associated with vehicle operation.
Care must be taken to avoid overloading the CAB
circuits.
CAUTION: In testing for open or short circuits, do
not ground or apply voltage to any of the circuits
unless instructed to do so for a diagnostic proce-
dure.
CAUTION: These circuits should only be tested
using a high impedance multi-meter or the DRBIIIT
scan tool as described in this section. Power
should never be removed or applied to any control
module with the ignition in the ON position. Before
removing or connecting battery cables, fuses, or
connectors, always turn the ignition to the OFF
position.
CAUTION: The CAB 24-way connector should never
be connected or disconnected with the ignition
switch in the ON position.
CAUTION: Use only factory wiring harnesses. Do
not cut or splice wiring to the brake circuits. The
addition of aftermarket electrical equipment (car
phone, radar detector, citizen band radio, trailer
lighting, trailer brakes, etc.) on a vehicle equipped
with antilock brakes may affect the function of the
antilock brake system.
CAUTION: When performing any service procedure
on a vehicle equipped with ABS, do not apply a
12-volt power source to the ground circuit of the
pump motor in the HCU. Doing this will damage the
pump motor and will require replacement of the
entire HCU.
CAUTION: An attempt to remove or disconnect cer-
tain system components may result in improper
system operation. Only those components with
approved removal and installation procedures in
this manual should be serviced.
RSBRAKES - ABS5-69
BRAKES - ABS (Continued)