LUG NUT CHRYSLER VOYAGER 2005 Repair Manual
[x] Cancel search | Manufacturer: CHRYSLER, Model Year: 2005, Model line: VOYAGER, Model: CHRYSLER VOYAGER 2005Pages: 2339, PDF Size: 59.69 MB
Page 2212 of 2339

(13) Remove the two screws that secure the top of
the quarter trim panel attaching bracket to the quar-
ter inner panel.(14) Remove the two screws that secure the bottom
of the quarter trim panel attaching bracket to the
rear HVAC housing.
(15) Remove the rear floor heat duct from the
right quarter inner panel (Refer to 24 - HEATING &
AIR CONDITIONING/DISTRIBUTION/REAR
FLOOR HEAT DUCT - REMOVAL).
(16) Take the proper precautions to protect the
carpeting below the rear heater core from spilled
engine coolant and have absorbent toweling readily
available to clean up any spills.
(17) Disconnect the heater hoses at the rear heater
core (Refer to 24 - HEATING & AIR CONDITION-
ING/PLUMBING - REAR/HEATER HOSE -
REMOVAL).
(18) Install plugs in, or tape over the opened
heater core fittings and both heater hoses.
(19) Use absorbent toweling to mop up any engine
coolant spills from the preceding operation.
(20) Remove the screw that secures the back of the
rear HVAC housing to the right D-pillar (Fig. 8).
(21) Remove the screw that secures the front of
the rear HVAC housing to the right quarter inner
panel.
(22) Lift the rear HVAC housing up far enough for
the lower mounting studs and the evaporator exten-
sion lines to clear the mounting holes in the rear
floor panel.
(23) Remove the rear HVAC housing from the
vehicle.
(24) Use absorbent toweling to mop up any engine
coolant spills from the preceding operation.
Fig. 5 Underbody A/C Line Rear Connections ± with
New Seating Element (NSE)
1 - UNDERBODY LIQUID LINE
2 - NUT
3 - SEALING PLATE
4 - UNDERBODY SUCTION LINE
5 - EXTENSION LINE TAPPING PLATE
Fig. 6 Underbody A/C Line Rear Connections ±
without New Seating Element (NSE)
1 - UNDERBODY LIQUID LINE
2 - BOLT
3 - EXTENSION LINE TAPPING PLATE
4 - UNDERBODY SUCTION LINE
5 - SEALING PLATE
Fig. 7 Rear HVAC Housing Mounting Studs ±
Typical
1 - REAR HVAC HOUSING MOUNTING STUDS
RSDISTRIBUTION - REAR24-61
HVAC HOUSING (Continued)
Page 2213 of 2339

INSTALLATION
NOTE: If the rear heater core or the rear HVAC
housing have been removed from the vehicle for
service, the rear heater core may be pre-filled with
the proper engine coolant mixture prior to recon-
necting the heater hoses to the heater core hose fit-
tings (Refer to 24 - HEATING & AIR CONDITIONING/
PLUMBING - REAR/HEATER CORE - STANDARD
PROCEDURE - HEATER CORE FILLING).
(1) Position the rear HVAC housing into the vehi-
cle with the evaporator extension line sealing plate
inserted into the rectangular hole in the rear floor
panel behind the right rear wheel house.
(2) Align the rear HVAC housing lower mounting
studs with the holes in the rear floor panel and lower
the rear HVAC housing to the floor.
(3) Install the screw that secures the front of the
rear HVAC housing to the right quarter inner panel.
Tighten the screw to 11 N´m (97 in. lbs.).(4) Install the screw that secures the back of the
rear HVAC housing to the right D-pillar. Tighten the
screw to 11 N´m (97 in. lbs.).
(5) Remove the plugs or tape from both heater core
fittings and both heater hoses.
(6) Reconnect the heater hoses to the rear heater
core (Refer to 24 - HEATING & AIR CONDITION-
ING/PLUMBING - REAR/HEATER HOSE - INSTAL-
LATION).
(7) Reinstall the rear floor heat duct onto the right
quarter inner panel (Refer to 24 - HEATING & AIR
CONDITIONING/DISTRIBUTION/REAR FLOOR
HEAT DUCT - INSTALLATION).
(8) Install the two screws that secure the bottom
of the quarter trim panel attaching bracket to the
rear HVAC housing. Tighten the screws to 2 N´m (17
in. lbs.).
(9) Install and tighten the two screws that secure
the top of the quarter trim panel attaching bracket to
the quarter inner panel.
Fig. 8 Rear HVAC Housing ± Typical
1 - U-NUT (3)
2 - REAR HVAC HOUSING
3 - SCREW (3)
4 - EXPANSION VALVE5 - STUD (2 w/NSE, 3 wo/NSE)
6 - HEATER LINES
7 - NUT (5)
8 - STUD (2)
24 - 62 DISTRIBUTION - REARRS
HVAC HOUSING (Continued)
Page 2214 of 2339

(10) Reconnect the body wire harness connector for
the rear HVAC housing to the rear HVAC wire har-
ness connector located near the expansion valve at
the back of the housing.
(11) Reinstall the rear distribution duct onto the
rear HVAC housing and the rear roof duct (Refer to
24 - HEATING & AIR CONDITIONING/DISTRIBU-
TION/AIR OUTLETS - INSTALLATION).
(12) Reinstall the right quarter trim panel and
right D-pillar trim panel onto the quarter inner
panel (Refer to 23 - BODY/INTERIOR/QUARTER
TRIM PANEL - INSTALLATION).
(13) Raise and support the vehicle.
(14) Install the three nuts that secure the rear
HVAC housing mounting studs to the rear floor panel
behind the right rear wheel housing. Tighten the
nuts to 9 N´m (80 in. lbs.).
(15) Remove the tape or plugs from the underbody
refrigerant line fittings and both ports in the rear
evaporator extension line sealing plate.
(16) Lubricate new rubber O-ring seals with clean
refrigerant oil and install them on the underbody
refrigerant line fittings.
(17) Reconnect the underbody refrigerant line seal-
ing plate to the evaporator extension line tapping
plate.
(18) Install the nut that secures the underbody
refrigerant line sealing plate to the evaporator exten-
sion line tapping plate. Tighten the nut to 23 N´m
(17 ft. lbs.).
(19) Lower the vehicle.
(20) Reconnect the battery negative cable.
(21) Refill the engine cooling system (Refer to 7 -
COOLING - STANDARD PROCEDURE - COOLING
SYSTEM REFILL).
(22) Evacuate the refrigerant system (Refer to 24 -
HEATING & AIR CONDITIONING/PLUMBING -
FRONT/REFRIGERANT - STANDARD PROCE-
DURE - REFRIGERANT SYSTEM EVACUATE).
(23) Charge the refrigerant system (Refer to 24 -
HEATING & AIR CONDITIONING/PLUMBING -
FRONT/REFRIGERANT - STANDARD PROCE-
DURE - REFRIGERANT SYSTEM CHARGE).
(24) Run the HVAC Cooldown test to verify proper
operation (Refer to 24 - HEATING & AIR CONDI-
TIONING - DIAGNOSIS AND TESTING).REAR FLOOR HEAT DUCT
REMOVAL
(1) Remove the trim from the right quarter inner
panel (Refer to 23 - BODY/INTERIOR/RIGHT
QUARTER TRIM PANEL - REMOVAL).
(2) Remove the two screws that secure the rear
floor heat duct to the right quarter inner panel (Fig.
9).
(3) Slide the rear floor heat duct forward far
enough to disengage it from the outlet on the front of
the rear HVAC housing.
(4) Remove the rear floor heat duct from the vehi-
cle.
INSTALLATION
(1) Align the inlet end of rear floor heat duct with
the outlet on the front of the rear HVAC housing.
(2) Slide the rear floor heat duct rearward far
enough to fully engage the inlet end of the duct with
the outlet on the rear HVAC housing.
(3) Install the two screws that secure the rear floor
heat duct to the right quarter inner panel. Tighten
the screws to 2 N´m (17 in. lbs.).
(4) Reinstall the trim onto the right quarter inner
panel (Refer to 23 - BODY/INTERIOR/RIGHT
QUARTER TRIM PANEL - INSTALLATION).
Fig. 9 Rear Floor Heat Duct
1 - REAR FLOOR HEAT DUCT
2 - REAR HVAC HOUSING OUTLET
3 - SCREW (2)
RSDISTRIBUTION - REAR24-63
HVAC HOUSING (Continued)
Page 2216 of 2339
PLUMBING - FRONT
DESCRIPTION
CAUTION: The system must be completely empty
before opening any fitting or connection in the
refrigeration system. Open fittings with caution
even after the system has been emptied. If any
pressure is noticed as a fitting is loosened,
retighten fitting and evacuate the system again.
The use of correct wrenches when making connec-
tions is very important. Improper wrenches or
improper use of wrenches can damage the fittings.
The internal parts of the A/C system will remain sta-
ble as long as moisture-free refrigerant and refrig-
erant oil is used. Abnormal amounts of dirt,
moisture or air can upset the chemical stability.
This may cause operational troubles or even seri-
ous damage if present in more than very small
quantities. Before disconnecting a refrigerant line
or hose, clean the outside of the fittings thoroughly
to prevent contamination from entering the refriger-
ant system.
When opening a refrigeration system, have every-
thing you will need to repair the system ready to
minimize the amount of time the system is opened.
Cap or plug all refrigerant line fittings as soon as
they are opened. This will help prevent the entrance
of dirt and moisture. All new lines and components
should be capped or sealed until they are ready to
be used. Before connecting a refrigerant line or
hose, clean the outside of the fittings thoroughly to
prevent contamination from entering the refrigerant
system.
All tools, including the refrigerant dispensing mani-
fold, manifold gauge set and test hoses should be
kept clean and dry.
The A/C refrigerant lines and hoses are used to
carry the refrigerant between the various A/C system
components. The refrigerant lines and hoses for the
R-134a system on this vehicle consist of a barrier-
hose design with a nylon tube sandwiched between
rubber layers. The nylon tube helps to contain the
R-134a refrigerant, which has a smaller molecular
structure than R-12 refrigerant. The ends of the
refrigerant lines are made from lightweight alumi-
num or steel, and commonly use braze-less fittings.Any kinks or sharp bends in the refrigerant lines
and hoses will reduce the capacity of the entire A/C
system and can reduce the flow of refrigerant in the
system. The radius of all bends in the flexible hose
refrigerant lines should be at least ten times the
diameter of the hose and the refrigerant lines should
be routed so they are at least 80 millimeters (3
inches) away from the exhaust manifold(s) and
exhaust pipe(s).
OPERATION
High pressures are produced in the refrigerant sys-
tem when the A/C compressor is operating. Extreme
care must be exercised to make sure that each of the
refrigerant system connections is pressure-tight and
leak free. It is a good practice to inspect all flexible
hose refrigerant lines at least once a year to make
sure they are in good condition and properly routed.
The refrigerant lines and hoses are coupled to
other A/C system components with block-type fit-
tings. An O-ring seal, or a flat steel gasket with an
integral O-ring (dual plane seal), is used to mate the
refrigerant line fittings with A/C system components
to ensure the integrity of the refrigerant system.
The refrigerant lines and hoses cannot be repaired
and, if faulty or damaged, they must be replaced.
WARNING
ENGINE COOLING SYSTEM
WARNING: THE ENGINE COOLING SYSTEM IS
DESIGNED TO DEVELOP INTERNAL PRESSURES
OF 97 TO 123 KILOPASCALS (14 TO 18 POUNDS
PER SQUARE INCH). DO NOT REMOVE OR
LOOSEN THE COOLANT PRESSURE CAP, CYLIN-
DER BLOCK DRAIN PLUGS, RADIATOR DRAIN,
RADIATOR HOSES, HEATER HOSES, OR HOSE
CLAMPS WHILE THE ENGINE COOLING SYSTEM IS
HOT AND UNDER PRESSURE. FAILURE TO
OBSERVE THIS WARNING CAN RESULT IN SERI-
OUS BURNS FROM THE HEATED ENGINE COOL-
ANT. ALLOW THE VEHICLE TO COOL FOR A
MINIMUM OF 15 MINUTES BEFORE OPENING THE
COOLING SYSTEM FOR SERVICE.
RSPLUMBING - FRONT24-65
Page 2224 of 2339
NOTE: Prior to a vehicle being removed from ser-
vice or stored for more than two weeks, the com-
pressor should be operated to ensure adequate
refrigerant oil distribution throughout the system
components. Turn on the air conditioner for a min-
imum of five minutes with outside air and the high-
est blower speed selected.
BELT NOISE
If the compressor drive belt slips at initial start-up,
it does not necessarily mean the compressor has
failed. The following procedure can be used to iden-
tify a compressor drive belt noise problem.
A. Start the vehicle and run at idle.
B. Turn the air conditioner On and listen for belt
squeal.
C. If belt squeal is heard, turn the air conditioner
Off immediately.
If the belt squeal stops when the air conditioner is
turned Off, perform the following repair procedures.
(1) Using an appropriate sized oil filter wrench or
a strap wrench, grasp the outer diameter of the com-
pressor clutch hub. While facing the compressor,
rotate the hub clockwise, then counterclockwise. If
the hub rotates, proceed to the next step. If the hub
will not rotate, the compressor is internally damaged,
and must be replaced.
(2) Turn the hub clockwise five complete revolu-
tions and remove the tool.
(3) Start the vehicle and run at idle.
(4) Turn the air conditioner On. Observe the com-
pressor and the system for normal operation, noting
cooling performance and noise levels. Operate for five
minutes before turning the air conditioner Off. If
acceptable cooling performance is observed during
compressor operation, the compressor does not need
to be replaced.
(5) Inspect the drive belt for wear, damage, and
proper tension. (Refer to 7 - COOLING/ACCESSORY
DRIVE/DRIVE BELTS - DIAGNOSIS AND TEST-
ING).
REMOVAL
A/C COMPRESSOR
WARNING: REFER TO THE APPLICABLE WARN-
INGS AND CAUTIONS FOR THIS SYSTEM BEFORE
PERFORMING THE FOLLOWING OPERATION (Refer
to 24 - HEATING & AIR CONDITIONING/PLUMBING -
FRONT - WARNING - A/C PLUMBING) and (Refer to
24 - HEATING & AIR CONDITIONING/PLUMBING -
FRONT - CAUTION - A/C PLUMBING).(1) Recover the refrigerant from the refrigerant
system (Refer to 24 - HEATING & AIR CONDITION-
ING/PLUMBING - FRONT/REFRIGERANT - STAN-
DARD PROCEDURE - REFRIGERANT SYSTEM
RECOVERY).
(2) Disconnect and isolate the negative battery
cable.
(3) Remove the nuts that secure the A/C suction
line and the A/C discharge line to the A/C compres-
sor.
(4) Disconnect the A/C suction line and the A/C
discharge line from the A/C compressor.
(5) Remove the O-ring seal and gasket from the
suction and discharge line fittings and discard.
(6) Install plugs in, or tape over the opened suc-
tion and discharge fittings and the compressor ports.
(7) Raise and support the vehicle.
(8) Remove the accessory drive belt (Refer to 7 -
COOLING/ACCESSORY DRIVE/DRIVE BELTS -
REMOVAL).
(9) Disconnect the wire harness connector from the
compressor clutch coil wire connector located on the
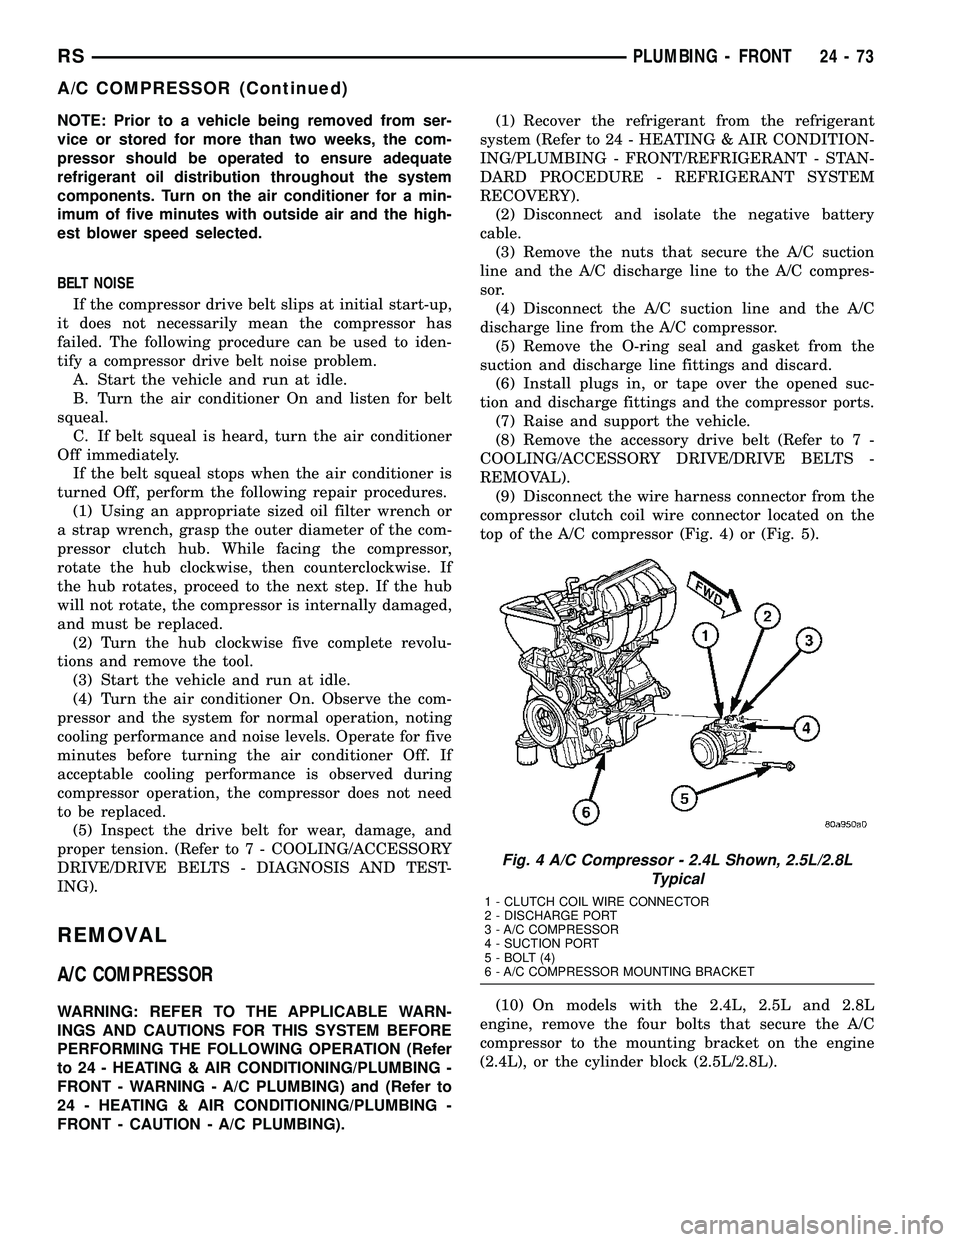
top of the A/C compressor (Fig. 4) or (Fig. 5).
(10) On models with the 2.4L, 2.5L and 2.8L
engine, remove the four bolts that secure the A/C
compressor to the mounting bracket on the engine
(2.4L), or the cylinder block (2.5L/2.8L).
Fig. 4 A/C Compressor - 2.4L Shown, 2.5L/2.8L
Typical
1 - CLUTCH COIL WIRE CONNECTOR
2 - DISCHARGE PORT
3 - A/C COMPRESSOR
4 - SUCTION PORT
5 - BOLT (4)
6 - A/C COMPRESSOR MOUNTING BRACKET
RSPLUMBING - FRONT24-73
A/C COMPRESSOR (Continued)
Page 2226 of 2339
²The upper bolt at the rear of the compressor.
²The lower bolt at the rear of the compressor.
(4) Connect the wire harness connector to the com-
pressor clutch coil wire connector.
(5) Install the accessory drive belt (Refer to 7 -
COOLING/ACCESSORY DRIVE/DRIVE BELTS -
INSTALLATION).
(6) Lower the vehicle.
(7) Remove the tape or plugs from the suction and
discharge line fittings and the compressor ports.
(8) Lubricate new rubber O-ring seals with clean
refrigerant oil and install them and a new gasket
onto the suction and discharge line fittings.
(9) Connect the A/C suction line and the A/C dis-
charge line to the A/C compressor.
(10) Install the nut that secures the A/C suction
line and the A/C discharge line to the A/C compres-
sor. Tighten the nuts to 23 N´m (17 ft. lbs.).
(11) Reconnect the negative battery cable.
(12) Evacuate the refrigerant system (Refer to 24 -
HEATING & AIR CONDITIONING/PLUMBING -
FRONT/REFRIGERANT - STANDARD PROCE-
DURE - REFRIGERANT SYSTEM EVACUATE).
(13) Charge the refrigerant system (Refer to 24 -
HEATING & AIR CONDITIONING/PLUMBING -
FRONT/REFRIGERANT - STANDARD PROCE-
DURE - REFRIGERANT SYSTEM CHARGE).
A/C COMPRESSOR MOUNTING BRACKET -
2.4L ENGINE
(1) Position the compressor mounting bracket onto
the engine.
(2) Install the four bolts that secure the compres-
sor mounting bracket to the engine. Tighten the bolts
to 54 N´m (40 ft. lbs.).
(3) Reinstall the A/C compressor onto the mount-
ing bracket (Refer to 24 - HEATING & AIR CONDI-
TIONING/PLUMBING/COMPRESSOR -
INSTALLATION).
A/C CONDENSER
DESCRIPTION
The A/C condenser is located in the front of the
engine compartment behind the front fascia. The A/C
condenser is a heat exchanger that allows the high-
pressure refrigerant gas being discharged by the A/C
compressor to give up its heat to the air passing over
the condenser fins, which causes the refrigerant to
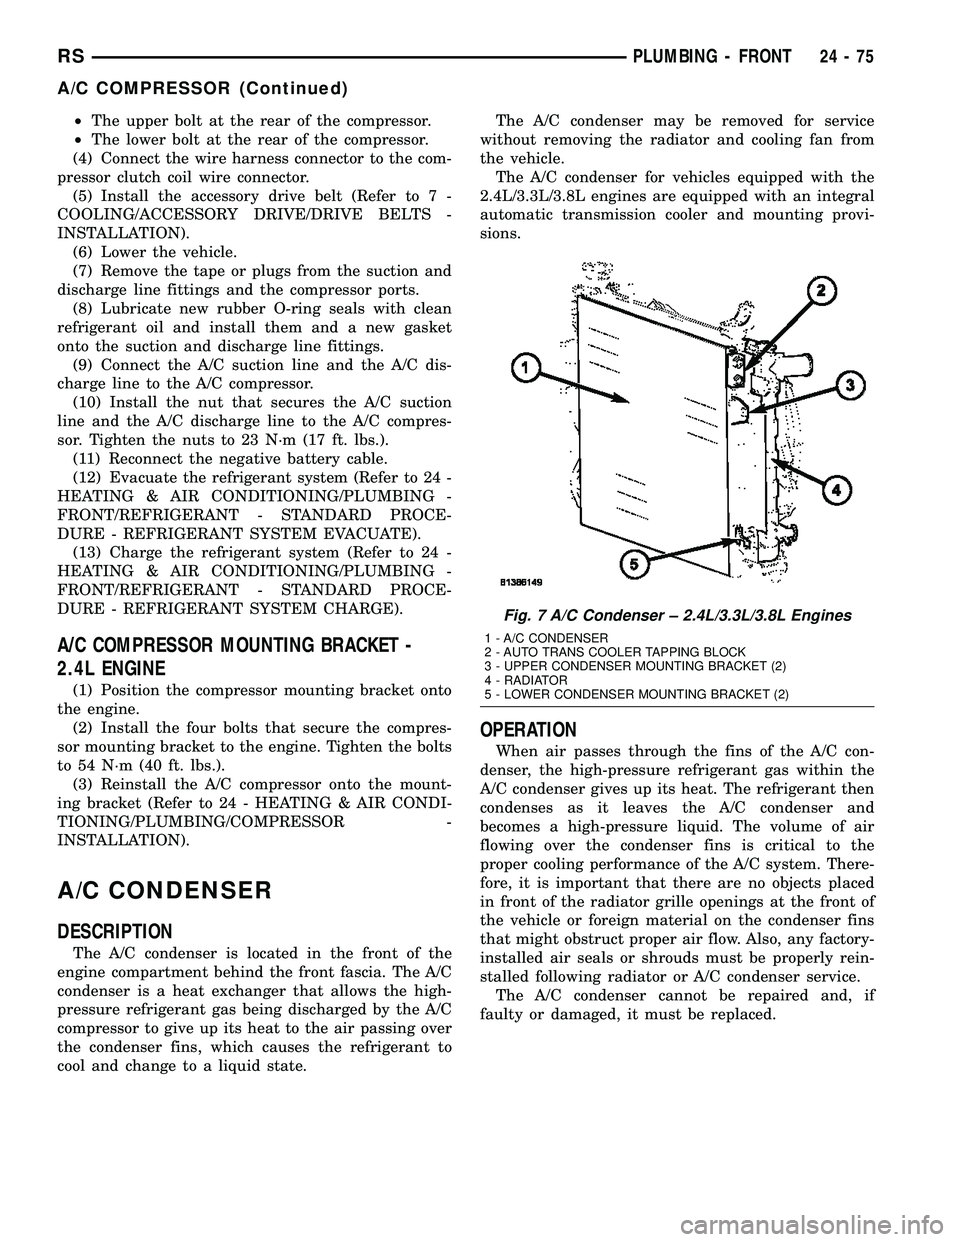
cool and change to a liquid state.The A/C condenser may be removed for service
without removing the radiator and cooling fan from
the vehicle.
The A/C condenser for vehicles equipped with the
2.4L/3.3L/3.8L engines are equipped with an integral
automatic transmission cooler and mounting provi-
sions.
OPERATION
When air passes through the fins of the A/C con-
denser, the high-pressure refrigerant gas within the
A/C condenser gives up its heat. The refrigerant then
condenses as it leaves the A/C condenser and
becomes a high-pressure liquid. The volume of air
flowing over the condenser fins is critical to the
proper cooling performance of the A/C system. There-
fore, it is important that there are no objects placed
in front of the radiator grille openings at the front of
the vehicle or foreign material on the condenser fins
that might obstruct proper air flow. Also, any factory-
installed air seals or shrouds must be properly rein-
stalled following radiator or A/C condenser service.
The A/C condenser cannot be repaired and, if
faulty or damaged, it must be replaced.
Fig. 7 A/C Condenser ± 2.4L/3.3L/3.8L Engines
1 - A/C CONDENSER
2 - AUTO TRANS COOLER TAPPING BLOCK
3 - UPPER CONDENSER MOUNTING BRACKET (2)
4 - RADIATOR
5 - LOWER CONDENSER MOUNTING BRACKET (2)
RSPLUMBING - FRONT24-75
A/C COMPRESSOR (Continued)
Page 2230 of 2339
(7) Remove the tape or plugs from the opened
refrigerant line fittings and the condenser ports.
(8) Connect the A/C discharge line and the A/C liq-
uid line to the A/C condenser (Refer to 24 - HEAT-
ING & AIR CONDITIONING/PLUMBING/A/C
DISCHARGE LINE - INSTALLATION) and (Refer to
24 - HEATING & AIR CONDITIONING/PLUMBING/
A/C LIQUID LINE - INSTALLATION).
(9) Reconnect the hoses to the transmission oil
cooler fittings on the left side of the cooling module
(Refer to 7 - COOLING/TRANSMISSION/TRANS
COOLER LINES - INSTALLATION).
(10) Reposition the hood latch to the front of the
radiator closure panel crossmember.
(11) Install the two screws that secure the hood
latch to the front of the radiator closure panel cross-
member. Check and adjust the hood latch as needed.
Tighten the screws to 14 N´m (123 in. lbs.).
(12) Position the radiator sight shield onto the
radiator closure panel crossmember.
(13) Install the five small screws that secure the
front fascia grille inserts to the radiator sight shield.
Tighten the screws to 2 N´m (17 in. lbs.).
(14) Install the two large screws that secure the
front fascia and the outboard ends of the radiator
sight shield to the radiator closure panel crossmem-
ber. Tighten the screws to 6 N´m (53 in. lbs.).
(15) Evacuate the refrigerant system (Refer to 24 -
HEATING & AIR CONDITIONING/PLUMBING -
FRONT/REFRIGERANT - STANDARD PROCE-
DURE - REFRIGERANT SYSTEM EVACUATE).
(16) Charge the refrigerant system (Refer to 24 -
HEATING & AIR CONDITIONING/PLUMBING -
FRONT/REFRIGERANT - STANDARD PROCE-
DURE - REFRIGERANT SYSTEM CHARGE).
A/C DISCHARGE LINE
REMOVAL
WARNING: REFER TO THE APPLICABLE WARN-
INGS AND CAUTIONS FOR THIS SYSTEM BEFORE
PERFORMING THE FOLLOWING OPERATION (Refer
to 24 - HEATING & AIR CONDITIONING/PLUMBING -
FRONT - WARNING - A/C PLUMBING) and (Refer to
24 - HEATING & AIR CONDITIONING/PLUMBING -
FRONT - CAUTION - A/C PLUMBING).
(1) Recover the refrigerant from the refrigerant
system (Refer to 24 - HEATING & AIR CONDITION-
ING/PLUMBING - FRONT/REFRIGERANT - STAN-
DARD PROCEDURE - REFRIGERANT SYSTEM
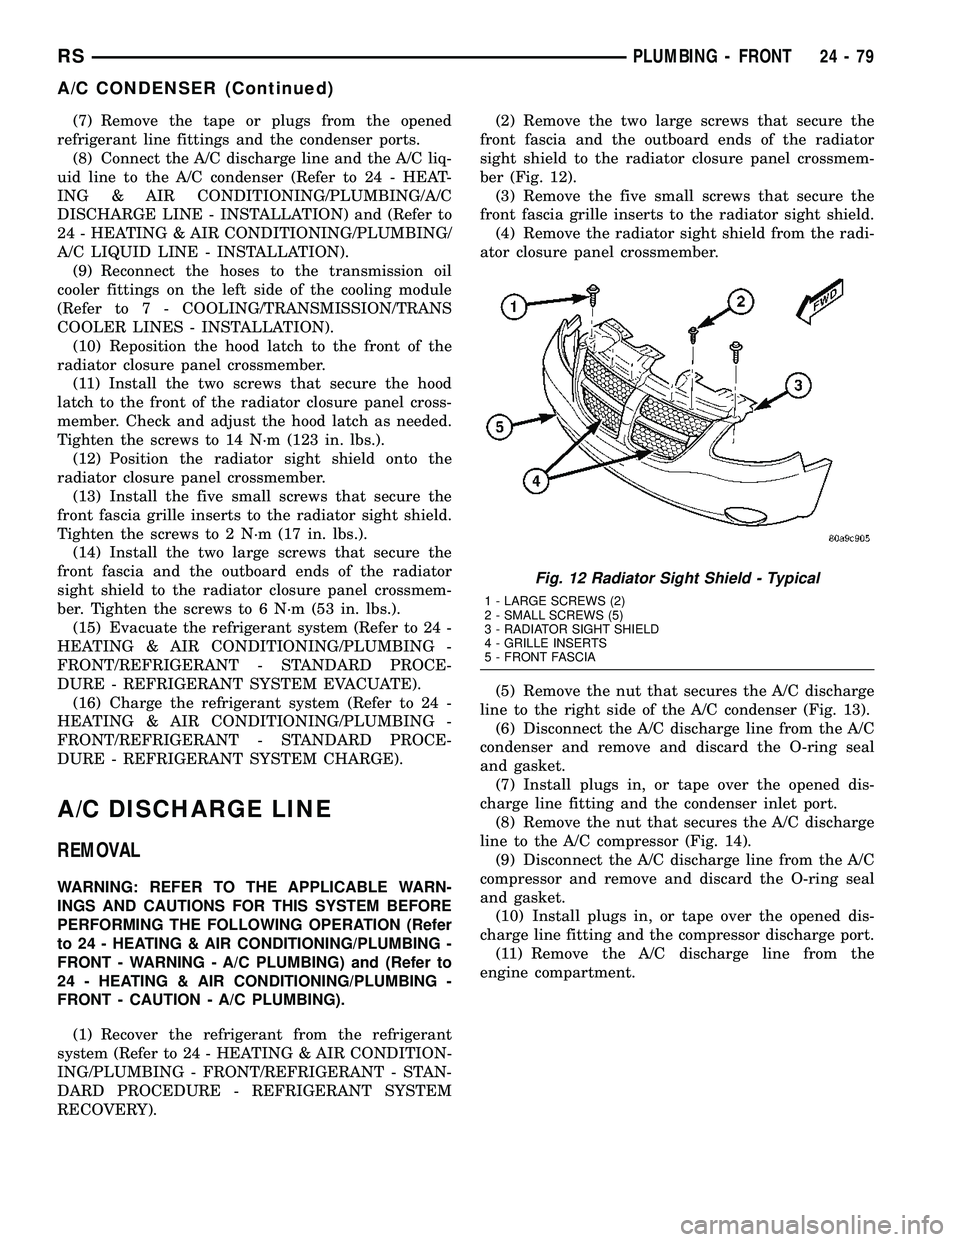
RECOVERY).(2) Remove the two large screws that secure the
front fascia and the outboard ends of the radiator
sight shield to the radiator closure panel crossmem-
ber (Fig. 12).
(3) Remove the five small screws that secure the
front fascia grille inserts to the radiator sight shield.
(4) Remove the radiator sight shield from the radi-
ator closure panel crossmember.
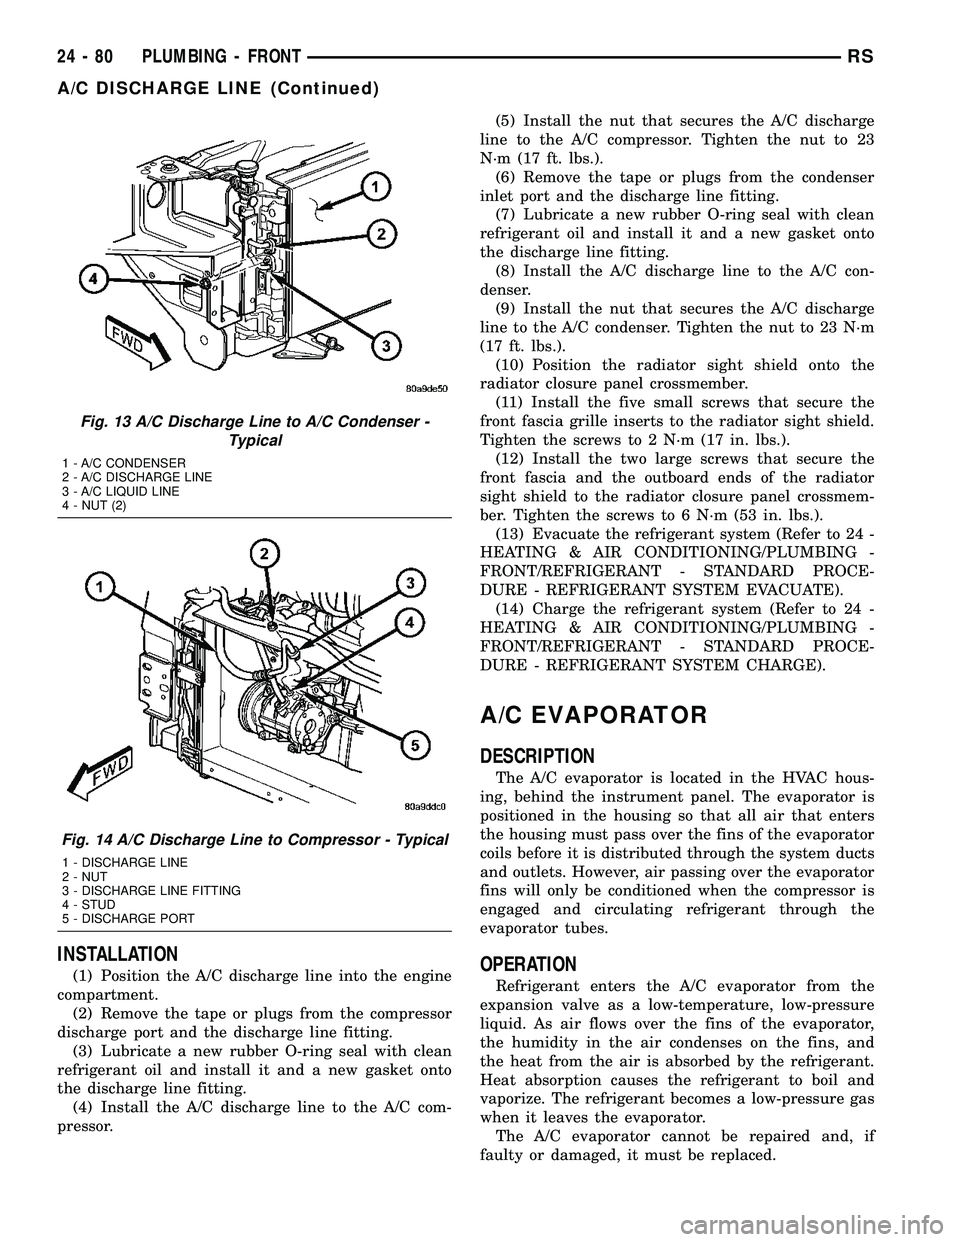
(5) Remove the nut that secures the A/C discharge
line to the right side of the A/C condenser (Fig. 13).
(6) Disconnect the A/C discharge line from the A/C
condenser and remove and discard the O-ring seal
and gasket.
(7) Install plugs in, or tape over the opened dis-
charge line fitting and the condenser inlet port.
(8) Remove the nut that secures the A/C discharge
line to the A/C compressor (Fig. 14).
(9) Disconnect the A/C discharge line from the A/C
compressor and remove and discard the O-ring seal
and gasket.
(10) Install plugs in, or tape over the opened dis-
charge line fitting and the compressor discharge port.
(11) Remove the A/C discharge line from the
engine compartment.
Fig. 12 Radiator Sight Shield - Typical
1 - LARGE SCREWS (2)
2 - SMALL SCREWS (5)
3 - RADIATOR SIGHT SHIELD
4 - GRILLE INSERTS
5 - FRONT FASCIA
RSPLUMBING - FRONT24-79
A/C CONDENSER (Continued)
Page 2231 of 2339
INSTALLATION
(1) Position the A/C discharge line into the engine
compartment.
(2) Remove the tape or plugs from the compressor
discharge port and the discharge line fitting.
(3) Lubricate a new rubber O-ring seal with clean
refrigerant oil and install it and a new gasket onto
the discharge line fitting.
(4) Install the A/C discharge line to the A/C com-
pressor.(5) Install the nut that secures the A/C discharge
line to the A/C compressor. Tighten the nut to 23
N´m (17 ft. lbs.).
(6) Remove the tape or plugs from the condenser
inlet port and the discharge line fitting.
(7) Lubricate a new rubber O-ring seal with clean
refrigerant oil and install it and a new gasket onto
the discharge line fitting.
(8) Install the A/C discharge line to the A/C con-
denser.
(9) Install the nut that secures the A/C discharge
line to the A/C condenser. Tighten the nut to 23 N´m
(17 ft. lbs.).
(10) Position the radiator sight shield onto the
radiator closure panel crossmember.
(11) Install the five small screws that secure the
front fascia grille inserts to the radiator sight shield.
Tighten the screws to 2 N´m (17 in. lbs.).
(12) Install the two large screws that secure the
front fascia and the outboard ends of the radiator
sight shield to the radiator closure panel crossmem-
ber. Tighten the screws to 6 N´m (53 in. lbs.).
(13) Evacuate the refrigerant system (Refer to 24 -
HEATING & AIR CONDITIONING/PLUMBING -
FRONT/REFRIGERANT - STANDARD PROCE-
DURE - REFRIGERANT SYSTEM EVACUATE).
(14) Charge the refrigerant system (Refer to 24 -
HEATING & AIR CONDITIONING/PLUMBING -
FRONT/REFRIGERANT - STANDARD PROCE-
DURE - REFRIGERANT SYSTEM CHARGE).
A/C EVAPORATOR
DESCRIPTION
The A/C evaporator is located in the HVAC hous-
ing, behind the instrument panel. The evaporator is
positioned in the housing so that all air that enters
the housing must pass over the fins of the evaporator
coils before it is distributed through the system ducts
and outlets. However, air passing over the evaporator
fins will only be conditioned when the compressor is
engaged and circulating refrigerant through the
evaporator tubes.
OPERATION
Refrigerant enters the A/C evaporator from the
expansion valve as a low-temperature, low-pressure
liquid. As air flows over the fins of the evaporator,
the humidity in the air condenses on the fins, and
the heat from the air is absorbed by the refrigerant.
Heat absorption causes the refrigerant to boil and
vaporize. The refrigerant becomes a low-pressure gas
when it leaves the evaporator.
The A/C evaporator cannot be repaired and, if
faulty or damaged, it must be replaced.
Fig. 13 A/C Discharge Line to A/C Condenser -
Typical
1 - A/C CONDENSER
2 - A/C DISCHARGE LINE
3 - A/C LIQUID LINE
4 - NUT (2)
Fig. 14 A/C Discharge Line to Compressor - Typical
1 - DISCHARGE LINE
2 - NUT
3 - DISCHARGE LINE FITTING
4 - STUD
5 - DISCHARGE PORT
24 - 80 PLUMBING - FRONTRS
A/C DISCHARGE LINE (Continued)
Page 2233 of 2339
DIAGNOSIS AND TESTING
FRONT A/C EXPANSION VALVE
WARNING: REFER TO THE APPLICABLE WARN-
INGS AND CAUTIONS FOR THIS SYSTEM BEFORE
PERFORMING THE FOLLOWING OPERATION (Refer
to 24 - HEATING & AIR CONDITIONING/PLUMBING -
FRONT - WARNING - A/C PLUMBING) and (Refer to
24 - HEATING & AIR CONDITIONING/PLUMBING -
FRONT - CAUTION - A/C PLUMBING).
NOTE: The A/C expansion valve should only be
tested following testing of the A/C compressor.
NOTE: Liquid CO
2is required to test the A/C expan-
sion valve. This material is available from most
welding supply facilities. Liquid CO
2is also avail-
able from companies which service and sell fire
extinguishers.
When testing the A/C expansion valve, the work
area and the vehicle temperature must be 21É to 27É
C (70É to 85É F). To test the expansion valve:
(1) Connect a charging station or manifold gauge
set to the refrigerant system service ports. Verify the
refrigerant charge level.
(2) Close all doors, windows and vents to the pas-
senger compartment.
(3) Set the A/C-heater controls so that the A/C
compressor is operating, the temperature control is
in the highest temperature position, the mode door is
directing the output to the floor outlets, and the
blower motor is operating at the highest speed set-
ting.
(4) Start the engine and allow it to idle. After the
engine has reached normal operating temperature,
allow the passenger compartment to heat up. This
will create the need for maximum refrigerant flow
into the A/C evaporator.
(5) If the refrigerant charge is sufficient, the dis-
charge (high pressure) gauge should read 965 kPa to
1655 kPa (140 psi to 240 psi). The suction (low pres-
sure) gauge should read 138 kPa to 207 kPa (20 psi
to 30 psi). If OK, go to Step 6. If not OK, replace the
faulty A/C expansion valve.
WARNING:
PROTECT THE SKIN AND EYES FROM EXPOSURE
TO LIQUID CO
2OR PERSONAL INJURY CAN
RESULT.
(6) If the suction (low pressure) gauge reads
within the specified range, freeze the A/C expansion
valve for 30 seconds using liquid CO
2or another suit-able super-cold material.Do not spray R-134a or
R-12 refrigerant on the A/C expansion valve for
this test.The suction (low pressure) gauge reading
should drop by 69 kPa (10 psi). If OK, go to Step 7 If
not OK, replace the faulty A/C expansion valve.
(7) Allow the expansion valve control head to thaw.
The suction (low pressure) gauge reading should sta-
bilize at 138 kPa to 207 kPa (20 psi to 30 psi). If not
OK, replace the faulty A/C expansion valve.
(8) When expansion valve testing is complete, test
the overall A/C system performance (Refer to 24 -
HEATING & AIR CONDITIONING - DIAGNOSIS
AND TESTING - A/C PERFORMANCE TEST).
REMOVAL
WARNING: REFER TO THE APPLICABLE WARN-
INGS AND CAUTIONS FOR THIS SYSTEM BEFORE
PERFORMING THE FOLLOWING OPERATION (Refer
to 24 - HEATING & AIR CONDITIONING/PLUMBING -
FRONT - WARNING - A/C PLUMBING) and (Refer to
24 - HEATING & AIR CONDITIONING/PLUMBING -
FRONT - CAUTION - A/C PLUMBING).
(1) Recover the refrigerant from the refrigerant
system (Refer to 24 - HEATING & AIR CONDITION-
ING/PLUMBING - FRONT/REFRIGERANT - STAN-
DARD PROCEDURE - REFRIGERANT
RECOVERY).
(2) Disconnect and isolate the battery negative
cable.
(3) Remove the air cleaner housing from the right
side of the engine compartment.
(4) Disconnect the drain tube from the wiper mod-
ule drain on the right side of the engine compart-
ment.
(5) Disconnect the wire harness connector from the
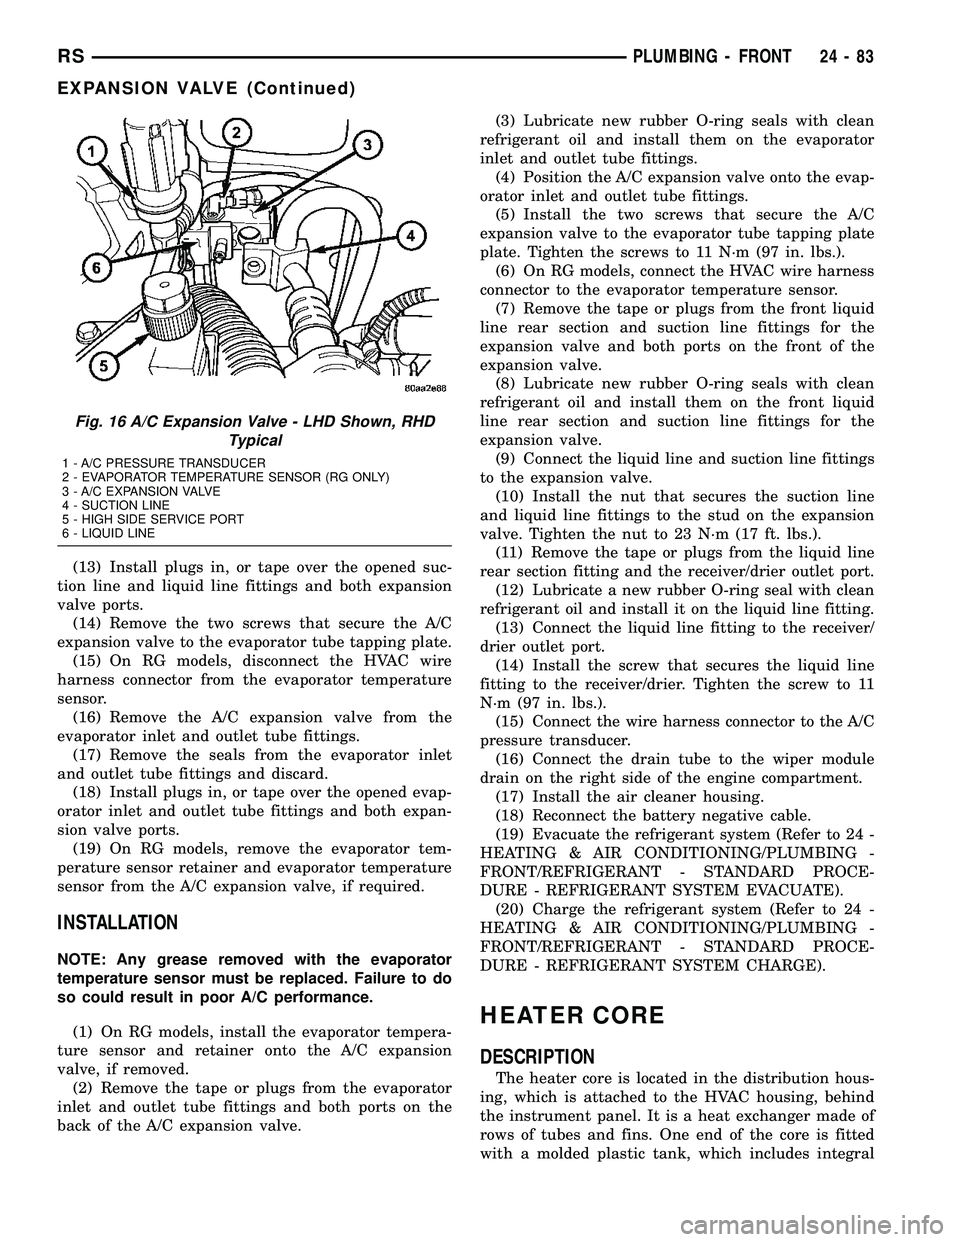
A/C pressure transducer (Fig. 16).
(6) Remove the screw that secures the front liquid
line rear section fitting to the top of the receiver/
drier.
(7) Disconnect the liquid line fitting from the
receiver/drier outlet port.
(8) Remove the seal from the liquid line fitting and
discard.
(9) Install plugs in, or tape over the opened liquid
line fitting and the receiver/drier outlet port.
(10) Remove the nut that secures the suction line
and liquid line fittings to the stud on the A/C expan-
sion valve.
(11) Disconnect the suction line and liquid line fit-
tings from the A/C expansion valve and move the
lines out of the way.
(12) Remove the seals from the suction line and
liquid line fittings and discard.
24 - 82 PLUMBING - FRONTRS
EXPANSION VALVE (Continued)
Page 2234 of 2339
(13) Install plugs in, or tape over the opened suc-
tion line and liquid line fittings and both expansion
valve ports.
(14) Remove the two screws that secure the A/C
expansion valve to the evaporator tube tapping plate.
(15) On RG models, disconnect the HVAC wire
harness connector from the evaporator temperature
sensor.
(16) Remove the A/C expansion valve from the
evaporator inlet and outlet tube fittings.
(17) Remove the seals from the evaporator inlet
and outlet tube fittings and discard.
(18) Install plugs in, or tape over the opened evap-
orator inlet and outlet tube fittings and both expan-
sion valve ports.
(19) On RG models, remove the evaporator tem-
perature sensor retainer and evaporator temperature
sensor from the A/C expansion valve, if required.
INSTALLATION
NOTE: Any grease removed with the evaporator
temperature sensor must be replaced. Failure to do
so could result in poor A/C performance.
(1) On RG models, install the evaporator tempera-
ture sensor and retainer onto the A/C expansion
valve, if removed.
(2) Remove the tape or plugs from the evaporator
inlet and outlet tube fittings and both ports on the
back of the A/C expansion valve.(3) Lubricate new rubber O-ring seals with clean
refrigerant oil and install them on the evaporator
inlet and outlet tube fittings.
(4) Position the A/C expansion valve onto the evap-
orator inlet and outlet tube fittings.
(5) Install the two screws that secure the A/C
expansion valve to the evaporator tube tapping plate
plate. Tighten the screws to 11 N´m (97 in. lbs.).
(6) On RG models, connect the HVAC wire harness
connector to the evaporator temperature sensor.
(7) Remove the tape or plugs from the front liquid
line rear section and suction line fittings for the
expansion valve and both ports on the front of the
expansion valve.
(8) Lubricate new rubber O-ring seals with clean
refrigerant oil and install them on the front liquid
line rear section and suction line fittings for the
expansion valve.
(9) Connect the liquid line and suction line fittings
to the expansion valve.
(10) Install the nut that secures the suction line
and liquid line fittings to the stud on the expansion
valve. Tighten the nut to 23 N´m (17 ft. lbs.).
(11) Remove the tape or plugs from the liquid line
rear section fitting and the receiver/drier outlet port.
(12) Lubricate a new rubber O-ring seal with clean
refrigerant oil and install it on the liquid line fitting.
(13) Connect the liquid line fitting to the receiver/
drier outlet port.
(14) Install the screw that secures the liquid line
fitting to the receiver/drier. Tighten the screw to 11
N´m (97 in. lbs.).
(15) Connect the wire harness connector to the A/C
pressure transducer.
(16) Connect the drain tube to the wiper module
drain on the right side of the engine compartment.
(17) Install the air cleaner housing.
(18) Reconnect the battery negative cable.
(19) Evacuate the refrigerant system (Refer to 24 -
HEATING & AIR CONDITIONING/PLUMBING -
FRONT/REFRIGERANT - STANDARD PROCE-
DURE - REFRIGERANT SYSTEM EVACUATE).
(20) Charge the refrigerant system (Refer to 24 -
HEATING & AIR CONDITIONING/PLUMBING -
FRONT/REFRIGERANT - STANDARD PROCE-
DURE - REFRIGERANT SYSTEM CHARGE).
HEATER CORE
DESCRIPTION
The heater core is located in the distribution hous-
ing, which is attached to the HVAC housing, behind
the instrument panel. It is a heat exchanger made of
rows of tubes and fins. One end of the core is fitted
with a molded plastic tank, which includes integral
Fig. 16 A/C Expansion Valve - LHD Shown, RHD
Typical
1 - A/C PRESSURE TRANSDUCER
2 - EVAPORATOR TEMPERATURE SENSOR (RG ONLY)
3 - A/C EXPANSION VALVE
4 - SUCTION LINE
5 - HIGH SIDE SERVICE PORT
6 - LIQUID LINE
RSPLUMBING - FRONT24-83
EXPANSION VALVE (Continued)