CHRYSLER VOYAGER 2021 Owners Manual
Manufacturer: CHRYSLER, Model Year: 2021, Model line: VOYAGER, Model: CHRYSLER VOYAGER 2021Pages: 348, PDF Size: 18.73 MB
Page 121 of 348
STARTING AND OPERATING119
NOTE:
Even if the power steering assistance is no
longer operational, it is still possible to steer
the vehicle. Under these conditions there will
be a substantial increase in steering effort,
especially at low speeds and during parking
maneuvers.
The power steering system is fully electric; it
requires no power steering fluid.
If the condition persists, see an authorized
dealer for service.
STOP/START SYSTEM — IF EQUIPPED
The Stop/Start function is developed to reduce
fuel consumption. The system will stop the engine
automatically during a vehicle stop if the required
conditions are met. Releasing the brake pedal,
pressing the accelerator pedal or shifting out of
DRIVE (D) will automatically re-start the engine.
This vehicle has been upgraded with a heavy duty
starter, enhanced battery, and other upgraded
engine parts to handle the additional engine starts.
AUTOSTOP MODE
The Stop/Start feature is enabled after every
normal customer engine start. At that time, the
system will go into STOP/START READY and if
all other conditions are met, can go into a
STOP/START AUTOSTOP ACTIVE. To Activate Auto STOP/START, The Following Must
Occur:
The system must be in STOP/START READY
state. A STOP/START READY message will be
displayed in the instrument cluster within the
Stop/Start section
Úpage 97.
The vehicle must be completely stopped.
The gear selector must be in a forward gear and
the brake pedal pressed.
The engine will shut down, the tachometer will
move to the zero position and the Stop/Start
telltale will illuminate indicating you are in
Autostop. Customer settings will be maintained
throughout the Auto Stop/Start process.
POSSIBLE REASONS THE ENGINE DOES
N
OT AUTOSTOP
Prior to engine shut down, the system will check
many safety and comfort conditions for Stop/Start
and ensure they are fulfilled. Detailed information
about the operation of the Stop/Start system
may be viewed in the instrument cluster display
Stop/Start screen. In the following situations the
engine will not stop:
If Stop/Start is manually disabled by the
Stop/Start OFF button.
Driver’s seat belt is not buckled.
Driver’s door is not closed.
Battery temperature is too warm or cold.
Battery charge is low. During this time a
message will display "Stop/Start Not Ready
Battery Charging".
The vehicle is on a steep grade.
Cabin heating or cooling is in process and an
acceptable cabin temperature has not been
achieved.
HVAC is set to full defrost mode at a high blower
speed.
HVAC set to MAX A/C.
Engine has not reached normal operating
temperature.
The transmission is not in a forward gear.
Hood is open.
Brake pedal is not pressed with sufficient pres -
sure.
Accelerator pedal input.
Engine temperature too high.
5 mph (8 km/h) threshold not achieved from
previous Autostop.
Steering angle beyond threshold.
It may be possible for the vehicle to be driven
several times without the Stop/Start system going
into a STOP/START READY state under more
extreme conditions of the items listed above.
4
21_RUV_OM_EN_USC_t.book Page 119
Page 122 of 348
120STARTING AND OPERATING
TO START THE ENGINE WHILE IN AUTO
S
TOP/START
While in a forward gear, the engine will start when
the brake pedal is released or the throttle pedal is
pressed. The transmission will automatically
re-engage upon engine restart.
Conditions That Will Cause The Engine To Start
Automatically While In Auto Stop/Start:
The transmission selector is moved out of
DRIVE.
To maintain cabin temperature comfort.
HVAC is set to full defrost mode.
HVAC system temperature or fan speed is
manually adjusted.
Battery voltage drops too low. During this time a
message will display "Stop/Start Not Ready
Battery Charging".
Stop/Start OFF switch is pushed.
A Stop/Start system error occurs.
TO MANUALLY TURN OFF THE
S
TOP/START SYSTEM
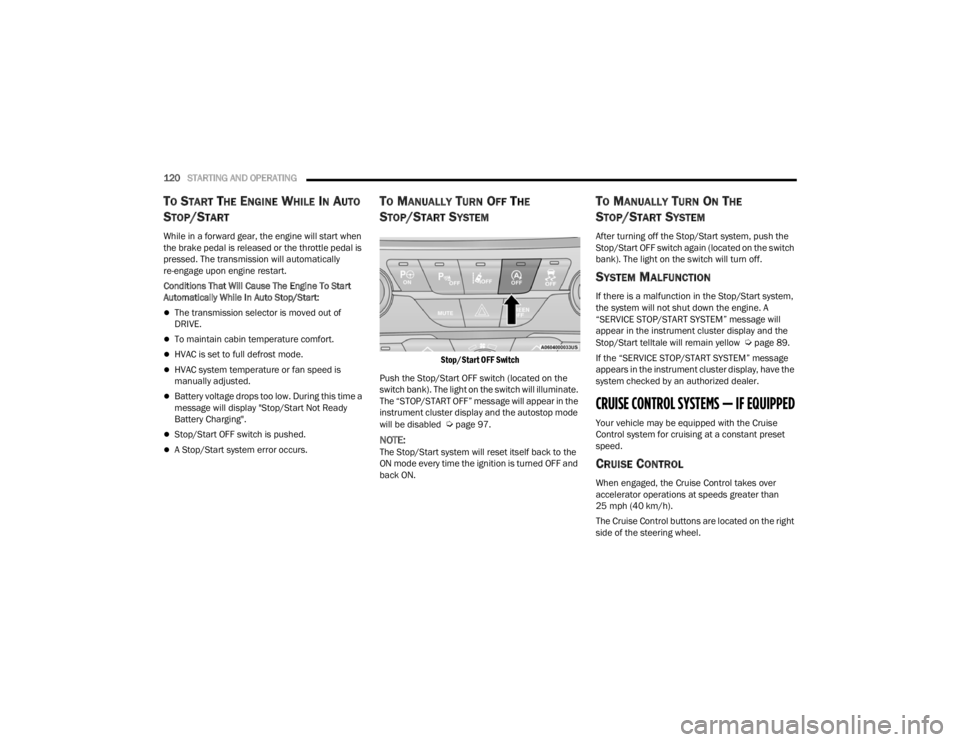
Stop/Start OFF Switch
Push the Stop/Start OFF switch (located on the
switch bank). The light on the switch will illuminate.
The “STOP/START OFF” message will appear in the
instrument cluster display and the autostop mode
will be disabled
Úpage 97.
NOTE:The Stop/Start system will reset itself back to the
ON mode every time the ignition is turned OFF and
back ON.
TO MANUALLY TURN ON THE
S
TOP/START SYSTEM
After turning off the Stop/Start system, push the
Stop/Start OFF switch again (located on the switch
bank). The light on the switch will turn off.
SYSTEM MALFUNCTION
If there is a malfunction in the Stop/Start system,
the system will not shut down the engine. A
“SERVICE STOP/START SYSTEM” message will
appear in the instrument cluster display and the
Stop/Start telltale will remain yellow
Úpage 89.
If the “SERVICE STOP/START SYSTEM” message
appears in the instrument cluster display, have the
system checked by an authorized dealer.
CRUISE CONTROL SYSTEMS — IF EQUIPPED
Your vehicle may be equipped with the Cruise
Control system for cruising at a constant preset
speed.
CRUISE CONTROL
When engaged, the Cruise Control takes over
accelerator operations at speeds greater than
25 mph (40 km/h).
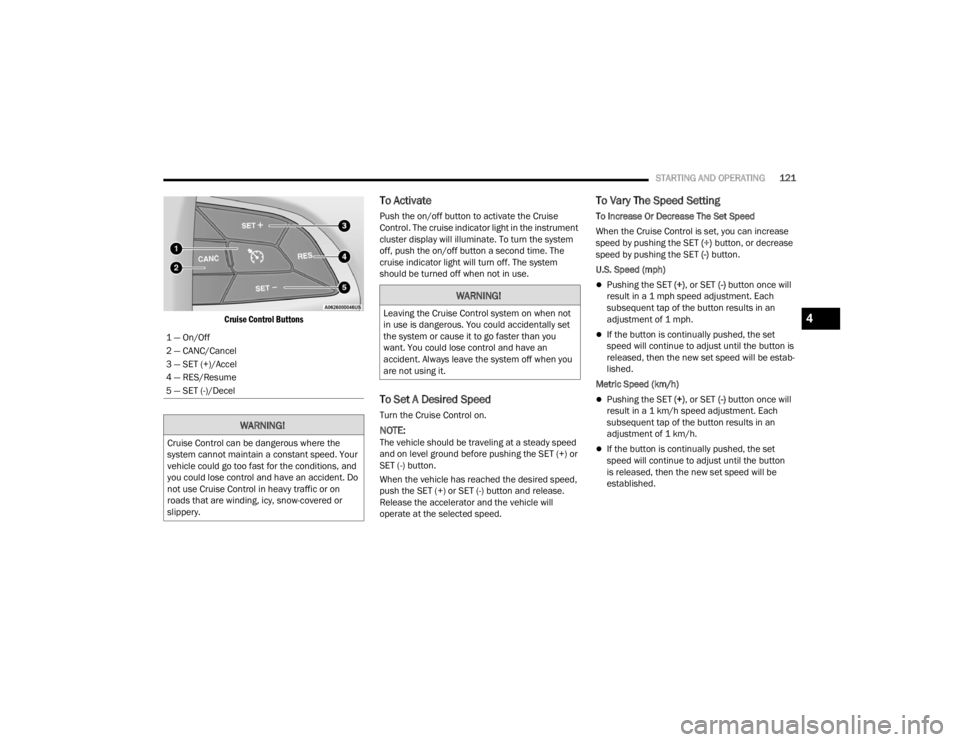
The Cruise Control buttons are located on the right
side of the steering wheel.
21_RUV_OM_EN_USC_t.book Page 120
Page 123 of 348
STARTING AND OPERATING121
Cruise Control Buttons
To Activate
Push the on/off button to activate the Cruise
Control. The cruise indicator light in the instrument
cluster display will illuminate. To turn the system
off, push the on/off button a second time. The
cruise indicator light will turn off. The system
should be turned off when not in use.
To Set A Desired Speed
Turn the Cruise Control on.
NOTE:The vehicle should be traveling at a steady speed
and on level ground before pushing the SET (+) or
SET (-) button.
When the vehicle has reached the desired speed,
push the SET (+) or SET (-) button and release.
Release the accelerator and the vehicle will
operate at the selected speed.
To Vary The Speed Setting
To Increase Or Decrease The Set Speed
When the Cruise Control is set, you can increase
speed by pushing the SET (+) button, or decrease
speed by pushing the SET (-) button.
U.S. Speed (mph)
Pushing the SET (+) , or SET (-) button once will
result in a 1 mph speed adjustment. Each
subsequent tap of the button results in an
adjustment of 1 mph.
If the button is continually pushed, the set
speed will continue to adjust until the button is
released, then the new set speed will be estab -
lished.
Metric Speed (km/h)
Pushing the SET (+), or SET (-) button once will
result in a 1 km/h speed adjustment. Each
subsequent tap of the button results in an
adjustment of 1 km/h.
If the button is continually pushed, the set
speed will continue to adjust until the button
is released, then the new set speed will be
established.
1 — On/Off
2 — CANC/Cancel
3 — SET (+)/Accel
4 — RES/Resume
5 — SET (-)/Decel
WARNING!
Cruise Control can be dangerous where the
system cannot maintain a constant speed. Your
vehicle could go too fast for the conditions, and
you could lose control and have an accident. Do
not use Cruise Control in heavy traffic or on
roads that are winding, icy, snow-covered or
slippery.
WARNING!
Leaving the Cruise Control system on when not
in use is dangerous. You could accidentally set
the system or cause it to go faster than you
want. You could lose control and have an
accident. Always leave the system off when you
are not using it.4
21_RUV_OM_EN_USC_t.book Page 121
Page 124 of 348
122STARTING AND OPERATING
To Accelerate For Passing
Press the accelerator as you would normally. When
the pedal is released, the vehicle will return to the
set speed.
USING CRUISE CONTROL ON HILLS
The transmission may downshift on hills to
maintain the vehicle set speed.
The Cruise Control system maintains speed up and
down hills. A slight speed change on moderate hills
is normal. On steep hills, a greater speed loss or
gain may occur so it may be preferable to drive
without Cruise Control.
To Resume Speed
To resume a previously set speed, push the RES
button and release. Resume can be used at any
speed above 20 mph (32 km/h).
To Deactivate
A tap on the brake pedal, or pushing the CANC
button, or normal brake pressure will deactivate
the Cruise Control system without erasing the set
speed from memory.
Pushing the on/off button or placing the ignition in
the OFF position erases the set speed from
memory.
PARKSENSE REAR PARK ASSIST —
IF EQUIPPED
The ParkSense Rear Park Assist system provides
visual and audible indications of the distance
between the rear fascia and a detected obstacle
when backing up (e.g. during a parking maneuver).
If your vehicle is equipped with an Automatic
Transmission, the vehicle brakes may be
automatically applied and released when
performing a reverse parking maneuver if the
system detects a possible collision with an
obstacle.
NOTE:
The driver can override the automatic braking
function by pressing the gas pedal, turning Park-
Sense off via ParkSense switch, or changing the
gear while the automatic brakes are being
applied.
Automatic brakes will not be available if Elec -
tronic Stability Control (ESC) is not available.
Automatic brakes will not be available if there is
a faulted condition detected with the ParkSense
Park Assist system or the Braking System
Module.
The automatic braking function may not provide
enough vehicle deceleration to avoid colliding
with a detected obstacle depending on vehicle
speed, road conditions, and brake capability.
The automatic braking function may not be
applied fast enough for moving obstacles that
approach the rear of the vehicle from the left
and/or right sides.
The automatic braking function can be
enabled/disabled from the Customer-Program -
mable Features section of the Uconnect system.
ParkSense will retain its last known configura -
tion state for the automatic braking function
through ignition cycles.
The automatic braking function is intended to
assist the driver in avoiding possible collisions with
detected obstacles when backing up in REVERSE
gear.
WARNING!
Cruise Control can be dangerous where the
system cannot maintain a constant speed. Your
vehicle could go too fast for the conditions, and
you could lose control and have an accident. Do
not use Cruise Control in heavy traffic or on
roads that are winding, icy, snow-covered or
slippery.
21_RUV_OM_EN_USC_t.book Page 122
Page 125 of 348
STARTING AND OPERATING123
NOTE:
The system is provided to assist the driver and
not to substitute the driver.
The driver must stay in full control of the
vehicle's acceleration and braking and is
responsible for controlling the vehicle's move -
ments.
For limitations of this system and
recommendations/precautions, see
Úpage 126.
ParkSense will retain the last system state
(enabled or disabled) from the last ignition cycle
when the ignition is changed to the ON/RUN
position.
ParkSense can be active only when the gear
selector is in REVERSE. If ParkSense is enabled at
this gear selector position, the system will remain
active until the vehicle speed is increased to
approximately 7 mph (11 km/h) or above. When in
REVERSE and above the system's operating speed,
a warning will appear within the instrument cluster
display indicating the vehicle speed is too fast. The
system will become active again if the vehicle
speed is decreased to speeds less than
approximately 6 mph (9 km/h).
PARKSENSE SENSORS
The four ParkSense sensors, located in the rear
fascia/bumper, monitor the area behind the
vehicle that is within the sensors’ field of view. The
sensors can detect obstacles from approximately
12 inches (30 cm) up to 79 inches (200 cm) from
the rear fascia/bumper in the horizontal direction,
depending on the location, type and orientation of
the obstacle.
PARKSENSE WARNING DISPLAY
The ParkSense Warning screen will only be
displayed if Sound and Display is selected from the
Customer-Programmable Features section of the
Uconnect system
Úpage 142.
The ParkSense Warning screen is located within
the instrument cluster display
Úpage 89. It
provides visual warnings to indicate the distance
between the rear fascia/bumper and the detected
obstacle.
PARKSENSE DISPLAY
When the vehicle is in REVERSE and an obstacle
has been detected, the warning display will turn on
indicating the system status, and remain on until
the vehicle is moved out of REVERSE.
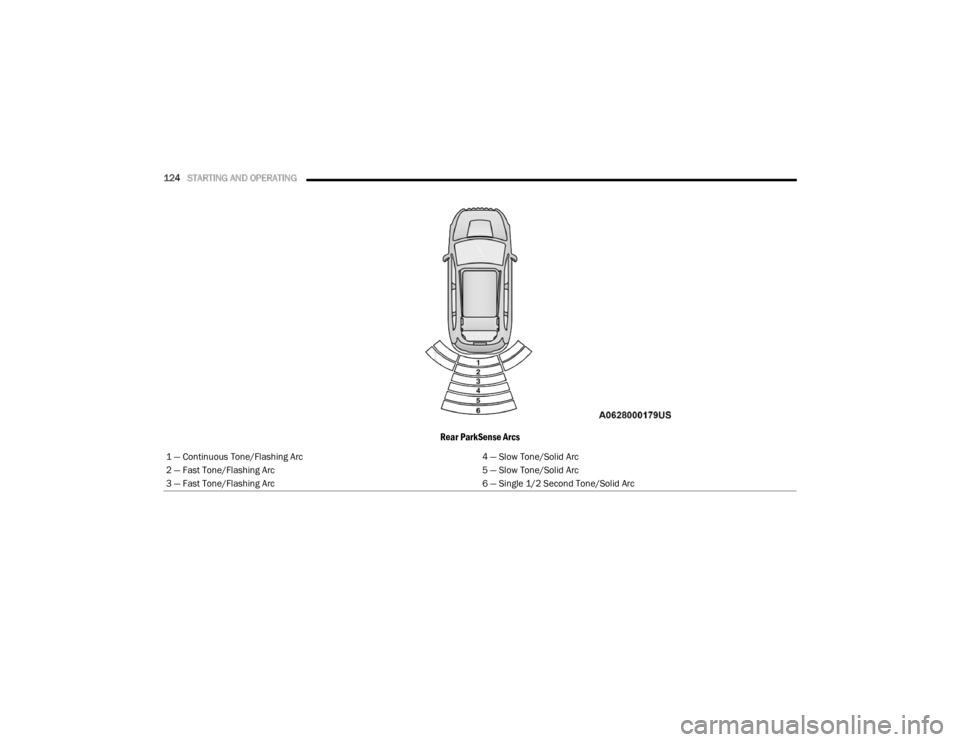
The system will indicate a detected obstacle by
showing a single arc in one or more regions based
on the obstacle’s distance and location relative to
the vehicle.
If an obstacle is detected in the center rear region,
the display will show a single solid arc in the center
rear region and will produce a one-half second
tone. As the vehicle moves closer to the obstacle,
the display will show the single arc moving closer to
the vehicle and the sound tone will change from
slow, to fast, to continuous.
If an obstacle is detected in the left and/or right
rear region, the display will show a single flashing
arc in the left and/or right rear region and will
produce a fast sound tone. As the vehicle moves
closer to the obstacle, the display will show the
single arc moving closer to the vehicle and the tone
will change from fast to continuous.
4
21_RUV_OM_EN_USC_t.book Page 123
Page 126 of 348
124STARTING AND OPERATING
Rear ParkSense Arcs
1 — Continuous Tone/Flashing Arc 4 — Slow Tone/Solid Arc
2 — Fast Tone/Flashing Arc 5 — Slow Tone/Solid Arc
3 — Fast Tone/Flashing Arc 6 — Single 1/2 Second Tone/Solid Arc
21_RUV_OM_EN_USC_t.book Page 124
Page 127 of 348
STARTING AND OPERATING125
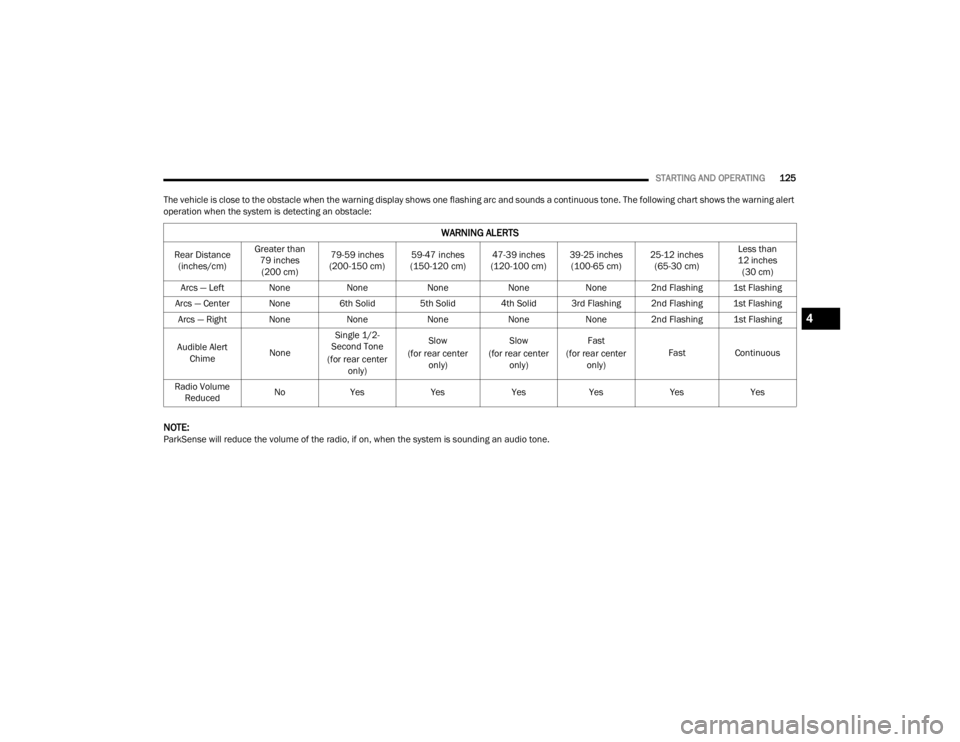
The vehicle is close to the obstacle when the warning display shows one flashing arc and sounds a continuous tone. The following chart shows the warning alert
operation when the system is detecting an obstacle:
NOTE:ParkSense will reduce the volume of the radio, if on, when the system is sounding an audio tone.
WARNING ALERTS
Rear Distance (inches/cm) Greater than
79 inches (200 cm) 79-59 inches
(200-150 cm) 59-47 inches
(150-120 cm) 47-39 inches
(120-100 cm) 39-25 inches
(100-65 cm) 25-12 inches
(65-30 cm) Less than
12 inches (30 cm)
Arcs — Left None NoneNoneNoneNone 2nd Flashing 1st Flashing
Arcs — Center None 6th Solid 5th Solid 4th Solid 3rd Flashing 2nd Flashing 1st Flashing
Arcs — Right None NoneNoneNoneNone 2nd Flashing 1st Flashing
Audible Alert Chime NoneSingle 1/2-
Second Tone
(for rear center only) Slow
(for rear center only) Slow
(for rear center only) Fast
(for rear center only) Fast
Continuous
Radio Volume Reduced No
Yes YesYesYes YesYes
4
21_RUV_OM_EN_USC_t.book Page 125
Page 128 of 348
126STARTING AND OPERATING
ENABLING AND DISABLING PARKSENSE
ParkSense can be enabled and disabled
with the ParkSense switch, located on
the switch panel below the Uconnect
display.
When the ParkSense switch is pushed to disable
the system, the instrument cluster will display the
“PARKSENSE OFF” message for approximately five
seconds. When the gear selector is moved to
REVERSE and the system is disabled, the
instrument cluster display will show the
“PARKSENSE OFF” message for as long as the
vehicle is in REVERSE.
The ParkSense switch LED will be on when
ParkSense is disabled or requires service. The
ParkSense switch LED will be off when the system
is enabled. If the ParkSense switch is pushed, and
requires service, the ParkSense switch LED will
blink momentarily, and then the LED will be on.
NOTE:When KeySense feature is present, the ParkSense
system will reject customer input to turn the
system off via the hard switch. The instrument
cluster display will show a "KeySense in Use
Selected Feature Cannot be Disabled" message.
SERVICE THE PARKSENSE REAR PARK
A
SSIST SYSTEM
During vehicle start up, when the ParkSense Rear
Park Assist system has detected a faulted
condition, the instrument cluster will actuate a
single chime, once per ignition cycle, and it will
display the “PARKSENSE UNAVAILABLE WIPE
REAR SENSORS” or the “PARKSENSE
UNAVAILABLE SERVICE REQUIRED”. When the
gear selector is moved to REVERSE and the system
has detected a faulted condition, the instrument
cluster display
Úpage 89 will show the
"PARKSENSE UNAVAILABLE WIPE REAR SENSORS"
or "PARKSENSE UNAVAILABLE SERVICE
REQUIRED" message for five seconds while the
vehicle is in REVERSE. The vehicle graphic will
remain displayed for as long as the vehicle is in
REVERSE.
If “PARKSENSE UNAVAILABLE WIPE REAR
SENSORS” appears in the instrument cluster
display, make sure the outer surface and the
underside of the rear fascia/bumper is clean and
clear of snow, ice, mud, dirt, or other obstruction
and then cycle the ignition. If the message
continues to appear, see an authorized dealer.
If “PARKSENSE UNAVAILABLE SERVICE
REQUIRED” appears in the instrument cluster
display, see an authorized dealer.
CLEANING THE PARKSENSE SYSTEM
Clean the ParkSense sensors with water, car wash
soap, and a soft cloth. Do not use rough or hard
cloths. Do not scratch or poke the sensors.
PARKSENSE SYSTEM USAGE
P
RECAUTIONS
NOTE:
Ensure that the rear bumper is free of snow, ice,
mud, dirt, and debris to keep the ParkSense
system operating properly.
Jackhammers, large trucks, and other vibra -
tions could affect the performance of Park -
Sense.
When you turn ParkSense off, the instrument
cluster will display “PARKSENSE OFF”. Further -
more, once you turn ParkSense off, it remains
off until you turn it on again, even if you cycle the
ignition.
When you move the gear selector to the
REVERSE position and ParkSense is turned off,
the instrument cluster display will show “PARK -
SENSE OFF” for as long as the vehicle is in
REVERSE.
21_RUV_OM_EN_USC_t.book Page 126
Page 129 of 348
STARTING AND OPERATING127
ParkSense, when on, will reduce the volume of
the radio when it is sounding a tone.
Clean the ParkSense sensors regularly, taking
care not to scratch or damage them. The
sensors must not be covered with ice, snow,
slush, mud, dirt, or debris. Failure to do so can
result in the system not working properly. The
ParkSense system might not detect an obstacle
behind the fascia/bumper, or it could provide a
false indication that an obstacle is behind the
fascia/bumper.
ParkSense should be disabled when the liftgate
is in the open position.
Use the ParkSense switch to turn the ParkSense
system off if objects such as bicycle carriers,
trailer hitches, etc. are placed within 12 inches
(30 cm) from the rear fascia/bumper. Failure to
do so can result in the system misinterpreting a
close object as a blockage or sensor problem,
causing the “PARKSENSE UNAVAILABLE WIPE
REAR SENSORS” message to be displayed in
the instrument cluster display.
PARKVIEW REAR BACK UP CAMERA
The ParkView Rear Back Up Camera allows you to
see an on-screen image of the rear surroundings of
your vehicle whenever the gear selector is put into
REVERSE. The image will be displayed on the
touchscreen display along with a caution note
“Check Entire Surroundings” across the top of the
screen. After five seconds, this note will disappear.
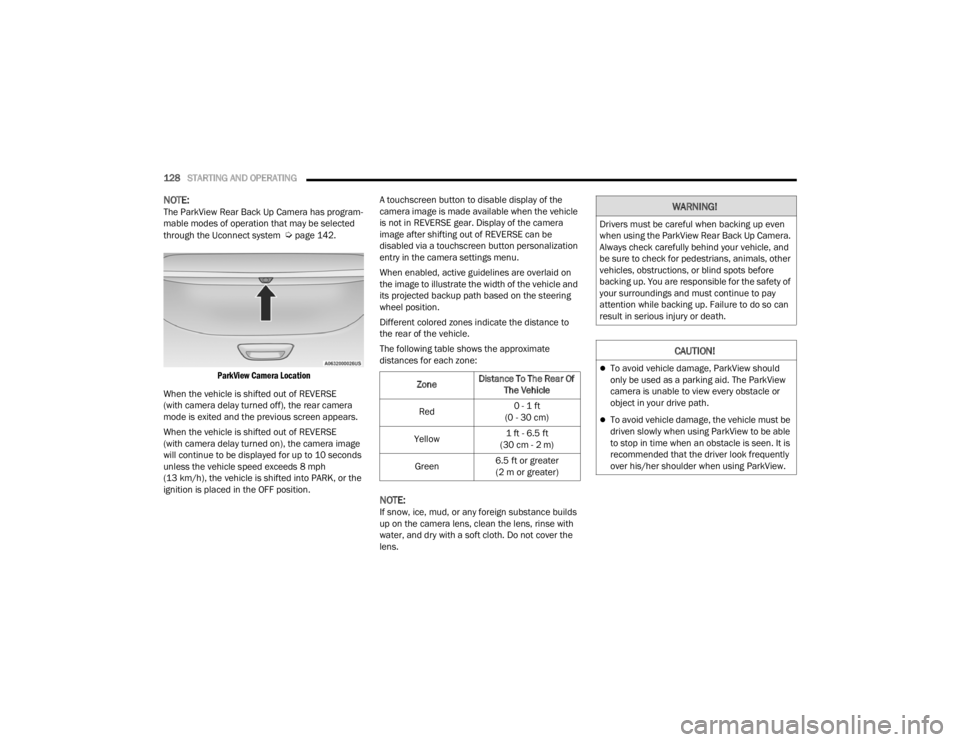
The ParkView Rear Back Up Camera is located on
the rear of the vehicle above the rear license plate.
WARNING!
Drivers must be careful when backing up even
when using ParkSense. Always check carefully
behind your vehicle, look behind you, and be
sure to check for pedestrians, animals, other
vehicles, obstructions, and blind spots before
backing up. You are responsible for safety and
must continue to pay attention to your
surroundings. Failure to do so can result in
serious injury or death.
Before using ParkSense, it is strongly recom -
mended that the ball mount and hitch ball
assembly be disconnected from the vehicle
when the vehicle is not used for towing.
Failure to do so can result in injury or damage
to vehicles or obstacles because the hitch ball
will be much closer to the obstacle than the
rear fascia when the vehicle sounds the
continuous tone. Also, the sensors could
detect the ball mount and hitch ball assembly,
depending on its size and shape, giving a false
indication that an obstacle is behind the
vehicle.
CAUTION!
ParkSense is only a parking aid and it is
unable to recognize every obstacle, including
small obstacles. Parking curbs might be
temporarily detected or not detected at all.
Obstacles located above or below the sensors
will not be detected when they are in close
proximity.
The vehicle must be driven slowly when using
ParkSense in order to be able to stop in time
when an obstacle is detected. It is recom -
mended that the driver looks over his/her
shoulder when using ParkSense.4
21_RUV_OM_EN_USC_t.book Page 127
Page 130 of 348
128STARTING AND OPERATING
NOTE:The ParkView Rear Back Up Camera has program -
mable modes of operation that may be selected
through the Uconnect system
Úpage 142.
ParkView Camera Location
When the vehicle is shifted out of REVERSE
(with camera delay turned off), the rear camera
mode is exited and the previous screen appears.
When the vehicle is shifted out of REVERSE
(with camera delay turned on), the camera image
will continue to be displayed for up to 10 seconds
unless the vehicle speed exceeds 8 mph
(13 km/h), the vehicle is shifted into PARK, or the
ignition is placed in the OFF position. A touchscreen button to disable display of the
camera image is made available when the vehicle
is not in REVERSE gear. Display of the camera
image after shifting out of REVERSE can be
disabled via a touchscreen button personalization
entry in the camera settings menu.
When enabled, active guidelines are overlaid on
the image to illustrate the width of the vehicle and
its projected backup path based on the steering
wheel position.
Different colored zones indicate the distance to
the rear of the vehicle.
The following table shows the approximate
distances for each zone:
NOTE:If snow, ice, mud, or any foreign substance builds
up on the camera lens, clean the lens, rinse with
water, and dry with a soft cloth. Do not cover the
lens.
Zone
Distance To The Rear Of
The Vehicle
Red 0 - 1 ft
(0 - 30 cm)
Yellow 1 ft - 6.5 ft
(30 cm - 2 m)
Green 6.5 ft or greater
(2 m or greater)
WARNING!
Drivers must be careful when backing up even
when using the ParkView Rear Back Up Camera.
Always check carefully behind your vehicle, and
be sure to check for pedestrians, animals, other
vehicles, obstructions, or blind spots before
backing up. You are responsible for the safety of
your surroundings and must continue to pay
attention while backing up. Failure to do so can
result in serious injury or death.
CAUTION!
To avoid vehicle damage, ParkView should
only be used as a parking aid. The ParkView
camera is unable to view every obstacle or
object in your drive path.
To avoid vehicle damage, the vehicle must be
driven slowly when using ParkView to be able
to stop in time when an obstacle is seen. It is
recommended that the driver look frequently
over his/her shoulder when using ParkView.
21_RUV_OM_EN_USC_t.book Page 128