Citroen BERLINGO 2005 1.G Workshop Manual
Manufacturer: CITROEN, Model Year: 2005, Model line: BERLINGO, Model: Citroen BERLINGO 2005 1.GPages: 462, PDF Size: 10.48 MB
Page 391 of 462
Downloaded from www.Manualslib.com manuals search engine 385
AXLES
SUSPENSION
STEERING
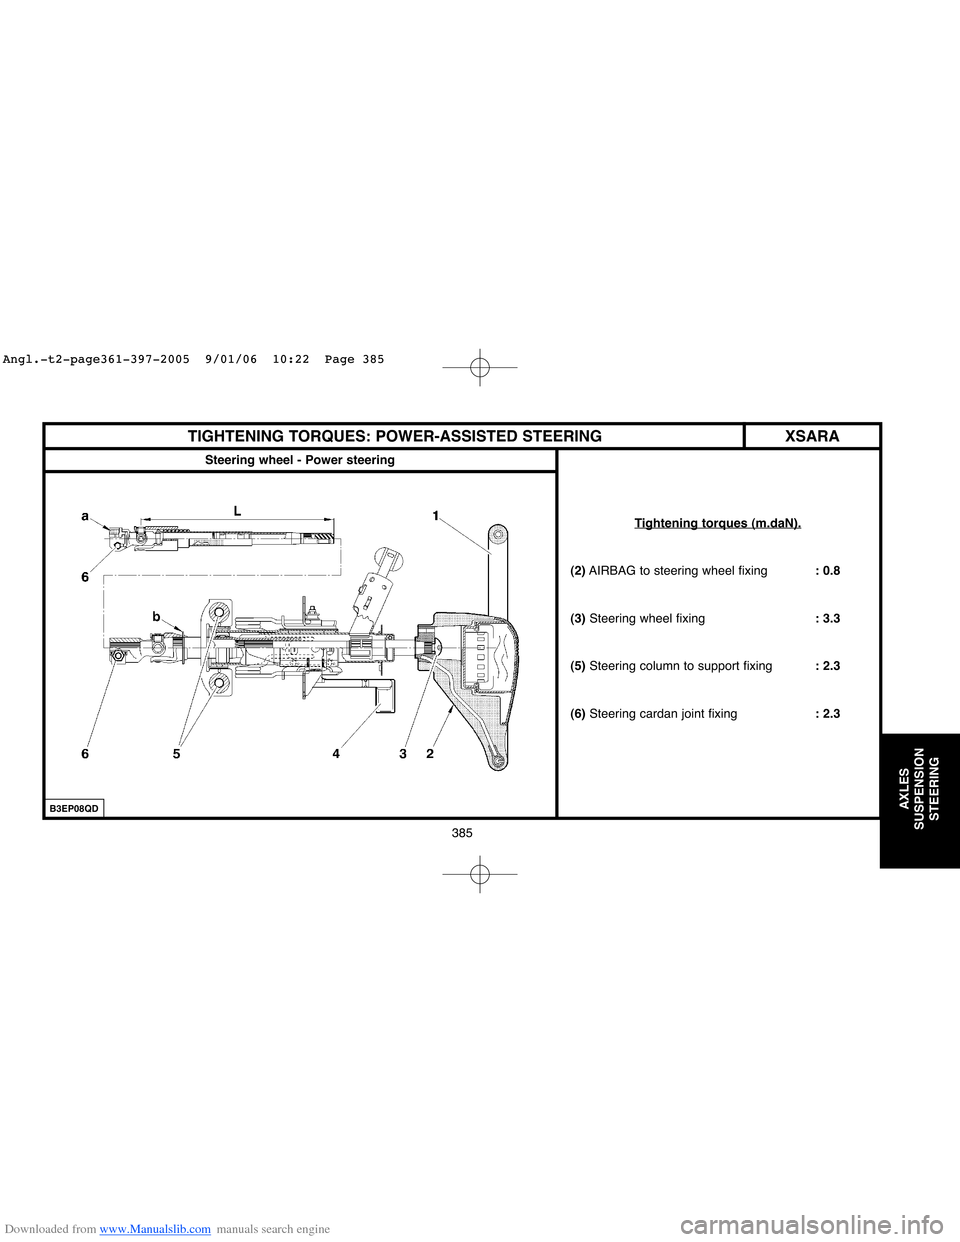
XSARA TIGHTENING TORQUES: POWER-ASSISTED STEERING
Steering wheel - Power steering
Tightening torques (m.daN).
(2)AIRBAG to steering wheel fixing: 0.8
(3) Steering wheel fixing: 3.3
(5)Steering column to support fixing: 2.3
(6)Steering cardan joint fixing: 2.3
B3EP08QD
Angl.-t2-page361-397-2005 9/01/06 10:22 Page 385
Page 392 of 462

Downloaded from www.Manualslib.com manuals search engine 386
AXLES
SUSPENSION
STEERING
TIGHTENING TORQUES: POWER-ASSISTED STEERING
Power steering
XSARA
Tightening torques (m.daN).
(7)Pivot ball-joint nut: 4
(8)Link rod lock nut: 4.5
(9)Ball-joint on steering rack: 6
(10)Fixing on subframe: 5
(11) Hydraulic pipe connection: 2.5
(12)Valve to housing fixing: 1.2
(13)Plunger flange screw: 1.2
(14) Screw fixing the steering ram
to the housing: 5.5
(15)Nut fixing the steering ram
to the yoke: 5.5
B3EP08RD
Angl.-t2-page361-397-2005 9/01/06 10:22 Page 386
Page 393 of 462
Downloaded from www.Manualslib.com manuals search engine 387
AXLES
SUSPENSION
STEERING
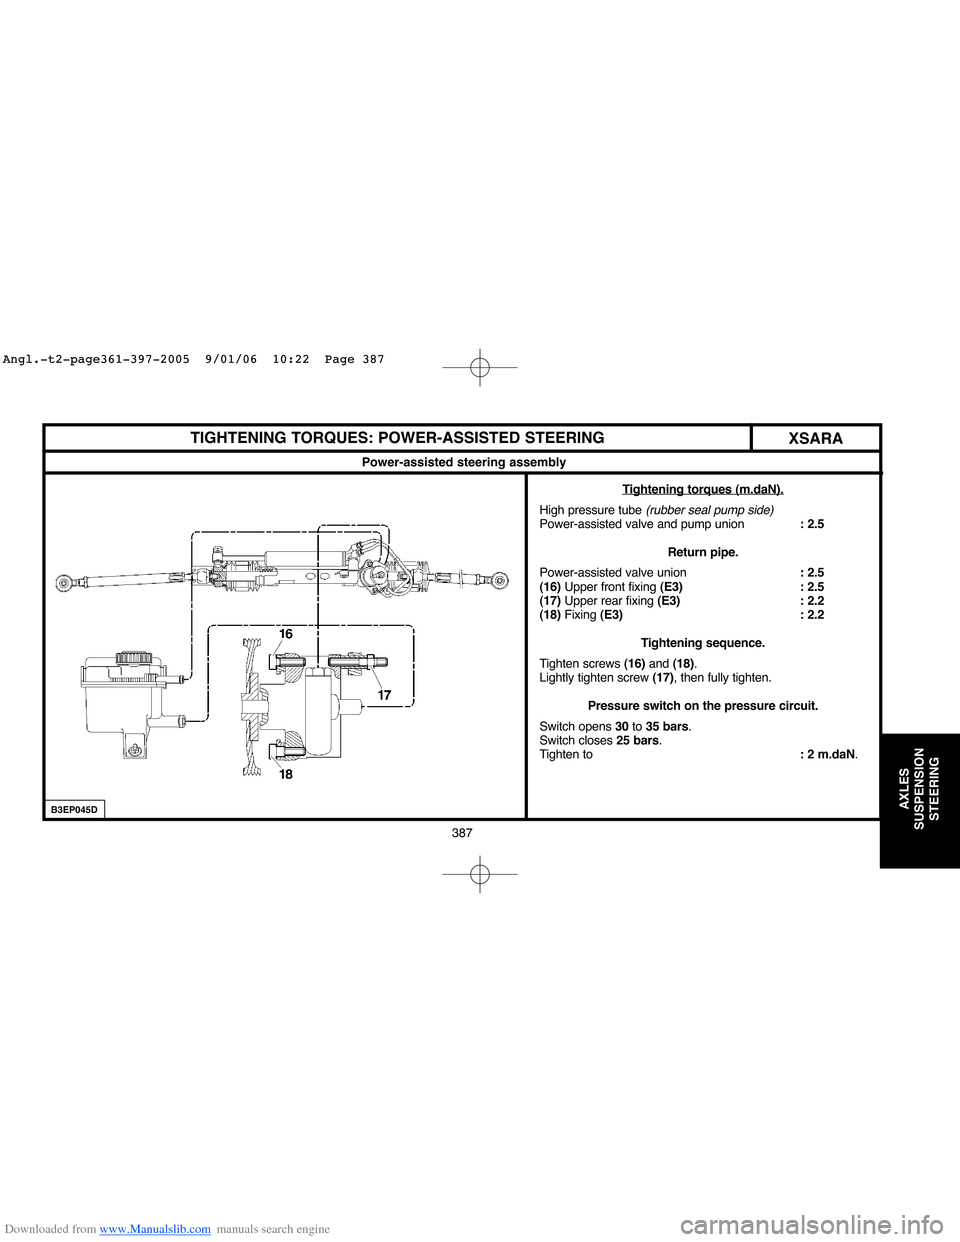
TIGHTENING TORQUES: POWER-ASSISTED STEERING
XSARA
Power-assisted steering assembly
T
ightening torques (m.daN).
High pressure tube (rubber seal pump side)Power-assisted valve and pump union: 2.5
Return pipe.
Power-assisted valve union: 2.5
(16)Upper front fixing (E3) : 2.5
(17)Upper rear fixing (E3) : 2.2
(18)Fixing (E3) : 2.2
Tightening sequence.
Tighten screws (16) and (18).
Lightly tighten screw (17), then fully tighten.
Pressure switch on the pressure circuit.
Switch opens 30to 35 bars.
Switch closes 25 bars.
Tighten to: 2 m.daN.
B3EP045D
Angl.-t2-page361-397-2005 9/01/06 10:22 Page 387
Page 394 of 462
Downloaded from www.Manualslib.com manuals search engine 388
AXLES
SUSPENSION
STEERING
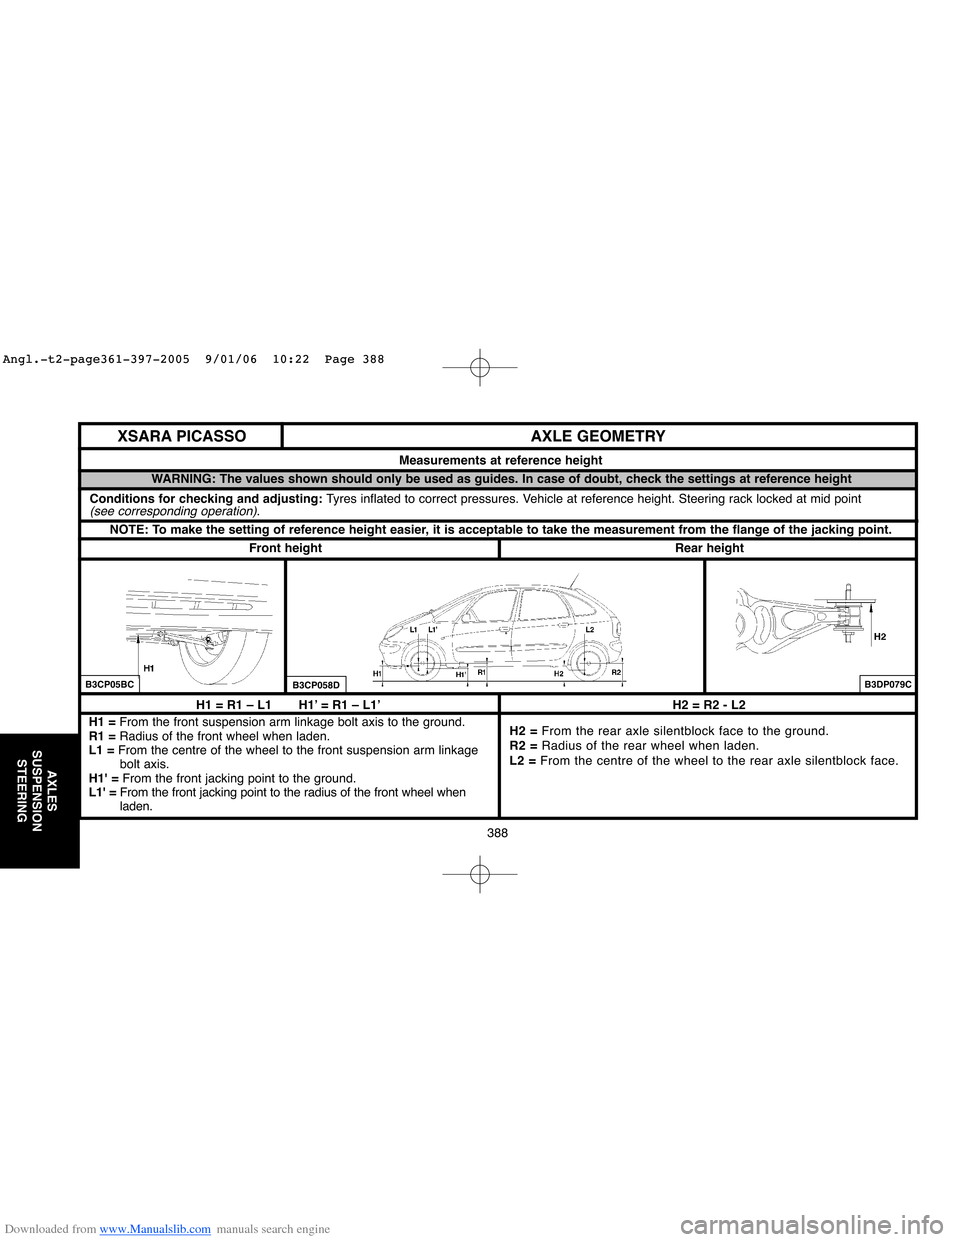
H1 = R1 – L1 H1’ = R1 – L1’
H1 = From the front suspension arm linkage bolt axis to the ground.
R1 =Radius of the front wheel when laden.
L1 =From the centre of the wheel to the front suspension arm linkage
bolt axis.
H1' =From the front jacking point to the ground.
L1' =From the front jacking point to the radius of the front wheel when
laden.H2 = R2 - L2
H2 = From the rear axle silentblock face to the ground.
R2 =Radius of the rear wheel when laden.
L2 =From the centre of the wheel to the rear axle silentblock face.
AXLE GEOMETRY
Measurements at reference height
NOTE: To make the setting of reference height easier, it is acceptable to take the measurement from the flange of the jacking point.
WARNING: The values shown should only be used as guides. In case of doubt, check the settings at reference height
Rear heightFront height
B3CP05BCB3CP058DB3DP079C
XSARA PICASSO
Conditions for checking and adjusting: Tyres inflated to correct pressures. Vehicle at reference height. Steering rack locked at mid point(see corresponding operation).
Angl.-t2-page361-397-2005 9/01/06 10:22 Page 388
Page 395 of 462
Downloaded from www.Manualslib.com manuals search engine 389
AXLES
SUSPENSION
STEERING
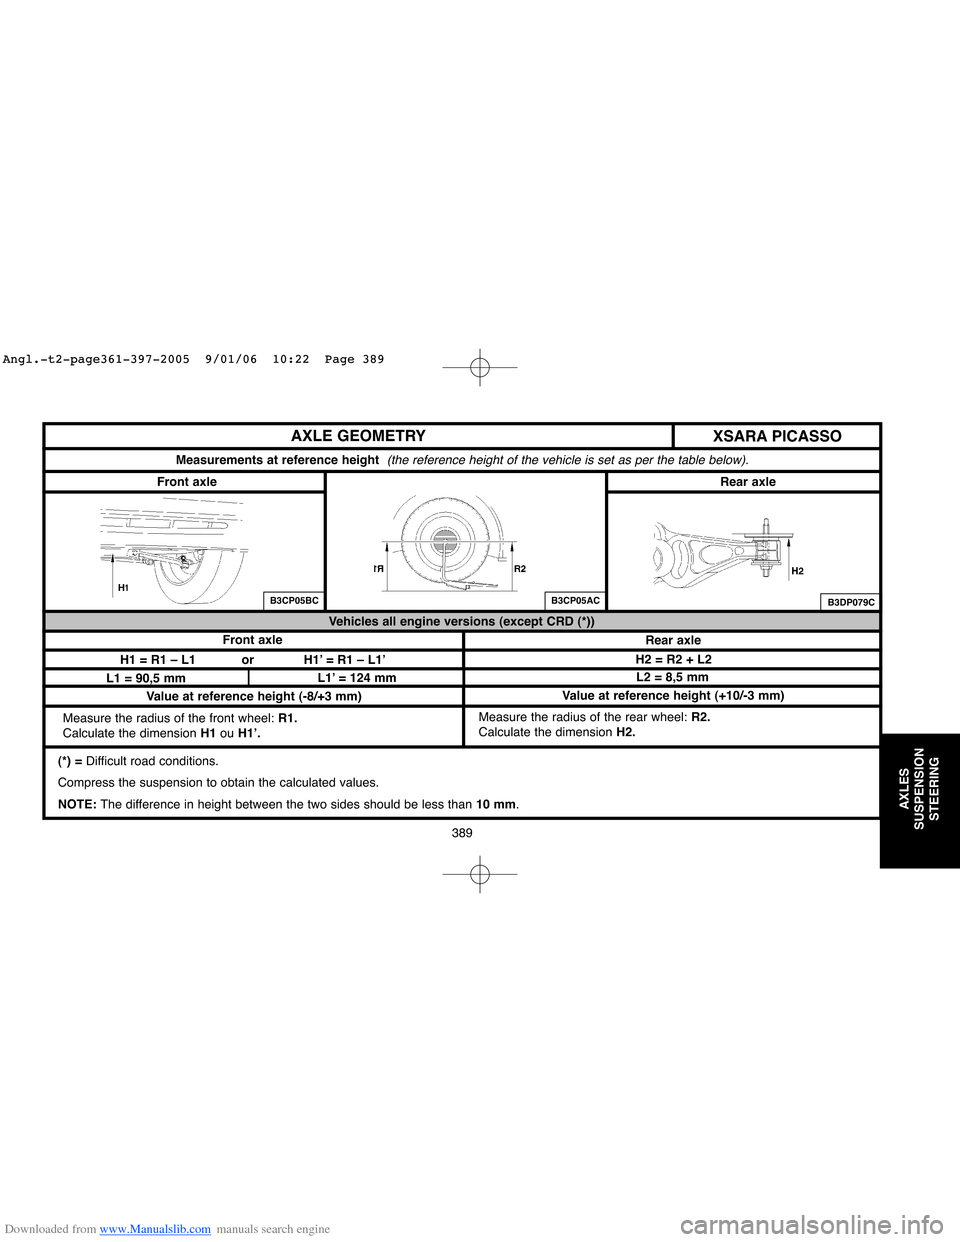
AXLE GEOMETRY
(*) = Difficult road conditions.
Compress the suspension to obtain the calculated values.
NOTE: The difference in height between the two sides should be less than10 mm. Measure the radius of the rear wheel: R2.
Calculate the dimensionH2. Measure the radius of the front wheel: R1.
Calculate the dimension H1 ouH1’.
Measurements at reference height (the reference height of the vehicle is set as per the table below).
B3CP05BCB3CP05AC
XSARA PICASSO
Front axleRear axle
Front axle
Rear axle Vehicles all engine versions (except CRD (*))
H1 = R1 – L1 or H1’ = R1 – L1’
L1 = 90,5 mmL1’ = 124 mmL2 = 8,5 mm H2 = R2 + L2
B3DP079C
Value at reference height (-8/+3 mm)Value at reference height (+10/-3 mm)
Angl.-t2-page361-397-2005 9/01/06 10:22 Page 389
Page 396 of 462
Downloaded from www.Manualslib.com manuals search engine 390
AXLES
SUSPENSION
STEERING
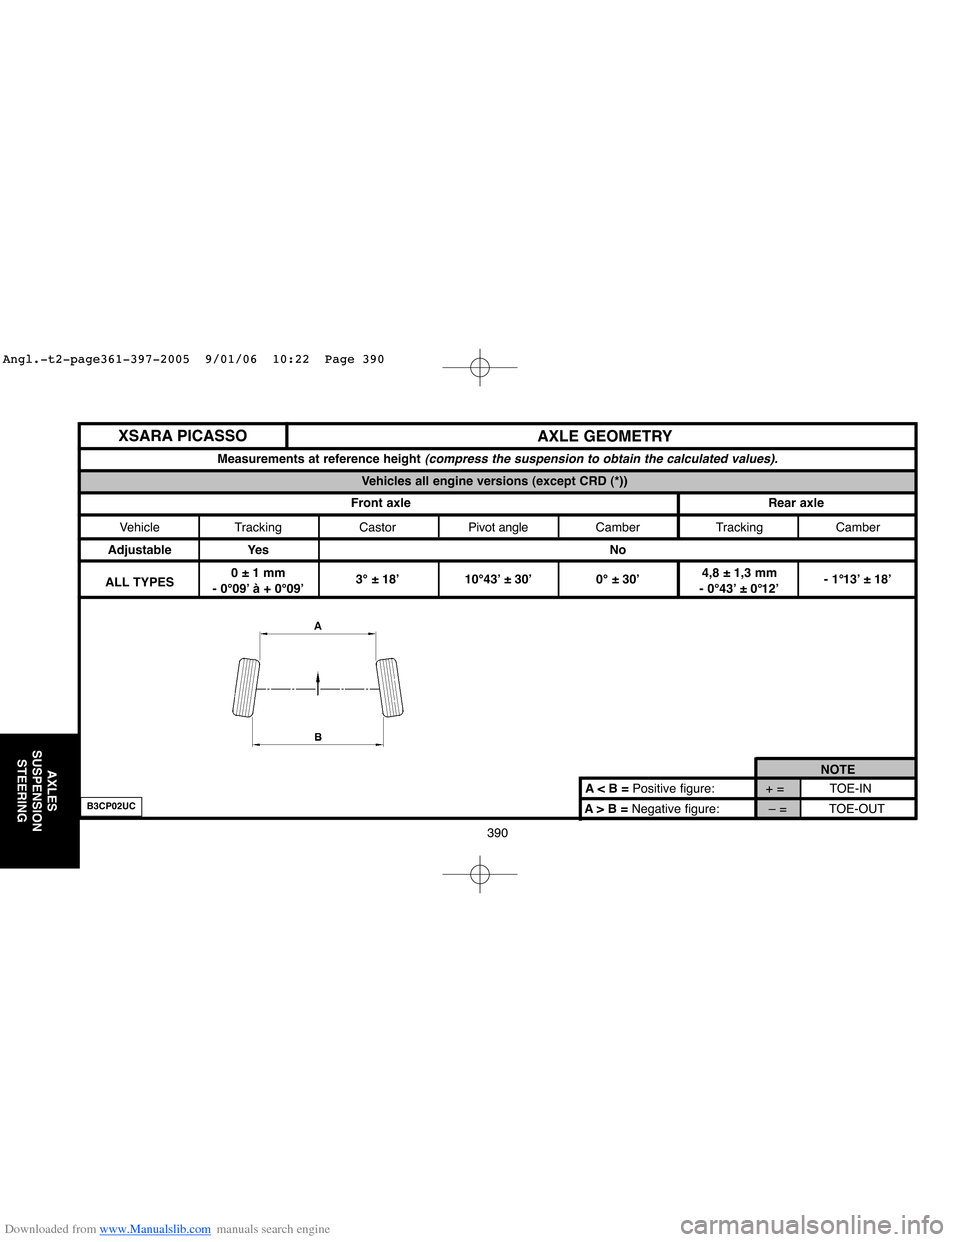
A> B =Negative figure: – = TOE-OUT A < B = Positive figure: + = TOE-INNOTE
AXLE GEOMETRY
Measurements at reference height (compress the suspension to obtain the calculated values).
Vehicles all engine versions (except CRD (*))
Front axle Rear axle
Vehicle Tracking CastorPivot angleCamber Tracking Camber
Adjustable Yes No
ALL TYPES0 ± 1 mm4,8 ± 1,3 mm
- 0°09’ à + 0°09’3° ± 18’ 10°43’ ± 30’ 0° ± 30’
- 0°43’ ± 0°12’- 1°13’ ± 18’
XSARA PICASSO
B3CP02UC
Angl.-t2-page361-397-2005 9/01/06 10:22 Page 390
Page 397 of 462
Downloaded from www.Manualslib.com manuals search engine 391
AXLES
SUSPENSION
STEERING
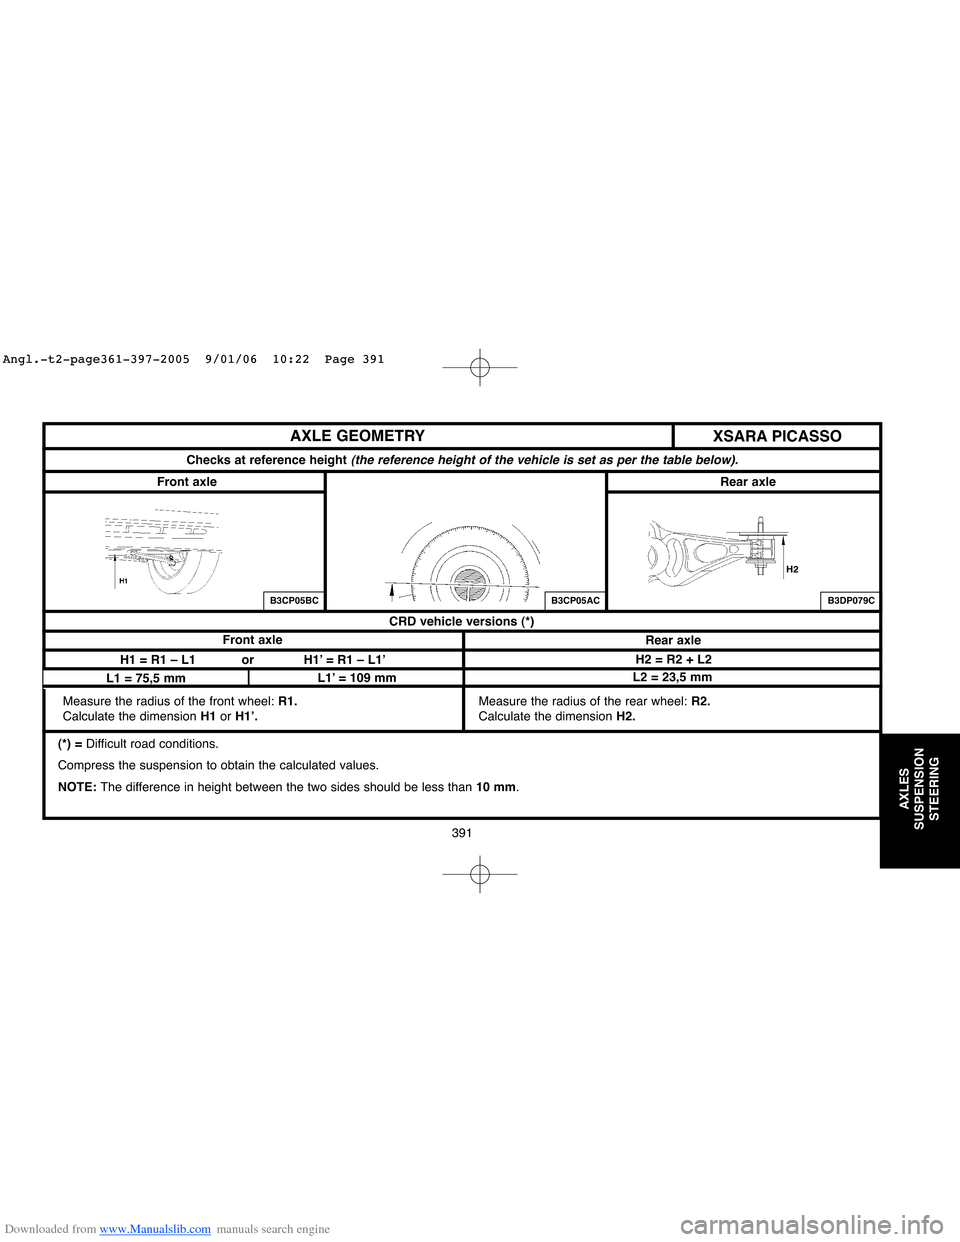
AXLE GEOMETRY
(*) = Difficult road conditions.
Compress the suspension to obtain the calculated values.
NOTE: The difference in height between the two sides should be less than10 mm. Measure the radius of the rear wheel: R2.
Calculate the dimensionH2. Measure the radius of the front wheel: R1.
Calculate the dimension H1 orH1’.
Checks at reference height (the reference height of the vehicle is set as per the table below).
B3CP05BCB3CP05AC
XSARA PICASSO
Front axleRear axle
Front axle
Rear axle CRD vehicle versions (*)
H1 = R1 – L1 or H1’ = R1 – L1’
L1 = 75,5 mmL1’ = 109 mmL2 = 23,5 mmH2 = R2 + L2
B3DP079C
Angl.-t2-page361-397-2005 9/01/06 10:22 Page 391
Page 398 of 462

Downloaded from www.Manualslib.com manuals search engine 392
AXLES
SUSPENSION
STEERING
A> B =Negative figure: – = TOE-OUT A < B = Positive figure: + = TOE-INNOTE
AXLE GEOMETRY
Measurements at reference height (compress the suspension to obtain the calculated values).
Vehicles all engine versions (except CRD (*))
Front axle Rear axle
Vehicle Tracking CastorPivot angleCamber Tracking Camber
Adjustable Yes No
ALL TYPES- 1 ± 1 mm3,7 ± 1,3 mm
- 0°18’ à 0°0’2°56’ ± 18’ 10°25’ ± 30’ 0°07’ ± 30’
- 0°33’ ± 0°12’- 1°14’ ± 18’
XSARA PICASSO
B3CP02UC
Angl.-t2-page361-397-2005 9/01/06 10:22 Page 392
Page 399 of 462
Downloaded from www.Manualslib.com manuals search engine 393
AXLES
SUSPENSION
STEERING
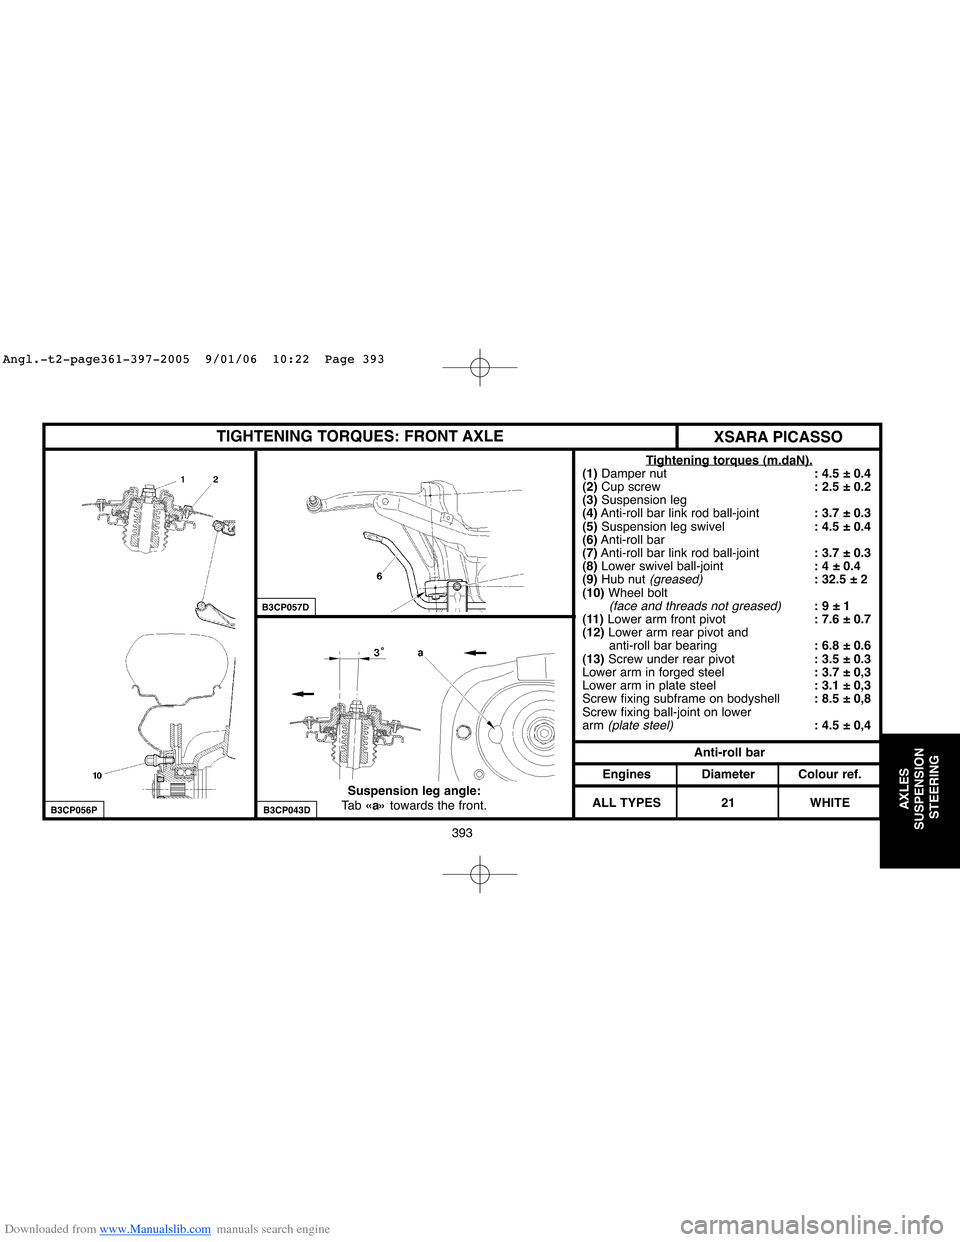
TIGHTENING TORQUES: FRONT AXLE
Tightening torques (m.daN).(1) Damper nut: 4.5 ± 0.4
(2)Cup screw: 2.5 ± 0.2
(3)Suspension leg
(4)Anti-roll bar link rod ball-joint: 3.7 ± 0.3
(5)Suspension leg swivel: 4.5 ± 0.4
(6)Anti-roll bar
(7)Anti-roll bar link rod ball-joint: 3.7 ± 0.3
(8)Lower swivel ball-joint: 4 ± 0.4
(9)Hub nut
(greased): 32.5 ± 2
(10)Wheel bolt
(face and threads not greased): 9 ± 1
(11) Lower arm front pivot: 7.6 ± 0.7
(12) Lower arm rear pivot and
anti-roll bar bearing: 6.8 ± 0.6
(13) Screw under rear pivot : 3.5 ± 0.3
Lower arm in forged steel : 3.7 ± 0,3
Lower arm in plate steel: 3.1 ± 0,3
Screw fixing subframe on bodyshell: 8.5 ± 0,8
Screw fixing ball-joint on lower
arm
(plate steel): 4.5 ± 0,4
Anti-roll bar
Engines
ALL TYPESDiameter
21Colour ref.
WHITE Suspension leg angle:
Ta b«a»towards the front.
B3CP056P
B3CP057D
B3CP043D
XSARA PICASSO
Angl.-t2-page361-397-2005 9/01/06 10:22 Page 393
Page 400 of 462
Downloaded from www.Manualslib.com manuals search engine 394
AXLES
SUSPENSION
STEERING
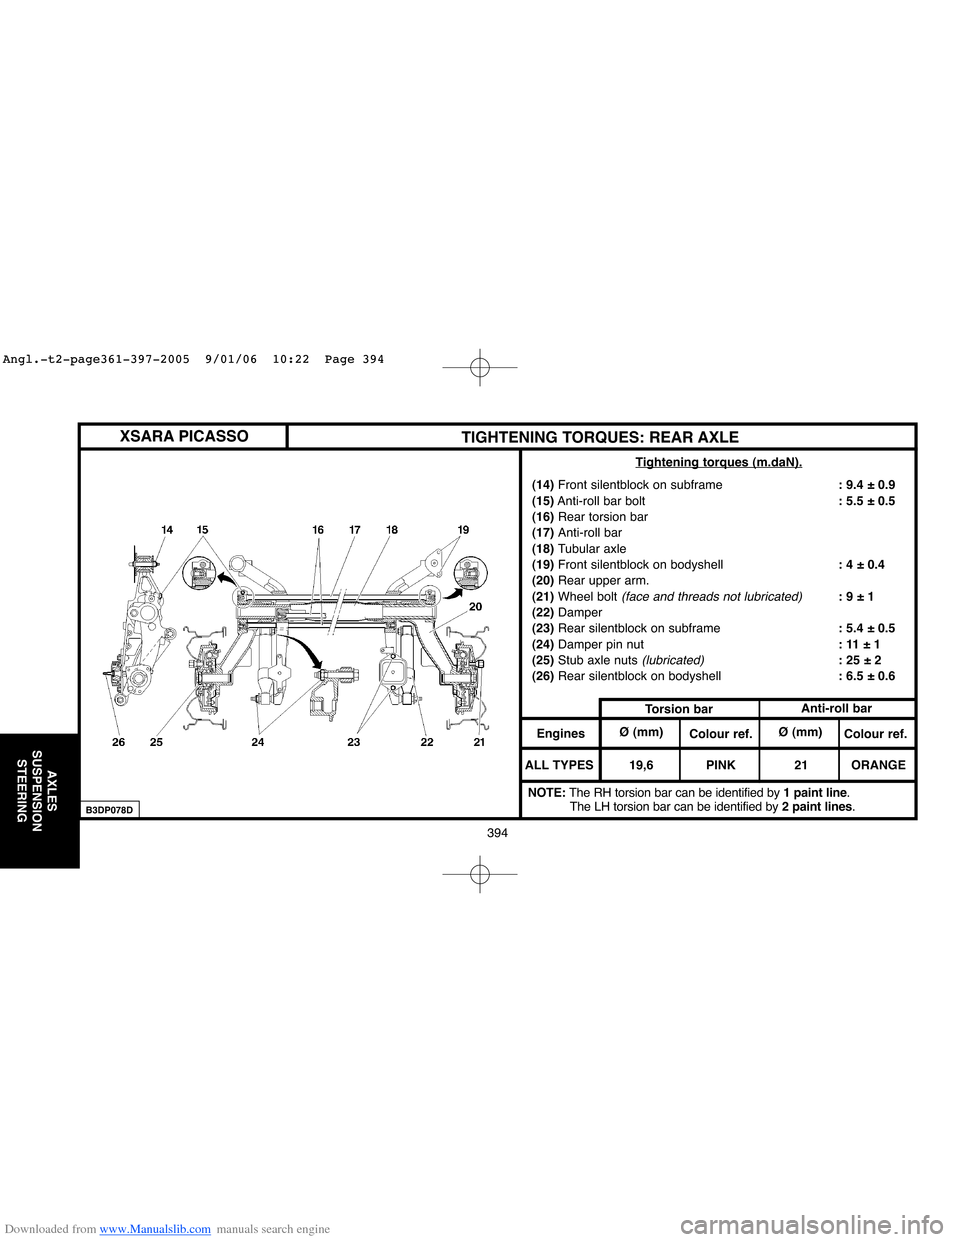
TIGHTENING TORQUES: REAR AXLE
Tightening torques (m.daN).
(14)Front silentblock on subframe: 9.4 ± 0.9
(15)Anti-roll bar bolt: 5.5 ± 0.5
(16)Rear torsion bar
(17) Anti-roll bar
(18) Tubular axle
(19)Front silentblock on bodyshell: 4 ± 0.4
(20)Rear upper arm.
(21)Wheel bolt
(face and threads not lubricated): 9 ± 1
(22)Damper
(23)Rear silentblock on subframe: 5.4 ± 0.5
(24)Damper pin nut: 11 ± 1
(25)Stub axle nuts
(lubricated): 25 ± 2
(26)Rear silentblock on bodyshell: 6.5 ± 0.6
Anti-roll bar
Torsion bar
Engines
ALL TYPES 19,6 PINKØ (mm)
Colour ref.Ø (mm)
21Colour ref.
ORANGE
B3DP078D
NOTE: The RH torsion bar can be identified by 1 paint line.
The LH torsion bar can be identified by 2 paint lines.
XSARA PICASSO
Angl.-t2-page361-397-2005 9/01/06 10:22 Page 394