ad blue CITROEN BERLINGO VAN 2019 User Guide
[x] Cancel search | Manufacturer: CITROEN, Model Year: 2019, Model line: BERLINGO VAN, Model: CITROEN BERLINGO VAN 2019Pages: 324, PDF Size: 9.41 MB
Page 26 of 324
24
Instruments
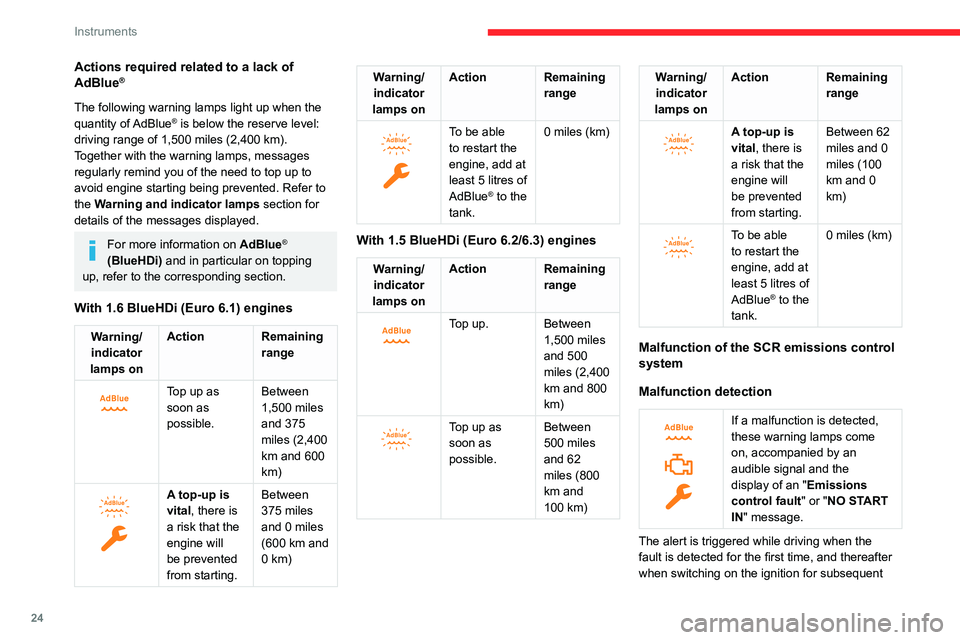
Actions required related to a lack of
AdBlue®
The following warning lamps light up when the
quantity of AdBlue® is below the reserve level:
driving range of 1,500 miles (2,400 km).
Together with the warning lamps, messages
regularly remind you of the need to top up to
avoid engine starting being prevented. Refer to
the Warning and indicator lamps section for
details of the messages displayed.
For more information on AdBlue®
(BlueHDi) and in particular on topping
up, refer to the corresponding section.
With 1.6 BlueHDi (Euro 6.1) engines
Warning/ indicator
lamps on Action Remaining
range
Top up as
soon as
possible.Between
1,500 miles
and 375
miles (2,400
km and 600
km)
A top-up is
vital, there is
a risk that the
engine will
be prevented
from starting.Between
375 miles
and 0 miles
(600 km and
0 km)
Warning/
indicator
lamps on Action Remaining
range
To be able
to restart the
engine, add at
least 5 litres of
AdBlue
® to the
tank. 0 miles (km)
With 1.5 BlueHDi (Euro 6.2/6.3) engines
Warning/
indicator
lamps on Action Remaining
range
Top up. Between 1,500 miles
and 500
miles (2,400
km and 800
km)
Top up as
soon as
possible.Between
500 miles
and 62
miles (800
km and
100
km)
Warning/indicator
lamps on Action Remaining
range
A top-up is
vital, there is
a risk that the
engine will
be prevented
from starting.Between 62
miles and 0
miles (100
km and 0
km)
To be able
to restart the
engine, add at
least 5 litres of
AdBlue
® to the
tank. 0 miles (km)
Malfunction of the SCR emissions control
system
Malfunction detection
If a malfunction is detected,
these warning lamps come
on, accompanied by an
audible signal and the
display of an "
Emissions
control
fault" or "NO START
IN" message.
The alert is triggered while driving when the
fault is detected for the first time, and thereafter
when switching on the ignition for subsequent
Page 27 of 324
25
Instruments
1journeys, for as long as the cause of the fault
persists.
If the fault is temporary, the alert
disappears during the next journey, after
self-diagnostic checks of the SCR emissions
control system.
Malfunction confirmed during the
permitted driving phase (between 685
miles and 0
miles (1,100 km and 0 km))
If the fault indication is still displayed
permanently after 31 miles (50 km) of driving, the
fault in the SCR system is confirmed.
The AdBlue warning lamp flashes and
a message is displayed (" Emissions
control
fault: starting prevented in X miles
(kms)" or "NO START IN X miles (kms)"),
indicating the driving range in miles or
kilometres.
While driving, the message is displayed every 30
seconds. The alert is repeated when switching
on the ignition.
You can continue driving for up to 685 miles
(1,100
km) before the engine starting
prevention system is triggered.
Have it checked by a CITROËN dealer or
a qualified workshop.
Starting prevented
Every time the ignition is switched on, the
message "Emissions control fault: Starting
prevented" or "NO START IN" is displayed.
To restart the engine
Contact a CITROËN dealer or a qualified
workshop.
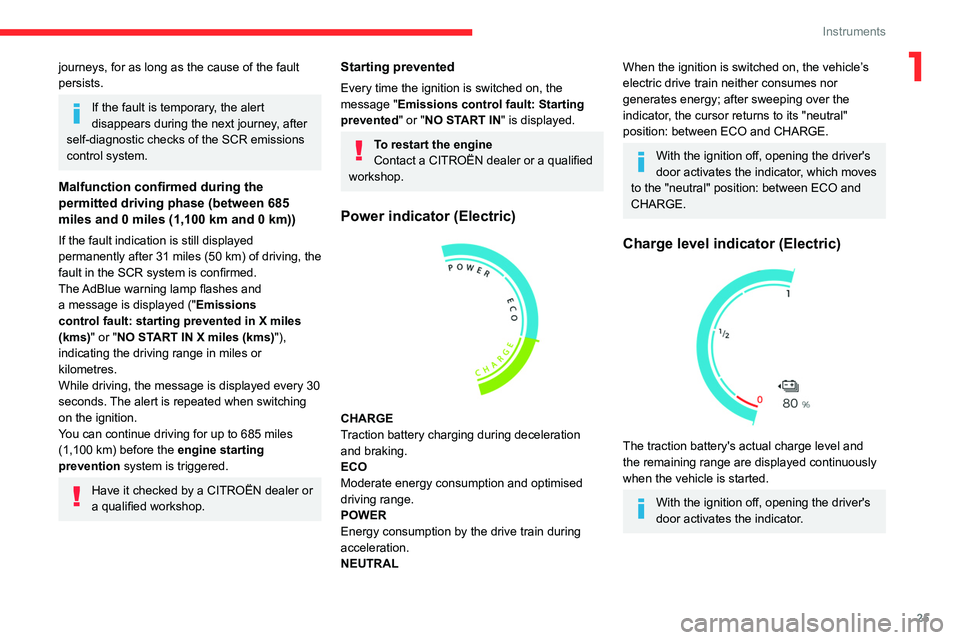
Power indicator (Electric)
CHARGE
Traction battery charging during deceleration
and braking.
ECO
Moderate energy consumption and optimised
driving range.
POWER
Energy consumption by the drive train during
acceleration.
NEUTRAL
When the ignition is switched on, the vehicle’s
electric drive train neither consumes nor
generates energy; after sweeping over the
indicator, the cursor returns to its "neutral"
position: between ECO and CHARGE.
With the ignition off, opening the driver's
door activates the indicator, which moves
to the "neutral" position: between ECO and
CHARGE.
Charge level indicator (Electric)
The traction battery's actual charge level and
the remaining range are displayed continuously
when the vehicle is started.
With the ignition off, opening the driver's
door activates the indicator.
Page 29 of 324
27
Instruments
1With digital instrument
panel
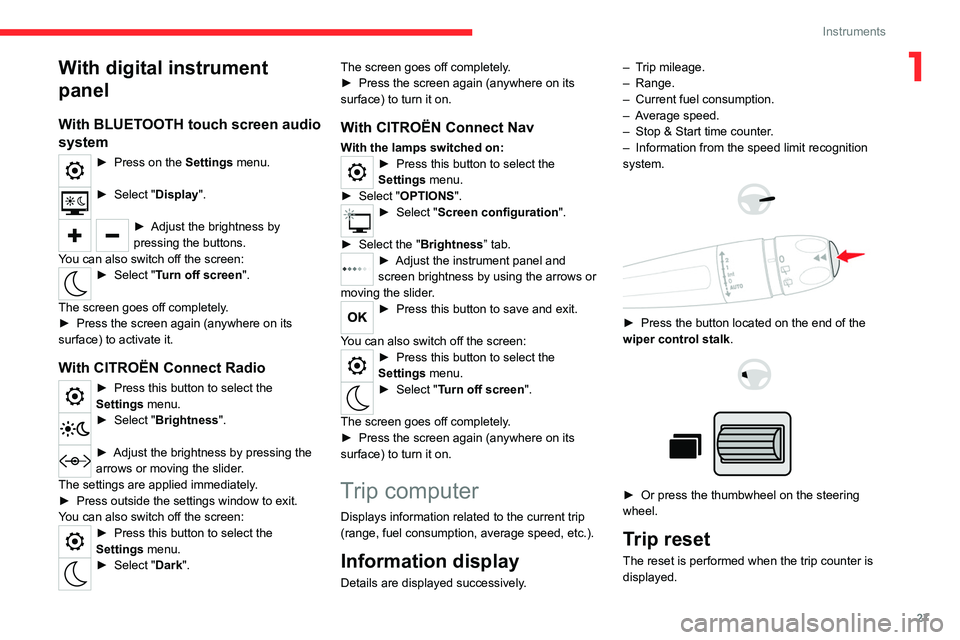
With BLUETOOTH touch screen audio
system
► Press on the Settings menu.
► Select "Display".
► Adjust the brightness by
pressing the buttons.
You can also switch off the screen:
► Select " Turn off screen".
The screen goes off completely.
►
Press the screen again (anywhere on its
surface) to activate it.
With CITROËN Connect Radio
► Press this button to select the
Settings menu.
► Select " Brightness".
► Adjust the brightness by pressing the
arrows or moving the slider .
The settings are applied immediately.
►
Press outside the settings window to exit.
Y
ou can also switch off the screen:
► Press this button to select the
Settings menu.
► Select " Dark". The screen goes off completely.
►
Press the screen again (anywhere on its
surface) to turn it on.
With CITROËN Connect Nav
With the lamps switched on:► Press this button to select the
Settings menu.
►
Select "
OPTIONS".
► Select " Screen configuration".
►
Select the "
Brightness” tab.
► Adjust the instrument panel and
screen brightness by using the arrows or
moving the slider
.
► Press this button to save and exit.
You can also switch off the screen:
► Press this button to select the
Settings menu.
► Select " Turn off screen".
The screen goes off completely.
►
Press the screen again (anywhere on its
surface) to turn it on.
Trip computer
Displays information related to the current trip
(range, fuel consumption, average speed, etc.).
Information display
Details are displayed successively. –
T
rip mileage.
– Range.
–
Current fuel consumption.
–
A
verage speed.
–
Stop & Start time counter
.
–
Information from the speed limit recognition
system.
► Press the button located on the end of the
wiper control stalk .
► Or press the thumbwheel on the steering
wheel.
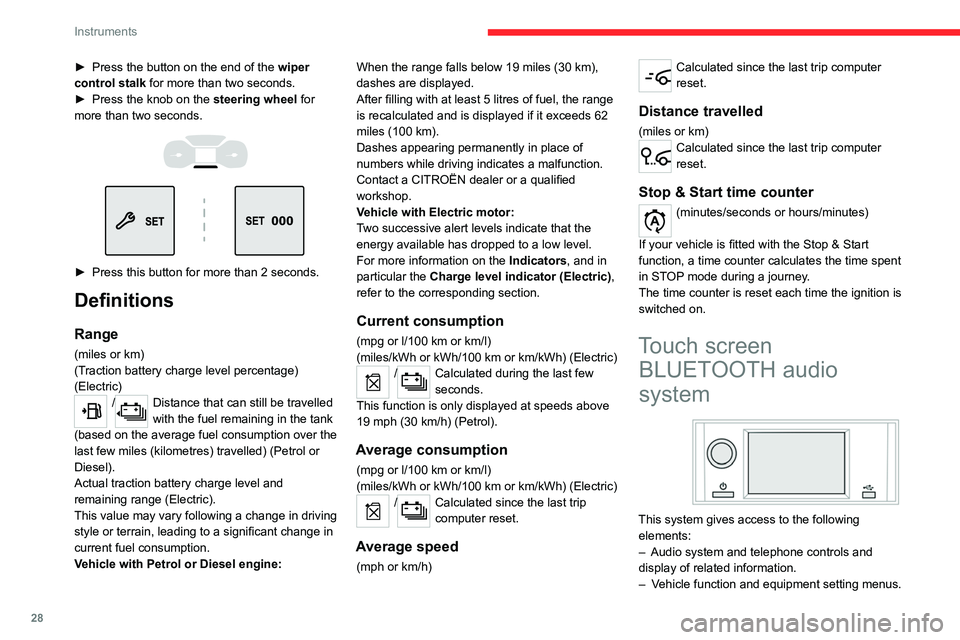
Trip reset
The reset is performed when the trip counter is
displayed.
Page 30 of 324
28
Instruments
► Press the button on the end of the wiper
control stalk for more than two seconds.
►
Press the knob on the
steering wheel for
more than two seconds.
► Press this button for more than 2 seconds.
Definitions
Range
(miles or km)
(Traction battery charge level percentage)
(Electric)
/Distance that can still be travelled
with the fuel remaining in the tank
(based on the average fuel consumption over the
last few miles (kilometres) travelled) (Petrol or
Diesel).
Actual traction battery charge level and
remaining range (Electric).
This value may vary following a change in driving
style or terrain, leading to a significant change in
current fuel consumption.
Vehicle with Petrol or Diesel engine: When the range falls below 19 miles (30
km),
dashes are displayed.
After filling with at least 5 litres of fuel, the range
is recalculated and is displayed if it exceeds 62
miles (100 km).
Dashes appearing permanently in place of
numbers while driving indicates a malfunction.
Contact a CITROËN dealer or a qualified
workshop.
Vehicle with Electric motor:
Two successive alert levels indicate that the
energy available has dropped to a low level.
For more information on the Indicators, and in
particular the Charge level indicator (Electric),
refer to the corresponding section.
Current consumption
(mpg or l/100 km or km/l)
(miles/kWh or kWh/100 km or km/kWh) (Electric)
/Calculated during the last few
seconds.
This function is only displayed at speeds above
19 mph (30
km/h) (Petrol).
Average consumption
(mpg or l/100 km or km/l)
(miles/kWh or kWh/100 km or km/kWh) (Electric)
/Calculated since the last trip
computer reset.
Average speed
(mph or km/h)
Calculated since the last trip computer
reset.
Distance travelled
(miles or km)Calculated since the last trip computer
reset.
Stop & Start time counter
(minutes/seconds or hours/minutes)
If your vehicle is fitted with the Stop & Start
function, a time counter calculates the time spent
in STOP mode during a journey.
The time counter is reset each time the ignition is
switched on.
Touch screen BLUETOOTH audio
system
This system gives access to the following
elements:
–
Audio system and telephone controls and
display of
related information.
–
V
ehicle function and equipment setting menus.
Page 31 of 324
29
Instruments
1– Air conditioning system controls (depending
on version).
For safety reasons, always stop the
vehicle before performing operations
that require sustained attention.
Some functions are not accessible while
driving.
Recommendations
Do not use pointed objects on the touch screen.
Do not touch the touch screen with wet hands.
Use a soft, clean cloth to clean the touch screen.
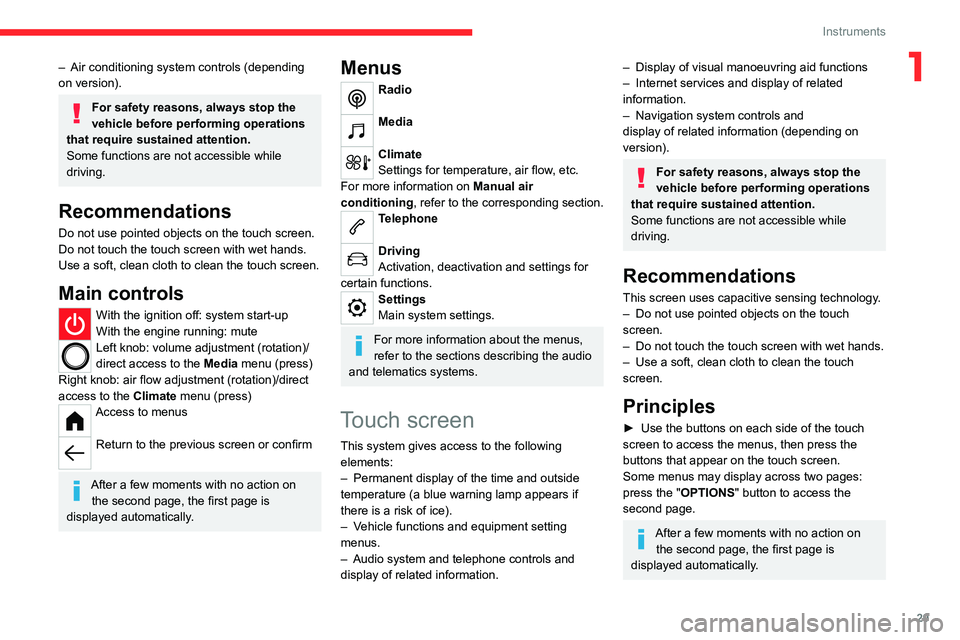
Main controls
With the ignition off: system start-up
With the engine running: mute
Left knob: volume adjustment (rotation)/
direct access to the Media menu (press)
Right knob: air flow adjustment (rotation)/direct
access to the Climate menu (press)
Access to menus
Return to the previous screen or confirm
After a few moments with no action on
the second page, the first page is
displayed automatically.
Menus
Radio
Media
Climate
Settings for temperature, air flow, etc.
For more information on Manual air
conditioning , refer to the corresponding section.
Telephone
Driving
Activation, deactivation and settings for
certain functions.
Settings
Main system settings.
For more information about the menus,
refer to the sections describing the audio
and telematics systems.
Touch screen
This system gives access to the following elements:
–
Permanent display of the time and outside
temperature (a blue warning lamp appears if
there is a risk of ice).
–
V
ehicle functions and equipment setting
menus.
–
Audio system and telephone controls and
display of related information.
– Display of visual manoeuvring aid functions
– Internet services and display of related
information.
–
Navigation system controls and
display
of related information (depending on
version).
For safety reasons, always stop the
vehicle before performing operations
that require sustained attention.
Some functions are not accessible while
driving.
Recommendations
This screen uses capacitive sensing technology.
– Do not use pointed objects on the touch
screen.
–
Do not touch the touch screen with wet hands.
–
Use a soft, clean cloth to clean the touch
screen.
Principles
► Use the buttons on each side of the touch
screen to access the menus, then press the
buttons that appear on the touch screen.
Some menus may display across two pages:
press the "OPTIONS" button to access the
second page.
After a few moments with no action on the second page, the first page is
displayed automatically.
Page 32 of 324
30
Instruments
To deactivate/activate a function, select "OFF"
or "ON".
Configuring a function
Access to additional information on the function
Confirm
Return to the previous page or confirm
Menus
Press the touch screen with three fingers
to show all of the menu buttons.
For more information about the menus,
refer to the sections describing the audio
and telematics systems.
Radio/Media
Navigation (Depending on equipment)
Driving or Vehicle (Depending on
equipment)
Activation, deactivation and settings for certain
functions.
The functions are organised in 2 tabs: " Driving
functions" and "Vehicle settings".
Telephone
Applications Display of available connected services.
Energy (with CITROËN Connect Nav)
Access the specific Electric functions
(energy flow, consumption statistics, deferred
charge) organised in the corresponding 3 tabs.
or
Settings
Main settings for the audio system and
touch
screen.
Audio system on/off Volume adjustment/mute
Upper bar
Certain information is displayed permanently in
the upper bar of the touch screen:
–
T
ime and outside temperature (a blue warning
lamp appears if there is a risk of ice).
–
Reminder of information from the
RadioMedia
and Telephone menus and
navigation instructions (depending on
equipment).
–
Notifications.
– Access to the Settings.
Energy menu
This menu is only available with CITROËN
Connect Nav .
Depending on version, this is accessible either:
– directly, by pressing the button near the
touch screen.
– via the Applications menu.
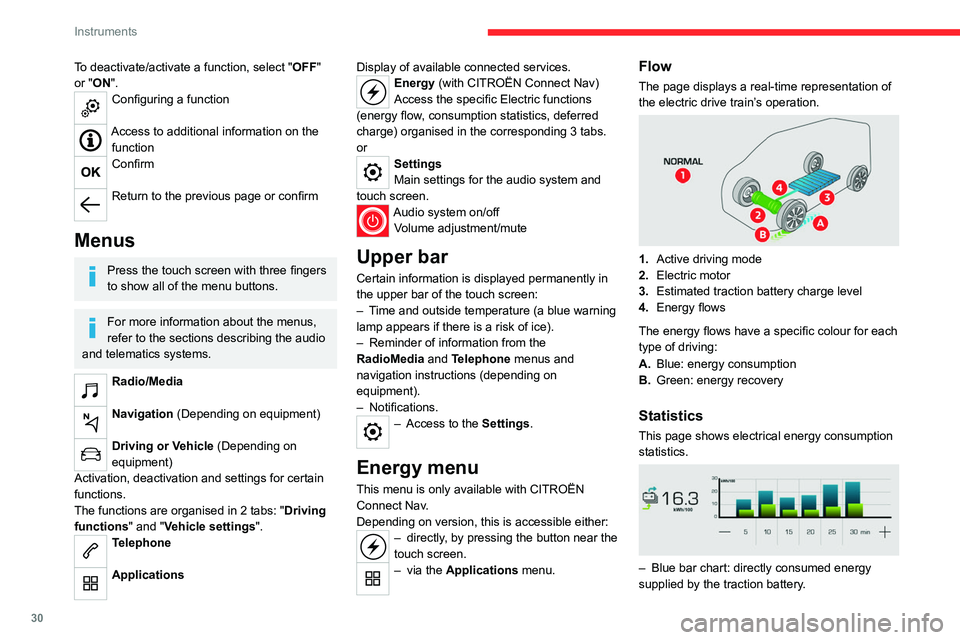
Flow
The page displays a real-time representation of
the electric drive train’s operation.
1.Active driving mode
2. Electric motor
3. Estimated traction battery charge level
4. Energy flows
The energy flows have a specific colour for each
type of driving:
A. Blue: energy consumption
B. Green: energy recovery
Statistics
This page shows electrical energy consumption
statistics.
– Blue bar chart: directly consumed energy
supplied by the traction battery .
Page 33 of 324
31
Instruments
1– Green bar chart: energy recovered during
deceleration and braking, used to recharge the
battery
.
The average result for the current trip is stated in
kWh/100
km.
►
Y
ou can change the displayed time scale by
pressing the
-
or + buttons.
A current trip is any trip of more than 20 minutes without switching off the ignition.
Charging
This page allows you to programme deferred
charging.
For more information on Charging the traction
battery (Electric) , refer to the corresponding
section.
Setting the date and time
Without audio system
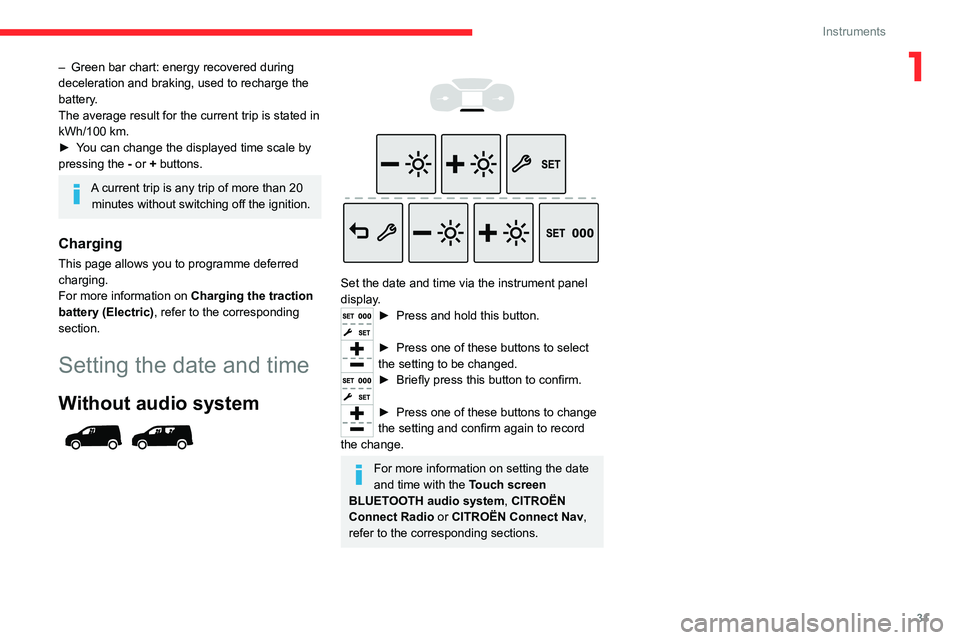
Set the date and time via the instrument panel
display.
► Press and hold this button.
► Press one of these buttons to select
the setting to be changed.
► Briefly press this button to confirm.
► Press one of these buttons to change
the setting and confirm again to record
the change.
For more information on setting the date
and time with the Touch screen
BLUETOOTH audio system, CITROËN
Connect Radio or CITROËN Connect Nav,
refer to the corresponding sections.
Page 165 of 324
163
Driving
6bicycle carrier is connected to a towing device
installed in accordance with the
manufacturer's recommendations.
In this case, the outline of a trailer is displayed
at the rear of the image of the vehicle.
The parking sensors are deactivated while the
Park Assist function is measuring a space.
For more information on the Park
Assist
function, refer to the corresponding
section.
Operating limits
If the boot is heavily loaded, the vehicle may tilt,
affecting distance measurements.
Malfunction
In the event of a malfunction when
changing into reverse gear, this warning
lamp lights up on the instrument panel,
accompanied by the display of a message and
an audible signal (short beep).
Have it checked by a CITROËN dealer or a
qualified workshop.
Reversing camera
For more information, refer to the
General recommendations on the use
of driving and manoeuvring aids .With the ignition on, this system uses a camera
located near the third brake lamp to display
a view of the rear of your vehicle on the
reproduction screen (if it is a panel van or has a
solid partition).
The reversing camera is activated automatically
when reverse gear is engaged. The image
is displayed on the reproduction screen. The
reproduction screen switches off when the
gearbox is in neutral or in a forward gear.
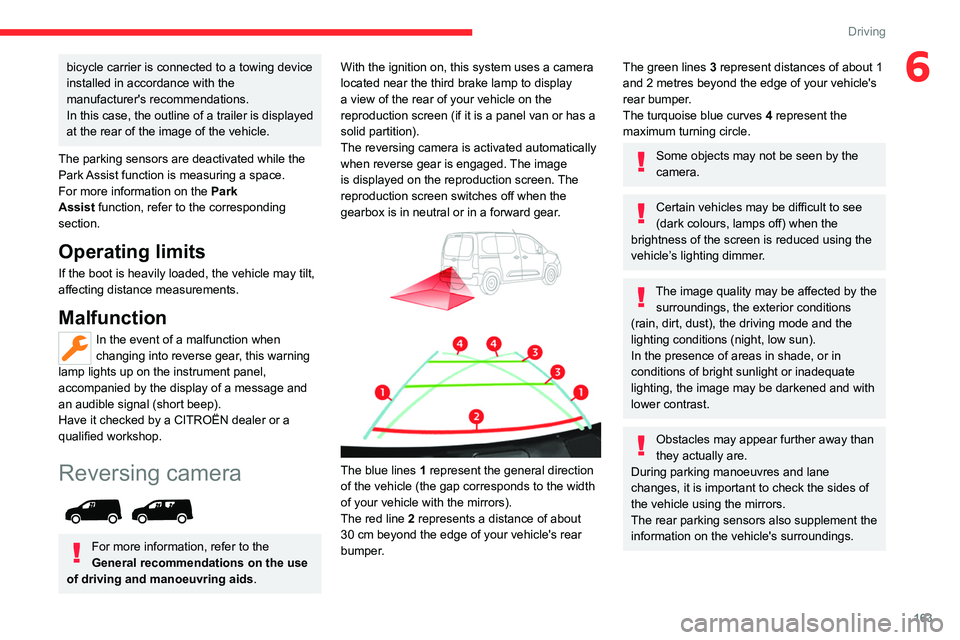
The blue lines 1 represent the general direction
of the vehicle (the gap corresponds to the width
of your vehicle with the mirrors).
The red line 2 represents a distance of about
30
cm beyond the edge of your vehicle's rear
bumper.
The green lines 3 represent distances of about 1
and 2 metres beyond the edge of your vehicle's
rear bumper.
The turquoise blue curves 4 represent the
maximum turning circle.
Some objects may not be seen by the
camera.
Certain vehicles may be difficult to see
(dark colours, lamps off) when the
brightness of the screen is reduced using the
vehicle’s lighting dimmer.
The image quality may be affected by the surroundings, the exterior conditions
(rain, dirt, dust), the driving mode and the
lighting conditions (night, low sun).
In the presence of areas in shade, or in
conditions of bright sunlight or inadequate
lighting, the image may be darkened and with
lower contrast.
Obstacles may appear further away than
they actually are.
During parking manoeuvres and lane
changes, it is important to check the sides of
the vehicle using the mirrors.
The rear parking sensors also supplement the
information on the vehicle's surroundings.
Page 167 of 324
165
Driving
6
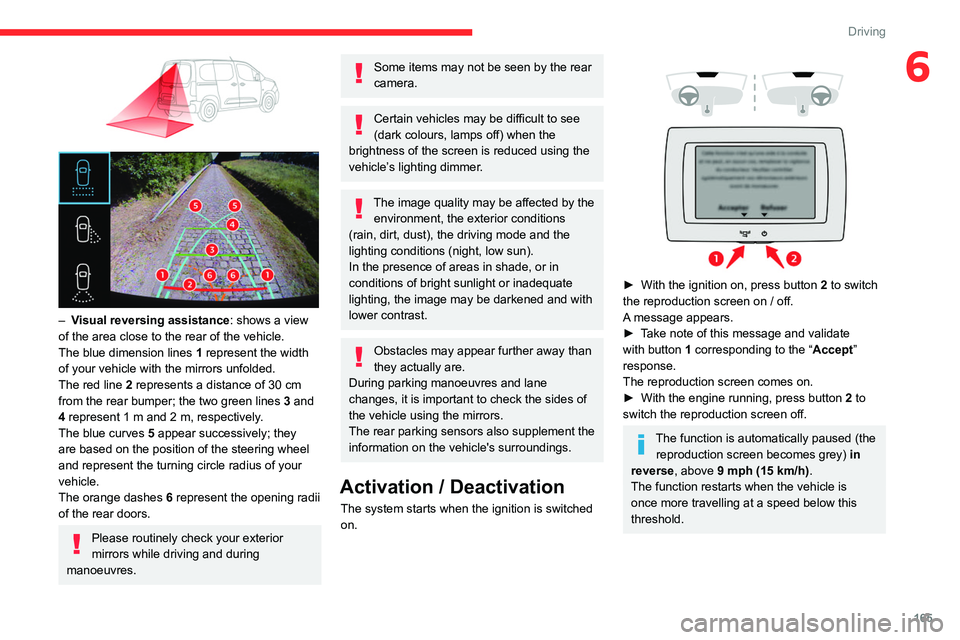
– Visual reversing assistance : shows a view
of the area close to the rear of the vehicle.
The blue dimension lines 1 represent the width
of your vehicle with the mirrors unfolded.
The red line 2 represents a distance of 30
cm
from the rear bumper; the two green lines 3 and
4 represent 1
m and 2 m, respectively.
The blue curves 5 appear successively; they
are based on the position of the steering wheel
and represent the turning circle radius of your
vehicle.
The orange dashes 6 represent the opening radii
of the rear doors.
Please routinely check your exterior
mirrors while driving and during
manoeuvres.
Some items may not be seen by the rear
camera.
Certain vehicles may be difficult to see
(dark colours, lamps off) when the
brightness of the screen is reduced using the
vehicle’s lighting dimmer.
The image quality may be affected by the environment, the exterior conditions
(rain, dirt, dust), the driving mode and the
lighting conditions (night, low sun).
In the presence of areas in shade, or in
conditions of bright sunlight or inadequate
lighting, the image may be darkened and with
lower contrast.
Obstacles may appear further away than
they actually are.
During parking manoeuvres and lane
changes, it is important to check the sides of
the vehicle using the mirrors.
The rear parking sensors also supplement the
information on the vehicle's surroundings.
Activation / Deactivation
The system starts when the ignition is switched
on.
► With the ignition on, press button 2 to switch
the reproduction screen on / off.
A message appears.
►
T
ake note of this message and validate
with button 1 corresponding to the “ Accept”
response.
The reproduction screen comes on.
►
With the engine running, press button 2
to
switch the reproduction screen off.
The function is automatically paused (the reproduction screen becomes grey) in
reverse , above 9 mph (15
km/h).
The function restarts when the vehicle is
once more travelling at a speed below this
threshold.
Page 170 of 324
168
Driving
AUTO mode
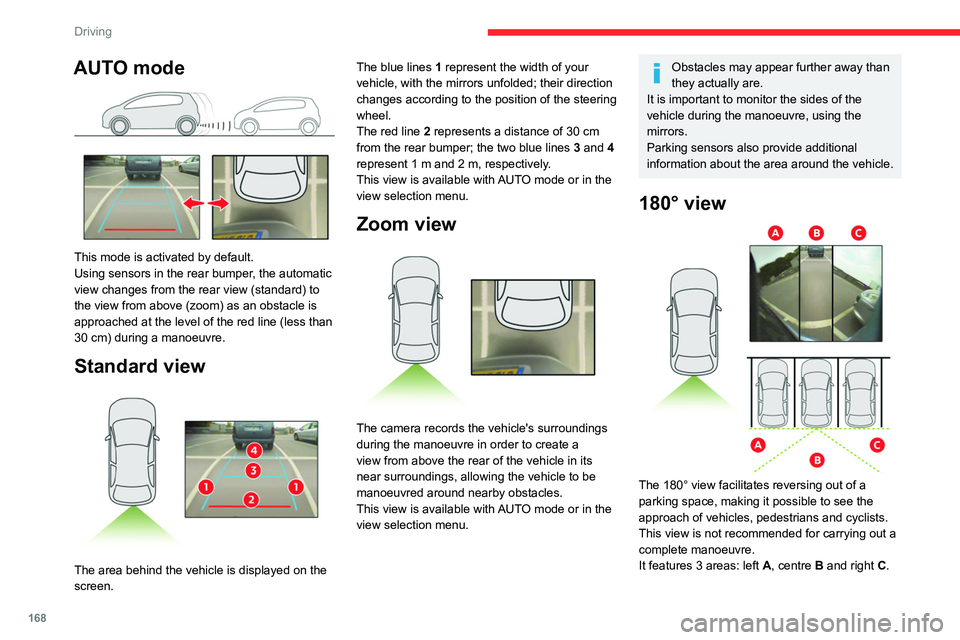
This mode is activated by default.
Using sensors in the rear bumper, the automatic
view changes from the rear view (standard) to
the view from above (zoom) as an obstacle is
approached at the level of the red line (less than
30 cm) during a manoeuvre.
Standard view
The area behind the vehicle is displayed on the
screen. The blue lines
1 represent the width of your
vehicle, with the mirrors unfolded; their direction
changes according to the position of the steering
wheel.
The red line 2 represents a distance of 30 cm
from the rear bumper; the two blue lines 3 and 4
represent 1 m and 2 m, respectively.
This view is available with AUTO mode or in the
view selection menu.
Zoom view
The camera records the vehicle's surroundings
during the manoeuvre in order to create a
view from above the rear of the vehicle in its
near surroundings, allowing the vehicle to be
manoeuvred around nearby obstacles.
This view is available with AUTO mode or in the
view selection menu.
Obstacles may appear further away than
they actually are.
It is important to monitor the sides of the
vehicle during the manoeuvre, using the
mirrors.
Parking sensors also provide additional
information about the area around the vehicle.
180° view
The 180° view facilitates reversing out of a
parking space, making it possible to see the
approach of vehicles, pedestrians and cyclists.
This view is not recommended for carrying out a
complete manoeuvre.
It features 3 areas: left A, centre B and right C.