light CITROEN BERLINGO VAN 2021 Handbook (in English)
[x] Cancel search | Manufacturer: CITROEN, Model Year: 2021, Model line: BERLINGO VAN, Model: CITROEN BERLINGO VAN 2021Pages: 260, PDF Size: 7.57 MB
Page 43 of 260

41
Ease of use and comfort
3Heated mirrors
► Press this button.
For more information on Rear screen
demisting/defrosting , refer to the
corresponding section.
Interior rear view mirror
Equipped with an anti-dazzle system, which
darkens the mirror glass and reduces the
nuisance to the driver caused by the sun,
headlamps of other vehicles, etc.
Manual model
Day/night position
► Pull the lever to change to the anti-dazzle
"night” position.
►
Push the lever to change to the normal "day"
position.
Adjustment
►
Set the mirror to the normal “day” position.
Automatic "electrochrome" model
This system automatically and gradually
transitions between day and night use, with the
aid of a sensor that measures the light arriving
from the rear of the vehicle.
To ensure optimum visibility while manoeuvring, the mirror lightens
automatically when reverse gear is engaged.
Child-monitoring mirror
A child-monitoring mirror is installed above
the interior rear view mirror. It allows the
vehicle's rear passengers to be observed and
facilitates discussion between the front and rear
passengers without changing the mirror setting
and without turning around. It can be folded
easily to avoid dazzle.
Rear bench seat (row 2)
Folding the backrests
First steps:
► lower the head restraints,
►
if necessary
, move the front seats forward,
►
check that nothing or no person might
interfere with the folding of the backrests
(clothing, luggage, etc.),
►
check that the outer seat belts are lying flat
on the backrests.
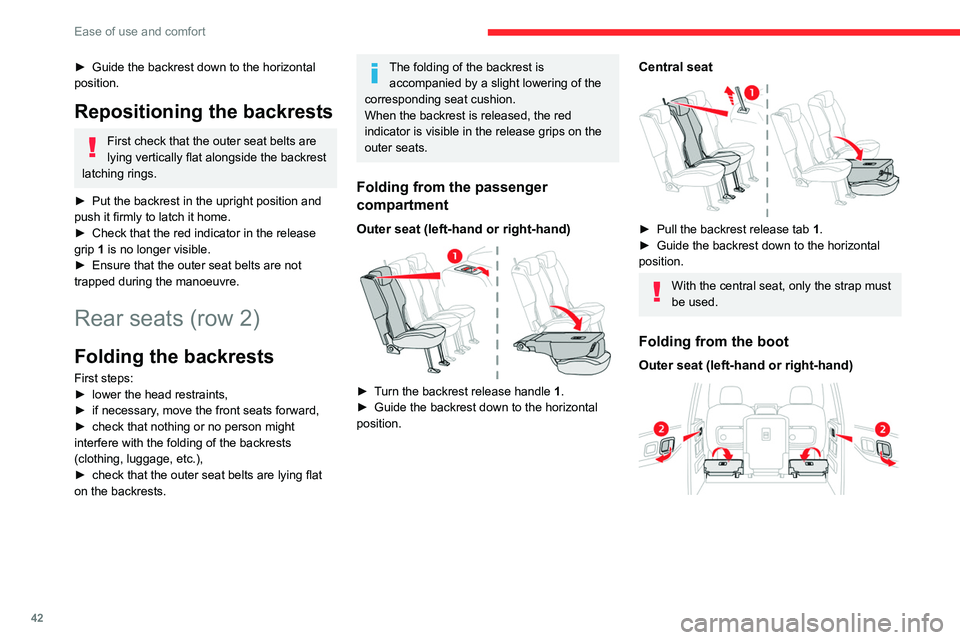
The folding of the backrest is accompanied by a slight lowering of the
corresponding seat cushion.
When the backrest is released, the red
indicator is visible in the release grips on the
outer seats.
► Turn the backrest release handle 1.
Page 44 of 260
42
Ease of use and comfort
Central seat
► Pull the backrest release paddle 2 or 3
towards you.
The backrest folds fully onto the cushion.
Repositioning the backrests
Outer seat (left-hand or right-hand)
First check that the outer seat belts are
lying vertically flat alongside the backrest
latching rings.
► Put the backrest in the upright position and
push it firmly to latch it home.
► Check that the red indicator on the release
grips 1 of the outer seats is no longer visible.
► Ensure that the outer seat belts are not
trapped during the manoeuvre.
Check that the backrest of the upright
central seat is correctly aligned with the
backrests of the outer seats.
► Guide the backrest down to the horizontal
position.
Repositioning the backrests
First check that the outer seat belts are
lying vertically flat alongside the backrest
latching rings.
►
Put the backrest in the upright position and
push it firmly to latch it home.
►
Check that the red indicator in the release
grip
1 is no longer visible.
►
Ensure that the outer seat belts are not
trapped during the manoeuvre.
Rear seats (row 2)
Folding the backrests
First steps:
► lower the head restraints,
►
if necessary
, move the front seats forward,
►
check that nothing or no person might
interfere with the folding of the backrests
(clothing, luggage, etc.),
►
check that the outer seat belts are lying flat
on the backrests.
The folding of the backrest is accompanied by a slight lowering of the
corresponding seat cushion.
When the backrest is released, the red
indicator is visible in the release grips on the
outer seats.
Folding from the passenger
compartment
Outer seat (left-hand or right-hand)
► Turn the backrest release handle 1.
► Guide the backrest down to the horizontal
position.
Central seat
► Pull the backrest release tab 1 .
► Guide the backrest down to the horizontal
position.
With the central seat, only the strap must
be used.
Folding from the boot
Outer seat (left-hand or right-hand)
Page 48 of 260
46
Ease of use and comfort
12 V accessory socket(s)
► Plug in a 12 V accessory (with a maximum
rated power of 120 W) using a suitable adapter.
Observe the maximum power rating to
avoid damaging your accessory.
The connection of an electrical device not approved by CITROËN, such as a
USB charger, may adversely affect the
operation of vehicle electrical systems,
causing faults such as poor radio reception or
interference with displays in the screens.
– Never fit one mat on top of another .
The use of mats not approved by CITROËN
may interfere with access to the pedals and
hinder the operation of the cruise control/
speed limiter.
The approved mats have two fasteners
located underneath the seat.
Roof and roof storage
Overhead storage compartment and
central storage compartment
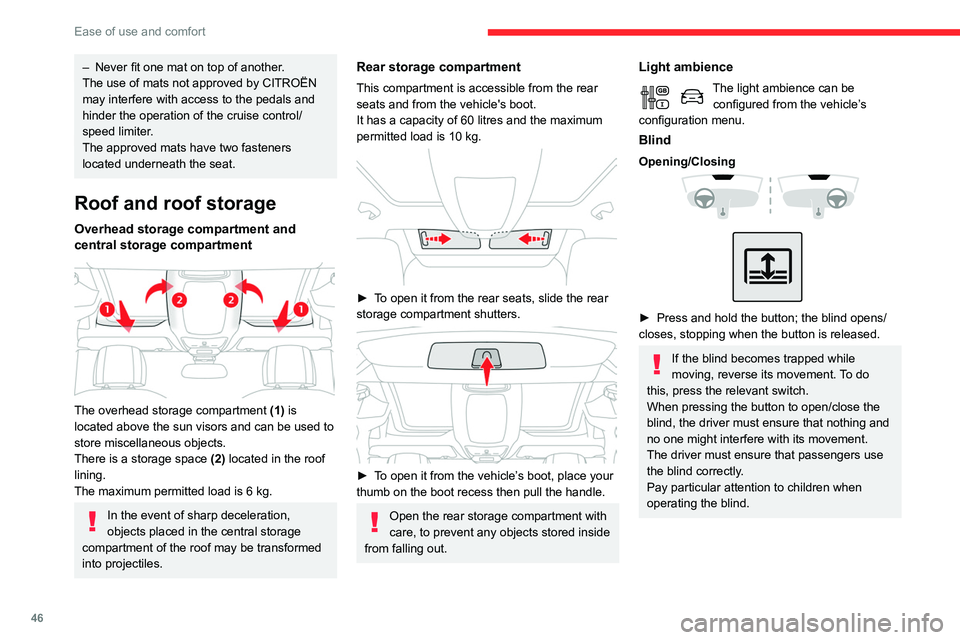
The overhead storage compartment (1) is
located above the sun visors and can be used to
store miscellaneous objects.
There is a storage space
(2)
located in the roof
lining.
The maximum permitted load is 6
kg.
In the event of sharp deceleration,
objects placed in the central storage
compartment of the roof may be transformed
into projectiles.
Rear storage compartment
This compartment is accessible from the rear
seats and from the vehicle's boot.
It has a capacity of 60 litres and the
maximum
permitted load is
10 kg.
► To open it from the rear seats, slide the rear
storage compartment shutters.
► To open it from the vehicle’s boot, place your
thumb on the boot recess then pull the handle.
Open the rear storage compartment with
care, to prevent any objects stored inside
from falling out.
Light ambience
The light ambience can be configured from the vehicle’s
configuration menu.
Blind
Opening/Closing
► Press and hold the button; the blind opens/
closes, stopping when the button is released.
If the blind becomes trapped while
moving, reverse its movement. To do
this, press the relevant switch.
When pressing the button to open/close the
blind, the driver must ensure that nothing and
no one might interfere with its movement.
The driver must ensure that passengers use
the blind correctly.
Pay particular attention to children when
operating the blind.
Page 50 of 260

48
Ease of use and comfort
If the problem persists, have the system checked
by a CITROËN dealer or a qualified workshop.
Floor boxes
There are two boxes located under the rear
passenger footwells.
► To open them, slide your fingers into the
notch and lift the cover.
Aircraft style tables
► To put the table back in place, pull it upwards.
As a safety precaution, the aircraft style table
unhooks itself if excessive pressure is applied.
Connect only one device at a time to the
socket (do not use extension leads or
multi-socket adapters).
Connect only devices with class II insulation
(shown on the device).
Do not use metal-cased devices (e.g. electric
shaver, etc.).
As a safety measure, if power consumption is high and power is
required by the vehicle's electrical system
(due to severe weather conditions, electrical
overload, etc.), power to the socket may be
cut off, in which case the green indicator lamp
goes off.
Wireless smartphone
charger
It allows wireless charging of a portable device
such as a smartphone, using the magnetic
induction principle, in accordance with the Qi 1.1
standard.
The portable device to be charged must be
compatible with the Qi standard, either by design
or by using a compatible holder or shell.
The charging area is identified by the Qi symbol.
The charger works with the engine running and
with the Stop & Start system in STOP mode.
Charging is managed by the smartphone.
With Keyless Entry and Starting, the charger’s
operation may be briefly disrupted when a door
is opened or the ignition is switched off.
Charging
► With the charging area clear , place a device
in its centre.
When the portable device is detected, the
charger’s indicator lamp lights up green. It
remains lit for the whole time that the battery is
being charged.
The system is not designed to charge multiple devices simultaneously.
Do not leave any metal objects (coins,
keys, vehicle remote control, etc.) in the
charging area while a device is being
charged, due to the risk of overheating or
interrupting the charging process.
Operating check
The state of the indicator lamp allows the
operation of the charger to be monitored.
State of the
indicator lamp Meaning
Off Engine switched off.
No compatible devices
detected.
Charging finished.
Fixed green Compatible device detected.
Charging.
Flashing orange Foreign object detected in the charging zone.
Device not well centred in
the charging zone.
Fixed orange Fault with the device's battery meter.
Device battery
temperature too high.
Charger malfunction.
If the indicator lamp is lit orange:
– remove the device, then place it back in the
centre of the charging zone.
or
–
remove the device and try again in a quarter
of an hour
.
Page 55 of 260
53
Ease of use and comfort
3Stop & Start
The heating and air conditioning systems
only operate when the engine is running.
Temporarily deactivate the Stop & Start
system to maintain a comfortable temperature
in the passenger compartment.
For more information on the Stop & Start,
refer to the corresponding section.
Heating
Manual air conditioning
The air conditioning system only operates with the engine running.
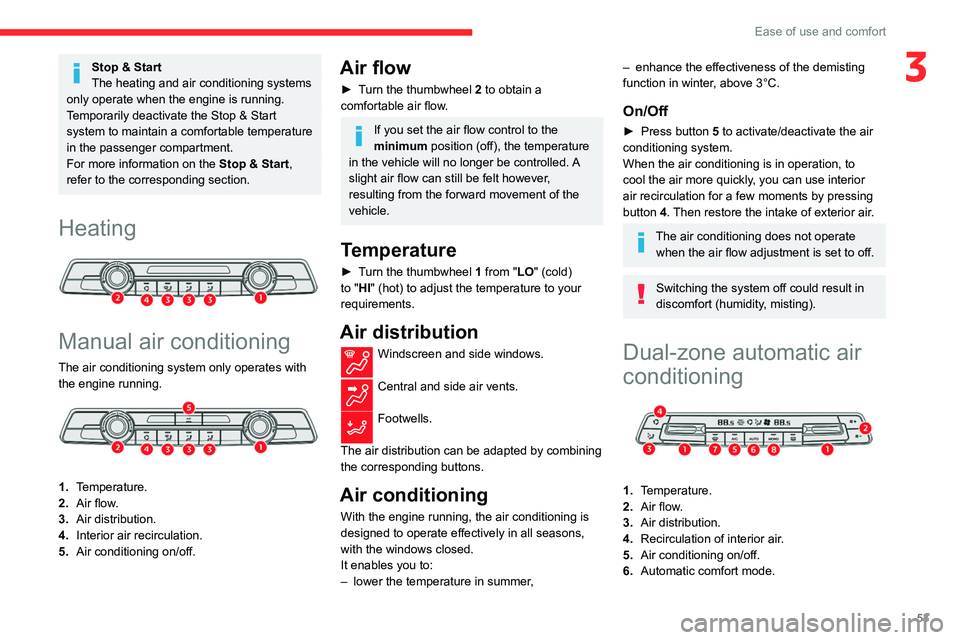
1. Temperature.
2. Air flow.
3. Air distribution.
4. Interior air recirculation.
5. Air conditioning on/off.
Air flow
► Turn the thumbwheel 2 to obtain a
comfortable air flow.
If you set the air flow control to the
minimum position (off), the temperature
in the vehicle will no longer be controlled. A
slight air flow can still be felt however,
resulting from the forward movement of the
vehicle.
Temperature
► Turn the thumbwheel 1 from "LO" (cold)
to "HI" (hot) to adjust the temperature to your
requirements.
Air distribution
Windscreen and side windows.
Central and side air vents.
Footwells.
The air distribution can be adapted by combining
the corresponding buttons.
Air conditioning
With the engine running, the air conditioning is
designed to operate effectively in all seasons,
with the windows closed.
It enables you to:
–
lower the temperature in summer
,
– enhance the effectiveness of the demisting
function in winter , above 3°C.
On/Off
► Press button 5 to activate/deactivate the air
conditioning system.
When the air conditioning is in operation, to
cool the air more quickly, you can use interior
air recirculation for a few moments by pressing
button 4. Then restore the intake of exterior air.
The air conditioning does not operate when the air flow adjustment is set to off.
Switching the system off could result in
discomfort (humidity, misting).
Dual-zone automatic air
conditioning
1. Temperature.
2. Air flow.
3. Air distribution.
4. Recirculation of interior air.
5. Air conditioning on/off.
6. Automatic comfort mode.
Page 56 of 260

54
Ease of use and comfort
► Press the “AUTO” button 6 to return to the
automatic comfort programme.
Air conditioning
With the engine running, the air conditioning is
designed to operate effectively in all seasons,
with the windows closed.
It enables you to:
– lower the temperature in summer,
– enhance the effectiveness of the demisting
function in winter, above 3°C.
On/Off
► Press button 5 to activate/deactivate the air
conditioning system.
When the air conditioning is in operation, to
cool the air more quickly, you can use interior
air recirculation for a few moments by pressing
button 4. Then restore the intake of exterior air.
The air conditioning does not operate when the air flow adjustment is set to off.
Switching the system off could result in
discomfort (humidity, misting).
Air distribution
► Pressing button 3 successively directs the air
flow towards:
– windscreen, side windows and footwells,
– footwells,
– central vents, side vents and footwells,
7. Visibility programme.
8. "Mono" function.
Automatic comfort mode
► Press the " AUTO" button 6 to toggle the
mode.
The active mode appears in the display screen,
as described below:
Ensures soft, quiet operation by limiting
air flow.
Offers the best compromise between a
comfortable temperature and quiet
operation.
Provides dynamic, effective air flow.
When the engine is cold, the air flow will
only increase to its optimum level
gradually, to avoid distributing too much cold
air.
In cold weather, it prioritises the distribution of
warm air to the windscreen, the side windows
and the footwells only.
Manual mode
If you wish, you can make a different choice from
that suggested by the system, by changing a
setting. The other functions will still be controlled
automatically.
The "AUTO" symbol disappears if you change
a setting.
Deactivating the system
► Press button 2 "-" until the fan symbol
disappears.
This disables all functions of the dual-zone
automatic air conditioning system.
The temperature is no longer regulated. A slight
flow of air can still be felt, due to the forward
movement of the vehicle.
►
Press button
2 "+" to switch the system on
again.
Temperature
The driver and front passenger can each set the
temperature to suit their preferences.
The value shown on the display is a level
of comfort, not a temperature in Celsius or
Fahrenheit.
►
Push button
1 down to decrease the value or
up to increase it.
A setting of around 21 provides optimum comfort. Depending on your
requirements, a setting between 18 and 24 is
normal.
In addition, we recommend avoiding left/right
setting differences of more than 3.
On entering the vehicle, if the interior
temperature is significantly colder or
warmer than the comfort value setting, there
is no need to alter the value displayed in
order to reach the required level of comfort.
The system compensates automatically and
corrects the temperature difference as quickly
as possible.
For maximum cooling or heating of the
passenger compartment, it is possible to
exceed the minimum value 14 or the
maximum value 28.
►
Push button
1 down until "LO" is
displayed or up until "HI" is displayed.
"Mono" function
The comfort setting for the passenger side
can be indexed to the driver's comfort setting
(mono-zone).
►
Press the corresponding button 8
to activate/
deactivate the function.
The indicator lamp in the button comes on when
the function is activated.
The function is deactivated automatically if a
passenger uses the temperature control.
Visibility programme
► Press the “ visibility” button 7 to demist or
defrost the windscreen and side windows as
quickly as possible.
The system automatically manages the air
conditioning, air flow and air intake, and provides
optimum distribution towards the windscreen and
side windows.
►
Press the “
visibility” button 8 again to stop
the programme.
Or
Page 61 of 260
59
Ease of use and comfort
3– the battery charge and the fuel level are
sufficient,
–
the engine has been started since the
previous heating cycle,
–
60
minutes have elapsed between two
heating requests.
The programmable heating is supplied by the vehicle fuel tank. Before use, make
sure that you have sufficient fuel. If the fuel
tank is on reserve, you are strongly
recommended not to program the heating.
The additional heating must always be
switched off while refuelling to avoid any risk
of fire or explosion.
To avoid the risks of poisoning or asphyxia, the programmable heating
must not be used, even for short periods, in a
closed environment such as a garage or
workshop which is not equipped with an
exhaust gas extraction system.
Do not park the vehicle on a flammable
surface (dry grass, dead leaves, paper, etc.)
- Risk of fire!
Glazed surfaces such as the rear screen
or windscreen can become very hot in
places.
Never put objects on these surfaces; never
touch these surfaces - Risk of burns!
Do not throw remote control batteries
away, as they contain metals that are
harmful to the environment. Take them to an
approved disposal point.
Courtesy lamp
Automatic switching on/off
The front courtesy lamp comes on when the key
is removed from the ignition switch.
All courtesy lamps come on when the vehicle is
unlocked, when one of the corresponding doors
is opened and when locating the vehicle using
the remote control.
They fade to off after the ignition is switched on
and when the vehicle is locked.
Take care not to allow objects to come into contact with the courtesy lamp.
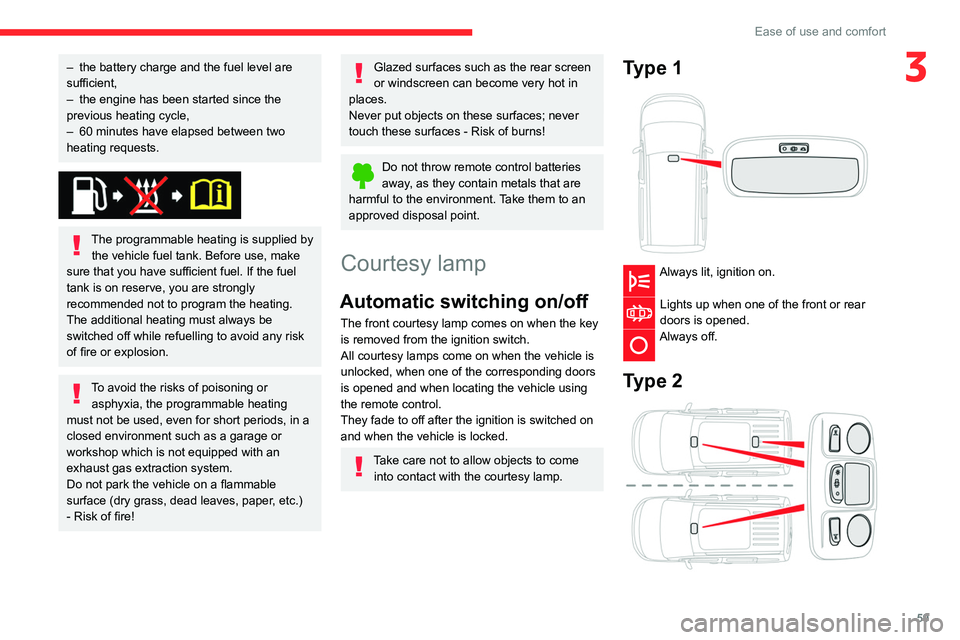
Type 1
Always lit, ignition on.
Lights up when one of the front or rear
doors is opened.
Always off.
Type 2
Page 63 of 260

61
Lighting and visibility
4Lighting control stalk
Main lighting
Automatic illumination of lamps/daytime running lamps
Sidelamps only
Dipped or main beam headlamps
Operation of the selected lighting is
confirmed by the illumination of the
corresponding indicator lamp.
In some weather conditions (e.g. low
temperature or humidity), the presence
of misting on the internal surface of the glass
of the headlamps and rear lamps is normal; it
disappears after the lamps have been on for a
few minutes.
Headlamp dipping
Pull the stalk to switch between dipped and main
beam headlamps.
In "AUTO" and sidelamps modes, the driver can
switch on the main beam headlamps temporarily
("headlamp flash") by maintaining a pull on the
stalk.
Foglamps selection ring
Rear foglamps
They operate with the sidelamps on.
►
Rotate the ring forwards to switch them on
and backwards to switch them off.
When the lighting is switched off automatically
("AUTO" position), the foglamps and the dipped
beam headlamps will remain on.
With front and rear foglamps
They operate with the dipped beam headlamps on, in manual or auto mode.
Turn and release the ring:
►
once forwards to switch on the front foglamps
and then a second time for the rear foglamps.
►
once backwards to switch off the rear
foglamps and then a second time for the front
foglamps.
If the lighting is switched off automatically
("
AUTO" position) or the dipped beam
headlamps are switched off manually, the
foglamps and sidelamps will remain on.
►
T
urn the ring backwards to switch the
foglamps off; the sidelamps will then switch off.
When the lighting is left on
An audible signal when a front door is
opened warns the driver that the vehicle's
exterior lighting is on, with the ignition off and
in manual lighting mode.
In this case, switching off the lighting stops
the audible signal.
Page 64 of 260

62
Lighting and visibility
Daytime running lamps /
Sidelamps
The front lamps light up automatically when the
engine starts.
They provide the following functions:
– Daytime running lamps (lighting control stalk in
the "AUTO" position with adequate light level).
– Sidelamps (lighting control stalk in the " AUTO"
position with low light levels or "Sidelamps only”
or "Dipped/main beam headlamps").
The LEDs are brighter when operating as daytime running lamps.
Parking lamps
Side markers for the vehicle by illumination of
the sidelamps on the traffic side only.
► Depending on version, within one minute of
switching off the ignition, operate the lighting
control stalk up or down depending on the traffic
side (for example: when parking on the left;
The lighting goes off when you switch off the
ignition, but you can always switch it on again
using the lighting control stalk.
Travelling abroad
If using your vehicle in a country that
drives on the other side of the road, the
headlamps must be adjusted to avoid
dazzling on-coming drivers.
Contact a CITROËN dealer or a qualified
workshop.
In good or rainy weather, by both day
and night, use of the front foglamps and
the rear foglamps are prohibited. In these
situations, the power of their beams may
dazzle other drivers. They should only be
used in fog or falling snow.
In these weather conditions, it is your
responsibility to switch on the foglamps and
dipped headlamps manually as the sunshine
sensor may detect sufficient light.
Switch off the front and rear foglamps when
they are no longer necessary.
Never look too closely at the luminous
beam of LED headlamps: risk of serious
eye injury.
Direction indicators
► Left or right: lower or raise the lighting control
stalk, beyond the point of resistance.
Three flashes
► Press briefly upwards or downwards, without
going beyond the point of resistance; the
direction indicators will flash 3 times.
Automatic headlamp illumination
When a low level of ambient light is detected
by a sunshine sensor, the number plate
lamps,
sidelamps and dipped beam headlamps
are switched on automatically, without any action
on the part of the driver. They can also come
on if rain is detected, at the same time as the
automatic rain sensitive wipers.
As soon as the brightness returns to a sufficient
level or after the windscreen wipers are switched
off, the lamps are switched off automatically.
► Turn the ring to the "AUTO" position. When
the function is activated, a message is also
displayed.
►
T
urn the ring to another position . An
onscreen message is displayed to confirm that
the function has been deactivated.
Malfunction
In the event of a malfunction of the
sunshine sensor, the lighting comes on
and this warning lamp is displayed in the
instrument panel, accompanied by an audible
signal and/or a message.
Contact a CITROËN dealer or a qualified
workshop.
In fog or snow, the sunshine sensor may
detect sufficient light. In this case, the
lighting will not come on automatically.
Do not cover the sunshine sensor, located on
the dashboard or at the top of the windscreen
behind the rear view mirror (depending on
equipment); the associated functions would
no longer be controlled.
Page 65 of 260

63
Lighting and visibility
4Daytime running lamps /
Sidelamps
The front lamps light up automatically when the
engine starts.
They provide the following functions:
–
Daytime running lamps (lighting control stalk in
the "
AUTO" position with adequate light level).
–
Sidelamps (lighting control stalk in the " AUT
O"
position with low light levels or "Sidelamps only”
or "Dipped/main beam headlamps").
The LEDs are brighter when operating as daytime running lamps.
Parking lamps
Side markers for the vehicle by illumination of
the sidelamps on the traffic side only.
►
Depending on version, within one minute of
switching off the ignition, operate the lighting
control stalk up or down depending on the traffic
side (for example: when parking on the left; lighting control stalk upwards; the right-hand
sidelamps come on).
This is confirmed by an audible signal and
illumination of the corresponding direction
indicator lamp in the instrument panel.
T
o switch off the parking lamps, return the
lighting control stalk to the central position.
Guide-me-home lighting
Manual
Switching on/off
► With the ignition off, "flash" the headlamps
using the lighting control stalk to switch the
function on or off.
Manual guide-me-home lighting goes off
automatically at the end of a given period of
time.
Automatic
With the ring in the "AUTO" position, when the
light is poor, the dipped beam headlamps come
on automatically when the ignition is switched
off.
The activation, deactivation and duration of guide-me-
home lighting are set in the vehicle configuration
menu.
Automatic exterior welcome lighting
With the "Automatic headlamp illumination"
function activated, when the light is poor, the
sidelamps and dipped beam headlamps come
on automatically when the vehicle is unlocked.
Activation, deactivation and
the duration of the exterior
welcome lighting are set in the vehicle
configuration menu.
Automatic headlamp dipping
This system automatically changes between
dipped and main beam headlamps according to
the brightness and driving conditions, using a
camera located at the top of the windscreen.
This system is a driving aid.
The driver remains responsible for
the vehicle's lighting, its correct use for the