wiper blades CITROEN BERLINGO VAN 2021 Handbook (in English)
[x] Cancel search | Manufacturer: CITROEN, Model Year: 2021, Model line: BERLINGO VAN, Model: CITROEN BERLINGO VAN 2021Pages: 260, PDF Size: 7.57 MB
Page 58 of 260

56
Ease of use and comfort
consumption in turn reduces fuel
consumption.
Rear screen demisting/defrosting can
only operate with the engine is running.
Rear heating and air
conditioning
If your vehicle is so equipped, the temperature of
the air distributed by the system is the same as
the selection for the front.
Air flow
► Press one of the buttons 2 to increase/
decrease the air flow.
Dual-zone automatic air
conditioning
► Press this button to demist or defrost
the windscreen and side windows more
quickly
.
The system automatically manages the air
conditioning, air flow and air intake, and provides
optimum distribution towards the windscreen and
side windows.
► To turn it off, press this button
again or press " AUTO".
The system restarts with the values in use before
it was deactivated.
Heated windscreen and washer jets
For more information on the Wiper
control stalk and in particular the heated
windscreen and washer jets, refer to the
corresponding section.
With Stop & Start, when demisting
- defrosting has been activated, STOP
mode is not available.
Heated windscreen
Depending on country of sale.
This function heats the windscreen in cold
weather.
In area 1, the heating melts ice, enabling you to
free the wiper blades.
In area 2, the heating enhances visibility by
preventing the build-up of snow while the wipers
are operating.
On/Off
► With the engine running, press this button to
activate/deactivate the function (confirmed by an
indicator lamp).
The period of operation depends on the exterior
temperature.
Rear screen demisting
- defrosting
On/Off
► Press this button to switch on/off rear
screen and door mirror defrosting (if fitted
to the vehicle).
Switch off the rear screen and door
mirror defrosting function as soon as
possible, as decreasing electrical
Page 67 of 260

65
Lighting and visibility
4Do not allow snow to accumulate on the
bonnet or roof of the vehicle as this could
obstruct the detection camera.
Headlamp beam height
adjustment
To avoid inconvenience to other road users,
the height of the halogen headlamps should be
adjusted according to the load in the vehicle.
0Unladen.
1 Partial load.
2 Medium load.
3 Maximum
authorised load.
4 5 6 Not used.
The initial setting is position 0.
Wiper control stalk
Programming
Your vehicle may also include some functions
that can be activated/deactivated:
–
automatic windscreen wipers,
–
rear wiping on engaging reverse gear
.
In wintry conditions, remove snow, ice or
frost present on the windscreen, around
the wiper arms and blades and the
windscreen seal, before operating the wipers.
Do not operate the wipers on a dry
windscreen. Under extremely hot or cold
conditions, ensure that the wiper blades are
not stuck to the windscreen before operating
the wipers.
Manual controls
The wipers are controlled directly by the driver.
With manual wiping (intermittent)
With AUTO wiping
Windscreen wipers
► To select the wiping speed: raise or lower the
stalk to the desired position.
Fast wiping (heavy rain)
Normal wiping (moderate rain)
Intermittent wiping (proportional to the
vehicle’s speed)
Off
or
Automatic wiping (press down, then release).
Single wipe (pull the stalk briefly towards you).
Page 68 of 260

66
Lighting and visibility
After refitting a windscreen wiper blade
► To return the wiper blades to their initial
position, switch on the ignition and operate the
wiper control stalk.
Changing a wiper blade
Removing/refitting at the front
► Carry out these wiper blade replacement
operations from the driver's side.
► Starting with the wiper blade farthest from
you, hold each arm by the rigid section and raise
it as far as possible.
Take care not to hold the arms at the jet locations.
Do not touch the wiper blades. Risk of
irreparable deformation.
Do not release them while moving them. Risk
of damaging the windscreen!
Windscreen wash
► Pull the wiper control stalk towards you and
hold.
The screenwash and windscreen wipers operate
for as long as the control stalk is pulled.
A
final wiping cycle is performed when
screenwashing ends.
On vehicles fitted with automatic air
conditioning, any action on the
screenwash control temporarily closes the air
intake, to avoid odours inside the passenger
compartment.
The windscreen wash jets are incorporated into the tip of each wiper
arm.
Screenwash fluid is sprayed along the length
of the wiper blade. This improves visibility and
reduces screenwash fluid consumption.
In some cases, depending on the contents
or colour of the fluid and on the exterior
brightness, the liquid spray may be barely
noticeable.
To avoid damaging the wiper blades, do not operate the windscreen washer if the
windscreen washer reservoir is empty.
Only operate the windscreen washer if
there is no risk of the fluid freezing on the
windscreen and hindering visibility. Always
use windscreen washer fluid suitable for low
temperatures during the winter period.
Never top up with water.
Rear wiper
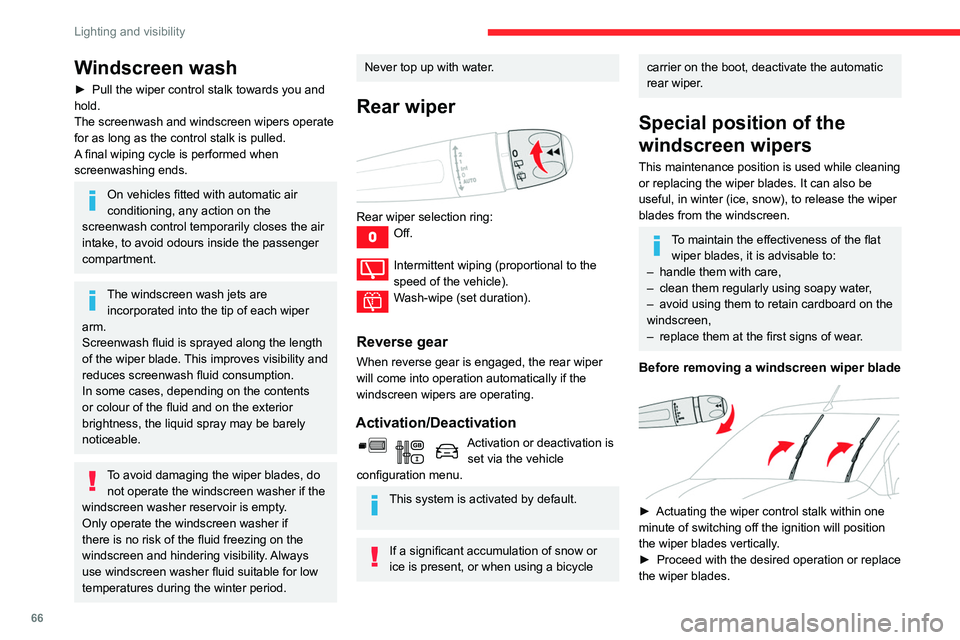
Rear wiper selection ring:
Off.
Intermittent wiping (proportional to the
speed of the vehicle).
Wash-wipe (set duration).
Reverse gear
When reverse gear is engaged, the rear wiper
will come into operation automatically if the
windscreen wipers are operating.
Activation/Deactivation
Activation or deactivation is set via the vehicle
configuration menu.
This system is activated by default.
If a significant accumulation of snow or
ice is present, or when using a bicycle
carrier on the boot, deactivate the automatic
rear wiper.
Special position of the
windscreen wipers
This maintenance position is used while cleaning
or replacing the wiper blades. It can also be
useful, in winter (ice, snow), to release the wiper
blades from the windscreen.
To maintain the effectiveness of the flat wiper blades, it is advisable to:
–
handle them with care,
–
clean them regularly using soapy water
,
–
avoid using them to retain cardboard on the
windscreen,
–
replace them at the first signs of wear
.
Before removing a windscreen wiper blade
► Actuating the wiper control stalk within one
minute of switching off the ignition will position
the wiper blades vertically
.
►
Proceed with the desired operation or replace
the wiper blades.
Page 69 of 260

67
Lighting and visibility
4After refitting a windscreen wiper blade
► To return the wiper blades to their initial
position, switch on the ignition and operate the
wiper control stalk.
Changing a wiper blade
Removing/refitting at the front
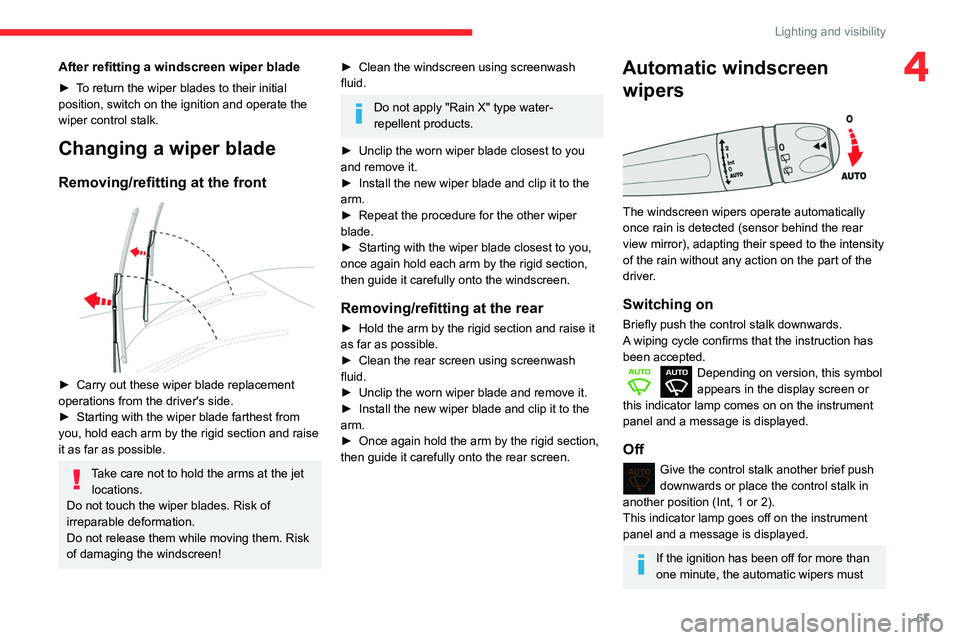
► Carry out these wiper blade replacement
operations from the driver's side.
►
Starting with the wiper blade farthest from
you, hold each arm by the rigid section and raise
it as far as possible.
Take care not to hold the arms at the jet locations.
Do not touch the wiper blades. Risk of
irreparable deformation.
Do not release them while moving them. Risk
of damaging the windscreen!
► Clean the windscreen using screenwash
fluid.
Do not apply "Rain X" type water-
repellent products.
►
Unclip the worn wiper blade closest to you
and remove it.
►
Install the new wiper blade and clip it to the
arm.
►
Repeat the procedure for the other wiper
blade.
►
Starting with the wiper blade closest to you,
once again hold each arm by the rigid section,
then guide it carefully onto the windscreen.
Removing/refitting at the rear
► Hold the arm by the rigid section and raise it
as far as possible.
►
Clean the rear screen using screenwash
fluid.
►
Unclip the worn wiper blade and remove it.
►
Install the new wiper blade and clip it to the
arm.
►
Once again hold the arm by the rigid section,
then guide it carefully onto the rear screen.
Automatic windscreen wipers
The windscreen wipers operate automatically
once rain is detected (sensor behind the rear
view mirror), adapting their speed to the intensity
of the rain without any action on the part of the
driver.
Switching on
Briefly push the control stalk downwards.
A wiping cycle confirms that the instruction has
been accepted.
Depending on version, this symbol
appears in the display screen or
this indicator lamp comes on on the instrument
panel and a message is displayed.
Off
Give the control stalk another brief push
downwards or place the control stalk in
another position (Int, 1 or 2).
This indicator lamp goes off on the instrument
panel and a message is displayed.
If the ignition has been off for more than
one minute, the automatic wipers must
Page 240 of 260

238
Alphabetical index
T
Tables of fuses 167–169
Tank, fuel
140–141
Technical data
176–180
Telephone
48, 189–191, 202–203, 225–227
Telephone, Bluetooth with voice
recognition
191
Temperature, coolant
16
Three flashes (direction indicators)
62
Time (setting)
205, 229
TMC (Traffic info)
216
Tools
155
Topping-up AdBlue®
152
Top Rear Vision
132
Towbar
74, 142–143
Towed loads
176–180
Towing another vehicle
172–174
Towing device
143
Towing eye
173
Traction control (ASR)
73, 75
Traffic information (TA)
184
Traffic information (TMC)
216
Trailer
74, 142
Trailer stability assist (TSA)
74
Trajectory control systems
73–74
Triangle, warning
52
Trip computer
21–22
Type of bulbs
162
Tyres
150, 181
Tyre under-inflation detection
106, 158
U
Under-inflation (detection) 106
Unlocking
23, 25–26
Unlocking from the inside
30
Updating the date
205, 229
Updating the time
205, 229
USB
186, 200, 219, 224
V
Ventilation 52–53, 57–58
Video
224
Voice commands
211–213
W
Warning and indicator lamps 11
Warning lamp, driver''s seat belt
not fastened
78
Warning lamps
11
Warning lamp, seat belts
78
Warnings and indicators
11
Washer jets, heated
56
Washing
11 0
Washing (advice)
153–154
Weights
176–180
Welcome lighting
24
Wheel, spare
106, 150, 155–156, 158–159, 161
Windows, rear doors
36
Windscreen, heated
56
Windscreen wipers 65
Wiper blades (changing)
66–67
Wiper, rear
66
Wipers
65, 67–68
Wipers, automatic rain sensitive
65, 67–68