audio CITROEN C-ELYSÉE 2017 User Guide
[x] Cancel search | Manufacturer: CITROEN, Model Year: 2017, Model line: C-ELYSÉE, Model: CITROEN C-ELYSÉE 2017Pages: 260, PDF Size: 7.11 MB
Page 163 of 260

161
C-elysee_en_Chap09_info-pratiques_ed01-2016
Dashboard fuses
The fusebox is placed in the lower dashboard (left-hand side).
Access to the fuses
F Refer to the paragraph "Access to the tools".Fuse N°
Rating Functions
F02 5 AHeadlamp adjusters, diagnostic socket, air conditioning
panel.
F09 5 AAlarm,
alar
m
(
accessory).
F11 5 AAdditional
h
eating.
F13 5 AParking sensors, parking sensors
(accessory)
F14 10 AAir
c
onditioning
pan
el.
F16 15 ACigarette lighter, 12 V socket.
F17 15 AAudio system, audio system (accessory).
F18 20 AAudio
system / Bluetooth, audio system (accessory).
F19 5 AMonochrome
screen C.
F23 5 ACourtesy
lamps, map reading lamps.
F26 15 AHorn.
F27 15 AScreenwash
pu
mp.
F28 5 AAnti-theft.
Fuse tables
9
Practical information
Page 167 of 260
165
C-elysee_en_Chap09_info-pratiques_ed01-2016
Starting using another
battery
F Start the engine of the vehicle with the g
ood battery and leave it running for a
f
ew minutes.
F
O
perate the starter on the broken down
v
ehicle and let the engine run.
I
f the engine does not start straight away,
s
witch off the ignition and wait a few
m
oments before trying again.
Never
try
to
start
the
engine
by
c
onnecting
a
battery
charger.
Never
use
a
24
V
or
higher
battery
b
o o s t e r.
First
check
that
the
slave
battery
has
a
n
ominal
voltage
of
12
V
and
a
capacity
a
t
least
equal
to
that
of
the
discharged
b
attery.
The
two
vehicles
must
not
be
in
contact
w
ith
each
other.
Switch
off
the
electrical
consumers
on
b
oth
vehicles
(audio
system,
wipers,
l
ighting,
...
).
Ensure
that
the
jump
lead
cables
do
n
ot
pass
close
to
moving
parts
of
the
e
ngine
(cooling
fan,
belts,
...).
Do
not
disconnect
the
(+)
terminal
when
t
he
engine
is
running.
When
your
vehicle's
battery
is
discharged,
the
e
ngine
can
be
started
using
a
slave
battery
(
external
or
on
another
vehicle)
and
jump
lead
c
ables
or
a
battery
booster.
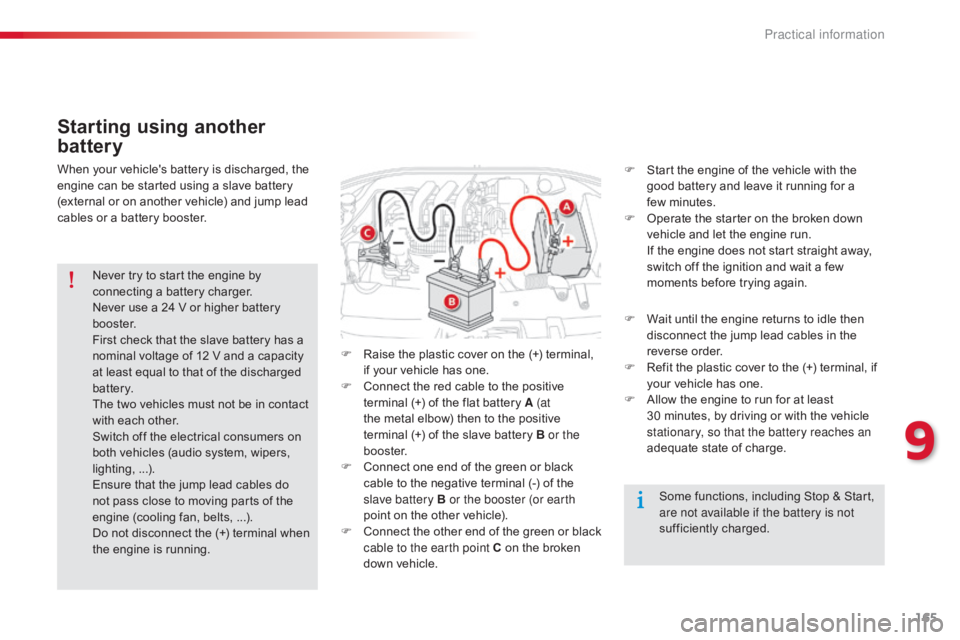
F
R
aise
the
plastic
cover
on
the
(+)
terminal,
i
f
your
vehicle
has
one.
F
C
onnect
the
red
cable
to
the
positive
t
erminal
(+)
of
the
flat
battery
A (at
the
metal
elbow)
then
to
the
positive
t
erminal (+)
of
the
slave
battery
B or the
b o o s t e r.
F
C
onnect
one
end
of
the
green
or
black
c
able
to
the
negative
terminal
(-)
of
the
s
lave battery B or the booster (or earth
point
on
the
other
vehicle).
F
C
onnect
t
he
o
ther
e
nd
o
f
t
he
g
reen
o
r
b
lack
c
able to the earth point C
on
the
broken
d
own
vehicle. F
W
ait until the engine returns to idle then
d
isconnect the jump lead cables in the
r
everse
o
rder.
F
R
efit the plastic cover to the (+) terminal, if
y
our vehicle has one.
F
A
llow the engine to run for at least
3
0 minutes, by driving or with the vehicle
s
tationary, so that the battery reaches an
adequate
state of charge.
Some
functions, including Stop & Start,
a
re not available if the battery is not
sufficiently
c
harged.
9
Practical information
Page 168 of 260

166
C-elysee_en_Chap09_info-pratiques_ed01-2016
Charging the battery using
a battery charger
For optimum service life of the battery, it is essential to maintain an adequate state of
c
harge.
In
some circumstances it may be necessary to
c
harge the battery:
-
i
f you use your vehicle essentially for short
j
ourneys,
-
i
f the vehicle is to be taken off the road for
s
everal weeks.
Contact
a CITROËN dealer or a qualified
w
orkshop. Never
try to charge a frozen battery.
If the battery has been frozen, have
it
checked by a CITROËN dealer or a
q
ualified workshop, who will check that
t
he internal components have not been
d
amaged and the casing is not cracked,
w
hich could cause a leak of toxic and
c
orrosive acid.
If
you envisage charging your vehicle's
b
attery yourself, use only a charger
c
ompatible with lead-acid batteries of a
n
ominal voltage of 12 V.
If this label is present, it is essential
to
use only a 12 V charger, to avoid
c
ausing irreversible damage to the
e
lectrical components related to the
S
top & Start system. Follow
the instructions for use provided
b
y the manufacturer of the charger.
Never
reverse polarities.
It
is not necessary to disconnect the
b
attery.
F
S
witch off the ignition.
F
S
witch off all electrical consumers (audio
s
ystem, lighting, wipers, ...).
F
S
witch off the charger B before connecting
t
he cables to the battery, so as to avoid any
d
angerous
spar
ks.
F
E
nsure that the charger cables are in good
c
ondition.
F
R
aise the plastic cover, if your vehicle has
one,
on the (+) terminal.
F
C
onnect the charger B cables as follows:
-
t
he positive (+) red cable
to
the (+) terminal of the battery A,
-
t
he negative (-) black cable to the earth
p
oint C on the vehicle.
F
A
t the end of the charging operation, switch
o
ff the charger B before disconnecting the
c
ables from the battery A.
Practical information
Page 169 of 260
167
C-elysee_en_Chap09_info-pratiques_ed01-2016
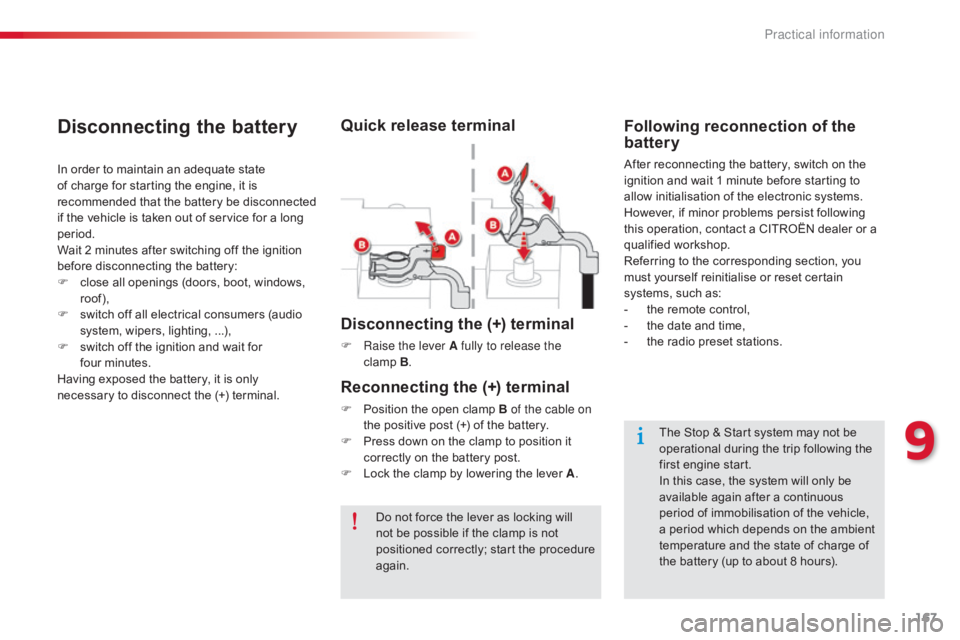
Disconnecting the (+) terminal
F Raise the lever A fully to release the clamp B.
Reconnecting the (+) terminal
F Position the open clamp B of the cable on
the positive post (+) of the battery.
F
P
ress down on the clamp to position it
c
orrectly on the battery post.
F
L
ock the clamp by lowering the lever A.
Do
not force the lever as locking will
n
ot be possible if the clamp is not
p
ositioned correctly; start the procedure
ag
ain.
Disconnecting the battery
In order to maintain an adequate state of charge for starting the engine, it is
r
ecommended that the battery be disconnected
i
f the vehicle is taken out of service for a long
p
eriod.
Wait
2 minutes after switching off the ignition
b
efore disconnecting the battery:
F
c
lose all openings (doors, boot, windows,
r
oof),
F
s
witch off all electrical consumers (audio
s
ystem, wipers, lighting, ...),
F
s
witch off the ignition and wait for
f
our minutes.
Having
exposed the battery, it is only
n
ecessary to disconnect the (+) terminal.
Following reconnection of the
battery
After reconnecting the battery, switch on the ignition and wait 1 minute before starting to
a
llow initialisation of the electronic systems.
However,
if minor problems persist following
t
his operation, contact a CITROËN dealer or a
q
ualified
w
orkshop.
Referring
to the corresponding section, you
m
ust yourself reinitialise or reset certain
s
ystems, such as:
-
t
he remote control,
-
t
he date and time,
-
t
he radio preset stations.
Quick release terminal
The Stop & Start system may not be operational during the trip following the
f
irst engine start.
In
this case, the system will only be
a
vailable again after a continuous
p
eriod of immobilisation of the vehicle,
a
period which depends on the ambient
t
emperature and the state of charge of
t
he battery (up to about 8 hours).
9
Practical information
Page 170 of 260

168
C-elysee_en_Chap09_info-pratiques_ed01-2016
System which manages the duration of use of certain functions to retain a sufficient level of
charge
in the battery.
After
the engine has stopped, you can
s
till use functions such as the audio and
t
elematics system, windscreen wipers, dipped
b
eam headlamps, courtesy lamps, etc. for
a
maximum combined duration of about
t
hirty
m
inutes.
Electrical energy economy mode
Switching to economy mode
Once this time has elapsed, a message appears in the screen indicating that the
v
ehicle has switched to economy mode and the
a
ctive functions are put on standby.
If
a telephone call is being made at this time,
it
will be maintained for around 10 minutes with
t
he Bluetooth hands-free system of your audio
s
ystem.
Exiting economy mode
These functions are reactivated automatically n ext time the vehicle is driven.
F
T
o restore these functions immediately,
s
tart the engine and let it run for at least
f
ive
m
inutes.
A
flat battery prevents the engine from
s
tarting (refer to the corresponding
s
ection).
Load reduction mode
System which manages the use of certain functions according to the level of charge
r
emaining in the battery.
When
the vehicle is being driven, the load
r
eduction function temporarily deactivates
c
ertain functions, such as the air conditioning,
t
he heated rear screen...
The
deactivated functions are reactivated
a
utomatically as soon as conditions permit.
Practical information
Page 178 of 260
176
C-elysee_en_Chap09_info-pratiques_ed01-2016
* To avoid any risk of jamming of the
pedals:
-
e
nsure that the mat is positioned and
s
ecured
c
orrectly,
-
n
ever fit one mat on top of another.
"Protection":
mats* (carpet or rubber), seat covers, alarm, front a nd r ear m ud f laps, b oot l iner, b oot c arpet,
s
ide rubbing strips, bumper protective strips,
t
ransparent boot sill protector, shield under
e
ngine...
The
fitting of electrical equipment or
a
ccessories which are not recommended
b
y CITROËN may result in a failure of
y
our vehicle's electronic system and
e
xcessive electrical consumption.
Contact
a CITROËN dealer
f
or information on the range of
r
ecommended equipment and
a
ccessories.
Installation of radio
communication
transmitters
Before installing any after-market radio communication transmitter, you can
c
ontact a CITROËN dealer for the
s
pecification of transmitters which can
b
e fitted (frequency, maximum power,
a
erial position, specific installation
requirements),
in line with the Vehicle
E
lectromagnetic
C
ompatibility
D
irective (2004/104/EC). Depending
on the legislation in force in
t
he country, certain safety equipment
m
ay be compulsory: high visibility
s
afety vests, warning triangles,
b
reathalyzers, spare bulbs, spare fuses,
fire extinguisher, first aid kit, mud flaps
a
t the rear of the vehicle.
By
visiting a CITROËN dealer, you can also
o
btain
products for cleaning and maintenance
(
exterior and interior) - including ecological
p
roducts in the "TECHNATURE" range, topping
u
p
products (screenwash...), touch-up pens
a
nd
paint aerosols for the exact colour of your
v
ehicle, refills (cartridge for the temporary
p
uncture repair kit...), ...
"Multimedia":
audio systems, portable satellite and semi-
i ntegral navigation systems, fixed and portable
h
ands-free kit, universal solar charger,
s
peakers and wiring, 230 V socket, rear
m
ultimedia bracket, telephone bracket...
Practical information
Page 197 of 260

195
C-elysee_en_Chap12a_RD5(RD45)_ed01-2016
Your audio system is coded in such a way that it will only operate in your vehicle.
Audio system / Bluetooth®
01 First steps
For safety reasons, the driver must only carry out operations which require prolonged attention while the
vehicle
is stationary.
When
the engine is switched off and to prevent
discharging
of the battery, the audio system may switch
of
f after a few minutes.
CONTENTS
02
Steering
mounted controls
03
Main
menu
04
Audio
05
Using
the telephone
06
Audio
settings
07
Screen
menu map(s)
Frequently asked questions p.
p.
p.
p.
p.
p.
p.
p.
196
197
198
199
209
218
219
221
Page 198 of 260
01
196
C-elysee_en_Chap12a_RD5(RD45)_ed01-2016
On / Off.
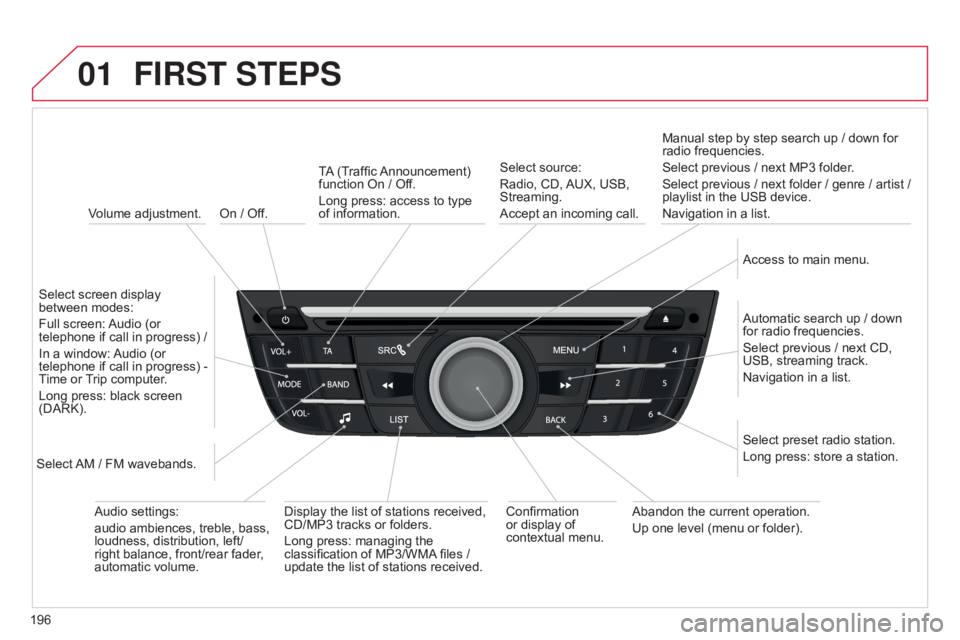
FIRST STEPS
Volume adjustment.
Select
screen display
between
modes:
Full
screen:
Audio
(or
telephone
if call in progress) /
In
a
window:
Audio
(or
telephone
if call in progress) -
Time
or
T
rip computer.
Long
press: black screen
(DARK).
Select
AM
/ FM wavebands. Select
preset radio station.
Long
press: store a station.
Display
the list of stations received,
CD/MP3
tracks or folders.
Long
press: managing the
classification
of MP3/WMA
files /
update
the list of stations received.
TA
(Traffic
Announcement)
function
On / Off.
Long press: access to type of
information.
Confirmation
or
display of
contextual
menu.Automatic
search up / down
for
radio frequencies.
Select
previous / next CD,
USB,
streaming track.
Navigation
in a list.
Abandon
the current operation.
Up
one level (menu or folder).
Manual
step by step search up / down for
radio
frequencies.
Select previous / next MP3 folder.
Select previous / next folder / genre / artist /
playlist
in the USB device.
Navigation in a list.
Select source:
Radio, CD,
AUX,
USB,
Streaming.
Accept
an incoming call.
Access to main menu.
Audio
settings:
audio
ambiences, treble, bass,
loudness,
distribution, left/
right
balance, front/rear fader,
automatic
volume.
Page 199 of 260
02
197
C-elysee_en_Chap12a_RD5(RD45)_ed01-2016
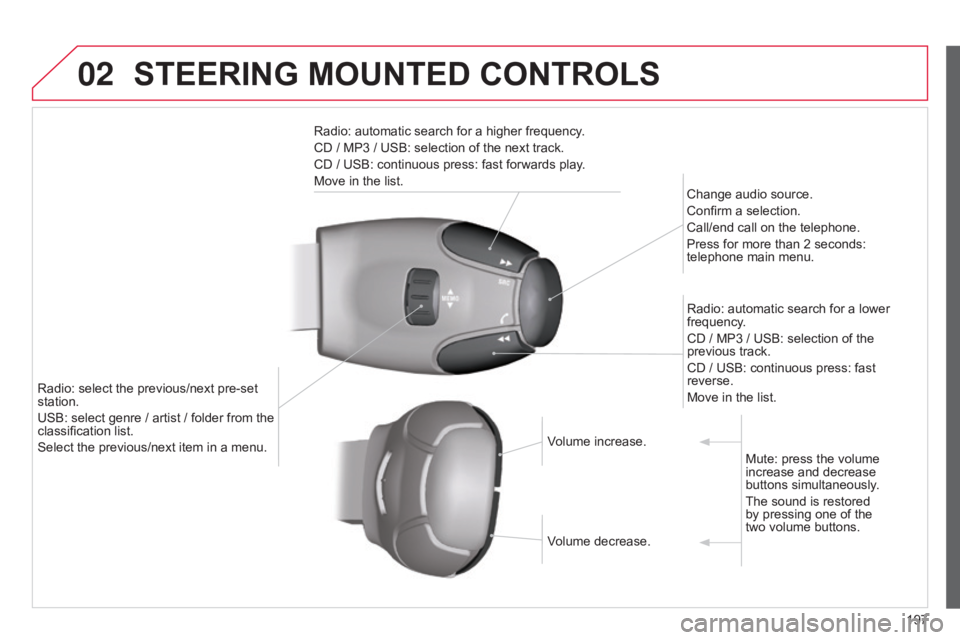
STEERING MOUNTED CONTROLS
Radio: automatic search for a higher frequency.
CD / MP3 / USB: selection of the next track.
CD
/ USB: continuous press: fast forwards play.
Move
in the list. Change
audio source.
Confirm
a selection.
Call/end
call on the telephone.
Press
for more than 2 seconds:
telephone
main menu.
Radio:
automatic search for a lower
frequency
.
CD
/ MP3 / USB: selection of the
previous
track.
CD
/ USB: continuous press: fast
reverse.
Move
in the list.
Radio:
select
the
previous/next
pre-set
station.
USB:
select
genre
/
artist
/
folder
from
the
classification
list.
Select
the
previous/next
item
in
a
menu. Volume
increase.
Volume
decrease.Mute:
press the volume
increase
and decrease
buttons
simultaneously.
The
sound is restored
by
pressing one of the
two volume
buttons.
Page 201 of 260
04
199
C-elysee_en_Chap12a_RD5(RD45)_ed01-2016
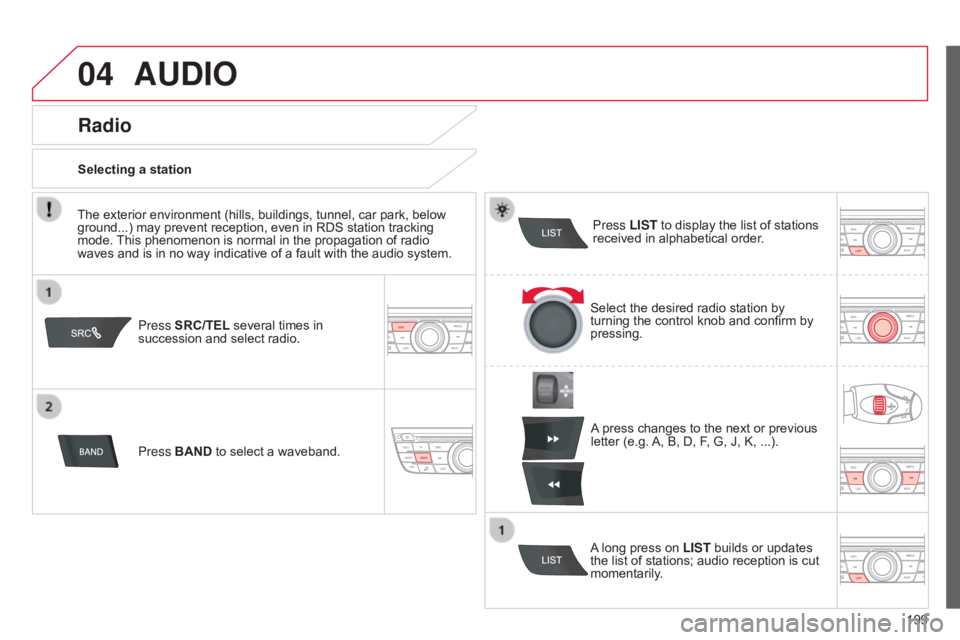
AUDIO
Press SRC/TEL several times in succession and select radio.
Press BAND
to select a waveband. Press LIST
to display the list of stations
received
in alphabetical order.
A
press changes to the next or previous
letter
(e.g.
A,
B, D, F, G, J, K, ...).
Radio
Select the desired radio station by turning the control knob and confirm by
pressing.
Selecting a station
A
long press on
LIST
builds or updates
the
list of stations; audio reception is cut
momentarily
.
The
exterior
environment
(hills,
buildings,
tunnel,
car
park,
below
ground...)
may
prevent
reception,
even
in
RDS
station
tracking
mode.
This
phenomenon
is
normal
in
the
propagation
of
radio
waves
and
is
in
no
way
indicative
of
a
fault
with
the
audio
system.