height CITROEN C-ELYSÉE 2017 Owners Manual
[x] Cancel search | Manufacturer: CITROEN, Model Year: 2017, Model line: C-ELYSÉE, Model: CITROEN C-ELYSÉE 2017Pages: 260, PDF Size: 7.11 MB
Page 4 of 260

.
.
C-elysee_en_Chap00a_sommaire_ed01-2016
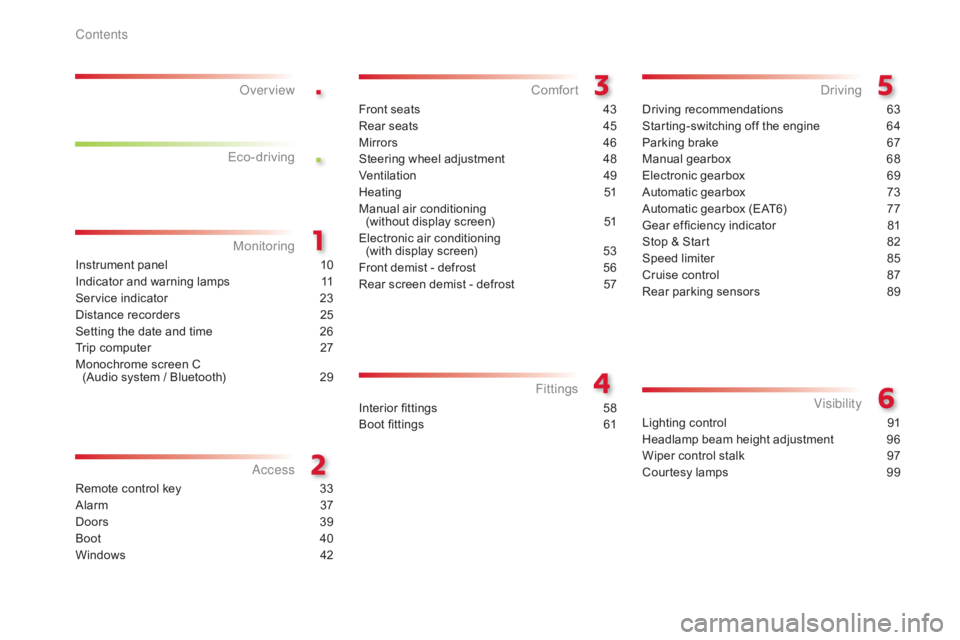
Instrument panel 10
Indicator and warning lamps
1
1
Service
indicator
2
3
Distance
recorders
2
5
Setting
the date and time
2
6
Trip
computer
2
7
Monochrome
screen C
(Audio
system / Bluetooth)
2
9
MonitoringOver view
Remote control key 3
3
Alarm
3
7
Doors
39
Boo
t
4
0
Windows
4
2
Access
Front seats 43
Rear seats
4
5
Mirrors
4
6
Steering
wheel adjustment
4
8
Ventilation
4
9
Heating
5
1
Manual
a
ir
c
onditioning
(
without display screen)
5
1
Electronic
air conditioning
(with
display screen)
5
3
Front
demist - defrost
5
6
Rear
screen demist - defrost
5
7
Comfort
Driving recommendations 63
Starting-switching off the engine
6
4
Parking
brake
6
7
Manual
g
earbox
6
8
Electronic
gearbox
6
9
Automatic
gearbox
7
3
Automatic
gearbox (EAT6)
7
7
Gear
ef ficiency indicator
8
1
Stop
& Start
8
2
Speed
limiter
8
5
Cruise
control
87
R
ear parking sensors
8
9
Driving
Lighting control 91
Headlamp beam height adjustment
9
6
Wiper
control stalk
9
7
Courtesy
lamps
9
9
Visibility
Eco-drivingInterior fittings 5
8
Boot fittings
6
1
Fittings
Contents
Page 8 of 260

6
C-elysee_en_Chap00b_vue-ensemble_ed01-2016
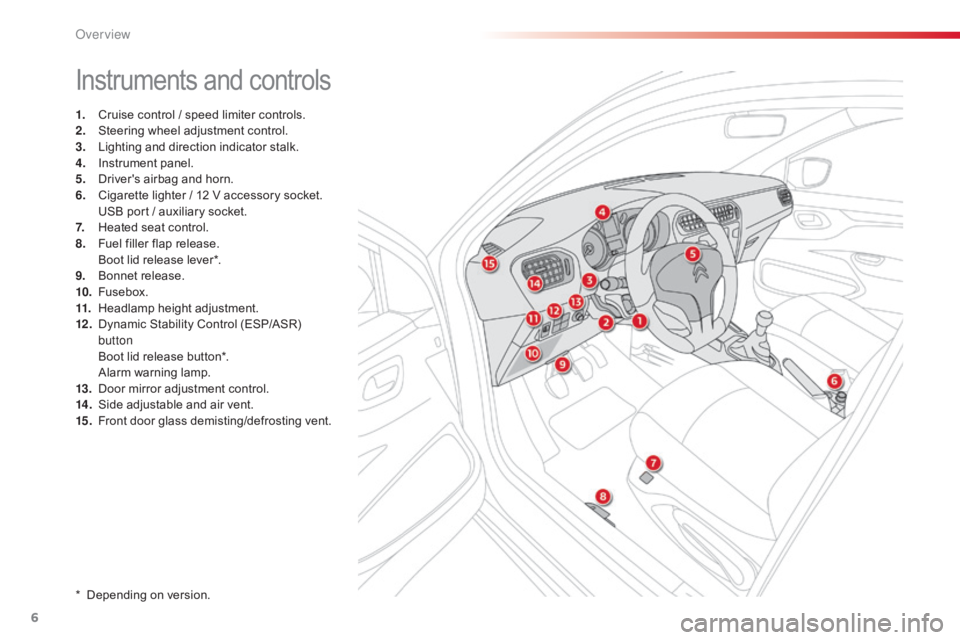
Instruments and controls
1. Cruise control / speed limiter controls.
2. S teering wheel adjustment control.
3.
L
ighting and direction indicator stalk.
4.
I
nstrument panel.
5.
D
river's airbag and horn.
6.
C
igarette lighter / 12 V accessory socket.
U
SB port / auxiliary socket.
7.
H
eated seat control.
8.
F
uel filler flap release.
B
oot lid release lever*.
9.
B
onnet release.
10.
F
usebox.
11.
H
eadlamp height adjustment.
12 .
D
ynamic Stability Control (ESP/ASR)
b
utton
B
oot lid release button*.
A
larm
w
arning
lam
p.
13.
D
oor mirror adjustment control.
14 .
S
ide adjustable and air vent.
15.
F
ront door glass demisting/defrosting vent.
*
Depending on version.
Over view
Page 45 of 260

43
C-elysee_en_Chap03_confort_ed01-2016
Front seats
F Raise the control and slide the seat f
or wards or backwards. F
P ull the control upwards to raise or push i
t downwards to lower, as many times as
r
equired, to obtain the position required.
F
P ush the control rear wards.
Forwards-backwards
Height
(driver only)
Seat backrest angle
As a safety measure, adjustments to the driver's seat must only be done when stationary.
B efore moving the seat backwards, ensure that there is nothing that might prevent the full
t
ravel of the seat, so as to avoid the risk of of jamming the seat caused by the presence
o
f objects on the floor behind the seat or rear passengers. If the seat jams, stop the
m
ovement immediately.
3
Comfort
Page 46 of 260

44
C-elysee_en_Chap03_confort_ed01-2016
F To raise the head restraint, pull it upwards.
F T o remove the head restraint, press the lug A
and
pull the head restraint upwards.
F
T
o put the head restraint back in place,
e
ngage the head restraint stems in the
o
penings keeping them in line with the seat
b
ack.
F
T
o lower the head restraint, press the lug A
and
the head restraint at the same time.The
head restraint is fitted with a frame
w
ith notches which prevents it from
l
owering; this is a safety device in case
o
f impact.
The adjustment is correct when the
upper edge of the head restraint is
level with the top of the head.
Never
drive with the head restraints
r
emoved; they must be in place and
adj
usted
c
orrectly.
Adjusting the height of
the
h
ead restraint
Press the control.
T he temperature is controlled automatically.
Pressing
a second time stops operation.
Heated seat control
Comfort
Page 50 of 260

48
C-elysee_en_Chap03_confort_ed01-2016
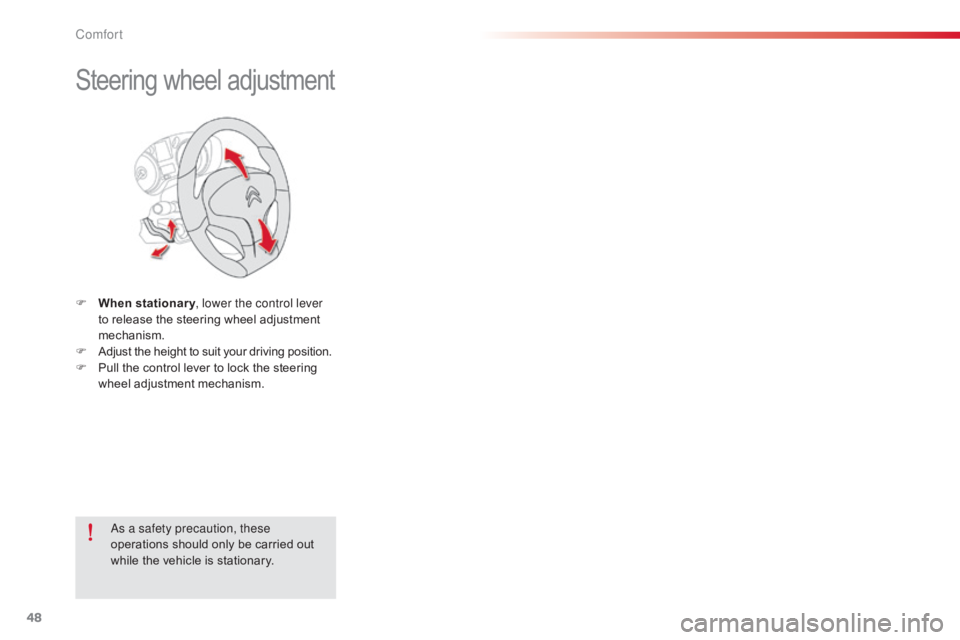
Steering wheel adjustment
F When stationary , lower the control lever
to release the steering wheel adjustment
m
echanism.
F
A
djust the height to suit your driving position.
F
P
ull the control lever to lock the steering
w
heel
a
djustment
m
echanism.
As a safety precaution, these
operations
should only be carried out
w
hile the vehicle is stationary.
Comfort
Page 98 of 260

96
C-elysee_en_Chap06_visibilite_ed01-2016
Headlamp beam height adjustment
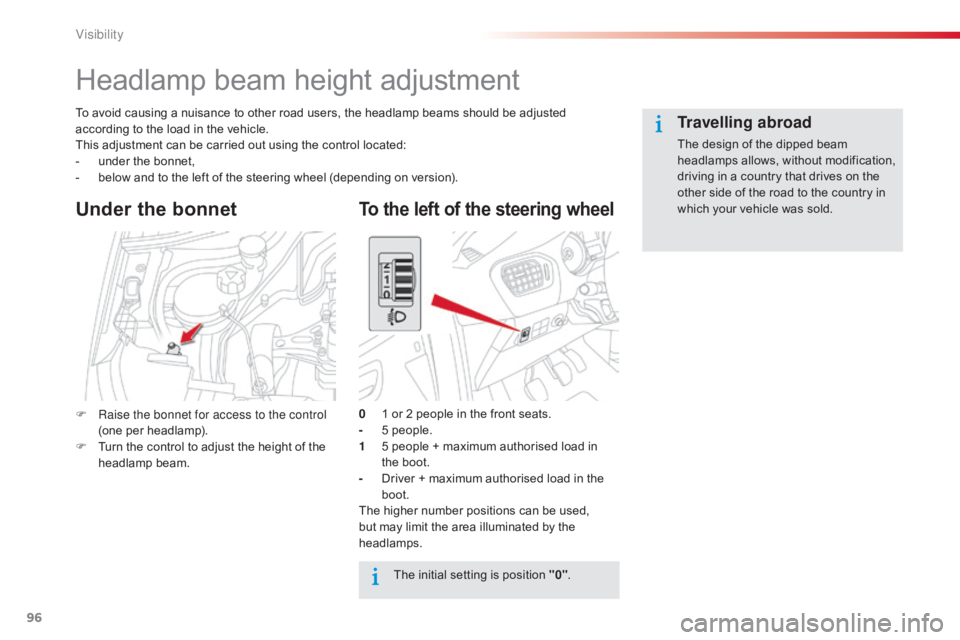
To avoid causing a nuisance to other road users, the headlamp beams should be adjusted according to the load in the vehicle.
This
adjustment can be carried out using the control located:
-
u
nder the bonnet,
-
b
elow and to the left of the steering wheel (depending on version).
The
initial setting is position "0".
0
1
or 2 people in the front seats.
-
5
people.
1
5
people + maximum authorised load in
t
he boot.
-
D
river + maximum authorised load in the
b
oot.
The
higher number positions can be used,
b
ut may limit the area illuminated by the
h
eadlamps.
Under the bonnet
F Raise the bonnet for access to the control (one per headlamp).
F
T
urn the control to adjust the height of the
h
eadlamp
b
eam.
Travelling abroad
The design of the dipped beam headlamps allows, without modification,
d
riving in a country that drives on the
o
ther side of the road to the country in
w
hich your vehicle was sold.
To the left of the steering wheel
Visibility
Page 126 of 260

124
C-elysee_en_Chap08_securite-enfants_ed01-2016
ISOFIX child seats recommended by CITROËN and approved
f
or your vehicle
Follow the instructions for fitting child seats contained in their manufacturer's installation guide. "RÖMER Baby- Safe Plus and its Baby- Safe Plus ISOFIX base" (size category: E
)
Group 0+: from bir th to 13 kg
Installed rear ward facing using an ISOFIX base which is attached to the rings A
.
The base has a support leg, adjustable for height, which sits on the vehicle's floor.
This child seat can also be secured with a seat belt. In this case, only the shell is used
and attached to the vehicle's seat by the three-point seat belt.
Child safety
Page 128 of 260

126
C-elysee_en_Chap08_securite-enfants_ed01-2016
"Baby P2C Midi" and its ISOFIX base (size categories: D, C, A, B, B1)
Group 1: from 9 to 18 kg
Installed
rear ward facing using an ISOFIX base which is attached to the anchorage rings A.
The
base has a support leg, adjustable for height, which sits on the vehicle's floor.
This
child seat can also be used for ward facing.
This seat can not
be secured with a seat belt.
We
recommend that you use the seat in the rear ward facing position up to the age of 3 years.
Follow the instructions for fitting child seats contained in the seat manufacturer's installation guide. FAIR G 0/1 S
and its RWF A and FWF A ISOFIX bases
(size
category C for the rear ward facing version, size category A for the for ward facing version)
Group 0+ and 1: from bir th to 18 kg
Installed
in the rear ward facing position for children under 18 kg and for ward facing for children
b
etween 13 and 18 kg, using its ISOFIX base, which is attached to the rings A.
Use
the rear ward facing (RWF )
type A ISOFIX base or the for ward facing (FWF )
type A ISOFIX base.
6
positions of inclination of the shell.
This
child seat can also be used in a for ward facing position on seating
positions
not equipped with ISOFIX mountings.
In
this case the shell of the child seat must be attached to
the
vehicle seat using the three-point seat belt.
Child safety
Page 180 of 260

178
C-elysee_en_Chap09_info-pratiques_ed01-2016
Roof bars
For safety reasons and to avoid damaging the roof, it is essential to use the transverse bars
listed
for your vehicle. When
fitting roof bars, use only the four fixing p
oints located in the roof frame. The points are
m
asked by the vehicle doors when closed.
The
roof bar fixings include a stud to be fitted to
t
he hole at each fixing point.
Observe
the fitting instructions and the
c
onditions of use in the guide supplied with
t
he bars. Maximum
authorised weight on the roof
b
ars:
75
kg.
If
the height exceeds 40 cm, adapt the
s
peed of the vehicle to the profile of the
r
oad to avoid damaging the roof bars
a
nd the fixings on the roof.
Be
sure to refer to national legislation in
o
rder to comply with the regulations for
t
ransporting objects which are longer
t
han the vehicle.
Practical information
Page 244 of 260

242
C-elysee_en_Chap13_recherche-visuelle_ed01-2016
Exterior
Remote control key 33 -36
- o pening / closing
-
a
nti-theft protection
-
s
tarting
-
b
attery
Boot
4
0-41
-
o
pening / closing
-
em
ergency
r
elease
Temporary
pu
ncture
r
epair kit
1
40 -144
W i p e r s
9
7- 9 8
Changing
a wiper blade
1
69
Changing
bu
lbs
1
57-158
-
r
ear lamps
-
3rd brake lamp
-
n
umber plate lamps
-
fo
glamp
Fuel
tank, misfuel
prevention
1
29-131
Running
out of fuel (Diesel)
1
32
Accessories
1
75-176
ESP/ASR
1
06
Tyre
pressures
1
93
Spare
wheel
1
45 -151
-
t
ools
-
r
emoving
/
refitting
Snow
chains
1
52
Under-inflation
d
etection
1
01-104
Lighting
controls
9
1-95
Daytime
running
lamps
9
5
Headlamp
beam
height
adjustment
9
6
Changing
bu
lbs
1
53-156
-
f
ront
lamps
-
fo
glamps
-
d
irection
indicator
repeaters
To w i n g
17
0 -171
Very
cold
climate
screen(s)
1
74
Door
mirrors
4
6 - 47
Doors
3
3 -36,
39
-
o
pening
/
closing
-
c
entral
locking
-
s
econdary
control
Alarm
3
7-38
Electric
windows
4
2 Rear
parking sensors
8
9 -90
To w b a r
17
2-173
Visual search