Citroen C4 2015 2.G Owner's Manual
Manufacturer: CITROEN, Model Year: 2015, Model line: C4, Model: Citroen C4 2015 2.GPages: 494, PDF Size: 20.49 MB
Page 251 of 494
249
C4-2_en_Chap11_info-pratique_ed01-2015
C4-2_en_Chap11_info-pratique_ed01-2015
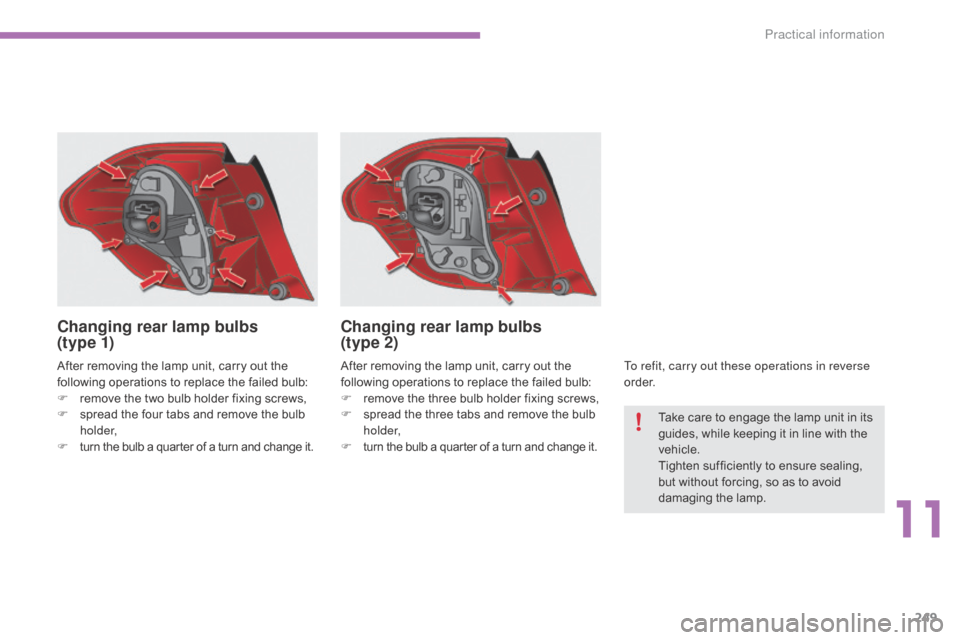
After removing the lamp unit, carry out the following operations to replace the failed bulb:
F
r
emove the two bulb holder fixing screws,
F
s
pread the four tabs and remove the bulb
h
o l d e r,
F
t
urn the bulb a quarter of a turn and change it.
Changing rear lamp bulbs
(t y p e 1)
After removing the lamp unit, carry out the following operations to replace the failed bulb:
F
r
emove the three bulb holder fixing screws,
F
s
pread the three tabs and remove the bulb
h
o l d e r,
F
t
urn the bulb a quarter of a turn and change it.To refit, carry out these operations in reverse
o r d e r.
Changing rear lamp bulbs
(type
2)
Take care to engage the lamp unit in its g
uides, while keeping it in line with the
v
ehicle.
Tighten
sufficiently to ensure sealing,
b
ut without forcing, so as to avoid
d
amaging
t
he
lam
p.
11
Practical information
Page 252 of 494
250
C4-2_en_Chap11_info-pratique_ed01-2015
C4-2_en_Chap11_info-pratique_ed01-2015
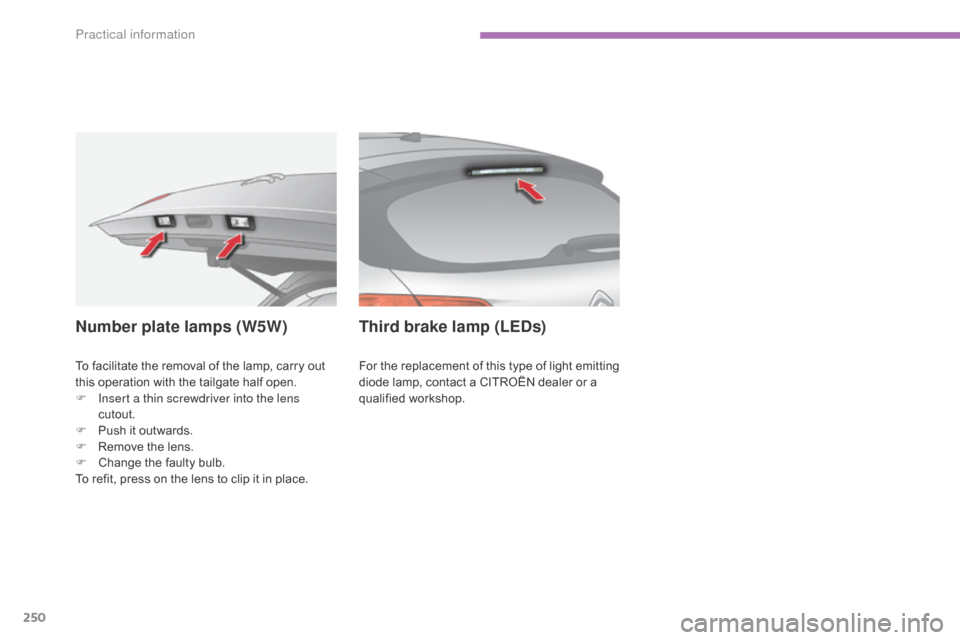
To facilitate the removal of the lamp, carry out this operation with the tailgate half open.
F
I
nsert a thin screwdriver into the lens
cutout.
F
P
ush it outwards.
F
R
emove the lens.
F
C
hange the faulty bulb.
To
refit, press on the lens to clip it in place.
Third brake lamp (LEDs)
For the replacement of this type of light emitting diode lamp, contact a CITROËN dealer or a
q
ualified
w
orkshop.
Number plate lamps (W5W)
Practical information
Page 253 of 494
251
C4-2_en_Chap11_info-pratique_ed01-2015
C4-2_en_Chap11_info-pratique_ed01-2015
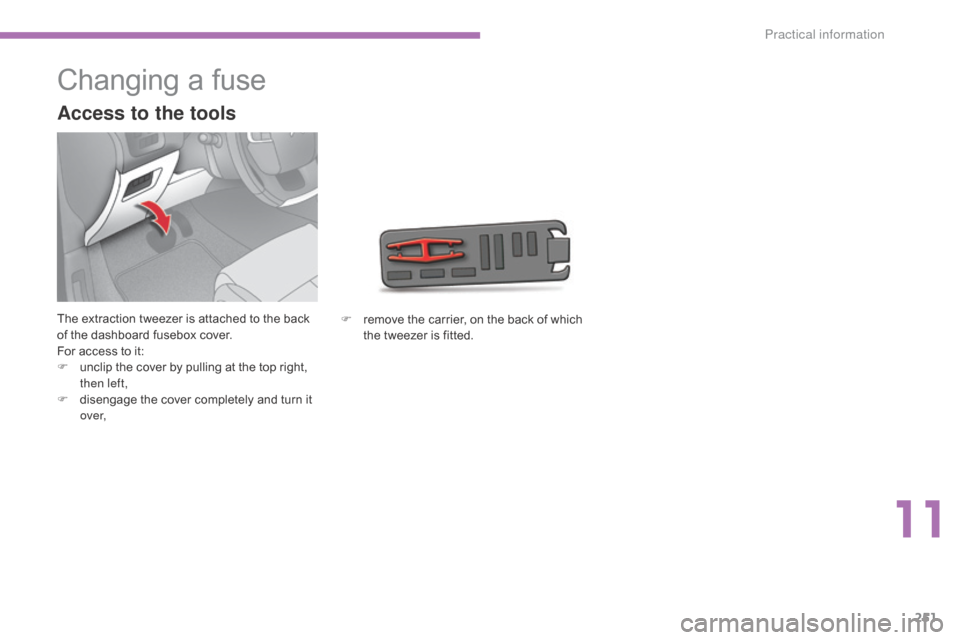
Changing a fuse
The extraction tweezer is attached to the back of the dashboard fusebox cover.
For
access to it:
F
u
nclip the cover by pulling at the top right,
t
hen left,
F
d
isengage the cover completely and turn it
o
ve r,
Access to the tools
F remove the carrier, on the back of which t
he tweezer is fitted.
11
Practical information
Page 254 of 494
252
C4-2_en_Chap11_info-pratique_ed01-2015
C4-2_en_Chap11_info-pratique_ed01-2015
Changing a fuse
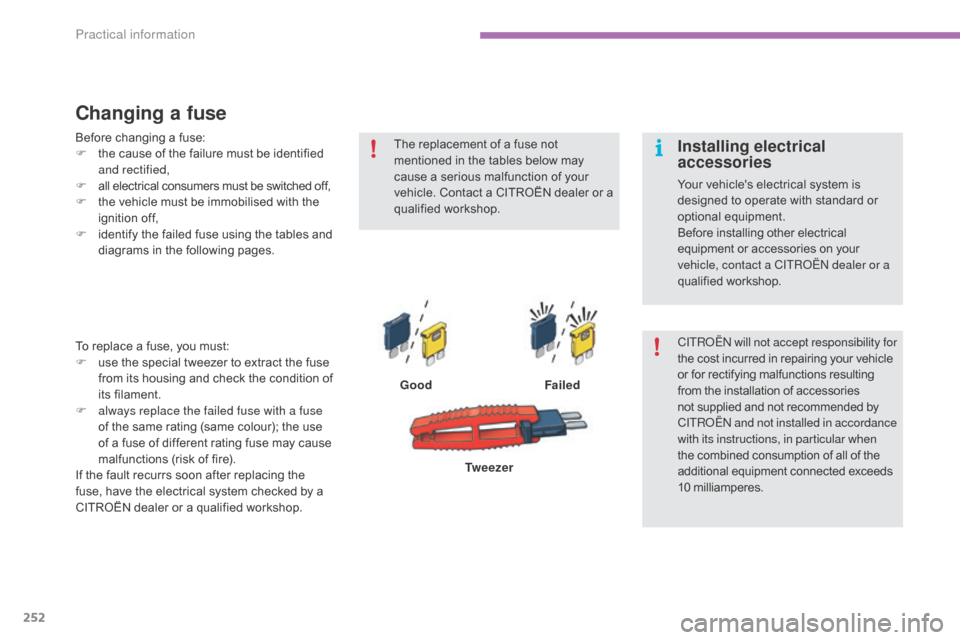
GoodFailed
To
replace
a
fuse,
you
must:
F
u
se
the
special
tweezer
to
extract
the
fuse
f
rom
its
housing
and
check
the
condition
of
it
s f
ilament.
F
a
lways replace the failed fuse with a fuse
of
the
same
rating
(same
colour);
the
use
o
f
a
fuse
of
different
rating
fuse
may
cause
m
alfunctions
(risk
of
fire).
If
the
fault
recurrs
soon
after
replacing
the
f
use,
have
the
electrical
system
checked
by
a
C
ITROËN
dealer
or
a
qualified
workshop. Tw e e z e r
The
replacement of a fuse not
m
entioned in the tables below may
c
ause a serious malfunction of your
v
ehicle. Contact a CITROËN dealer or a
q
ualified
w
orkshop.
CITR
oËn
will not accept responsibility for
the cost incurred in repairing your vehicle
o
r for rectifying malfunctions resulting f
rom the installation of accessories n
ot supplied and not recommended by
C
ITR
oËn an
d not installed in accordance
with its instructions, in particular when
the
combined consumption of all of the
a
dditional equipment connected exceeds
1
0
mil
liamperes.
Installing electrical
accessories
Your vehicle's electrical system is designed to operate with standard or
o
ptional
e
quipment.
Before
installing other electrical
e
quipment or accessories on your
v
ehicle, contact a CITR
oËn
dealer or a
qualified
w
orkshop.
Before
changing
a
fuse:
F
t
he
cause
of
the
failure
must
be
identified
a
nd rectified,
F
a
ll
electrical
consumers
must
be
switched
off,
F
t
he
vehicle
must
be
immobilised
with
the
ig
nition
o
ff,
F
i
dentify
the
failed
fuse
using
the
tables
and
d
iagrams
in
the
following
pages.
Practical information
Page 255 of 494
253
C4-2_en_Chap11_info-pratique_ed01-2015
C4-2_en_Chap11_info-pratique_ed01-2015
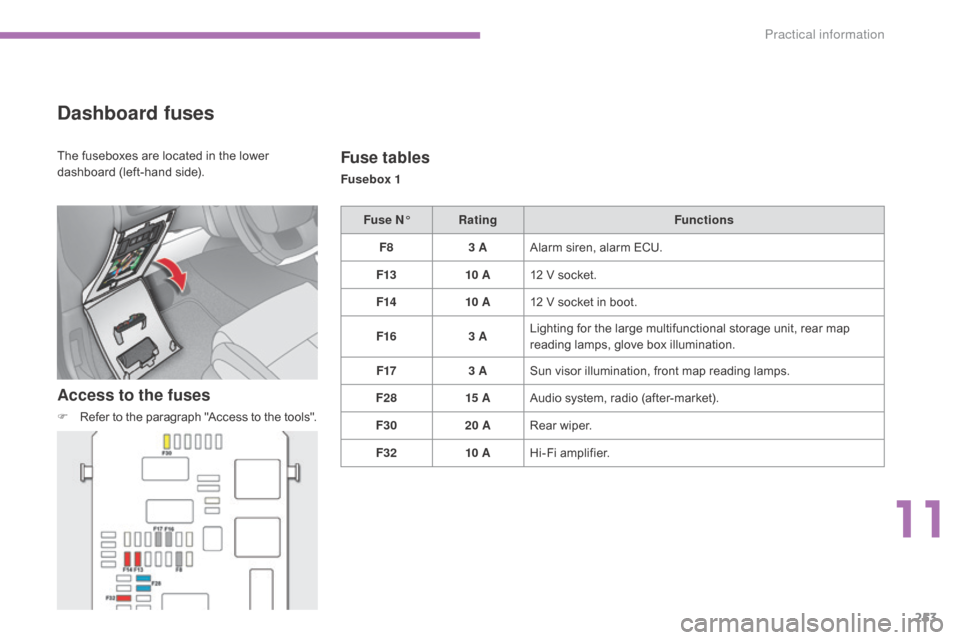
Dashboard fuses
Access to the fuses
F Refer to the paragraph "Access to the tools".
Fuse tables
Fusebox 1
Fuse N° Rating Functions
F8 3 AAlarm
s
iren,
alar
m
E
CU.
F13 10 A12
V socket.
F14 10 A12
V socket in boot.
F16 3 ALighting
for the large multifunctional storage unit, rear map
r
eading lamps, glove box illumination.
F17 3 ASun
visor illumination, front map reading lamps.
F28 15 AAudio
system, radio (after-market).
F30 20 ARear
wiper.
F32 10 AHi-Fi
amplifier.
The
fuseboxes
are
located
in
the
lower
d
ashboard
(left-hand
side).
11
Practical information
Page 256 of 494
254
C4-2_en_Chap11_info-pratique_ed01-2015
C4-2_en_Chap11_info-pratique_ed01-2015
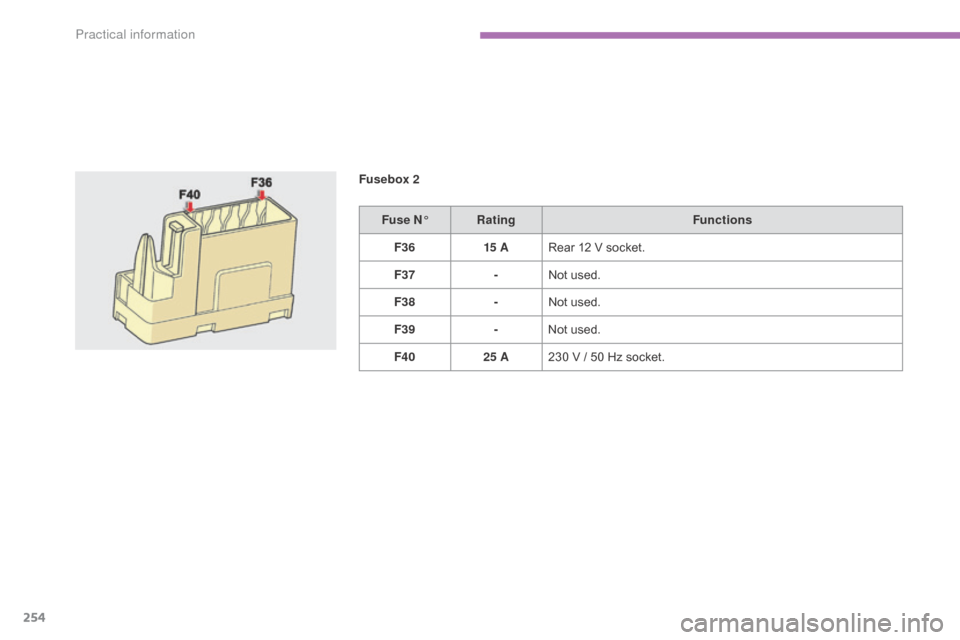
Fuse N°Rating Functions
F36 15 ARear
12 V socket.
F37 -Not
used.
F38 -Not
used.
F39 -Not
used.
F40 25 A230
V / 50 Hz socket.
Fusebox 2
Practical information
Page 257 of 494
255
C4-2_en_Chap11_info-pratique_ed01-2015
C4-2_en_Chap11_info-pratique_ed01-2015
Fuse N°Rating Functions
F19 30 AWindscreen
wipers slow / fast speed.
F20 15 AFront
and rear screenwash pump.
F21 20 AHeadlamp
wash pump.
F22 15 AHorn.
F23 15 ARight-hand
main beam headlamp.
F24 15 ALeft-hand
main beam headlamp.
F27 5 ALeft-hand
d
ipped
h
eadlamp.
F28 5 ARight-hand
d
ipped
h
eadlamp.
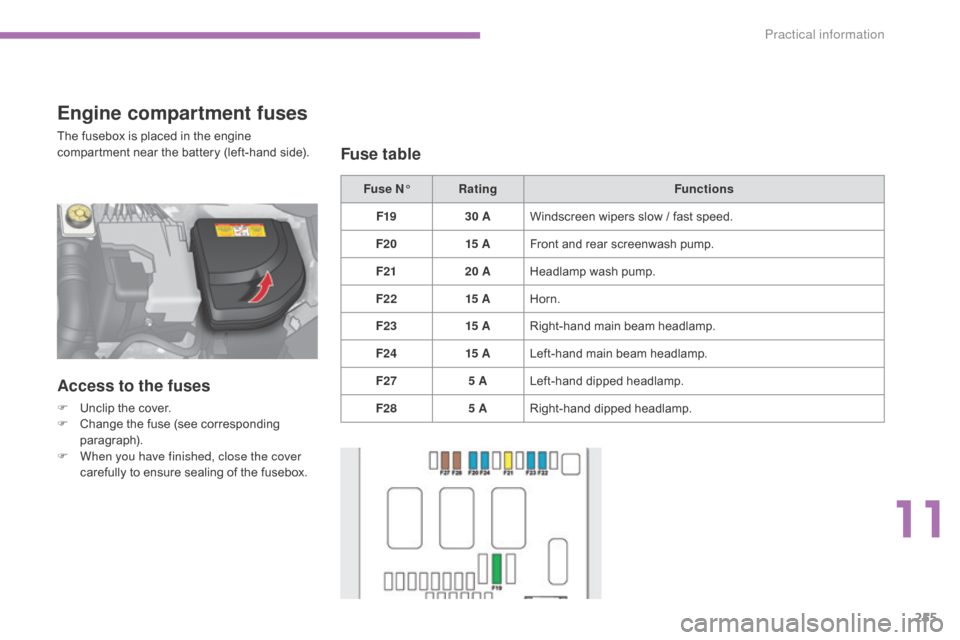
Engine compartment fuses
The fusebox is placed in the engine compartment near the battery (left-hand side).
Access to the fuses
F Unclip the cover.
F C hange the fuse (see corresponding
par
agraph).
F
W
hen you have finished, close the cover
carefully
to ensure sealing of the fusebox.
Fuse table
11
Practical information
Page 258 of 494
256
C4-2_en_Chap11_info-pratique_ed01-2015
C4-2_en_Chap11_info-pratique_ed01-2015
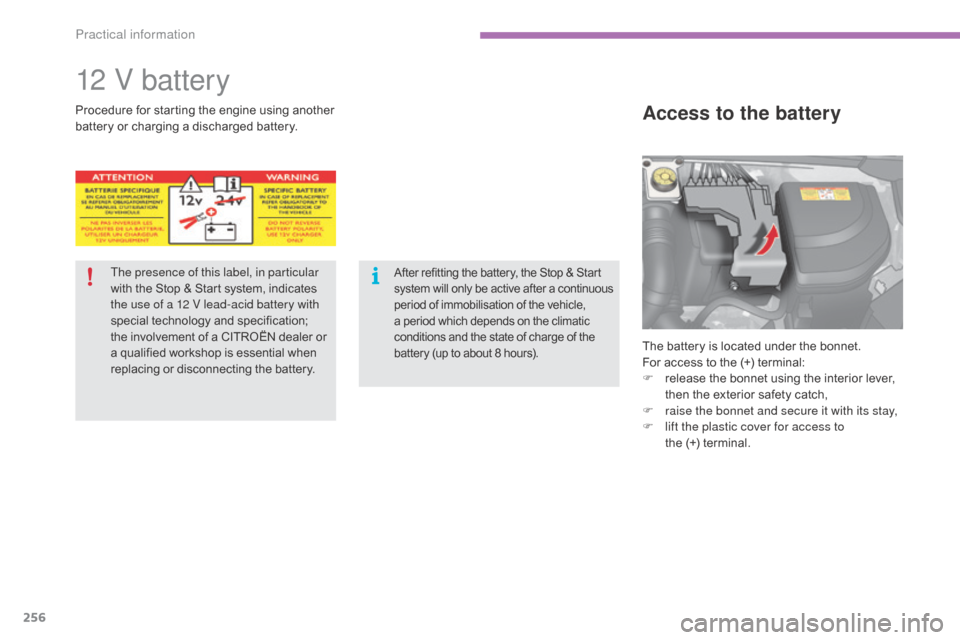
12 V battery
The battery is located under the bonnet.
For access to the (+) terminal:
F
r
elease the bonnet using the interior lever,
t
hen the exterior safety catch,
F
r
aise the bonnet and secure it with its stay,
F
l
ift the plastic cover for access to
the (+)
terminal.
Access to the batteryProcedure for starting the engine u sing another b
attery or charging a discharged battery.
The presence of this label, in particular
with
the Stop & Start system, indicates
t
he use of a 12 V lead-acid battery with
special
t
echnology
a
nd
s
pecification;
t
he involvement of a CITROËN dealer or
a
qualified workshop is essential when
r
eplacing or disconnecting the battery.
After refitting the battery, the Stop & Start system w ill o nly b e a ctive a fter a c ontinuous p
eriod of immobilisation of the vehicle,
a
period which depends on the climatic
c
onditions and the state of charge of the
b
attery (up to about 8 hours).
Practical information
Page 259 of 494
257
C4-2_en_Chap11_info-pratique_ed01-2015
C4-2_en_Chap11_info-pratique_ed01-2015
When your vehicle's battery is discharged, the engine can be started using a slave battery
(
external or on another vehicle) and jump lead
c
ables.
Starting using another
battery
First check that the slave battery has a n ominal voltage of 12 V and a capacity
a
t least equal to that of the discharged
b
attery.
Do
not try to start the engine by
c
onnecting a battery charger.
Do
not disconnect the (+) terminal when
t
he engine is running. F
S
tart the engine of the vehicle with the
g
ood battery and leave it running for a few
m
inutes.
F
O
perate the starter on the broken down
v
ehicle and let the engine run. I
f the engine does not start straight away, s
witch off the ignition and wait a few
m
oments before trying again.
Before disconnecting the battery
Wait 2 minutes after switching off the ignition before disconnecting the battery.
Close the windows and the doors before
disconnecting
the battery.
F
R
emove
the
plastic
cover
from
the
(+)
terminal,
if
your
vehicle
has
one.
F
C
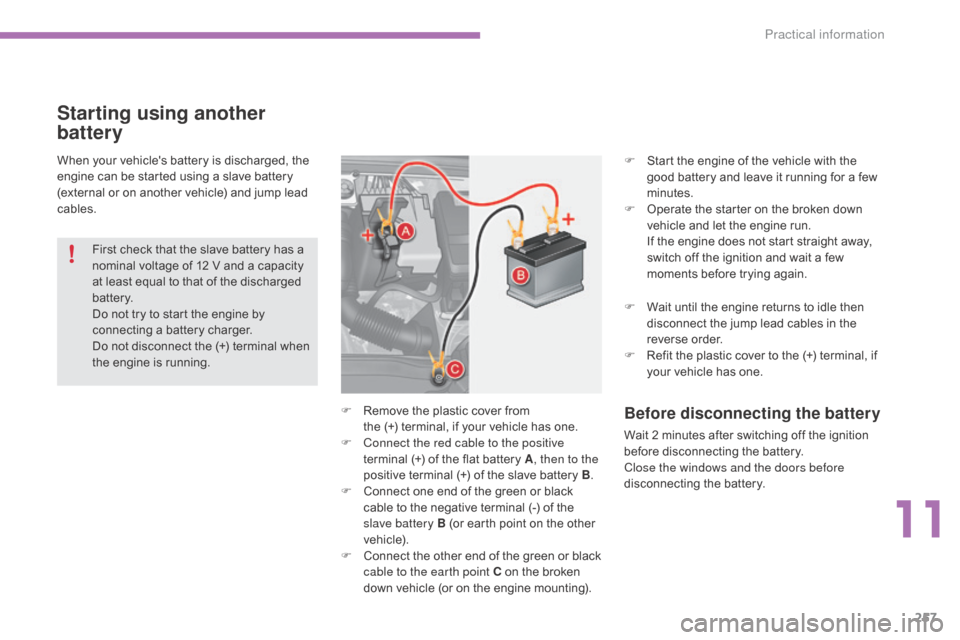
onnect the red cable to the positive
terminal
(+)
of
the
flat
battery
A , then to the
positive
terminal
(+)
of
the
slave
battery
B.
F
C
onnect
one
end
of
the
green
or
black
c
able
to
the
negative
terminal
(-)
of
the
s
lave battery B
(or
earth
point
on
the
other
v
ehicle).
F
C
onnect
t
he
o
ther
e
nd
o
f
t
he
g
reen
o
r
b
lack
c
able to the earth point C
on
the
broken
d
own
vehicle
(or
on
the
engine
mounting). F
W
ait until the engine returns to idle then
d
isconnect the jump lead cables in the
r
everse
o
rder.
F
R
efit the plastic cover to the (+) terminal, if
y
our vehicle has one.
11
Practical information
Page 260 of 494
258
C4-2_en_Chap11_info-pratique_ed01-2015
C4-2_en_Chap11_info-pratique_ed01-2015
Protect your eyes and face before
handling the battery.
All
operations on the battery must be
c
arried out in a well ventilated area and
away
from naked flames and sources
o
f sparks, so as to avoid the risk of
e
xplosion or fire.
Do
not try to charge a frozen battery;
t
he battery must first be thawed out to
a
void the risk of explosion. If the battery
h
as been frozen, before charging have
i
t checked by a CITROËN dealer or a
q
ualified workshop who will check that
t
he internal components have not been
d
amaged and the casing is not cracked,
w
hich could cause a leak of toxic and
c
orrosive acid.
do n
ot reverse the polarity and use only
a
12 V charger.
Do
not disconnect the terminals while
t
he engine is running.
Do
not charge the batteries without
d
isconnecting the terminals first.
Wash
your hands after wards.do n ot push the vehicle to start the
engine if you have an electronic or
a
utomatic gearbox.
Some
functions
are
not
available
if
the
b
attery
is
not
sufficiently
charged.
It is advisable to disconnect the battery if
the
vehicle
is
to
be
left
unused
for
more
t
han
one
month.
The batteries contain harmful substances s uch as sulphuric acid and lead. They m
ust be disposed of in accordance
w
ith regulations and must not, in any
c
ircumstances, be discarded with household
w
aste.
Take
used remote control batteries and
v
ehicle batteries to a special collection point.
Practical information