Citroen C4 2016 2.G Owner's Manual
Manufacturer: CITROEN, Model Year: 2016, Model line: C4, Model: Citroen C4 2016 2.GPages: 396, PDF Size: 10.22 MB
Page 161 of 396
159
C4-2_en_Chap05_securite_ed02-2015
U: seating position suitable for the installation o
f a child seat secured using the seat belt
a
nd universally approved rear ward facing
a
nd/or for ward facing.
U(R1) :
i
dentical to U,
with the vehicle's seat
b
ackrest inclined fully for wards.
U(R2) :
i
dentical to U,
with the vehicle's seat
a
djusted to the highest position.
X :
s
eating position not suitable for installing a
c
hild seat for the weight group indicated.(a)
U niversal child seat: child seat which can be i
nstalled in all vehicles using the seat belt.
(b)
G
roup 0: from birth to 10 kg. Infant car seats
a
nd "car cots" cannot be installed on the
front
p
assenger
sea
t.
(c)
C
onsult the legislation in force in your
c
ountry before installing your child on this
sea
t.
(d)
T
o install a child seat at the rear, rear ward
o
r for ward facing, move the front seat
f
or ward, then straighten the backrest to
a
llow enough room for the child seat and the
c
hild's legs.Remove
and stow the head restraint
b
efore installing a child seat with
b
ackrest on a passenger seat. Refit the
h
ead restraint once the child seat has
been
removed.
5
Safety
Page 162 of 396
160
C4-2_en_Chap05_securite_ed02-2015
"ISOFIX" mountings
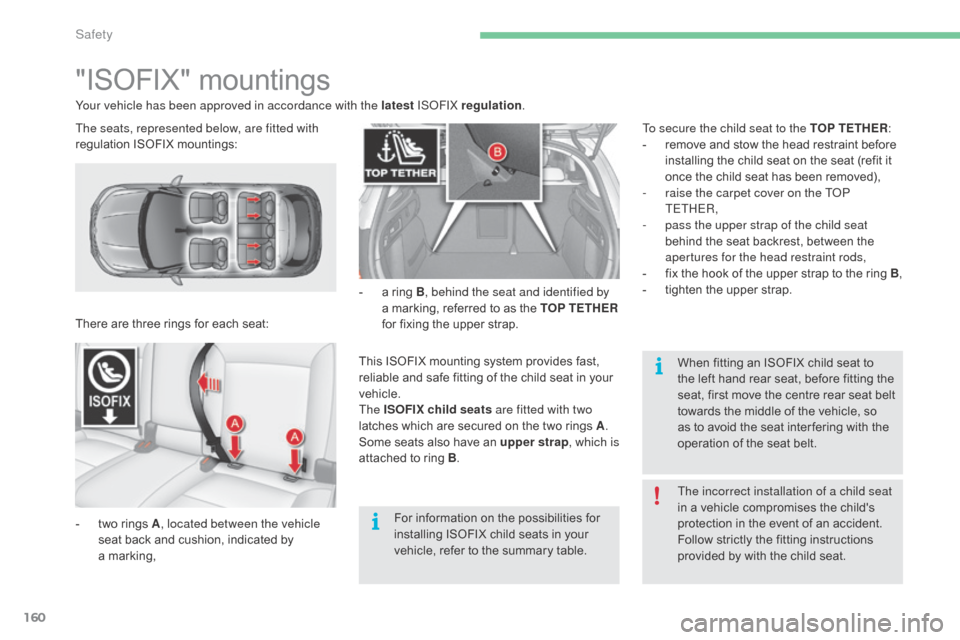
There are three rings for each seat:
-
t
wo rings A, located between the vehicle
seat
back and cushion, indicated by
a m
arking, This
ISOFIX mounting system provides fast,
r
eliable and safe fitting of the child seat in your
v
ehicle.
The ISOFIX child seats are fitted with two
latches
which are secured on the two rings A.
Some
seats also have an upper strap, which is
attached
to ring B.
Your vehicle has been approved in accordance with the latest
ISOFIX regulation.
To secure the child seat to the TOP TETHER :
-
r
emove and stow the head restraint before
i
nstalling the child seat on the seat (refit it
o
nce the child seat has been removed),
-
r
aise the carpet cover on the TOP
TETHER,
-
p
ass the upper strap of the child seat
behind the seat backrest, between the
a
pertures for the head restraint rods,
-
f
ix the hook of the upper strap to the ring B,
-
t
ighten the upper strap.
-
a
ring B
, behind the seat and identified by
a marking, referred to as the TOP TETHER
for fixing the upper strap.
The incorrect installation of a child seat
in
a vehicle compromises the child's
p
rotection in the event of an accident.
Follow
strictly the fitting instructions
p
rovided by with the child seat.
When
fitting an ISOFIX child seat to
t
he left hand rear seat, before fitting the
s
eat, first move the centre rear seat belt
t
owards the middle of the vehicle, so
a
s to avoid the seat inter fering with the
o
peration of the seat belt.
For
information on the possibilities for
i
nstalling ISOFIX child seats in your
v
ehicle, refer to the summary table.
The seats, represented below, are fitted with
regulation
I
SOFIX
m
ountings:
Safety
Page 163 of 396
161
C4-2_en_Chap05_securite_ed02-2015
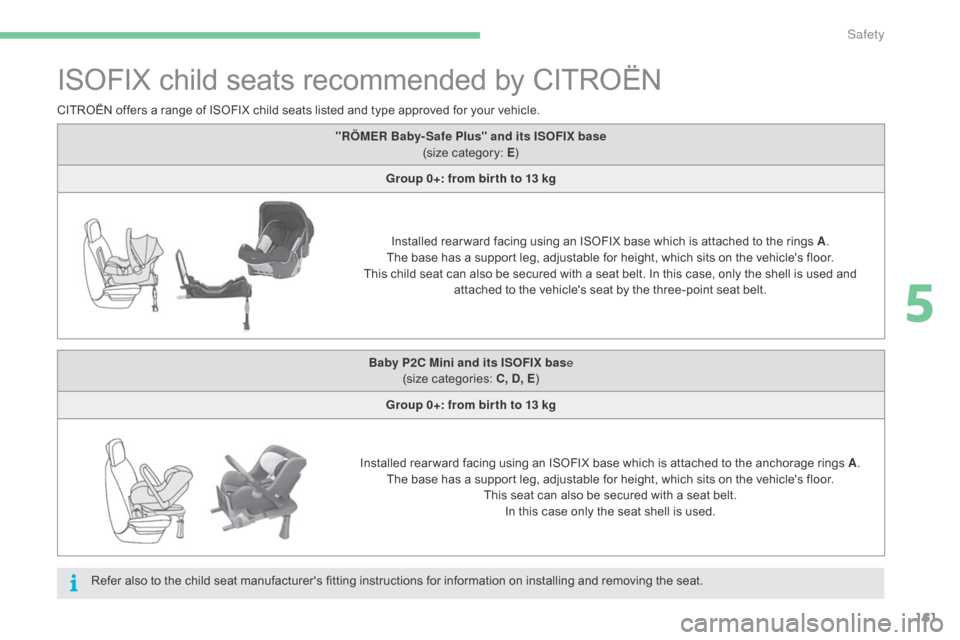
ISOFIX child seats recommended by CITROËN
CITROËN offers a range of ISOFIX child seats listed and type approved for your vehicle.
R efer also to the child seat manufacturer's fitting instructions for information on installing and removing the seat.
"RÖMER Baby- Safe Plus" and its ISOFIX base
(size
category: E)
Group 0+: from bir th to 13 kg
Installed
rear ward facing using an ISOFIX base which is attached to the rings A.
The
base has a support leg, adjustable for height, which sits on the vehicle's floor.
This
child seat can also be secured with a seat belt. In this case, only the shell is used and
a
ttached to the vehicle's seat by the three-point seat belt.
Baby P2C Mini and its ISOFIX bas e
(size
c
ategories:
C
, D, E)
Group 0+: from bir th to 13 kg
Installed
rear ward facing using an ISOFIX base which is attached to the anchorage rings A.
The
base has a support leg, adjustable for height, which sits on the vehicle's floor.
This
seat can also be secured with a seat belt.
In
this case only the seat shell is used.
5
Safety
Page 164 of 396
162
C4-2_en_Chap05_securite_ed02-2015
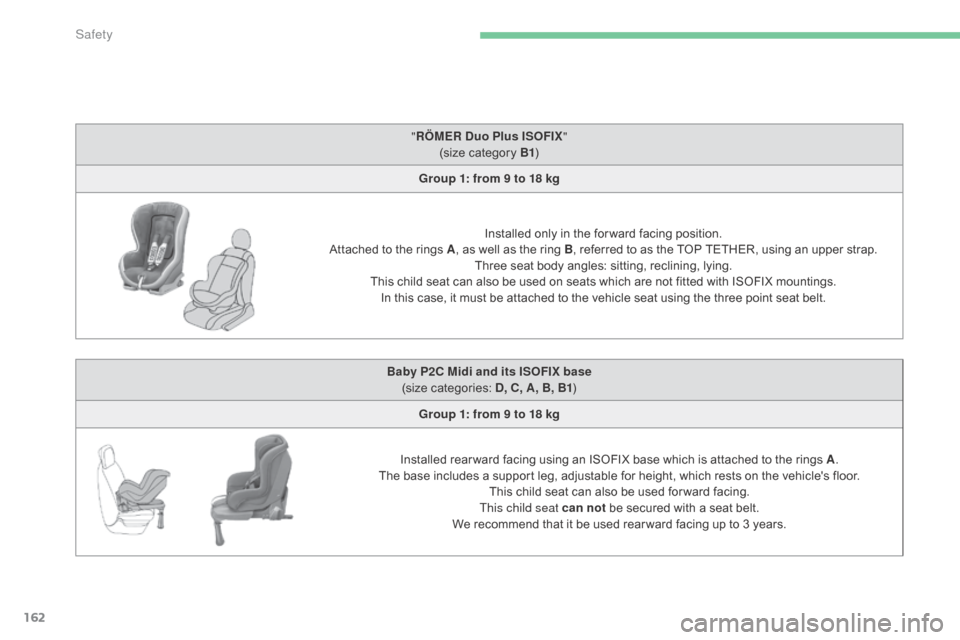
"RÖMER Duo Plus ISOFIX "
(size category B1)
Group 1: from 9 to 18 kg
Installed
only in the for ward facing position.
Attached
to
the rings A,
as well as the ring B,
referred to as the TOP TETHER, using an upper strap.
Three
seat body angles: sitting, reclining, lying.
This
child seat can also be used on seats which are not fitted with ISOFIX mountings.
In
this case, it must be attached to the vehicle seat using the three point seat belt.
Baby P2C Midi and its ISOFIX base (size
c
ategories:
D
, C, A, B, B1)
Group 1: from 9 to 18 kg
Installed
rear ward facing using an ISOFIX base which is attached to the rings A.
The
base includes a support leg, adjustable for height, which rests on the vehicle's floor.
This
child seat can also be used for ward facing.
This child seat can not
be secured with a seat belt.
We
recommend that it be used rear ward facing up to 3 years.
Safety
Page 165 of 396
163
C4-2_en_Chap05_securite_ed02-2015
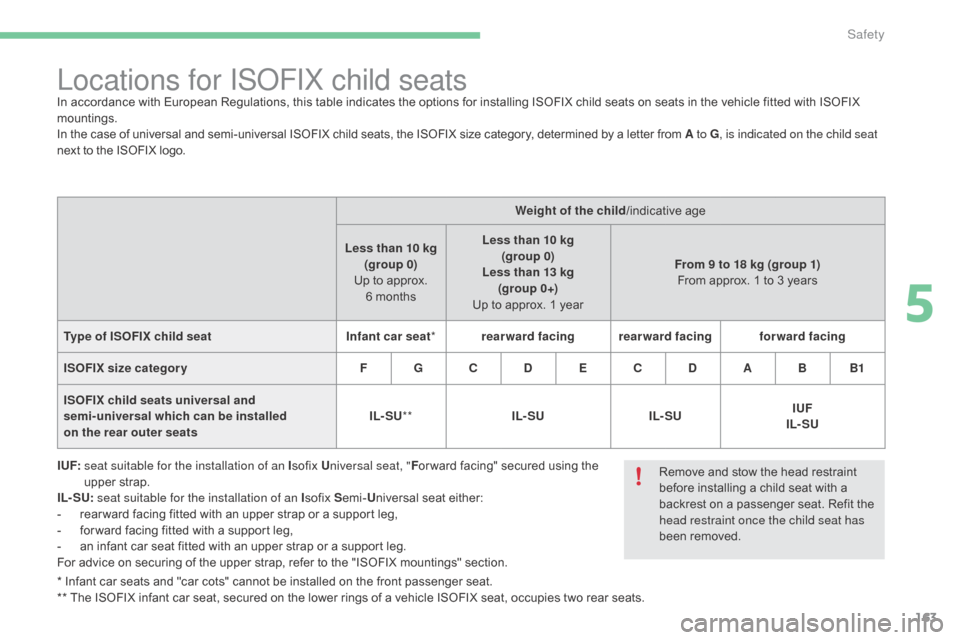
* Infant car seats and "car cots" cannot be installed on the front passenger seat.
* * The ISOFIX infant car seat, secured on the lower rings of a vehicle ISOFIX seat, occupies two rear seats.
Locations for ISOFIX child seatsIn accordance with European Regulations, this table indicates the options for installing ISOFIX child seats on seats in the vehicle fitted with ISOFIX mountings.
In
the case of universal and semi-universal ISOFIX child seats, the ISOFIX size category, determined by a letter from A to G , is indicated on the child seat
next
to the ISOFIX logo.
I UF:
s
eat suitable for the installation of an I sofix
Universal seat, " For ward
facing" secured using the
u
pper strap.
IL- SU: seat suitable for the installation of an I sofix
Semi- Universal
sea
t
ei
ther:
-
r
ear ward facing fitted with an upper strap or a support leg,
-
f
or ward facing fitted with a support leg,
-
a
n infant car seat fitted with an upper strap or a support leg.
For
advice on securing of the upper strap, refer to the "ISOFIX mountings" section.Weight of the child
/indicative
age
Less than 10
kg
(group 0)
Up
to approx.
6
monthsLess than 10 kg
(group 0)
Less than 13 kg (group 0+)
Up
to approx. 1 yearFrom 9 to 18 kg (group 1)
From
approx. 1 to 3 years
Type of ISOFIX child seat Infant car seat*rearward facing rearward facing forward facing
ISOFIX size categor y F G C D E C D A B B1
ISOFIX child seats universal and
semi-universal which can be installed
on the rear outer seats IL- SU
** IL- SU IL- SU IUF
IL- SU
Remove
and stow the head restraint
b
efore installing a child seat with a
b
ackrest on a passenger seat. Refit the
h
ead restraint once the child seat has
been
removed.
5
Safety
Page 166 of 396
164
C4-2_en_Chap05_securite_ed02-2015
For optimum installation o f t he fo rward f acing c
hild seat, ensure that the back of the child
s
eat is as close as possible to the backrest
o
f the vehicle's seat, in contact if possible.
You
mst remove the head restraint before
i
nstalling a child seat with backrest to a
p
assenger
sea
t.
Ensure that the head restraint is stored or
attached
securely to prevent it from being
t
hrown around the vehicle in the event of
sharp
braking. Refit the head restraint when
t
he child seat is removed.
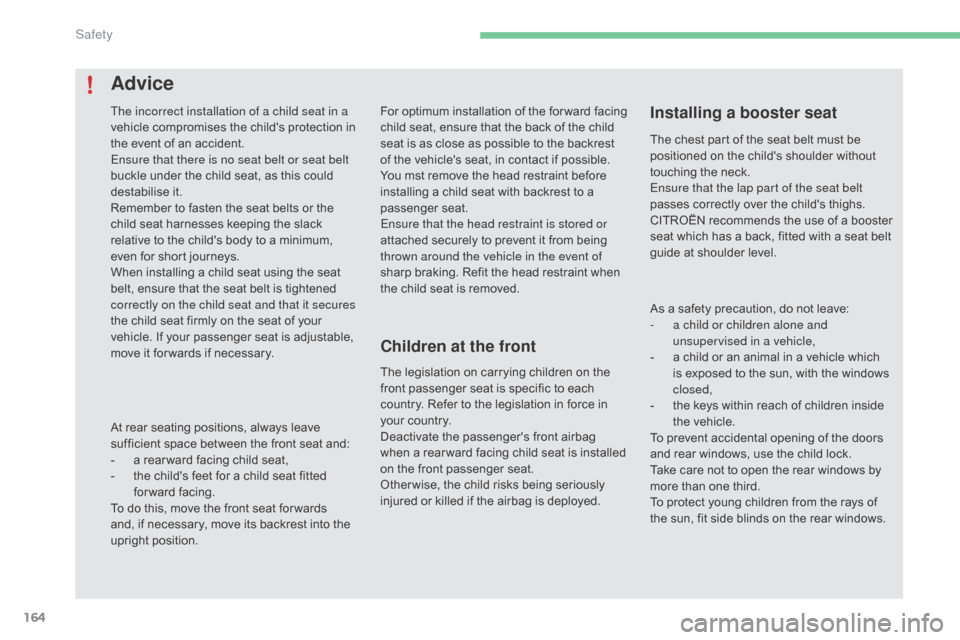
Advice
Installing a booster seat
Children at the frontThe incorrect installation of a child seat in a
vehicle compromises the child's protection in
t
he event of an accident.
Ensure that there is no seat belt or seat belt
buckle
under the child seat, as this could
de
stabilise
i
t.
Remember
to fasten the seat belts or the
c
hild seat harnesses keeping the slack
r
elative to the child's body to a minimum,
e
ven for short journeys.
When
installing a child seat using the seat
b
elt, ensure that the seat belt is tightened
c
orrectly on the child seat and that it secures
the
child seat firmly on the seat of your
v
ehicle. If your passenger seat is adjustable,
m
ove it for wards if necessary. The
legislation on carrying children on the
f
ront passenger seat is specific to each
c
ountry. Refer to the legislation in force in
y
our country.
Deactivate
the passenger's front airbag
w
hen a rear ward facing child seat is installed
o
n the front passenger seat.
Otherwise,
t
he
c
hild
r
isks
b
eing
ser
iously
i
njured or killed if the airbag is deployed.The
chest part of the seat belt must be
p
ositioned on the child's shoulder without
t
ouching the neck.
Ensure that the lap part of the seat belt
passes
correctly over the child's thighs.
CITROËN
recommends the use of a booster
s
eat which has a back, fitted with a seat belt
g
uide at shoulder level.
At
rear seating positions, always leave
s
ufficient space between the front seat and:
-
a
rear ward facing child seat,
-
t
he child's feet for a child seat fitted
fo
rward
f
acing.
To
do this, move the front seat for wards
a
nd, if necessary, move its backrest into the
u
pright
p
osition. As
a safety precaution, do not leave:
-
a c
hild or children alone and
unsupervised in a vehicle,
-
a
child or an animal in a vehicle which
i
s exposed to the sun, with the windows
c
losed,
-
t
he keys within reach of children inside
t
he vehicle.
To
prevent accidental opening of the doors
a
nd rear windows, use the child lock.
Take
care not to open the rear windows by
m
ore than one third.
To
protect young children from the rays of
t
he sun, fit side blinds on the rear windows.
Safety
Page 167 of 396
165
C4-2_en_Chap05_securite_ed02-2015
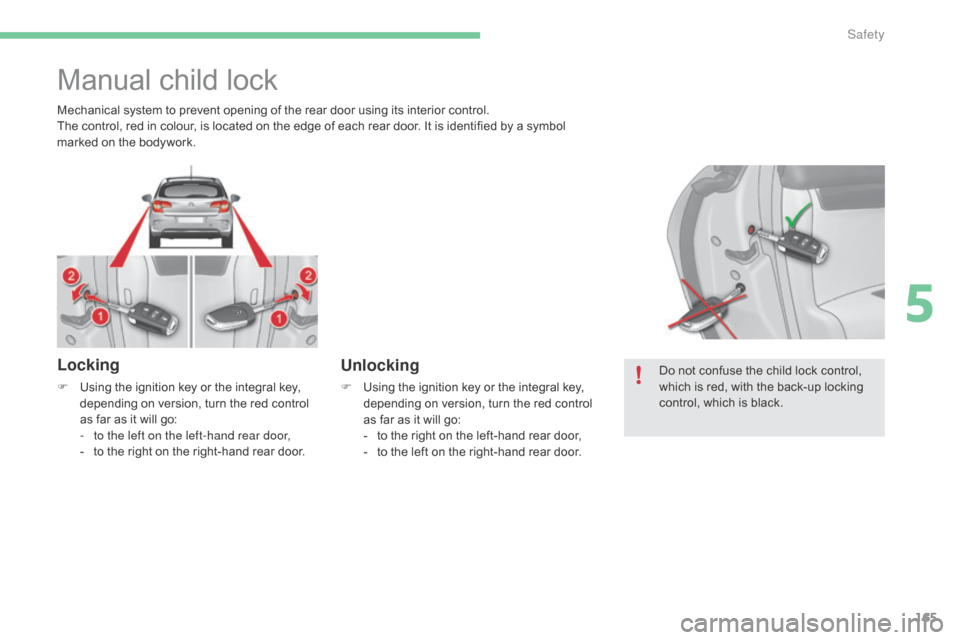
Manual child lock
Locking
F Using the ignition key or the integral key, d
epending on version, turn the red control
a
s far as it will go:
-
t
o the left on the left-hand rear door,
-
t
o the right on the right-hand rear door.
Unlocking
F Using the ignition key or the integral key, d
epending on version, turn the red control
a
s far as it will go:
-
t
o the right on the left-hand rear door,
-
t
o the left on the right-hand rear door.Do
not confuse the child lock control, w
hich is red, with the back-up locking c
ontrol, which is black.
Mechanical
system
to
prevent
opening
of
the
rear
door using its interior control.
The
control,
red
in
colour,
is
located
on
the
edge
of
each rear door. It is identified by a symbol
m
arked
on
the
bodywork.
5
Safety
Page 168 of 396
166
C4-2_en_Chap06_conduite_ed02-2015
Driving recommendations
Observe the driving regulations and remain vigilant whatever the traffic conditions.
Pay
close attention to the traffic and keep your
h
ands on the wheel so that you are ready to
react
at any time to any eventuality.
On
a long journey, a break every two hours is
s
trongly
re
commended.
In
difficult weather, drive smoothly, anticipate
t
he need to brake and increase the distance
f
rom other vehicles.
Driving on flooded roads
We strongly advise against driving on flooded roads, as this could cause serious damage
t
o the engine or gearbox, as well as to the
e
lectrical systems of your vehicle.
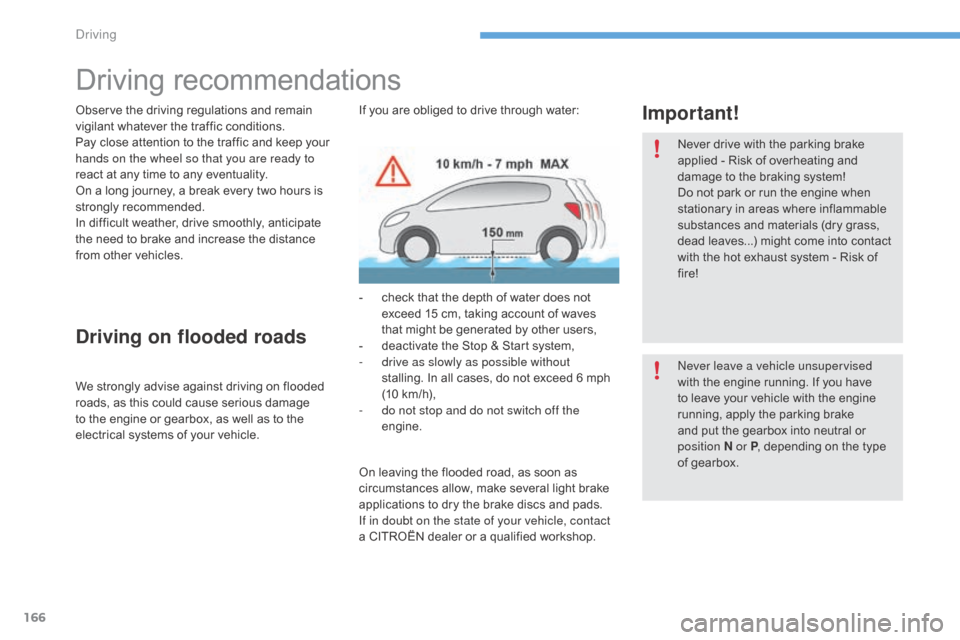
Important!If you are obliged to drive through water:
-
c
heck that the depth of water does not
e
xceed 15 cm, taking account of waves
t
hat might be generated by other users,
-
d
eactivate the Stop & Start system,
-
d
rive as slowly as possible without
stalling.
In all cases, do not exceed 6 mph
(
10 km/h),
-
d
o not stop and do not switch off the
engine. Never
drive with the parking brake
a
pplied - Risk of overheating and
d
amage to the braking system!
Do
not park or run the engine when
s
tationary in areas where inflammable
s
ubstances and materials (dry grass,
d
ead leaves...) might come into contact
w
ith the hot exhaust system - Risk of
f
ire!
Never leave a vehicle unsupervised
with
the engine running. If you have
t
o leave your vehicle with the engine
r
unning, apply the parking brake
a
nd put the gearbox into neutral or
p
osition
N or P,
depending on the type
o
f gearbox.
On
leaving the flooded road, as soon as
c
ircumstances allow, make several light brake
a
pplications to dry the brake discs and pads.
If in doubt on the state of your vehicle, contact
a
CITROËN dealer or a qualified workshop.
Driving
Page 169 of 396
167
C4-2_en_Chap06_conduite_ed02-2015
When towing
Distribution of loads
F Distribute the load in the trailer so that the heaviest items are as close as possible to t
he axle and the nose weight approaches the
m
aximum permitted without exceeding it.
Air density decreases with altitude,
thus
r
educing
e
ngine
p
erformance.
A
bove 1 000 metres, the maximum towed
l
oad must be reduced by 10 % for every
1 0
00 metres of altitude.
Side wind
F Take into account the increased sensitivity t
o side wind.
For
more information on weights (and the
t
owed loads which apply to your vehicle) refer
t
o the corresponding section.
F
I
f the warning lamp and the
S
TOP
warning lamp come on,
s
top the vehicle and switch off
the engine as soon as possible.
Braking
Towing a trailer increases the braking distance.
T o avoid overheating of the brakes, the use of
e
ngine braking is recommended.
Ty r e s
F Check the tyre pressures of the towing v
ehicle and of the trailer, observing the
re
commended
p
ressures.
Lighting
F Check the electrical lighting and signalling o
n the trailer and the hadlamp beam height
o
f your vehicle.
For
more information on adjusting the
h
eadlamp beam height, refer to the
c
orresponding
s
ection.
The
rear parking sensors will be
d
eactivated automatically if a genuine
C
ITROËN towbar is used.
Cooling
Towing a trailer on a slope increases the temperature of the coolant.
As
the fan is electrically controlled, its cooling
c
apacity is not dependent on the engine speed.
F
T
o lower the engine speed, reduce your
s
peed.
The
maximum towed load on a long incline
d
epends on the gradient and the ambient
t
emperature.
In
all cases, keep a check on the coolant
t
emperature.
6
Driving
Page 170 of 396
168
C4-2_en_Chap06_conduite_ed02-2015
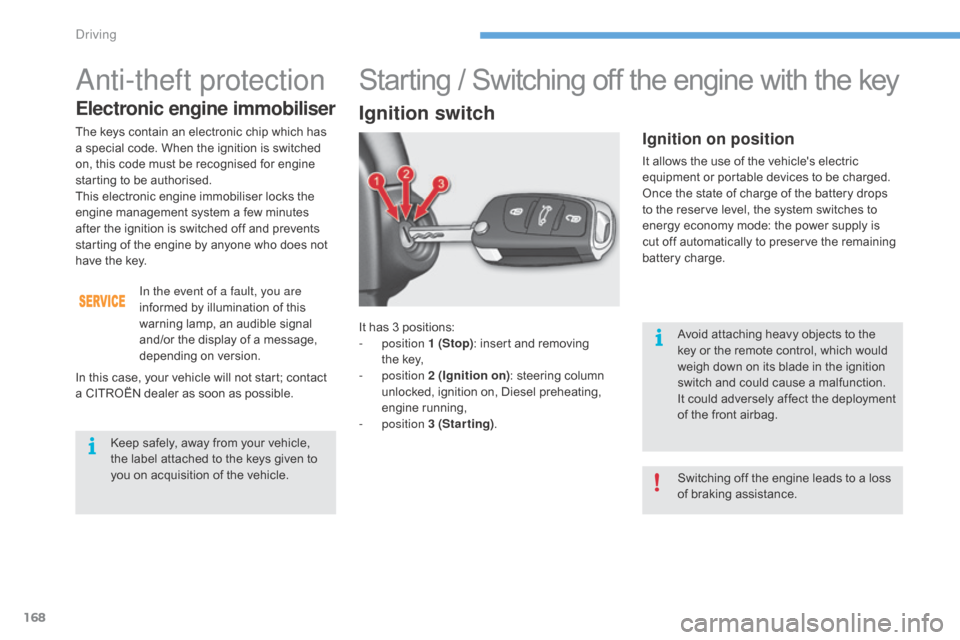
It has 3 positions:
- position 1 (Stop):
insert and removing
t
he key,
-
position 2 (Ignition on) :
steering column
u
nlocked, ignition on, Diesel preheating,
e
ngine
r
unning,
-
position 3 (Starting) .
Ignition on position
It allows the use of the vehicle's electric e
quipment or portable devices to be charged.
Once
the state of charge of the battery drops
t
o the reserve level, the system switches to
e
nergy economy mode: the power supply is
c
ut off automatically to preserve the remaining
b
attery charge.
Starting / Switching off the engine with the key
Ignition switch
Avoid attaching heavy objects to the key or the remote control, which would
w
eigh down on its blade in the ignition
s
witch and could cause a malfunction.
It
could adversely affect the deployment
o
f the front airbag.
Switching
off the engine leads to a loss
o
f braking assistance.
Anti-theft protection
Electronic engine immobiliser
Keep safely, away from your vehicle, the label attached to the keys given to
y
ou on acquisition of the vehicle.
The
keys contain an electronic chip which has
a
special code. When the ignition is switched
o
n,
this code must be recognised for engine
s
tarting to be authorised.
This
electronic engine immobiliser locks the
e
ngine management system a few minutes
a
fter
the ignition is switched off and prevents
s
tarting of the engine by anyone who does not
h
ave
the key.
In the event of a fault, you are
informed by illumination of this
w
arning lamp, an audible signal
a
nd/or the display of a message,
d
epending
o
n
v
ersion.
In
this
case, your vehicle will not start; contact
a
CITROËN dealer as soon as possible.
Driving