CITROEN C4 PICASSO 2010 Manual PDF
Manufacturer: CITROEN, Model Year: 2010, Model line: C4 PICASSO, Model: CITROEN C4 PICASSO 2010Pages: 352, PDF Size: 10.66 MB
Page 71 of 352

Downloaded from www.Manualslib.com manuals search engine III
69
COMFORT
Storing driving positions
System which registers the electrical
settings of the driver's seat and door
mirrors. It enables you to store and
recall two positions using the but-
tons on the side of the driver's seat.
Storing a position
Using buttons M/1/2
�)
Switch on the ignition.
�)
Adjust your seat and the door
mirrors.
�)
Press button M
, then press but-
ton 1
or 2
within four seconds.
An audible signal indicates that
the position has been stored.
Storing a new position cancels the
previous position.
Recalling a stored position
Ignition on or engine running
�)
Press button 1
or 2
to recall the
corresponding position.
An audible signal indicates the end
of the adjustment.
You can interrupt the current move-
ment by pressing button M
, 1
or 2
or
by using one of the seat controls.
A stored position cannot be recalled
while driving.
Recalling stored positions is deacti-
vated 45 seconds after switching off
the ignition.
Page 72 of 352

Downloaded from www.Manualslib.com manuals search engine III
70
COMFORT
REAR HEAD RESTRAINTS
The rear head restraints can be
removed and have two positions:
- high, position for use,
- low, storage position.
To raise a head restraint, pull it up-
wards.
To lower it, press the lug then the
head restraint.
To remove it, place it in the high posi-
tion, push the lug and pull it upwards.
To r efi t it, engage the head restraint
rods in the holes taking care to re-
main in line with the seat back.
SECOND ROW SEATS
Forwards-backwards adjustment
Lift the control A
, located at the front
of the seat, then move the seat to
the desired position.
"Comfort" position
The 3 second-row seats are inde-
pendent of each other and all the
same width. They all can have a
"comfort" position.
Placing a seat in the "comfort"
position
�)
Pull on the control B
and guide
the seat rearwards.
The backrest reclines and the seat
base pivots slightly.
Returning the seat to the initial
position
�)
Pull on the control B
and allow
the seat to come forwards.
Always supervise any movements
of seats by children. Never drive with the head restraints
removed, they must be in place
and correctly adjusted.
Page 73 of 352
Downloaded from www.Manualslib.com manuals search engine III
71
COMFORT
SECOND ROW SEATS(C4 PICASSO)
Folding a seat
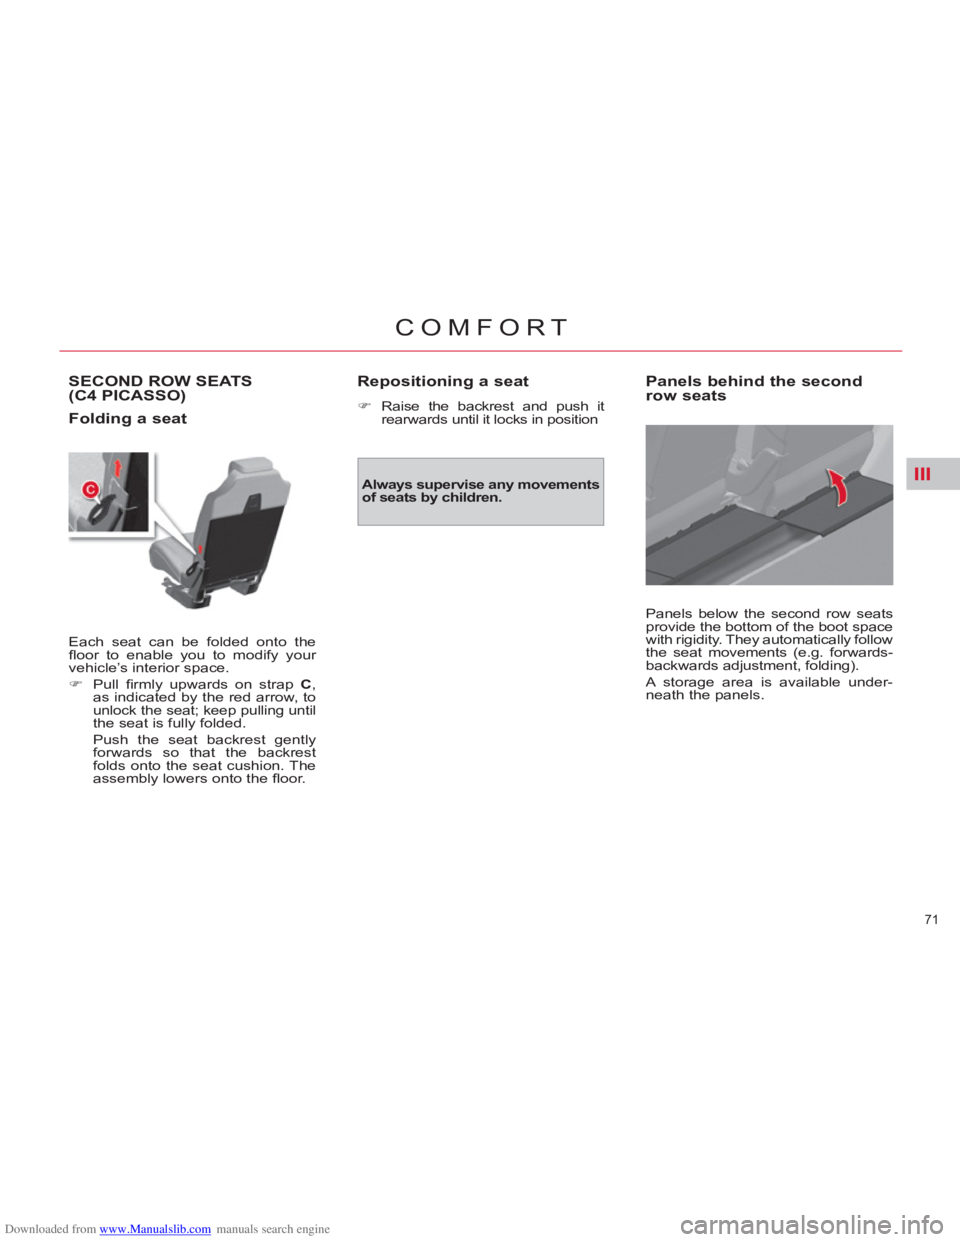
Each seat can be folded onto the
fl oor to enable you to modify your
vehicle’s interior space.
�)
Pull fi rmly upwards on strap C
,
as indicated by the red arrow, to
unlock the seat; keep pulling until
the seat is fully folded.
Push the seat backrest gently
forwards so that the backrest
folds onto the seat cushion. The
assembly lowers onto the fl oor.
Repositioning a seat
�)
Raise the backrest and push it
rearwards until it locks in position
Always supervise any movements
of seats by children.
Panels behind the second
row seats
Panels below the second row seats
provide the bottom of the boot space
with rigidity. They automatically follow
the seat movements (e.g. forwards-
backwards adjustment, folding).
A storage area is available under-
neath the panels.
Page 74 of 352
Downloaded from www.Manualslib.com manuals search engine III
72
COMFORT
SECOND ROW REAR SEATS(GRAND C4 PICASSO)
Each seat can be folded onto the
fl oor to form a fl at surface, thus en-
abling you to adapt your vehicle’s
interior space.
Folding a seat
From the outside
�)
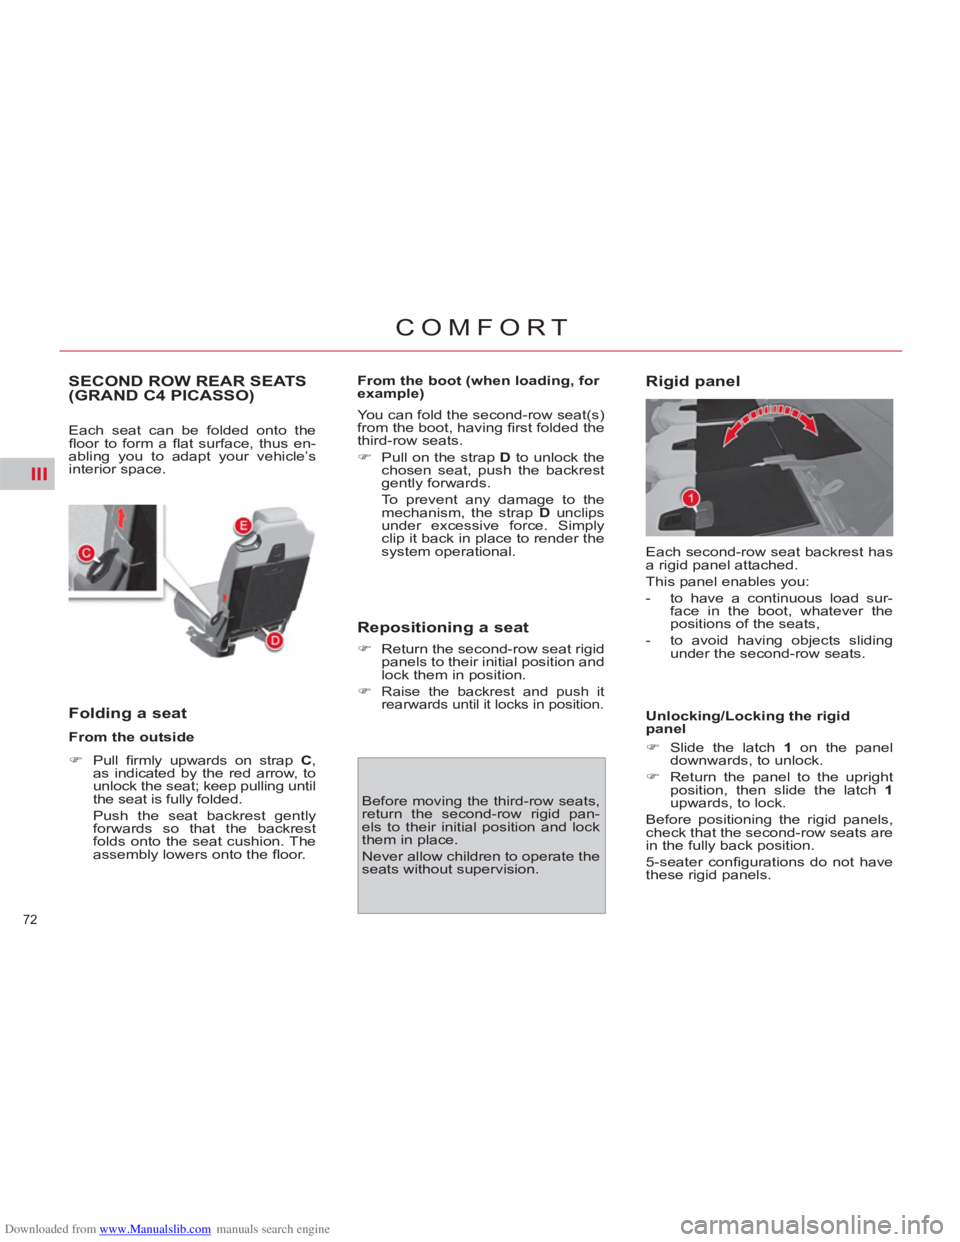
Pull fi rmly upwards on strap C
,
as indicated by the red arrow, to
unlock the seat; keep pulling until
the seat is fully folded.
Push the seat backrest gently
forwards so that the backrest
folds onto the seat cushion. The
assembly lowers onto the fl oor.
From the boot (when loading, for
example)
You can fold the second-row seat(s)
from the boot, having fi rst folded the
third-row seats.
�)
Pull on the strap D
to unlock the
chosen seat, push the backrest
gently forwards.
To prevent any damage to the
mechanism, the strap D
unclips
under excessive force. Simply
clip it back in place to render the
system operational.
Repositioning a seat
�)
Return the second-row seat rigid
panels to their initial position and
lock them in position.
�)
Raise the backrest and push it
rearwards until it locks in position.
Before moving the third-row seats,
return the second-row rigid pan-
els to their initial position and lock
them in place.
Never allow children to operate the
seats without supervision.
Rigid panel
Each second-row seat backrest has
a rigid panel attached.
This panel enables you:
- to have a continuous load sur-
face in the boot, whatever the
positions of the seats,
- to avoid having objects sliding
under the second-row seats.
Unlocking/Locking the rigid
panel
�)
Slide the latch 1
on the panel
downwards, to unlock.
�)
Return the panel to the upright
position, then slide the latch 1
upwards, to lock.
Before positioning the rigid panels,
check that the second-row seats are
in the fully back position.
5-seater confi gurations do not have
these rigid panels.
Page 75 of 352
Downloaded from www.Manualslib.com manuals search engine III
73
COMFORT
"Cinema seat" position
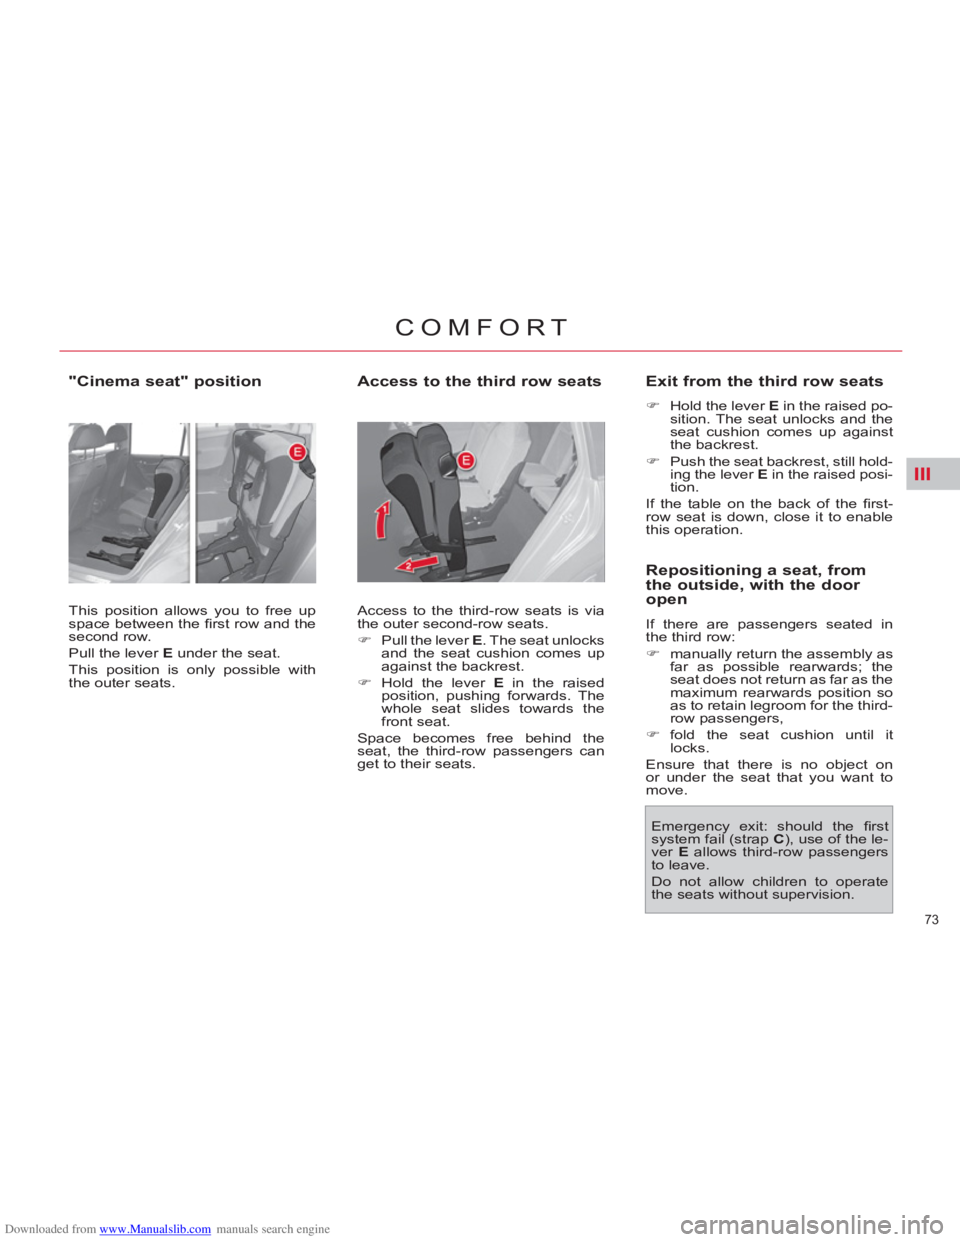
This position allows you to free up
space between the fi rst row and the
second row.
Pull the lever E
under the seat.
This position is only possible with
the outer seats.
Access to the third row seats
Access to the third-row seats is via
the outer second-row seats.
�)
Pull the lever E
. The seat unlocks
and the seat cushion comes up
against the backrest.
�)
Hold the lever E
in the raised
position, pushing forwards. The
whole seat slides towards the
front seat.
Space becomes free behind the
seat, the third-row passengers can
get to their seats.
Exit from the third row seats
�)
Hold the lever E
in the raised po-
sition. The seat unlocks and the
seat cushion comes up against
the backrest.
�)
Push the seat backrest, still hold-
ing the lever E
in the raised posi-
tion.
If the table on the back of the fi rst-
row seat is down, close it to enable
this operation.
Repositioning a seat, from
the outside, with the door
open
If there are passengers seated in
the third row:
�)
manually return the assembly as
far as possible rearwards; the
seat does not return as far as the
maximum rearwards position so
as to retain legroom for the third-
row passengers,
�)
fold the seat cushion until it
locks.
Ensure that there is no object on
or under the seat that you want to
move.
Emergency exit: should the fi rst
system fail (strap C
), use of the le-
ver E
allows third-row passengers
to leave.
Do not allow children to operate
the seats without supervision.
Page 76 of 352
Downloaded from www.Manualslib.com manuals search engine III
74
COMFORT
THIRD ROW SEATS (GRAND
C4 PICASSO)
Concertina boards
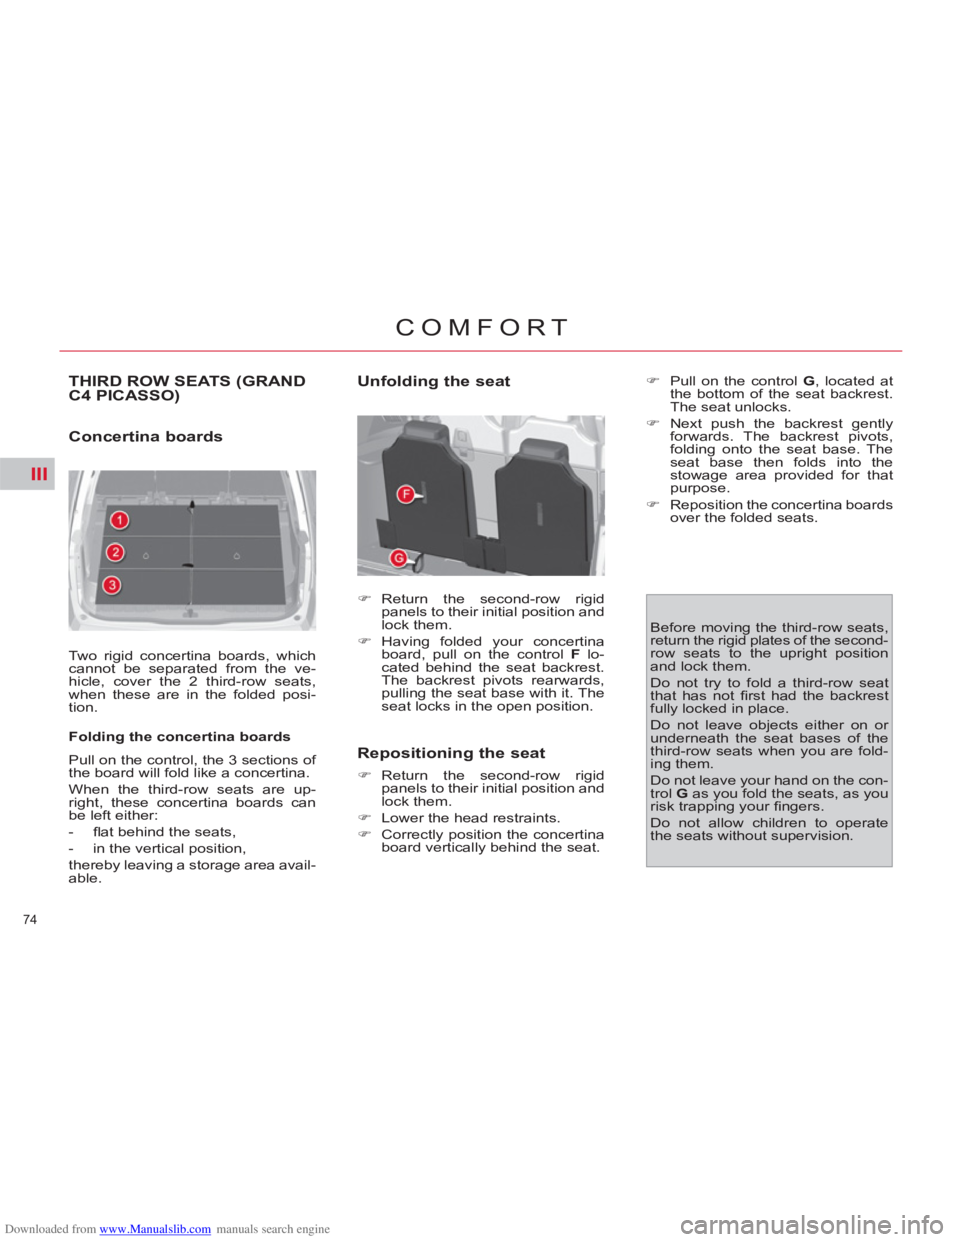
Two rigid concertina boards, which
cannot be separated from the ve-
hicle, cover the 2 third-row seats,
when these are in the folded posi-
tion.
Folding the concertina boards
Pull on the control, the 3 sections of
the board will fold like a concertina.
When the third-row seats are up-
right, these concertina boards can
be left either:
- fl at behind the seats,
- in the vertical position,
thereby leaving a storage area avail-
able.
Unfolding the seat
�)
Return the second-row rigid
panels to their initial position and
lock them.
�)
Having folded your concertina
board, pull on the control F
lo-
cated behind the seat backrest.
The backrest pivots rearwards,
pulling the seat base with it. The
seat locks in the open position.
Repositioning the seat
�)
Return the second-row rigid
panels to their initial position and
lock them.
�)
Lower the head restraints.
�)
Correctly position the concertina
board vertically behind the seat.
�)
Pull on the control G
, located at
the bottom of the seat backrest.
The seat unlocks.
�)
Next push the backrest gently
forwards. The backrest pivots,
folding onto the seat base. The
seat base then folds into the
stowage area provided for that
purpose.
�)
Reposition the concertina boards
over the folded seats.
Before moving the third-row seats,
return the rigid plates of the second-
row seats to the upright position
and lock them.
Do not try to fold a third-row seat
that has not fi rst had the backrest
fully locked in place.
Do not leave objects either on or
underneath the seat bases of the
third-row seats when you are fold-
ing them.
Do not leave your hand on the con-
trol G
as you fold the seats, as you
risk trapping your fi ngers.
Do not allow children to operate
the seats without supervision.
Page 77 of 352

Downloaded from www.Manualslib.com manuals search engine III
75
COMFORT
SEAT MODULARITY AND THE VARIOUS CONFIGURATIONS
Examples of C4 Picasso seat configurations
5 seats
4 seats
3 seats
Maximum
loadspace
Examples of seat configurations Grand C4 Picasso
7 seats
6 seats
5 seats
4 seats
Maximum loadspace
For easy modifi cation of your interior vehicle space, all the rear seats can be individually folded: onto the second-row fl oor,
and under the third-row fl oor (in the case of the Grand C4 Picasso). You can then have a load fl oor that is continuous up
to the front seat backrests.
Page 78 of 352

Downloaded from www.Manualslib.com manuals search engine III
76
COMFORT
MIRRORS
Door mirrors
Each mirror is adjustable to provide
the rear view needed for overtaking
or parking. They can also be folded
for parking in confi ned spaces.
Adjustment
With the ignition on:
�)
move control A
to the right or to
the left to select the correspond-
ing mirror,
�)
move control B
in one of four di-
rections to adjust,
�)
return control A
to the central po-
sition. The objects observed are, in reality,
closer than they appear.
Take this into account in order to
correctly judge the distance of ve-
hicles approaching from behind.
Folding
�)
From outside: lock the vehicle
using the remote control or the
key.
�)
From inside: with the ignition on,
pull the control A
in the central
position rearwards.
If the mirrors are folded using con-
trol A
, they will not unfold when the
vehicle is unlocked. Pull again on
control A
.
Unfolding
�)
From outside: unlock the vehicle
using the remote control or the
key.
�)
From inside: with the ignition on,
pull the control A
in the central
position rearwards.
The folding and unfolding of the door
mirrors using the remote control can
be deactivated by a CITROËN dealer
or a qualifi ed workshop.
Never fold or unfold the electric fold-
ing mirrors manually.
Automatic tilting in reverse gear
System which provides a view of the
ground during parking manoeuvres
in reverse gear.
Programming
�)
With the engine running, engage
reverse gear.
�)
Select and adjust the left-hand
and right-hand mirrors in suc-
cession.
The adjustment is stored immedi-
ately.
Switching off
�)
Exit reverse gear and wait ten seconds.
or
�)
Return control A
to the central
position.
The mirror glass returns to its initial
position.
The mirror glass also returns to its
initial position:
-
if the speed exceeds 6 mph (10 km/h),
- if the engine is switched off.
Switching on
�)
With the engine running, engage
reverse gear.
�)
Move control A
to the right or to
the left to select the correspond-
ing mirror.
The glass of the mirror selected tilts
downwards, in accordance with its
programming. The demisting/defrosting of the door
mirrors is linked to that of the rear
screen.
Page 79 of 352
Downloaded from www.Manualslib.com manuals search engine III
77
COMFORT
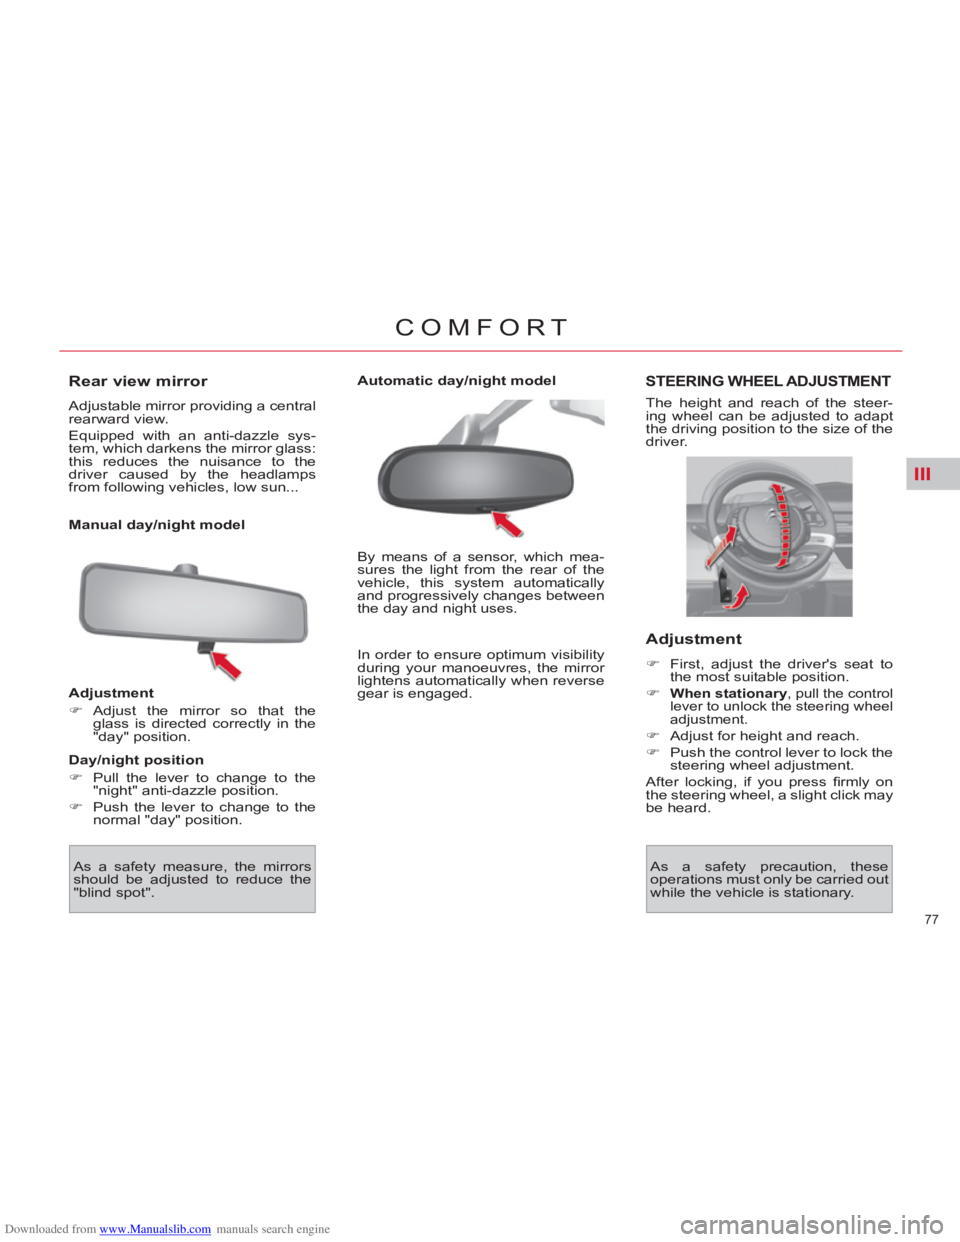
Rear view mirror
Adjustable mirror providing a central
rearward view.
Equipped with an anti-dazzle sys-
tem, which darkens the mirror glass:
this reduces the nuisance to the
driver caused by the headlamps
from following vehicles, low sun...
Manual day/night model
Adjustment
�)
Adjust the mirror so that the
glass is directed correctly in the
"day" position.
Day/night position
�)
Pull the lever to change to the
"night" anti-dazzle position.
�)
Push the lever to change to the
normal "day" position.
By means of a sensor, which mea-
sures the light from the rear of the
vehicle, this system automatically
and progressively changes between
the day and night uses.
STEERING WHEEL ADJUSTMENT
The height and reach of the steer-
ing wheel can be adjusted to adapt
the driving position to the size of the
driver.
Adjustment
�)
First, adjust the driver's seat to
the most suitable position.
�)
When stationary
, pull the control
lever to unlock the steering wheel
adjustment.
�)
Adjust for height and reach.
�)
Push the control lever to lock the
steering wheel adjustment.
After locking, if you press fi rmly on
the steering wheel, a slight click may
be heard.
As a safety measure, the mirrors
should be adjusted to reduce the
"blind spot".
Automatic day/night model
As a safety precaution, these
operations must only be carried out
while the vehicle is stationary.
In order to ensure optimum visibility
during your manoeuvres, the mirror
lightens automatically when reverse
gear is engaged.
Page 80 of 352

Downloaded from www.Manualslib.com manuals search engine IV
78
ACCESS
REMOTE CONTROL KEY
System which permits central un-
locking or locking of the vehicle us-
ing the door lock or remotely. It is
also used to locate the vehicle, acti-
vate the guide-me-home lighting and
start the engine, as well as providing
protection against theft.
Unlocking the vehicle
Complete unlocking using the
remote control
Unfolding the key
�)
First press this button to unfold
the key.
�)
Press the open padlock
to unlock the vehicle.
Complete unlocking using the
key
�)
Turn the key to the left in the
driver's door lock to unlock the
vehicle.
Unlocking is confi rmed by rapid
fl ashing of the direction indicators
for approximately two seconds.
According to version, the door mir-
rors unfold at the same time.
This also triggers the timed illumina-
tion of the exterior side spotlamps
and the interior welcome lighting for
a period of thirty seconds.
Selective unlocking using
the remote control
�)
Press the open pad-
lock once to unlock the
driver's door only. According to version, the door mir-
rors unfold at the same time as the
fi rst unlocking action.
It also triggers the timed operation of the
exterior side spotlamps and the interior
welcome lighting for thirty seconds.
The complete or se-
lective unlocking pa-
rameter is set via the
multifunction screen
confi guration menu.
Complete unlocking is activated by
default.
Unlocking is confi rmed by rapid
fl ashing of the direction indicators
for approximately two seconds. Selective unlocking is not available
using the key.
�)
Press the open padlock again to
unlock the other doors and the
boot.