engine Citroen C4 PICASSO 2015 2.G Manual Online
[x] Cancel search | Manufacturer: CITROEN, Model Year: 2015, Model line: C4 PICASSO, Model: Citroen C4 PICASSO 2015 2.GPages: 420, PDF Size: 10.72 MB
Page 288 of 420
286
The batteries contain harmful substances such as sulphuric acid and lead. They m
ust be disposed of in accordance
w
ith regulations and must not, in any
c
ircumstances, be discarded with household
w
aste.
Take
used remote control batteries and
v
ehicle batteries to a special collection point.
Protect your eyes and face before handling the battery.
All
operations on the battery must be
c
arried out in a well ventilated area and
a
way from naked flames and sources
o
f sparks, so as to avoid the risk of
e
xplosion or fire.
Do
not try to charge a frozen battery;
t
he battery must first be thawed out to
a
void the risk of explosion. If the battery
h
as been frozen, before charging have
i
t checked by a CITROËN dealer or a
q
ualified workshop who will check that
t
he internal components have not been
d
amaged and the casing is not cracked,
w
hich could cause a leak of toxic and
c
orrosive acid.
Do
not reverse the polarity and use only
a
12 V charger.
Do
not disconnect the terminals while
t
he engine is running.
Do
not charge the batteries without
d
isconnecting the terminals first.
Wash
your hands after wards.
It
is
advisable
to
disconnect
the
battery
i
f
the
vehicle
is
to
be
left
unused
for
m
ore
than
one
month.
do n
ot push the vehicle to start the
engine
if you have an electronic or
a
utomatic gearbox.Charging the battery using
a battery charger
F Disconnect the battery from the vehicle.
F F ollow the instructions for use provided by
t
he manufacturer of the charger.
F
C
onnect the battery starting with the
n
egative terminal (-).
F
C
heck that the terminals and connectors
a
re clean. If they are covered with sulphate
(
whitish or greenish deposit), remove them
a
nd clean them.
With
Stop & Start, the battery does not
h
ave to be disconnected for charging.
Do
not
apply
excessive
force
on
the
t
ab
as
locking
will
not
be
possible
if
the
c
lamp
is
not
positioned
correctly;
start
t
he
procedure
again.
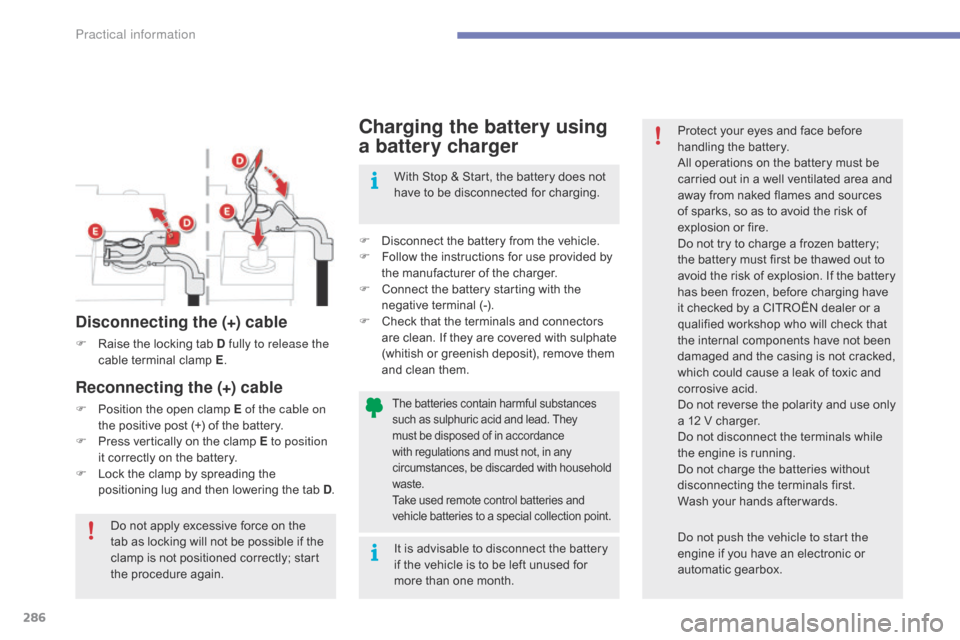
Disconnecting the (+) cable
F Raise the locking tab D fully to release the
cable t erminal c lamp E.
Reconnecting the (+) cable
F Position the open clamp E of the cable on
the positive post (+) of the battery.
F
P
ress vertically on the clamp E to position
it
correctly on the battery.
F
L
ock the clamp by spreading the
p
ositioning lug and then lowering the tab D.
Practical information
Page 289 of 420
287
Exiting economy mode
These functions are reactivated automatically next time the vehicle is driven.
F
I
n order to restore the use of these
f
unctions immediately, start the engine and
l
et it run:
-
f
or less than ten minutes, to use
t
he equipment for approximately
f
ive minutes,
-
f
or more than ten minutes, to use the
e
quipment for up to approximately
t
hirty
m
inutes.
Let
the engine run for the duration specified to
e
nsure that the battery charge is sufficient.
Do
not repeatedly and continuously restart the
e
ngine in order to charge the battery.
A
flat battery prevents the engine from starting
(
refer to the "Battery" section).
Load reduction mode
System which manages the use of certain functions according to the level of charge
r
emaining in the battery.
When
the vehicle is being driven, the load
r
eduction function temporarily deactivates
c
ertain functions, such as the air conditioning,
t
he heated rear screen...
The
deactivated functions are reactivated
a
utomatically as soon as conditions permit.
Energy economy mode
Switching to economy mode
A message then appears in the instrument p
anel screen indicating that the vehicle has
s
witched to economy mode and the active
f
unctions are put on standby.
If
a telephone call is being made at this time,
i
t will be maintained for around 10 minutes
w
ith the Bluetooth hands-free system of your
a
udio system.
System
which manages the duration of use of
c
ertain functions to conserve a sufficient level
of charge in the battery.
After the engine has stopped, you can
s
till use functions such as the audio and
t
elematics system, windscreen wipers, dipped
b
eam headlamps, courtesy lamps, etc. for
a
maximum combined duration of about
f
orty
m
inutes.
7
Practical information
Page 291 of 420
289
Towing the vehicle
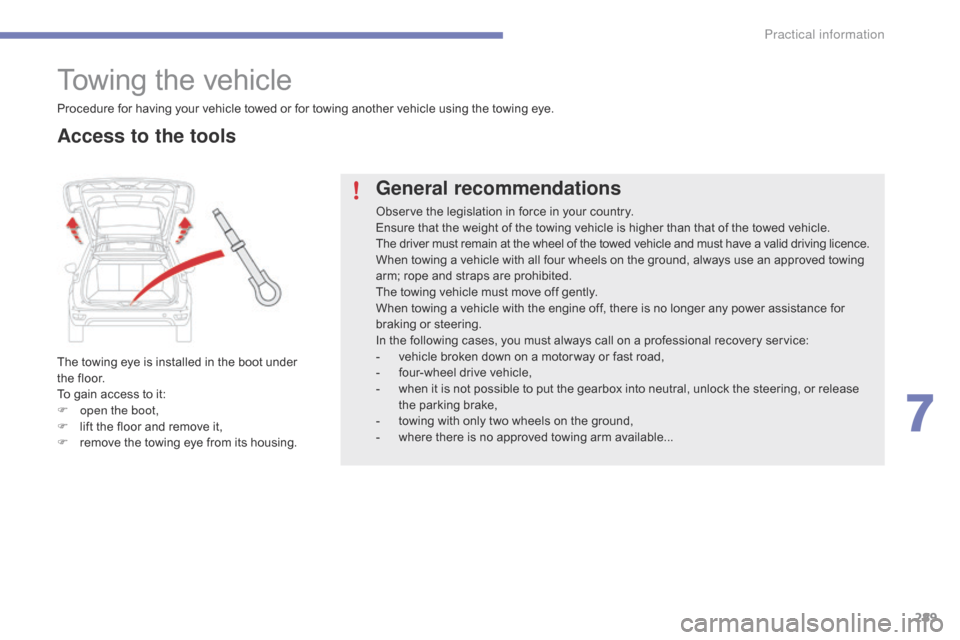
The towing eye is installed in the boot under the floor.
To
gain access to it:
F
o
pen the boot,
F
l
ift the floor and remove it,
F
r
emove the towing eye from its housing.
General recommendations
Observe the legislation in force in your country.
E nsure that the weight of the towing vehicle is higher than that of the towed vehicle.
The
driver must remain at the wheel of the towed vehicle and must have a valid driving licence.
When
towing a vehicle with all four wheels on the ground, always use an approved towing
a
rm; rope and straps are prohibited.
The
towing vehicle must move off gently.
When
towing a vehicle with the engine off, there is no longer any power assistance for
b
raking or steering.
In
the following cases, you must always call on a professional recovery service:
-
v
ehicle broken down on a motor way or fast road,
-
f
our-wheel drive vehicle,
-
w
hen it is not possible to put the gearbox into neutral, unlock the steering, or release
t
he parking brake,
-
t
owing with only two wheels on the ground,
-
w
here there is no approved towing arm available...
Procedure
for
having
your
vehicle
towed
or
for
towing
another vehicle using the towing eye.
Access to the tools
7
Practical information
Page 292 of 420

290
Towing another vehicle
F On the rear bumper, unclip the cover by p
ressing at the bottom.
F
S
crew the towing eye in fully.
F
I
nstall the towing bar.
F
S
witch on the hazard warning lamps on
b
oth vehicles.
F
M
ove off gently, drive slowly and for a short
di
stance.
F
O
n
the
front
bumper,
unclip
the
cover
by
p
ressing
on
the
left.
F
S
crew
the
towing
eye
in
fully.
F
I
nstall
the
towing
bar.
F
P
lace
the
gear
lever
in
neutral
(position
N
on
an
electronic
or
automatic
gearbox).
Towing your vehicle
Failure to observe this instruction could r esult in damage to certain components
(
braking, transmission...) and the
a
bsence of braking assistance the next
t
ime the engine is started.
F
U
nlock the steering by turning the key
i
n
the ignition one notch and release the
par
king
b
rake.
F
S
witch on the hazard warning lamps on
b
oth vehicles.
F
M
ove off gently, drive slowly and for a short
di
stance.
Practical information
Page 296 of 420
294
Driving advice
Distribution of loads
F Distribute the load in the trailer so that the h
eaviest items are as close as possible to t
he axle and the nose weight approaches the
m
aximum permitted without exceeding it.
Air
density decreases with altitude, thus
r
educing engine per formance. Above
1 0
00 metres, the maximum towed load must
b
e reduced by 10 % for every 1 000 metres of
al
titude.
Side wind
F Take into account the increased sensitivity t
o side wind.
Cooling
Towing a trailer on a slope increases the temperature of the coolant.
As
the fan is electrically controlled, its cooling
c
apacity is not dependent on the engine speed.
F
T
o lower the engine speed, reduce your
s
peed.
The
maximum towed load on a long incline
d
epends on the gradient and the ambient
t
emperature.
In
all cases, keep a check on the coolant
t
emperature. F
I
f the warning lamp and the
S
TOP
warning lamp come on,
s
top the vehicle and switch off
t
he engine as soon as possible.
Braking
Towing a trailer increases the braking distance.
T o avoid overheating of the brakes on a long
m
ountain type of descent, the use of engine
b
raking is recommended.
Ty r e s
F Check the tyre pressures of the towing v
ehicle and of the trailer, observing the
re
commended
p
ressures.
Lighting
F Check the electrical lighting and signalling o
n the trailer.
Refer
to
the
"Technical
data"
section
for
details
o
f
the
weights
and
towed
loads
which
apply
to
y
our
vehicle.
When
not
towing
a
trailer,
remove
the
q
uickly-detachable
tow
ball
before
d
riving. The
rear parking sensors will be
d
eactivated automatically if a genuine
C
ITROËN towbar is used.
Practical information
Page 302 of 420
300
ToTaL & CITRoËn
Partners in performance and
protecting the environment
Innovation in the search for
performance
For over 40 year, the TOTAL Research and Development departments have developed lubricants
f
or CITROËN, to match the latest technical innovations
o
n CITROËN vehicles, both for competition and for
e
veryday motoring.
For you, this is an assurance that you will obtain the
best
per formance from your engine.
Optimum protection for
your engine
By having your CITROËN vehicle serviced with TOTAL lubricants, you are
c
ontributing towards improving the life
a
nd per formance of your engine, while
a
lso protecting the environment.
Checks
Page 303 of 420
301
bonnet
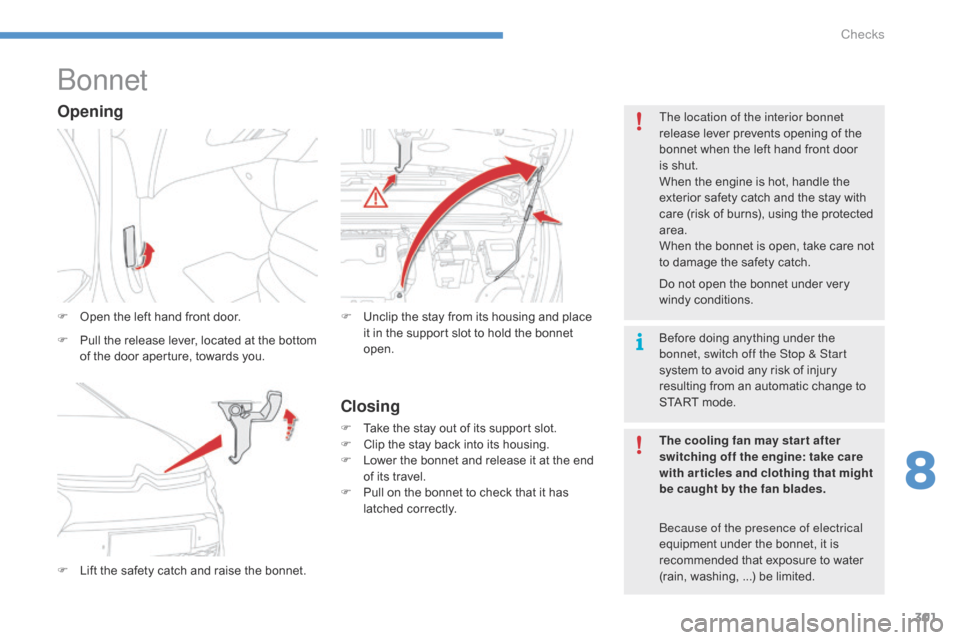
F Open the left hand front door.
F
L
ift the safety catch and raise the bonnet.F
U nclip the stay from its housing and place i
t in the support slot to hold the bonnet
ope
n.
Opening
F Pull the release lever, located at the bottom o
f the door aperture, towards you. Before
doing anything under the b
onnet, switch off the Stop & Start
system
to avoid any risk of injury
r
esulting from an automatic change to
S
TART mode.
The cooling fan may star t after
switching off the engine: take care
with articles and clothing that might
be caught by the fan blades. Do not open the bonnet under very
wi
ndy
c
onditions.
The location of the interior bonnet
release lever prevents opening of the
b
onnet when the left hand front door
i
s shut.
When the engine is hot, handle the
e
xterior safety catch and the stay with
c
are (risk of burns), using the protected
a
rea.
When the bonnet is open, take care not
t
o damage the safety catch.
be
cause of the presence of electrical
equipment
under the bonnet, it is
r
ecommended that exposure to water
(
rain, washing, ...) be limited.
Closing
F Take the stay out of its support slot.
F C lip the stay back into its housing.
F
L
ower the bonnet and release it at the end
o
f its travel.
F
P
ull on the bonnet to check that it has
l
atched correctly.
8
Checks
Page 304 of 420
302
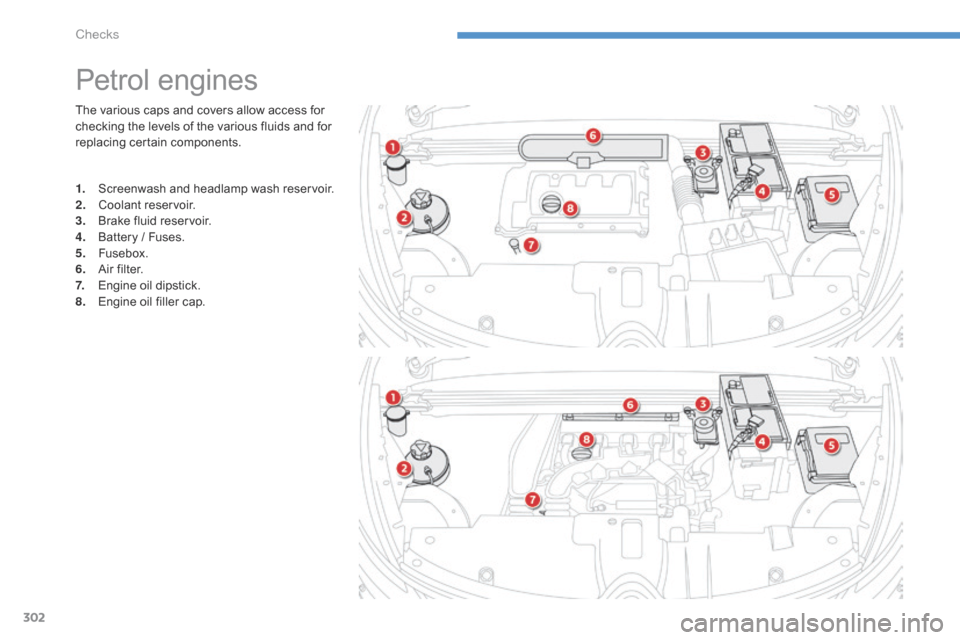
The various caps and covers allow access for checking the levels of the various fluids and for
r
eplacing certain components.
Petrol engines
1. Screenwash and headlamp wash reservoir.
2. C oolant r eservoir.
3.
B
rake fluid reservoir.
4.
B
attery / Fuses.
5.
F
usebox.
6.
A
ir filter.
7.
E
ngine oil dipstick.
8.
E
ngine oil filler cap.
Checks
Page 305 of 420
303
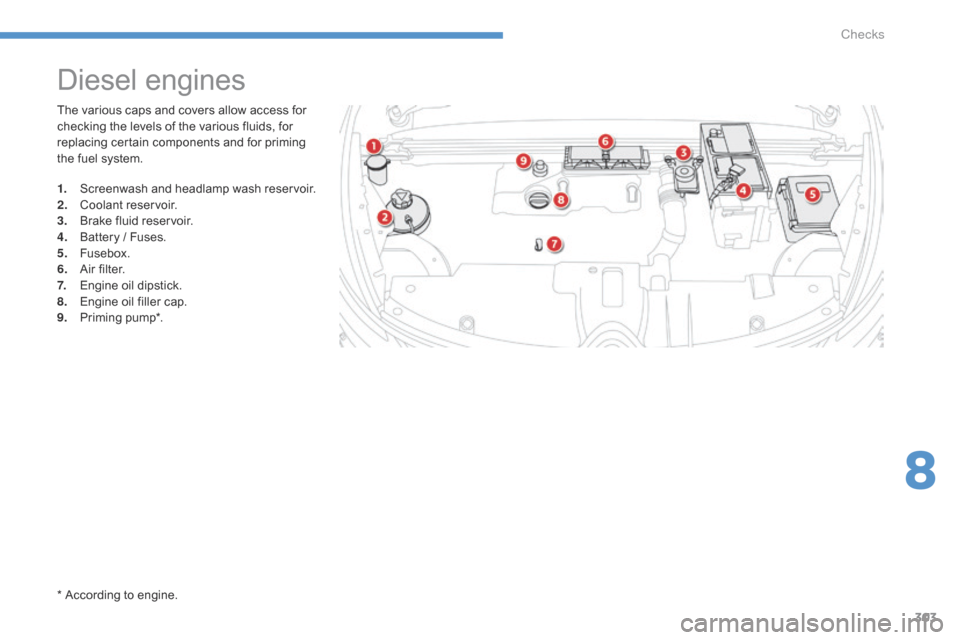
The various caps and covers allow access for checking the levels of the various fluids, for
r
eplacing certain components and for priming
t
he fuel system.
Diesel engines
1. Screenwash and headlamp wash reservoir.
2. C oolant r eservoir.
3.
B
rake fluid reservoir.
4.
B
attery / Fuses.
5.
F
usebox.
6.
A
ir filter.
7.
E
ngine oil dipstick.
8.
E
ngine oil filler cap.
9.
P
riming
pu
mp*.
*
According to engine.
8
Checks
Page 306 of 420
304
Fuel
Capacity of the tank: approximately 57 litres (petrol) or 55 litres (Diesel).
Low fuel levelRefuelling
When the low fuel level is reached, t
his warning lamp comes on in the
i
nstrument panel, accompanied by an
a
udible warning and a message and
t
he last bar of the fuel gauge comes
o
n in orange.
F
T
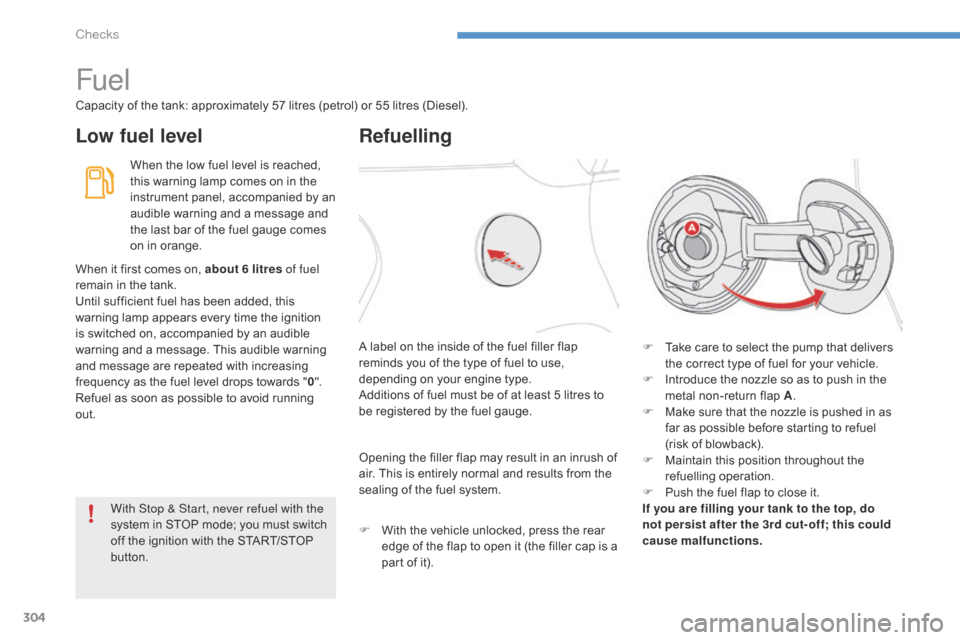
ake care to select the pump that delivers
t
he correct type of fuel for your vehicle.
F
I
ntroduce the nozzle so as to push in the
m
etal non-return flap A.
F
M
ake sure that the nozzle is pushed in as
f
ar as possible before starting to refuel
(risk
of blowback).
F
M
aintain this position throughout the
r
efuelling
ope
ration.
F
P
ush the fuel flap to close it.
If you are filling your tank to the top, do
not persist after the 3rd cut- off; this could
cause malfunctions.
A
label on the inside of the fuel filler flap
r
eminds you of the type of fuel to use,
d
epending on your engine type.
Additions
of fuel must be of at least 5 litres to
b
e registered by the fuel gauge.
When
it
first comes on, about 6 litres of fuel
remain
in
the tank.
Until
sufficient fuel has been added, this
w
arning
lamp appears every time the ignition
i
s
switched on, accompanied by an audible
w
arning
and a message. This audible warning
a
nd
message are repeated with increasing
f
requency
as the fuel level drops towards "0 ".
Refuel
as
soon as possible to avoid running
o
ut. Opening
the filler flap may result in an inrush of
a
ir. This is entirely normal and results from the
s
ealing of the fuel system.
F
W
ith the vehicle unlocked, press the rear
e
dge of the flap to open it (the filler cap is a
p
art of it).
With Stop & Start, never refuel with the
system
in STOP mode; you must switch
o
ff
the ignition with the START/STOP
b
utton.
Checks