Citroen C4 PICASSO RHD 2014.5 1.G Owner's Manual
Manufacturer: CITROEN, Model Year: 2014.5, Model line: C4 PICASSO RHD, Model: Citroen C4 PICASSO RHD 2014.5 1.GPages: 428, PDF Size: 10.03 MB
Page 301 of 428

299
Roof bars
For safety reasons and to avoid damaging the roof, it is essential to use transverse roof bars
that
are approved for your vehicle.
Observe
the fitting instructions and the
c
onditions of use given in the information
p
rovided with the roof bars.Version with longitudinal
bars
To install the roof bars, you must secure them only to the four anchorage points in the
r
oof frame. These points are masked by the
v
ehicle's doors when closed.
The
roof bar fixings include a stud that should
b
e introduced into the aperture at each
anc
horage
p
oint.
Version without longitudinal
bars
You must fit the transverse bars to the longitudinal bars at the fixing points indicated
b
y engraved markings on the longitudinal bars.
7
Practical information
Page 302 of 428

300
Maximum load, distributed over the roof bars, for a loading height not
e
xceeding 40 cm: 80 kg.
This
value is subject to change,
p
lease check the maximum load
s
tated in the instructions provided with
h
e roof bars.
If
the height exceeds 40 cm, adapt the
s
peed of the vehicle to the profile of the
r
oad to avoid damaging the roof bars
a
nd the fixings on the vehicle.
Please
refer to national legislation so as
t
o meet the requirements on carrying
o
bjects that are longer than the vehicle.
F
D
istribute
the
load
evenly,
avoiding
ov
erloading
on
one
side.
F
A
rrange
the
heaviest
part
of
the
load
as
c
lose
as
possible
to
the
roof.
F
A
nchor
the
load
securely
and
fit
a
warning
f
lag
if
part
of
it
overhangs
the
vehicle.
F
D
rive
gently,
as
the
vehicle
will
be
more
l
iable
to
the
effects
of
side
winds
(vehicle
s
tability
may
be
affected).
F
R
emove
the
roof
bars
as
soon
as
they
are
n
o
lon
ger
n
eeded.Recommendations
When carrying long objects, it is r ecommended that you deactivate the
m
otorised operation of the tailgate.
Practical information
Page 303 of 428

301
Very cold climate screen*
Removable protective screen which prevents the accumulation of snow at the radiator cooling fan.
F
O
ffer up the very cold climate screen to
t
he front of the lower section of the front
b u m p e r.
F
P
ress around its edge to engage its fixing
c
lips one by one. F
U
se a screwdriver as a lever to release
e
ach fixing clip in turn.
*
According to country.
Do
not forget to remove the very cold climate
s
creen
w
hen:
-
t
he ambient temperature exceeds 10 °C,
-
tow
ing,
-
d
riving at speeds above 75 mph
(120
km/h).
Removal
Fitting
360 Vision system
The pre-cut zone must be removed b
efore fitting the screen to the front
b
umper, to allow operation of the
c
amera.
When
the very cold climate screen
i
s fitted, the image provided by the
c
amera is slightly different.
7
Practical information
Page 304 of 428
302
accessories
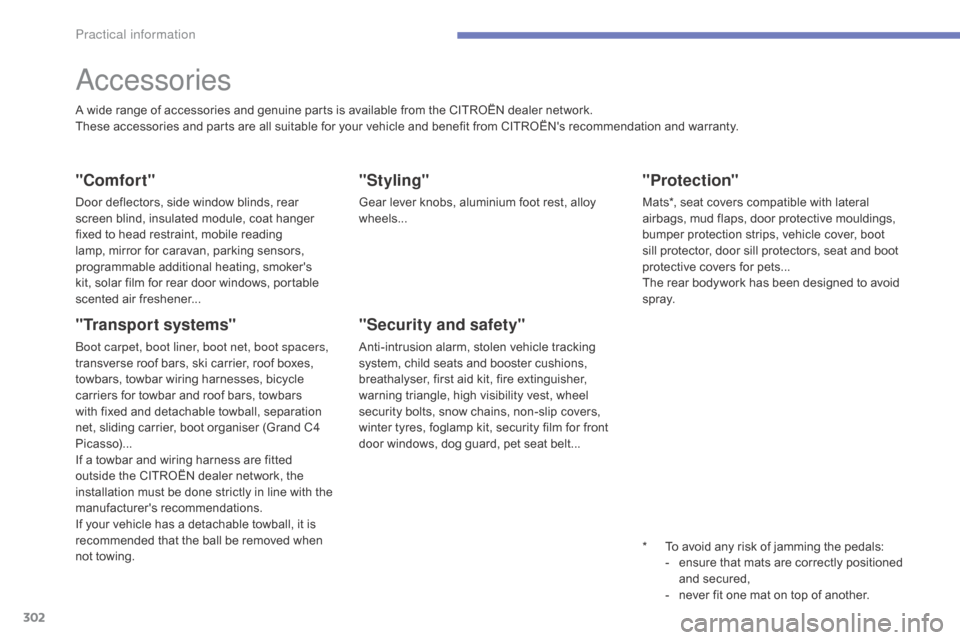
A wide range of accessories and genuine parts is available from the CITROËN dealer network.
T hese accessories and parts are all suitable for your vehicle and benefit from CITROËN's recommendation and warranty.
"Comfort"
Door deflectors, side window blinds, rear screen blind, insulated module, coat hanger
f
ixed to head restraint, mobile reading
l
amp, mirror for caravan, parking sensors,
p
rogrammable additional heating, smoker's
k
it, solar film for rear door windows, portable
s
cented air freshener...
"Transport systems"
boot carpet, boot liner, boot net, boot spacers,
transverse roof bars, ski carrier, roof boxes,
t
owbars, towbar wiring harnesses, bicycle
c
arriers for towbar and roof bars, towbars
w
ith fixed and detachable towball, separation
n
et, sliding carrier, boot organiser (Grand C4
P
icasso)...
If
a towbar and wiring harness are fitted
o
utside the CITROËN dealer network, the
i
nstallation must be done strictly in line with the
ma
nufacturer's
r
ecommendations.
If
your vehicle has a detachable towball, it is
r
ecommended that the ball be removed when
n
ot towing.
"Styling"
Gear lever knobs, aluminium foot rest, alloy wheels...
"Security and safety"
Anti-intrusion alarm, stolen vehicle tracking system, child seats and booster cushions,
b
reathalyser, first aid kit, fire extinguisher,
w
arning triangle, high visibility vest, wheel
s
ecurity bolts, snow chains, non-slip covers,
w
inter tyres, foglamp kit, security film for front
d
oor windows, dog guard, pet seat belt...
"Protection"
Mats*, seat covers compatible with lateral airbags, mud flaps, door protective mouldings,
b
umper protection strips, vehicle cover, boot
s
ill protector, door sill protectors, seat and boot
p
rotective covers for pets...
The
rear bodywork has been designed to avoid
s
p r ay.
*
T
o avoid any risk of jamming the pedals:
-
e
nsure that mats are correctly positioned
a
nd secured,
-
n
ever fit one mat on top of another.
Practical information
Page 305 of 428
303
The fitting of electrical equipment or accessories which are not
recommended
by CITROËN may result
i
n a failure of your vehicle's electronic
s
ystem and excessive electrical
c
onsumption.
Contact
a CITROËN dealer
f
or information on the range of
r
ecommended equipment and
a
ccessories.
Installation of radio
communication transmitters
Before installing any after-market radio communication transmitter, you can
c
ontact a CITROËN dealer for the
s
pecification of transmitters which can
b
e fitted (frequency, maximum power,
a
erial position, specific installation
requirements),
in line with the Vehicle
E
lectromagnetic
C
ompatibility
D
irective (2004/104/EC). Depending
on the legislation in force in
t
he country, certain safety equipment m
ay be compulsory: high visibility s
afety vests, warning triangles,
b
reathalyzers,
spar
e
bu
lbs,
spar
e
f
uses,
f
ire extinguisher, first aid kit, mud flaps
a
t the rear of the vehicle.
"Multimedia"
Speakers, Hi-Fi module, head-up display screen, portable satellite navigation system,
d
riving assistance systems, reversing camera,
p
ortable video screen, portable video carrier,
t
elephone carrier, two-screen video pack,
p
ortable video player, CD player, 230 V/50 Hz
s
ocket, 230 V/12 V adaptor, iPhone/iPad
c
harger...
By
visiting a CITROËN dealer you can also
o
btain cleaning and maintenance products
(
interior and exterior) - including ecological
p
roducts in the "TECHNATURE" range,
p
roducts for topping up (screenwash...), paint
t
ouch-up pens and aerosols for the exact
c
olour of your vehicle, refills (sealant cartridge
f
or the temporary puncture repair kit...), ...
7
Practical information
Page 306 of 428

304
ToTaL & CITRoËn
Partners in performance and
protecting the environment
Innovation in the search for
performance
For over 40 year, the TOTAL Research and Development departments have developed for
C
ITROËN, lubricants to match the latest technical
i
nnovations
o
n
C
ITROËN
v
ehicles,
b
oth
f
or
c
ompetition
a
nd for everyday motoring.
For you, this is an assurance that you will obtain of the
best
per formance for your engine.
Optimum protection for
your engine
By having your CITROËN vehicle serviced with TOTAL lubricants, you are
c
ontributing towards improving the life
a
nd per formances of your engine, while
a
lso protecting the environment.
prefers
Checks
Page 307 of 428
305
bonnet
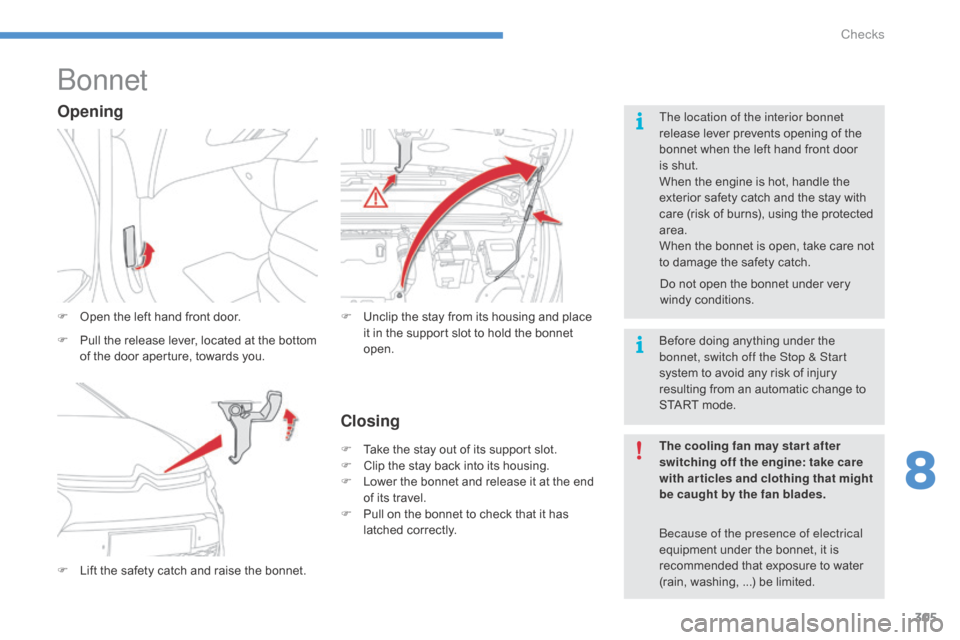
F Open the left hand front door.
F
L
ift the safety catch and raise the bonnet.F
U nclip the stay from its housing and place i
t in the support slot to hold the bonnet
ope
n.
Opening
F Pull the release lever, located at the bottom o
f the door aperture, towards you.
Closing
F Take the stay out of its support slot.
F C lip the stay back into its housing.
F
L
ower the bonnet and release it at the end
o
f its travel.
F
P
ull on the bonnet to check that it has
l
atched correctly. Before
doing anything under the
b
onnet, switch off the Stop & Start
system to avoid any risk of injury
r
esulting from an automatic change to
S
TART mode.
The cooling fan may star t after
switching off the engine: take care
with articles and clothing that might
be caught by the fan blades. Do
not open the bonnet under very
wi
ndy
c
onditions.
The location of the interior bonnet
release lever prevents opening of the
b
onnet when the left hand front door
i
s shut.
When the engine is hot, handle the
e
xterior safety catch and the stay with
c
are (risk of burns), using the protected
a
rea.
When the bonnet is open, take care not
t
o damage the safety catch.
be
cause of the presence of electrical
equipment
under the bonnet, it is
r
ecommended that exposure to water
(
rain, washing, ...) be limited.
8
Checks
Page 308 of 428
306
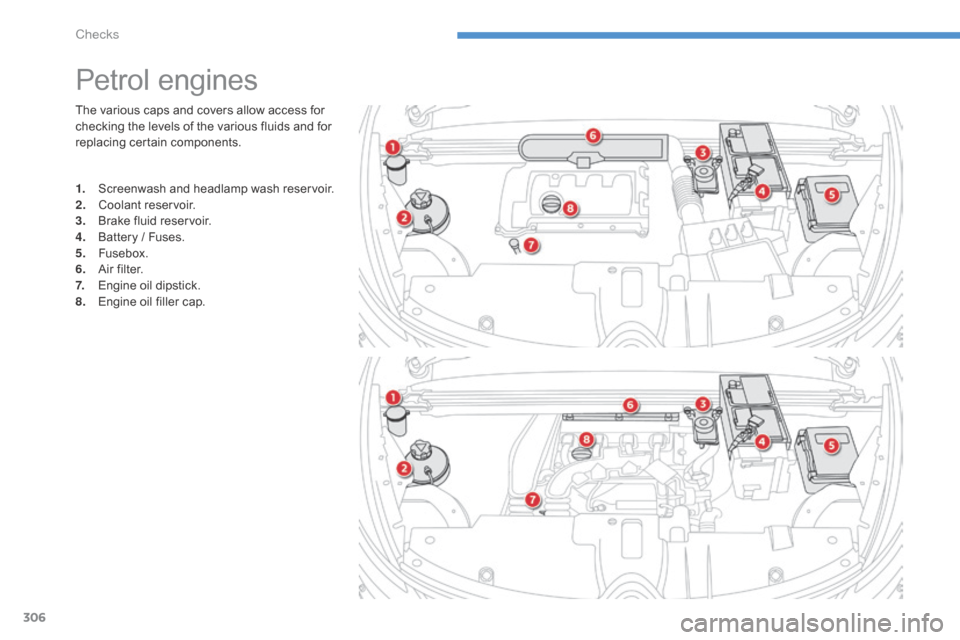
The various caps and covers allow access for checking the levels of the various fluids and for
r
eplacing certain components.
Petrol engines
1. Screenwash and headlamp wash reservoir.
2. C oolant r eservoir.
3.
B
rake fluid reservoir.
4.
B
attery / Fuses.
5.
F
usebox.
6.
A
ir filter.
7.
E
ngine oil dipstick.
8.
E
ngine oil filler cap.
Checks
Page 309 of 428
307
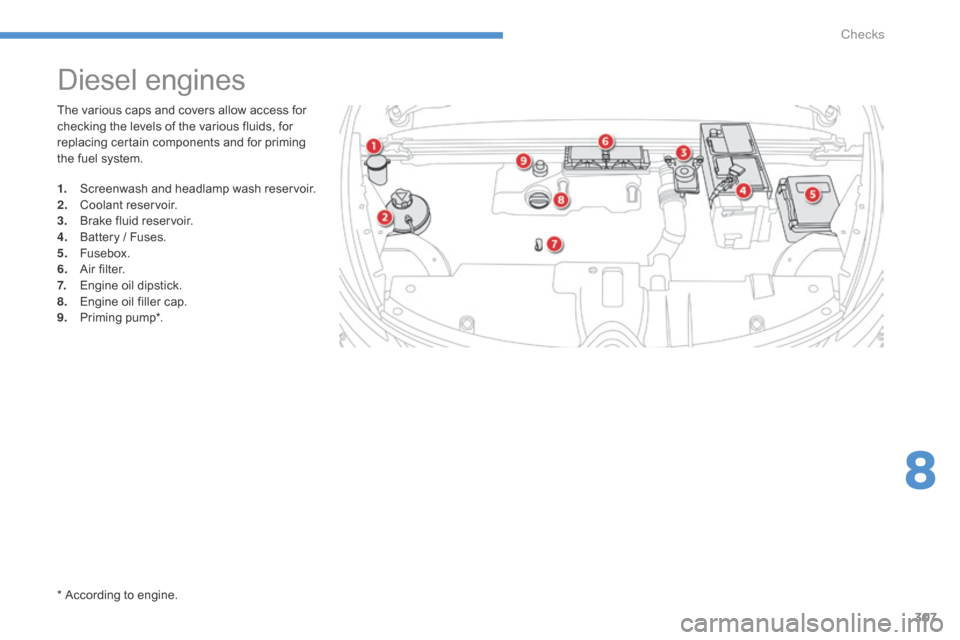
The various caps and covers allow access for checking the levels of the various fluids, for
r
eplacing certain components and for priming
t
he fuel system.
Diesel engines
1. Screenwash and headlamp wash reservoir.
2. C oolant r eservoir.
3.
B
rake fluid reservoir.
4.
B
attery / Fuses.
5.
F
usebox.
6.
A
ir filter.
7.
E
ngine oil dipstick.
8.
E
ngine oil filler cap.
9.
P
riming
pu
mp*.
*
According to engine.
8
Checks
Page 310 of 428

308
Fuel
Capacity of the tank: approximately 57 litres (petrol) or 55 litres (Diesel).
Low fuel levelRefuelling
When the low fuel level is reached, t
his warning lamp in the instrument
p
anel comes on, accompanied by an
a
udible warning, a message and the
l
ast bar of the fuel gauge comes on
i
n orange.
F
T
ake care to select the pump that delivers
t
he correct type of fuel for your vehicle.
F
I
ntroduce the nozzle so as to push in the
m
etal non-return flap A.
F
M
ake sure that the nozzle is pushed in as
f
ar as possible before starting to refuel (risk
o
f blowback).
F
M
aintain this position throughout the
r
efuelling
ope
ration.
F
P
ush the fuel flap to close it.
If you are filling your tank to the top, do
not persist after the 3rd cut- off; this could
cause malfunctions.
A
label on the inside of the fuel filler flap
r
eminds you of the type of fuel to use,
d
epending on your engine type.
Additions
of fuel must be of at least 5 litres to
b
e registered by the fuel gauge.
When
it
first comes on, about 6 litres of fuel
remain
in
the tank.
Until
sufficient fuel has been added, this warning
l
amp
appears every time the ignition is switched
o
n,
accompanied by an audible warning and a
m
essage.
This audible warning and message
a
re
repeated with increasing frequency as the
f
uel
level
drops towards "0 ".
Refuel
as
soon as possible to avoid running out.Opening
the filler flap may result in an inrush of
a
ir. This is entirely normal and results from the
s
ealing of the fuel system.
F
P
ress the rear edge of the flap to open it
(
the filler cap is part of it).
With Stop & Start, never refuel with the
system
in STOP mode; you must switch
o
ff
the ignition with the START/STOP
b
utton.
Checks