audio Citroen C4 PICASSO RHD 2015 1.G Owner's Manual
[x] Cancel search | Manufacturer: CITROEN, Model Year: 2015, Model line: C4 PICASSO RHD, Model: Citroen C4 PICASSO RHD 2015 1.GPages: 428, PDF Size: 10.09 MB
Page 5 of 428
Direction indicators 213
Hazard warning lamps
2
13
H or n
2
13
Emergency
or assistance call
2
14
Warning
triangle
2
14
Under-inflation
d
etection
2
15
ESC
system
2
18
Seat
belts
2
22
Airbags
2
27
Child
seats
2
33
Deactivating
the passenger's front airbag
2
35
ISOFIX
mountings
2
44
Child
lock
2
52
Safety
Temporary puncture repair kit 253
Changing a wheel
2
61
Snow
chains
2
71
Changing
a bulb
2
72
Changing
a fuse
2
81
12
V battery
2
88
Energy
economy mode
2
91
Changing
a wiper blade
2
92
Towing
the vehicle
2
93
Towbar
with quickly detachable towball
2
95
Towing
a trailer
2
97
Roof
bars
2
99
Very
cold climate screen
3
01
Accessories
3
02
Practical information
Bonnet 305
Petrol engines
3
06
Diesel
engines
3
07
Fuel
3
08
Misfuel
prevention (Diesel)
3
10
Running
out of fuel (Diesel)
3
12
Checking
levels
3
13
C h e c ks
3
17
AdBlue
® additive and SCR system
(
BlueHDi Diesel) 3 19
Checks
Petrol engines 3 28
Petrol weights
3
30
Diesel
engines
3
32
Diesel
weights
3
35
Dimensions
3
38
Identification
ma
rkings
3
40
Technical data
Emergency or assistance 3 41
7-inch touch screen tablet
3
43
Audio and telematics
Lighting controls 1 93
Automatic illumination of headlamps
1
98
Automatic
headlamp dipping
1
99
Daytime
running lamps
2
01
Headlamp
adj
ustment
2
02
Directional
l
ighting
2
04
Wiper
controls
2
05
Screenwash
2
07
Automatic
rain sensitive wipers
2
08
Courtesy
lamps
2
10
Panoramic
sunroof
2
11
Interior
mood lighting
2
12
Visibility
Alphabetical
in
dex
Contents
Page 8 of 428
6
Instruments and controls
Touch screen tablet 11-19
Equipment se ttings 1 3-17
Setting
the date/time
4
7
GPS
Navigation /
M
ultimedia audio system /
B
luetooth telephone
3
44- 415
Ventilation
9
4-95
Heating
9
6
Dual-zone
m
anual
a
ir
c
onditioning
9
7- 98
Dual-zone
automatic air
c
onditioning
9
9-104
Demisting
/ defrosting
1
04-105 Door
mirrors
9
1-92
Electric windows, deactivating
7
2-73
5/6 -speed manual gearbox
1
40
Gear
efficiency indicator
1
50Automatic
gearbox
1
45 -149
Electronic gearbox
1
41-144
Gear efficiency indicator
1
50
Opening the bonnet
3
05Courtesy lamps
2
10
Rear view mirror
9
2
Panoramic sunroof
2
11
Instrument panels
2
0 -24
Lighting dimmer
4
5
Warning
lam
ps
2
5-39
Indicators
4
0 - 43
-
s
ervice indicator
-
o
il level indicator
Electric parking brake
1
32-138
Dashboard
fuses
2
81-285
O
Page 14 of 428
12
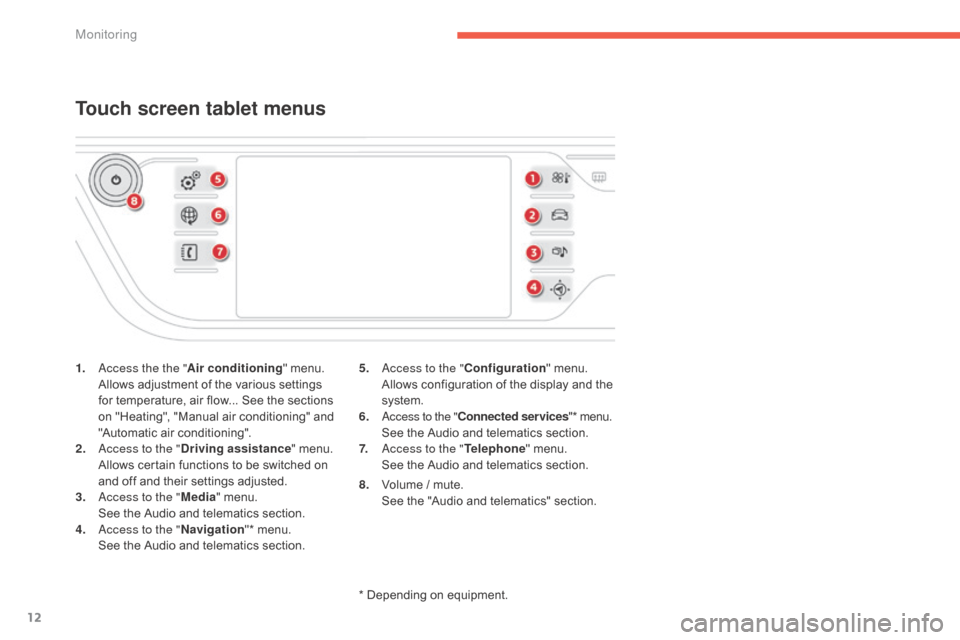
1. access the the "Air conditioning" menu. A
llows adjustment of the various settings
f
or temperature, air flow... See the sections
o
n "Heating", "Manual air conditioning" and
"
Automatic air conditioning".
2.
a
c
cess to the " Driving assistance "
menu.
A
llows certain functions to be switched on
a
nd off and their settings adjusted.
3.
a
c
cess to the " Media"
menu.
S
ee the Audio and telematics section.
4.
a
c
cess to the " Navigation"*
menu.
S
ee the Audio and telematics section.
Touch screen tablet menus
5. access to the "Configuration" menu. A
llows configuration of the display and the
s
ystem.
6.
a
c
cess to the " Connected services "*
menu.
S
ee the Audio and telematics section.
7.
a
c
cess to the " Telephone"
menu.
S
ee the Audio and telematics section.
*
Depending on equipment.
8.
V
olume / mute.
S
ee the "Audio and telematics" section.
Monitoring
Page 20 of 428
18
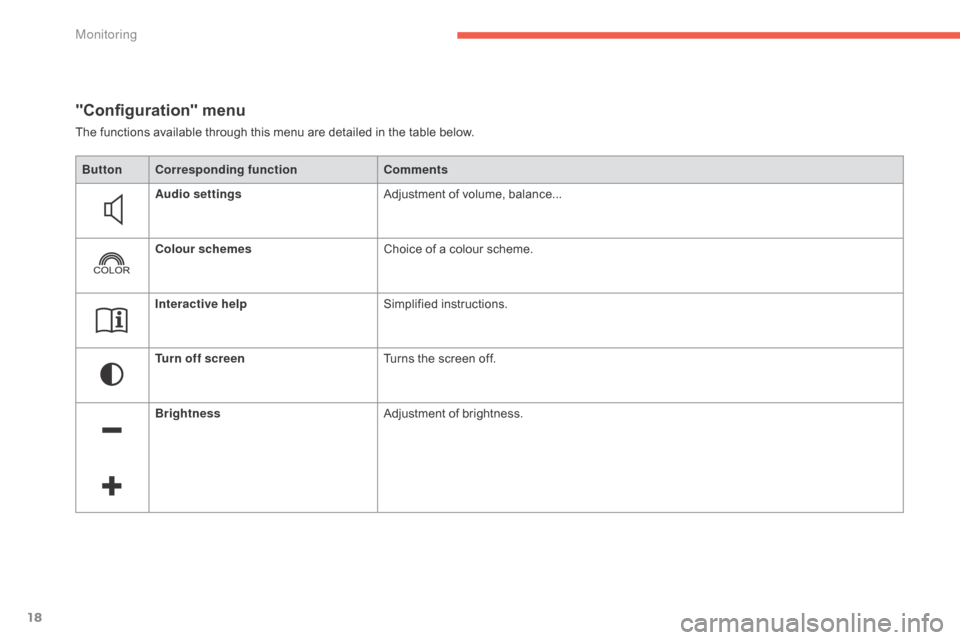
"Configuration" menu
The functions available through this menu are detailed in the table below.
Bu tton Corresponding function Comments
Audio settings Adjustment
of volume, balance...
Colour schemes Choice
of a colour scheme.
Interactive help Simplified
i
nstructions.
Turn off screen Turns
the screen off.
Brightness Adjustment
of brightness.
Monitoring
Page 110 of 428
108
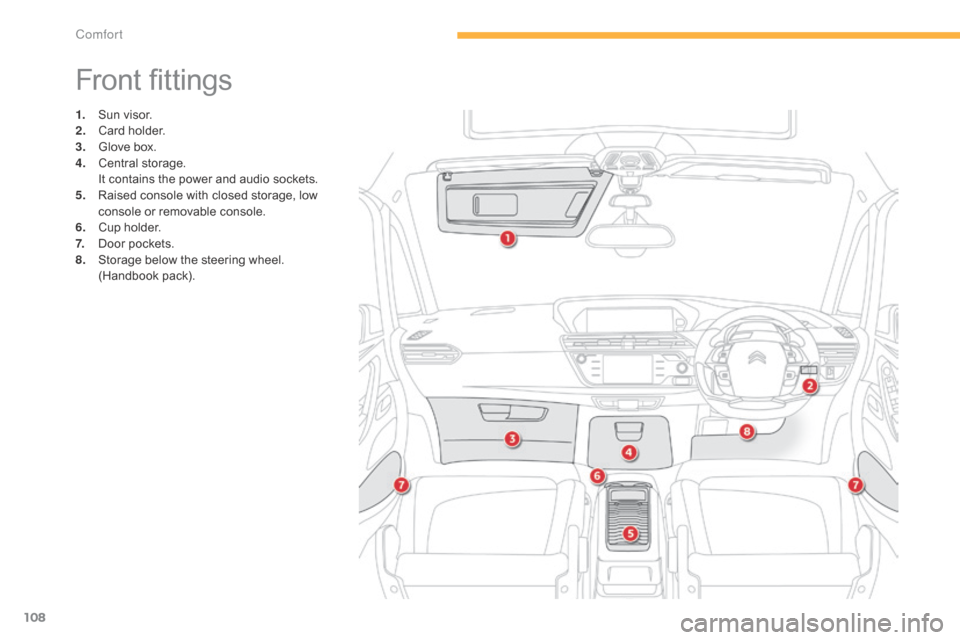
Front fittings
1. Sun visor.
2. C ard holder.
3.
G
love box.
4.
C
entral
s
torage.
I
t contains the power and audio sockets.
5.
R
aised console with closed storage, low
c
onsole or removable console.
6.
C
up holder.
7.
D
oor pockets.
8.
S
torage below the steering wheel.
(
Handbook pack).
Comfort
Page 114 of 428
112
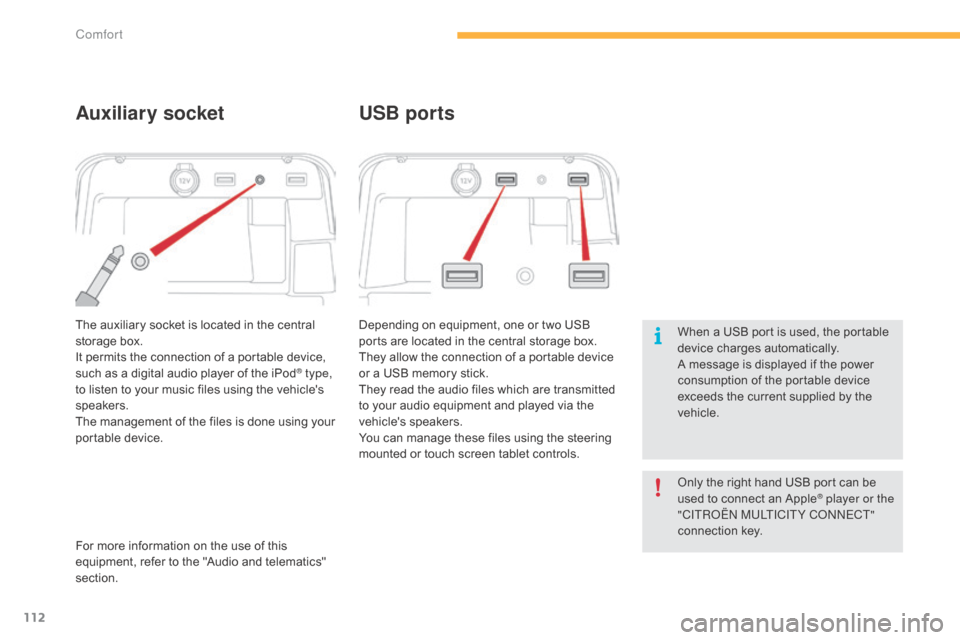
The auxiliary socket is located in the central storage box.
It
permits the connection of a portable device,
s
uch as a digital audio player of the iPod
® type,
to
listen
to
your
music
files
using
the
vehicle's
s
peakers.
The
management
of
the
files
is
done
using your
p
ortable
d
evice. Depending
on equipment, one or two USB
p
orts are located in the central storage box.
They allow the connection of a portable device o
r a USB memory stick.
They read the audio files which are transmitted
t
o your audio equipment and played via the
v
ehicle's
s
peakers.
You
can manage these files using the steering
m
ounted or touch screen tablet controls.
Auxiliary socketUSB ports
For more information on the use of this e
quipment, refer to the "Audio and telematics"
s
ection. When
a USB port is used, the portable
d
evice charges automatically.
A message is displayed if the power
c
onsumption of the portable device
e
xceeds the current supplied by the
v
ehicle.
Only the right hand USB port can be
u
sed to connect an Apple
® player or the
"CITRoËn M
ULTICITY Co nnE CT"
connection
k
ey.
Comfort
Page 216 of 428
214
This system allows you to make an emergency or assistance call to the emergency services or
t
o the dedicated CITROËN service.
Emergency or
a
ssistance call
For more information on the use of this f
unction, refer to the "Audio and telematics"
s
ection.
Warning triangle
This safety device should be used in addition to the hazard warning lamps.
Its
presence in the vehicle is mandatory.
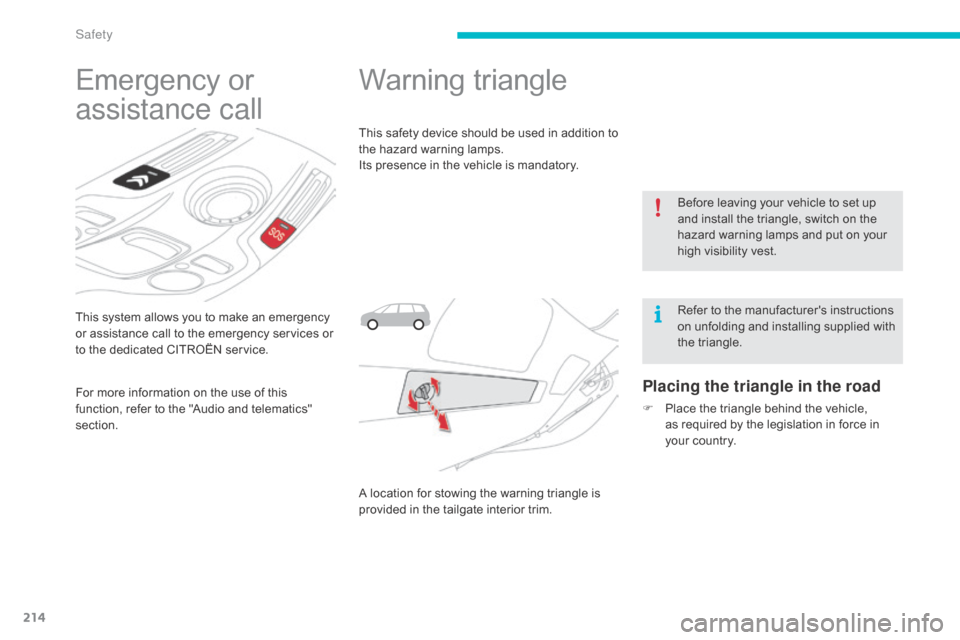
A
location for stowing the warning triangle is
p
rovided in the tailgate interior trim.
Placing the triangle in the road
F Place the triangle behind the vehicle, a
s required by the legislation in force in
y
our country.Before
leaving your vehicle to set up
a
nd install the triangle, switch on the
h
azard warning lamps and put on your
h
igh visibility vest.
Refer to the manufacturer's instructions
o
n unfolding and installing supplied with
t
he triangle.
Safety
Page 285 of 428
283
Type 1 fuse tables
Fusebox 1
Dashboard fuses
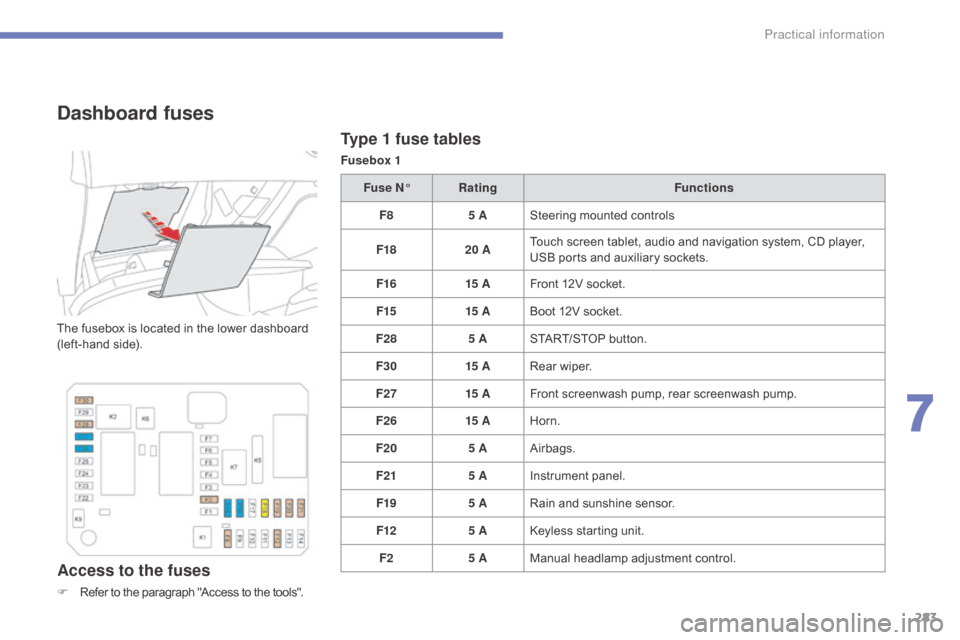
The fusebox is located in the lower dashboard (left-hand side).
Access to the fuses
F Refer to the paragraph "Access to the tools".Fuse N°
Rating Functions
F8 5 ASteering mounted controls
F18 20 ATouch screen tablet, audio and navigation system, CD player,
U
SB ports and auxiliary sockets.
F16 15 AFront 12V socket.
F15 15 ABoot 12V socket.
F28 5 ASTART/STOP button.
F30 15 ARear wiper.
F27 15 AFront screenwash pump, rear screenwash pump.
F26 15 AHorn.
F20 5 AAirbags.
F21 5 AInstrument panel.
F19 5 ARain and sunshine sensor.
F12 5 AKeyless starting unit.
F2 5 AManual
h
eadlamp
a
djustment
c
ontrol.
7
Practical information
Page 287 of 428
285
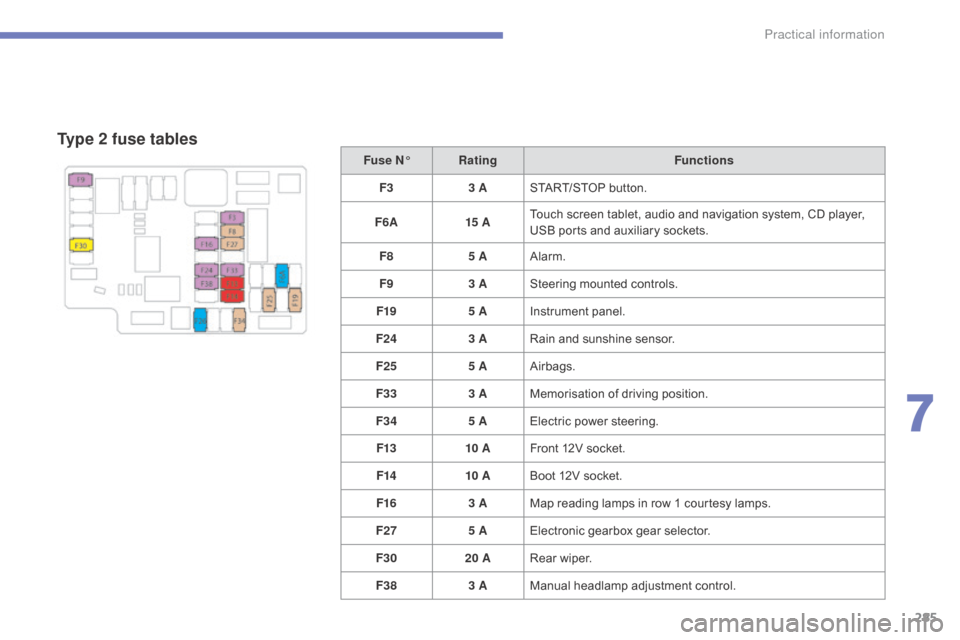
Type 2 fuse tables
Fuse N°Rating Functions
F3 3 ASTART/STOP
button.
F6 A 15 ATouch
screen tablet, audio and navigation system, CD player,
U
SB ports and auxiliary sockets.
F8 5 AAlarm.
F9 3 ASteering
mounted controls.
F19 5 AInstrument
panel.
F24 3 ARain
and sunshine sensor.
F25 5 AAirbags.
F33 3 AMemorisation
o
f
d
riving
p
osition.
F34 5 AElectric
power steering.
F13 10 AFront
12V socket.
F14 10 ABoot
12V socket.
F16 3 AMap
reading lamps in row 1 courtesy lamps.
F27 5 AElectronic
gearbox gear selector.
F30 20 ARear
wiper.
F38 3 AManual
h
eadlamp
a
djustment
c
ontrol.
7
Practical information
Page 293 of 428
291
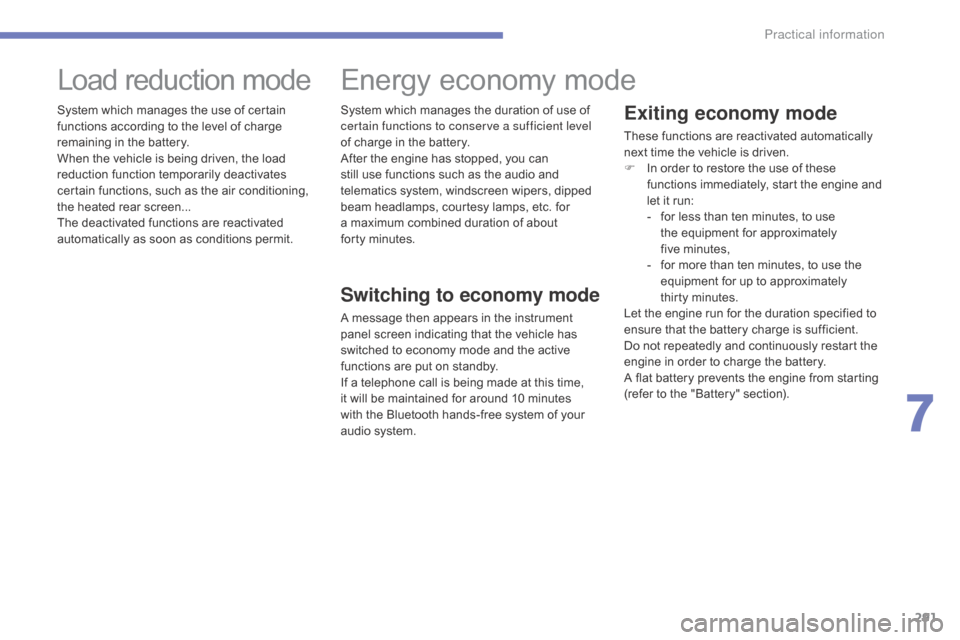
Exiting economy mode
These functions are reactivated automatically next time the vehicle is driven.
F
I
n order to restore the use of these
f
unctions immediately, start the engine and
l
et it run:
-
f
or less than ten minutes, to use
t
he equipment for approximately
f
ive minutes,
-
f
or more than ten minutes, to use the
e
quipment for up to approximately
t
hirty
m
inutes.
Let
the engine run for the duration specified to
e
nsure that the battery charge is sufficient.
Do
not repeatedly and continuously restart the
e
ngine in order to charge the battery.
A
flat battery prevents the engine from starting
(
refer to the "Battery" section).
Load reduction mode
System which manages the use of certain functions according to the level of charge
r
emaining in the battery.
When
the vehicle is being driven, the load
r
eduction function temporarily deactivates
c
ertain functions, such as the air conditioning,
t
he heated rear screen...
The
deactivated functions are reactivated
a
utomatically as soon as conditions permit.
Energy economy mode
Switching to economy mode
A message then appears in the instrument p
anel screen indicating that the vehicle has
s
witched to economy mode and the active
f
unctions are put on standby.
If
a telephone call is being made at this time,
i
t will be maintained for around 10 minutes
w
ith the Bluetooth hands-free system of your
a
udio system.
System
which manages the duration of use of
c
ertain functions to conserve a sufficient level
of charge in the battery.
After the engine has stopped, you can
s
till use functions such as the audio and
t
elematics system, windscreen wipers, dipped
b
eam headlamps, courtesy lamps, etc. for
a
maximum combined duration of about
f
orty
m
inutes.
7
Practical information