CITROEN C5 AIRCROSS DAG 2020 Handbook (in English)
Manufacturer: CITROEN, Model Year: 2020, Model line: C5 AIRCROSS DAG, Model: CITROEN C5 AIRCROSS DAG 2020Pages: 292, PDF Size: 8.59 MB
Page 111 of 292

109
Recommended child
seats
Range of recommended child seats which are
secured using a three-point seat belt .
Group 0+: from bir th to 13
kg
L1
"RÖMER Baby-Safe Plus"
Installed in the "rearward facing" position. Groups 2
and 3: from 15 to 36 kg
L5
"RÖMER KIDFIX"
Can be fitted to the vehicle's ISOFIX mountings.
The child is restrained by the seat belt.
A version with a
removable backrest may be
used for children weighing more than 25
kg.
However, for better protection, use a
booster
seat with backrest for all children weighing up to 36
kg.
5
Safety
Page 112 of 292
110
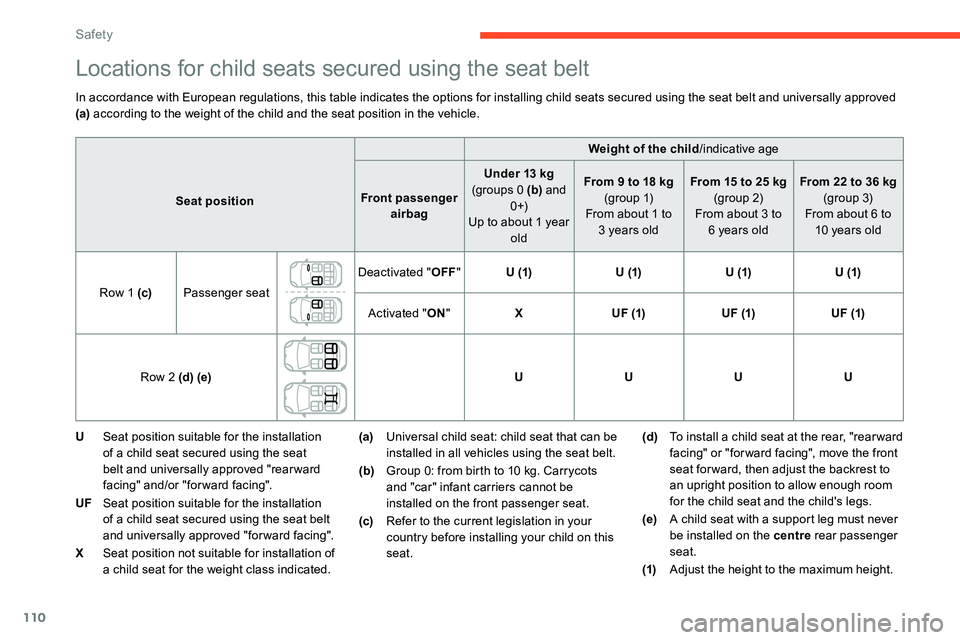
Locations for child seats secured using the seat belt
In accordance with European regulations, this table indicates the options for installing child seats secured using the seat belt and universally approved
(a) according to the weight of the child and the seat position in the vehicle.
U Seat position suitable for the installation
of a
child seat secured using the seat
belt and universally approved "rear ward
facing" and/or "forward facing".
UF Seat position suitable for the installation
of a
child seat secured using the seat belt
and universally approved "forward facing".
X Seat position not suitable for installation of
a
child seat for the weight class indicated. (a)
Universal child seat: child seat that can be
installed in all vehicles using the seat belt.
(b) Group 0: from birth to 10
kg. Carrycots
and "car" infant carriers cannot be
installed on the front passenger seat.
(c) Refer to the current legislation in your
country before installing your child on this
seat. (d)
To install a
child seat at the rear, "rear ward
facing" or "for ward facing", move the front
seat for ward, then adjust the backrest to
an upright position to allow enough room
for the child seat and the child's legs.
(e) A child seat with a
support leg must never
be installed on the centre rear passenger
seat.
(1) Adjust the height to the maximum height.
Weight of the child
/indicative age
Seat position Front passenger
airbag Under 13
kg
(groups 0 (b) and
0 +)
Up to about 1
year
old From 9
to 18 kg
(g r o u p 1)
From about 1
to
3
years oldFrom 15
to 25 kg
(group 2)
From about 3
to
6
years oldFrom 22
to 36 kg
(group 3)
From about 6
to
10
years old
Row 1 (c) Passenger seat Deactivated "
OFF" U (1) U (1)U (1)U (1)
Activated " ON" X U F (1) U F (1)U F (1)
Row 2 (d) (e) UUUU
Safety
Page 113 of 292

111
"ISOFIX" mountings
The seats, shown below, are fitted with ISOFIX
compliant mountings:
The mountings comprise three rings for each
seat: ISOFIX child seats are fitted with two latches
which are secured on the two rings A
.
Some seats also have an upper strap which is
attached to ring B .
To secure the child seat to the TOP TETHER :
F
r
emove and stow the head restraint before
installing the child seat on the seat (refit it
once the child seat has been removed),
F
p
ass the strap of the child seat behind
the seat backrest, centring it between the
apertures for the head restraint rods,
F
s
ecure the upper strap hook to ring B,
F
t
ighten the upper strap.When fitting an ISOFIX child seat to the
left-hand rear seat of the bench seat,
before fitting the seat, first move the
centre rear seat belt towards the middle
of the vehicle, so as to avoid the seat
interfering with the operation of the seat
belt.
-
t
wo rings A , located between the vehicle
seat backrest and cushion, indicated by
a
marking, Front seat
Rear seats
-
o
ne ring B, located behind the seat and
indicated by a
marking, referred to as the
TOP TETHER for fixing the upper strap.
This system prevents the child seat from tipping
for ward in the event of a
front impact.
This ISOFIX mounting system ensures fast,
reliable and safe fitting of the child seat in your
vehicle.
5
Safety
Page 114 of 292

112
Recommended ISOFIX
child seats
Also consult the user guide from the child
seat's manufacturer to find out how to
install and remove the seat. For information about the installation
possibilities for ISOFIX child seats in your
vehicle, refer to the summary table."
RÖMER Baby- Safe Plus and its ISOFIX
base"
(size category: E )
Group 0+: from bir th to 13 kg
Installed "rearward facing" using an ISOFIX base which is attached to rings A .
Is only installed on the front passenger seat or on the outer rear seats.
The base has a support leg, height-
adjustable, which rests on the vehicle's floor. This child seat can also be secured with
a
seat belt. In this case, only the shell is used
and attached to the vehicle seat using the three-point seat belt. "
RÖMER Duo Plus ISOFIX "
(size category: B1 )
Group 1: from 9 to 18 kg
Installed only in the "forward facing" position. Is attached to rings A and ring B , referred to
as TOP TETHER, using an upper strap.
Is only installed on the front passenger seat
or on the outer rear seats. The head restraint on the outer rear seat must be fully raised. Three shell angles: sitting, reclining, lying down.
This child seat can also be used on seats
not equipped with ISOFIX mountings. In this case, it must be secured to the vehicle seat using the three-point seat belt. Adjust the
front seat of the vehicle so that the child's feet do not touch the backrest.
An incorrectly installed child seat
compromises the child's safety in the
event of an accident.
Strictly obser ve the fitting instructions
provided in the user guide supplied with
the child seat.
Safety
Page 115 of 292
113
Summary table of locations for ISOFIX child seats
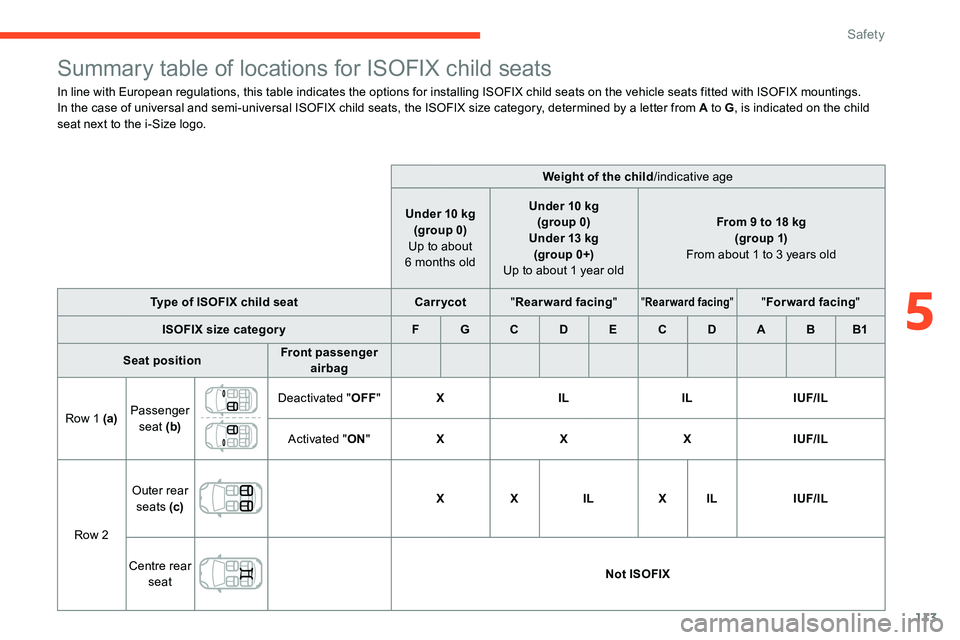
In line with European regulations, this table indicates the options for installing ISOFIX child seats on the vehicle seats fitted with ISOFIX mountings.
In the case of universal and semi-universal ISOFIX child seats, the ISOFIX size category, determined by a letter from A to G, is indicated on the child
seat next to the i-Size logo.
Weight of the child/indicative age
Under 10
kg
(group 0)
Up to about
6
months oldUnder 10
kg
(group 0)
Under 13
kg
(group 0+)
Up to about 1
year oldFrom 9
to 18 kg
(g ro up 1)
From about 1
to 3 years old
Type of ISOFIX child seat Carr ycot"Rearward facing "
"Rearward facing ""Forward facing "
ISOFIX size categor y F G C D E C D A B B1
Seat position Front passenger
airbag
Row 1 (a) Passenger
seat (b) Deactivated "
OFF" X IL ILIUF/IL
Activated " ON" X XXIUF/IL
Row 2 Outer rear
seats (c) X
XIL XIL IUF/IL
Centre rear seat Not ISOFIX
5
Safety
Page 116 of 292
114
XSeat not suitable for installing an ISOFIX
seat or carrycot of the weight group
indicated.
(a) Refer to the current legislation in your
country before installing a
child at this
seat position.
(b) Tilt the seat backrest to 45°, then install
the child seat.
Straighten the backrest until it contacts
the child seat's backrest.
(c) To install a
child seat on a rear seat,
"rearward facing" or "forward facing",
adjust the rear seat to the fully back
position with the backrest tilted.
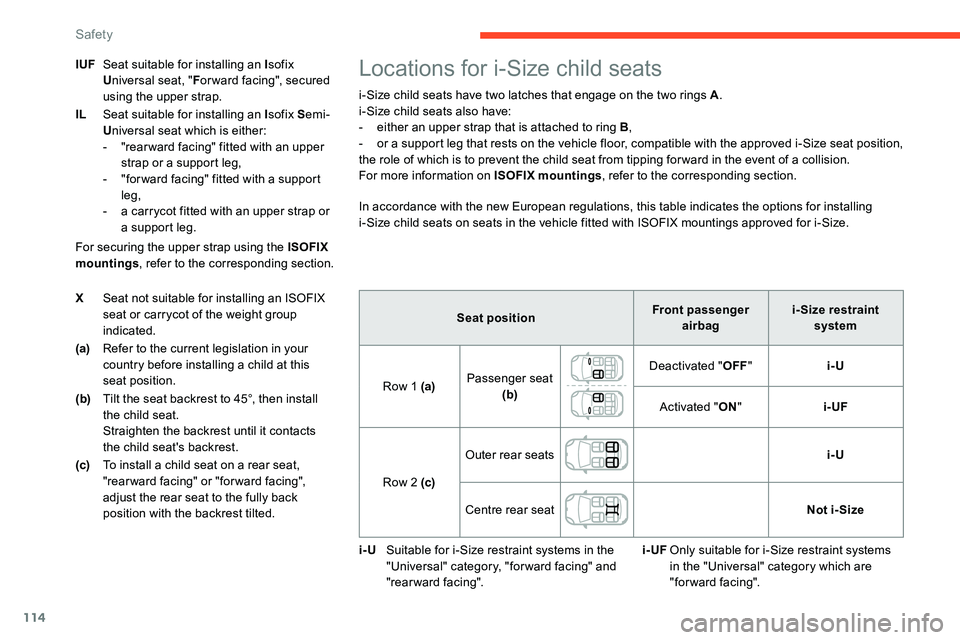
Locations for i-Size child seats
i-Size child seats have two latches that engage on the two rings A .
i-Size child seats also have:
-
e
ither an upper strap that is attached to ring B ,
-
o
r a support leg that rests on the vehicle floor, compatible with the approved i-Size seat position,
the role of which is to prevent the child seat from tipping for ward in the event of a
collision.
For more information on ISOFIX mountings , refer to the corresponding section.
In accordance with the new European regulations, this table indicates the options for installing
i-Size child seats on seats in the vehicle fitted with ISOFIX mountings approved for i-Size.
For securing the upper strap using the ISOFIX
mountings , refer to the corresponding section.
IUF
Seat suitable for installing an I sofix
U niversal seat, " For ward facing", secured
using the upper strap.
IL Seat suitable for installing an I sofix Semi-
U niversal seat which is either:
-
"
rear ward facing" fitted with an upper
strap or a
support leg,
-
"
for ward facing" fitted with a
support
leg,
-
a c
arrycot fitted with an upper strap or
a
support leg. Seat positionFront passenger
airbag i- Size restraint
system
Row 1 (a) Passenger seat
(b) Deactivated "
OFF" i-U
Activated " ON" i-UF
Row 2 (c) Outer rear seats
i-U
Centre rear seat Not i- Size
i-U Suitable for i-Size restraint systems in the
"Universal" category, "forward facing" and
"rearward facing". i-UF
Only suitable for i-Size restraint systems
in the "Universal" category which are
"forward facing".
Safety
Page 117 of 292
115
(a)Refer to the current legislation in your
country before installing a
child at this
seat position.
(b) Tilt the seat backrest to 45°, then install
the child seat.
Straighten the backrest until it contacts
the child seat's backrest.
(c) To install a
child seat on a rear seat,
"rearward facing" or "forward facing",
adjust the rear seat to the fully back
position with the backrest tilted.
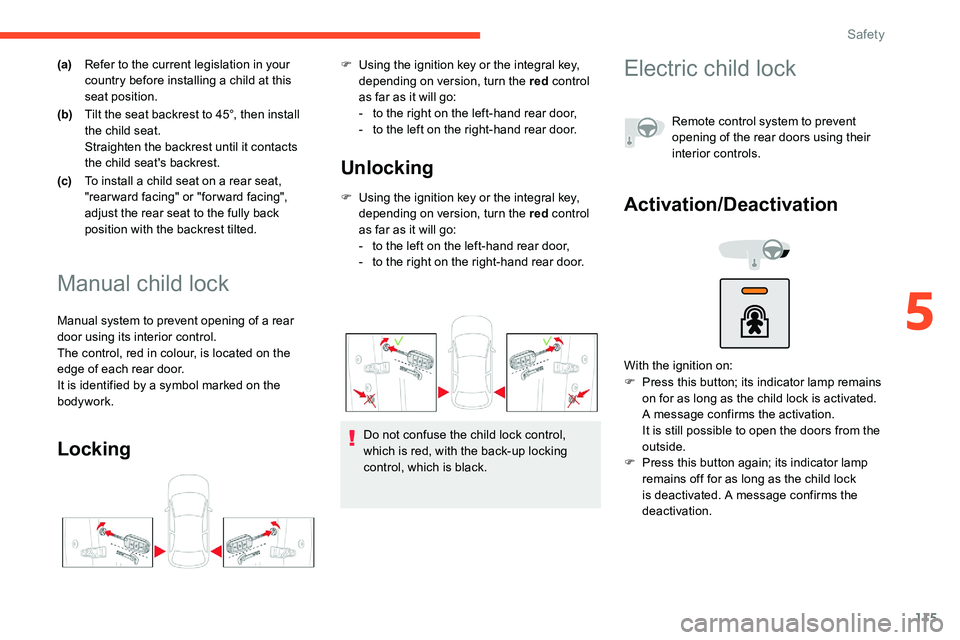
Manual child lock
Manual system to prevent opening of a rear
d oor using its interior control.
The control, red in colour, is located on the
edge of each rear door.
It is identified by a
symbol marked on the
bodywork.
Locking Unlocking
F Using the ignition key or the integral key,
depending on version, turn the red control
as far as it will go:
-
t
o the left on the left-hand rear door,
-
t
o the right on the right-hand rear door.
F
U
sing the ignition key or the integral key,
depending on version, turn the red control
as far as it will go:
-
t
o the right on the left-hand rear door,
-
t
o the left on the right-hand rear door.
Do not confuse the child lock control,
which is red, with the back-up locking
control, which is black.
Electric child lock
Activation/Deactivation
F Press this button; its indicator lamp remains on for as long as the child lock is activated.
A message confirms the activation.
It is still possible to open the doors from the
outside.
F
P
ress this button again; its indicator lamp
remains off for as long as the child lock
is deactivated. A message confirms the
deactivation. Remote control system to prevent
opening of the rear doors using their
interior controls.
With the ignition on:
5
Safety
Page 118 of 292

116
Driving recommendations
F Observe the driving regulations and remain vigilant whatever the traffic conditions.
F
M
onitor your environment and keep your
hands on the wheel to be able to react to
anything that may happen any time.
F
D
rive smoothly, anticipate the need for
braking and maintain a
longer safety
distance, especially in bad weather.
F
S
top the vehicle to carry out operations
that require close attention (such as
adjustments).
F
D
uring long trips, take a break every two
hours.
Important!
Never leave the engine running in
a closed space without sufficient
ventilation. Internal combustion engines
emit toxic exhaust gases such as carbon
monoxide. Danger of poisoning and death! In severe wintry conditions (temperature
below -23°C), let the engine run for
4
minutes before moving off, to ensure
the correct operation and durability of the
mechanical components of your vehicle
(engine and gearbox).
Never drive with the parking brake
applied . Risk of overheating and damage
to the braking system!
Never park the vehicle or leave the
engine running on a flammable sur face
(dr y grass, dead leaves, etc.). The
exhaust system of your vehicle is very
hot, even several minutes after the engine
stops. Risk of fire!
Never leave a
vehicle unattended with
the engine running. If you have to leave
your vehicle with the engine running, apply
the parking brake and put the gearbox into
neutral or position N or P (depending on
the type of gearbox). Never leave children inside the vehicle
unsupervised
.
On flooded roads
We strongly advise against driving on flooded
roads, as this could cause serious damage
to the engine or gearbox, as well as to the
electrical systems of your vehicle.
If you are obliged to drive on a
flooded road:
F
c
heck that the depth of water does not
exceed 15
cm, taking account of waves that
might be generated by other users,
F
d
eactivate the Stop & Start function,
F
d
rive as slowly as possible without stalling.
In all cases, do not exceed 6
mph (10 km/h),
F
d
o not stop and do not switch off the engine.
Driving
Page 119 of 292
117
In case of towing
Driving with a trailer places greater
d emands on the towing vehicle and
requires extra care from the driver.
Respect the maximum towable weights.
At altitude: reduce the maximum load
by 10% per 1,000
metres of altitude; the
decreased air density at altitude reduces
engine performance.
New vehicle: do not pull a
trailer
before having driven at least 620
miles
(1,000
kilometres). If the outside temperature is high, let the
engine idle for 1
to 2 minutes after the
vehicle comes to a stop, to help it to cool.
Before setting off
Nose weight
On leaving the flooded road, as soon as safety
conditions allow, make several light brake
applications to dry the brake discs and pads.
If in doubt about the state of your vehicle,
contact a
CITROËN dealer or a qualified
workshop.
F
D
istribute the load in the trailer so that the
heaviest items are as close as possible to
the axle and the nose weight (at the point
where it joins your vehicle) approaches the
maximum permitted without exceeding it.
Ty r e s
F Check the tyre pressures of the towing vehicle and of the trailer, observing the
recommended pressures.
Lighting
F Check the electrical signalling on the trailer and the headlamp beam height of your
vehicle.
If a
genuine CITROËN towing device is
used, the rear parking sensors will be
deactivated automatically to avoid the
audible signal.
When driving
Cooling
Towing a trailer uphill increases the
t emperature of the coolant. The maximum
towable load depends on the gradient and the
exterior temperature. The cooling capacity of
the fan does not increase with engine speed.
F
R
educe speed and lower the engine speed,
so as to limit the heating-up.
In all cases, pay attention to the coolant
temperature.
If this warning lamp and the STOP
warning lamp come on, stop the
vehicle and switch off the engine as
soon as possible.
Brakes
Braking distances are increased when towing
a trailer. To avoid overheating of the brakes, the
use of engine braking is recommended.
Side wind
Bear in mind the increased susceptibility to the
wind that the vehicle will have.
6
Driving
Page 120 of 292
118
Anti-theft protection
Electronic immobiliser
The keys include an electronic engine
immobiliser system, whose secret code must
be recognised in order for starting to be
possible.
If the system malfunctions, indicated by the
display of a message, the engine will not start.
Contact the CITROËN dealer.
Starting/Switching off the
engine with the key
Key ignition switch
Avoid attaching heavy objects to the key
or the remote control, which would weigh
down on its blade in the ignition switch
and could cause a
malfunction.
Ignition on position
It allows the use of the vehicle's electric
equipment or portable devices to be charged.
Once the state of charge of the battery drops
to the reser ve level, the system switches to
energy economy mode: the power supply is
cut off automatically to preser ve the remaining
battery charge.
Switching off the engine leads to a
loss of
braking assistance.
Starting the engine
F Insert the key into the ignition switch; the system recognises the code.
F
U
nlock the steering column by
simultaneously turning the steering wheel
and the key.
In certain cases, you may have to apply
significant force to move the steering
wheel (wheels on full lock, for example).
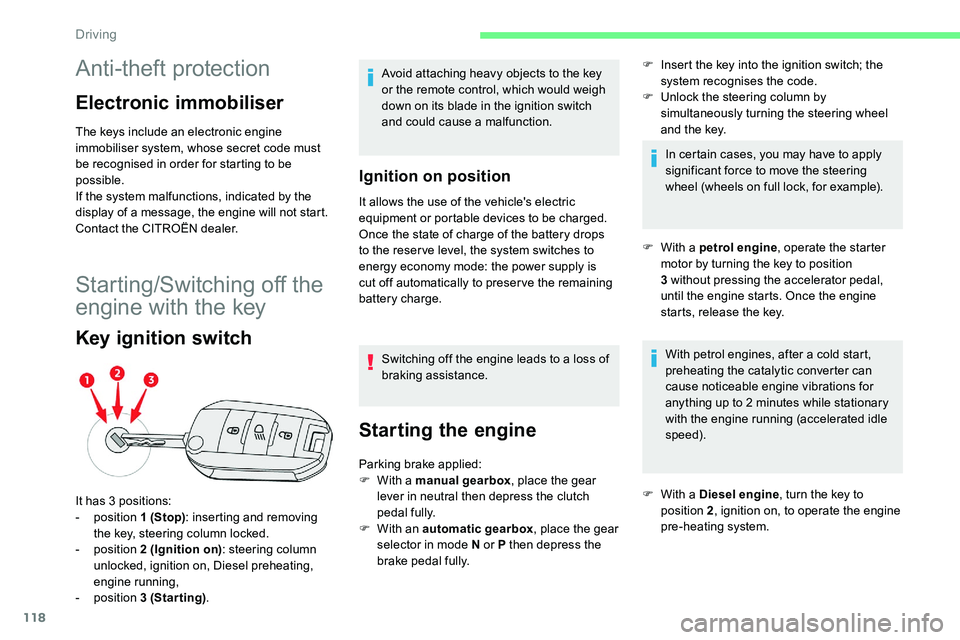
It has 3
positions:
-
position 1 (Stop): inserting and removing
the key, steering column locked.
-
position 2 (Ignition on) : steering column
unlocked, ignition on, Diesel preheating,
engine running,
-
position 3 (Starting) . Parking brake applied:
F
W
ith a
manual gearbox , place the gear
lever in neutral then depress the clutch
pedal fully.
F
W
ith an automatic gearbox , place the gear
selector in mode N or P then depress the
brake pedal fully. F
W
ith a petrol engine , operate the starter
motor by turning the key to position
3
without pressing the accelerator pedal,
until the engine starts. Once the engine
starts, release the key.
With petrol engines, after a cold start,
preheating the catalytic converter can
cause noticeable engine vibrations for
anything up to 2 minutes while stationary
with the engine running (accelerated idle
speed).
F
W
ith a Diesel engine , turn the key to
position 2 , ignition on, to operate the engine
pre-heating system.
Driving