Citroen C5 RHD 2015 (RD/TD) / 2.G Owner's Guide
Manufacturer: CITROEN, Model Year: 2015, Model line: C5 RHD, Model: Citroen C5 RHD 2015 (RD/TD) / 2.GPages: 344, PDF Size: 12.96 MB
Page 31 of 344
29
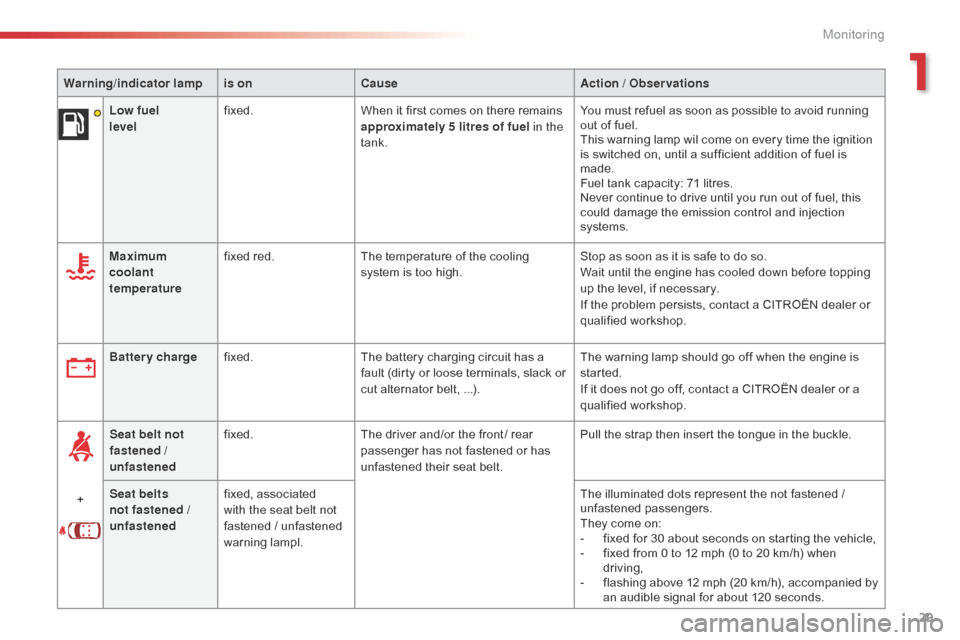
Warning/indicator lampis on Cause Action / Observations
Low fuel
level fixed.
When it first comes on there remains
approximately 5
litres of fuel in the
tank. You must refuel as soon as possible to avoid running
out of fuel.
This warning lamp wil come on every time the ignition
is switched on, until a sufficient addition of fuel is
made.
Fuel tank capacity: 71 litres.
Never continue to drive until you run out of fuel, this
could damage the emission control and injection
systems.
Maximum
coolant
temperature fixed red.
The temperature of the cooling
system is too high. Stop as soon as it is safe to do so.
Wait until the engine has cooled down before topping
up the level, if necessary.
If the problem persists, contact a CITROËN dealer or
qualified workshop.
Battery charge fixed. The battery charging circuit has a
fault (dirty or loose terminals, slack or
cut alternator belt, ...). The warning lamp should go off when the
engine is
started.
If it does not go off, contact a CITROËN dealer or a
qualified workshop.
+ Seat belt not
fastened /
unfastened
fixed.
The driver and/or the front / rear
passenger has not fastened or has
unfastened their seat belt. Pull the strap then insert the tongue in the buckle.
Seat belts
not fastened /
unfastened fixed, associated
with the seat belt not
fastened
/ unfastened
warning lampl. The illuminated dots represent the not fastened /
unfastened passengers.
They come on:
-
f
ixed for 30 about seconds on starting the vehicle,
-
f
ixed from 0 to 12 mph (0 to 20 km/h) when
driving,
-
f
lashing above 12 mph (20 km/h), accompanied by
an audible signal for about 120 seconds.
1
Monitoring
Page 32 of 344

30
Warning/indicator lampis on Cause Action / Observations
Under-inflation fixed. The pressure in one or more wheels
is too low. Check the pressure of the tyres as soon as possible.
This check should preferably be carried out when the
tyres are cold.
+ flashing then fixed,
accompanied by the
Service warning lamp.The tyre pressure monitoring system
has a fault or no sensor is detected
on one of the wheels. Under-inflation detection is not assured.
Have the system checked by a CITROËN dealer or a
qualified workshop.
Monitoring
Page 33 of 344
31
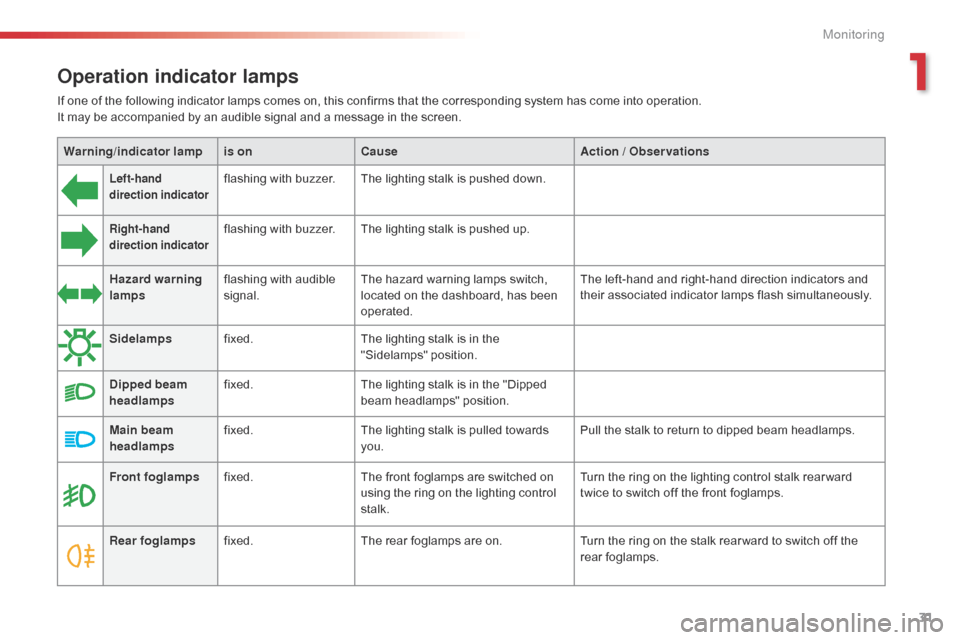
Front foglampsfixed. The front foglamps are switched on
using the ring on the lighting control
stalk. Turn the ring on the lighting control stalk rear ward
twice to switch off the front foglamps.
Rear foglamps fixed. The rear foglamps are on. Turn the ring on the stalk rear ward to switch off the
rear foglamps.
Operation indicator lamps
Warning/indicator lampis on Cause Action / Observations
Left-hand
direction indicatorflashing with buzzer.The lighting stalk is pushed down.
Right-hand
direction indicatorflashing with buzzer.The lighting stalk is pushed up.
Sidelamps fixed. The lighting stalk is in the
"Sidelamps" position.
Dipped beam
headlamps fixed.
The lighting stalk is in the "Dipped
beam headlamps" position.
Main beam
headlamps fixed.
The lighting stalk is pulled towards
you. Pull the stalk to return to dipped beam headlamps.
Hazard warning
lamps
flashing with audible
signal. The hazard warning lamps switch,
located on the dashboard, has been
operated. The left-hand and right-hand direction indicators and
their associated indicator lamps flash simultaneously.
If one of the following indicator lamps comes on, this confirms that the corresponding system has come into operation.
It may be accompanied by an audible signal and a message in the screen.
1
Monitoring
Page 34 of 344
32
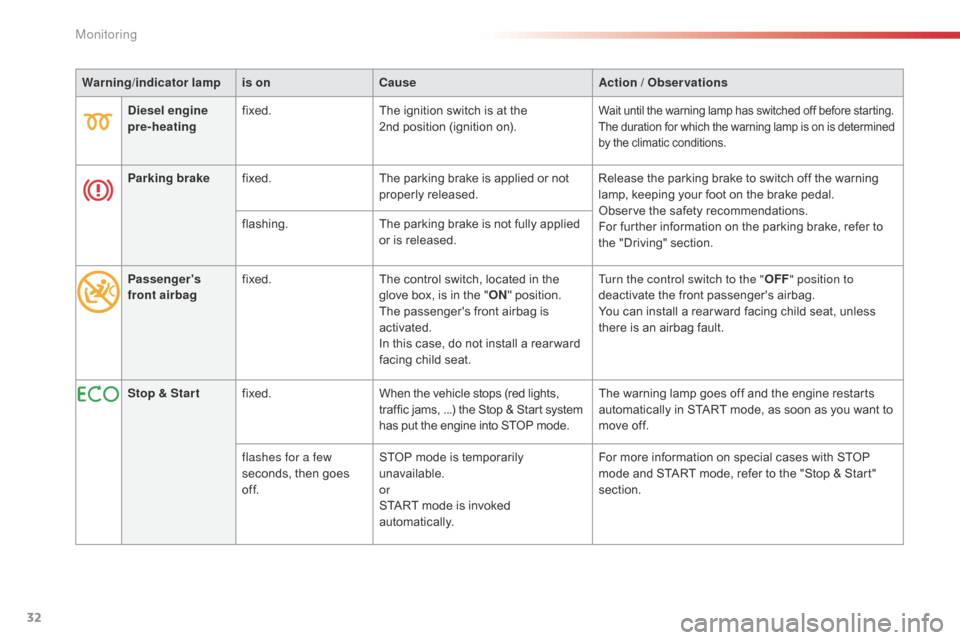
Warning/indicator lampis on Cause Action / Observations
Diesel engine
pre-heating fixed.
The ignition switch is at the
2nd
position (ignition on).
Wait until the warning lamp has switched off before starting.
The duration for which the warning lamp is on is determined
by the climatic conditions.
Parking brakefixed. The parking brake is applied or not
properly released. Release the parking brake to switch off the warning
lamp, keeping your foot on the brake pedal.
Observe the safety recommendations.
For further information on the parking brake, refer to
the "Driving" section.
flashing.
The parking brake is not fully applied
or is released.
Passenger's
front airbag fixed.
The control switch, located in the
glove box, is in the "ON" position.
The passenger's front airbag is
activated.
In this case, do not install a rear ward
facing child seat. Turn the control switch to the "
OFF" position to
deactivate the front passenger's airbag.
You can install a rear ward facing child seat, unless
there is an airbag fault.
Stop & Star t fixed. When the vehicle stops (red lights,
traffic jams, ...) the Stop & Start system
has put the engine into STOP mode. The warning lamp goes off and the engine restarts
automatically in START mode, as soon as you want to
move off.
flashes for a few
seconds, then goes
of f. STOP mode is temporarily
unavailable.
or
START mode is invoked
automatically. For more information on special cases with STOP
mode and START mode, refer to the "Stop & Start"
section.
Monitoring
Page 35 of 344

33
Deactivation indicator lamps
Warning/indicator lampis on Cause Action / Observations
Passenger's
front airbag fixed.
The control, located in the glove box,
is set to the OFF position.
The passenger's front airbag is
deactivated.
You can install a rear ward facing
child seat, unless there is a fault with
the operation of the airbags. Set the control to the ON
position to activate the
passenger's front airbag.
In this case, do not fit a child seat in the rear ward
facing position.
If one of the following indicator lamps comes on, this confirms that the corresponding system has been switched off intentionally.
This is may be accompanied by an audible signal and a message in the multifunction screen.
1
Monitoring
Page 36 of 344

34
Monochrome screen C
Displays in the screenControls
Displays according to context:
-
t ime
-
d
ate,
-
a
mbient temperature with air conditioning
(the value displayed flashes if there is a
risk of ice),
-
p
arking sensor information,
-
a
udio functions
-
a
lert messages. A.
a
c
cess to the "Main Menu"
B.
C
ancel the operation or return to the
previous display
C.
S
croll through the screen menus
C
onfirmation at the steering wheel
D.
C
onfirmation at the audio system control
panel
Selection of the type of
information displayed (Mode)
Successive presses on the end of the wiper
stalk or on the MODE button on the audio
equipment permit selection of the type of
information presented in the multifunction
screen (date or radio, CD, MP3 CD,
CD
changer).For safety reasons, it is recommended
that the driver does not operate the
controls while the vehicle is in motion.
Monitoring
Page 37 of 344
35
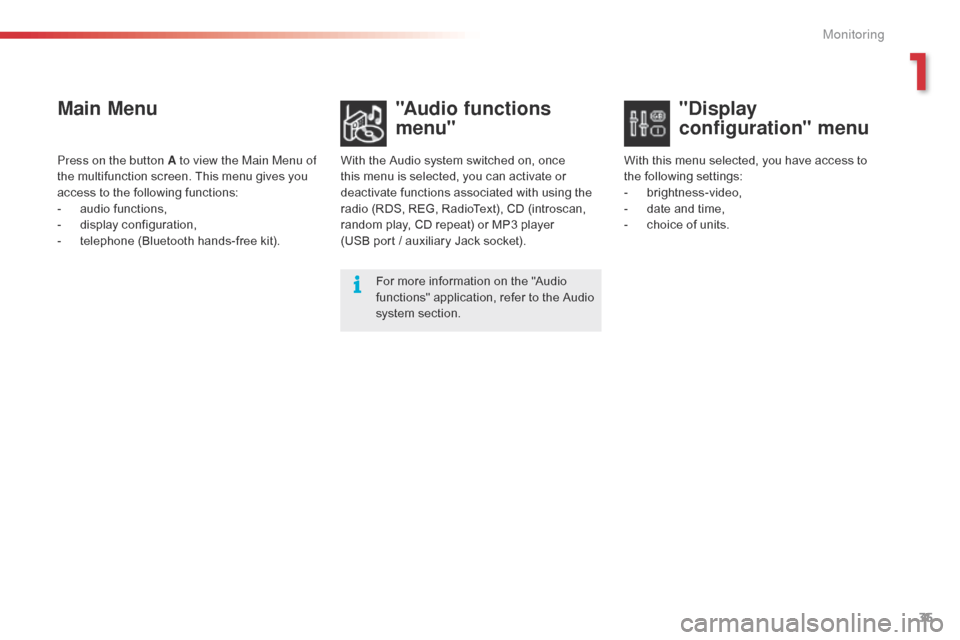
Main Menu"Audio functions
menu"
With the Audio system switched on, once
this menu is selected, you can activate or
deactivate functions associated with using the
radio (RDS, REG, RadioText), CD (introscan,
random play, CD repeat) or MP3 player
(USB
port / auxiliary Jack socket).For more information on the "Audio
functions" application, refer to the Audio
system section.
Press on the button A to view the Main Menu of
the multifunction screen. This menu gives you
access to the following functions:
-
a
udio functions,
-
d
isplay configuration,
-
t
elephone (Bluetooth hands-free kit). With this menu selected, you have access to
the following settings:
-
b
rightness-video,
-
d
ate and time,
-
c
hoice of units.
"Display
configuration" menu
1
Monitoring
Page 38 of 344

36
With the Audio system switched on, once
this menu is selected, you can configure
your Bluetooth hands-free kit (pairing), view
the different telephone directories (calls log,
services...) and manage your calls (start a call,
end a call, double call, secret mode...).Adjusting the date time
"Bluetooth - Telephone -
A udio" menu
For safety reasons, configuration of the
multifunction screen by the driver must
only be done when stationary. For more information, refer to the Audio
system section.
F
P
ress on A
.
F
U
se C to select the "Date and time" menu,
then confirm your choice with a press on
C
on the steering wheel or D on the audio
system.
F
S
elect the screen configuration using C .
Confirm with a press on C on the steering
wheel or D on the audio system.
F
S
elect the date and the time settings,
using B. Confirm with a press on C on the
steering wheel or D on the audio system.
F
Press C to select the values you wish to
modify. Confirm your choice with a press
on C on the steering wheel or D on the
audio system.
F
C
onfirm with "OK" on the screen.
Monitoring
Page 39 of 344

37
Colour screen (with eMyWay)
Depending on the context, it displays:
- t ime,
-
d
ate,
-
al
titude,
-
a
mbient temperature (the value displayed
flashes if there is a risk of ice),
-
p
arking sensor information,
-
a
udio functions,
-
t
elephone information and contacts,
-
s
atellite navigation system information.
-
a
lert messages,
-
s
ettings menus for the screen and the
navigation system.
Controls
From the eMyWay control panel, to select one
of the applications:
F
p
ress the dedicated "RADIO" , "MUSIC",
" N AV " , "TR AFFIC" , "SETUP" or
"PHONE" button for access to the
corresponding menu,
F
t
urn dial A to select a function, an item in
a
list,
F
p
ress button B to confirm the selection,
or
F
p
ress the "Back" button to abandon the
current operation and return to the previous
display.
"SETUP" menu
F Press the "SETUP" button to gain access
to the configuration menu. It allows you to
choose from the following functions:
-
"
Display configuration",
-
"
Speech synthesis setting",
-
"
Select language",
-
"
Trip computer".
Displays in the screen
For more information on these
applications, refer to the "eMyWay"
section.
1
Monitoring
Page 40 of 344
38
Speech synthesis setting
This menu allows you to set the volume for
navigation instructions and to chooses the type
of voice (male or female).
Select language
This menu allows you to select the language
used by the screen display from a defined list.
Select "Synchronise minutes with
GPS" , so that the minutes are set
automatically by satellite reception.
Display configuration
This menu allows you to choose a colour
scheme for the screen, adjust the brightness,
set the date and time and choose the units
for distance (km or miles), fuel consumption
(l/100
km, mpg or km/l) and temperature
(°Celsius or °Fahrenheit).
Date and time
F Press the " SETUP" button.
F S elect "Display configuration" and press
on
B to confirm.
F
S
elect "Adjust date and time" and press
on
B to confirm.
F
A
djust the settings one by one using the
directional arrows then confirm by pressing
on B .
Trip computer
This menu allows you to view information on
the state of the vehicle. You can choose from
the following functions:
-
"
Alert log".
L
ist of active alerts.
-
"
State of functions".
L
ist of the state of functions (activated,
deactivated or faulty).
For safety reasons, configuration of the
multifunction screen by the driver must
be only done when stationary.
Monitoring