window CITROEN C6 2012 Handbook (in English)
[x] Cancel search | Manufacturer: CITROEN, Model Year: 2012, Model line: C6, Model: CITROEN C6 2012Pages: 216, PDF Size: 10.23 MB
Page 85 of 216

83
IIIA
ACCESS
To make it easier to open the doors,
the windows automatically open bya few millimetres.
Note:This movement occurs immediately you touch an interior door handle.
The window recloses, automati-cally adjusting for a perfect seal.
IMPORTANT
This function has no anti-pinch. Donot leave your hand on the window
when you close the door.
Any interruption of your vehicle'selectrical supply will prevent the
windows from opening and closingcorrectly.
Note: Travelling at high speed,closing of windows may be hin-
dered by the aerodynamic pres-sure. Acoustic comfort may then
be adversely affected.
ELECTRICALLY-CONTROLLED CHILD SAFETY
This deactivates the controls in the rear of the vehicle, both for the rear
windows and for opening the rear doors from the inside.
For Pack Lounge seats, the seat slide adjustments, and those for the front
seats from the rear of the vehicle, are also deactivated.
Activation
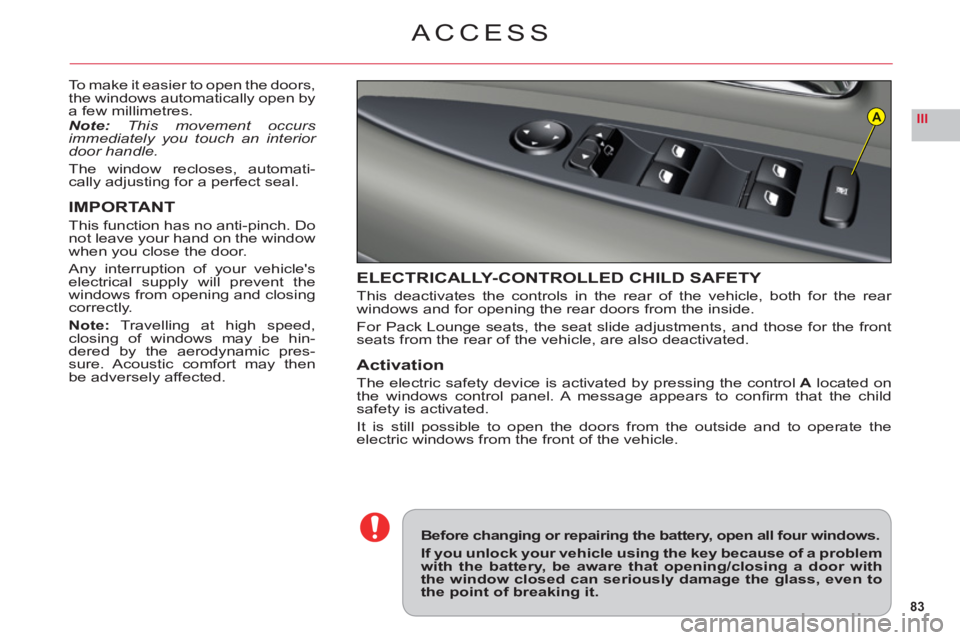
The electric safety device is activated by pressing the controlA located on
the windows control panel. A message appears to confi rm that the child
safety is activated.
It is still possible to open the doors from the outside and to operate the
electric windows from the front of the vehicle.
Before changing or repairing the battery, open all four windows.
If you unlock your vehicle using the key because of a problemwith the battery, be aware that opening/closing a door withthe window closed can seriously damage the glass, even tothe point of breaking it.
Page 88 of 216

86
III
AUTOMATIC AIR CONDITIONING
AIR CONDITIONING
This system automatically adjusts the temperature, the fl ow of air and the distribution of air inside the cabin,
depending on your desired comfort level.
Provided
you retain automatic mode (by pressing button "AUTO") and all the air vents are open, you will main-
tain an optimum comfort level, also removing humidity
and misting, whatever the ambient climatic conditions.
The temperature inside the cabin cannot be lower than
the temperature outside if the air conditioning is not
operating.
To be e
ffective, the air conditioning should only be used
with the windows closed. If after a lengthy stop in bright sunlight the interior temperature is excessive, air the passenger compartment by opening the windows for a
few moments, then close them again.
To keep the air conditioning compressor well sealed, it
is essential to operate the air conditioning at least once every month.
The air conditioning operates by using power from the engine. This results in a slight increase in fuel con-sumption.
Sensors
The automatic regulation of the air conditioning inside
the cabin makes use of a number of sensors, relieving you of the need to make adjustments, other than the desired cabin temperature.
Take care not to obstruct sensor A.
Air inlet
Check that the exterior grille for the air inlet, at the bot-
tom of the windscreen, is clean and free of dead leaves,snow, etc.
If washing the vehicle with a high pressure jet, avoid
targeting the air inlet zone.
Air circulation
For your comfort we advise you to maintain a proper
distribution of air within the cabin, both at the front andat the rear.
The air vents to the
face have thumbwheels so that you can
adjust the fl ow of air, and grilles to orient the direction.
Th
ere are air vents on the fl oor underneath the frontseats and on the rear control panel, for enhancedheating of the rear seat positions.
Do not obstruct the air outlets located in the boot area.
Dust/pollen fi lter
There is a fi lter for excluding pollen and dust.
This
fi lter has to be changed according to the vehicle
maintenance schedule. See "Maintenance and WarrantyGuide".
Page 91 of 216

89
III
3a3b
4
AUTOMATIC AIR CONDITIONING
3. ADJUSTING THE AIR DISTRIBUTION
Successive or continuous presses on buttons3aand 3b direct the fl ow of air to the passenger' side or to the driver's side.
The s
ymbol (arrows) corresponding to the direction chosen is displayed on the multifunction screen:Windscreen and side windows.
Central, lateral and soft diffusion air conditioning
vents (if open).
Passenger footwells."AUTO"automatic distribution.
•
•
••
Rotate the control to increase or decrease the fl ow of air.
The symbol for air fl ow (helix) is displayed on the multifunction screen and fi lls in as the required fl ow increases.
To prevent misting and poor air quality in the passenger compartment, take care to maintain a suffi cient fl ow of air.
4. ADJUSTING THE AIR FLOW
Soft diffusion system
The soft diffusion air conditioning unit situated at thecentre of the front console guaranteesoptimum diffu-sion of air for the front seat positions.r
This unit eliminates annoying draughts and guarantees
an optimum temperature inside the cabin.
Adjusting the air fl ow with soft diffusion air conditioning
The driver and the passenger can adjust the air fl ow for
the soft diffusion air conditioning unit independently.
To a djust the air fl ow, rotate the control to the desiredposition.
To close off the soft diffusion air conditioning, rotate thecontrol as far down as it will go.
In very hot weather, to improve the central and lateralventilation, closing off the soft diffusion air conditioning
is recommended.
Page 92 of 216

90
III
5
6
7
AUTOMATIC AIR CONDITIONING
5. FRONT DEMISTING - DEICING
Press button 5 for rapidclear windows. The warning lamp comes on. This system controls the air condi-
tioning, the air fl ow and the entry of air from outside. It sends the ventilation towards the windscreen and side
windows.
A press on the 1 button returns you to "AUTO"mode.
6. REAR DEMISTING - DEICING
Press button 6, with the engine running, to start a rapid
deicing or demisting of the rear screen and rear view mirrors. The warning lamp comes on.
This mode stops automatically depending on the out-side temperature. It can be paused by pressing again on button6or by stopping the engine.
In the latter case, demisting will resume when the engine is switched on again.Note:The heated rear screen operates independently of the automatic air conditioning.
7. AIR RECIRCULATION – ENTRY OF AIR
FROM OUTSIDE
Press repeatedly on button7 to select the air entrymode. The corresponding warning lamp lights up:Air intake in automatic pollution control mode (on by default, with automatic comfort regulation).
The automatic mode makes use of an air quality sen-sor. It analyses the air and isolates the cabin from theexterior if the presence of pollutants is detected. In thiscase it automatically activates recirculation of the cabinair.
Please note: this function does not detect and there-fore protect the cabin from unpleasant odours. It is not
active when the ambient temperature is below +5 °C so
as to avoid the risk of misting the vehicle’s windows.
Closing the exterior air intake
Press button 7to close the intake of air from the exterior.
While maintaining the other settings, this position allows
the driver to avoid unpleasant odours and smoke out-
side the vehicle at any time.
It should be cancelled as soon as possible to allowexchange of the cabin air and to avoid misting of
the vehicle’s windows.
Exterior air intake
Press button7once to open the exterior air intake.
•
•
•
Page 93 of 216

91
III
AUTOMATIC AIR CONDITIONING
To activate/deactivate
the air conditioningsystem
Press on the control"CLIM"to go into the "air conditioning" mode. Then press button"OK"or on the control to bring up
the "Air Conditioning menu" on the multifunction screen.
This menu allows you:To deactivate the air conditioning:"Cut aircon (A/C OFF)".
Press button"OK", or on the control, to validate the offer to activate or deactivate the air conditioning.The symbol"A/C OFF"displays on the multifunctionscreen in the case of deactivation.
Note
:Your temperature adjustment value may not bereached and you risk having the windows misted up.You can cancel deactivation of the air conditioning,by pressing the control 1"AUTO".
•
-
-
To activate/deactivate the differentiation of the air conditioning adjustment on the driver's side and on
the passenger's side.
A
fter making your selection using the arrow keys,press on "OK"or on the control, to validate the offer to activate or deactivate the air conditioning.
Activation of this function makes the adjust-
ments on the passenger's side identical to thosechosen by the driver.Note:any manual action on button 2b or 3b returns you to the independent adjustments.
•
A press on the "Menu" button brings up the
"Main menu" for access to choices similar to
those offered by the"CLIM" button. See "Mul-
tifunction displays".
Page 102 of 216

100
III
B
A
PACK LOUNGE SEATS
ANGLE OF THE REAR LATERAL HEADRESTRAINTS
To alter the angle of the rear lateralhead restraints, lift them then tilt
them upwards.
LONGITUDINAL
ADJUSTMENT OF THE
FRONT PASSENGER'S
SEA
T
For more room for the rear passen-ger, it is possible for the front pas-senger's seat to beslid forwardfrom the rear seat position.
To slide the front passenger's seatforward, press on the control Bat
the centre of the armrest.
Note: This control Bis not active if
adjustments are being made simul-
taneously at the front.
The front passen
ger's seat will slideforward for as long as you keepcontrolBpressed. It stops immedi-
ately you release controlB.
Note: Use of the child safety deac-
tivates button B. See "Windows".
ADJUSTING THE SEAT AND
ITS BACKREST
You can adjust the longitudinal position of the seat and theangleof its backrest simultaneously using the controlA.
IMPORTANT
Pack Loungeseats cannot be folded.
Note: Use of the child safety deac-
tivates buttonA. See "Windows".
Page 118 of 216

116
III
To prevent dazzle from ahead, fold
the visor downwards.
The
y can be disengaged from their central fi xing and pivoted over to
the side windows if required.
SUN VISOR WITH
ILLUMINATED MIRROR
Illuminates automatically on openingthe mirror cover fl ap (ignition on).
CARD-HOLDER
This is situated above the sun visor.
REAR BLIND
Take the blind by its grip and unroll it.
Engage the blind on the fi xings on each side of the third stoplamp.
BADGE READER
The athermic windscreen has adarkened area above the level of
the interior rear view mirror, to per-mit the optical registering of accesspermits (e.g. motorway toll cards).
GRAB HANDLES - COAT HOOKS
INTERIOR COMFORT
Page 126 of 216

124
IV
A
D
C
B
BATTERY LOCATION AND
ACCESS
The battery is located in the bootunder the left hand wing trim. To
access the battery, rotate the pin
on the fl ap by a 1/4.
CHANGING THE BATTERY (Contact a CITROËN dealer or a qualifi ed
workshop).
1. Release the two pins on each side at the back of the boot, and remove
the boot fl oor.2. On each side trim, release the two fi xing pinsA.3. Undo the two screws Bon each side and remove the sill embellisher.4. On the side trim close to the battery, release the pin D.5. Separate the side trim close to the battery, pulling hard to free the other fi xing points.
6. Unclip the boot lamp C.7.Disconnect both battery terminals.8. Release the battery from its support.9. Remove the battery.
Before changing or repairing the battery, open all four windows.
If you have to unlock your vehicle with the key because of a problem with the battery, any opening/closingof a door with the window closed may seriously damage the glass to the point of breaking it.
12 V BATTERY
Page 127 of 216

125
IV
STARTING THE ENGINE AFTER DISCONNECTING AND RECONNECTING THE BATTERY1. Turn the ignition key.2. Wait approximately 1 minute before operating the starter in order to allow the electronic systems to re-initialise.
After the battery has been disconnected for a lengthy period of time, it may be necessary to re-initialise the followingfunctions:The anti-pinch on the windows.
The anti-pinch on the sun roof.
The multifunction displa
y parameters (date, time, language, units of distance and of temperature).
The Radio stations.
The NaviDrive.
See NaviDrive chapter.
IMPORTANT
In the event of a battery failure, and if the boot is closed, it is then necessary to feed an electrical supply to your
vehicle. See following page.
•
•
••
•
12 V BATTERY
Page 131 of 216

129
IV
TABLE OF FUSES
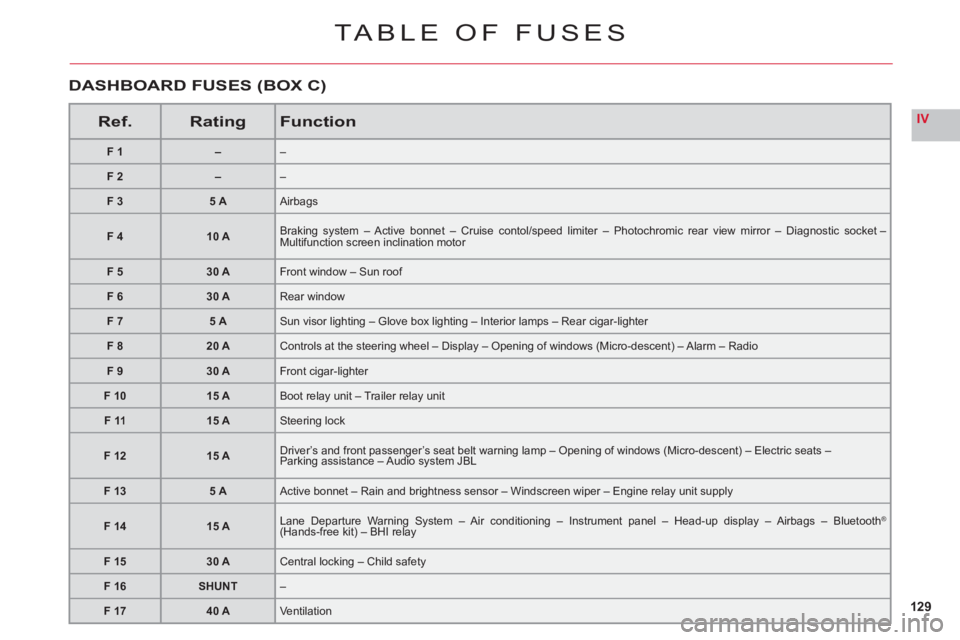
Ref.RatingFunction
F1––
F2––
F 35 AAirbags
F 410 ABraking system – Active bonnet – Cruise contol/speed limiter – Photochromic rear view mirror – Diagnostic socket – Multifunction screen inclination motor
F 530 AFront window – Sun roof
F 630 ARear window
F 75 ASun visor lighting – Glove box lighting – Interior lamps – Rear cigar-lighter
F 820 AControls at the steering wheel – Display – Opening of windows (Micro-descent) – Alarm – Radio
F 930 AFront cigar-lighter
F 1015 ABoot relay unit – Trailer relay unit
F 1115 ASteering lock
F1215 ADriver’s and front passenger’s seat belt warning lamp – Opening of windows (Micro-descent) – Electric seats –Parking assistance – Audio system JBL
F 135 AActive bonnet – Rain and brightness sensor – Windscreen wiper – Engine relay unit supply
F 1415 ALane Departure Warning System – Air conditioning – Instrument panel – Head-up display – Airbags – Bluetooth® (Hands-free kit) – BHI relaygg
F 1530 ACentral locking – Child safety
F 16SHUNT–
F 1740 AVentilation
DASHBOARD FUSES (BOX C)