CITROEN DS3 2018 Handbook (in English)
Manufacturer: CITROEN, Model Year: 2018, Model line: DS3, Model: CITROEN DS3 2018Pages: 248, PDF Size: 8.79 MB
Page 61 of 248
59
If the roof per forms an opening
manoeuvre in zone B, an action on the
boot opening command causes the roof to
close. The boot will be opened when the
roof has reached position 2 . You can then
raise the tailgate.
If the roof per forms an closing manoeuvre
in zone B , an action on the boot opening
command has no effect on the roof
manoeuvre, but triggering the opening of
the tailgate will only be effective when the
roof has reached position 2 . You can then
raise the tailgate.
If the roof per forms an opening or closing
manoeuvre in zone B following an
"anti-panic" function, the boot opening
command is inhibited. It will operate again
when the roof has reached position 2
or
position 3 .
If the roof is in position 3 , an action on
the boot opening control causes the roof
to close to position 2 . When the roof has
reached this position, the tailgate opening
will be triggered. You can then raise the
tailgate.Back-up control
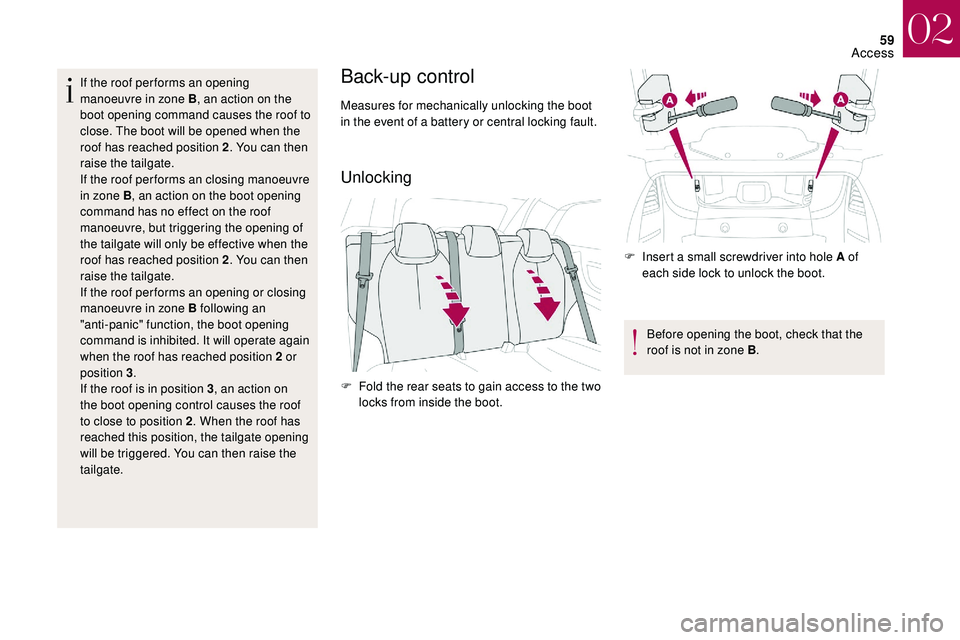
Measures for mechanically unlocking the boot
in the event of a battery or central locking fault.
Unlocking
F Fold the rear seats to gain access to the two locks from inside the boot. F
I
nsert a small screwdriver into hole A of
each side lock to unlock the boot.
Before opening the boot, check that the
roof is not in zone B .
02
Access
Page 62 of 248
EASE OF USE AND COMFORT
03
Page 63 of 248
61
Front seats
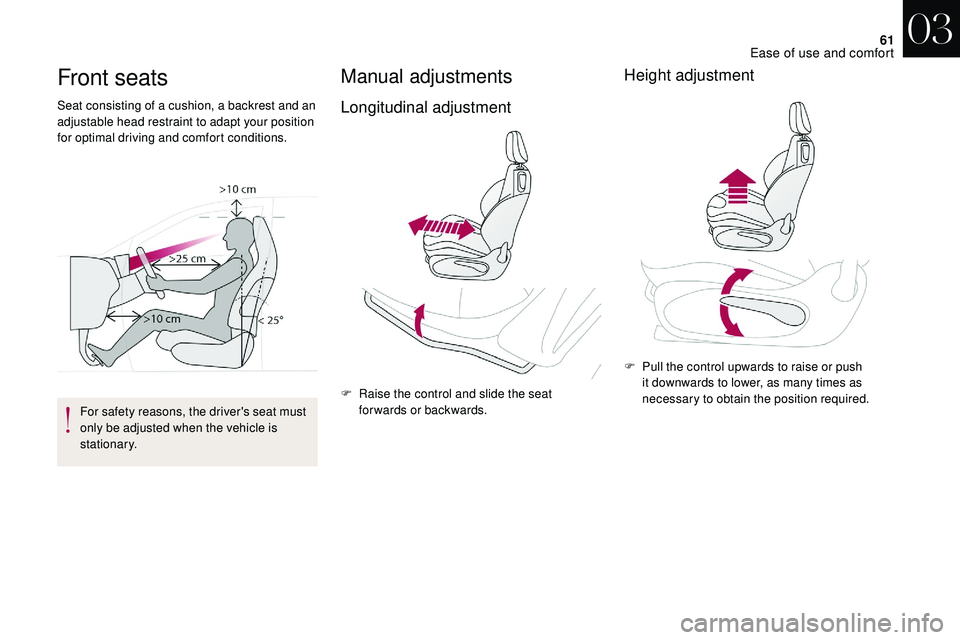
Seat consisting of a cushion, a backrest and an
a djustable head restraint to adapt your position
for optimal driving and comfort conditions.
For safety reasons, the driver's seat must
only be adjusted when the vehicle is
stationary.
Manual adjustments
Longitudinal adjustment
F Raise the control and slide the seat forwards or backwards.
Height adjustment
F Pull the control upwards to raise or push it downwards to lower, as many times as
necessary to obtain the position required.
03
Ease of use and comfort
Page 64 of 248
62
F Push the control backwards.Before moving the seat backwards,
ensure that there is nothing that might
prevent the full travel of the seat.
There is a
risk of trapping or pinching
passengers if present in the rear seats
or jamming the seat if large objects are
placed on the floor behind the seat.
Additional adjustments
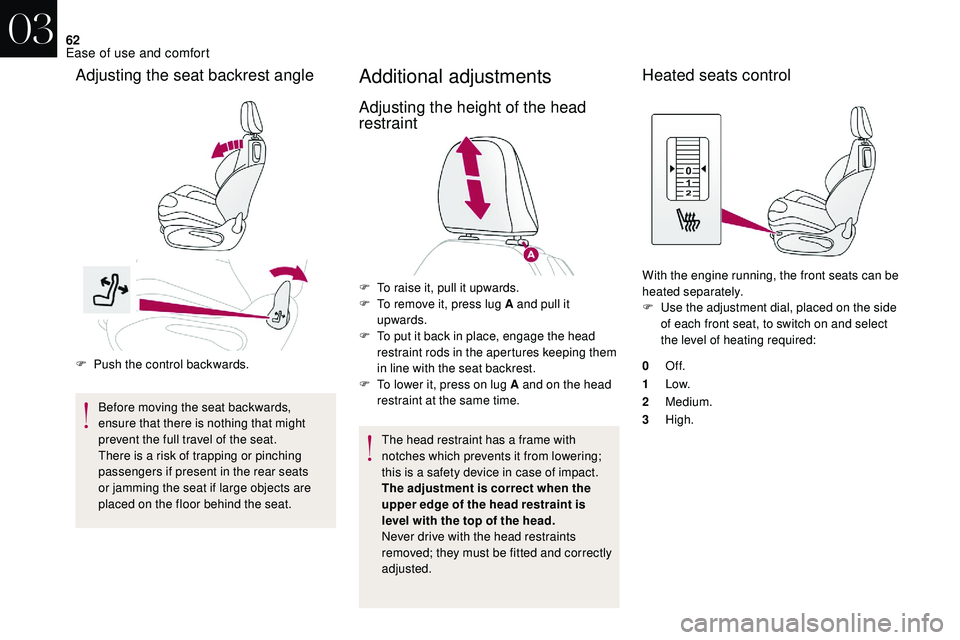
Adjusting the height of the head
restraint
The head restraint has a frame with
n otches which prevents it from lowering;
this is a
safety device in case of impact.
The adjustment is correct when the
upper edge of the head restraint is
level with the top of the head.
Never drive with the head restraints
removed; they must be fitted and correctly
adjusted.
Heated seats control
With the engine running, the front seats can be
heated separately.
F
U
se the adjustment dial, placed on the side
of each front seat, to switch on and select
the level of heating required:
0 Of f.
1 Low.
2 Medium.
3 High.
Adjusting the seat backrest angle
F To raise it, pull it upwards.
F
T o remove it, press lug A and pull it
upwards.
F
T
o put it back in place, engage the head
restraint rods in the apertures keeping them
in line with the seat backrest.
F
T
o lower it, press on lug A and on the head
restraint at the same time.
03
Ease of use and comfort
Page 65 of 248
63
Do not use the function when the seat is
not occupied.
Reduce the intensity of the heating as
soon as possible.
When the seat and passenger
compartment have reached an adequate
temperature, you can stop the function;
reducing the consumption of electrical
current reduces fuel consumption.Prolonged use at the highest setting is
not recommended for those with sensitive
skin.
There is a
risk of burns for people whose
perception of heat is impaired (illness,
taking medication, etc.).
There is a
risk of overheating the system if
material with insulating properties is used,
such as cushions or seat covers.
Do not use the system:
-
i
f wearing damp clothing,
-
i
f child seats are fitted.
To avoid breaking the heating element in
the seat:
-
d
o not place heavy objects on the seat,
-
d
o not kneel or stand on the seat,
-
d
o not place sharp objects on the seat,
-
d
o not spill liquids onto the seat.
To avoid the risk of short-circuit:
-
d
o not use liquid products for cleaning
the seat,
-
n
ever use the heating function when
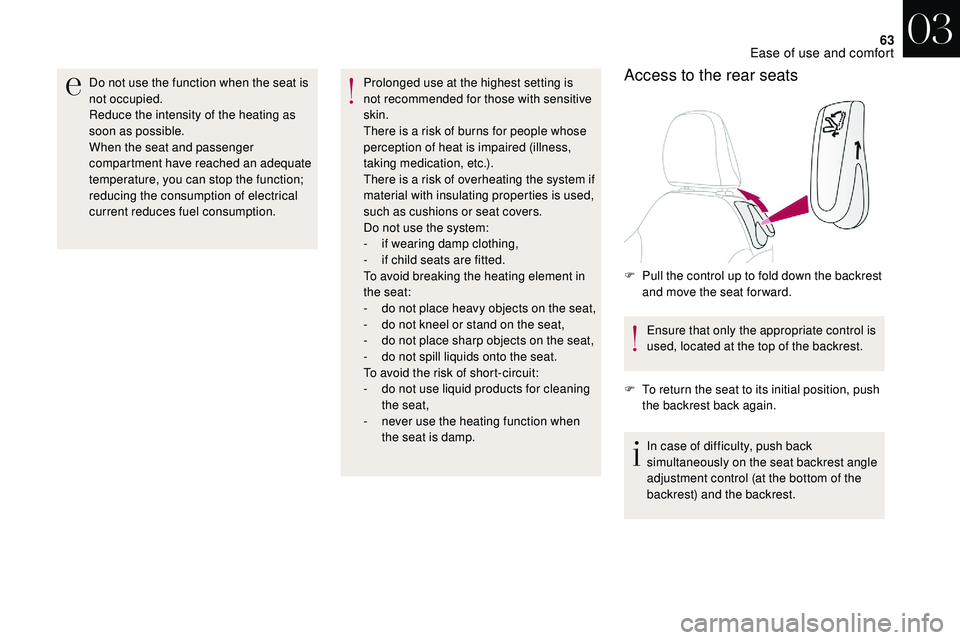
the seat is damp.Access to the rear seats
Ensure that only the appropriate control is
used, located at the top of the backrest.
F
T
o return the seat to its initial position, push
the backrest back again.
In case of difficulty, push back
simultaneously on the seat backrest angle
adjustment control (at the bottom of the
backrest) and the backrest.
F
P
ull the control up to fold down the backrest
and move the seat for ward.
03
Ease of use and comfort
Page 66 of 248
64
No person or object should block the
seat sliding back into its initial position;
returning to this position is necessary for
longitudinal locking.
Make sure that the seat belt has reeled in
correctly so as not to prevent passenger
access to the rear seats.
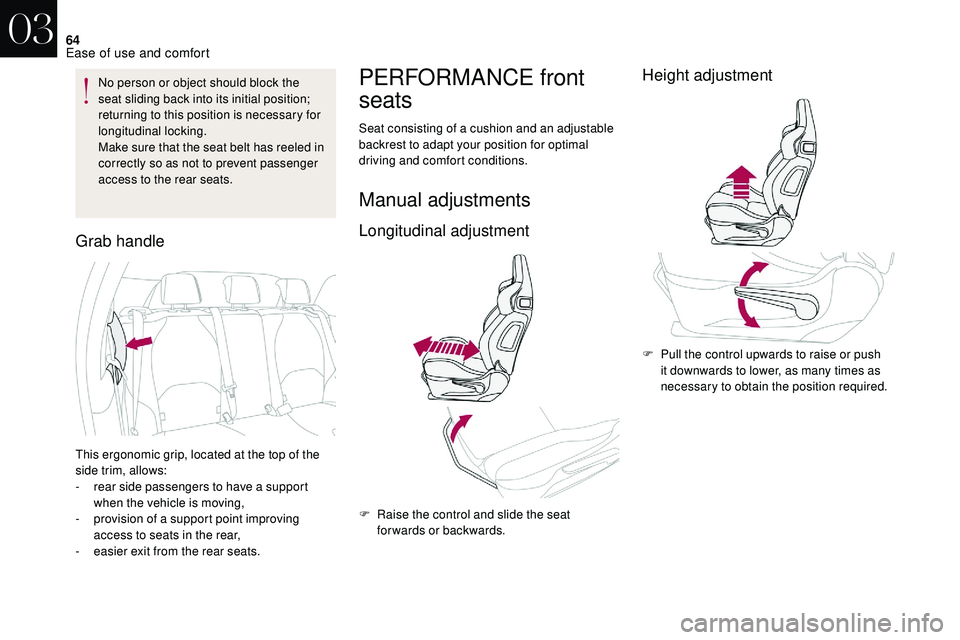
Grab handle
PERFORMANCE front
seats
Seat consisting of a cushion and an adjustable
b ackrest to adapt your position for optimal
driving and comfort conditions.
Manual adjustments
Longitudinal adjustment
F Raise the control and slide the seat forwards or backwards.
Height adjustment
F Pull the control upwards to raise or push it downwards to lower, as many times as
necessary to obtain the position required.
This ergonomic grip, located at the top of the
side trim, allows:
-
r
ear side passengers to have a
support
when the vehicle is moving,
-
p
rovision of a
support point improving
access to seats in the rear,
-
e
asier exit from the rear seats.
03
Ease of use and comfort
Page 67 of 248
65
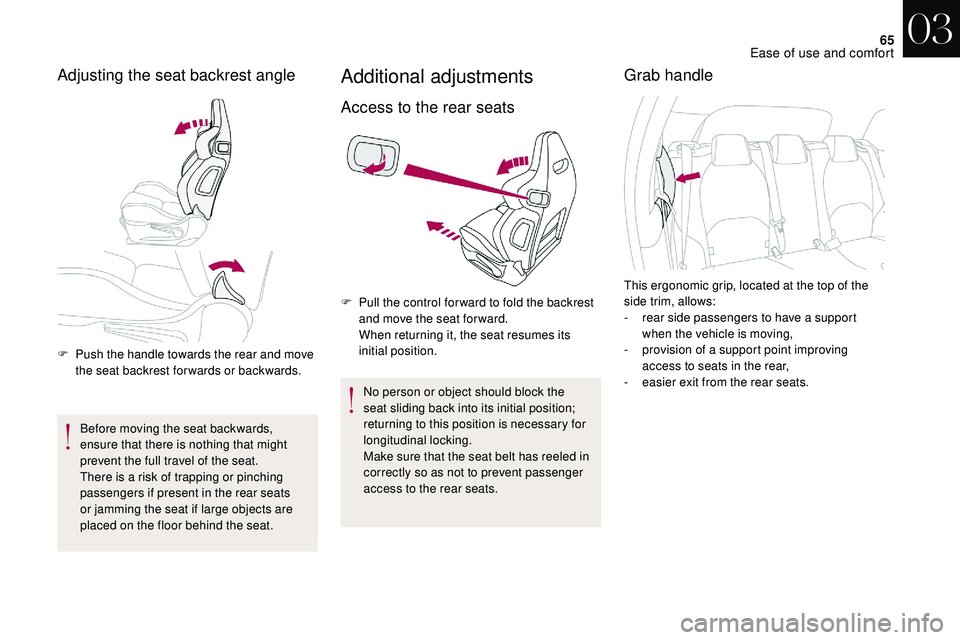
Adjusting the seat backrest angle
F Push the handle towards the rear and move the seat backrest for wards or backwards.
Before moving the seat backwards,
ensure that there is nothing that might
prevent the full travel of the seat.
There is a
risk of trapping or pinching
passengers if present in the rear seats
or jamming the seat if large objects are
placed on the floor behind the seat.
Additional adjustments
Access to the rear seats
F Pull the control for ward to fold the backrest and move the seat for ward.
When returning it, the seat resumes its
initial position.
No person or object should block the
seat sliding back into its initial position;
returning to this position is necessary for
longitudinal locking.
Make sure that the seat belt has reeled in
correctly so as not to prevent passenger
access to the rear seats.
Grab handle
This ergonomic grip, located at the top of the
side trim, allows:
-
r
ear side passengers to have a support
when the vehicle is moving,
-
p
rovision of a support point improving
access to seats in the rear,
-
e
asier exit from the rear seats.
03
Ease of use and comfort
Page 68 of 248
66
Rear seats
Bench seat with fixed one-piece cushion and
folding backrest (1/3 -2/3) to adapt the loading
space in the boot.
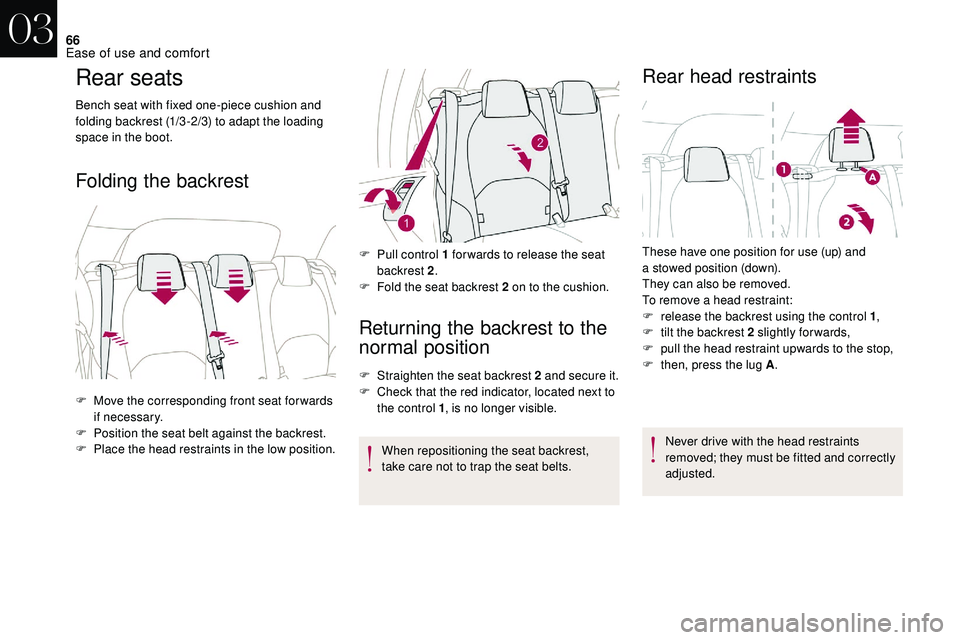
Folding the backrestReturning the backrest to the
normal position
F Straighten the seat backrest 2 and secure it.
F C heck that the red indicator, located next to
the control 1 , is no longer visible.
When repositioning the seat backrest,
take care not to trap the seat belts.
Rear head restraints
Never drive with the head restraints
removed; they must be fitted and correctly
adjusted.
F
M
ove the corresponding front seat for wards
if necessary.
F
P
osition the seat belt against the backrest.
F
P
lace the head restraints in the low position. F
P
ull control 1
for wards to release the seat
backrest 2 .
F
F
old the seat backrest 2
on to the cushion.
These have one position for use (up) and
a
stowed position (down).
They can also be removed.
To remove a head restraint:
F
r
elease the backrest using the control 1
,
F
t
ilt the backrest 2 slightly forwards,
F
p
ull the head restraint upwards to the stop,
F
t
hen, press the lug A
.
03
Ease of use and comfort
Page 69 of 248
67
Steering wheel adjustment
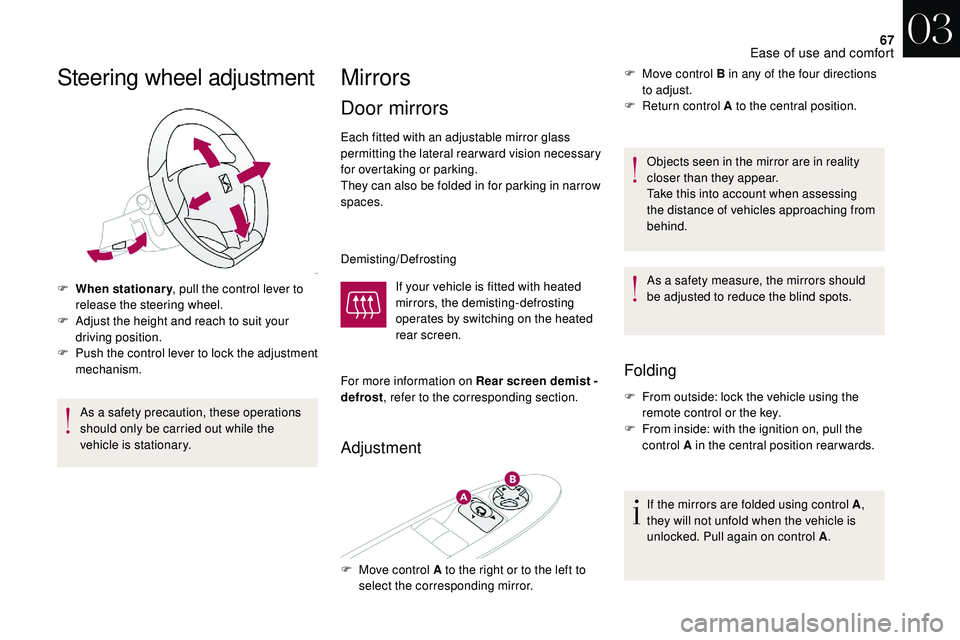
F When stationary, pull the control lever to
release the steering wheel.
F
A
djust the height and reach to suit your
driving position.
F
P
ush the control lever to lock the adjustment
mechanism.
As a
safety precaution, these operations
should only be carried out while the
vehicle is stationary.
Mirrors
Door mirrors
Each fitted with an adjustable mirror glass
permitting the lateral rearward vision necessary
for overtaking or parking.
They can also be folded in for parking in narrow
spaces.
Demisting/Defrosting
If your vehicle is fitted with heated
mirrors, the demisting-defrosting
operates by switching on the heated
rear screen.
For more information on Rear screen demist -
defrost , refer to the corresponding section.
Adjustment
F Move control B in any of the four directions
to adjust.
F
R
eturn control A to the central position.
Objects seen in the mirror are in reality
closer than they appear.
Take this into account when assessing
the distance of vehicles approaching from
behind.
As a
safety measure, the mirrors should
be adjusted to reduce the blind spots.
Folding
F From outside: lock the vehicle using the remote control or the key.
F
F
rom inside: with the ignition on, pull the
control A in the central position rearwards.
If the mirrors are folded using control A ,
they will not unfold when the vehicle is
unlocked. Pull again on control A .
F
M
ove control A to the right or to the left to
select the corresponding mirror.
03
Ease of use and comfort
Page 70 of 248
68
Unfolding
F From outside: unlock the vehicle using the remote control or the key.
F
F
rom inside: with the ignition on, pull the
control A in the central position rearwards.
The folding and unfolding of the door
mirrors using the remote control can be
deactivated in the dealer network or by
a
qualified workshop.
If necessary the mirrors can be folded
manually.
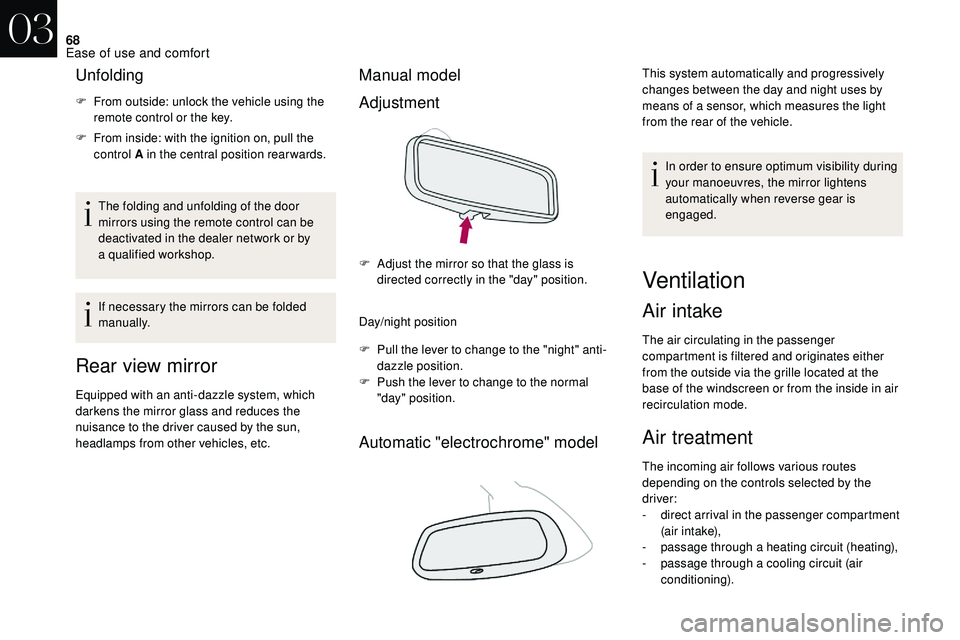
Rear view mirror
Equipped with an anti-dazzle system, which
darkens the mirror glass and reduces the
nuisance to the driver caused by the sun,
headlamps from other vehicles, etc.
Manual model
Adjustment
Day/night position
F
P
ull the lever to change to the "night" anti-
dazzle position.
F
P
ush the lever to change to the normal
"day" position.
Automatic "electrochrome" model
This system automatically and progressively
changes between the day and night uses by
means of a
sensor, which measures the light
from the rear of the vehicle.
In order to ensure optimum visibility during
your manoeuvres, the mirror lightens
automatically when reverse gear is
engaged.
F
A
djust the mirror so that the glass is
directed correctly in the "day" position.
Ventilation
Air intake
The air circulating in the passenger
compartment is filtered and originates either
from the outside via the grille located at the
base of the windscreen or from the inside in air
recirculation mode.
Air treatment
The incoming air follows various routes
depending on the controls selected by the
driver:
-
d
irect arrival in the passenger compartment
(air intake),
-
p
assage through a
heating circuit (heating),
-
p
assage through a cooling circuit (air
conditioning).
03
Ease of use and comfort