check engine light CITROEN DS3 2018 Handbook (in English)
[x] Cancel search | Manufacturer: CITROEN, Model Year: 2018, Model line: DS3, Model: CITROEN DS3 2018Pages: 248, PDF Size: 8.79 MB
Page 16 of 248
14
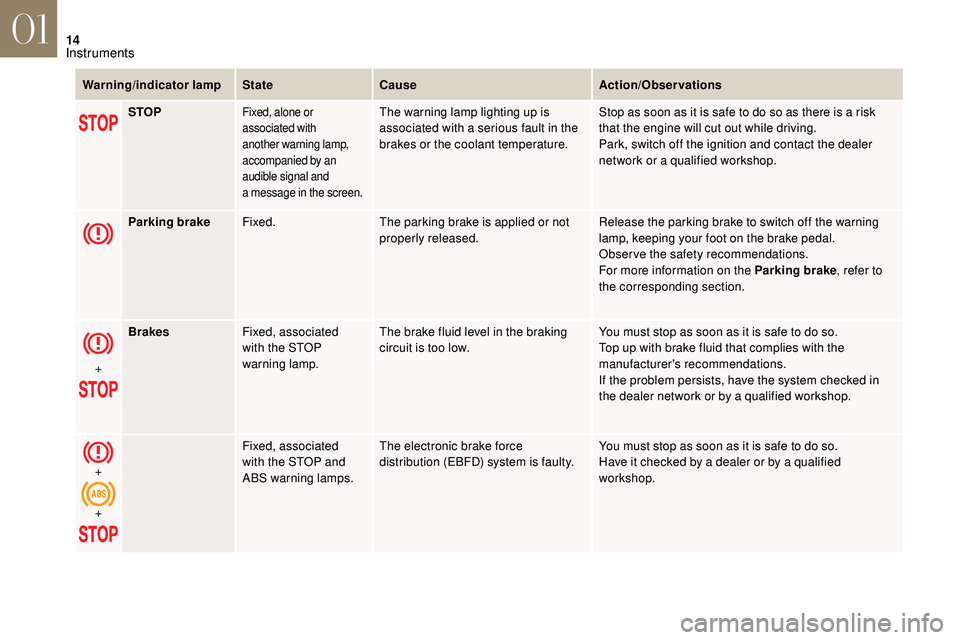
Warning/indicator lampStateCause Action/Observations
STOP
Fixed, alone or
associated with
another warning lamp,
accompanied by an
audible signal and
a
message in the screen.The warning lamp lighting up is
associated with a serious fault in the
brakes or the coolant temperature. Stop as soon as it is safe to do so as there is a
risk
that the engine will cut out while driving.
Park, switch off the ignition and contact the dealer
network or a
qualified workshop.
Parking brake Fixed. The parking brake is applied or not
properly released. Release the parking brake to switch off the warning
lamp, keeping your foot on the brake pedal.
Observe the safety recommendations.
For more information on the Parking brake
, refer to
the corresponding section.
+ Brakes
Fixed, associated
with the STOP
warning lamp. The brake fluid level in the braking
circuit is too low.
You must stop as soon as it is safe to do so.
Top up with brake fluid that complies with the
manufacturer's recommendations.
If the problem persists, have the system checked in
the dealer network or by a
qualified workshop.
+
+ Fixed, associated
with the STOP and
ABS warning lamps.
The electronic brake force
distribution (EBFD) system is faulty.
You must stop as soon as it is safe to do so.
Have it checked by a
dealer or by a qualified
workshop.
01
Instruments
Page 29 of 248
27
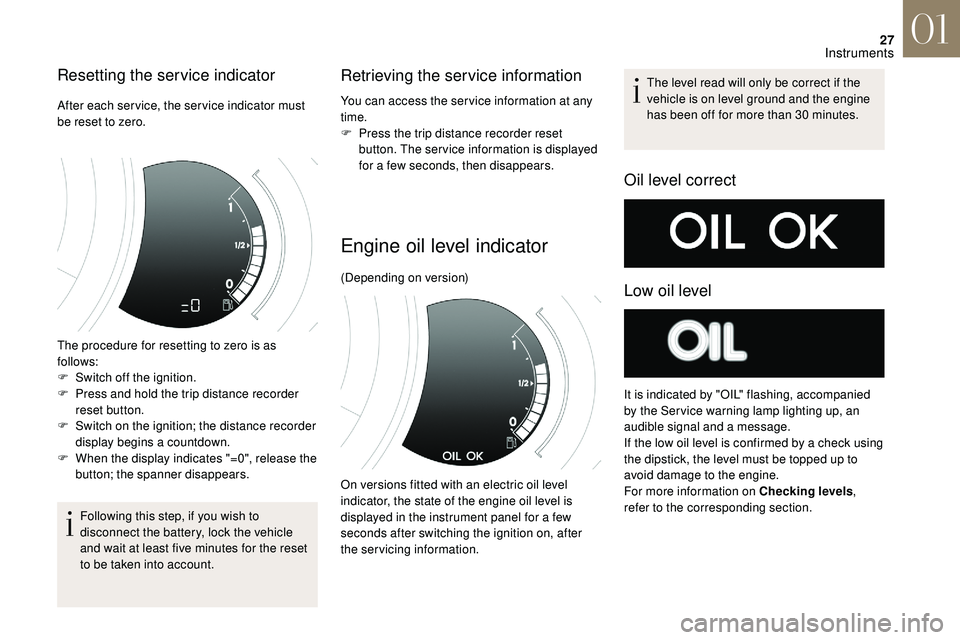
Resetting the service indicator
After each service, the service indicator must
be reset to zero.
The procedure for resetting to zero is as
follows:
F
S
witch off the ignition.
F
P
ress and hold the trip distance recorder
reset button.
F
S
witch on the ignition; the distance recorder
display begins a
countdown.
F
W
hen the display indicates "=0", release the
button; the spanner disappears.
Following this step, if you wish to
disconnect the battery, lock the vehicle
and wait at least five minutes for the reset
to be taken into account.
Retrieving the service information
You can access the ser vice information at any
time.
F
P
ress the trip distance recorder reset
button. The ser vice information is displayed
for a
few seconds, then disappears.
Engine oil level indicator
Oil level correct
Low oil level
(Depending on version) The level read will only be correct if the
vehicle is on level ground and the engine
has been off for more than 30
minutes.
It is indicated by "OIL" flashing, accompanied
by the Ser vice warning lamp lighting up, an
audible signal and a
message.
If the low oil level is confirmed by a
check using
the dipstick, the level must be topped up to
avoid damage to the engine.
For more information on Checking levels ,
refer to the corresponding section.
On versions fitted with an electric oil level
indicator, the state of the engine oil level is
displayed in the instrument panel for a
few
seconds after switching the ignition on, after
the servicing information.
01
Instruments
Page 99 of 248
97
Anti-slip regulation (ASR)
The ASR system (also known as Traction
Control) optimises traction in order to limit
wheel slip by acting on the brakes of the driving
wheels and on the engine. It also improves
the directional stability of the vehicle on
acceleration.
Dynamic stability control (DSC)
If there is a difference between the path
f ollowed by the vehicle and that required by
the driver, the DSC monitors each wheel and
automatically acts on the brake of one or more
wheels and on the engine to return the vehicle
to the required path, within the limits of the laws
of physics.
Anti-lock braking system
(ABS) and electronic brake
force distribution (EBD)It is triggered in relation to the speed at which
the brake pedal is pressed. This is felt by
a
reduction in the resistance of the pedal and
an increase in the effectiveness of the braking.
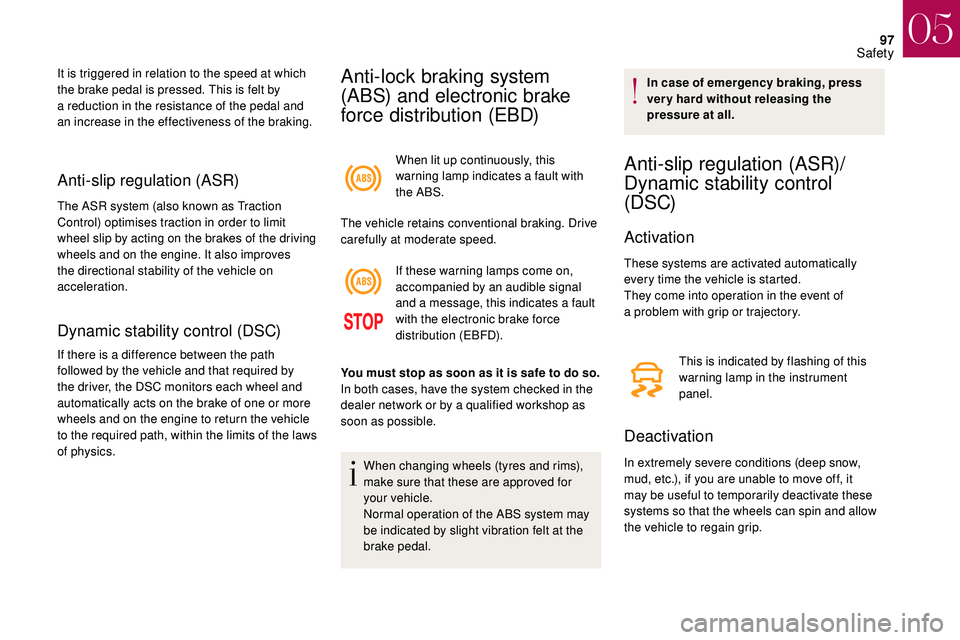
When lit up continuously, this
warning lamp indicates a
fault with
the ABS.
The vehicle retains conventional braking. Drive
carefully at moderate speed.
If these warning lamps come on,
accompanied by an audible signal
and a
message, this indicates a fault
with the electronic brake force
distribution (EBFD).
When changing wheels (tyres and rims),
make sure that these are approved for
your vehicle.
Normal operation of the ABS system may
be indicated by slight vibration felt at the
brake pedal. In case of emergency braking, press
ver y hard without releasing the
pressure at all.
Anti-slip regulation (ASR)/
Dynamic stability control
(DSC)
Activation
These systems are activated automatically
every time the vehicle is started.
They come into operation in the event of
a
problem with grip or trajectory.
This is indicated by flashing of this
warning lamp in the instrument
panel.
Deactivation
In extremely severe conditions (deep snow,
mud, etc.), if you are unable to move off, it
may be useful to temporarily deactivate these
systems so that the wheels can spin and allow
the vehicle to regain grip.
You must stop as soon as it is safe to do so.
In both cases, have the system checked in the
dealer network or by a
qualified workshop as
soon as possible.
05
Safety
Page 119 of 248
11 7
In case of towing
Driving with a trailer places greater
d emands on the towing vehicle and
requires extra care from the driver.
Distribution of loads
F Distribute the load in the trailer so that the heaviest items are as close as possible to
the axle and the nose weight approaches
the maximum permitted without exceeding
it.
Air density decreases with altitude, thus
reducing engine performance. The maximum
towed load must be reduced by 10% for every
1,000
metres of altitude.
Please respect the maximum towable
weights.
Side wind
F Take into account the increased sensitivity to wind.
Cooling
Towing a trailer on a slope increases the
t emperature of the coolant.
As the fan is electrically controlled, its cooling
capacity is not dependent on the engine speed.
F
T
o lower the engine speed, reduce your
speed.
The maximum towable load on an incline
depends on the gradient and the exterior
temperature.
In all cases, keep a
check on the coolant
temperature.
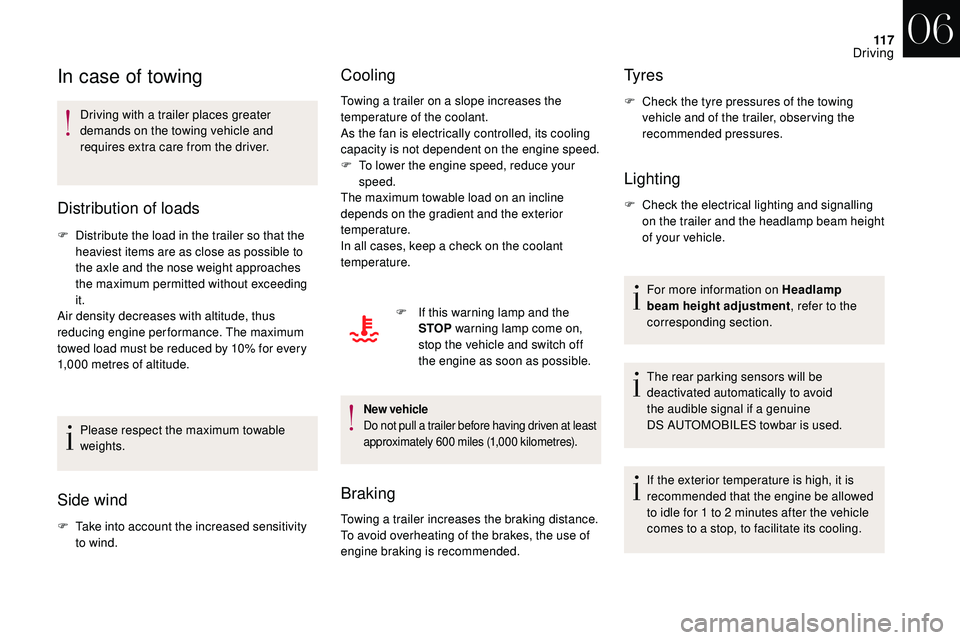
F
I
f this warning lamp and the
STOP warning lamp come on,
stop the vehicle and switch off
the engine as soon as possible.
New vehicle
Do not pull a trailer before having driven at least
approximately 600
miles (1,000
kilometres).
Braking
Towing a trailer increases the braking distance.
T o avoid overheating of the brakes, the use of
engine braking is recommended.
Ty r e s
F Check the tyre pressures of the towing vehicle and of the trailer, observing the
recommended pressures.
Lighting
F Check the electrical lighting and signalling on the trailer and the headlamp beam height
of your vehicle.
For more information on Headlamp
beam height adjustment , refer to the
corresponding section.
The rear parking sensors will be
deactivated automatically to avoid
the audible signal if a
genuine
DS
AUTOMOBILES towbar is used.
If the exterior temperature is high, it is
recommended that the engine be allowed
to idle for 1
to 2 minutes after the vehicle
comes to a
stop, to facilitate its cooling.
06
Driving
Page 134 of 248
132
Operating fault
If a fault occurs with the system,
t hese warning lamps come on.
Contact the dealer network or
a
qualified workshop to have the
system checked.
Stop & Start
The Stop & Start system puts the engine
temporarily into standby – STOP mode – during
stops in traffic (red lights, traffic jams, etc.). The
engine restarts automatically – START mode –
as soon as you want to move off.
The restart takes place instantly, quickly and
silently.
Per fect for urban use, the Stop & Start system
reduces fuel consumption and exhaust
emissions as well as the noise level when
stationary.
Going into engine STOP
mode
The " ECO" warning lamp comes
on in the instrument panel and the
engine goes into standby:
-
w
ith a
manual gearbox , at speeds below
12
mph (20 km/h) (depending on version),
when you place the gear lever in neutral and
you release the clutch pedal.
-
w
ith a
5-speed or 6-speed electronic
gearbox , vehicle stationary or at speeds
below 5
mph (8 km/h) (depending on
version), when you press the brake pedal or
place the gear selector into position N .
-
w
ith an automatic gearbox , vehicle
stationary, when you press the brake pedal
or put the gear selector in position N .
A time counter adds up the time
periods spent in STOP mode
during a
journey. It resets every
time the ignition is switched on
using the key.
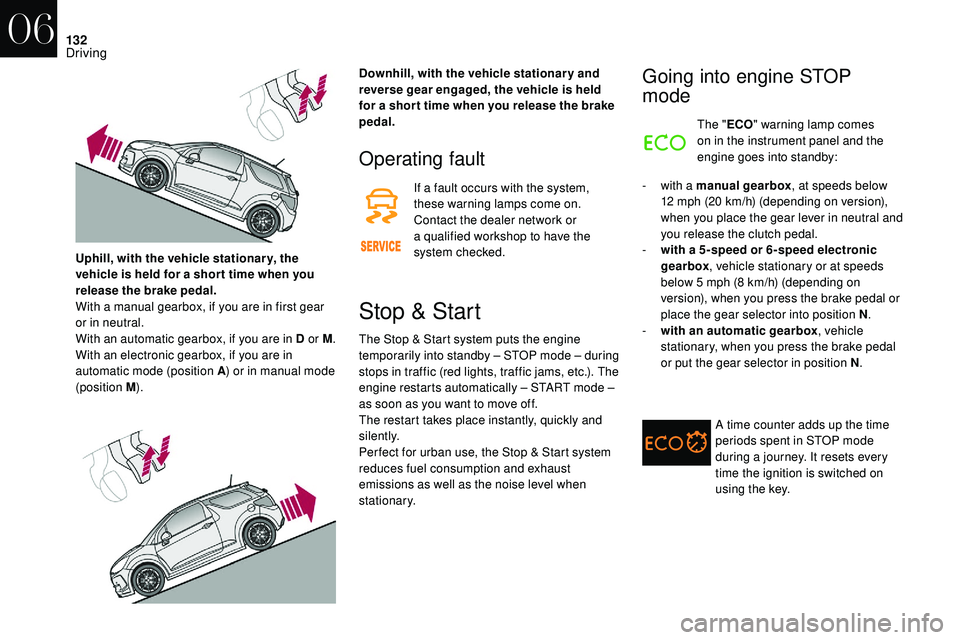
Uphill, with the vehicle stationar y, the
vehicle is held for a shor t time when you
release the brake pedal.
With a
manual gearbox, if you are in first gear
or in neutral.
With an automatic gearbox, if you are in D or M .
With an electronic gearbox, if you are in
automatic mode (position A ) or in manual mode
(position M ). Downhill, with the vehicle stationary and
reverse gear engaged, the vehicle is held
for a
shor t time when you release the brake
pedal.
06
Driving
Page 161 of 248
159
Brake pads
Brake wear depends on the style
of driving, particularly in the case
of vehicles used in town, over short
distances. It may be necessary to
have the condition of the brakes
checked, even between vehicle
services.
Unless there is a
leak in the circuit, a drop in
the brake fluid level indicates that the brake
pads are worn.
Brake disc/drum wear
For information on checking brake
disc wear, contact the dealer
network or a
qualified workshop. Only use products recommended by
DS
AUTOMOBILES or products of
equivalent quality and specification.
In order to optimise the operation of
components as important as those in
the braking system, DS AUTOMOBILES
selects and offers very specific products.
After washing the vehicle, dampness, or
in wintry conditions, ice can form on the
brake discs and pads: braking efficiency
may be reduced. Make light brake
applications to dry and defrost the brakes.
AdBlue® (BlueHDi
engines)
To respect the environment and ensure
compliance with the Euro 6
standard,
without adversely affecting the performance
or fuel consumption of diesel engines,
DS
AUTOMOBILES has taken the decision to
equip its vehicles with a
system that combines
SCR (Selective Catalytic Reduction) with
a
diesel particle filter (DPF) for the treatment of
exhaust gases.
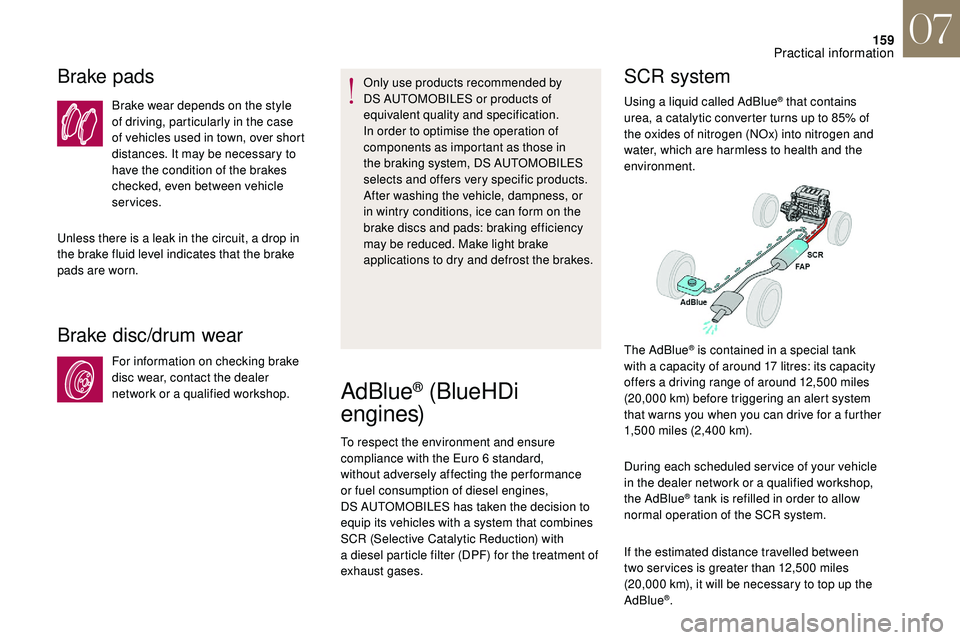
SCR system
Using a liquid called AdBlue® that contains
urea, a catalytic converter turns up to 85% of
the oxides of nitrogen (NOx) into nitrogen and
water, which are harmless to health and the
environment.
During each scheduled ser vice of your vehicle
in the dealer network or a
qualified workshop,
the AdBlue
® tank is refilled in order to allow
normal operation of the SCR system.
If the estimated distance travelled between
two ser vices is greater than 12,500
miles
(20,000
km), it will be necessary to top up the
AdBlue
®.
The AdBlue
® is contained in a special tank
w
ith a
capacity of around 17 litres: its capacity
offers a
driving range of around 12,500 miles
(20,000
km) before triggering an alert system
that warns you when you can drive for a
further
1,500
miles (2,400 km).
07
Practical information
Page 163 of 248
161
Bottles or containers are available from the
dealer network or a qualified workshop.
Never top up from an AdBlue
® dispenser
reserved for heavy goods vehicles.
Recommendations on storage
AdBlue® freezes below around -11°C and
deteriorates above 25°C. It is recommended
that bottles or containers be stored in a
cool
place and protected from direct sunlight.
Under these conditions, the fluid can be kept
for at least a
year.
If the fluid has frozen, it can be used once
it has completely thawed out at ambient
temperature.
Never store bottles or containers of
AdBlue
® in your vehicle.
Do not dispose of AdBlue
® bottles or
containers in the household waste.
Place them in a
container provided for
this purpose or take them to your dealer.
Procedure
Before topping up, ensure that the vehicle is
parked on a flat and level sur face.
In wintry conditions, ensure that the
temperature of the vehicle is above -11°C.
Otherwise the AdBlue
® may be frozen and
so cannot be poured into its tank. Park your
vehicle in a
warmer area for a few hours to
allow the top up to be carried out.
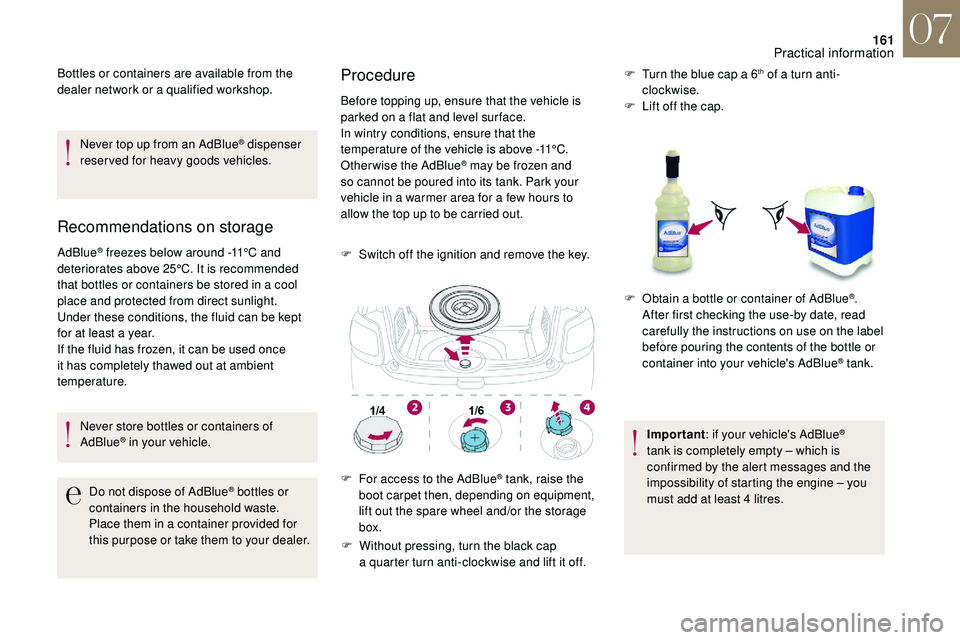
F
S
witch off the ignition and remove the key.
F
W
ithout pressing, turn the black cap
a
quarter turn anti-clockwise and lift it off. F
T
urn the blue cap a 6
th of a turn anti-
c
lockwise.
F
L
ift off the cap.
Important : if your vehicle's AdBlue
®
tank is completely empty – which is
confirmed by the alert messages and the
impossibility of starting the engine – you
must add at least 4
litres.
F
F
or access to the AdBlue
® tank, raise the
boot carpet then, depending on equipment,
lift out the spare wheel and/or the storage
box. F
O
btain a bottle or container of AdBlue
®.
After first checking the use-by date, read
carefully the instructions on use on the label
before pouring the contents of the bottle or
container into your vehicle's AdBlue
® tank.
07
Practical information
Page 191 of 248
189
Access to the battery
The battery is located under the bonnet.
To access it:
F
o
pen the bonnet using the interior release
lever, then the exterior safety catch,
F
s
ecure the bonnet stay,
F
l
ift the plastic cover on the (+) terminal.The battery (-) terminal is not accessible.
A remote earth point is located on the
front left-hand wheel arch.
Starting using another battery
When your vehicle's battery is discharged, the
engine can be started using a backup battery
(external or from another vehicle) and jump
leads or a
battery booster. Never try to start the engine by connecting
a
battery charger.
Never use a 24 V or higher battery
b o o s t e r.
Check beforehand that the backup
battery has a nominal voltage of 12 V and
a capacity at least equal to that of the
discharged battery.
The two vehicles must not be in contact
with each other.
Switch off all the electrical consumers
on both vehicles (audio system, wipers,
lighting, etc.).
Make sure that the jump leads are not
close to moving parts of the engine (fan,
belts, etc.).
Do not disconnect the (+) terminal while
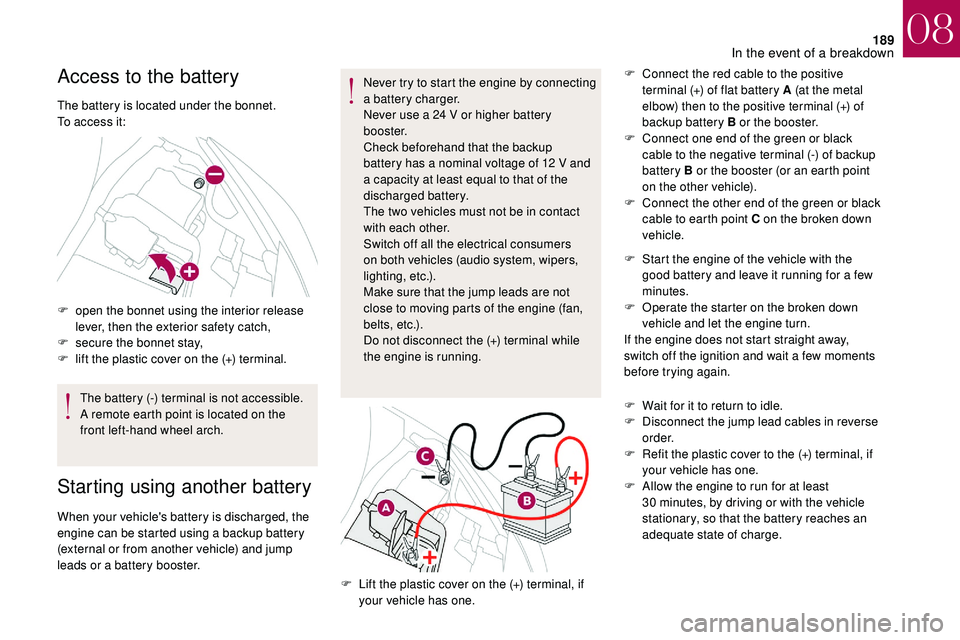
the engine is running. F
C
onnect the red cable to the positive
terminal (+) of flat battery A (at the metal
elbow) then to the positive terminal (+) of
backup battery B or the booster.
F
C
onnect one end of the green or black
cable to the negative terminal (-) of backup
battery B or the booster (or an earth point
on the other vehicle).
F
C
onnect the other end of the green or black
cable to earth point C on the broken down
vehicle.
F
L
ift the plastic cover on the (+) terminal, if
your vehicle has one. F
S
tart the engine of the vehicle with the
good battery and leave it running for a few
minutes.
F
O
perate the starter on the broken down
vehicle and let the engine turn.
If the engine does not start straight away,
switch off the ignition and wait a few moments
before trying again.
F
W
ait for it to return to idle.
F
D
isconnect the jump lead cables in reverse
o r d e r.
F
R
efit the plastic cover to the (+) terminal, if
your vehicle has one.
F
A
llow the engine to run for at least
30 minutes, by driving or with the vehicle
stationary, so that the battery reaches an
adequate state of charge.
08
In the event of a breakdown
Page 192 of 248
190
Charging the battery using
a
battery charger
For optimum ser vice life of the battery, it is
essential to maintain an adequate state of
charge.
In some circumstances it may be necessary to
charge the battery:
-
i
f you use your vehicle mostly for short
journeys,
-
i
f the vehicle is to be taken off the road for
several weeks.
Contact the dealer network or a
qualified
workshop.
If you plan to charge your vehicle's battery
yourself, use only a
charger compatible
with lead-acid batteries of a
nominal
voltage of 12
V.
Follow the instructions provided by the
manufacturer of the charger.
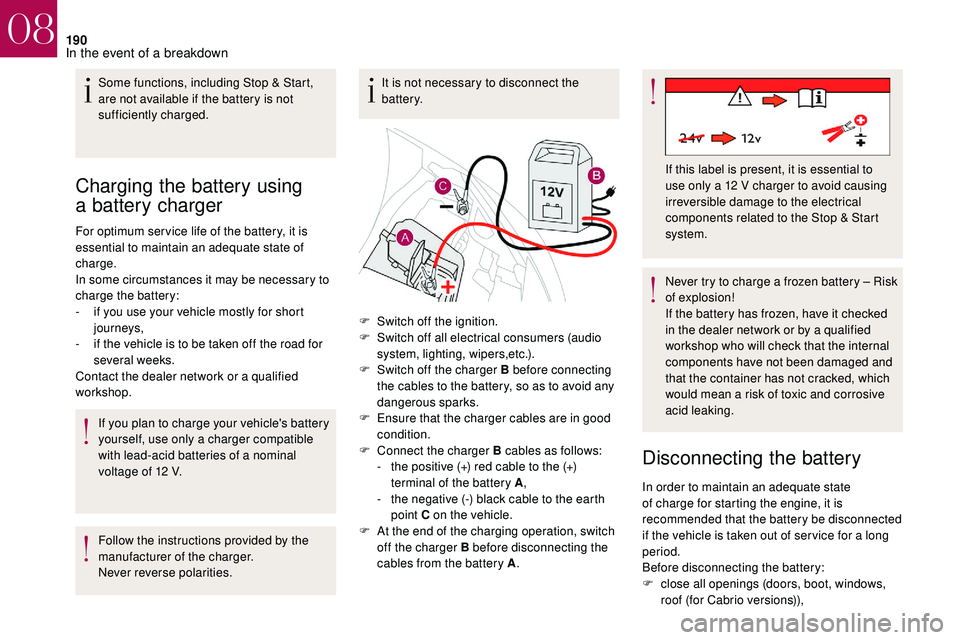
Never reverse polarities. It is not necessary to disconnect the
battery.
Never try to charge a frozen battery – Risk
of explosion!
If the battery has frozen, have it checked
in the dealer network or by a
qualified
workshop who will check that the internal
components have not been damaged and
that the container has not cracked, which
would mean a
risk of toxic and corrosive
acid leaking.
Disconnecting the battery
Some functions, including Stop & Start,
are not available if the battery is not
sufficiently charged.
F
S
witch off the ignition.
F
S
witch off all electrical consumers (audio
system, lighting, wipers,etc.).
F
S
witch off the charger B before connecting
the cables to the battery, so as to avoid any
dangerous sparks.
F
E
nsure that the charger cables are in good
condition.
F
C
onnect the charger B cables as follows:
-
t
he positive (+) red cable to the (+)
terminal of the battery A ,
-
t
he negative (-) black cable to the earth
point C on the vehicle.
F
A
t the end of the charging operation, switch
off the charger B before disconnecting the
cables from the battery A . If this label is present, it is essential to
use only a
12 V charger to avoid causing
irreversible damage to the electrical
components related to the Stop & Start
system.
In order to maintain an adequate state
of charge for starting the engine, it is
recommended that the battery be disconnected
if the vehicle is taken out of ser vice for a
long
period.
Before disconnecting the battery:
F
c
lose all openings (doors, boot, windows,
roof (for Cabrio versions)),
08
In the event of a breakdown
Page 241 of 248
203
ABS .....................................................................9 6 -97
Accessories .............................................................. 92
Access to rear seats
.......................................... 63-65
Active City Brake
............................................. 140 -142
AdBlue
® .............................................. 1 9, 28, 159 -161
Additive, diesel ....................................................... 15 8
Adjusting head restraints
......................................... 62
Adjusting seats
....................................... 6
1-62, 64-65
Adjusting the air distribution
.................................... 73
Adjusting the air flow
................................................ 73
Adjusting the date
................................... 31- 3 4 , 4 0 - 41
Adjusting the height and reach of the steering wheel
................................................. 67
Adjusting the temperature
.................................. 7
2-75
Adjusting the time
................................... 3
1- 3 4 , 4 0 - 41
Advice on care and maintenance
.........................162
Advice on driving
............................................. 11 6 -117
Airbags ...................................................... 17, 101, 10 6
Airbags, curtain
............................................... 102-103
Airbags, front
.......................................... 101-103, 10 6
Airbags, lateral
................................................ 102-103
Air conditioning, automatic
.......................... 70
, 72-75
Air conditioning, manual
............................... 7 0 -71, 74
Air intake
.............................................................. 72-75
Air vents
.............................................................. 68-69
Alarm ................................................................... 46 - 47
Anti-lock braking system (ABS)
........................96 -97
Anti-pinch
........................................................... 47- 4 8
Anti-slip regulation (ASR)
.................................. 96 -97
Apple CarPlay connection
....................................... 13
Armrest, front
........................................................... 79
Assistance call
................................................... 93
-96
Assistance, emergency braking ........................96 -97
Audio streaming (Bluetooth)
...........................1 0 -11, 6
A
Battery ..................................................... 1 5 7, 1 8 8 -1 9 1
Battery, charging ............................................ 1
8 9 -19 0Battery, remote control
......................................
44-45
Black panel
...............................................................
31
BlueHDi
...................................................
28, 159, 165
Bluetooth (hands-free)
................................
14 -16 , 6 - 8
Bluetooth (telephone)
.........................................
14 -16
Bonnet
............................................................
15 3 -15 4
Boot
.....................................................................
57- 5 8
Brake discs
.....................................................
15 8 -159
Brake lamps ..................................................... 176 -179
Brakes
.......................................................
14, 15 8 -159
Bulbs (changing)
.....................................
174, 176 -179
Cable, audio
............................................................. 10
C
able, Jack
...............................................................
10
Capacity, fuel tank
.................................................
148
Cartridge, fragrance
................................................
76
CD
........................................................................\
.......
5
CD, MP3
.................................................................
5-6
Central locking
...................................................
43, 49
Changing a
bulb
......................................
17
4, 176 -179
Changing a
fuse
......................
18
1-183, 185 -18 6, 188
Changing a
wheel
..................................
1
6 9 -170, 173
Changing a
wiper blade
...................................
9 0, 15 3
Changing the remote control battery
...................... 44
C
hecking the engine oil level
.............................
2
7-2 8
Checking the levels
........................................
15 5 -157
Checking tyre pressures (using the kit) ...165 -166, 168
Checks
..................................................... 15 4, 157-159
Checks, routine
............................................... 157-159
Child lock
........................................................ 11 0 , 113
Children
........................................................... 11 0 -113
Child seats
...................... 10
0, 104 -105, 109 -110, 114
Child seats, conventional
...................................... 10
9
Child seats, ISOFIX
......................................... 111 -113
Cleaning (advice)
................................................... 162
Closing the boot
........................................... 4
3 , 57- 5 8
Closing the doors
............................................... 4
3, 49
Configuration, vehicle
...................... 31-34, 36, 40 - 41 Connection, Bluetooth
........................................
1
4 -16
Connection, MirrorLink
............................................
12
Control, electric windows
.................................. 4
7- 4 8
Control, emergency boot release
.....................
5 7, 5 9
Control, emergency door
...................................
5 0 - 51
Control, heated seats
........................................
62- 63
Control stalk, lighting
................................... 2
2-23, 84
Control stalk, wipers
..........................................
8
8-89
Courtesy lamp
..................................................
7
7, 1 8 0
Cruise control
.................................................
13 8 -14 0
Cup holder ................................................................
78
DAB (Digital Audio Broadcasting) – Digital radio
.....
9
Date (setting)
...........................................
31- 3 4 , 4 0 - 41
Daytime running lamps, LED
..........................
87, 176
Deactivating the passenger airbag
....... 10
1-102, 10 6
Deadlocking
.......................................................
43-44
Defrosting
........................................................... 71
, 75
Demisting
.............................................................
71-75
Dials and gauges
.................................................. 9
-12
Dimensions
............................................................. 19
9
Dipstick
................................................ 2
7-28, 15 5 -15 6
Direction indicators
............................ 2
2 , 8 6 , 176 -179
Display screen, instrument panel
...............
9 -12, 13 0
Display screen, multifunction (with audio system) ...............................31- 3 4 , 4 0 - 41
Door pockets ............................................................ 78
Doors
........................................................................\
49
Dynamic stability control (DSC)
........................96 -97
B C
DEconomy mode ...................................................... 15 3
Electronic brake force distribution (EBFD) ....... 9
6 -97
Emergency braking assistance (EBA)
.............. 9
6 -97
Emergency call ................................................... 93-96
E
Alphabetical index