Citroen GRAND C4 PICASSO RHD 2016 2.G Owner's Guide
Manufacturer: CITROEN, Model Year: 2016, Model line: GRAND C4 PICASSO RHD, Model: Citroen GRAND C4 PICASSO RHD 2016 2.GPages: 523, PDF Size: 13.63 MB
Page 21 of 523
19
You can modify the appearance of the instrument panel, by choosing:
-
a
colour scheme,
-
a
display mode.
Choosing the language
This depends on the setting in the touch screen tablet.
Certain
languages are not available for the type 2
i
nstrument panel; English is selected by default.Each
mode corresponds to the type of
i
nformation displayed in the configurable area.
Personalisation of the type 2 instrument panel
Choice of display mode
- "Dials":
permanent display of the trip c
omputer and rev counter.
Display zones
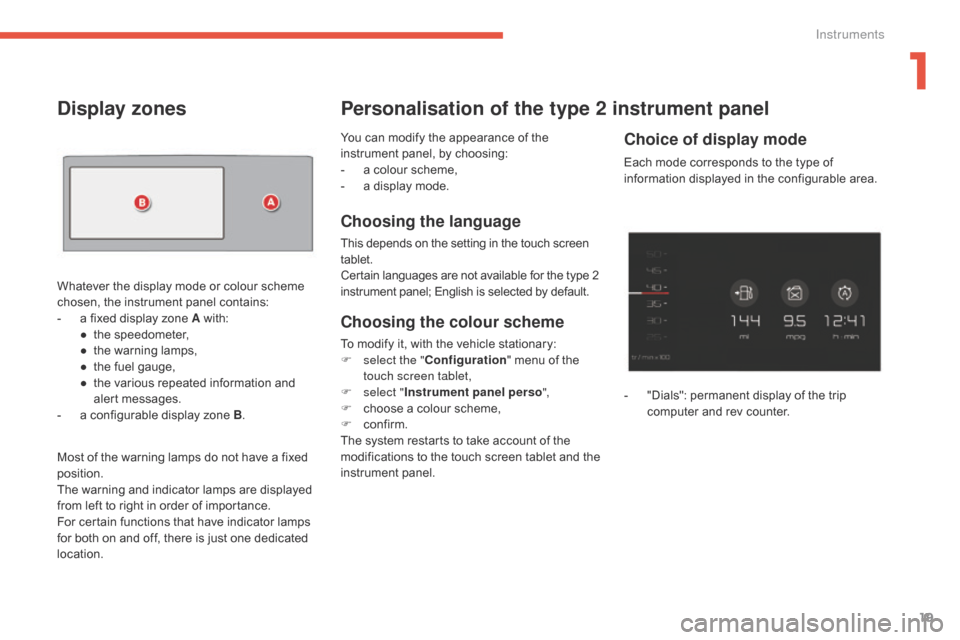
Whatever the display mode or colour scheme chosen, the instrument panel contains:
-
a
fixed display zone A
w
ith:
●
t
he speedometer,
●
t
he warning lamps,
●
t
he fuel gauge,
●
t
he various repeated information and
a
lert
m
essages.
-
a
configurable display zone B.
Most
of the warning lamps do not have a fixed
p
osition.
The
warning and indicator lamps are displayed
f
rom left to right in order of importance.
For
certain functions that have indicator lamps
f
or both on and off, there is just one dedicated
lo
cation.
Choosing the colour scheme
To modify it, with the vehicle stationary:
F s elect the " Configuration "
menu of the
t
ouch screen tablet,
F
s
elect " Instrument panel perso ",
F
c
hoose a colour scheme,
F
c
onfirm.
The
system restarts to take account of the
m
odifications to the touch screen tablet and the
in
strument
pan
el.
1
Instruments
Page 22 of 523
20
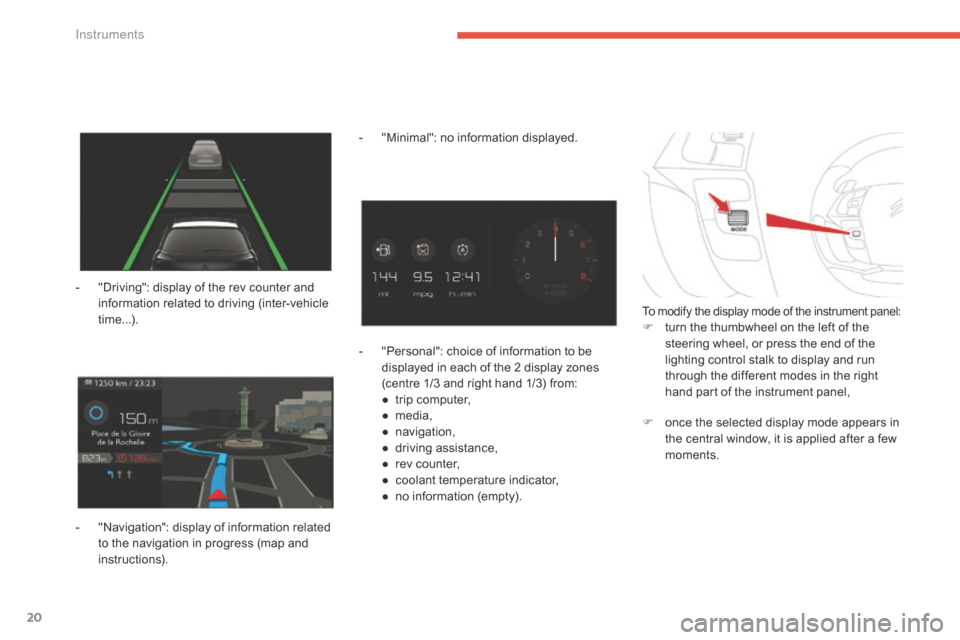
- "Driving": display of the rev counter and i
nformation related to driving (inter-vehicle
t
ime...).
-
"
Navigation": display of information related
t
o the navigation in progress (map and
i
nstructions). -
"
Minimal": no information displayed.
-
"
Personal": choice of information to be
d
isplayed in each of the 2 display zones
(
centre 1/3 and right hand 1/3) from:
●
t
rip computer,
●
m
edia,
●
n
avigation,
●
d
riving assistance,
●
r
ev counter,
●
c
oolant temperature indicator,
●
n
o information (empty).
To modify the display mode of the instrument panel:F turn the thumbwheel on the left of the s
teering wheel, or press the end of the
l
ighting control stalk to display and run
t
hrough the different modes in the right
h
and part of the instrument panel,
F
o
nce the selected display mode appears in
t
he central window, it is applied after a few
m
oments.
In
Page 23 of 523
21
Indicator and warning lamps
Certain warning lamps may come on in one of two modes: fixed (continuous) or
f
lashing.
Only
by relating the type of illumination
t
o the operation of the vehicle can it
be
determined whether the situation is
n
ormal or a fault has occurred. In the
e
vent of a fault, the illumination of the
w
arning lamp may be accompanied by
a
message.
Refer
to the tables on the following
p
ages
f
or
m
ore
i
nformation.
Visual
indicators
informing
the
driver
of
the
status
of
a
system (operation or deactivation indicator
l
amp)
or
the
existence
of
a
fault
(warning
lamp).When the ignition is switched on
Certain warning lamps come on for a few s
econds in the instrument panel when the
v
ehicle's ignition is switched on.
When
the engine is started, these same
w
arning lamps should go off.
If
they remain on, before moving off, refer to the
i
nformation on the warning lamp concerned.
Associated warnings
The illumination of certain warning lamps may be accompanied by an audible signal and a
m
essage.
The
warning lamps may come on continuously
(
fixed) or flash.
1
Instruments
Page 24 of 523
22
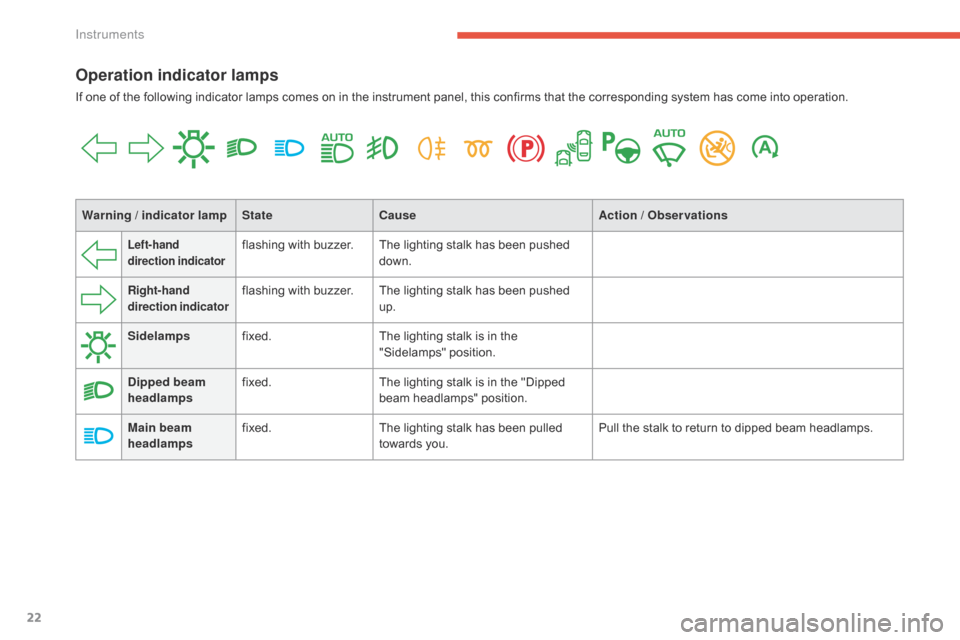
Operation indicator lamps
If one of the following indicator lamps comes on in the instrument panel, this confirms that the corresponding system has come into operation.
W arning / indicator lamp StateCause Action / Observations
Left-hand
direction indicatorflashing with buzzer.The lighting stalk has been pushed d
own.
Right-hand
direction indicatorflashing with buzzer.The lighting stalk has been pushed u
p.
Sidelamps fixed. The
lighting stalk is in the
"
Sidelamps"
p
osition.
Dipped beam
headlamps fixed.
The
lighting stalk is in the "Dipped
b
eam headlamps" position.
Main beam
headlamps fixed.
The
lighting stalk has been pulled
t
owards you.Pull
the stalk to return to dipped beam headlamps.
Instruments
Page 25 of 523
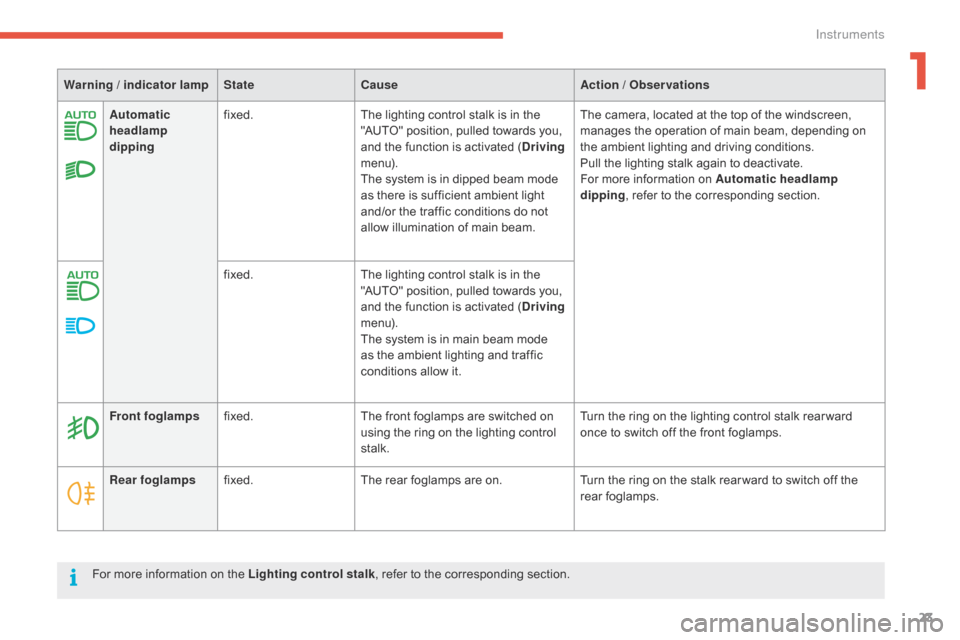
23
Automatic
headlamp
dippingfixed.
The lighting control stalk is in the "
AUTO" position, pulled towards you,
a
nd the function is activated (Driving
m e n u).
The
system is in dipped beam mode
a
s there is sufficient ambient light
a
nd/or the traffic conditions do not
a
llow illumination of main beam.The
camera, located at the top of the windscreen, m
anages the operation of main beam, depending on
t
he ambient lighting and driving conditions.
Pull
the lighting stalk again to deactivate.
For
more information on Automatic headlamp
dipping ,
refer to the corresponding section.
fixed. The
lighting control stalk is in the
"
AUTO" position, pulled towards you,
a
nd the function is activated (Driving
m e n u).
The
system is in main beam mode
a
s the ambient lighting and traffic
c
onditions allow it.
Warning / indicator lamp
StateCause Action / Observations
Rear foglamps fixed. The
rear foglamps are on.Turn
the ring on the stalk rear ward to switch off the
r
ear
fo
glamps.
Front foglamps
fixed. The
front foglamps are switched on
u
sing the ring on the lighting control
st
alk.Turn
the ring on the lighting control stalk rear ward
o
nce to switch off the front foglamps.
For
more information on the Lighting control stalk,
refer to the corresponding section.
1
Instruments
Page 26 of 523
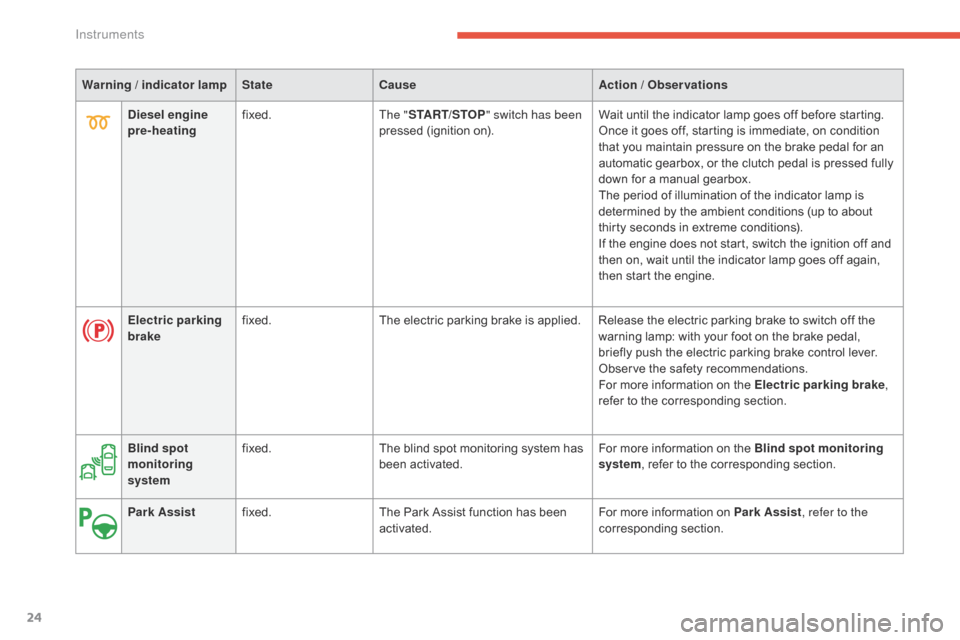
24
Warning / indicator lampStateCause Action / Observations
Electric parking
brake fixed.
The
electric parking brake is applied. Release the electric parking brake to switch off the
w
arning lamp: with your foot on the brake pedal,
b
riefly push the electric parking brake control lever.
Observe
the safety recommendations.
For
more information on the Electric parking brake,
refer
to the corresponding section.
Diesel engine
pre-heating
fixed.
The "START/STOP " switch has been
pressed
(ignition on).Wait
until the indicator lamp goes off before starting.
Once
it goes off, starting is immediate, on condition
t
hat you maintain pressure on the brake pedal for an
a
utomatic gearbox, or the clutch pedal is pressed fully
d
own for a manual gearbox.
The
period of illumination of the indicator lamp is
d
etermined by the ambient conditions (up to about
t
hirty seconds in extreme conditions).
If
the engine does not start, switch the ignition off and
t
hen on, wait until the indicator lamp goes off again,
t
hen start the engine.
Blind spot
monitoring
system fixed.
The
blind spot monitoring system has
b
een activated.For
more information on the Blind spot monitoring
system,
refer to the corresponding section.
Park Assist fixed. The
Park Assist function has been
a
ctivated.For
more information on Park Assist, refer to the
corresponding
s
ection.
Instruments
Page 27 of 523
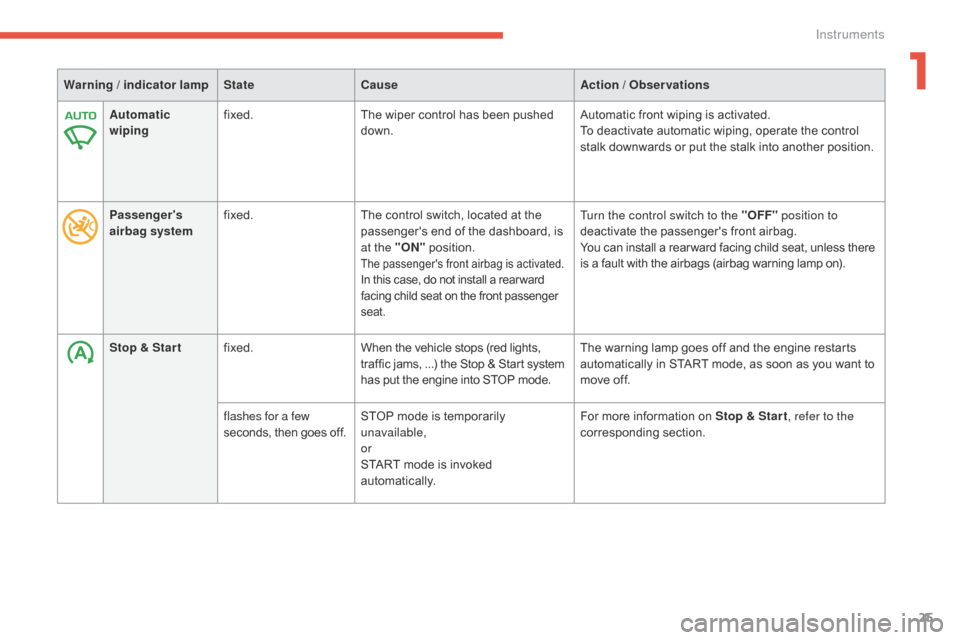
25
Warning / indicator lampStateCause Action / Observations
Automatic
wiping fixed.
The
wiper control has been pushed
d
own.Automatic
front wiping is activated.
To
deactivate automatic wiping, operate the control
s
talk downwards or put the stalk into another position.
Passenger 's
airbag system fixed.
The
control switch, located at the
p
assenger's end of the dashboard, is
a
t the "ON"
p
osition.
The passenger's front airbag is activated.In this case, do not install a rear ward facing child seat on the front passenger sea
t.
Turn the control switch to the "OFF " position to
deactivate the passenger's front airbag.
You
can install a rear ward facing child seat, unless there
i
s a fault with the airbags (airbag warning lamp on).
Stop & Star t fixed. When
the
vehicle
stops
(red
lights,
t
raffic
jams,
...)
the
Stop
&
Start
system
h
as
put
the
engine
into
STOP
mode. The
warning lamp goes off and the engine restarts
a
utomatically in START mode, as soon as you want to
m
ove off.
flashes for a few
seconds,
then
goes
off. STOP
mode
is
temporarily
u
navailable,
or
START
mode
is
invoked
au
tomatically. For
more information on Stop & Star t, refer to the
corresponding
s
ection.
1
Instruments
Page 28 of 523
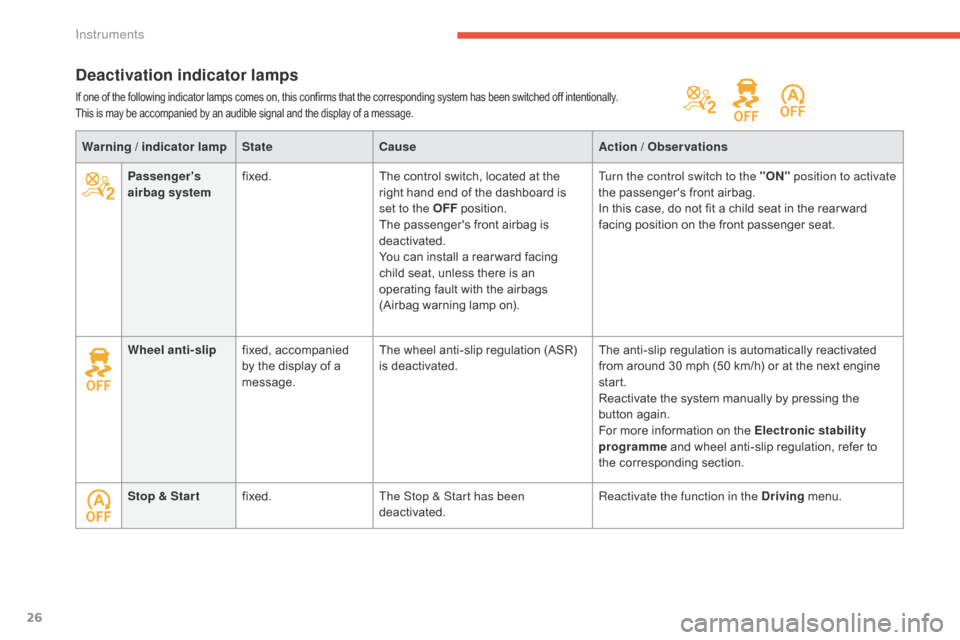
26
Warning / indicator lampStateCause Action / Observations
Passenger's
airbag system fixed.
The
control switch, located at the
r
ight hand end of the dashboard is
s
et to the OFF
p
osition.
The
passenger's front airbag is
d
eactivated.
You
can install a rear ward facing
c
hild seat, unless there is an
o
perating fault with the airbags
(
Airbag warning lamp on).Turn the control switch to the "ON"
position to activate
the
passenger's front airbag.
In
this case, do not fit a child seat in the rear ward
f
acing position on the front passenger seat.
Wheel anti-slip fixed,
a
ccompanied
b
y the display of a
m
essage.The
wheel anti-slip regulation (ASR)
i
s
d
eactivated.The
anti-slip regulation is automatically reactivated
f
rom around 30 mph (50 km/h) or at the next engine
st
art.
Reactivate
the system manually by pressing the
bu
tton
ag
ain.
For
more information on the Electronic stability
programme
and wheel anti-slip regulation, refer to
t
he corresponding section.
Stop & Star t fixed. The Stop & Start
has been
deactivated. Reactivate the function in the Driving
menu.
Deactivation indicator lamps
If one of the following indicator lamps comes on, this confirms that the corresponding system has been switched off intentionally.
T his is may be accompanied by an audible signal and the display of a message.
Instruments
Page 29 of 523
27
Warning lamps
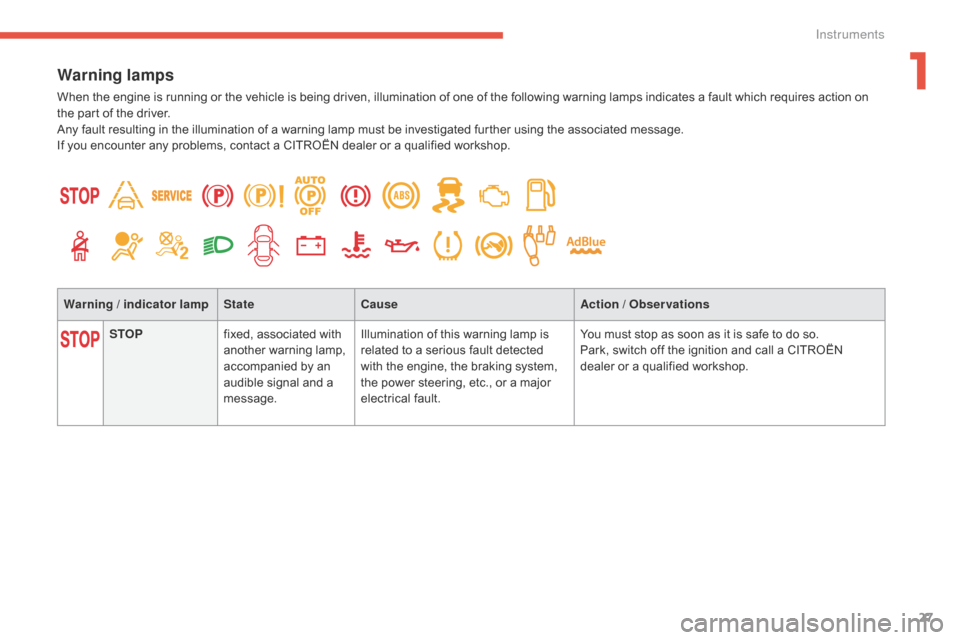
When the engine is running or the vehicle is being driven, illumination of one of the following warning lamps indicates a fault which requires action on the part of the driver.
Any
fault resulting in the illumination of a warning lamp must be investigated further using the associated message.
If
you encounter any problems, contact a CITROËN dealer or a qualified workshop.
Warning / indicator lamp StateCause Action / Observations
STOP fixed,
associated with
a
nother warning lamp,
a
ccompanied by an
a
udible signal and a
m
essage.Illumination
of this warning lamp is
r
elated to a serious fault detected
w
ith the engine, the braking system,
t
he power steering, etc., or a major
e
lectrical
fa
ult.You
must stop as soon as it is safe to do so.
Park,
switch off the ignition and call a CITROËN
d
ealer or a qualified workshop.
1
Instruments
Page 30 of 523
28
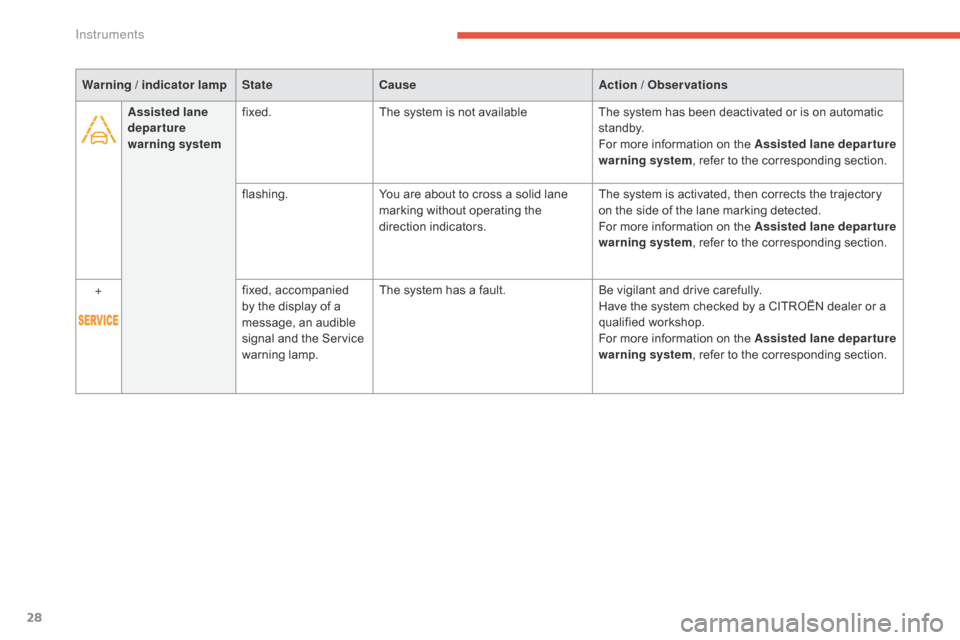
Assisted lane
departure
warning systemfixed.
The system is not available
The system has been deactivated or is on automatic s
t a n dby.
For
more information on the Assisted lane departure
warning system ,
refer to the corresponding section.
flashing. You
are about to cross a solid lane
m
arking without operating the
d
irection
i
ndicators.The
system is activated, then corrects the trajectory
o
n the side of the lane marking detected.
For
more information on the Assisted lane departure
warning system ,
refer to the corresponding section.
+ fixed,
a
ccompanied
b
y the display of a
m
essage, an audible
s
ignal and the Service
w
arning
lam
p.The
system has a fault.Be
vigilant and drive carefully.
Have
the system checked by a CITROËN dealer or a
q
ualified
w
orkshop.
For
more information on the Assisted lane departure
warning system ,
refer to the corresponding section.
Warning / indicator lamp
StateCause Action / Observations
Instruments