tow Citroen GRAND C4 PICASSO RHD 2016 2.G Owner's Guide
[x] Cancel search | Manufacturer: CITROEN, Model Year: 2016, Model line: GRAND C4 PICASSO RHD, Model: Citroen GRAND C4 PICASSO RHD 2016 2.GPages: 523, PDF Size: 13.63 MB
Page 224 of 523
222
Hazard warning lamps
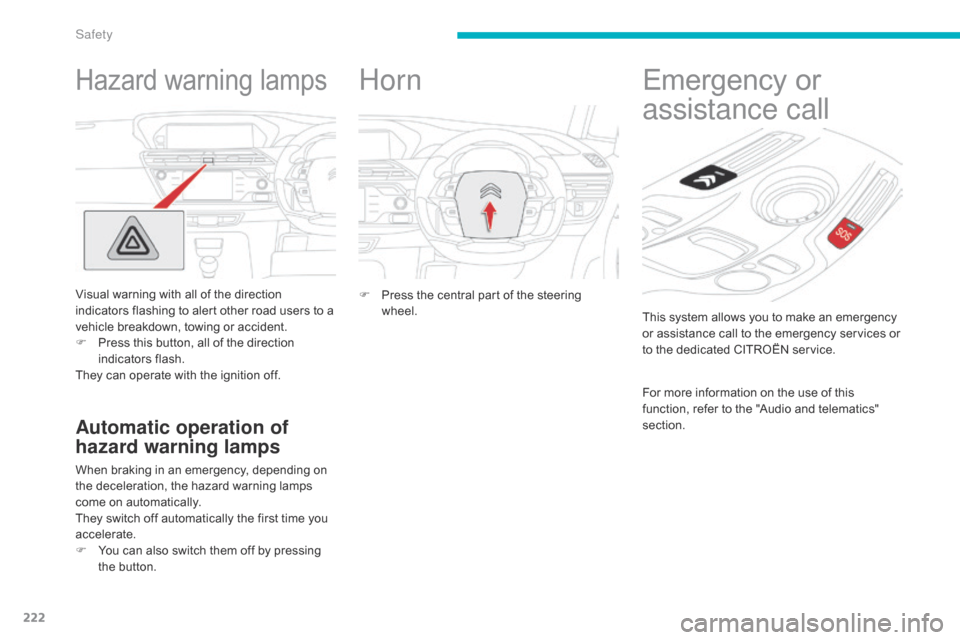
Visual warning with all of the direction i
ndicators flashing to alert other road users to a
v
ehicle breakdown, towing or accident.
F
P
ress this button, all of the direction
in
dicators
f
lash.
They
can operate with the ignition off.
Automatic operation of
hazard warning lamps
When braking in an emergency, depending on the deceleration, the hazard warning lamps
c
ome on automatically.
They
switch off automatically the first time you
a
ccelerate.
F
Y
ou can also switch them off by pressing
t
he button.
Horn
F Press the central part of the steering w
heel. This
system allows you to make an emergency
o
r assistance call to the emergency services or
t
o the dedicated CITROËN service.
Emergency or
a
ssistance call
For more information on the use of this f
unction, refer to the "Audio and telematics"
s
ection.
Safety
Page 225 of 523
223
Electronic stability control (ESC) incorporating the following systems:
-
a
nti-lock braking system (ABS) and
e
lectronic brake force distribution (EBFD),
-
e
mergency braking assistance (EBA),
-
w
heel anti-slip regulation (ASR) or traction
c
ontrol,
-
d
ynamic stability control (DSC).
Electronic stability control (ESC)
Definitions
Anti-lock braking system (ABS)
and electronic brake force
distribution (EBFD)
This system improves the stability and manoeuvrability of your vehicle when braking
a
nd contributes towards improved control on
c
orners, in particular on poor or slippery road
su
rfaces.
The
ABS prevents wheel lock in the event of
em
ergency
b
raking.
The
EBFD manages the braking pressure
w
heel by wheel.
Emergency braking assistance
(EBA)
In an emergency, this system enables you to reach the optimum braking pressure more
q
uickly and therefore reduce the stopping
di
stance.
It
is triggered according to the speed at which
t
he brake pedal is pressed. This is felt by a
r
eduction in the resistance of the pedal and an
i
ncrease in the effectiveness of the braking.
Anti-slip regulation (ASR)
The ASR system (also known as Traction Control) optimises traction in order to limit
w
heel slip by acting on the brakes of the driving
w
heels and on the engine. It also improves
t
he directional stability of the vehicle on
a
cceleration.
Dynamic stability control (DSC)
If there is a difference between the path followed by the vehicle and that required by
t
he driver, the DSC monitors each wheel and
a
utomatically acts on the brake of one or more
w
heels and on the engine to return the vehicle
t
o the required path, within the limits of the laws
o
f physics.
6
Safety
Page 229 of 523
227
2nd row seat belts
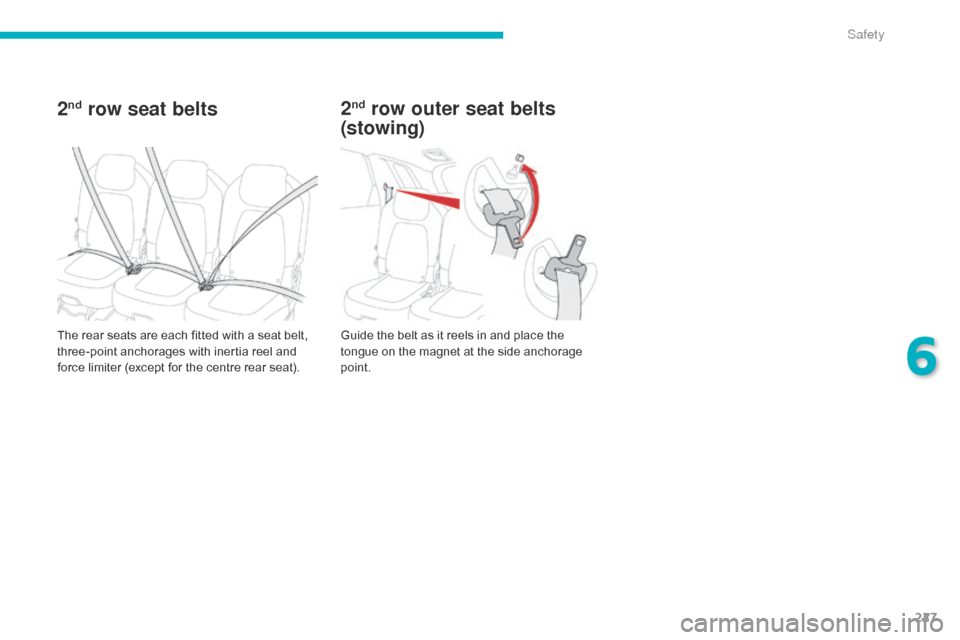
The rear seats are each fitted with a seat belt, three-point anchorages with inertia reel and
f
orce limiter (except for the centre rear seat).Guide
the belt as it reels in and place the t
ongue on the magnet at the side anchorage
po
int.
2nd row outer seat belts
(stowing)
6
Safety
Page 230 of 523
228
2nd row centre seat belt
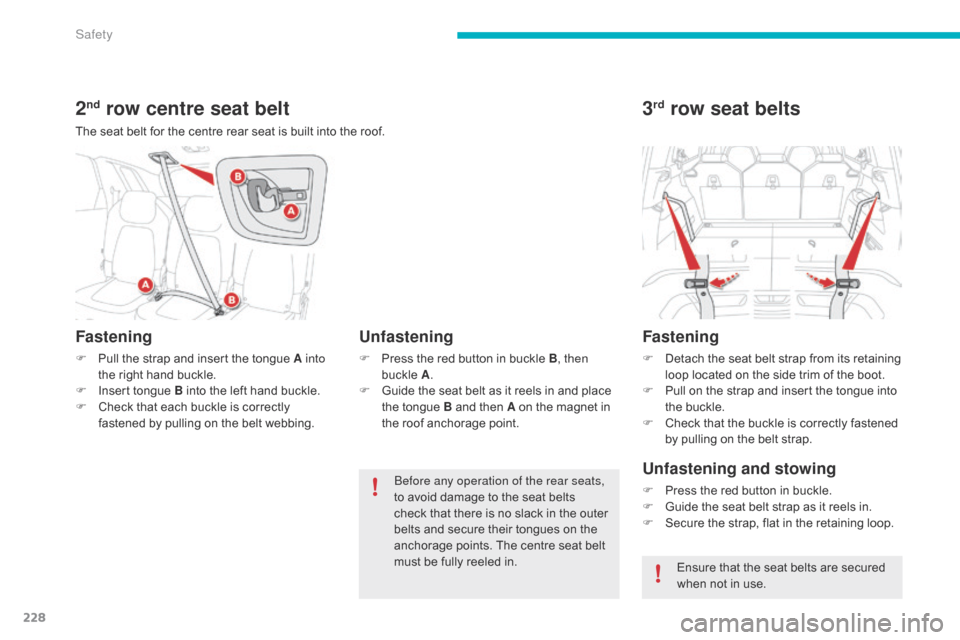
The seat belt for the centre rear seat is built into the roof.
Fastening
F Pull the strap and insert the tongue A into
the right hand buckle.
F
I
nsert tongue B into the left hand buckle.
F
C
heck that each buckle is correctly
f
astened by pulling on the belt webbing.
Unfastening
F Press the red button in buckle B, then
buckle A .
F
G
uide the seat belt as it reels in and place
t
he tongue B and then A on the magnet in
t
he roof anchorage point.
Before any operation of the rear seats,
to
avoid damage to the seat belts
c
heck that there is no slack in the outer
b
elts and secure their tongues on the
a
nchorage points. The centre seat belt
m
ust be fully reeled in.
3rd row seat belts
Fastening
F Detach the seat belt strap from its retaining l
oop located on the side trim of the boot.
F
P
ull on the strap and insert the tongue into
t
he buckle.
F
C
heck that the buckle is correctly fastened
b
y pulling on the belt strap.
Unfastening and stowing
F Press the red button in buckle.
F G uide the seat belt strap as it reels in.
F
S
ecure the strap, flat in the retaining loop.
Ensure
that the seat belts are secured
w
hen not in use.
Safety
Page 232 of 523
230
The driver must ensure that passengers use the seat belts correctly and that they are all
f
astened before setting off.
Wherever
you are seated in the vehicle,
a
lways fasten your seat belt, even for short
journeys.
Do
not interchange the seat belt buckles as
t
hey will not fulfill their role fully.
The
seat belts are fitted with an inertia reel
p
ermitting automatic adjustment of the
l
ength of the strap to your size. The seat belt
i
s stowed automatically when not in use.
Before
and after use, ensure that the seat
b
elt is reeled in correctly.
The
lower part of the strap must be
p
ositioned as low as possible on the pelvis.
The
upper part must be positioned in the
h
ollow of the shoulder.
The
inertia reels are fitted with an automatic
l
ocking device which comes into operation in
t
he event of a collision, emergency braking
o
r if the vehicle rolls over. You can release
t
he device by pulling the strap firmly and
t
hen releasing it so that it reels in slightly.Recommendations for children
Use a suitable child seat if the passenger is less than 12 years old or shorter than one
a
nd a half metres.
Never
use the same seat belt to secure more
t
han one person.
Never
allow a child to travel on your lap.
For
more information on Child seats, refer
to
the corresponding section.
In
order
to
be
effective,
a
seat
belt
must:
-
b
e
tightened
as
close
to
the
body
as
p
ossible,
-
b
e
pulled
in
front
of
you
with
a
smooth
m
ovement,
checking
that
it
does
not
t
wist,
-
b
e
used
to
restrain
only
one
person,
-
n
ot
bear
any
trace
of
cuts
or
fraying,
-
n
ot
be
converted
or
modified
to
avoid
a
ffecting
it
s
p
erformance.
In the event of an impact
Depending on the nature and
seriousness of the impact , the
pretensioning
device may be deployed
b
efore and independently of the airbags.
D
eployment of the pretensioners is
a
ccompanied by a slight discharge of
h
armless smoke and a noise, due to the
a
ctivation of the pyrotechnic cartridge
i
ncorporated in the system.
In
all cases, the airbag warning lamp comes
o
n.
Following
an impact, have the seat belts
s
ystem checked, and if necessary replaced,
b
y a CITROËN dealer or a qualified
w
orkshop.
In
accordance
with
current
safety
r
egulations,
for
all
repairs
on
your
vehicle's
s
eat
belts,
go
to
a
qualified
workshop
with
t
he
skills
and
equipment
needed,
which
a
C
ITROËN
dealer
is
able
to
provide.
Have
your
seat
belts
checked
regularly
by
a
CITROËN
dealer
or
a
qualified
workshop,
p
articularly
if
the
straps
show
signs
of
d
amage.
Clean the seat belt straps with soapy
water
or
a
textile
cleaning
product,
sold
by
C
ITROËN
dealers.
After
folding
or
moving
a
seat
or
rear
bench
s
eat,
ensure
that
the
seat
belt
is
positioned
a
nd
reeled
in
correctly.
Advice
Safety
Page 233 of 523
231
Airbags
System designed to contribute towards improving the safety of the occupants (with
t
he exception of the rear centre passenger)
i
n the event of violent collisions. The airbags
s
upplement the action of the force-limiting
s
eat belts (with the exception of the rear centre
p
assenger).
If
a collision occurs, the electronic detectors
r
ecord and analyse the front and side impacts
s
ustained in the impact detection zones:
-
i
n the case of a serious impact, the airbags
a
re deployed instantly and contribute
t
owards better protection of the occupants
o
f the vehicle (with the exception of the
r
ear centre passenger); immediately after
t
he impact, the airbags deflate rapidly so
t
hat they do not hinder visibility or the exit
o
f the occupants,
-
i
n the case of a minor or rear impact or in
c
ertain roll-over conditions, the airbags
m
ay not be deployed; the seat belt
a
lone contributes towards ensuring your
p
rotection in these situations.
The airbags do not operate when the
ignition is switched off.
This
equipment will only deploy once.
I
f a second impact occurs (during the
s
ame or a subsequent accident), the
a
irbag will not be deployed again. Deployment
of one or more of the
a
irbags is accompanied by a slight
e
mission of smoke and a noise, due
t
o the activation of the pyrotechnic
cartridge
incorporated in the system.
This
smoke is not harmful, but sensitive
i
ndividuals may experience slight
ir
ritation.
The
noise of detonation related to the
d
eployment of one or more airbags may
r
esult in a slight loss of hearing for a
s
hort time.
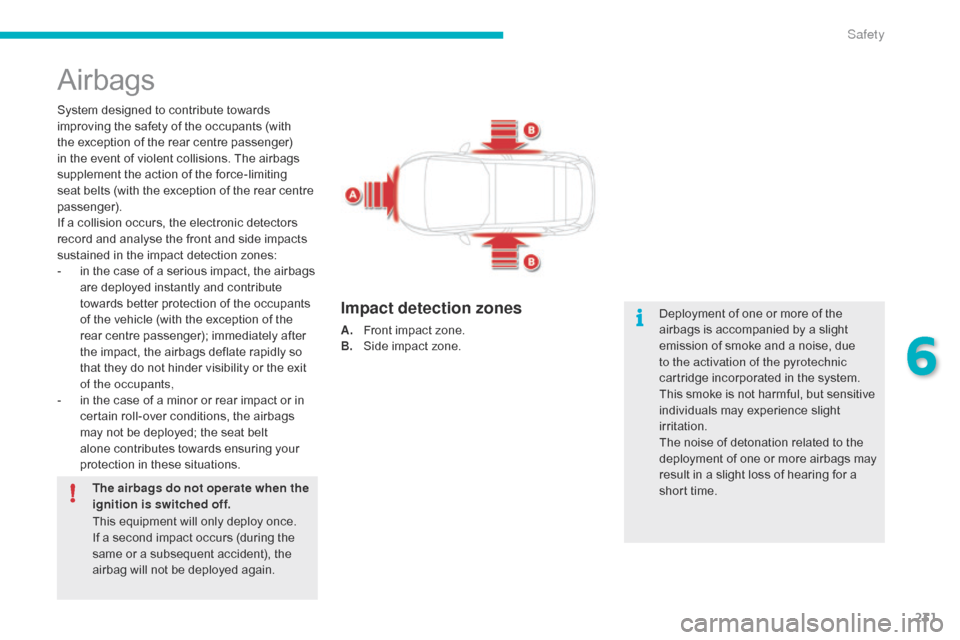
Impact detection zones
A. Front impact zone.
B. S ide impact zone.
6
Safety
Page 236 of 523
234
In the event of a minor impact or bump on the side of the vehicle or if the
v
ehicle rolls over, the airbags may not
b
e deployed.
In the event of a rear or front collision,
none
of the lateral airbags is deployed.
System
contributing
towards
greater
protection
f
or
the
driver
and
passengers
(with
the
e
xception
of
the
rear
centre
passenger)
in
the
e
vent
of
a
serious
side
impact
in
order
to
limit
t
he
risk
of
injury
to
the
side
of
the
head.
Each
curtain
airbag
is
built
into
the
pillars
and
t
he
upper
passenger
compartment
area.
Curtain airbags
Deployment
The curtain airbag is deployed at the same t
ime as the corresponding lateral airbag in the
e
vent of a serious side impact applied to all or
p
art of the side impact zone B, perpendicular
t
o the longitudinal centreline of the vehicle on a
h
orizontal plane and directed from the outside
t
owards the inside of the vehicle.
The
curtain airbag inflates between the front or
r
ear occupant of the vehicle and the windows.
If this warning lamp comes on in the instrument panel, you must contact
a
CITROËN dealer or a qualified
w
orkshop to have the system checked.
Operating fault
The airbags may no longer be deployed in the event of a serious impact.
Safety
Page 246 of 523
244
(a ) Universal child seat: child seat which can be i
nstalled in all vehicles using the seat belt.
( b )
G
roup 0: from birth to 10 kg. Infant car seats
a
nd "car cots" cannot be installed on the
f
ront passenger seat. When installed in the
2nd row, they may prevent use of the other seats.
( c )
C
onsult the legislation in force in your
c
ountry before installing your child on this
sea
t.
( d )
T
o
install a child seat on a rear seat,
r
ear ward facing or for ward facing, move
t
he front seat for ward, then straighten the
b
ackrest to allow enough space for the child
s
eat and the child's legs.
( e )
T
o
install a child seat on a rear seat,
r
ear ward facing or for ward facing, adjust the
r
ear seat to the fully back position, with the
b
ackrest upright. Remove
and stow the head restraint
b
efore installing a child seat on a
p
assenger seat. Refit the head restraint
o
nce the child seat has been removed.
U
:
s
eat suitable for the installation of a child
s
eat secured using the seat belt and
u
niversally approved rear ward facing and/
or for ward facing, with the passenger seat
a
djusted to the midway longitudinal position.
U(R) : s ame as U
, with the passenger's s
eat adjusted to the low position with
1
1 actions on the height control lever and
i
n the midway longitudinal position.
Safety
Page 248 of 523
246
(a ) Universal child seat: child seat which can be i
nstalled in all vehicles using the seat belt.
( b )
G
roup 0: from birth to 10 kg. Infant car seats
a
nd "car cots" cannot be installed on the
f
ront passenger seat or in the 3
rd row. When i
nstalled
in
the
2nd row, they may prevent u
se
of
the
other
seats.
( c )
C
onsult
the
legislation in force in your
c
ountry
before
installing your child on this
sea
t.
( d )
T
o
install
a
child
seat on a rear seat,
r
ear ward
facing
or for ward facing, move
t
he
front
seat
for ward, then straighten the
b
ackrest
to
allow
enough space for the child
s
eat
and
the
child's legs.
( e )
T
o
install
a
child
seat on a rear seat,
r
ear ward
facing
or for ward facing, adjust the
r
ear
seat
to
the
fully back position, with the
b
ackrest
upright. Remove
and stow the head restraint
b
efore installing a child seat on a
p
assenger seat. Refit the head restraint
o
nce the child seat has been removed.
U
:
s
eat suitable for the installation of a child
s
eat secured using the seat belt and
u
niversally approved rear ward facing and/
or for ward facing, with the passenger seat
a
djusted to the midway longitudinal position.
U(R) : s ame as U
, with the passenger's s
eat adjusted to the low position
w
ith 11 actions on the height control lever
a
nd in the midway longitudinal position.
Safety
Page 249 of 523
247
"ISOFIX" mountings
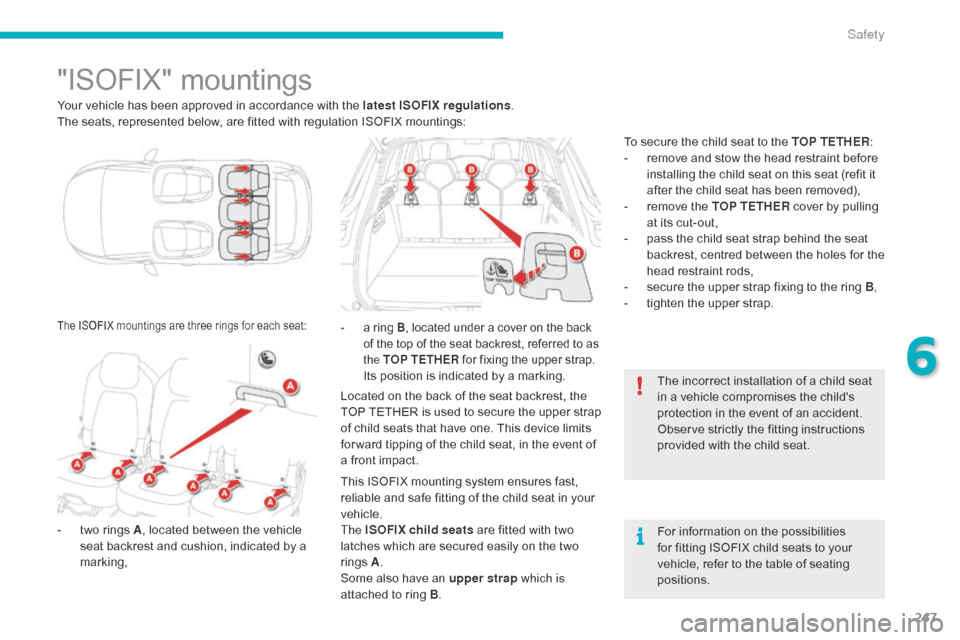
Your vehicle has been approved in accordance with the latest ISOFIX regulations .
T he seats, represented below, are fitted with regulation ISOFIX mountings:
-
t
wo rings A,
located between the vehicle
s
eat backrest and cushion, indicated by a
m
arking, -
a ring B, located under a cover on the back o
f the top of the seat backrest, referred to as
t
he TOP TETHER for fixing the upper strap.
Its position is indicated by a marking.
Located on the back of the seat backrest, the
T
OP
T
ETHER
i
s
u
sed
t
o
s
ecure
t
he
u
pper
s
trap
o
f child seats that have one. This device limits
f
or ward tipping of the child seat, in the event of
a
front impact. The
incorrect installation of a child seat
i
n a vehicle compromises the child's
p
rotection in the event of an accident.
Observe
strictly the fitting instructions
p
rovided with the child seat.
For
information on the possibilities
f
or fitting ISOFIX child seats to your
v
ehicle, refer to the table of seating
p
ositions.
The ISOFIX mountings are three rings for each seat:
This ISOFIX mounting system ensures fast, reliable and safe fitting of the child seat in your
v
ehicle.
The ISOFIX child seats
are fitted with two
l
atches which are secured easily on the two
r
ings
A .
S
ome also have an upper strap which is
attached
to ring B. To
secure the child seat to the TOP TETHER
:
-
r
emove and stow the head restraint before
i
nstalling the child seat on this seat (refit it
a
fter the child seat has been removed),
-
r
emove the TOP TETHER cover by pulling
a
t its cut-out,
-
p
ass the child seat strap behind the seat
b
ackrest, centred between the holes for the
h
ead restraint rods,
-
s
ecure the upper strap fixing to the ring B,
-
t
ighten the upper strap.
6
Safety